User manual
User profiles
Within the "Users profiles" panel, you can create new users, edit existing profiles and their statuses. You can manage registration requests, view the list of all users, and the users you created. You can also create custom user properties if you wish to have some additional fields when registering new users, and these fields will be visible on the user's profiles.
- Accessing the page
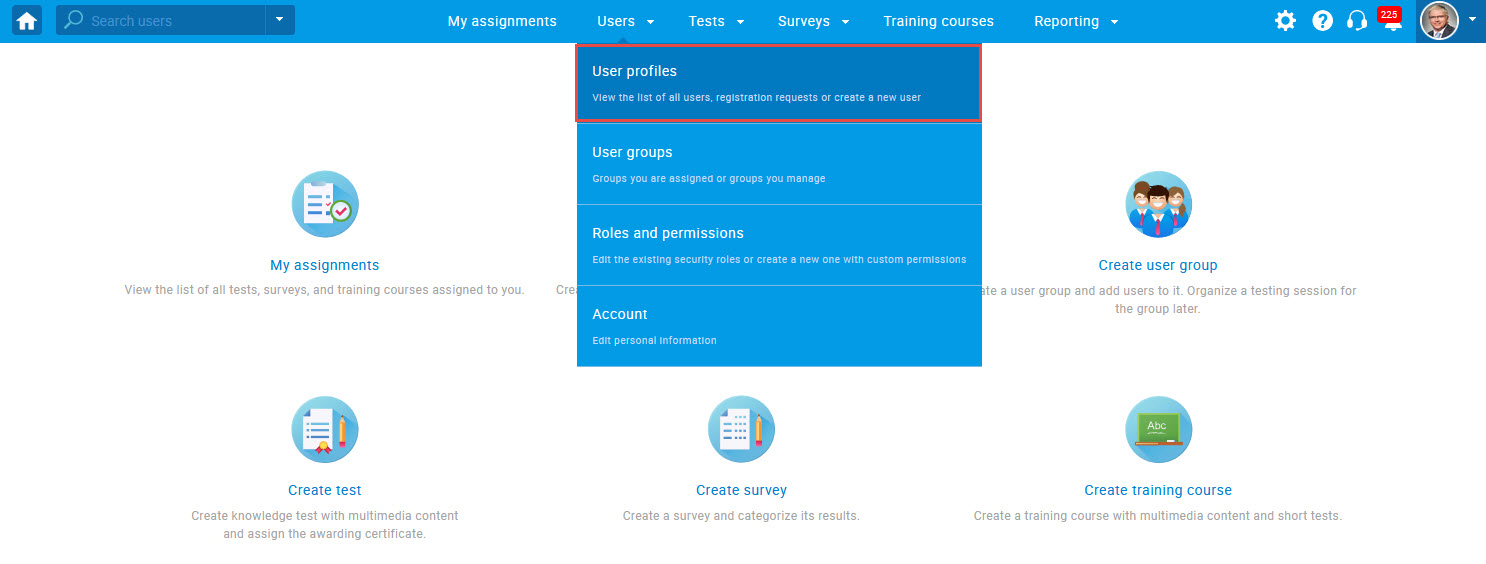
To access the "User profiles" page, you should hover over the "Users" tab in the main menu, and then select "User profiles" option.
- List of all users
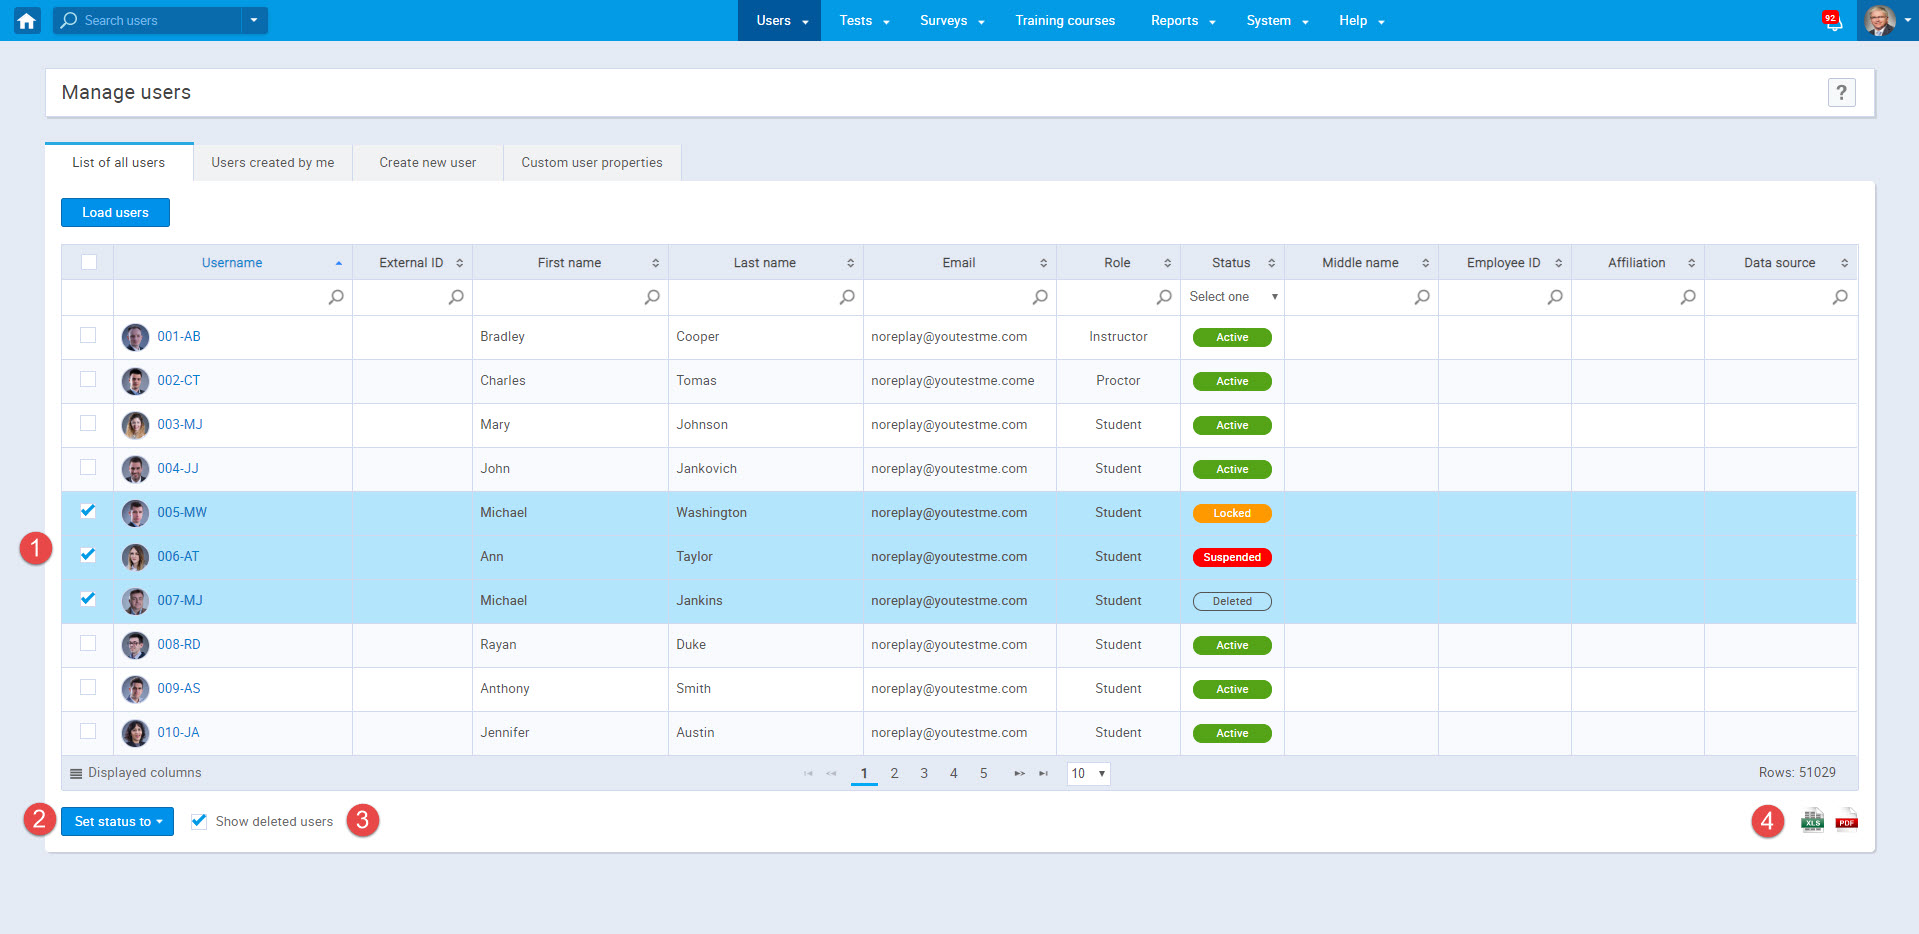
The table in this section contains a list of all users in the system, and here you can:
- View user profiles by clicking on their username.
- Change user status by:
- Selecting the users whose status you want to change.
- Clicking the on the "Set status to" button and selecting one of
the following statuses:
-
- "Active" - users with the status "Active" can access
and use the application.
Note: When you change the status a user to "Active", the system will send him an email with a new generic password. If you want to customize the email notifications that the user will receive upon a status changes, please visit Notifications.
Note: If a user uses the application only occasionaly, you can reactivate their account (even though they already have the status "Active") and reset their password. The system will send them an email with a username and a new generic password.-
- "Suspended" - When the administrator prohibits a user from entering the application, the user gets the status ''Suspended''.
The user’s data and statistics will be saved and visible in case their account is reactivated.
-
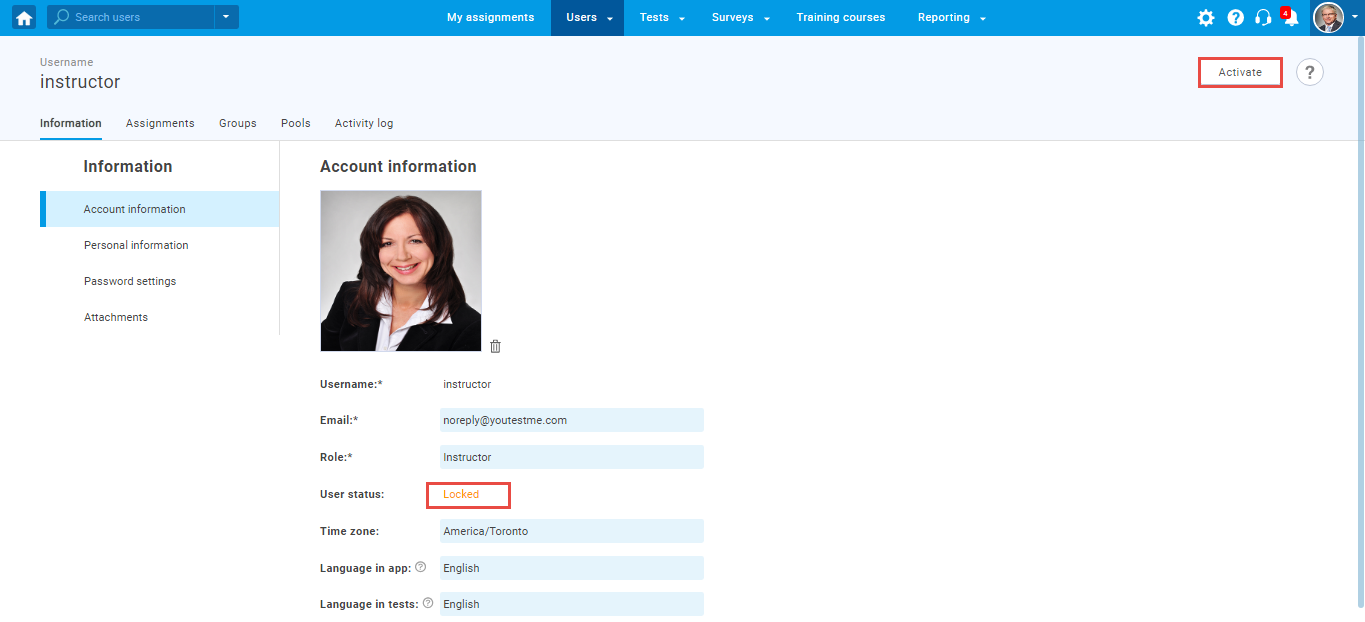
- "Locked" - A user that cannot enter the system
because the has typed in the wrong password several times gets the status ''Locked''. The user can unlock the account by himself
if he enters the correct password, but he will need to create a new password afterwards.
If the user cannot remember the previous password, he should click the''Forgot password''button, and a new password will be sent to his email address.
After the password change, the user can log in.
Note: The administrator can also lock the user's account, in which case the user will have to create a new password the next time he logs in. This option ensures the accounts’ security.-
- "Deactivated"- Deactivate the user profile.The user whose profile gets deactivated is excluded from any processing in the
system until his account gets activated again.
-
- "Deleted"- Permanently delete the user profile. When deleted, the user profile and all data associated with it will be permanently
erased from the system without the possibility of restoring.
- See the list of deleted users by clicking "Show deleted users".
- You can export the list of all users in Excel or PDF files by clicking the "Export" icon.
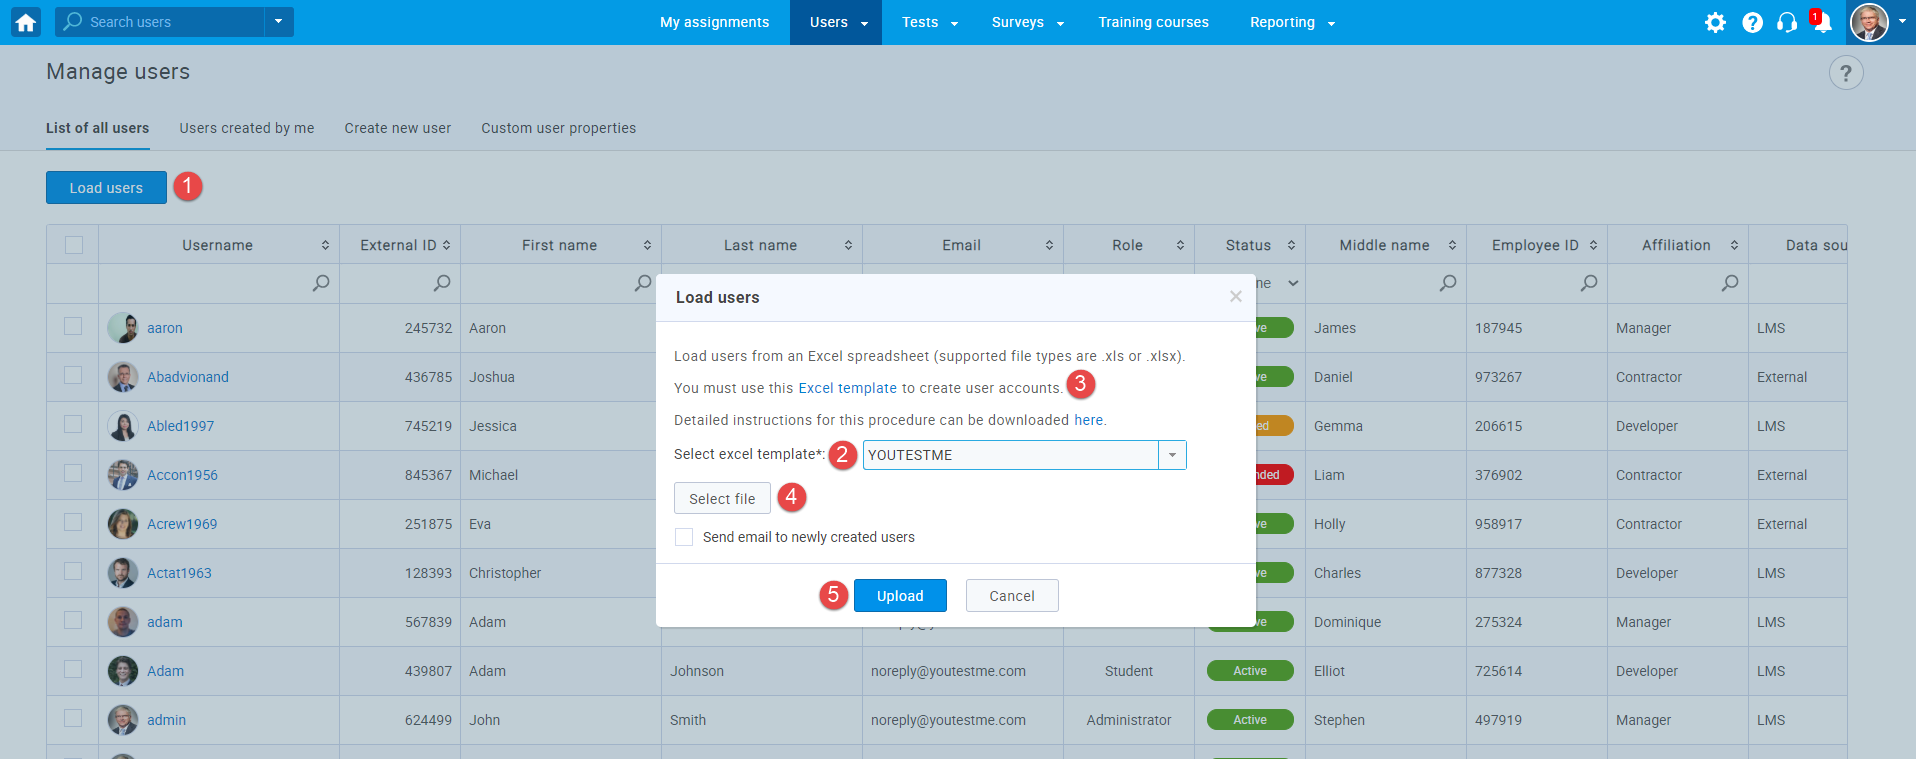
Also, you can load users from an Excel file, by following these steps:
- Click the "Load users" button.
- Select an Excel template -
You can choose between:
-
- "YOUTESTME"
template - the default and recommended option for uploading users.
into YouTestMe GetCertified.This template contains all the fields and it is fully compatible with GetCertified.
- - "AGILE"
template if your institution uses the Agile system export your users from it and import them into GetCertified.
- Click "Excel template" link to download. our Excel template which you should fill in with the user data.
- Add an Excel file with user data by clicking the "Select File" button.
- Click the "Upload" button to load users into
the system.
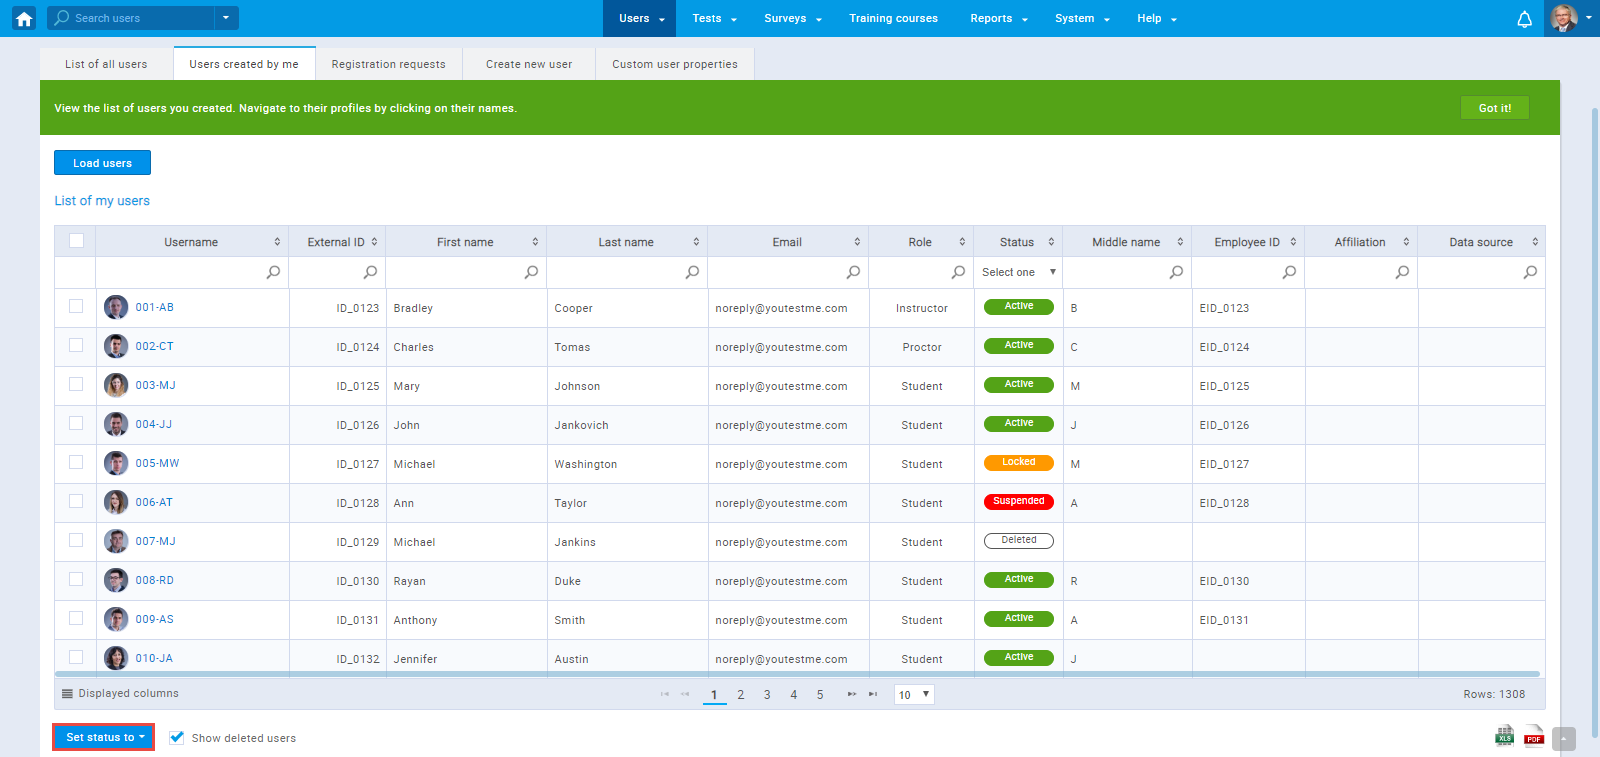
- Users created by me
The table " List of my users " displays a list of users created by you. You can change their statuses to "Active", "Suspended", "Locked" or "Deleted" by :
- Selecting the users whose statuses you want to change.
- Click the "Set status to" button and choose a desired status.
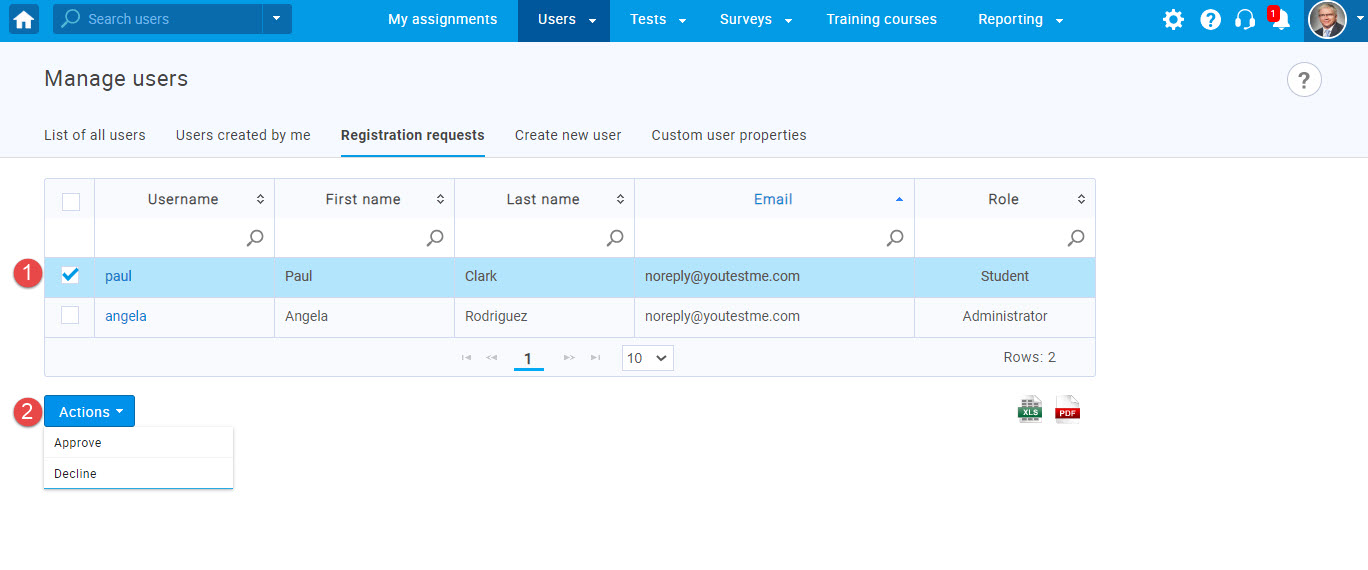
On this screen, you can approve or decline user registration requests. Users will receive an email notifying them if the registration request is approved or not.
To approve or decline user registration request, follow these steps:
- Select the user whose request you want to approve or decline.
- Click the "Actions" button and choose the desired action.
 Note:
Registration requests option is available only if the administrator needs to approve the registration, i.e. if the self-registration option is not enabled.
For more information, visit
Signing in and Registration .
Note:
Registration requests option is available only if the administrator needs to approve the registration, i.e. if the self-registration option is not enabled.
For more information, visit
Signing in and Registration .
On this page you can manually add a new user. A new user profile is created by entering user personal information, a password, uploading a profile picture, and assigning a security role. New users will be notified by email that their profile is created in the YouTestMe GetCertified system.
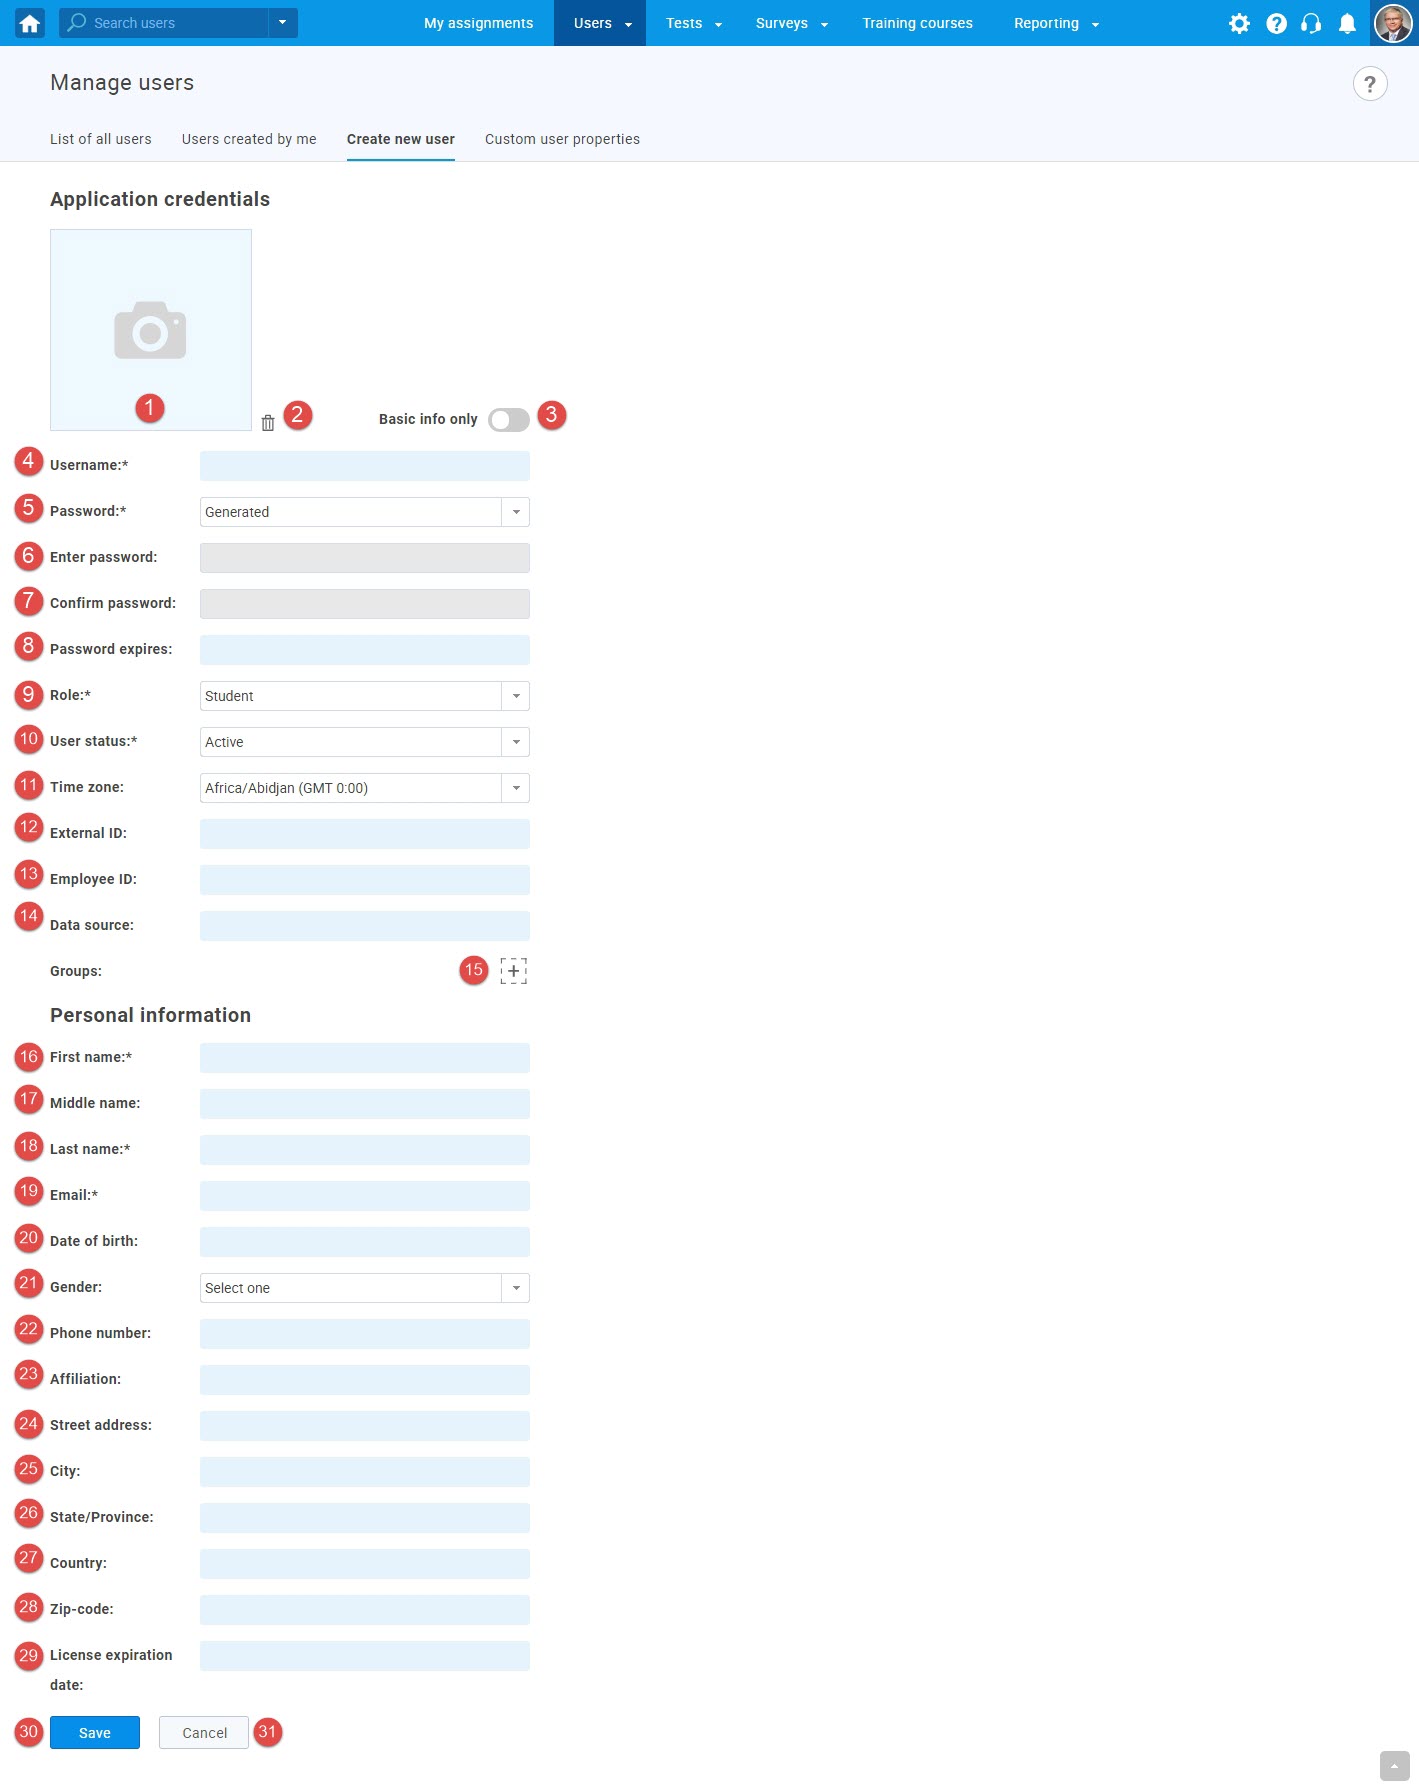
To add a new user, you should do the following:
- Upload the user's profile picture. Supported file types are JPG, JPEG, PNG, BMP, and the maximum size is 100MB.
- If you upload the wrong photo, you can delete it by clicking on the "Trash can" icon.
- By activating "Basic info only," you will see only the user's username, password and expiration date, role, status, time zone, name, and email.
- Enter the username that will be a unique. Each user must have a unique username that cannot be changed.
- Choose if you want the user to receive a generated password or you to create it.
- Enter a password.
- Confirm the entered password.
- Set the expiration date for the password. The system will remind the user when he/she needs to change the password.
- Set the user's role in the system. You can choose between the predefined roles or make your own.Please visit the New role help section to see how to create a custom security role. For more information, visit Roles and permisions.
- Select the user’s account status:
- "Active" - for all users who can log into the system with their username and password.
- "Suspended" - for all users who are prohibited from entering the system by an administrator.
- "Locked" - for all users who cannot enter the system because they have typed in the wrong password several times. The only way users with a locked status can enter the system again is to change their password. For more information visit Forgot password procedure .
- Set the Time zone according to the user’s current place of residence.
- Enter the user's external ID used for integration with external systems.
- Enter the Employee ID used for integration with external systems.
- Enter Data source - to save the source you entered the user data from.
- Add a new user into a group by clicking the "Plus" button.
- Enter the first name.
- Enter the middle name.
- Enter the last name.
- Enter the user's email address.
- Enter the user's date of birth.
- Select gender.
- Enter the user's phone number.
- Enter the user’s affiliation e.g., Military, Government, etc. This is just a descriptional field and does not cause any changes in application.
- Enter the user's street address.
- Enter the city.
- Enter the state/province.
- Enter the country.
- Enter the zip-code.
- Enter the license expiration date.
- Click the "Save" button to confirm the entered information.
- Click the "Cancel" button button to discard.
Please note that some of the fields are mandatory (fields marked with *).
Note: Here the user can see
all personal information only if privacy mode is
inactive. Otherwise, only a first, middle, and last name, an email,
and custom user properties will be visible. Users
can enable/disable this option in Additional
modules.
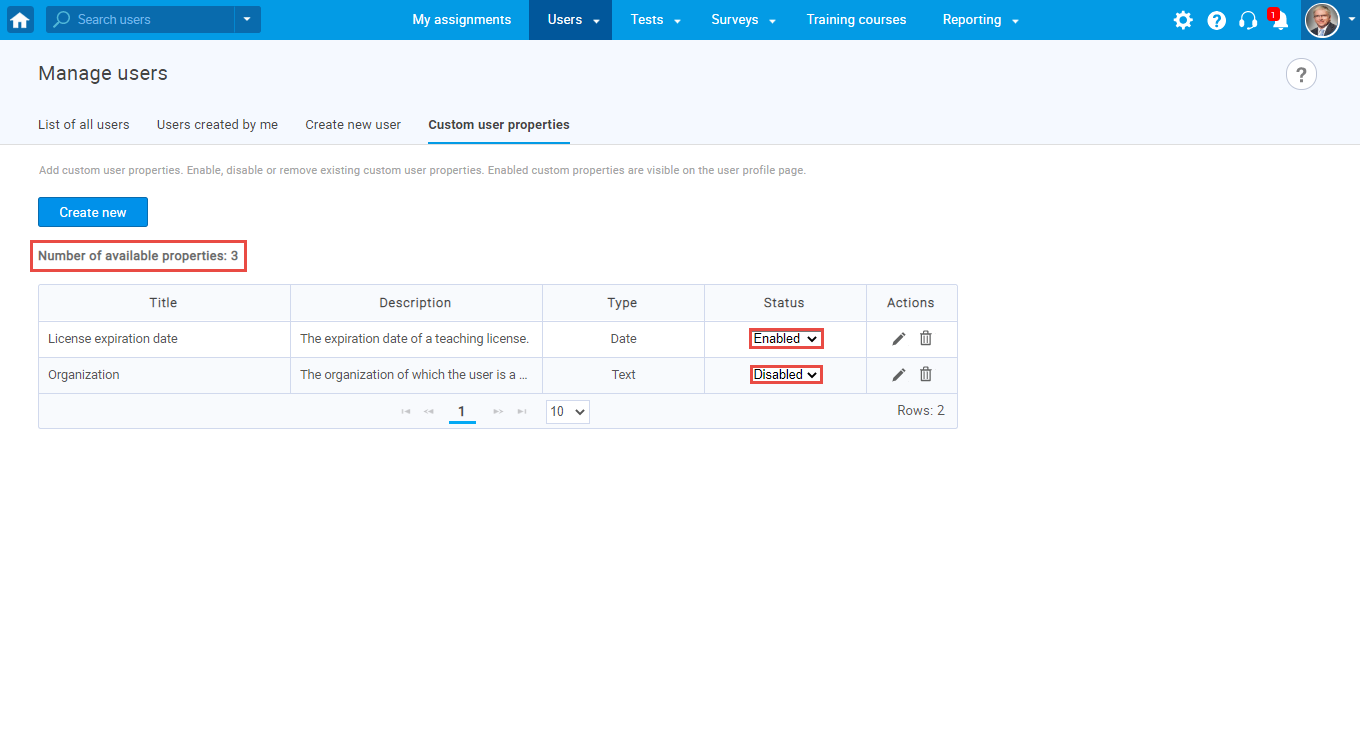
Custom user properties are the fields you define to describe and record additional information of your users, e.g. department, organization, etc. Custom user fields are visible on the user profile and in Report builder. You can add up to 5 custom properties in the following formats:
- Yes / No.
- Text.
- Timestamp.
- Date.
- Number.
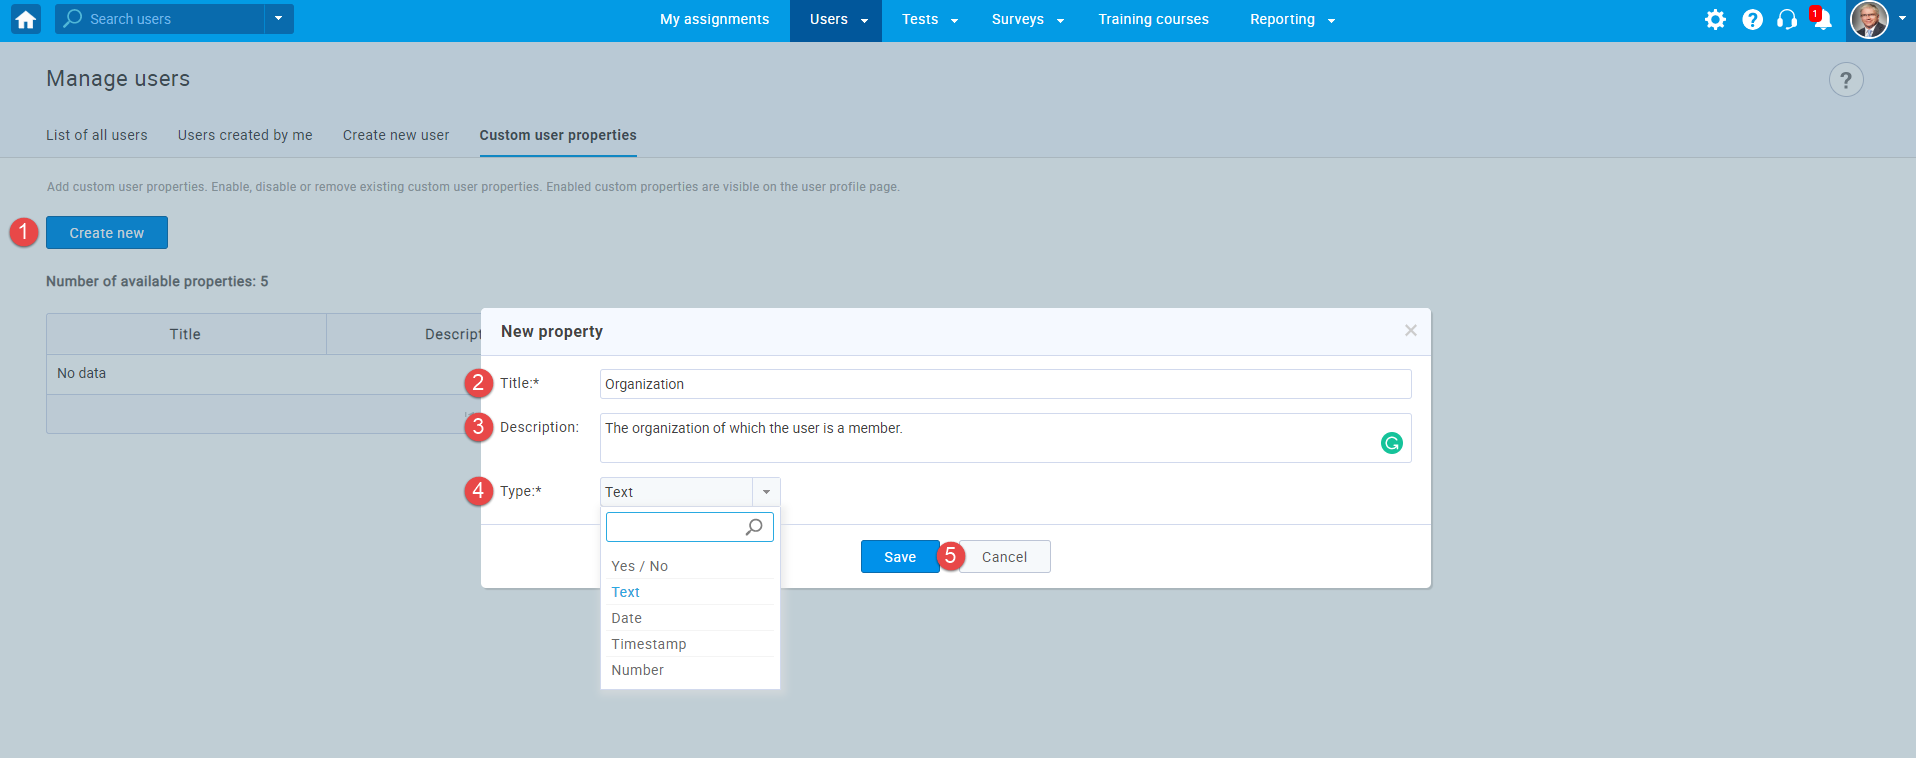
To add new custom user properties, follow these steps:
- Click the "Create new" button.
- Enter the name of the new property.
- Enter a description of the new property.
- Choose the type of the custom property from the drop-down menu.
- Click the "Save" button if you want to confirm the changes or the "Cancel" button if you want to cancel them.
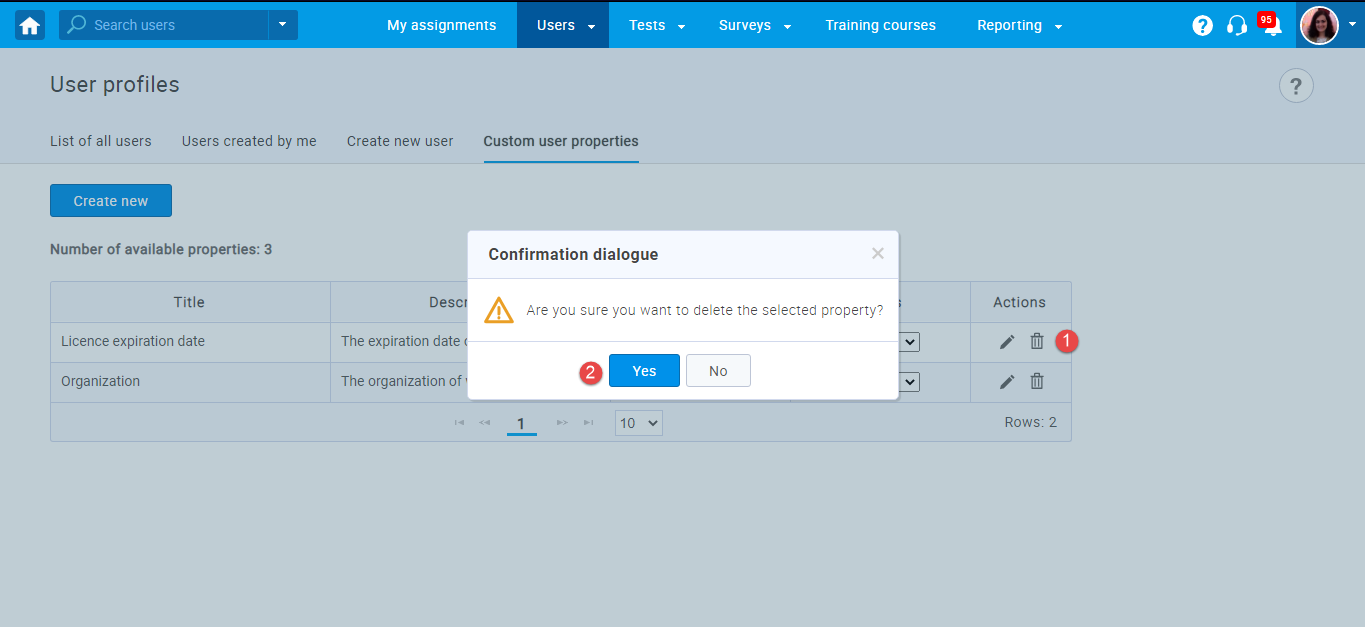
In the picture below, you can see the number of available properties that represent remaining number of custom columns you can create. By enabling/disabling the custom property, you can control the column's visibility at the user profile page. If a custom column is disabled, all stored values in property are saved but not displayed.
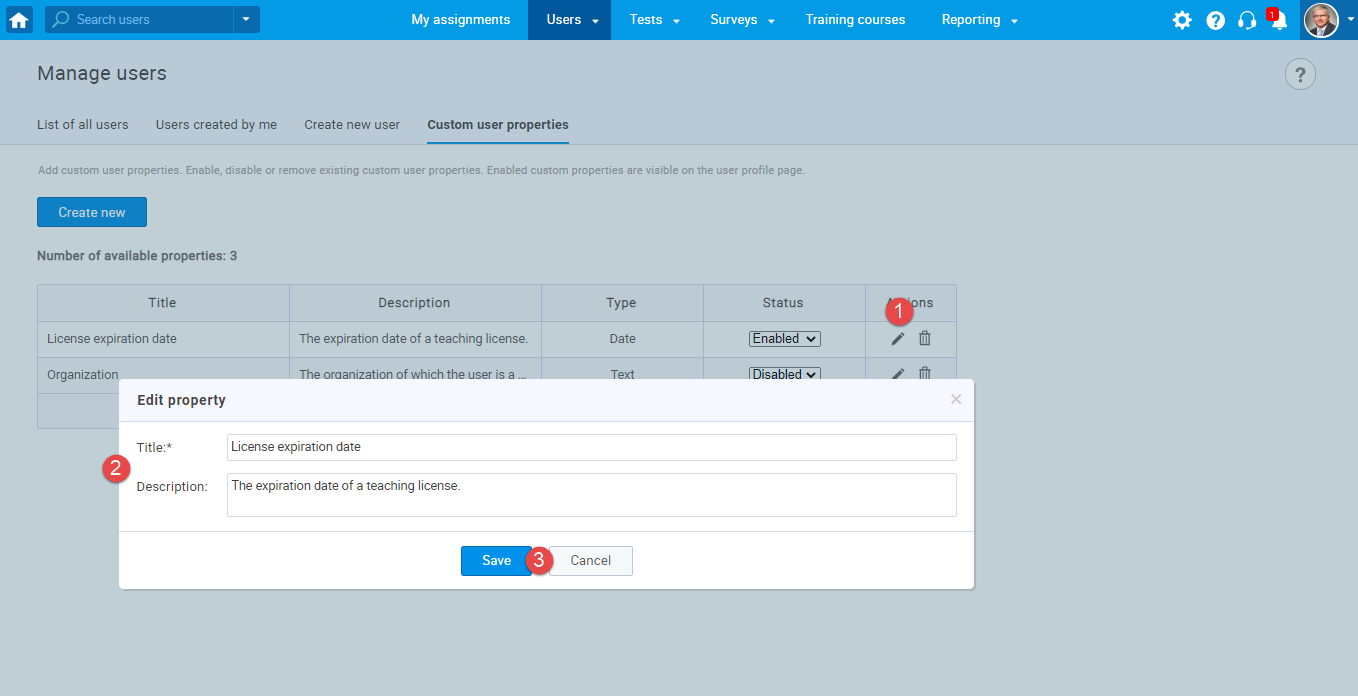
To edit an existing custom user property, follow these steps:
- Click the "Pencil" icon.
- Edit name and/or description.
- Click the "Save" button to confirm the or the "Cancel" button to cancel them.
Also, you can delete custom property following these steps:
- Click the "Trash can" icon.
- Confirm by clicking the "Yes" button in the confirmation dialog box, or cancel by clicking the "No" button.