User manual
Question types
- Introduction
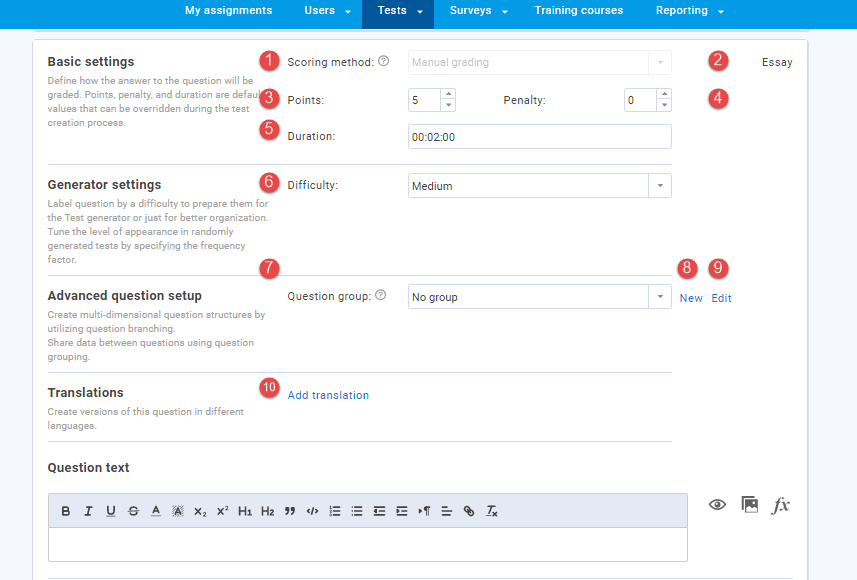
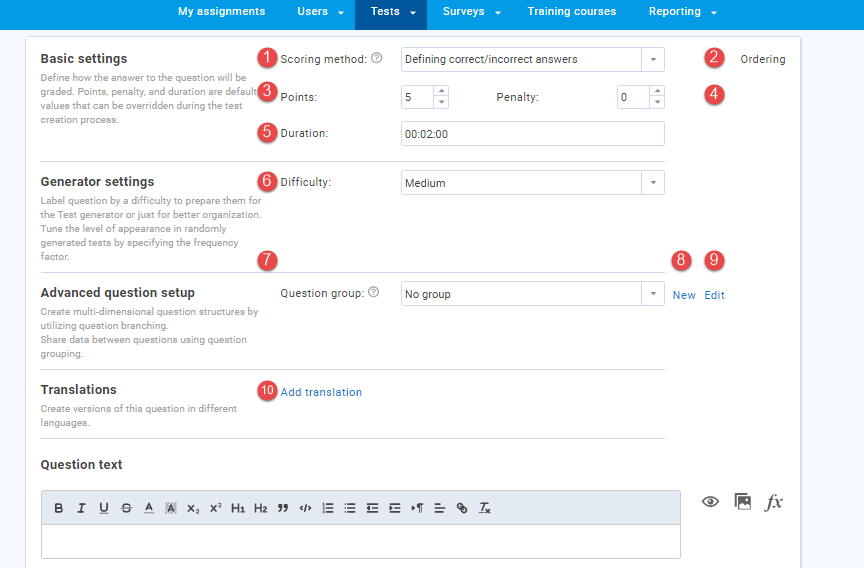
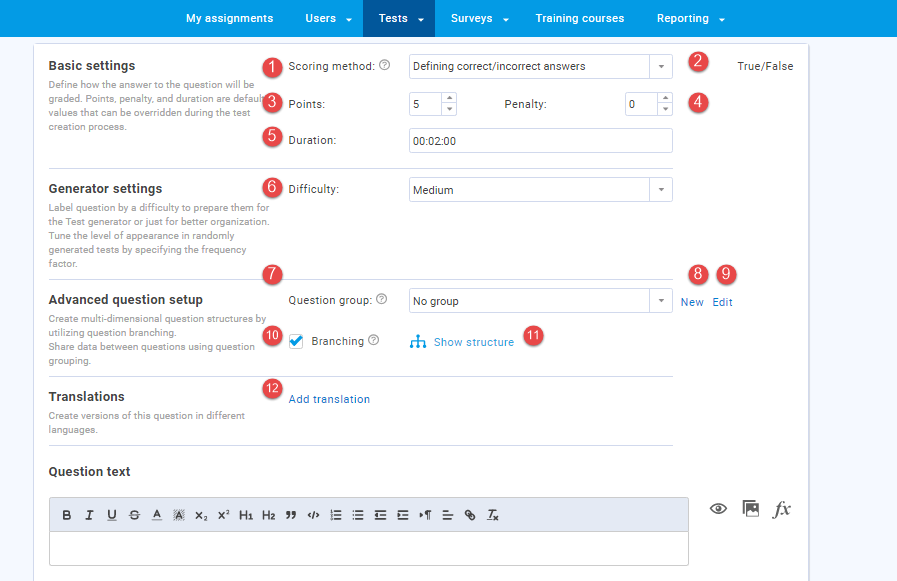
To create different types of questions for your test, enter the test creation wizard and choose "Add questions manually" method.At the following step, click the "Add new question" button and you will see the following screen:
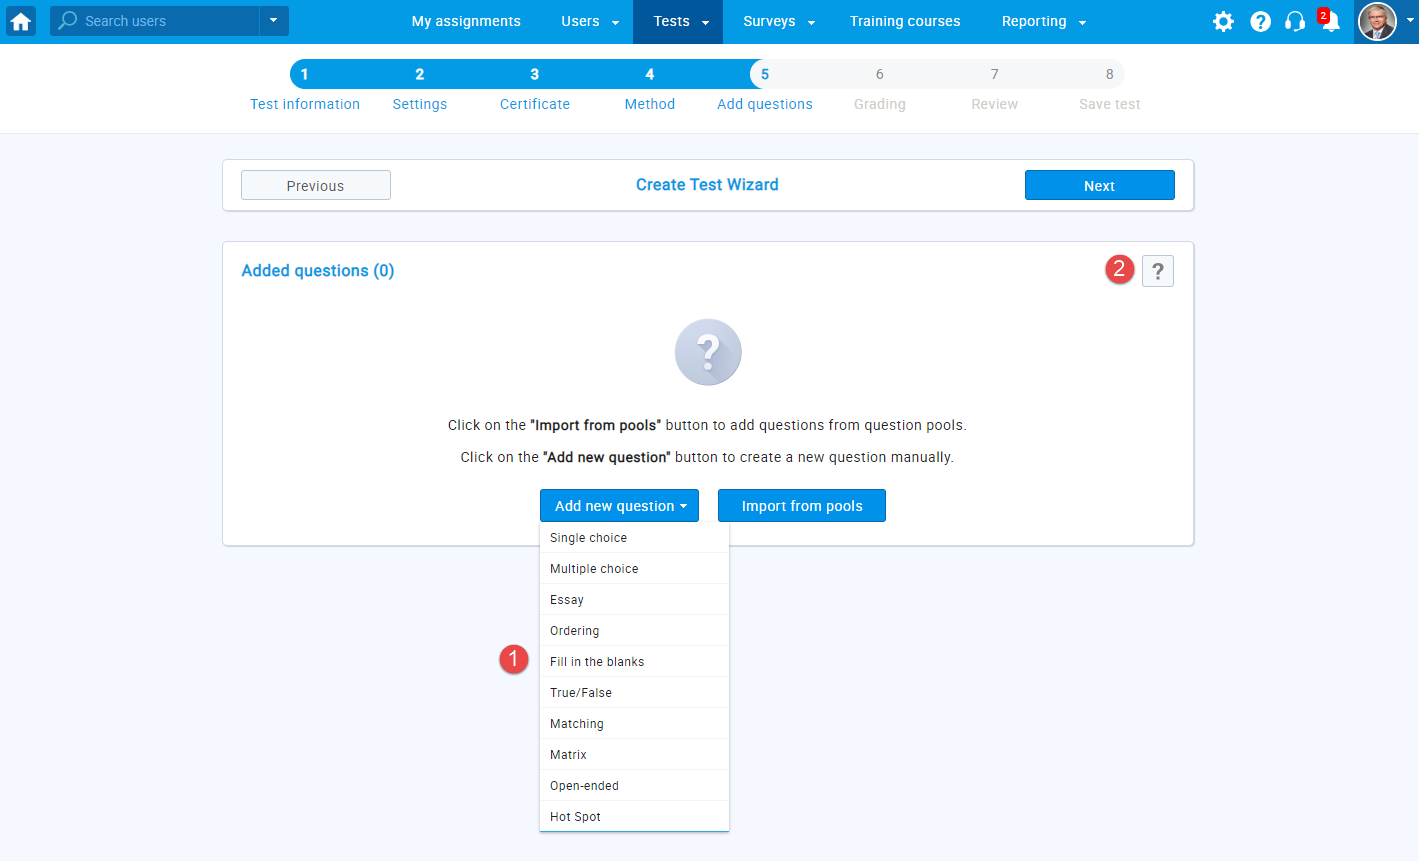
- The drop-down contains all the question types you can create:
- Single choice - multiple answers are displayed while only one of them can be selected as correct.
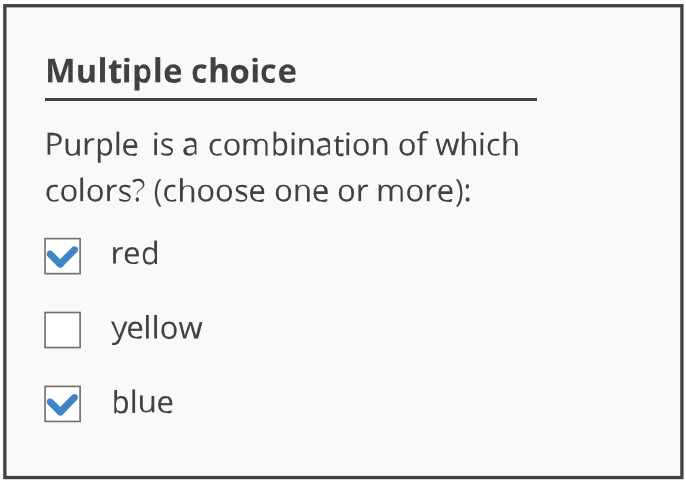
- Multiple choice - multiple answers are displayed, and muliple can be selected as correct.
- Essay - users have to type an essay in a text box. You have to grade these questions manually.
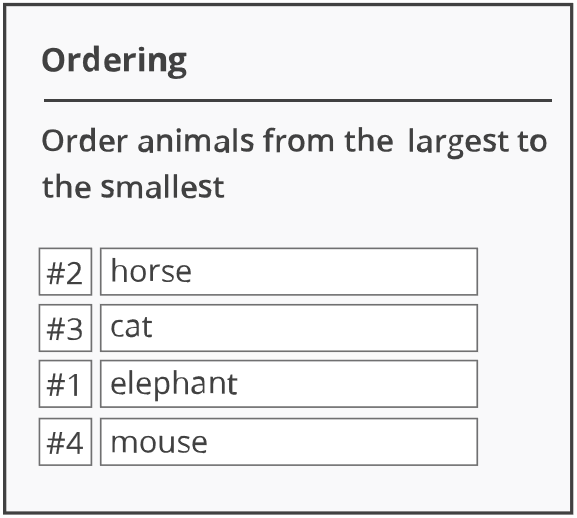
- Ordering - users need to rearrange answers into the correct order
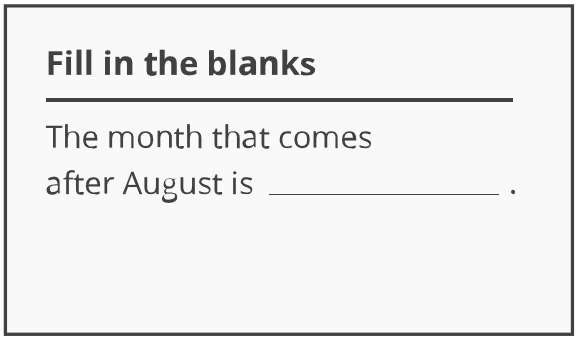
- Fill in the blanks - users need to fill in the sentences' missing parts. Grade this question manually or create offered answers in the drop-down form, which can be automatically graded.
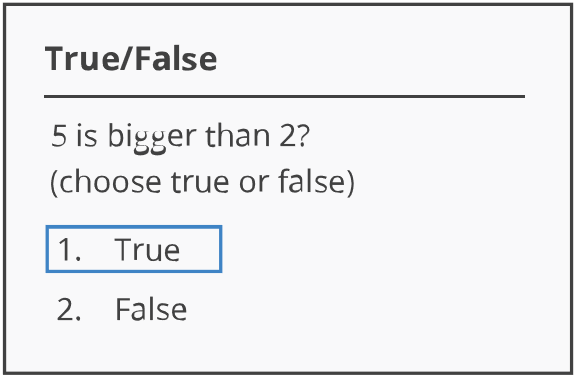
- True/False - users have to choose "true" or "false" to answer a question.
- Matching - users have to pair objects on the left with the objects on the right side.
- Matrix - questions represented in a grid format. The rows present the questions, and the columns offer a set of predefined answer choices that apply to each question in the row.
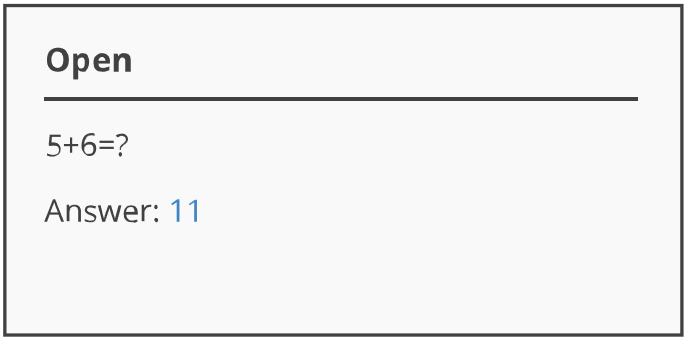
- Open-ended - blank space needs to be filled with the correct answer that the system will automatically compare with the predefined correct answer.
- Hotspot- users are required to mark "spots" on an image as an answer.
Note: You can hover over each question type to view a short example of it.
- Help - If you need any assistance with this step of test creation, click the help icon.
- The drop-down contains all the question types you can create:
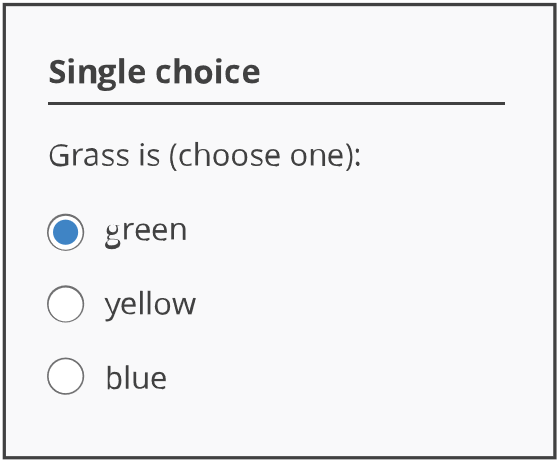
- Single choice questions
Single-choice questions offer multiple possible answers, only one of which can be selected as the correct one. Single choice questions are the best choice when you are certain there is only one correct answer to a question you create.
If you select a single choice question from the list of question types, a screen below with the following settings will be displayed:
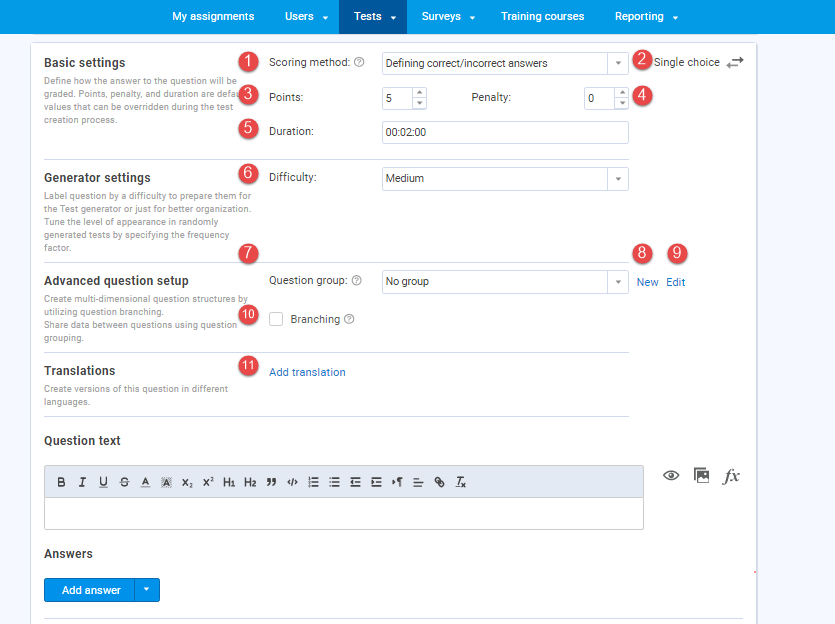
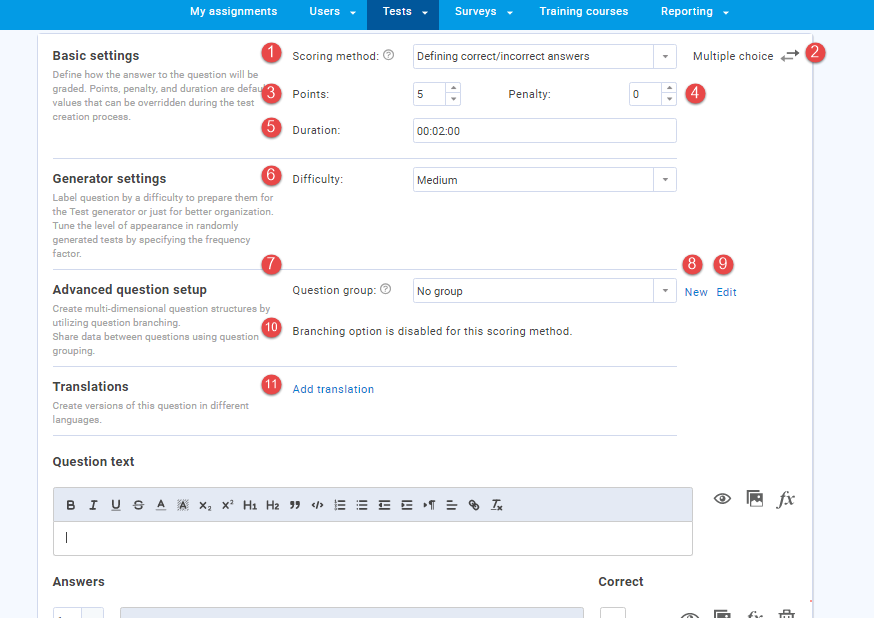
- Scoring method - choose between these options :
- Defining correct/incorrect answers - Check the correct answer while creating the question. The test taker will receive points only if he chooses the correct answer.
- By answer weight - Set the weight for each answer. A candidate will be awarded a number of points for each answer he picks accordingly.
- Manual grading - The test manager grades each candidate’s tests manually.
- Question type - Use this option to convert a single choice question to a multiple-choice question and vice versa.
- Points - Set the number of points a question is worth.
- Penalty - Set the number of negative points for incorrect answers.
- Duration - You can set the time limit for answering the question. Note: The duration values in seconds are default, and it can be overridden every time you create the test.
- Difficulty - Choose the question difficulty level from the drop-down list (Easy, Medium or Hard)from the drop-down list.
- Question group - Organize multiple questions into a group, add its short description and multimedia(image, audio, video) that will be displayed with each question within the group.
- New - Create a new question group. Enter the Group name, Text (optional), and add an Attachment. Supported file types are MP3, MP4, JPG, JPEG, PNG, BMP, and GIF and the maximum size of an attachment is 4MB.
- Edit - Edit the existing question group by choosing it from the drop-down list.
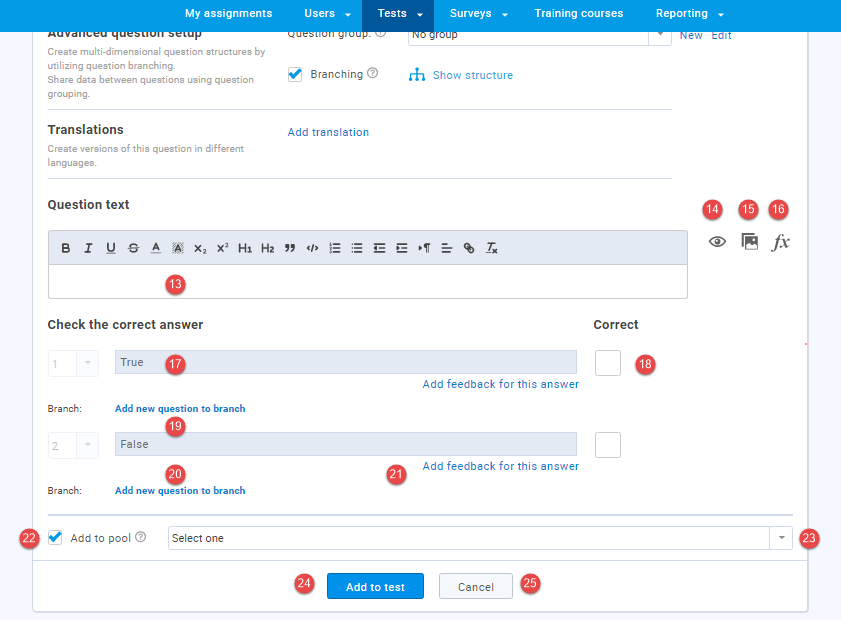
- Branching - Branching is an optional feature that allows you to add a follow-up question to each answer in the original question.
- View structure (if branching is enabled) - By selecting the option "Show structure", you can examine the diagram that shows the relations between question branches and answers.
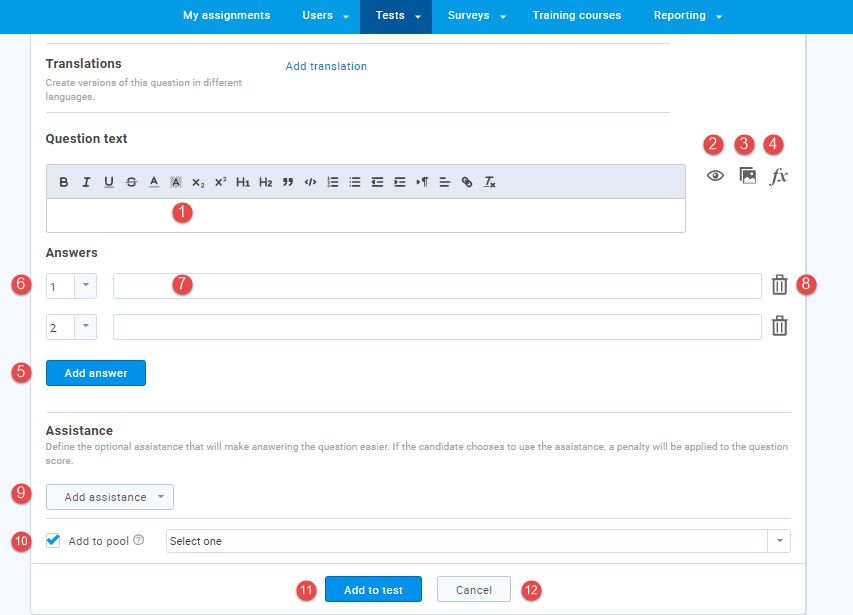
- Add translation - Create versions of this question in different languages. Click on ''Add translation'', choose a language from the drop-down list, and type the question text and answers in the selected language.
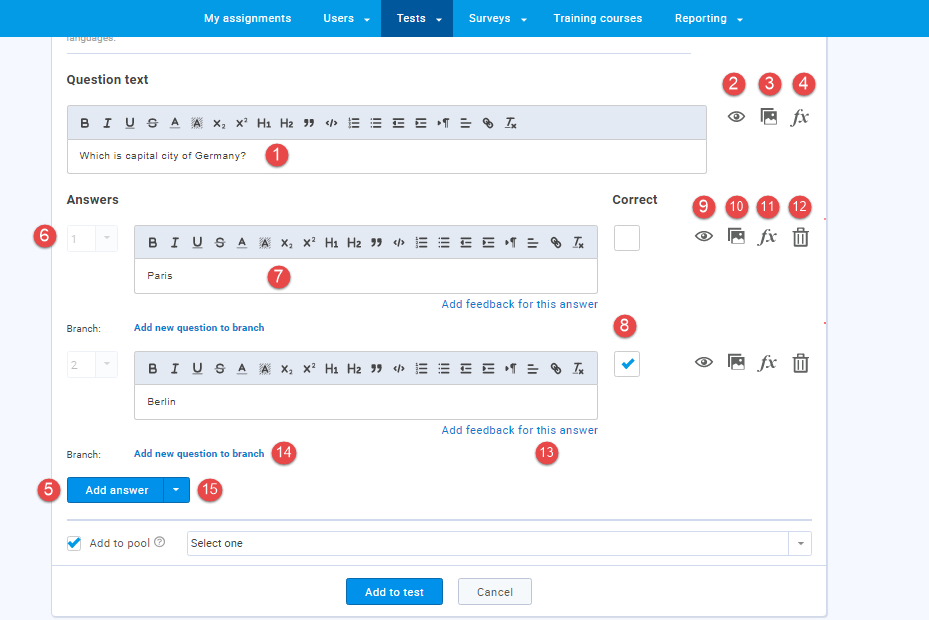
- Question text - Enter the question text into this field.
- Preview - Click this button to preview the question you are editing.
- Add attachment - Click this button to add multimedia files(image, audio, video) to the question.
- Add formula - Use this option to add the formulas to the question.
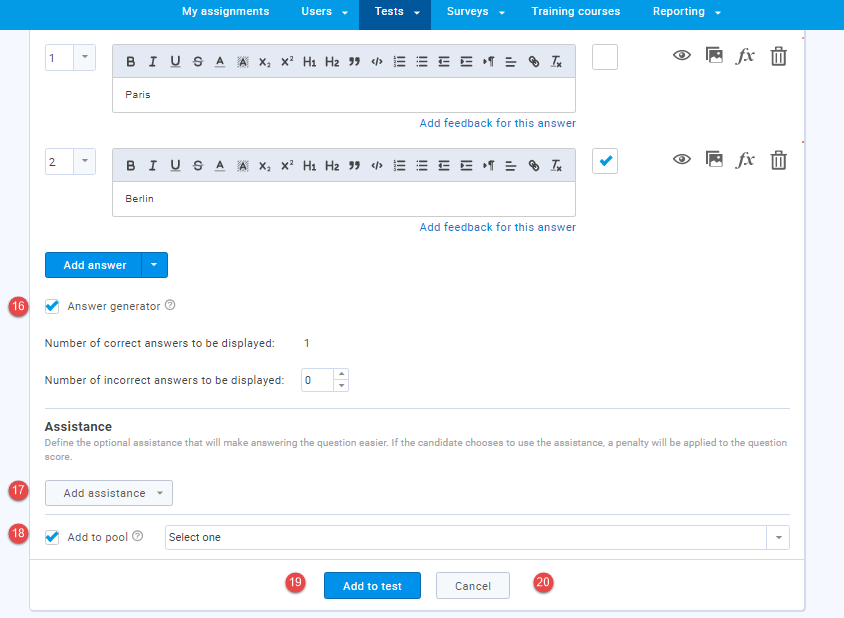
- Add answer - Click the ''Add answers'' button to add more answers for the question you create/edit
- Set the question’s ordinal number - Set the question’s ordinal number of appearance in the test.
- Enter your answer in this text box.
- If the answer is correct, check the box next to it. If you chose a grading method by answer weight, set the number of points for the answer.
- View the answer by clicking the ''eye'' icon.
- Add an image/audio/video to the answer
- Add a formula to the answer
- Delete the answer by clicking clicking the ''trash can'' icon.
- Add feedback to the question - The feedback will be displayed to a test-taker upon answering the question.
- Add a new question to the branch - Any question type can be added to the branch.
- Click on the arrow if you want to add ''All of the Above'' or ''None of the Above'' to the answers
- Answer generator - Check this option if you wish to set the number of correct and incorrect answers that will be displayed.
- Enter the number of correct answers from the set of possible answers.
- Enter the number of incorrect answers from the set of possible answers.
- Add assistance - click this button to enable the assistance for a test taker:
- Hint - If you choose this option, you will see an additional field where you need to enter the hint a test taker will get.
- Additional time - Enable the candidates to use additional time for answering a question.
- Minus one wrong answer - If a candidate chooses to use this assistance, the system will eliminate one wrong answer from the given answers.
Note: you can set penalty points for using each type of assistance.
- Add to the pool - By checking this option, you can add the question to one of the existing pools you manage. Choose a desired pool from a drop-down menu.
- Add to test - Click this button to add the question you have just created to the test.
- Cancel - At any moment, you can cancel the question creation and go back to the Test wizard.
To create and edit a single choice question and its answers follow these steps:
 Note: The last two screenshots are slightly different since the branching option is enabled on first one. When the branching option is enabled, the ''Assistance'' option is unavailable.
- Scoring method - choose between these options :
- Multiple choice questions
Multiple-choice questions offer several possible answers while more than one can be selected as correct. To answer a multiple-choice question correctly, a test-taker has to check all answers marked as correct during the question creation process.
If you select a multiple choice question from the list of question types, a screen below with the following settings will be displayed:
- Scoring method - choose between these options:
- Defining correct/incorrect answers - Check the correct answer while creating the question. The test taker will receive points only if he chooses the correct answer.
- By answer weight - Set the weight for each answer. A candidate will be awarded a number of points for each answer he picks accordingly.
- Manual grading - The test manager grades each candidate’s tests manually.
- By combination of answers - A candidate should select one of the predefined correct combinations of answers in order to receive points.
- Question type - Use this option to convert a multiple choice question to a single choice question and vice versa.
- Points - Set the number of points a question is worth.
- Penalty - Set the number of negative points for incorrect answers.
- Duration - You can set the time limit for answering the question. Note: The duration values in seconds are default, and it can be overridden every time you create the test.
- Difficulty - Choose the question difficulty level from the drop-down list (Easy, Medium or Hard)from the drop-down list.
- Question group - Organize multiple questions into a group, add its short description and multimedia(image, audio, video) that will be displayed with each question within the group.
- New - Create a new question group. Enter the Group name, Text (optional), and add an Attachment. Supported file types are MP3, MP4, JPG, JPEG, PNG, BMP, and GIF and the maximum size of an attachment is 4MB.
- Edit - Edit the existing question group by choosing it from the drop-down list.
- Branching - Branching is an optional feature that allows you to add a follow-up question to each answer in the original question.
Please note, that the branching option is unavailable when the scoring methods "Defining correct/incorrect answers", "By answer weight" and "Manual grading" is chosen.
Hint: If you wish to use any of the mentioned scoring methods, the suggestion is to use ''Single choice'' questions.- View structure (if branching is enabled) - By selecting the option to "Show structure", you can examine the diagram that shows the relations between question branches and answers.
- Add translation - Create versions of this question in different languages. Click on ''Add translation'', choose a language from the drop-down list, and type the question text and answers in the selected language.
To create and edit a multiple choice question and its answers follow these steps :
- Question text - Enter the question into this field.
- Preview - Click this button to preview the question you are editing.
- Add attachment - Click this button to add multimedia files (images, video, audio) to the question.
- Add formula - Use this option to add the formulas to the question.
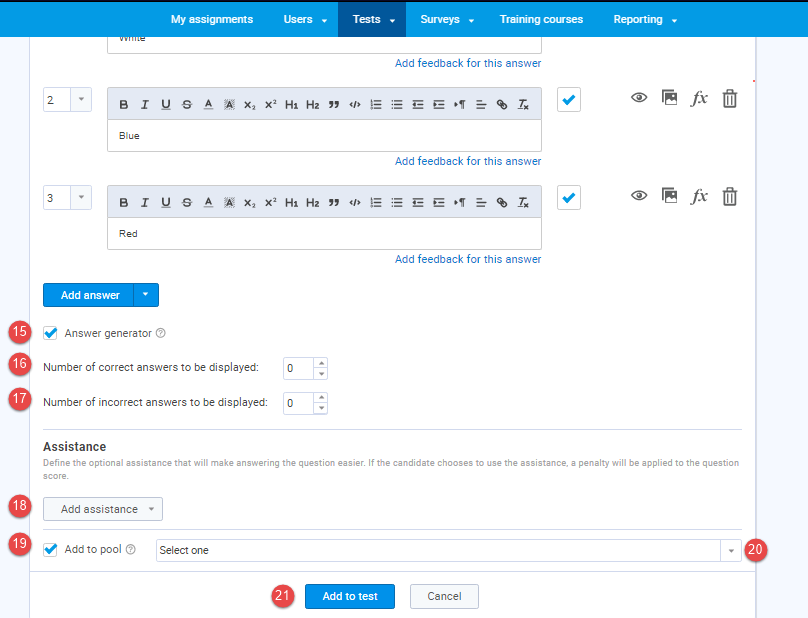
- Add answer - Click the ''Add answers'' button to add more answers for the question you create/edit.
- Set the question's ordinal number - Set the question’s ordinal number of appearance in the test.
- Enter your answer in this text box.
- View the answer by clicking the ''eye'' icon.
- Add an image/audio/video to the answer.
- Add a formula to the answer.
- Delete the answer by clicking the ''trash can'' icon.
- If the answer is correct, check the box next to it. If you chose a grading method by answer weight, set the number of points for the answer.
- Add feedback to the question - The feedback will be displayed to a test-taker upon answering the question.
- Click on the arrow if you want to add ''All of the Above'' or ''None of the Above'' to the answers
- Answer generator - Check this option if you wish to set the number of correct and incorrect answers that will be displayed.
- Enter the number of correct answers from the set of possible answers.
- Enter the number of incorrect answers from the set of possible answers.
- Add assistance - click this button to enable the assistance for a test taker:
- Hint - If you choose this option, you will see an additional field where you need to enter the hint a test taker will get.
- Additional time - Enable the candidates to use additional time for answering a question.
- Minus one wrong answer - If a candidate chooses to use this assistance, the system will eliminate one wrong answer from the given answers.
Note: you can set penalty points for using each type of assistance.
- Add to pool - By checking this option, you can add the question to one of the existing pools you manage.
- Choose a desired pool from a drop-down menu.
- Add to test - Click this button to add the question you have just created to the test.
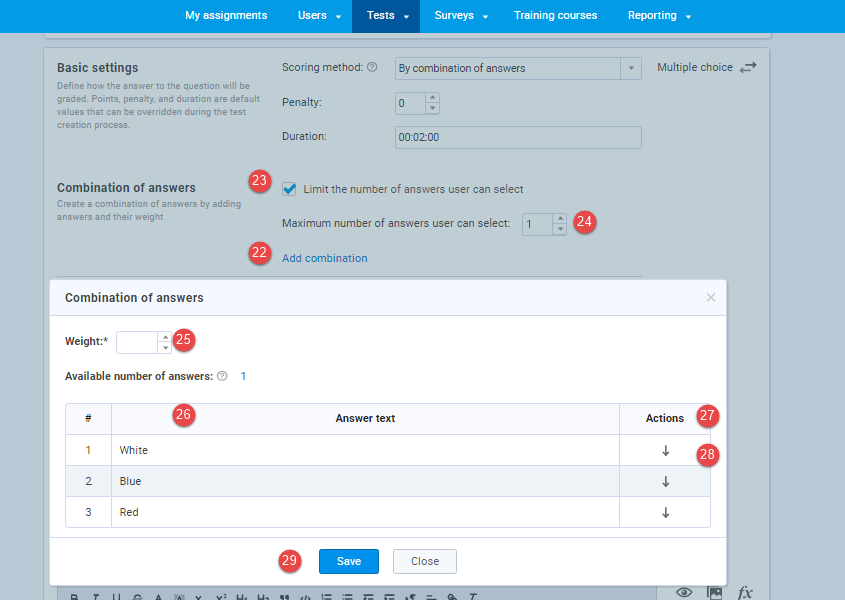
Note: At any moment, you can cancel the question creation and go back to the Test wizard. - Add a combination of answers - Click the ''Add combination'' button to create different combinations of answers and assign weight to them.
- Check the box to limit the number of answers a user can select.
- Enter the maximum number of answers a user can select.
- Assign the weight to the combination of answers.
- Preview the combinations of answers you have created.
- Actions - View which answers to add to the question.
- Add the branching question to the combination of answers you created by clicking the ''arrow'' icon.
- Save - save the combination of answers

Before you create a branching question, go through the following settings:
- Scoring method - choose between these options:
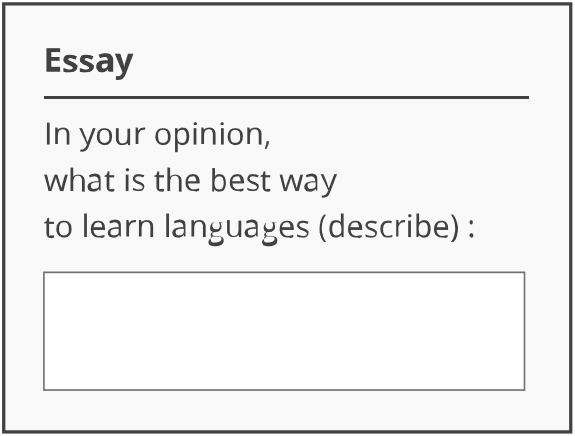
- Essay questions
Essay questions allow a test-taker to write a longer answer, e.g. analysis or explanation, usually of a specified length. When creating this question type, you should explain what is expected from a test-taker to write in order to earn the maximum score.
If you select an essay question from the list of question types, a screen below with the following settings will be displayed:
- Scoring method - For this question type, you can choose only ''Manual grading'' option. The test manager grades each candidate’s tests individually.
- Question type - You can preview which question type you have selected.
- Points - Set the number of points a question is worth.
- Penalty - Set the number of negative points for incorrect answers.
- Duration - You can set the time limit for answering the question. Note: The duration values in seconds are default, and it can be overridden every time you create the test.
- Difficulty - Choose the question difficulty level from the drop-down list (Easy, Medium or Hard)from the drop-down list.
- Question group - Organize multiple questions into a group, add its short description and multimedia(image, audio, video) that will be displayed with each question within the group.
- New - Create a new question group. Enter the Group name, Text (optional), and add an Attachment. Supported file types are MP3, MP4, JPG, JPEG, PNG, BMP, and GIF and the maximum size of an attachment is 4MB.
- Edit - Edit the existing question group by choosing it from the drop-down list.
- Add translation - Create versions of this question in different languages. Click on ''Add translation'', choose a language from the drop-down list, and type the question text and answers in the selected language.
- Question text - Enter the question into this field .
- Preview - Click this button to preview the question you are editing.
- Add attachment - Click this button to add multimedia files (images, video, audio) to the question.
- Add formula - Use this option to add the formulas to the question.
- Add assistance - Click this button to enable the hint assistance for a test taker. If you choose this option, you will see an additional field where you need to enter the hint a test taker will get.
- Add to the pool - By checking the "Add to pool" option, you can add the question to one of the existing pools. After checking it, a drop-down menu with the question pools that you manage will appear.
- Add to test - Click this button to add the question you have just created to the test.
- Cancel - At any moment, you can cancel the question creation and go back to the Test wizard.

To create and edit an essay question follow these steps:
When creating this question type, you should enter the question text, list the items and order them correctly. To successfully answer an ordering question, a test-taker should put the mixed items into the correct order.
If you select an ordering question from the list of question types, a screen below with the following settings will be displayed:
- Scoring method - choose between these options:
- Defining correct/incorrect answers - Check the correct answer while creating the question. The test taker will receive points only if he chooses the correct answer.
- Manual grading - The test manager grades each candidate’s tests manually.
- Question type - You can preview which question type you have selected.
- Points - Set the number of points a question is worth.
- Penalty - Set the number of negative points for incorrect answers.
- Duration - You can set the time limit for answering the question. Note: The duration values in seconds are default, and it can be overridden every time you create the test.
- Difficulty - Choose the question difficulty level from the drop-down list (Easy, Medium or Hard)from the drop-down list.
- Question group - Organize multiple questions into a group, add its short description and multimedia(image, audio, video) that will be displayed with each question within the group.
- New - Create a new question group. Enter the Group name, Text (optional), and add an Attachment. Supported file types are MP3, MP4, JPG, JPEG, PNG, BMP, and GIF and the maximum size of an attachment is 4MB.
- Edit - Edit the existing question group by choosing it from the drop-down list.
- Add translation - Create versions of this question in different languages. Click on ''Add translation'', choose a language from the drop-down list, and type the question text and answers in the selected language.
To create and edit an ordering question and its answers follow these steps:
- Question text - Enter the question into this field.
- Preview - Click this button to preview the question you are editing.
- Add attachment - Click this button to add multimedia files (images, audio, video) to the question.
- Add formula - Use this option to add the formulas to the question.
- Add answer - Click the ''Add answers'' button to add more answers for the question you create/edit.
- Set the answer’s ordinal number - Set the question’s ordinal number of appearance in the test.
- Enter your answer in this field box.
- Delete the answer by clicking the ''trash can'' icon.
- Add assistance - Click this button to enable the hint assistance for a test taker. If you choose this option, you will see an additional field where you need to enter the hint a test taker will get.
- Add to pool - By checking the "Add to pool" option, you can add the question to one of the existing pools. After checking it, a drop-down menu with the question pools that you manage will appear.
Fill in the blanks questions require a test-taker to fill in the blank places in the text to gain maximum points. When creating this question type, enter the desired text, decide on the place of the blanks and enter the text a test-taker should fill in.
If you select a fill in the blanks question from the list of question types, a screen below with the following settings will be displayed:
- Scoring method - For this question type, you can choose only the ''Manual grading'' option. The test manager grades each candidate’s tests individually.
To create and edit a fill in the blanks question and its answers follow these steps:
True-false questions are used when a test-taker should evaluate a written statement as ''True'' or ''False.'' When creating this question type, write your question in the form of a statement that can be either true or false.
If you select a true/false question from the list of question types, a screen below with the following settings will be displayed:
- Scoring method - choose between these options:
- Defining correct/incorrect answers - Check the correct answer while creating the question. The test taker will receive points only if he chooses the correct answer.
- By answer weight - Set the weight for each answer. A candidate will be awarded a number of points for each answer he picks accordingly.
- Manual grading - The test manager grades each candidate’s tests manually.
- By combination of answers - A candidate should select one of the predefined correct combinations of answers in order to receive points.
- Question type - You can preview which question type you have selected.
- Points - Set the number of points a question is worth.
- Penalty - Set the number of negative points for incorrect answers.
- Duration - You can set the time limit for answering the question. Note: The duration values in seconds are default, and it can be overridden every time you create the test.
- Difficulty - Choose the question difficulty level from the drop-down list (Easy, Medium or Hard)from the drop-down list.
- Question group - Organize multiple questions into a group, add its short description and multimedia(image, audio, video) that will be displayed with each question within the group.
- New - Create a new question group. Enter the Group name, Text (optional), and add an Attachment. Supported file types are MP3, MP4, JPG, JPEG, PNG, BMP, and GIF and the maximum size of an attachment is 4MB.
- Edit - Edit the existing question group by choosing it from the drop-down list.
- Branching - Branching is an optional feature that allows you to add a follow-up question to each answer in the original question.
- View structure (if branching is enabled) - By selecting the option "Show structure", you can examine the diagram that shows the relations between question branches and answers.
- Add translation - Create versions of this question in different languages. Click on ''Add translation'', choose a language from the drop-down list, and type the question text and answers in the selected language.
- Question text - Enter the question into this field.
- Preview - Click this button to preview the question you are editing.
- Add attachment - Click this button to add multimedia files (images, audio, video) to the question.
- Add formula - Use this option to add the formulas to the question.
- The answer is automatically generated (True or False).
- Check this box if the answer is correct.
- Add new question to the branch - Any question type can be added to the branch.
- Add feedback the question - The feedback will be displayed to a test-taker upon answering the question.
- Add to pool - By checking the "Add to pool" option, you can add the question to one of the existing pools. After checking it, a drop-down menu with the question pools that you manage will appear.
To create and edit a true/false question follow these steps:
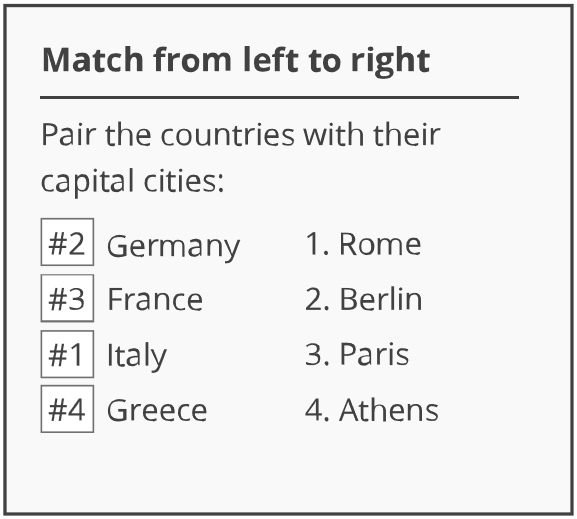
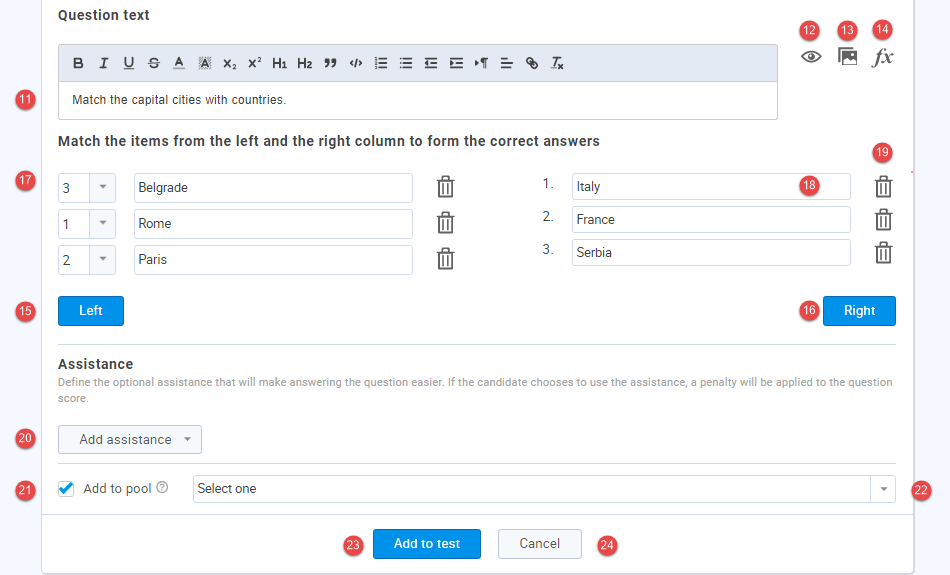
Matching questions require a test-taker to match an item on the left side with an item on the right side to form correct combinations. This question type is an ideal interactive choice for certain topics, e.g. geography (matching the countries and their capital cities).
If you select a matching question from the list of question types, a screen below with the following settings will be displayed:
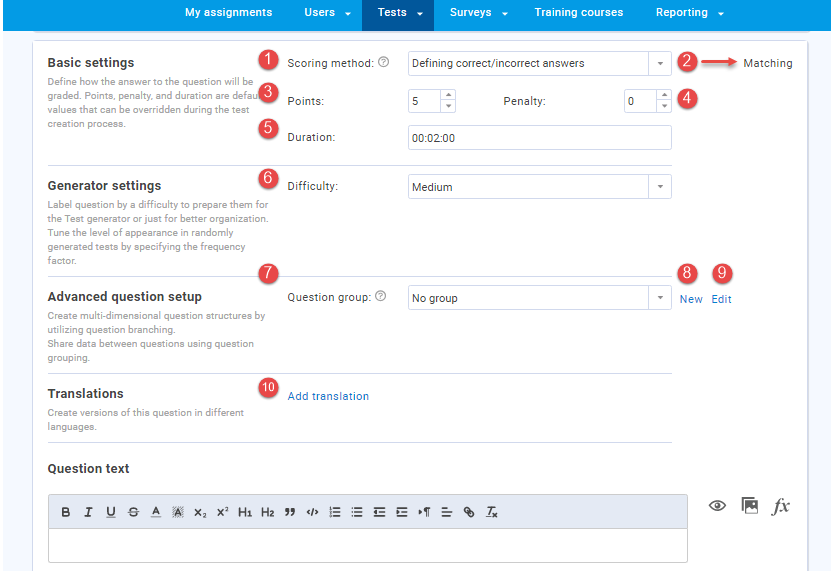
- Scoring method - choose between these options:
- Defining correct/incorrect answers - Check the correct answer while creating the question. The test taker will receive points only if he chooses the correct answer.
- Manual grading - The test manager grades each candidate’s tests manually.
- Question type - You can preview which question type you have selected.
- Points - Set the number of points a question is worth.
- Penalty - Set the number of negative points for incorrect answers.
- Duration - You can set the time limit for answering the question. Note: The duration values in seconds are default, and it can be overridden every time you create the test.
- Difficulty - Choose the question difficulty level from the drop-down list (Easy, Medium or Hard)from the drop-down list.
- Question group - Organize multiple questions into a group, add its short description and multimedia(image, audio, video) that will be displayed with each question within the group.
- New - Create a new question group. Enter the Group name, Text (optional), and add an Attachment. Supported file types are MP3, MP4, JPG, JPEG, PNG, BMP, and GIF and the maximum size of an attachment is 4MB.
- Edit - Edit the existing question group by choosing it from the drop-down list.
- Add translation - Create versions of this question in different languages. Click on ''Add translation'', choose a language from the drop-down list, and type the question text and answers in the selected language.
- Question text - Enter the question into this field.
- Preview - Click this button to preview the question you are editing.
- Add attachment - Click this button to add multimedia files (images, audio, video) to the question.
- Add formula - Use this option to add the formulas to the question.
- Left - Click the ''Left'' button to enter the left side answers that the test taker will later need to match with the right side answers.
- Right - Click the '' Right'' button to enter the right side answers.
- A candidate can match a left side answer by choosing a number from a drop-down menu that corresponds to the correct option on the right side. Alternatively, he can match the answers by drawing a line to connect them
- In this field you should enter the text of the left side and right side answer.
- Delete the answer by clicking the ''trash can'' icon.
- Add assistance - click this button to enable the assistance for a test taker:
- Hint - If you choose this option, you will see an additional field where you need to enter the hint a test taker will get.
- Additional time - Enable the candidates to use additional time for answering a question.
- Add to pool - By checking the "Add to pool" option, you can add the question to one of the existing pools. After checking it, a drop-down menu with the question pools that you manage will appear.
To create and edit a matching question follow these steps:
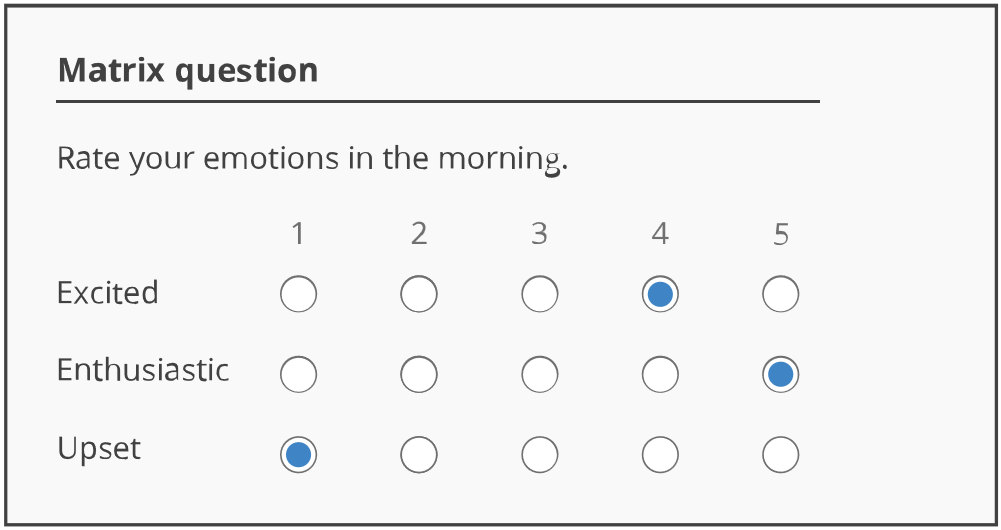
Matrix questions are the best choice for creating multiple single-choice questions within one. This question type usually consists of several statements/questions with the same possible answers, only one of which can be selected as correct.
If you select a matrix question from the list of question types, a screen below with the following settings will be displayed:
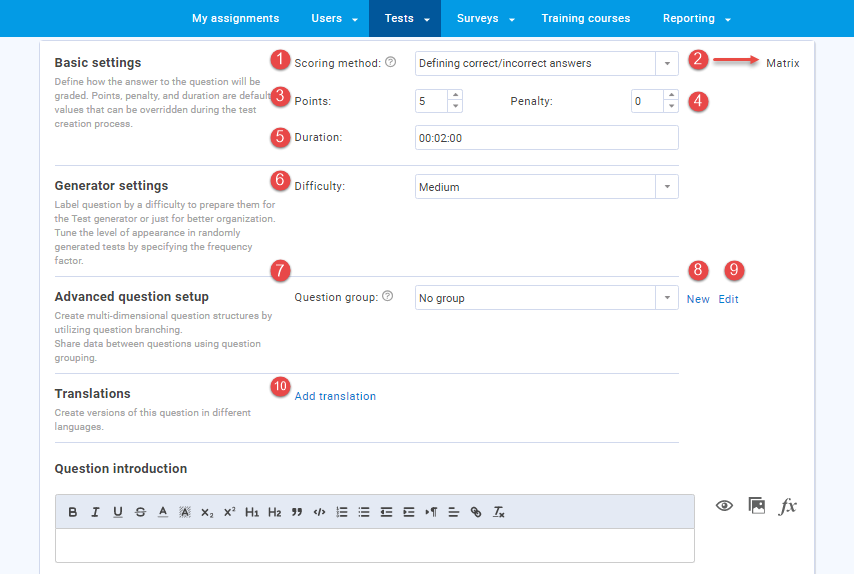
- Scoring method - choose between these options:
- Defining correct/incorrect answers - Check the correct answer while creating the question. The test taker will receive points only if he chooses the correct answer.
- By answer weight - Set the weight for each answer. A candidate will be awarded a number of points for each answer he picks accordingly.
- Manual grading - The test manager grades each candidate’s tests manually.
- Question type - You can preview which question type you have selected.
- Points - Set the number of points a question is worth.
- Penalty - Set the number of negative points for incorrect answers.
- Duration - You can set the time limit for answering the question. Note: The duration values in seconds are default, and it can be overridden every time you create the test.
- Difficulty - Choose the question difficulty level from the drop-down list (Easy, Medium or Hard)from the drop-down list.
- Question group - Organize multiple questions into a group, add its short description and multimedia(image, audio, video) that will be displayed with each question within the group.
- New - Create a new question group. Enter the Group name, Text (optional), and add an Attachment. Supported file types are MP3, MP4, JPG, JPEG, PNG, BMP, and GIF and the maximum size of an attachment is 4MB.
- Edit - Edit the existing question group by choosing it from the drop-down list.
- Add translation - Create versions of this question in different languages. Click on ''Add translation'', choose a language from the drop-down list, and type the question text and answers in the selected language.
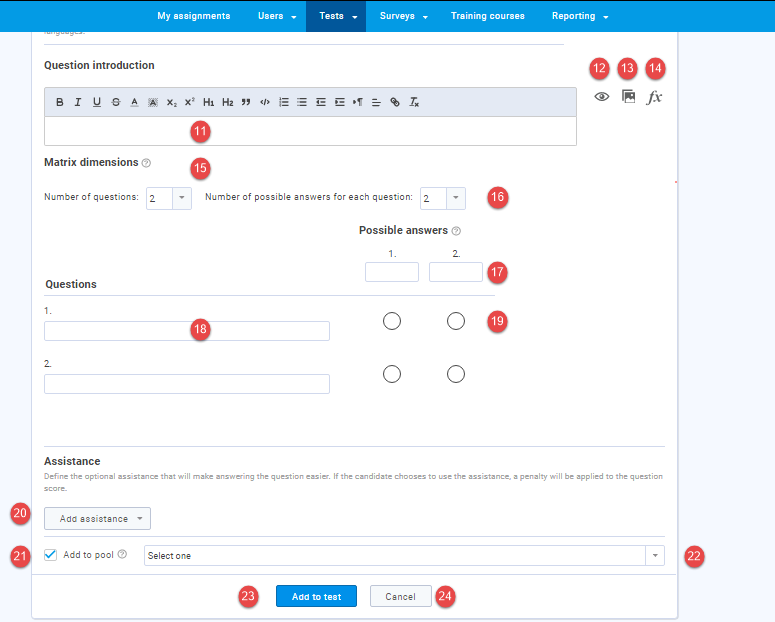
- Question introduction - You can enter the question introduction or instructions here (e.g. ''Please read the following statements and indicate the extent to which you agree with each of them'').
- Preview - Click this button to preview the question you are editing.
- Add attachment - Click this button to add multimedia files (images, audio, video) to the question.
- Add formula - Use this option to add the formulas to the question.
- Number of questions - Set the number of questions that the test-taker will see.
- Number of possible answers for each question - Set the number of possible answers the test-taker can choose from.
- Write the text of all questions the test taker should answer.
- Write all answers the text-taker will be able to choose from.
- Check the correct answer for each question.
- Add assistance - click this button to enable the assistance for a test taker:
- Hint - If you choose this option, you will see an additional field where you need to enter the hint a test taker will get.
- Additional time - Enable the candidates to use additional time for answering a question.
- Add to pool - By checking the "Add to pool" option, you can add the question to one of the existing pools. After checking it, a drop-down menu with the question pools that you manage will appear.
- Choose a desired pool from a drop-down menu.
To create and edit a matrix question follow these steps:
Open-ended questions are the most flexible questions and are usually used when a test-taker should give an answer directly related to the given question/statement or continue it.
If you select an open-ended question from the list of question types, a screen below with the following settings will be displayed:
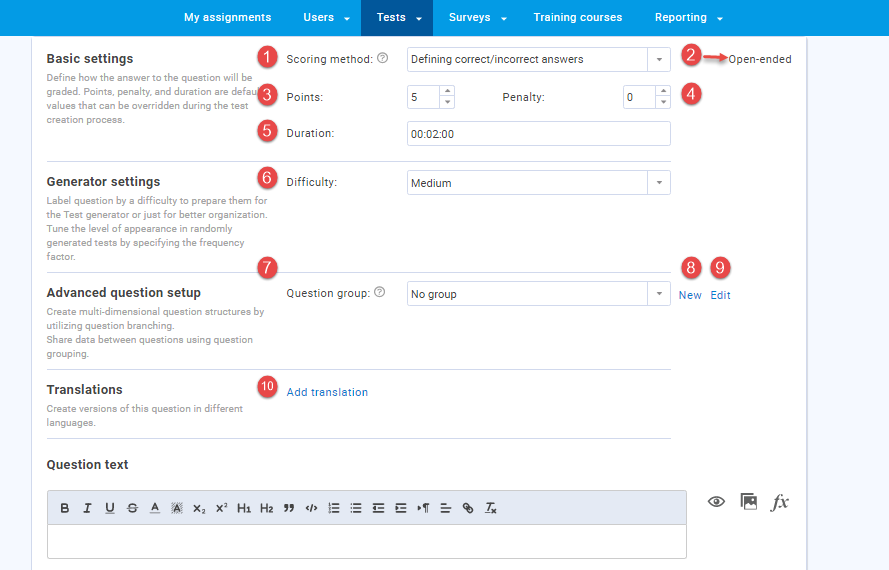
- Scoring method - choose between these options:
- Defining correct/incorrect answers - Check the correct answer while creating the question. The test taker will receive points only if he chooses the correct answer.
- Manual grading - The test manager grades each candidate’s tests manually.
- Question type - You can preview which question type you have selected.
- Points - Set the number of points a question is worth.
- Penalty - Set the number of negative points for incorrect answers.
- Duration - You can set the time limit for answering the question. Note: The duration values in seconds are default, and it can be overridden every time you create the test.
- Difficulty - Choose the question difficulty level from the drop-down list (Easy, Medium or Hard)from the drop-down list.
- Question group - Organize multiple questions into a group, add its short description and multimedia(image, audio, video) that will be displayed with each question within the group.
- New - Create a new question group. Enter the Group name, Text (optional), and add an Attachment. Supported file types are MP3, MP4, JPG, JPEG, PNG, BMP, and GIF and the maximum size of an attachment is 4MB.
- Edit - Edit the existing question group by choosing it from the drop-down list.
- Add translation - Create versions of this question in different languages. Click on ''Add translation'', choose a language from the drop-down list, and type the question text and answers in the selected language.
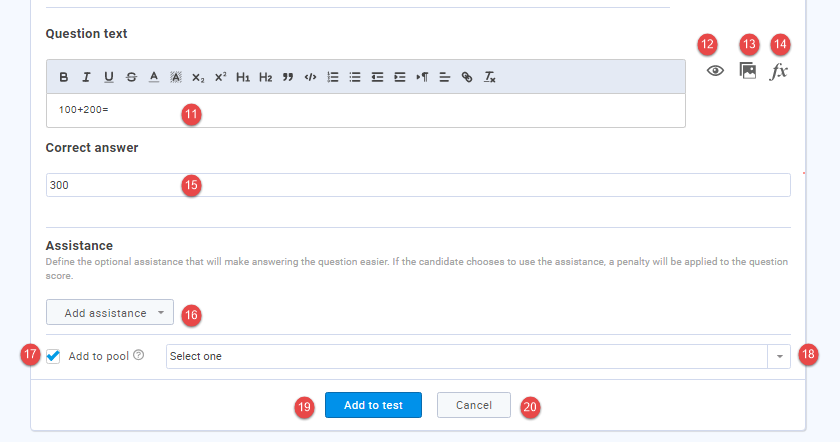
- Question text - Enter the question into this field.
- Preview - Click this button to preview the question you are editing.
- Add attachment - Click this button to add multimedia files (images, audio, video) to the question.
- Add formula - Use this option to add the formulas to the question.
- Correct answer - Enter the correct answer into this field.
- Add assistance - click this button to enable the assistance for a test taker:
- Hint - If you choose this option, you will see an additional field where you need to enter the hint a test taker will get.
- Additional time - Enable the candidates to use additional time for answering a question.
- Add to pool - By checking the "Add to pool" option, you can add the question to one of the existing pools. After checking it, a drop-down menu with the question pools that you manage will appear.
- Choose a desired pool from a drop-down menu.
To create and edit an open-ended question follow these steps:
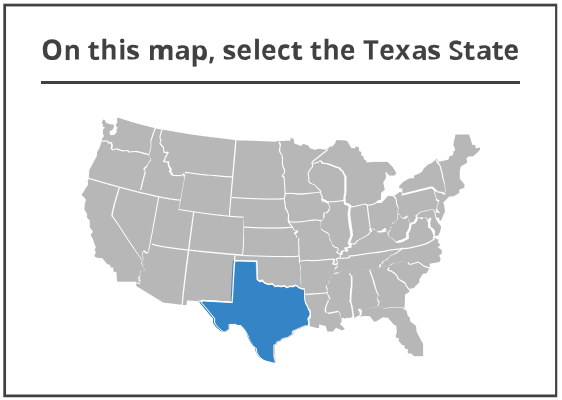
Hotspot questions are used when a test-taker should answer a question by marking the spots on an image (e.g. marking a place on a map). When creating this question type, you should upload the image and select the correct spots that should be marked on it.
If you select an hot spot question from the list of question types, a screen below with the following settings will be displayed:
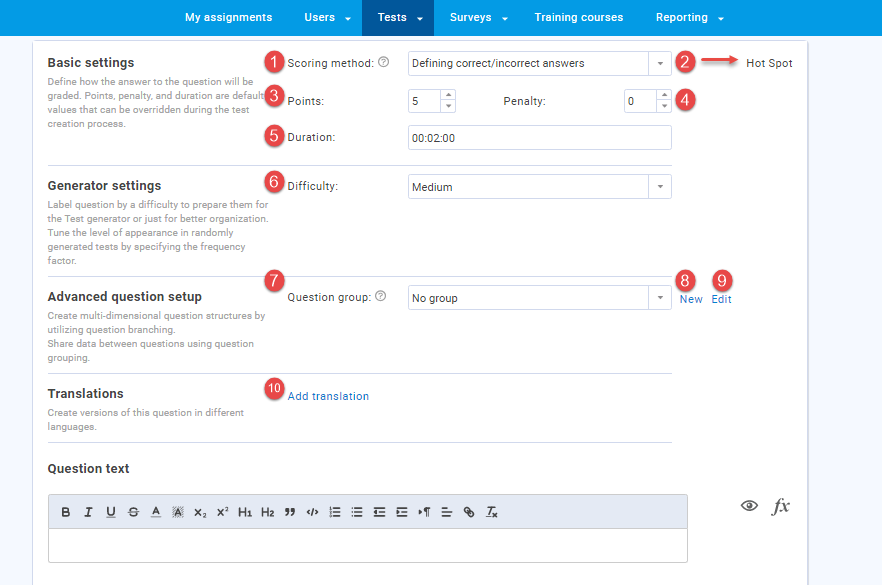
- Scoring method - choose between these options:
- Defining correct/incorrect answers - Check the correct answer while creating the question. The test taker will receive points only if he chooses the correct answer.
- Manual grading - The test manager grades each candidate’s tests manually.
- Question type - You can preview which question type you have selected.
- Points - Set the number of points a question is worth.
- Penalty - Set the number of negative points for incorrect answers.
- Duration - You can set the time limit for answering the question. Note: The duration values in seconds are default, and it can be overridden every time you create the test.
- Difficulty - Choose the question difficulty level from the drop-down list (Easy, Medium or Hard)from the drop-down list.
- Question group - Organize multiple questions into a group, add its short description and multimedia(image, audio, video) that will be displayed with each question within the group.
- New - Create a new question group. Enter the Group name, Text (optional), and add an Attachment. Supported file types are MP3, MP4, JPG, JPEG, PNG, BMP, and GIF and the maximum size of an attachment is 4MB.
- Edit - Edit the existing question group by choosing it from the drop-down list.
- Add translation - Create versions of this question in different languages. Click on ''Add translation'', choose a language from the drop-down list, and type the question text and answers in the selected language.
- Question text - Enter the question into this field.
- Preview - Click this button to preview the question you are editing.
- Add formula - Use this option to add the formulas to the question.
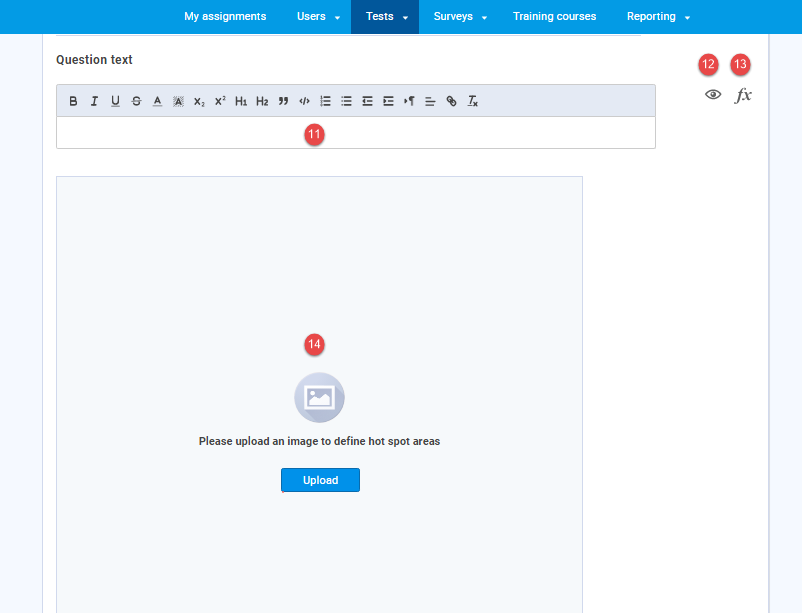
- Upload - Click this button to insert the picture.
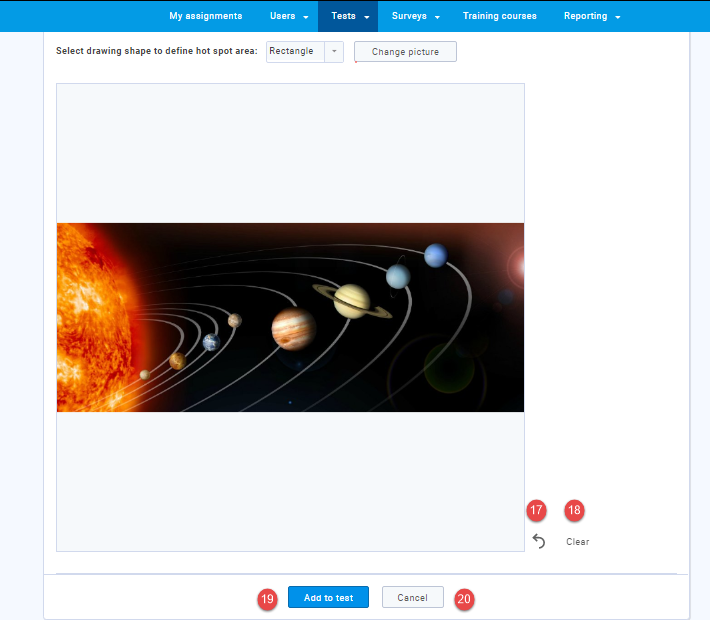
- Select a drawing shape to define a hot spot area- Choose a drawing shape - rectangle or circle, to mark the exact spot on the picture a user will need to select when answering the question.
- Change the picture - You can change the picture anytime while creating the hotspot question.
- You can undo the changes after selecting the hot spot area on the uploaded photo.
- Clear - You can erase all hot spot areas you selected and mark the new ones.
- Add to test - Click this button to add the question you have just created to the test.
- Cancel - At any moment, you can cancel the question creation and go back to the Test wizard.
To create and edit a hot spot question follow these steps:

Advanced options are not available when creating questions manually in the quiz wizard, but can be used when creating questions within question pools. The image below illustrates question creation in a question pool.
Note: You can choose any of the existing question types.
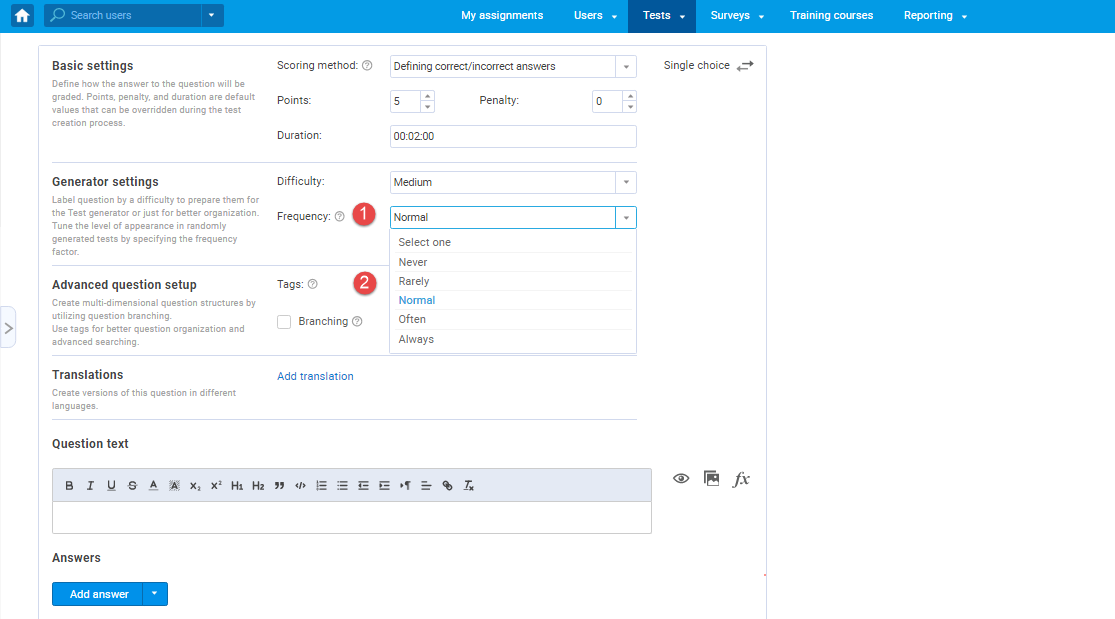
- Frequency factor - By checking this option, each question's frequency factor will be considered in the test generating process.
The selected frequency factor for each question will be considered in the test generating process. You can choose between the following options:
- Never - the question will not appear at all in the generated test.
- Rarely - The question will appear once in a while in the generated test.
- Normal- the question will appear in a regular frequency in the generated test.
- Often- the question will appear frequently.
- Always - the question will appear in each generated test.
For more information about the frequency factor option, please visit Use the test generator .
- Tags - Tags can be added to any question and are used primarily for searching purposes. A question can have an unlimited number of tags. To add a tag, type it and press the Enter key.
Available advanced options displayed on this screen are:
