User manual
Manage Tests
This page is the landing page after the test creation process. The "Manage Tests" panel allows you to view and edit the tests you have the access to. Here you can edit basic tests information, create new testing sessions, add users into the session, assign test managers and proctors and make different test reports. Also, you can modify the questions and grading scales for the tests not yet published.
- Accessing the page
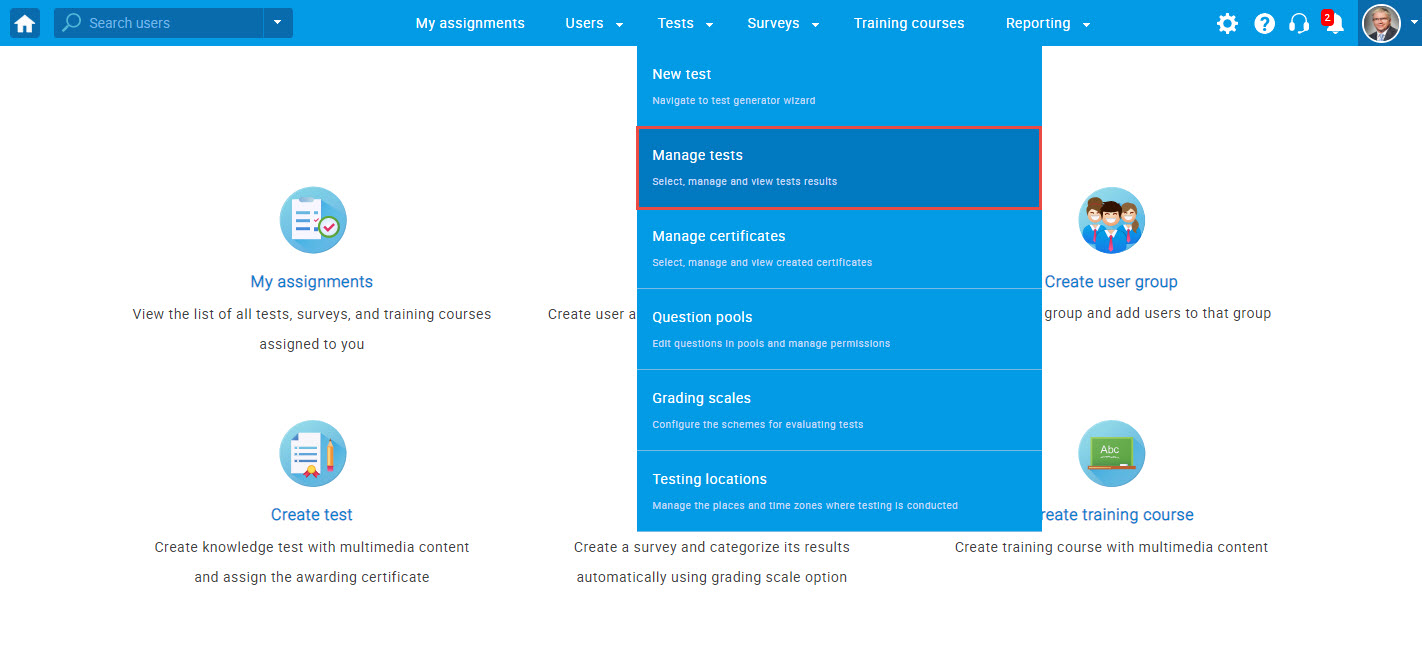
To access the "Manage tests" page, navigate to the "Tests" section oin the main menu and select "Manage tests".
- Page layout
On the left side of the "Manage tests" page, you will find a sidebar with a list of tests organized into the following categories:
- "Drafts"- tests that are created, but not yet published. These tests can be fully edited and modified.
- "Published"- Tests that have been created and published. Questions and grading scales of the published tests cannot be edited. These tests are available to users during their testing sessions.
- "Suspended"- Suspended tests are unavailable for taking and permanently disabled for any modifications. They can be used only for examining results.
- "Test templates"- Stored test settings that can be used when creating new tests.
Select the test you would like to work with by clicking on it.
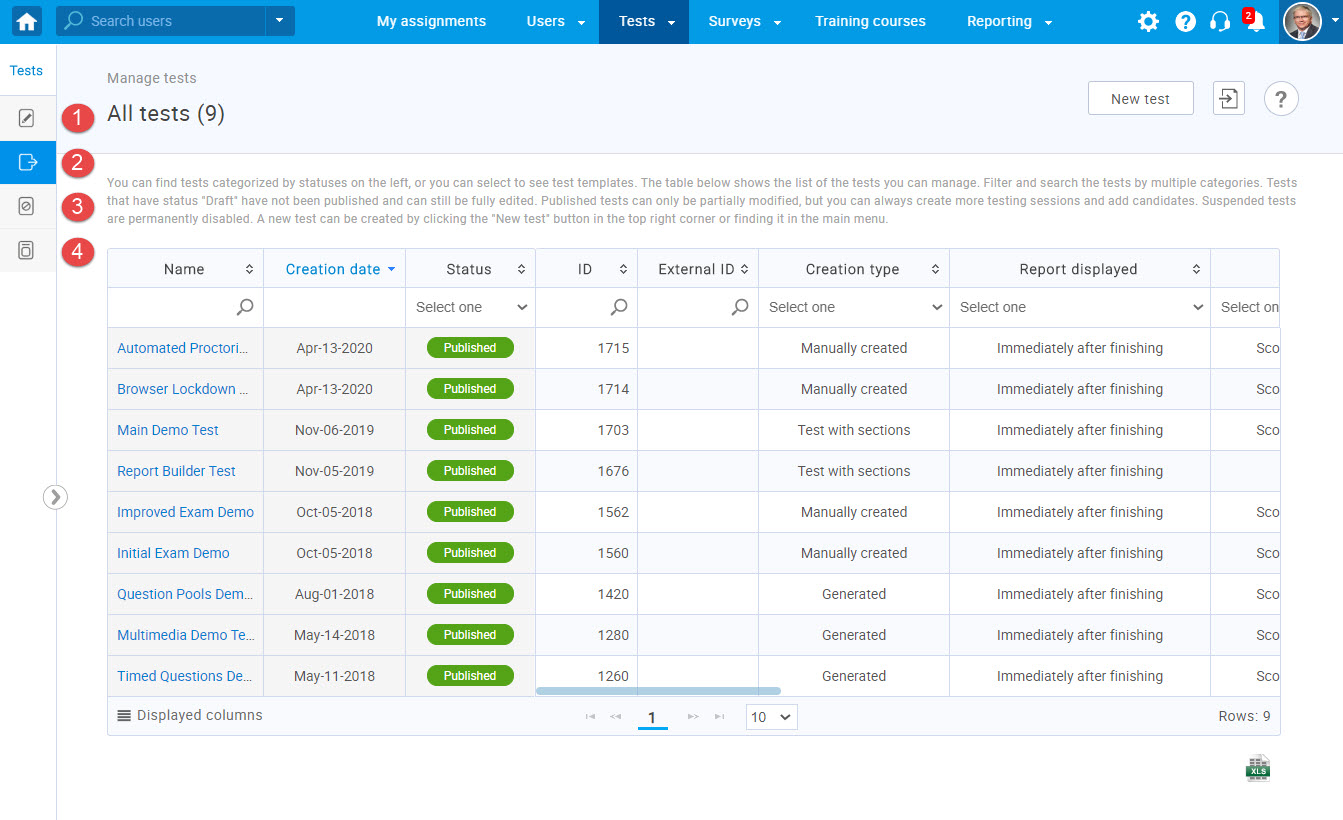
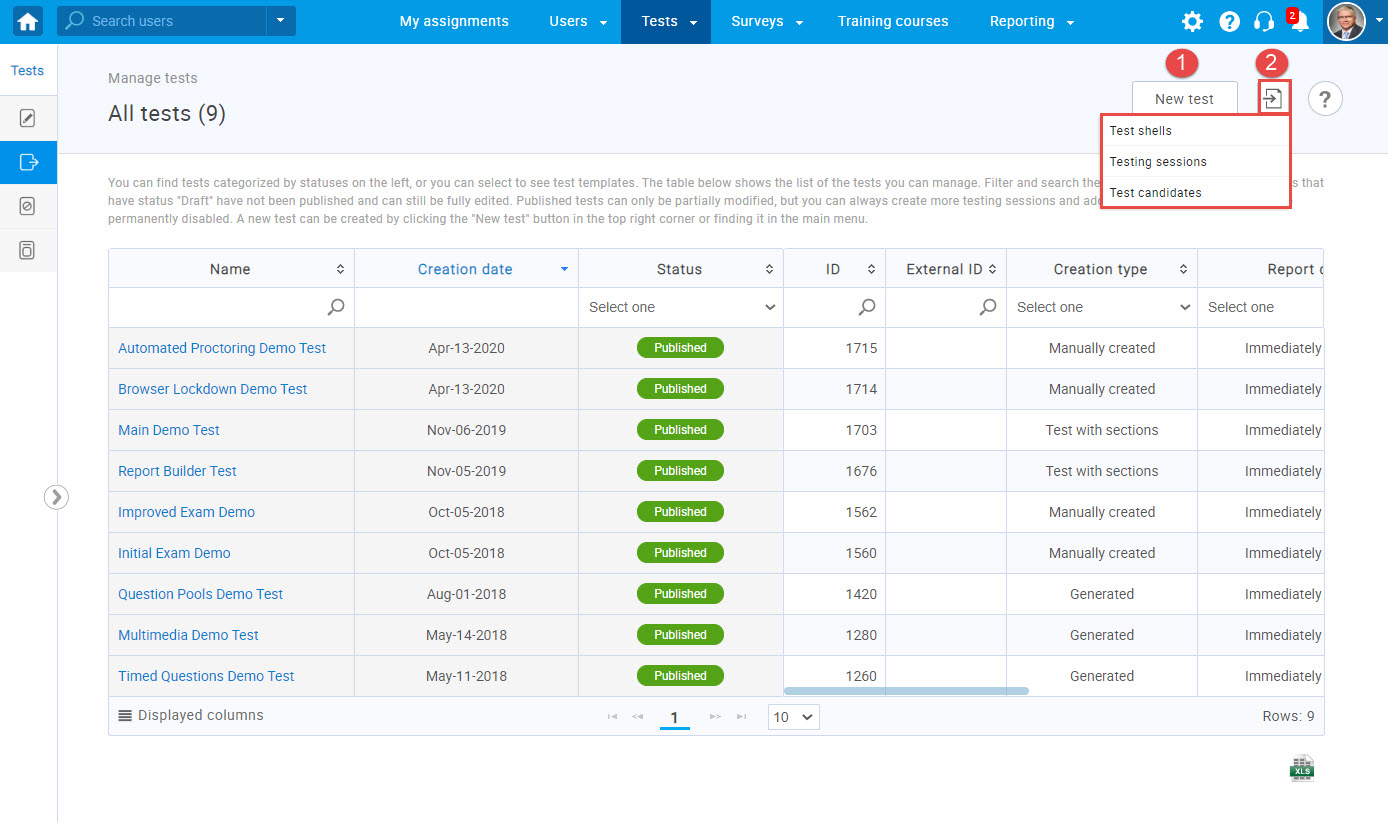
On this page, you have two options for creating a new test:
- The best way to create tests is through the test wizard that gives you full flexibility and enables you to configure all available settings. Once you create a test, you can schedule a testing session and assign candidates to it. To create a test through the wizard, click the "New Test" button.
- Another way to create tests, sessions, and add candidates is through excel files.
This option enables you to add basic information for organizing a test. Click the "Load"
button and choose between the following:
"Test shells" - create a test by uploading basic information such as ID, label, name, etc. through an Excel file. Finish the test creation through the test wizard.
"Testing sessions" - create a large number of testing sessions for one or more tests. This option creates only testing sessions, while users can be added later through the application or via an Excel file.
"Test candidates" - assign a large number of users to already created testing sessions via Excel file.
- Test settings
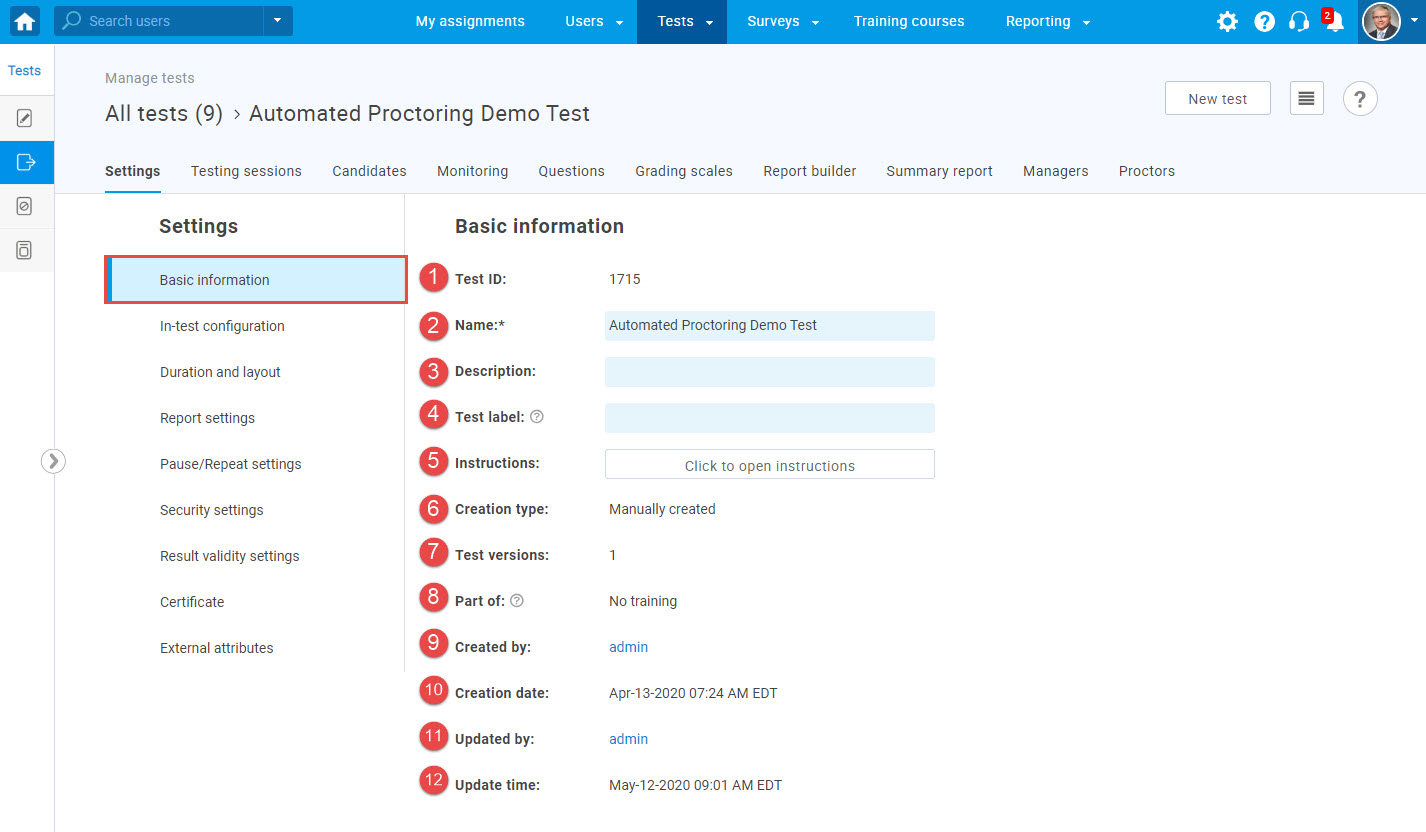
Once you select a test, you will be navigated to its "Settings" tab. Here you can view the main test settings, explained below:
-
Basic information
- "Test ID" - a unique value generated automatically once the test is created. This ID is used for linking the testing session to the particular test while uploading the testing session via Excel file.
- "Name" - the test name can be changed at any time.
- "Description" - an optional field where you can enter additional survey information.
- "Test label" - an optional label used for additional classification that will be displayed in every exported report. Eg. "Classified", "Confidential"...
- "Instructions" - specific rules or guidelines that students need to acknowledge in a pop-up dialog before they start the test and in the notes during the whole test-taking process.
- "Creation type" - "Manually created" (questions are created one by one or imported from pools) or "Generated" (questions are added using test generator).
- "Test versions" - manually created tests can have only one version, while generated tests can have multiple versions.
- "Part of" - specifies whether the test is assigned to a training course.
- "Created by" - displays the username of the user who created the test. By clicking on it, you will be redirected to that user's profile.
- "Creation date" - displays the date when the test is created.
- "Updated by" - displays the username od the user who updated the test. By clicking on it, you will be redirected to that user's profile.
- "Update time" - displays the date when the test is updated.
-
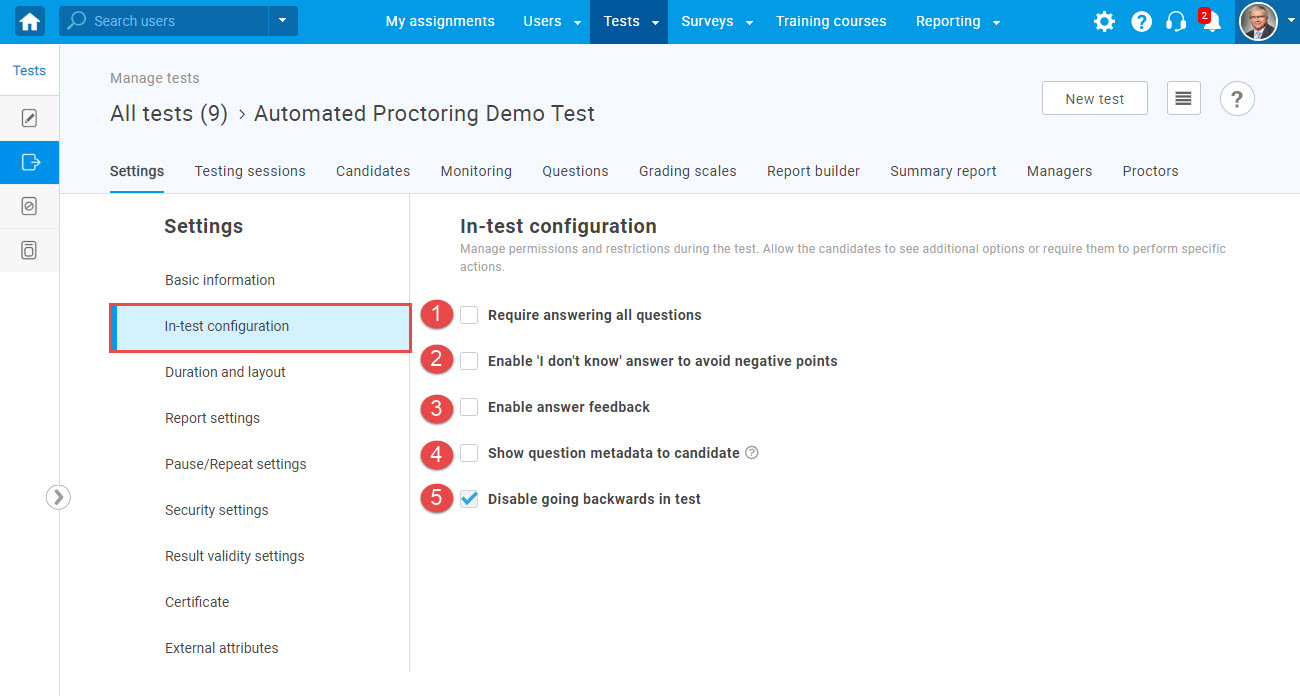
In-test configuration
- "Require answering all questions" - users will not be able to finish the test without answering all questions.
- "Enable 'I don't know' answer to avoid negative points" - users will be able to check the "I don't know" box when answering the question, to avoid gaining negative points.
- "Enable answer feedback" - you can create feedback that will be displayed to a user in a pop-up window after choosing a specific answer.
- "Show question metadata to candidate" - question points, type, and difficulty will be displayed to users during the test-taking.
- "Disable going backwards in test" - users will not be able to return to the previous questions while taking the test.
The following options are used for managing users’ permissions during test-taking or requiring them to perform specific actions.
-
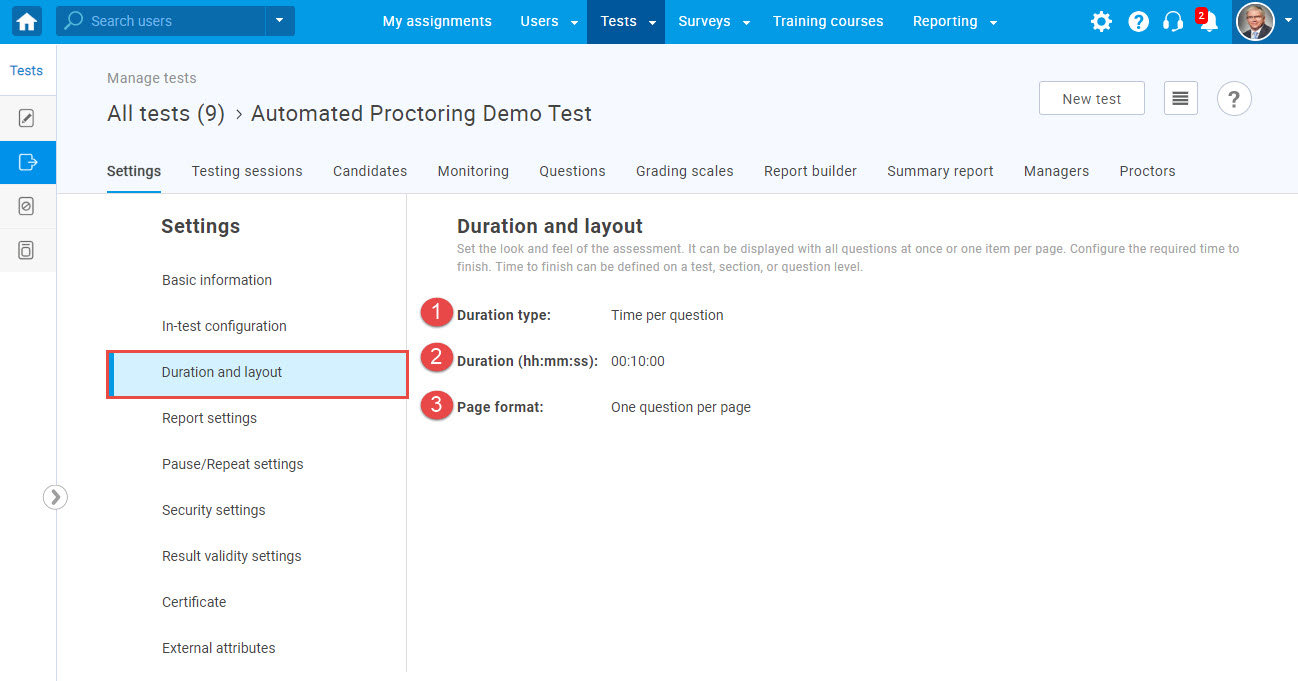
Duration and layout
- "Duration type" - specify the type of time limit for completing the test.
- "Duration" - set the time within which the test/section/question needs to be completed. "Duration type" defines whether the displayed time is for the whole test, section, or each question.
- "Page format" - set all questions to be displayed on one page, or one question per each page. .
The following options cannot be changed once the test is published. You can change the "Duration type" and "Duration" only in the test wizard, and "Page format" while the test is in the draft version.
-
Report settings
- "Show report"- choose when will the report be displayed to the users:
- "Real-time grading" - during the test-taking process, users will see the changes in their test scores upon submitting each answer.
- "Immediately after finishing" - users will see the report immediately after completing the test.
- "On manager's approval" - users will see the report after the test manager approves it.
Note: Some question types, such as essays, require manual grading by an instructor. Thus, the results of tests that contain this type of question cannot be immediately displayed.
- "Report content" - define what will the users see in the test's report:
- "Score and answer preview" - the user will see his score, preview of all questions, his answers and correct answers.
- "Score only"- the user will see only his score.
- "Configure report lifespan" - define how long will the report be available to the users.
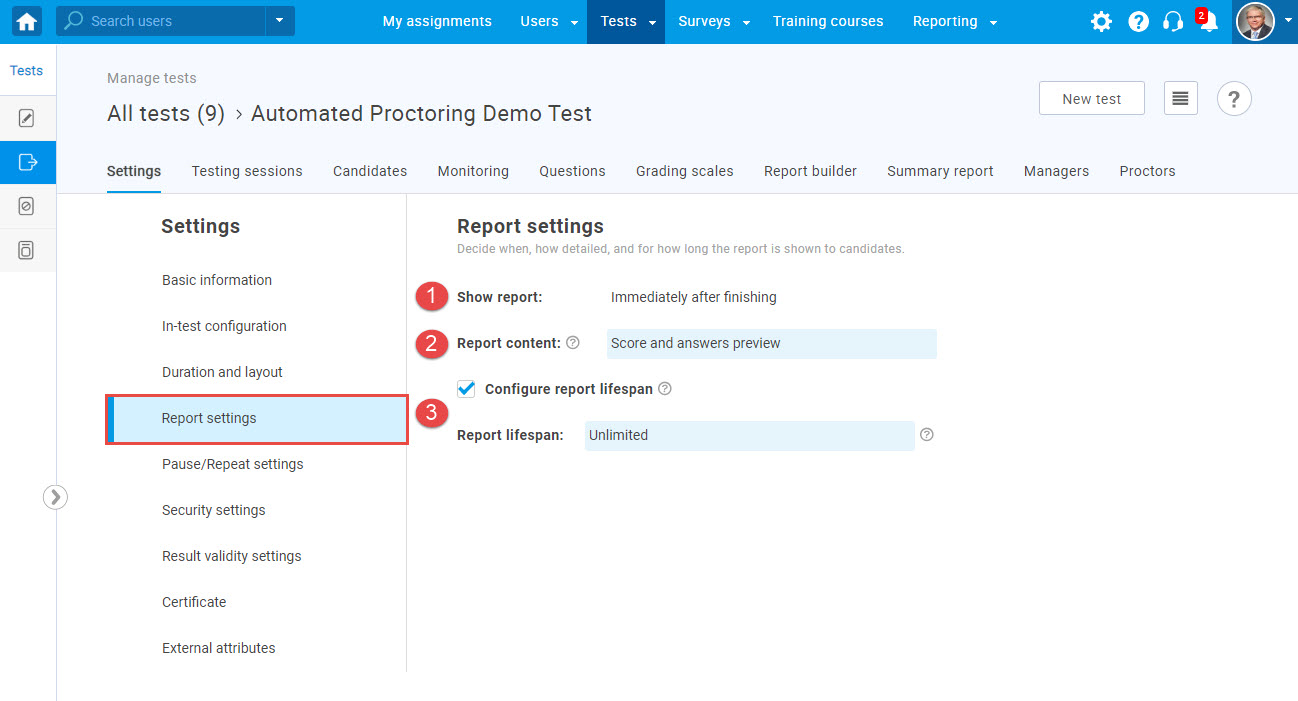
Report settings define when and for how long the report will be shown to candidates, and allow you to decide on its content.
-
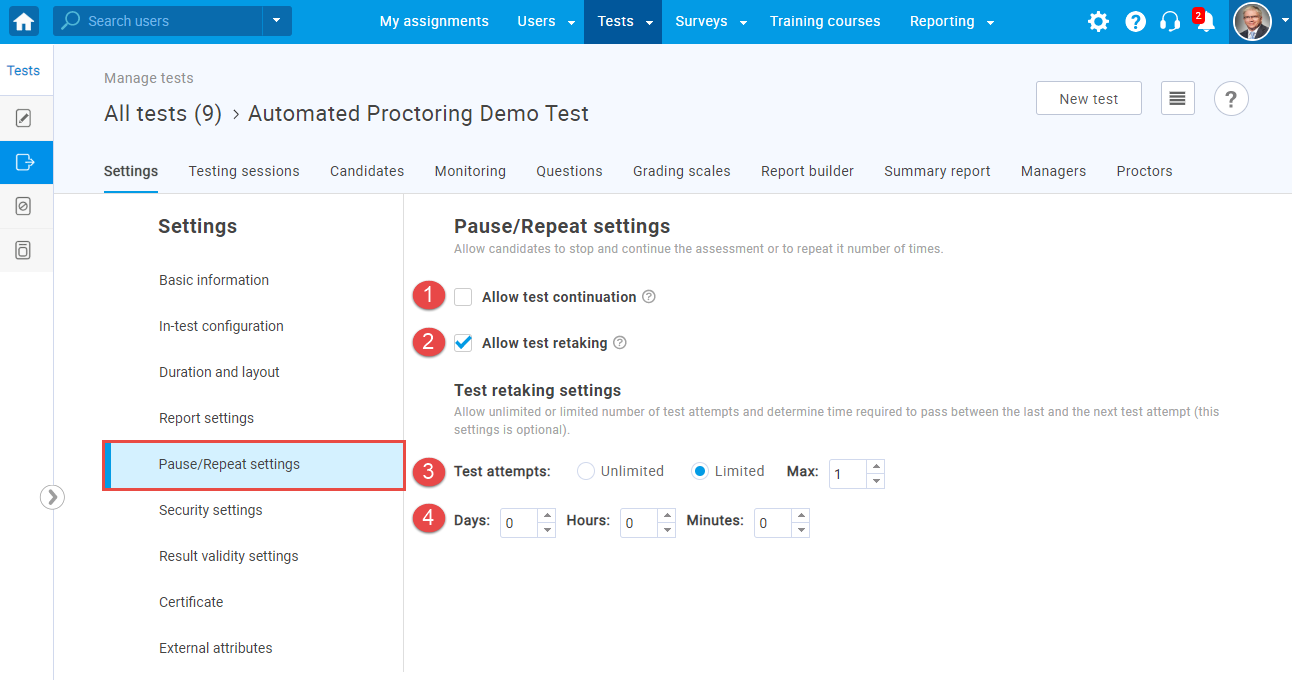
Pause/Repeat settings
- "Allow test continuation"- by enabling this option, the users will be able to save their answers, take a pause, and continue the test within the tests' availability period. The availability period is set later in the testing session creation process.
- "Allow test retaking" - by enabling this option, you will allow users to retake the test within its availability period. You can limit this option by following steps 3. and 4.
Allow candidates to pause and continue the assessment or to repeat it a certain number of times.
- "Test attempts" - you can choose between two
options:
- "Unlimited" - the users can repeat the test an unlimited number of times.
- "Limited" - the users can repeat the test as many times as you allow them.
- "Time between attempts" - set the time required to pass between two test attempts.
-
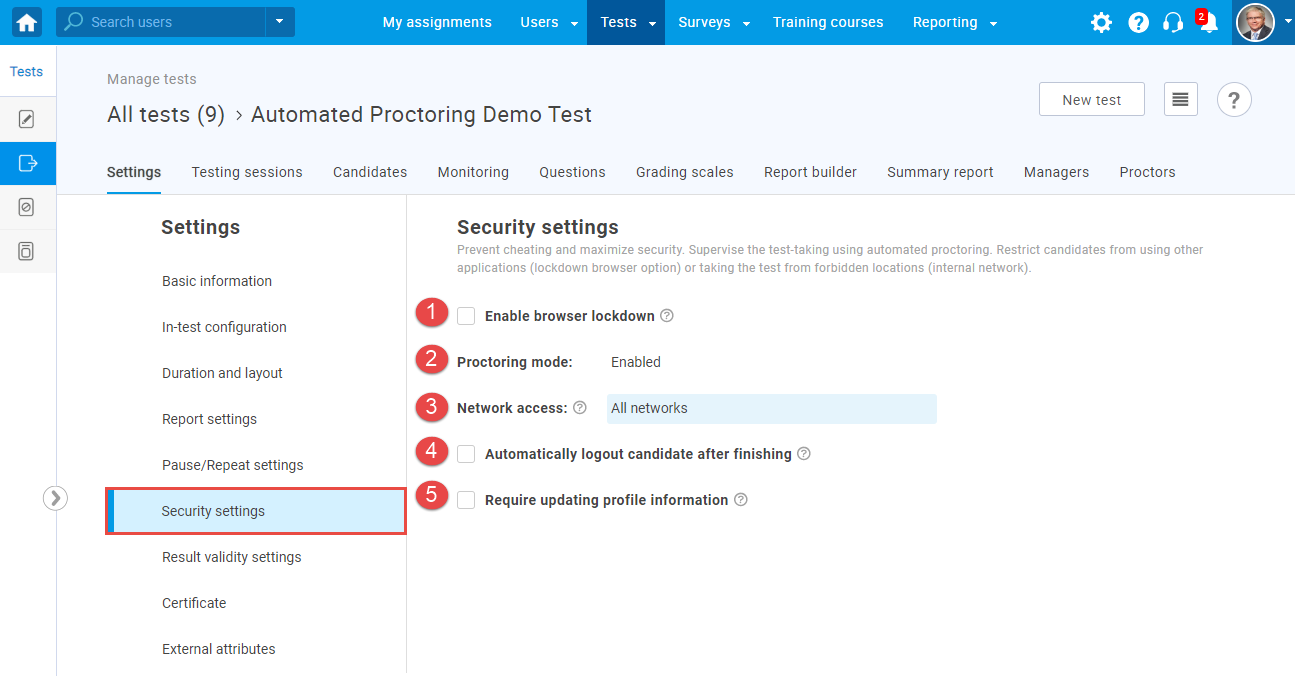
Security settings
- "Enable browser lockdown"- the users will not be able to cut, copy, save or print anything from the screen during the test-taking process. Also, the web browser will be in the full-screen mode, and if the users try to minimize it, the test attempt will be terminated.
- "Network access"- limit the access to the test only to people within your local (internal) network.
- "Automatically logout candidate after finishing"- the application will automatically logout the user upon completing the test.
- "Require updating personal information"- when starting the test, a screen with the user's personal information will appear. The user can confirm the validity of the information or make necessary changes in order to start the test.
-
Results' validity settings
You can define the test results' validity period in days, after which they will become invalid, and users will need to retake the test. A new testing session for the test retaking will be created automatically.

-
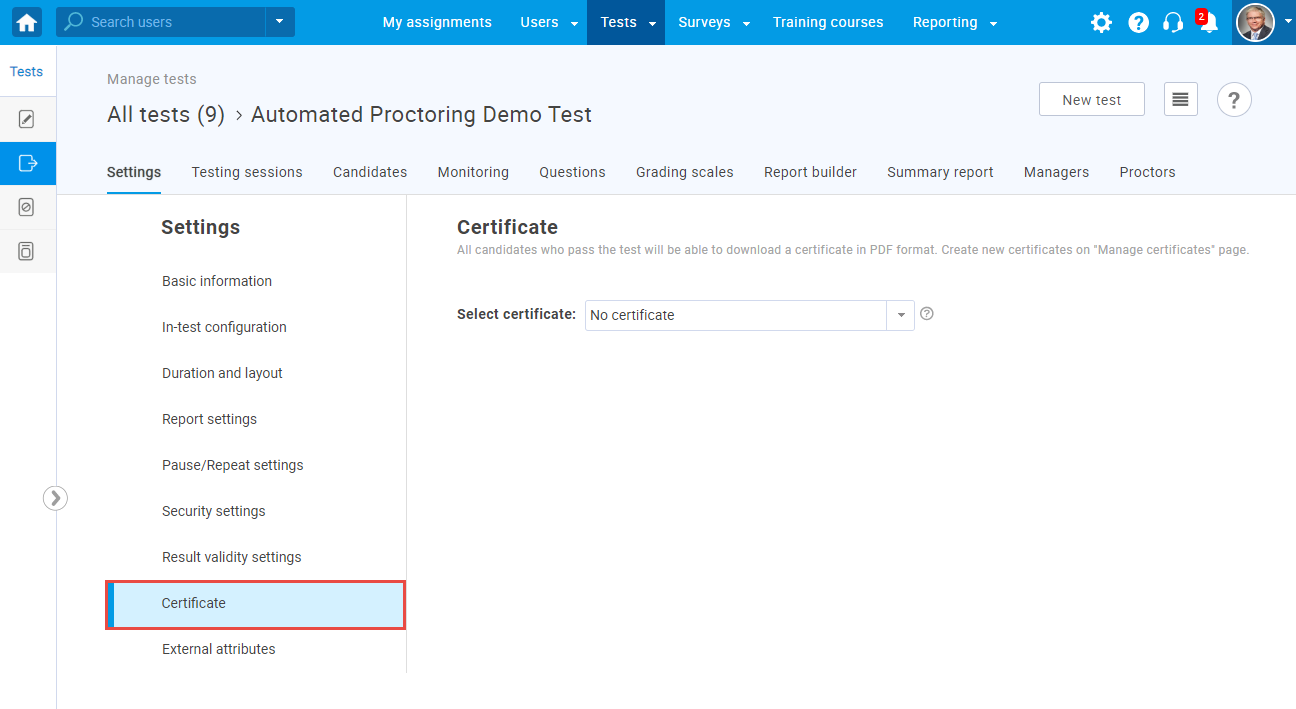
Certificate
View a list of all certificates you manage. Choose the one that will be awarded to users who pass the test. All users who pass the test will be able to download a certificate in PDF format.
-
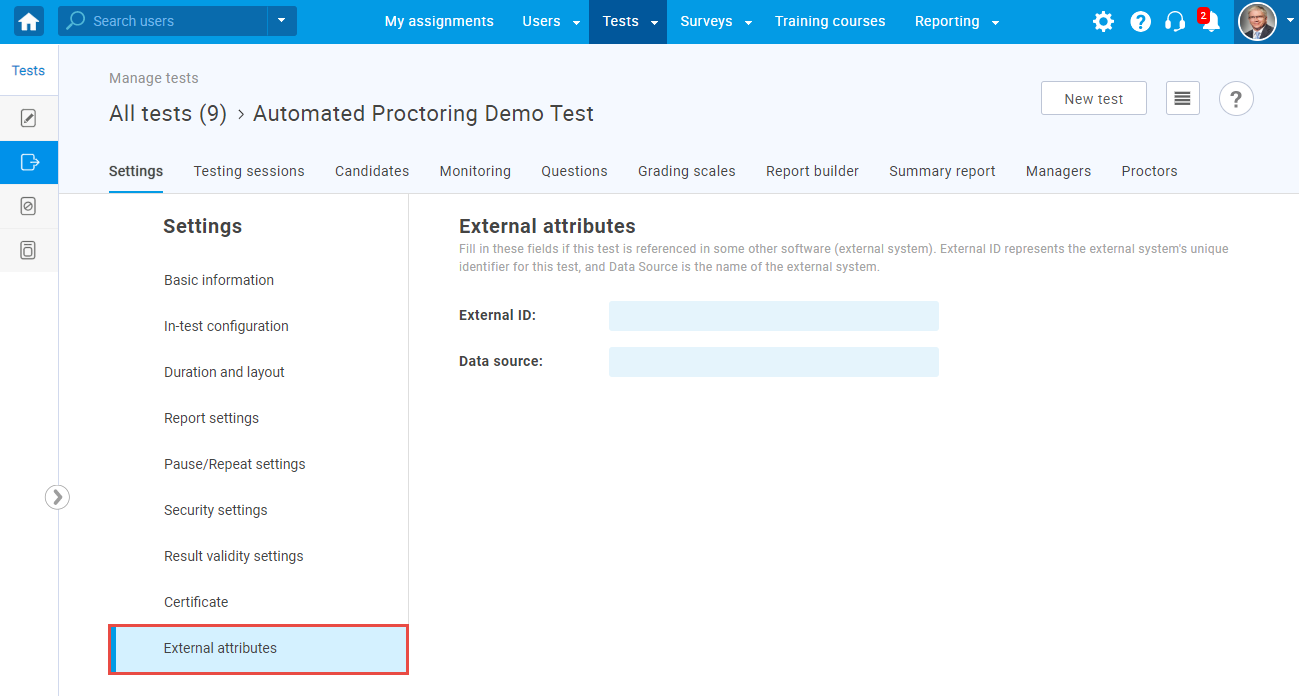
External attributes
- External ID- a test’s unique identifier used for integration with external systems
- Data Source - the name of the external system.
Fill in the following fields if the test is referenced in any other software (external system).
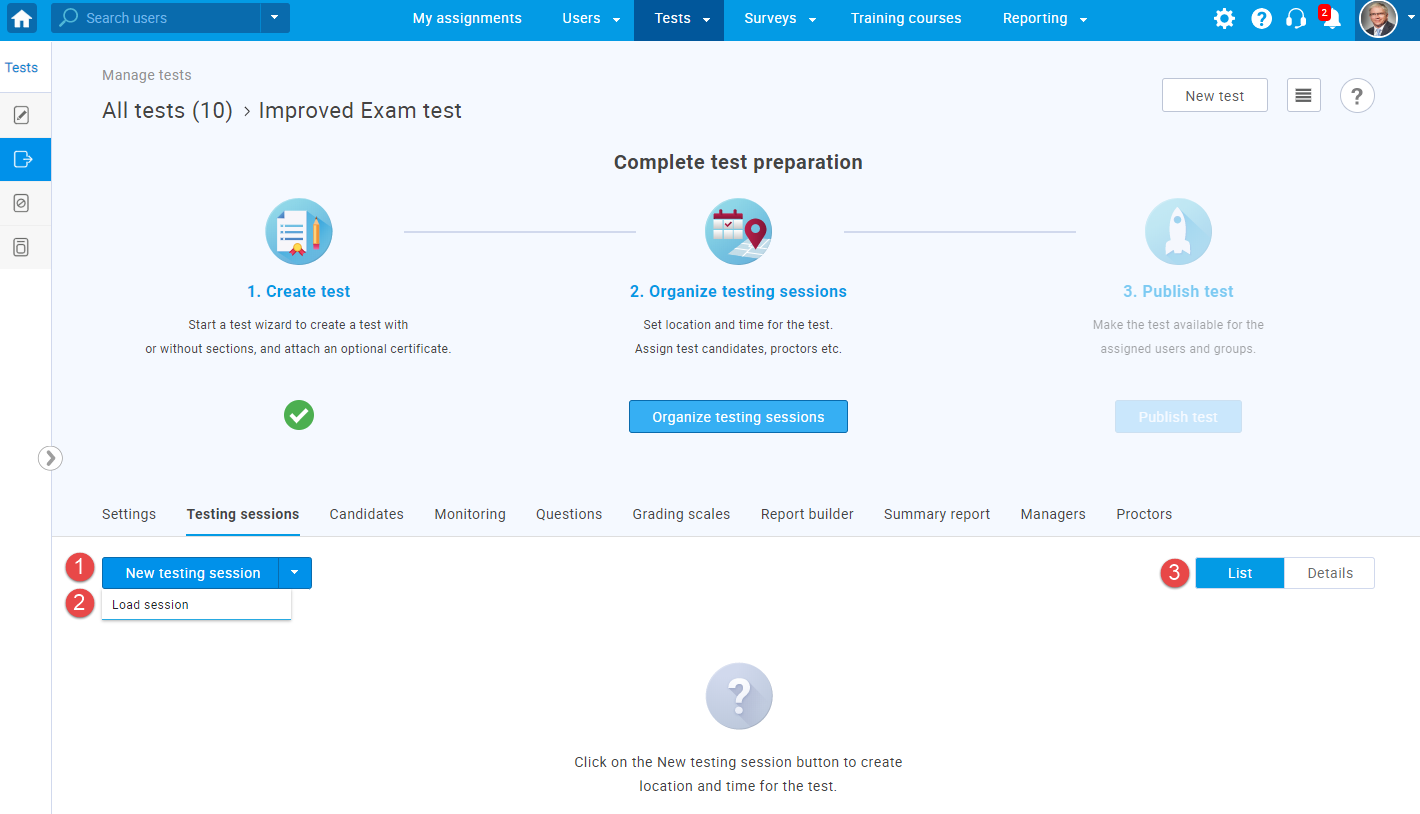
Testing sessions allow you to organize a test for users located at different time zones, states, continents, etc.
To create a new testing session:
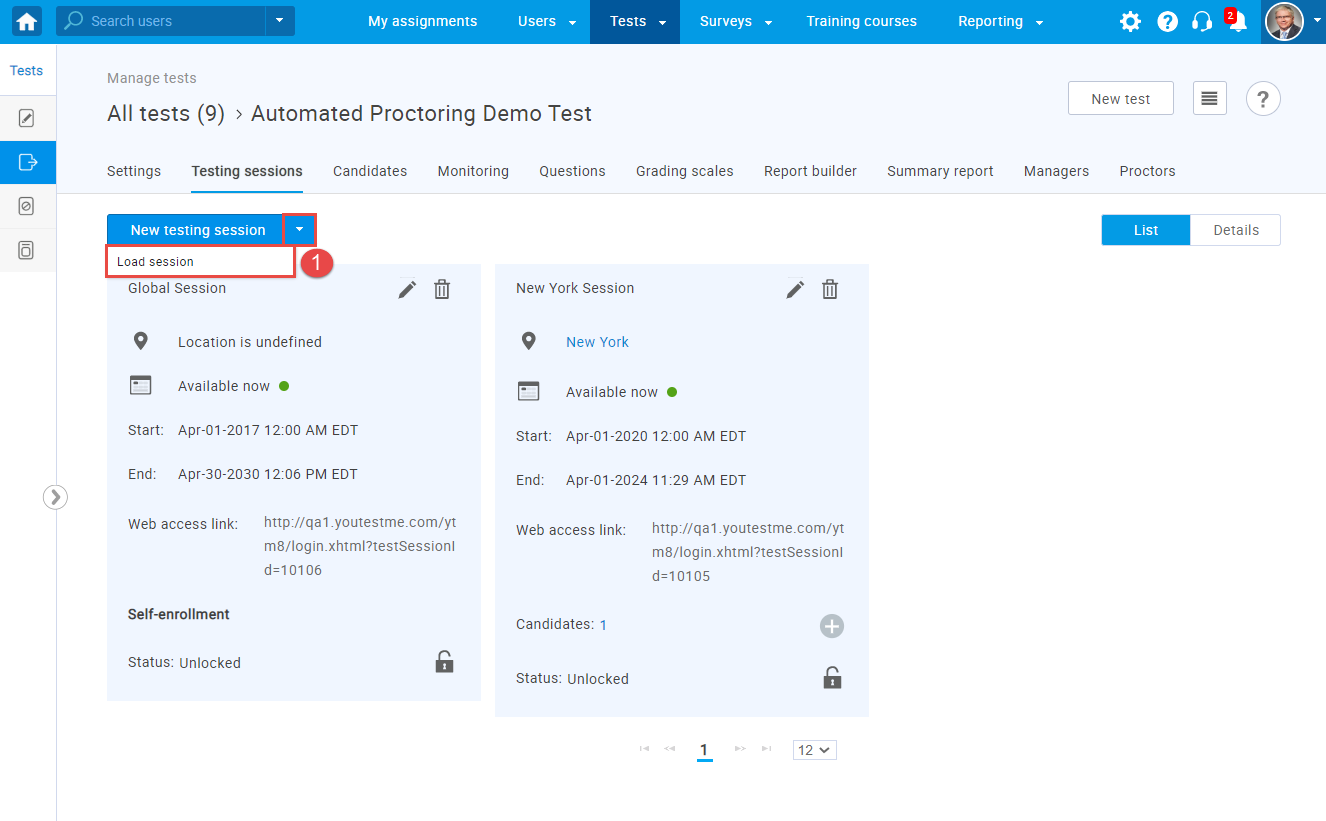
- Click the "New testing session" button or
- Click the "Load sessions" button to load sessions by using the predefined excel template
- You can switch to a detailed view by clicking the "Details" button.
- Creating and
editing new testing sessions
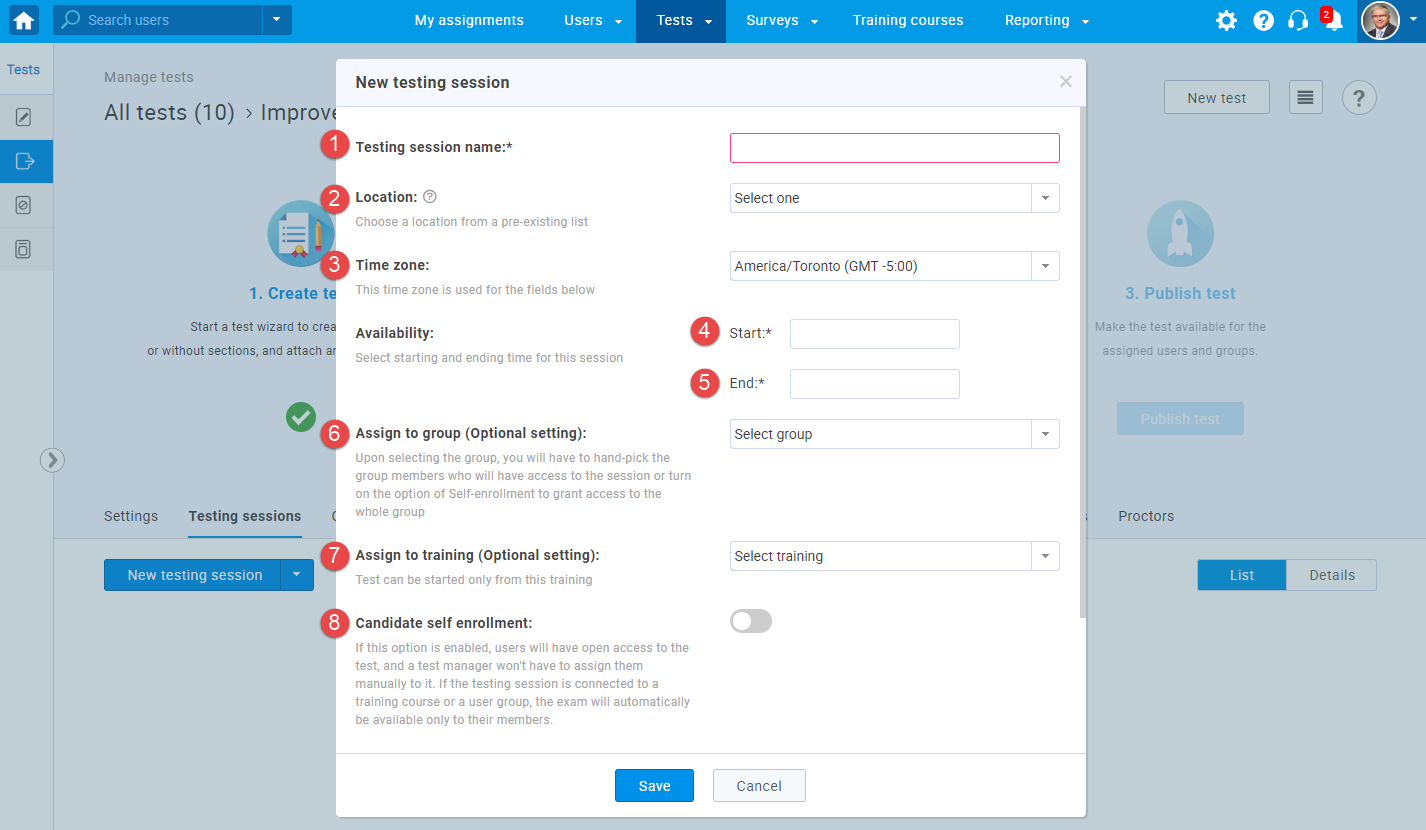
To create or edit a test session, click the "New testing session" button and then:
- Enter the "Testing session name."
- "Location" - choose one of the previously defined testing locations. This field is optional. If you need more information on how to create a new testing location, please visit Testing locations.
- The field displays the time zone of the user creating the session. The dates and times below are defined according to this time zone.
- Enter the date and time when the session will become available to the users.
- Enter the date and time by which the session will be available to the users.
- If you use this option, only users from a group you choose will be able to enroll in the session. Upon selecting the group, you will have to hand-pick the group members who will have access to the session or turn on the option of Self-enrollment to grant access to the whole group.
- If you enable this option, the test can be started only from the selected training course.
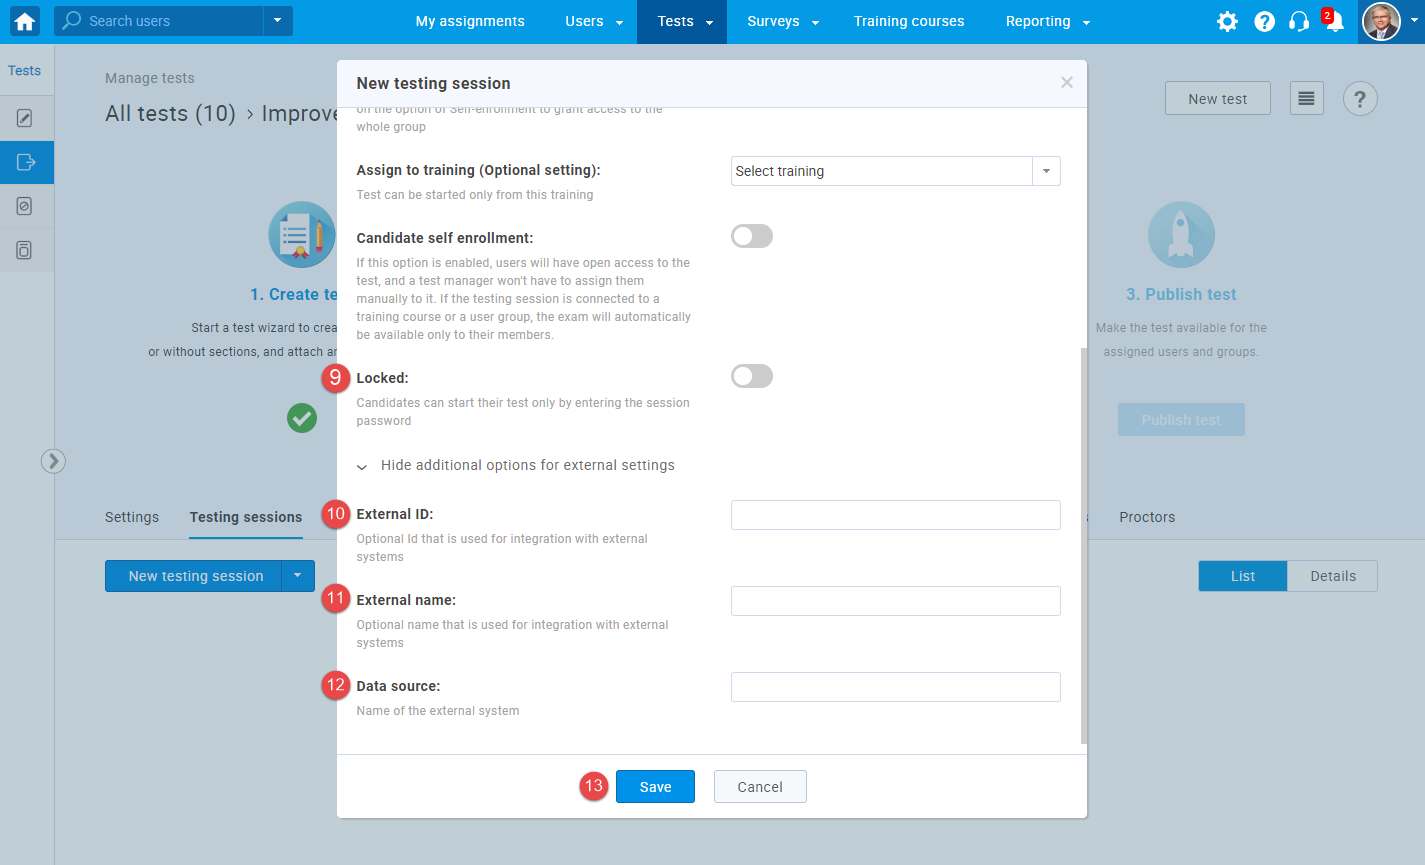
- If this option is enabled, all registered users, as well as those who register subsequently, will have open access to the assignment. If the session is connected to a user group, the assignment will be available only to group members who can access the assignment from the My assignments panel.
- If the "Locked" option is enabled, a user will be able to start the test only by entering the "Session password". The test managers and proctors can see the session password.
- This option is optional and used for integration with external systems.
- This option is optional and used for integration with external systems.
- Name of the external system.
- Click the "Save" button to save a session.
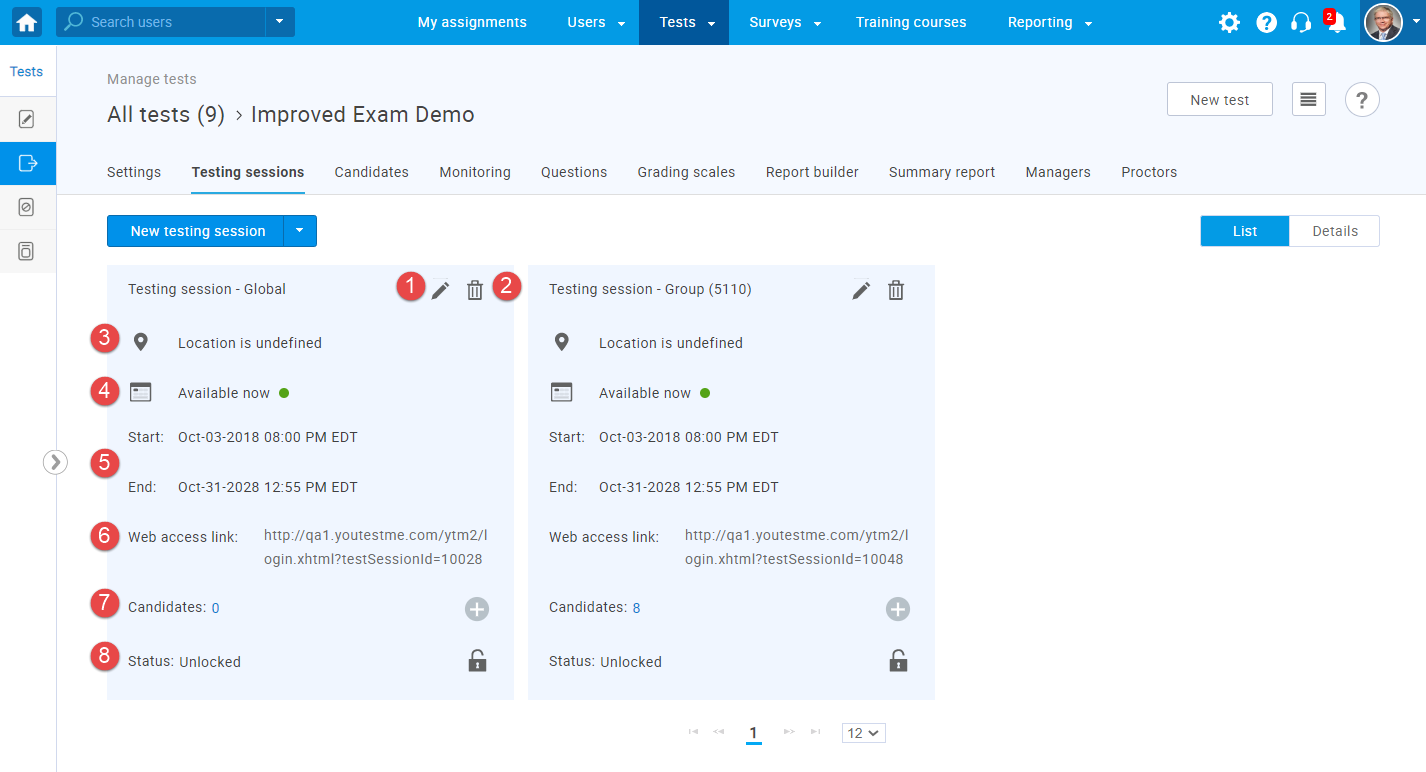
After creating a session, you will be able to see it in the "Testing sessions" tab with the following options and informatio:
- Click the pencil icon to edit the existing testing session.
- Click the trash icon to delete a session, and make it unavailable for users.
- The location of the session.
- Shows if the session is currently available.
- The start and end date of the session’s availability period.
- The link for direct access to the test session.
- The number of assigned users. A new user can be added to the session by clicking the plus icon. Also, here you can hand-pick the group members you want to assign if you have selected a group option.
- The status of the session. It can be locked or unlocked. Click the padlock icon to lock/unlock the session once you create/enter the password.
Loading testing sessions using an Excel template allows you to organize one or more sessions for a desired test quickly and efficiently.
To load testing sessions using predefined Excel template, follow these steps:
- Choose the "Load session" option.
- Download an Excel template which you should fill in, by clicking the "Excel template" link.
- Download detailed instructions on how to fill in the template by clicking the link.
- Click the "Select file" button to choose the template you filled in..
- Click on the "Upload" button to add testing sessions into the GetCertified application.
- Click on the "Cancel" button to discard changes.

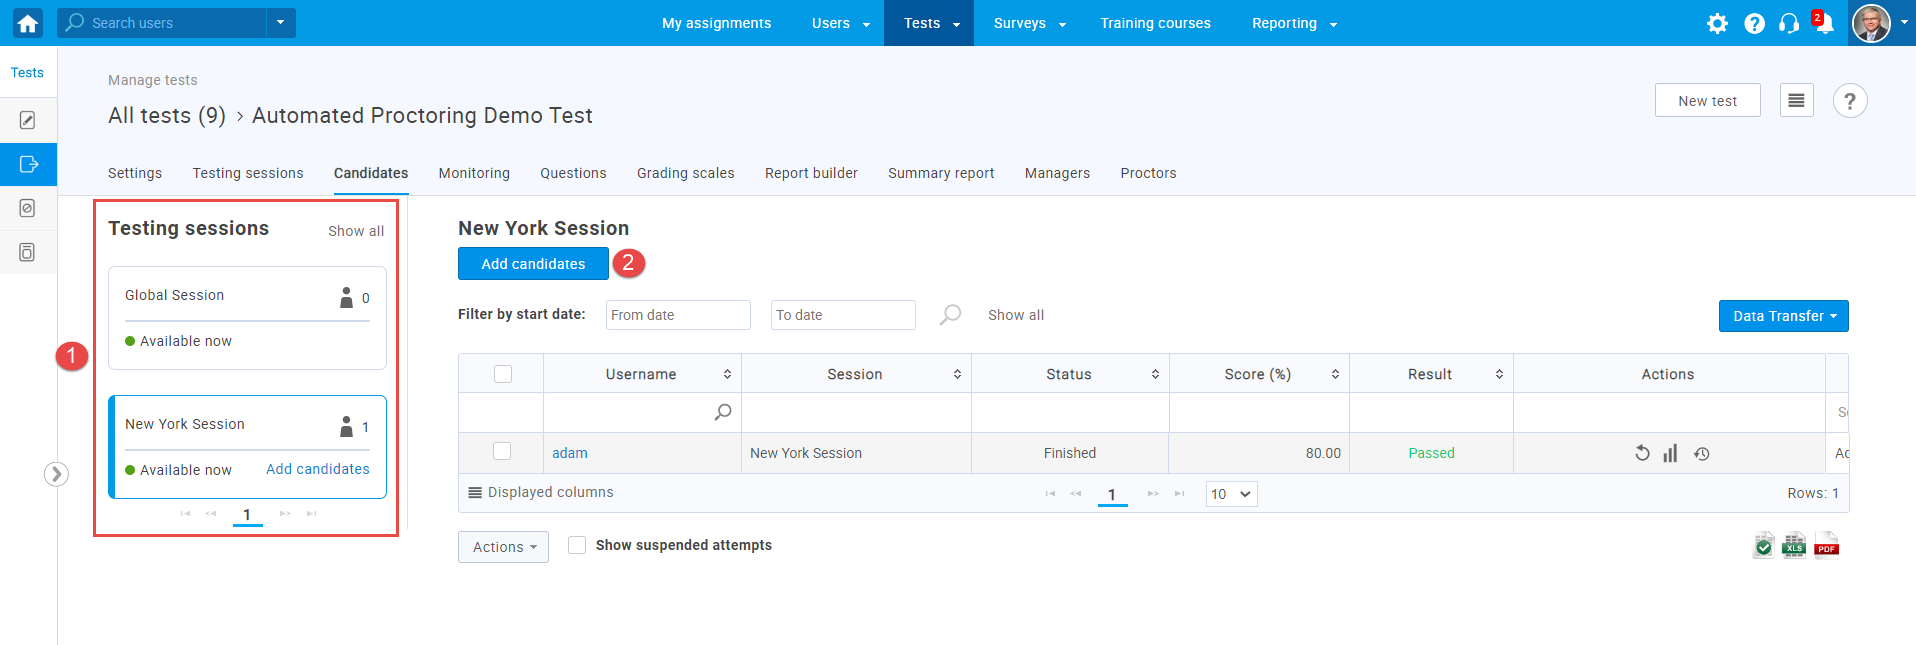
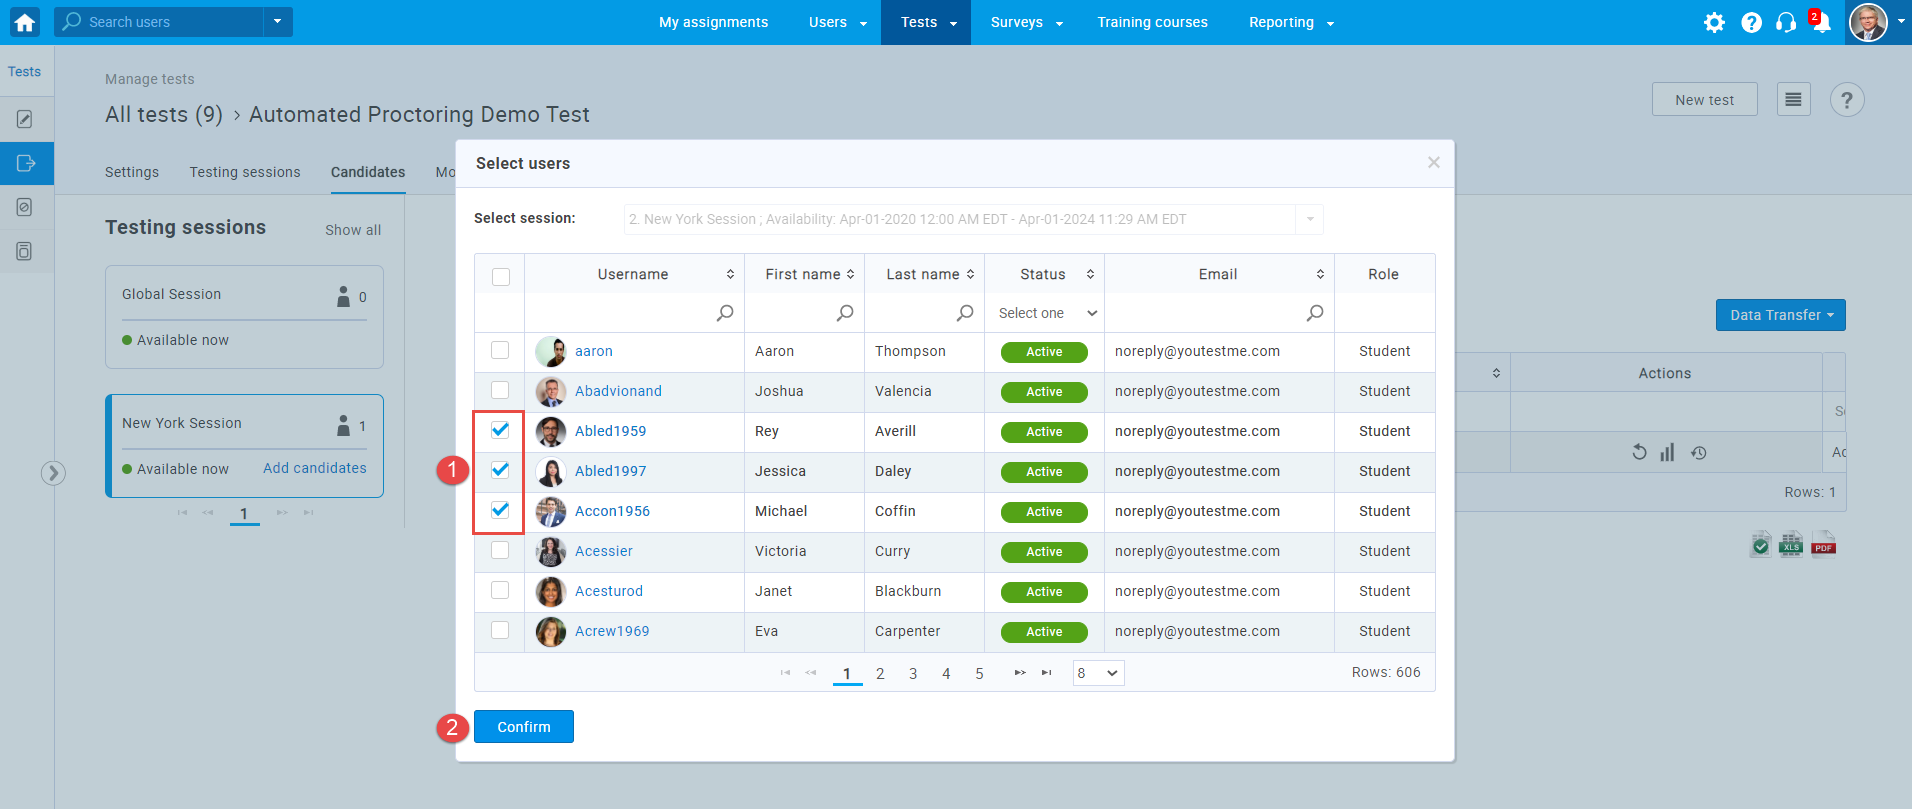
This tab allows you to assign candidates to the testing session. The candidates will be able to access and complete the test within its availability period.
To add candidates to the testing session:
- Choose the session you want to assign candidates to.
- Click the "Assign candidates" button.
After that, a pop-up window will appear where you should:
- Select the users you want to add to the session.
- Click the "Confirm" button.
The assigned candidates will be displayed in the table which contains the following options:
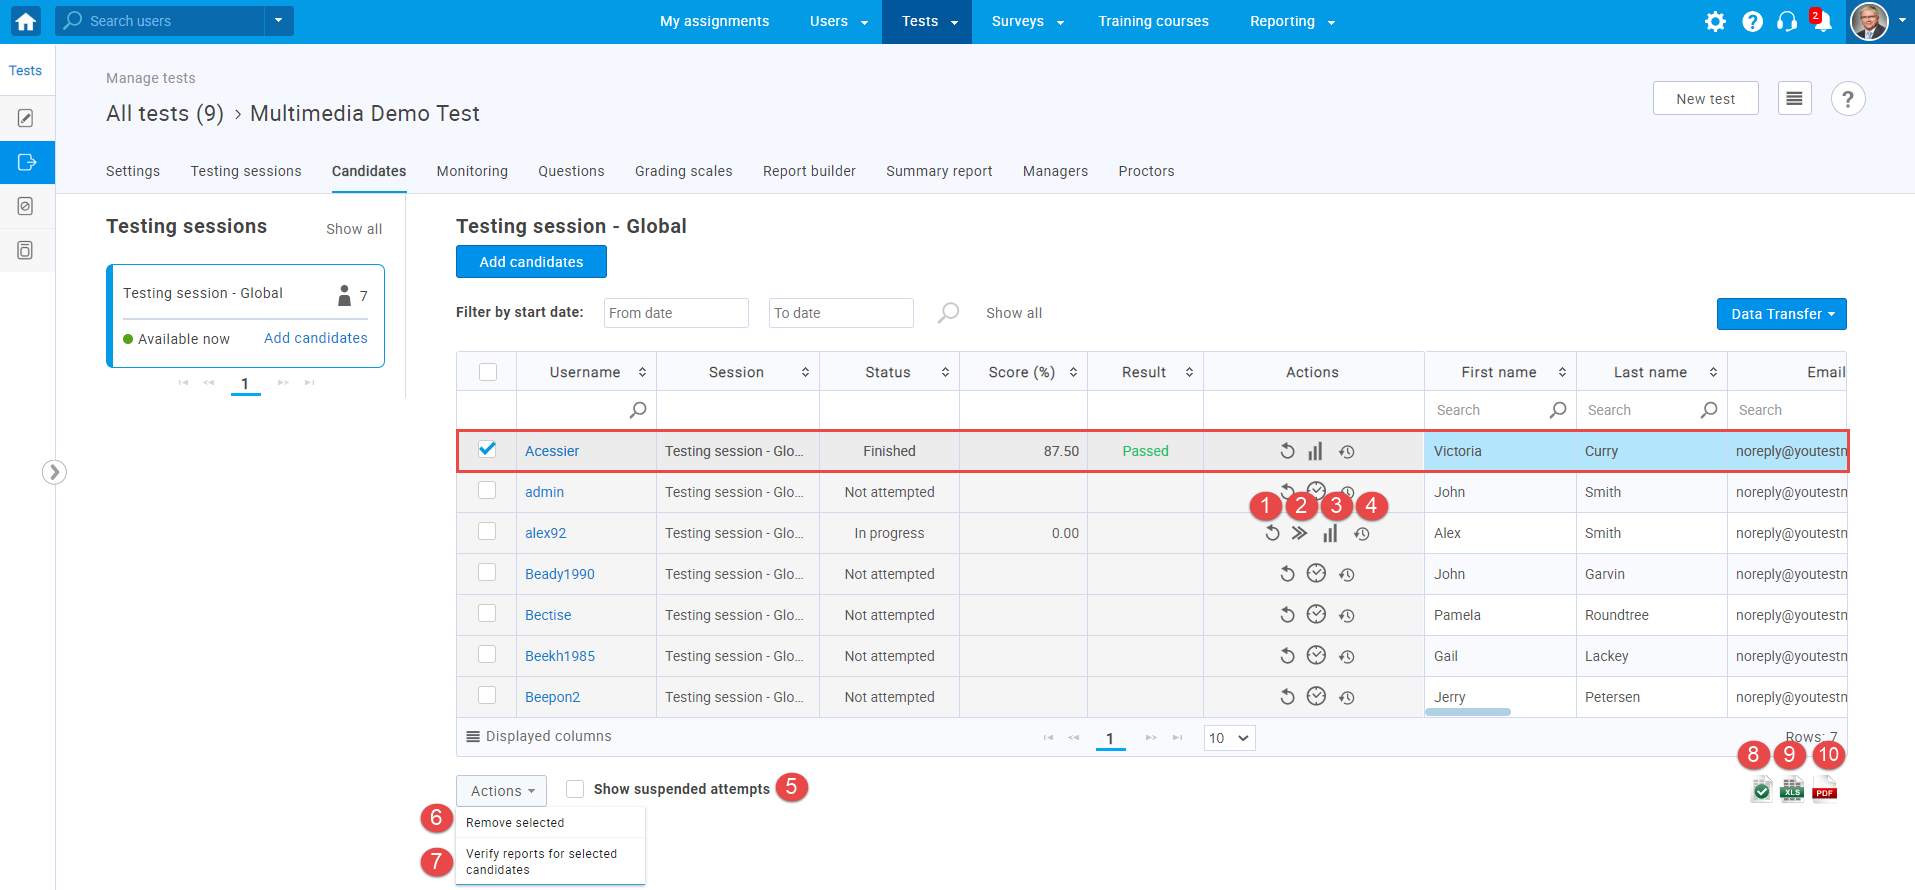
- Clicking this button will reset a candidate's test attempt. That user will be able to do the test again.
- This button is displayed only if the candidate left the test he started. Clicking this button will allow the candidate to continue the test.
- Clicking this button will open the candidate's personal report. There you can see the candidate's result, preview questions and answers, and submit points for manually graded questions. For further information, please visit Personal report.
- This option allows you to preview the candidate's previous attempts. If the candidate has no previous attempts, the icon will not be visible.
- By enabling this option, you will be able to preview the suspended attempts.
- To remove candidates from the testing session, you
should:
- Select the candidates you want to remove, as shown in the picture above.
- Click the"Action" button and choose "Remove selected".
- To verify the candidates’ reports:
- Select the candidates whose reports you want to verify.
- Click the "Action" button and choose "Verify reports for selected candidates".
This option allows you to update the verification date of the candidate's report to the current date. Verification of candidates’ reports allows you to export the Completion status excel file that contains a list of verified users with their verification dates and completion statuses.
- Download the Completion status excel file with a list of verified users with their verification dates and completion statuses.
- Download an Excel file with important information about candidates, their survey-taking attempts, and results.
- Download a PDF file with important information about candidates, their survey-taking attempts and results.
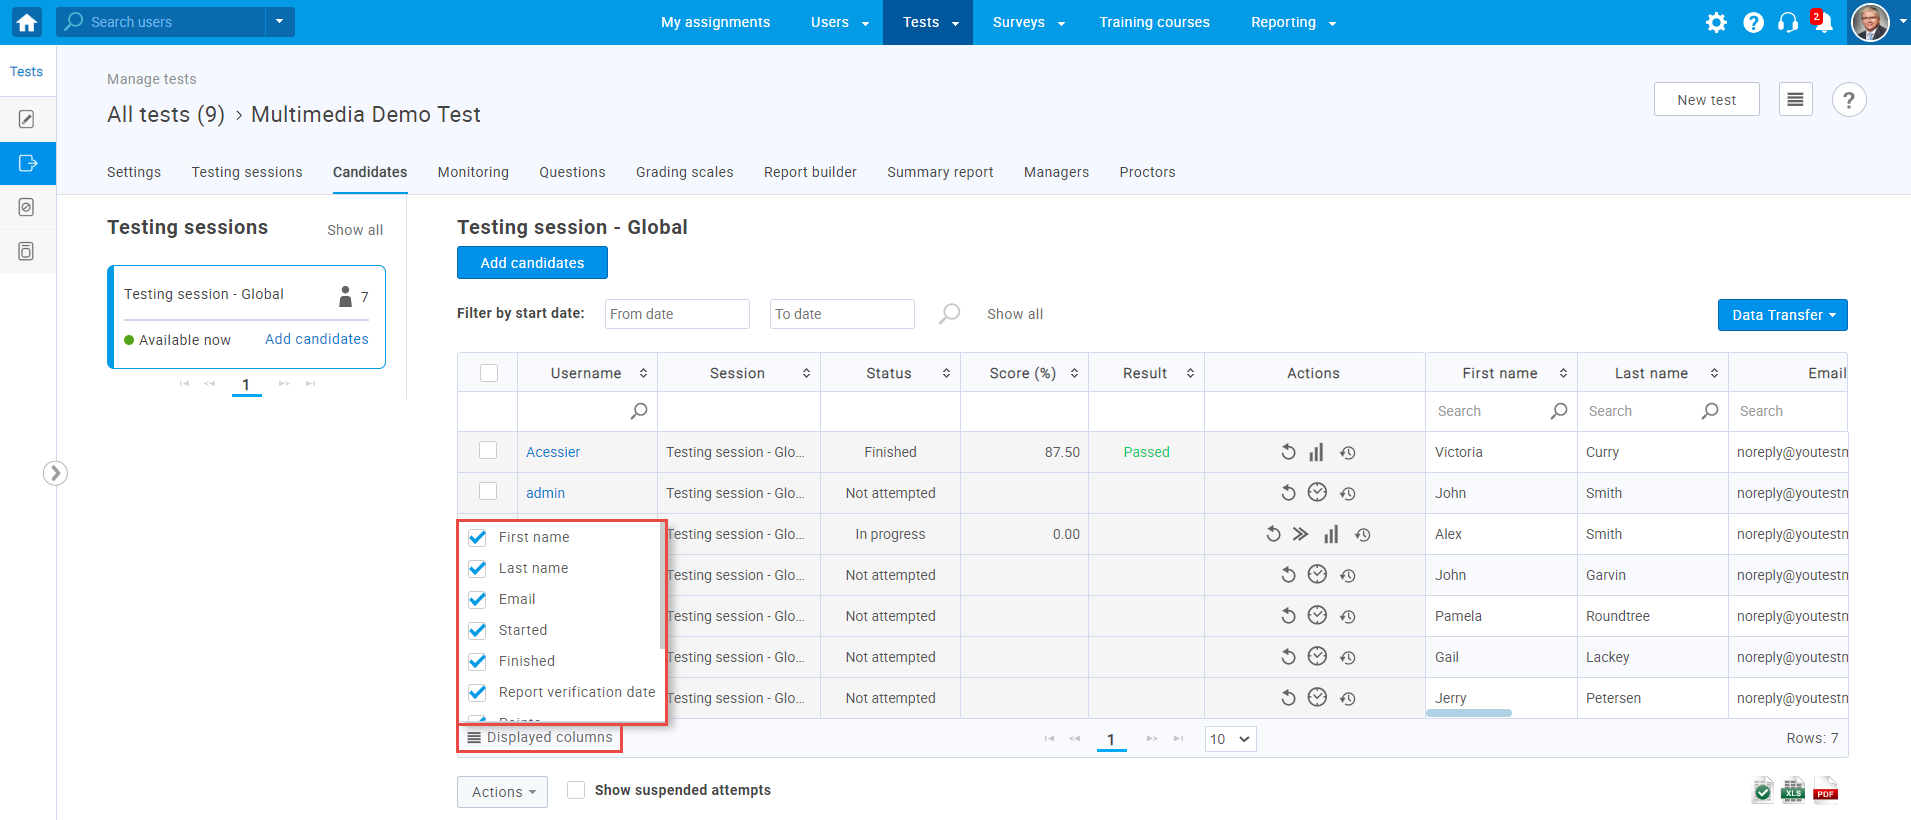
You can choose which columns will be displayed in the table by clicking the "Displayed columns" option.
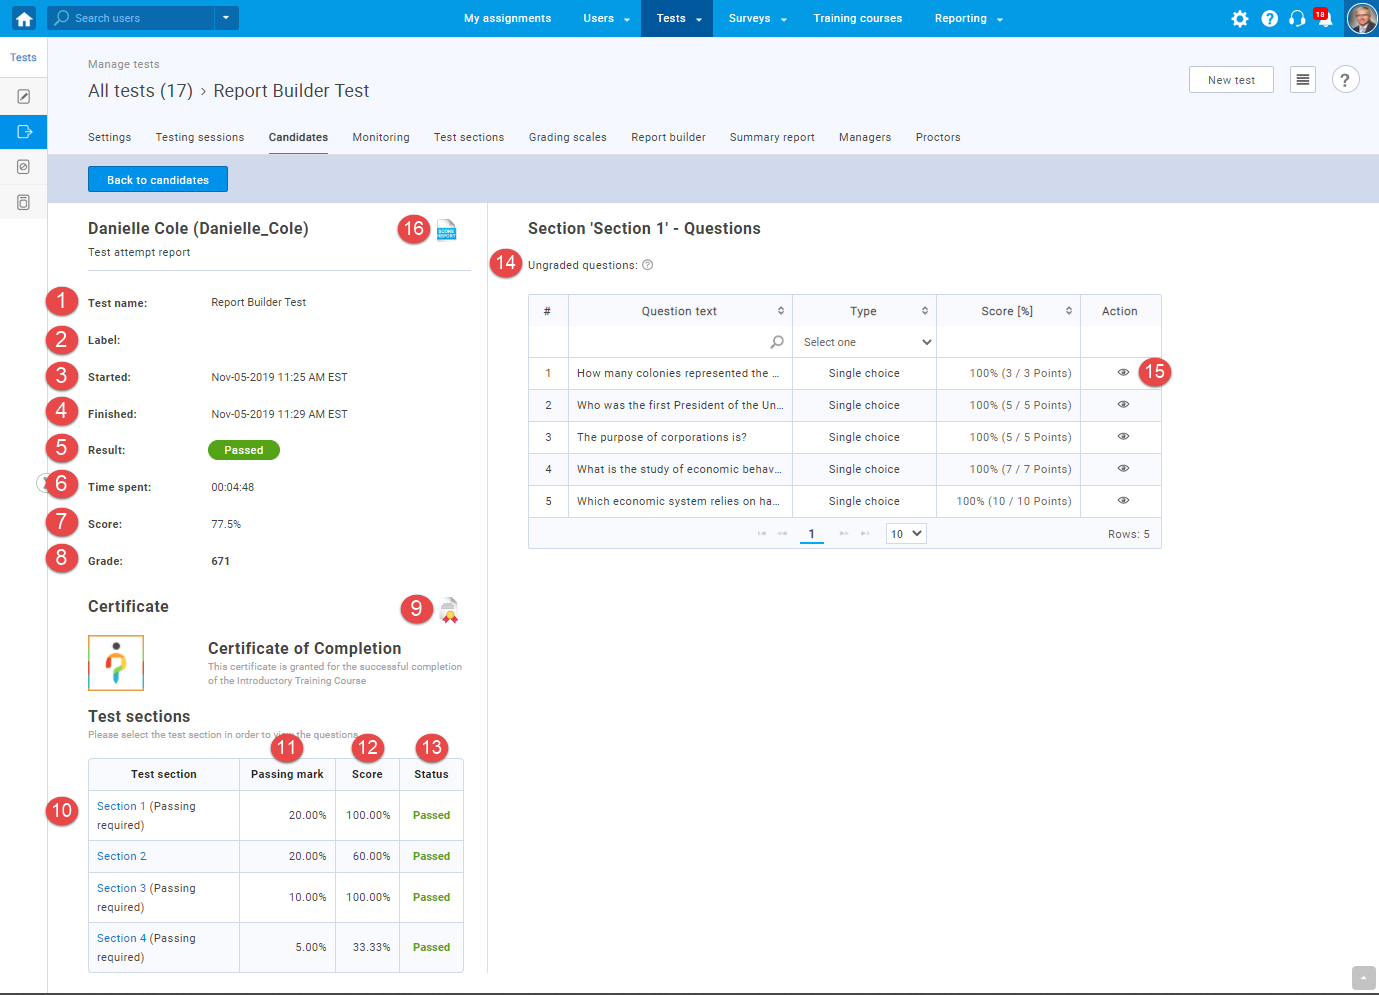
A personal report contains information about the test and the candidate’s success on it.
A personal report can contain:
- "Test name" - the name of the test that the user has completed.
- "Label" - a label used for additional classification. Eg. "Classified", "Confidential"...
- "Started" - the time when the user started the test.
- "Finished" - the time when the user completed the test.
- "Result" - can be "Passed" or "Failed."
- "Time spent" - the total time the user spent doing the test.
- "Score" - the number of points the user earned or percentage of the test he completed successfully.
- "Grade" - the corresponding grade for the earned number of points.
- A certificate the user achieves upon completion. It can be downloaded by clicking the "Export certificate" option.
- The list of test sections (if any). Clicking on a section opens the table on the right, with all questions within the section.
- The percentage needed for passing the section.
- The achieved percentage for the section.
- Information on whether the section is passed or not.
- The list of questions that need to be graded manually.
- By clicking the eye icon, you can see the question details and grade the questions.
- By clicking the "Score report" option you can download the user’s report.
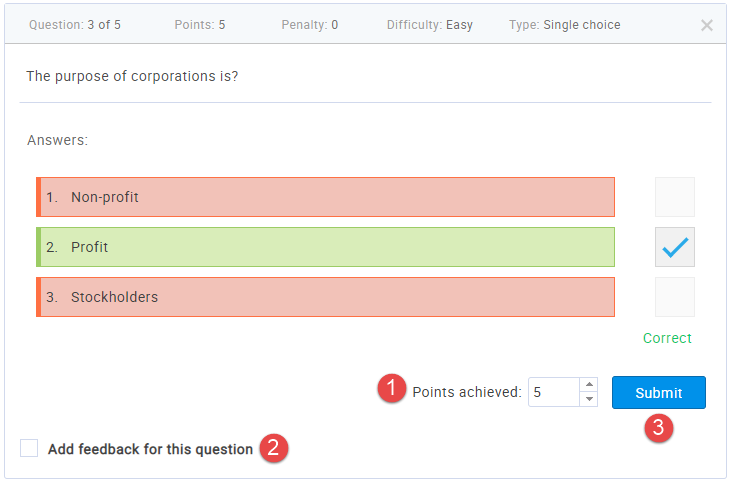
When you open the panel with information related to a specific question, you will be able to see the question text and the answer the user provided. You can also grade the question and give your feedback by:
- Choosing the appropriate number of points in the "Points achieved" field.
- Selecting the "Add feedback for this question" option and entering your feedback in the text field.
- Clicking the "Submit" button.
In case the "Proctoring mode" option is enabled, the report will contain additional fields:
- "Conclusion" - the grade given by the proctor.
- "Face match" - grades how much the face photographed at the beginning of the test matches the face of the user who took the test.
- "Credibility" - grades how much the user behaved appropriately. During the test, the system records all suspicious movements (the user looked down, talked to someone, etc.) that may affect this percentage. However, this grade does not have to affect the test result, since the proctor makes the final judgment upon reviewing the recording.

The monitoring tab contains basic monitoring options such as users' progress,
score, time spent on each question, and their answers.
GetCertified also offers the automated-proctoring solution
where the system automatically monitors the test-taker using behavioral trackers.
For more information,
please see
Proctoring settings.
In the "Monitoring" tab, you can pause the session for a user during test-taking and write the reason for the pause. The user will see the message you have provided and will not be able to continue the test as long as the session is paused. To do so:
- Choose the session you want to pause by clicking on it in the left side menu.
- Click the "Pause" button and enter the message.
Once you pause the session, the "Resume session" button will appear. Later, you can continue the session by clicking this button.
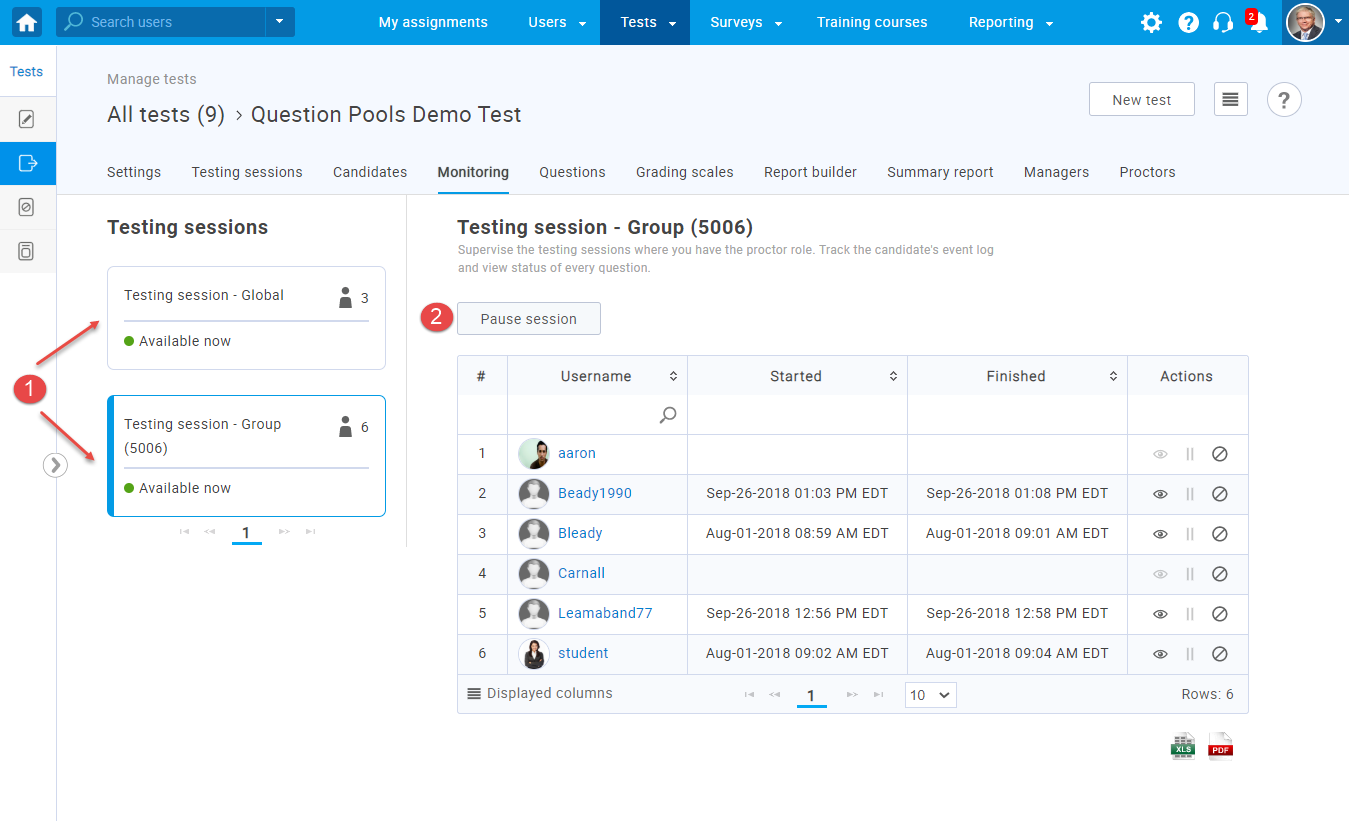
All monitoring options are explained below:
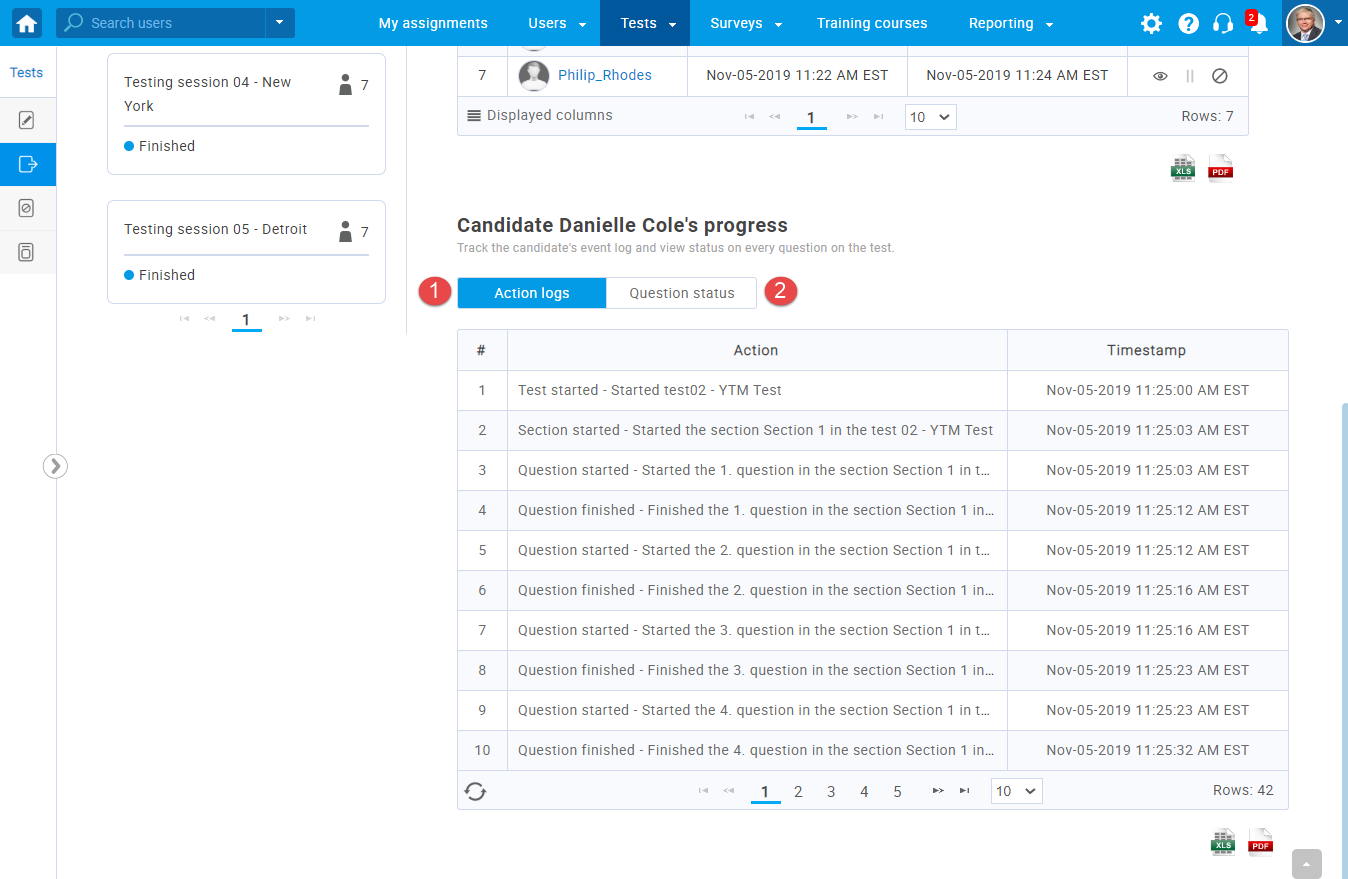
- The "Details" button allows you to view the progress of a particular user. By clicking this button, you can track the candidate's event log and view the status for each test question.
- The "Pause" button allows you to pause the test for each candidate separately. You can also send a message to the candidates with an explanation for test pausing.
- This option allows you to prohibit a candidate from taking the test. To allow the candidate to take the survey later on, click again on the same icon. Note that the candidate will remain on the list of candidates, but that his access to the test will be suspended.
- This option allows you to download an Excel file with each user's start and finish time of test-taking.
- This option allows you to download a PDF file with each user's start and finish time of test-taking.
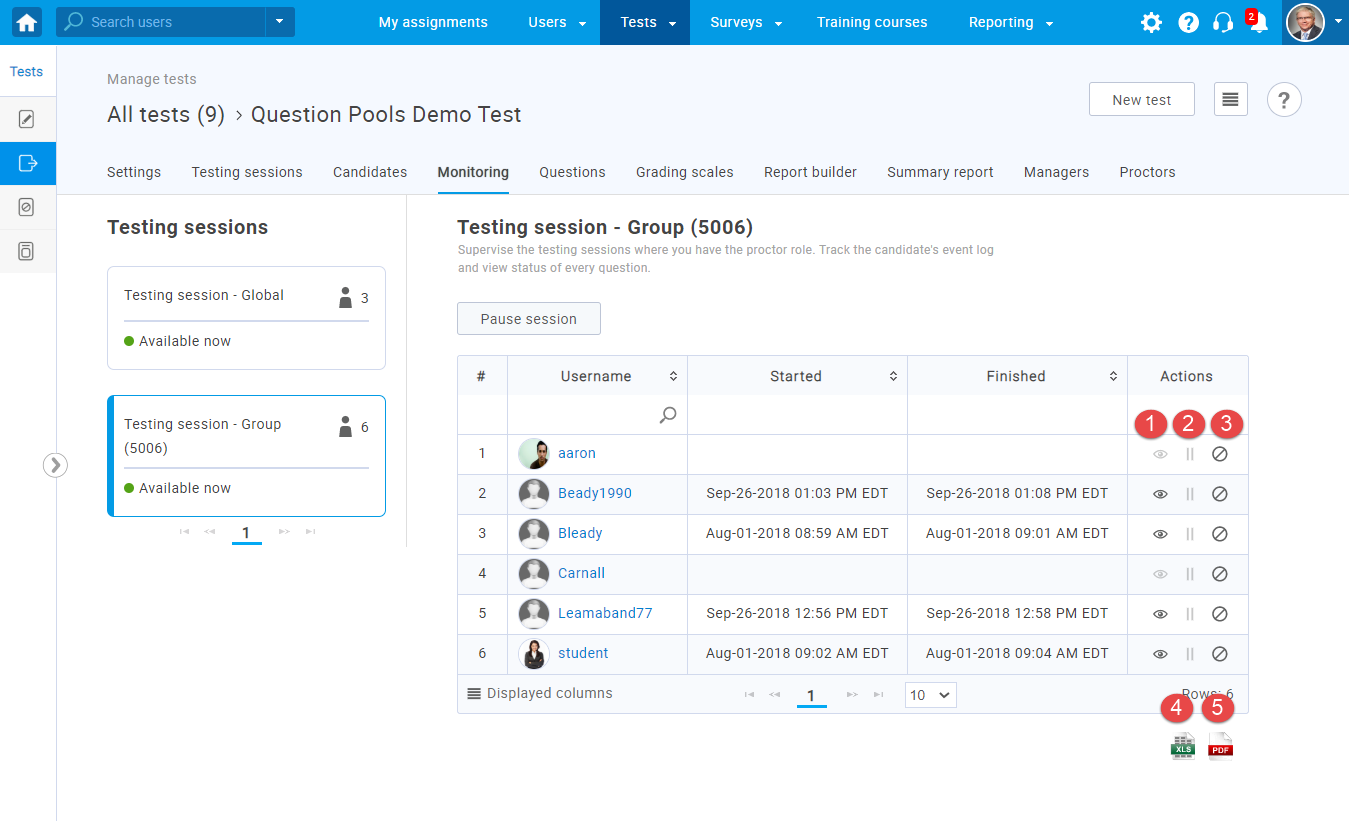
If you click the "Details" icon to view a candidate’s progress, the following options will be available:
- "Action logs" - all actions with timestamps for this survey attempt will be displayed.
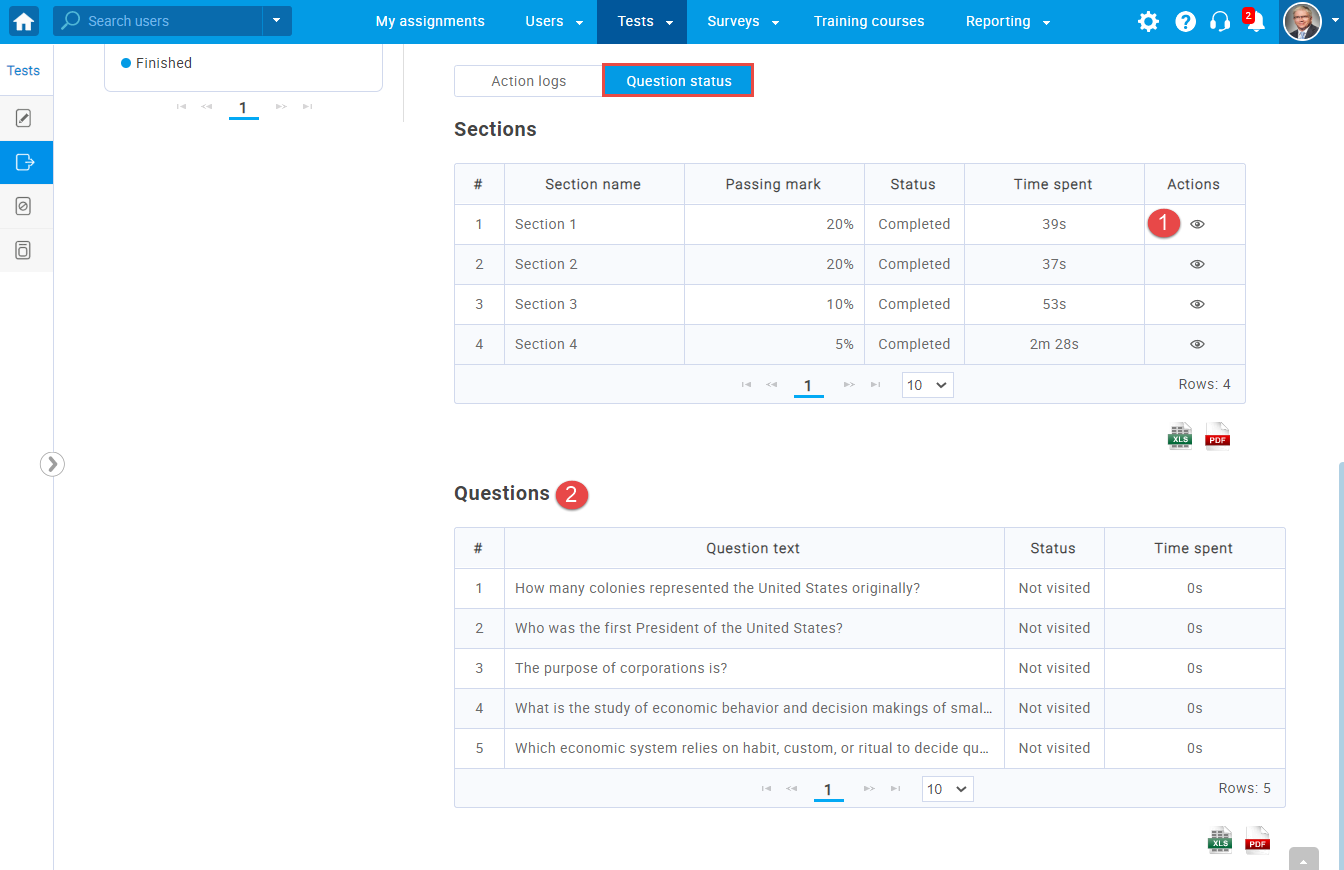
- "Question status"- shows the time a user spent on each question.
If the test has more than one section, you can view the time a user spent on each section, and the time spent on each question within the section.
When clicking the "Question status" option:
- Choose a section by clicking the "View section progress" option in the Action column.
- A table with the statuses of all questions within the selected section will appear.
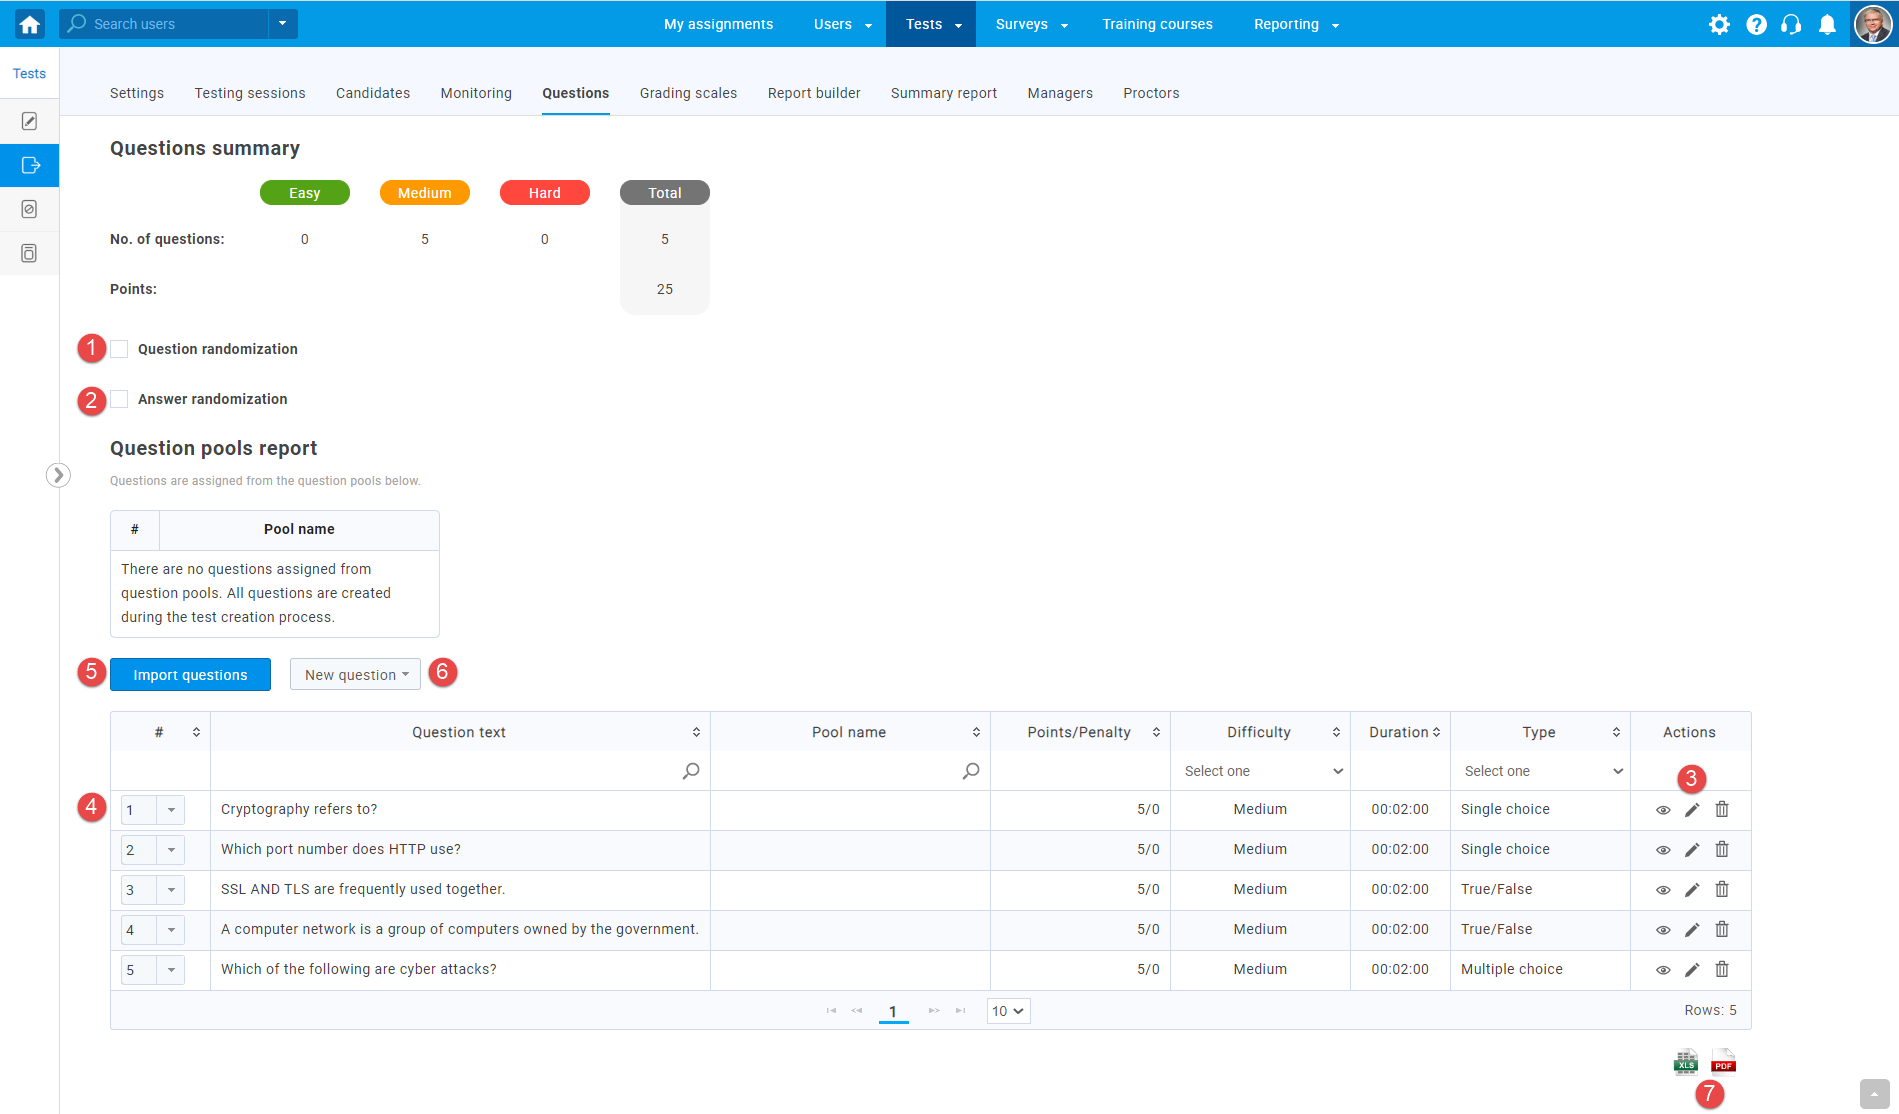
In the "Questions" tab, you can view and edit the test questions. If the test has not been published yet, you can still add, modify, or remove questions from the test. After publishing, such modifications are no longer possible.
- Test not published
If the test is not published, the following options are available:
- Randomize the order of questions. Each user will get questions in a different order.
- Randomize the order of answers for each question. Each user will get a different answer order for the same question.
- These options allows you to preview, edit or delete added questions.
- Make a different order of the questions by changing the number in the field.
- Clicking the "Import questions" button, you can add additional questions from pools (groups of questions). You should choose the desired pool and select the questions you want to add.
- Clicking the "New question" button allows you to add new questions into the test manually. For more information on how to create each question type, please visit Question types.
- Export the list of questions as Excel/PDF file.
- Test published
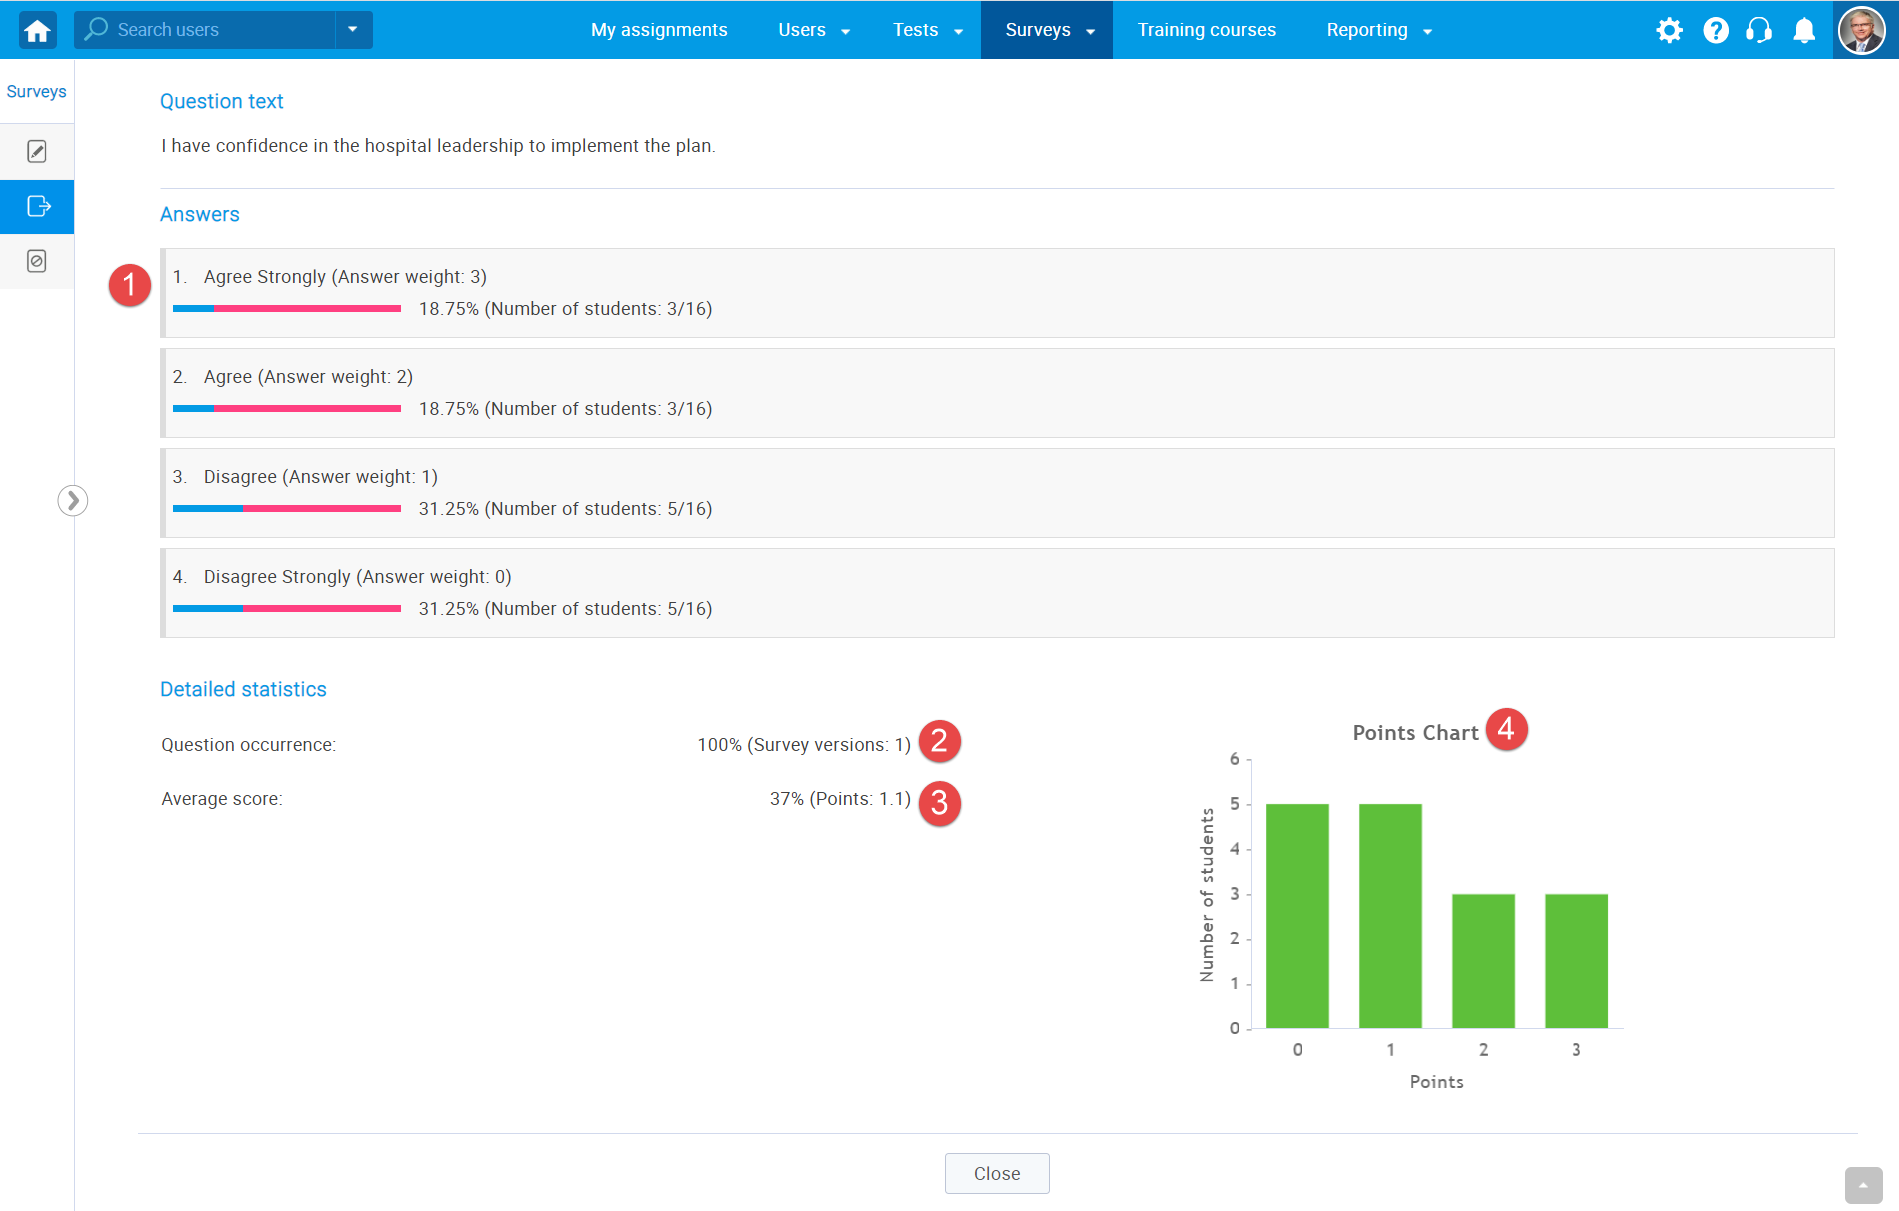
If the test has been published, you can examine the statistics for each question by clicking the "Details" icon in the "Action" column.
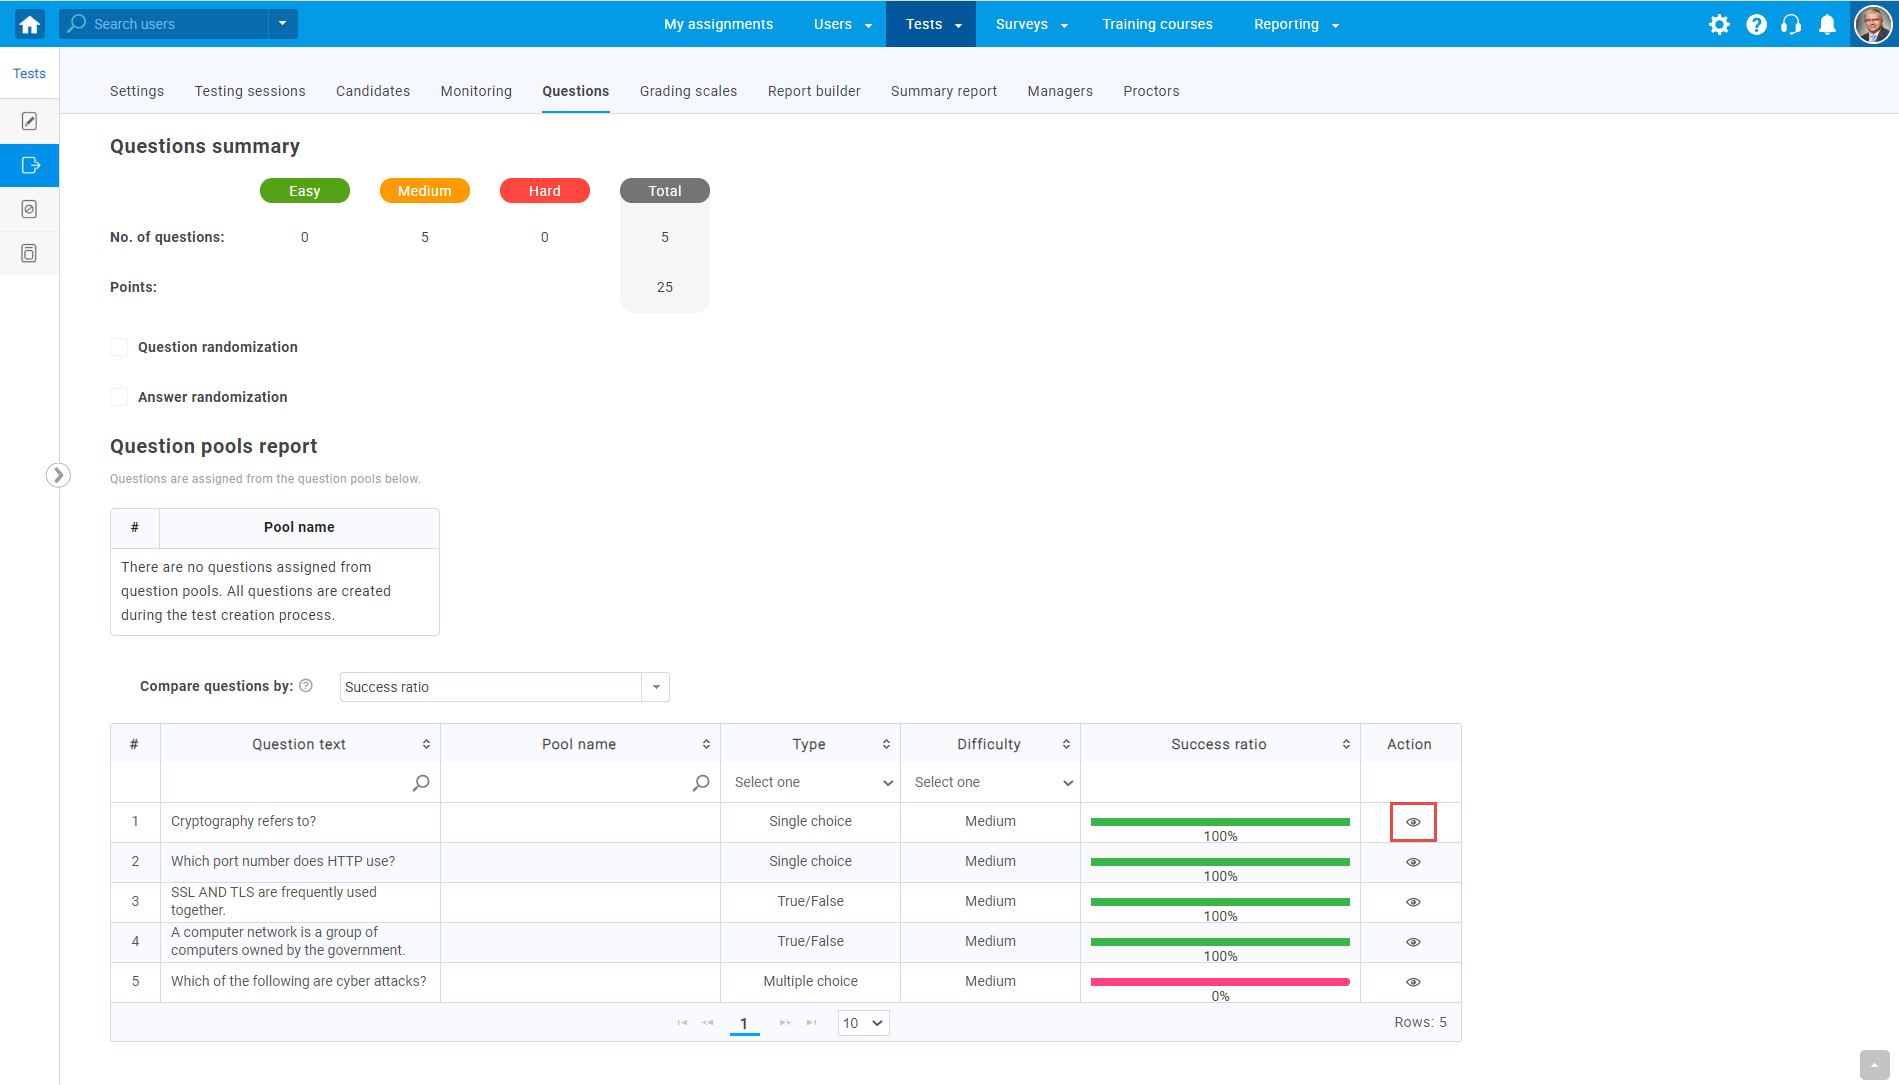
This will allow you to see detailed information about the selected question:
- The number of students who chose each answer out of the total number of students who took the test.
- The number of test versions(with different combinations of questions).
- The average number of points scored on this question.
- Graphic representation of the number of students who achieved each possible score.
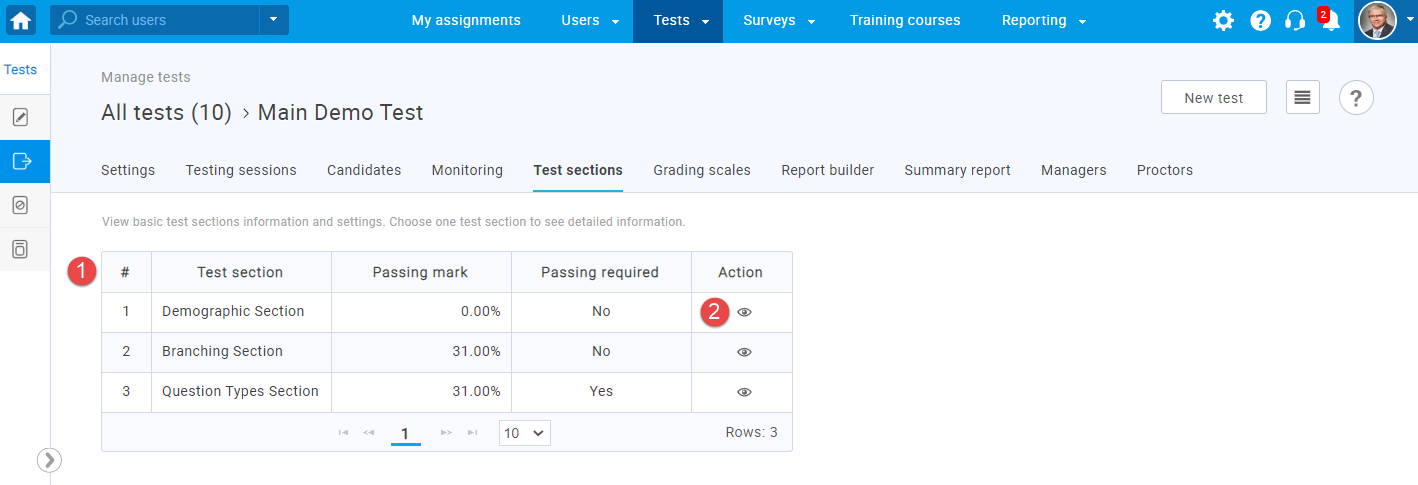
In the "Test sections" tab you can see the information regarding the test sections you created.
- In the table, you can see information about each section- its name, passing mark, and whether it is required to pass it in order to pass the test.
- Click the "Details" option in the "Action" column to edit the test section settings.
Note! If the test is published, you cannot edit questions within test sections. You can only see each question’s statistics.
To see how to edit the section settings, please visit the Test settings.
The test manager can edit test settings, add new candidates, proctors and managers, create test sessions, and monitor the progress of each candidate. Also, a manager can create test reports and view question's statistics.
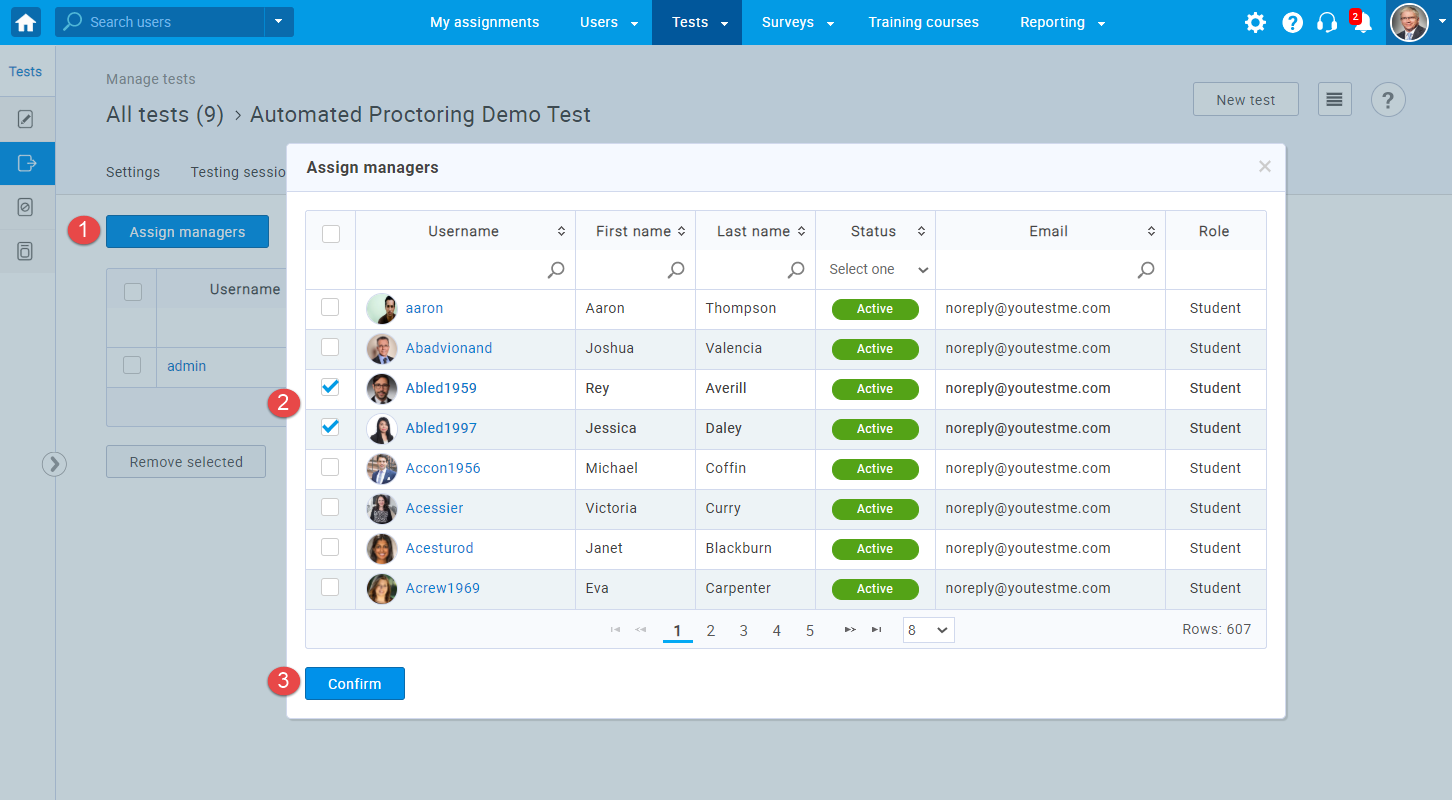
To add new managers, follow these steps:
- Click the "Assign managers" button.
- Select the users that you want to add.
- Click the "Confirm" button.
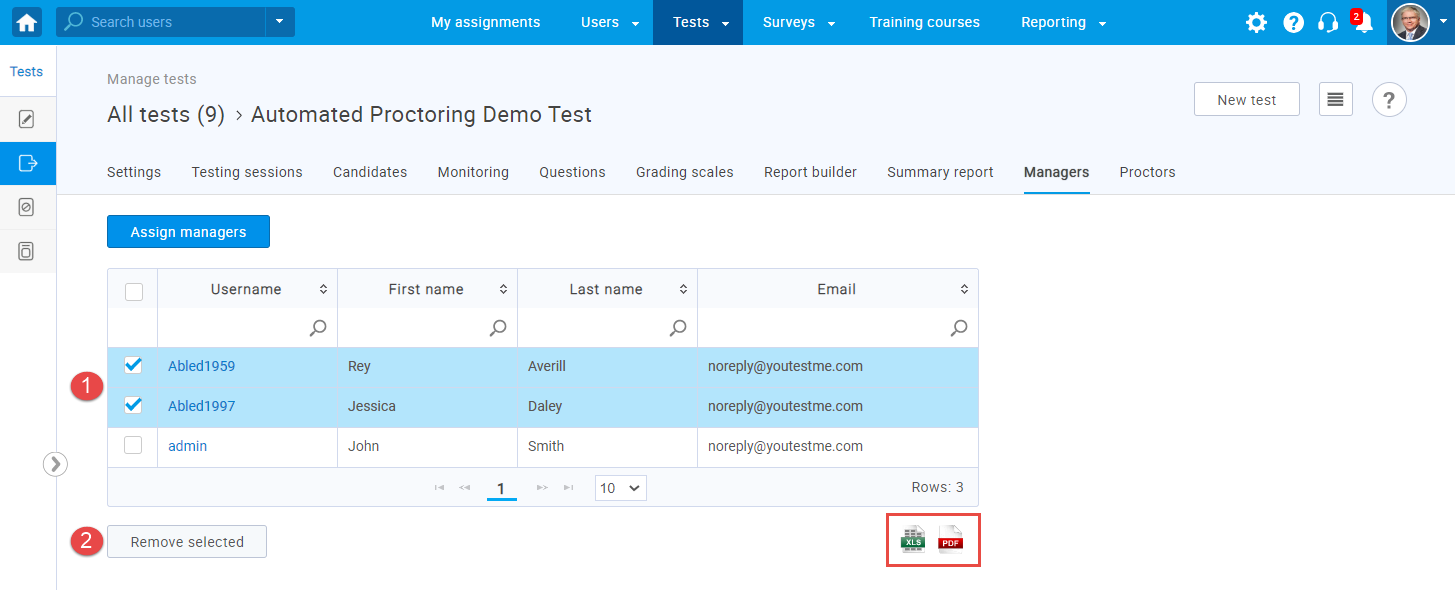
By clicking the "Export as Excel" or "Export as PDF" button, you can download the list of managers.
To delete the existing managers, follow these steps:
- Select the users that you want to remove.
- Click the "Remove selected" button and accept the deleting in a confirmation dialog.
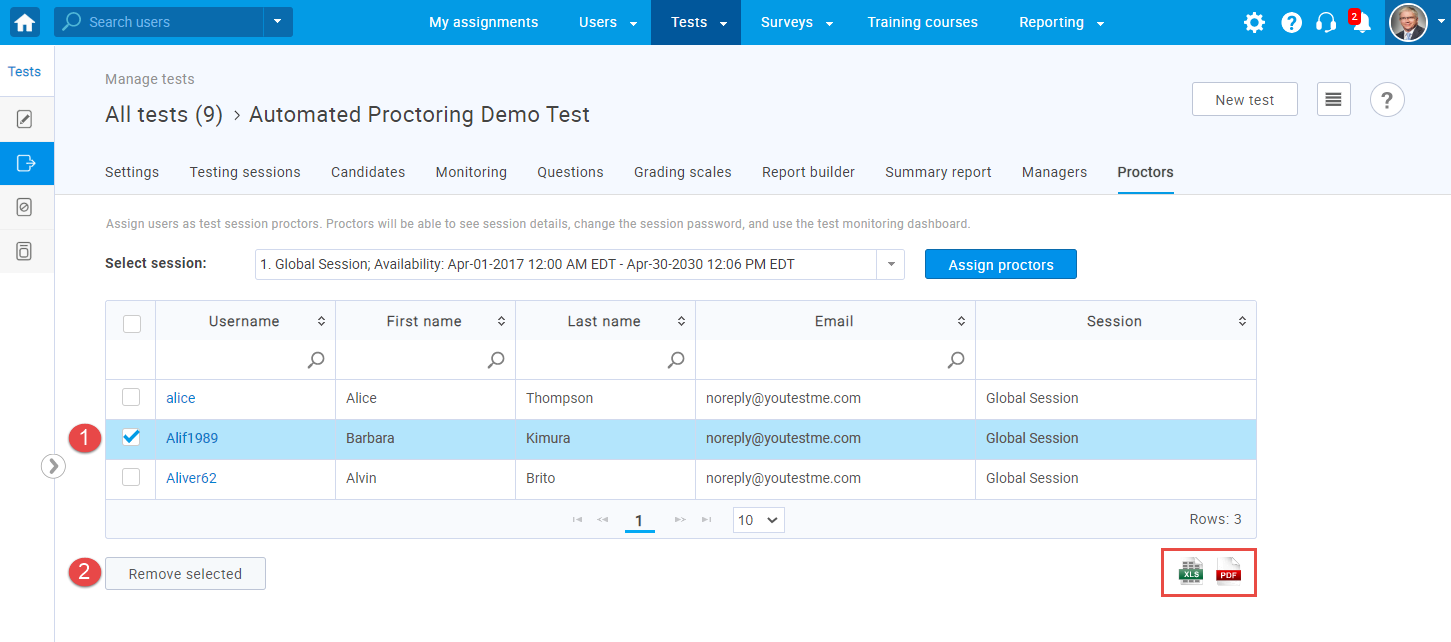
In this tab, you can assign or remove the users as proctors. The user who has the default "Proctor" role or who is assigned as a test proctor will only be able only to monitor the candidates' progress, while a manager can edit the test, create new sessions, etc.
A proctor can monitor the candidates' progress in the "Monitoring" tab and view previous attempts, candidates' report or allow test retaking in the "Candidates" tab.
If a user does not have all proctor permissions (less than the default Proctor role), he can not monitor the test.
If you want a proctor to have more permissions, you can create a new proctor role or update the existing one. For more information on how to create and edit user roles, please visit Roles and permissions.
To add a new proctor, follow these steps:
- Select the session you want to add a proctor to.
- Click the "Assign proctors" button.
- Select the proctor you want to add.
- Click the "Confirm" button.

By clicking the "Export as Excel" or "Export as PDF" button, you can download the list of proctors.
To remove a proctor, follow these steps:
- Select the users you want to remove.
- Click the "Remove selected" button.
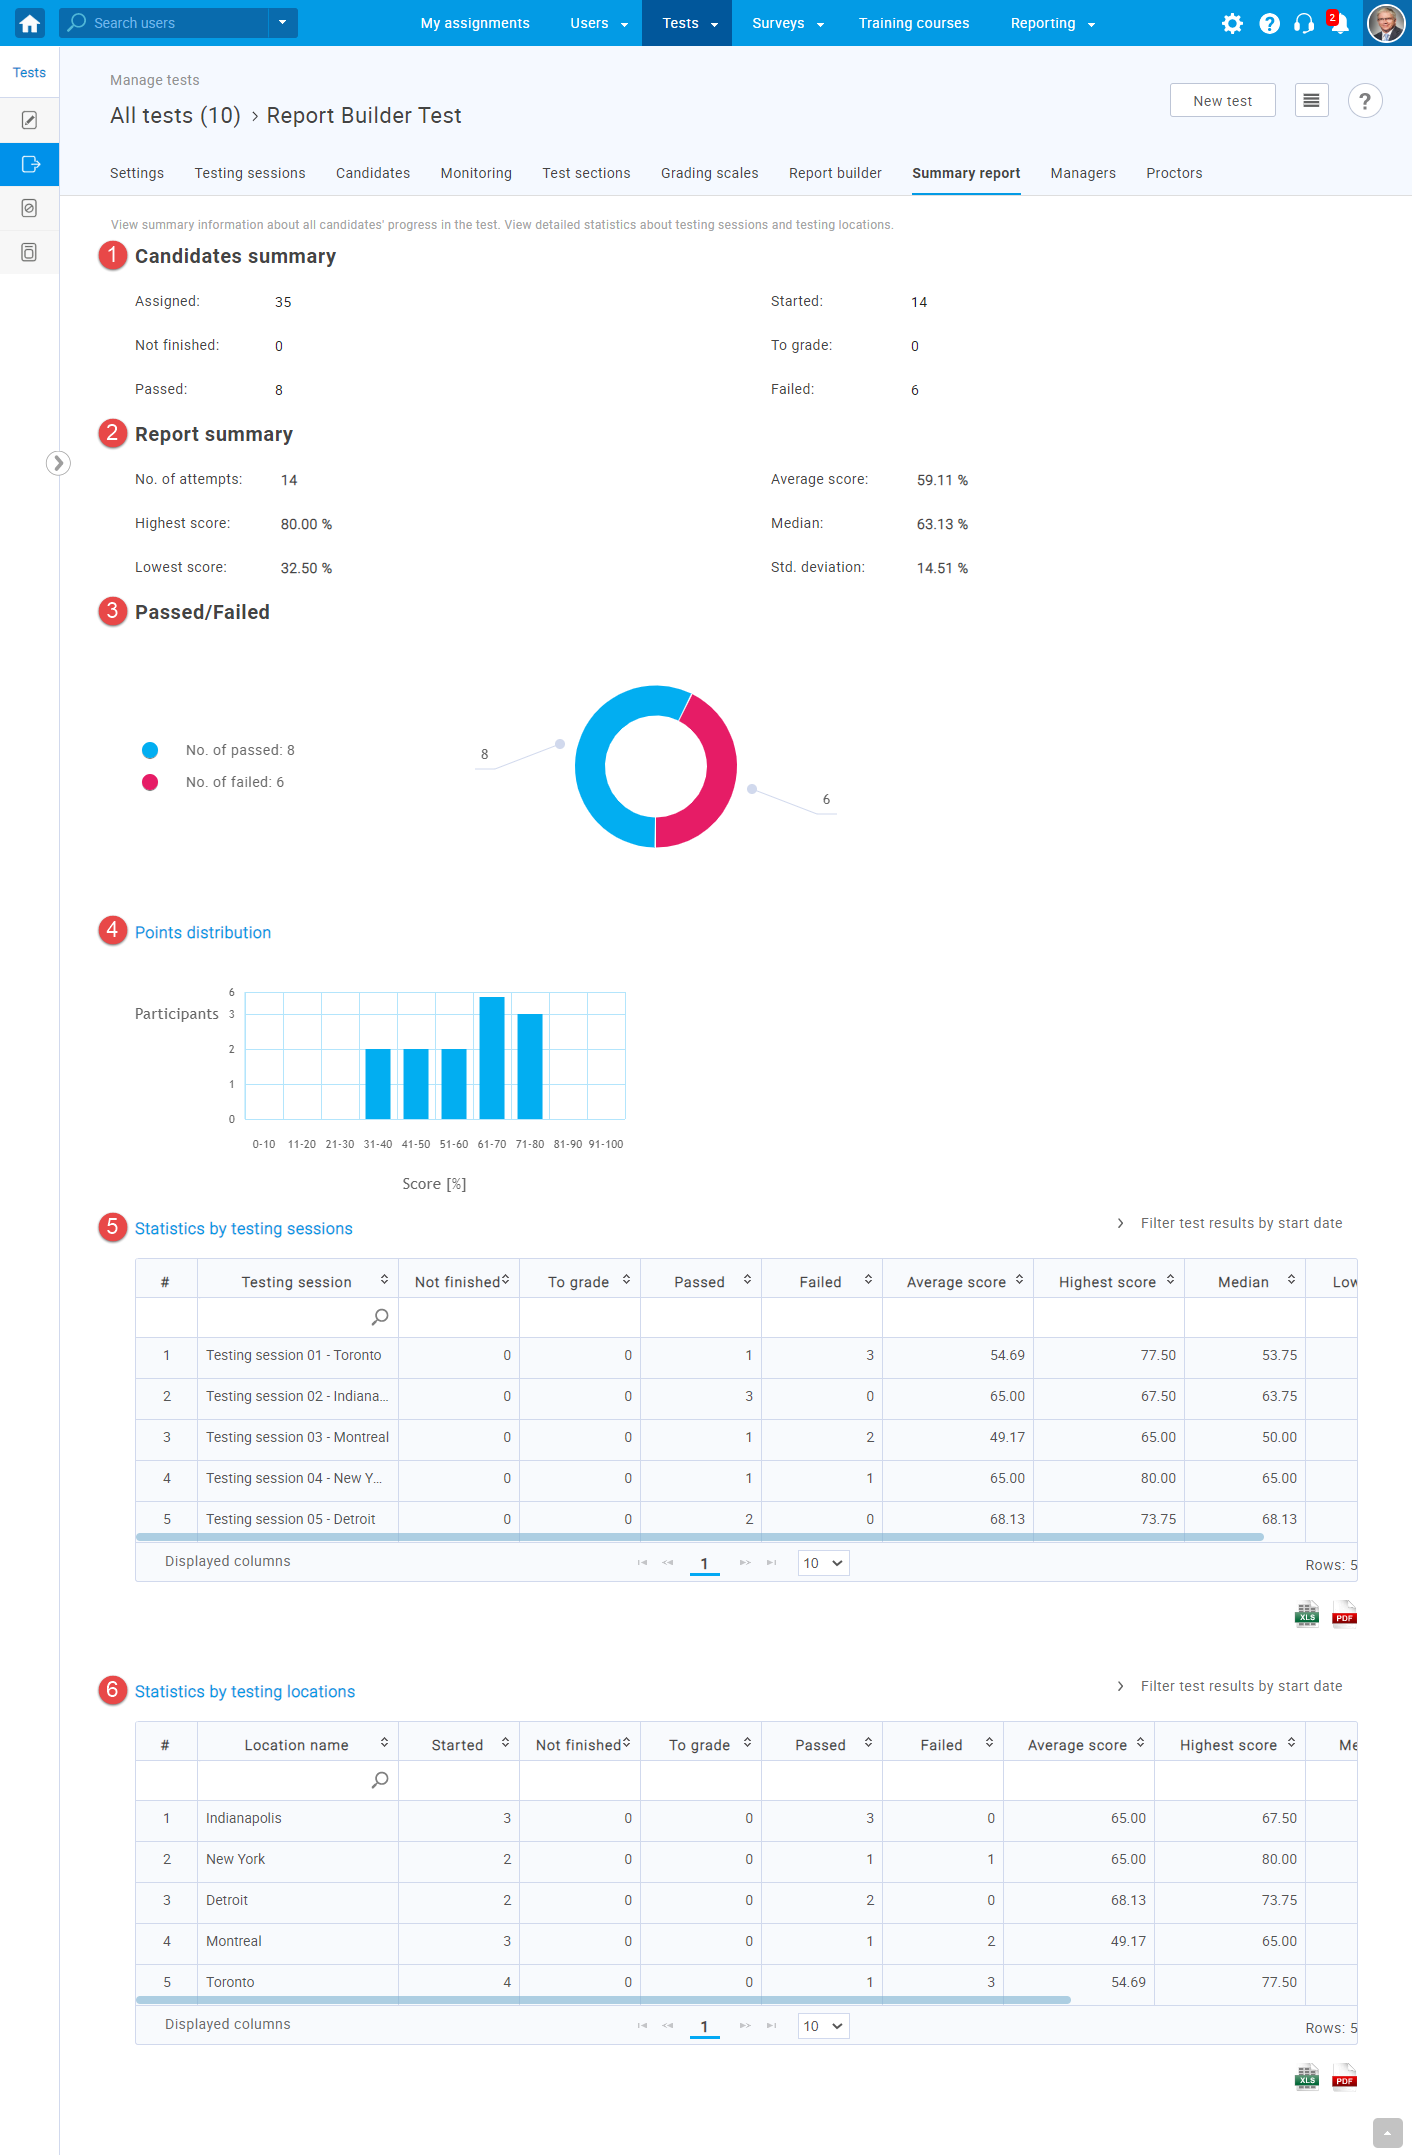
The Summary report section displays basic information related to test attempts. It is divided into six sub-sections:
- Candidates summary - shows the total number of candidates, numbers of candidates that started the test, candidates that didn't finish the test, candidates need to be graded, and candidates who pass/fail the test.
- Report summary - displays the number of attempts, average, highest and lowest score, median and standard deviation.
- Passed/Failed - graphical representation of the ratio between the number of test-takers that passed the tests and that failed the test.
- Points distribution- a graphical representation of the number of candidates whose score was in each of the ranges.
- Statistics by testing sessions.
- Statistics by testing locations - if one location is in multiple sessions, the total score for that location will be displayed.
The "Grading scale" panel allows you to configure points/percentages necessary for passing the whole test, each section, section group, and question pool. Also, you can choose an adequate scale to display the test results in a standardized way, e.g. on a scale from A to F.
On this page, you can:
- Choose the passing mark to be in percentages or points.
- Set the passing mark to the desired value.
- Make the passing mark inclusive (candidates will pass the test if they gain a score that is equal to or greater than the passing mark).
- Select the previously created grading scale from the dropdown menu.
- See the list of all question pools used in the test, by clicking "Show question pools report setup"
- Edit the passing mark for each question pool separately (this passing mark will not affect the test passing mark and is used mainly for organizational and reporting purposes).
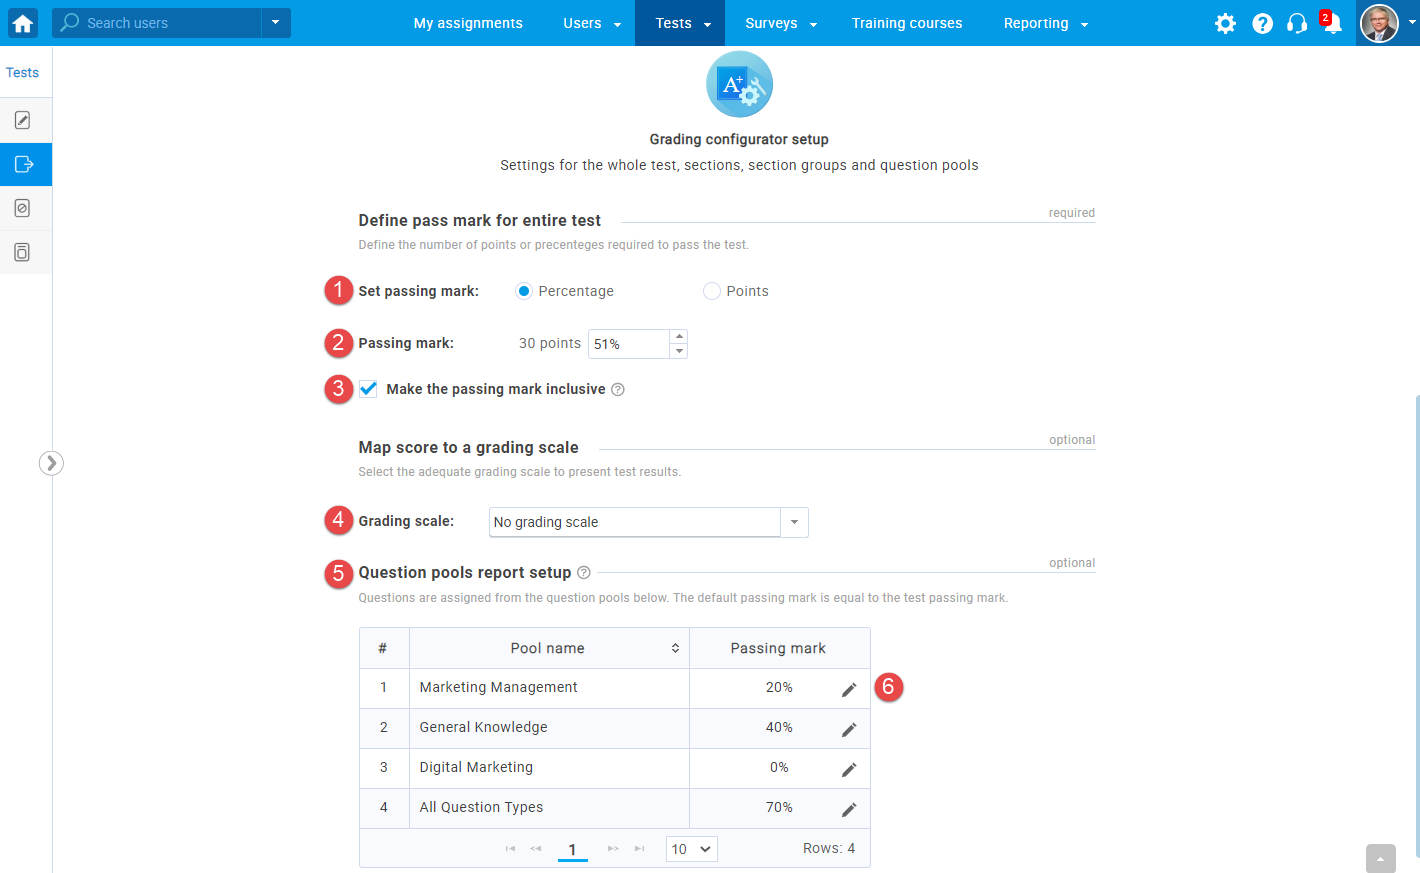
Note: A grading scale can be changed while the test is in the draft version. Once you publish the test, it is no longer possible to modify the scale.
Grading in the test with sections is configured in the same way as in the test without sections. To see the instructions, please visit Grading scale.
Additionally, a table with the list of all test sections will be displayed. Here you can:
- Drag and drop the table rows to reorder the sections.
- Edit the passing mark for each test section separately and check the "Passing required" option if the passing of the section is required for passing the test.
- See the list of the created test section groups.
- Create a new section group.
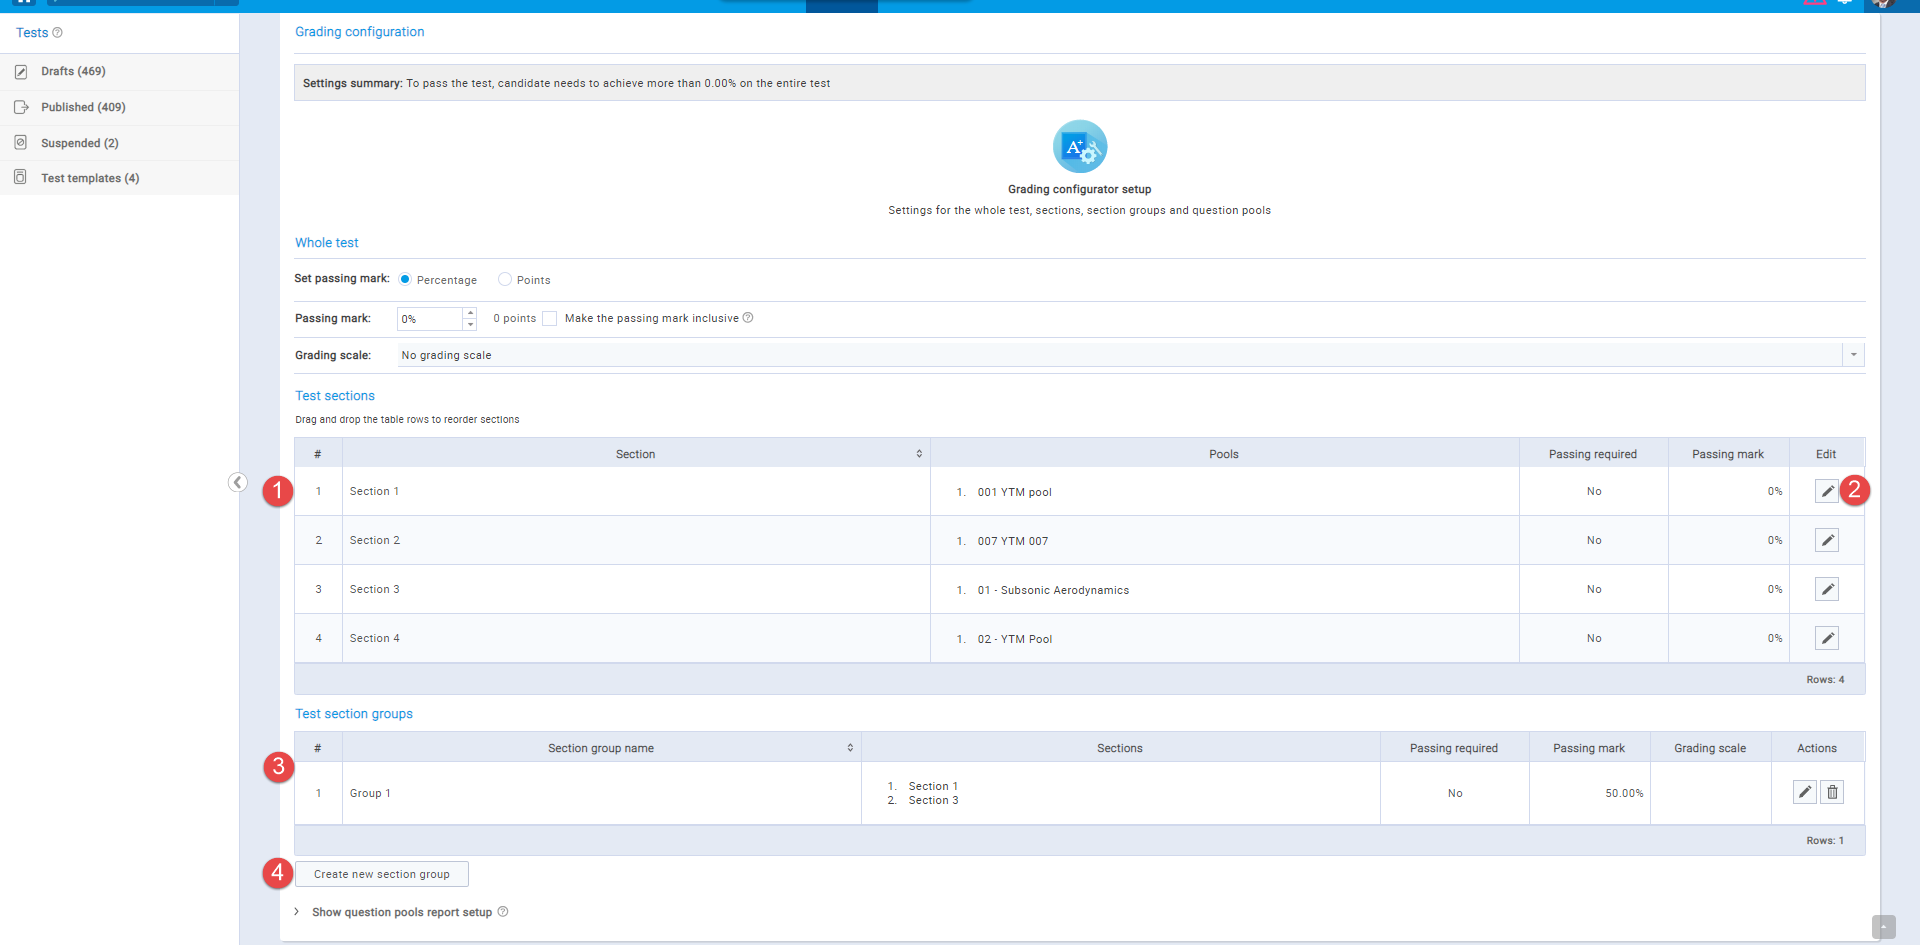
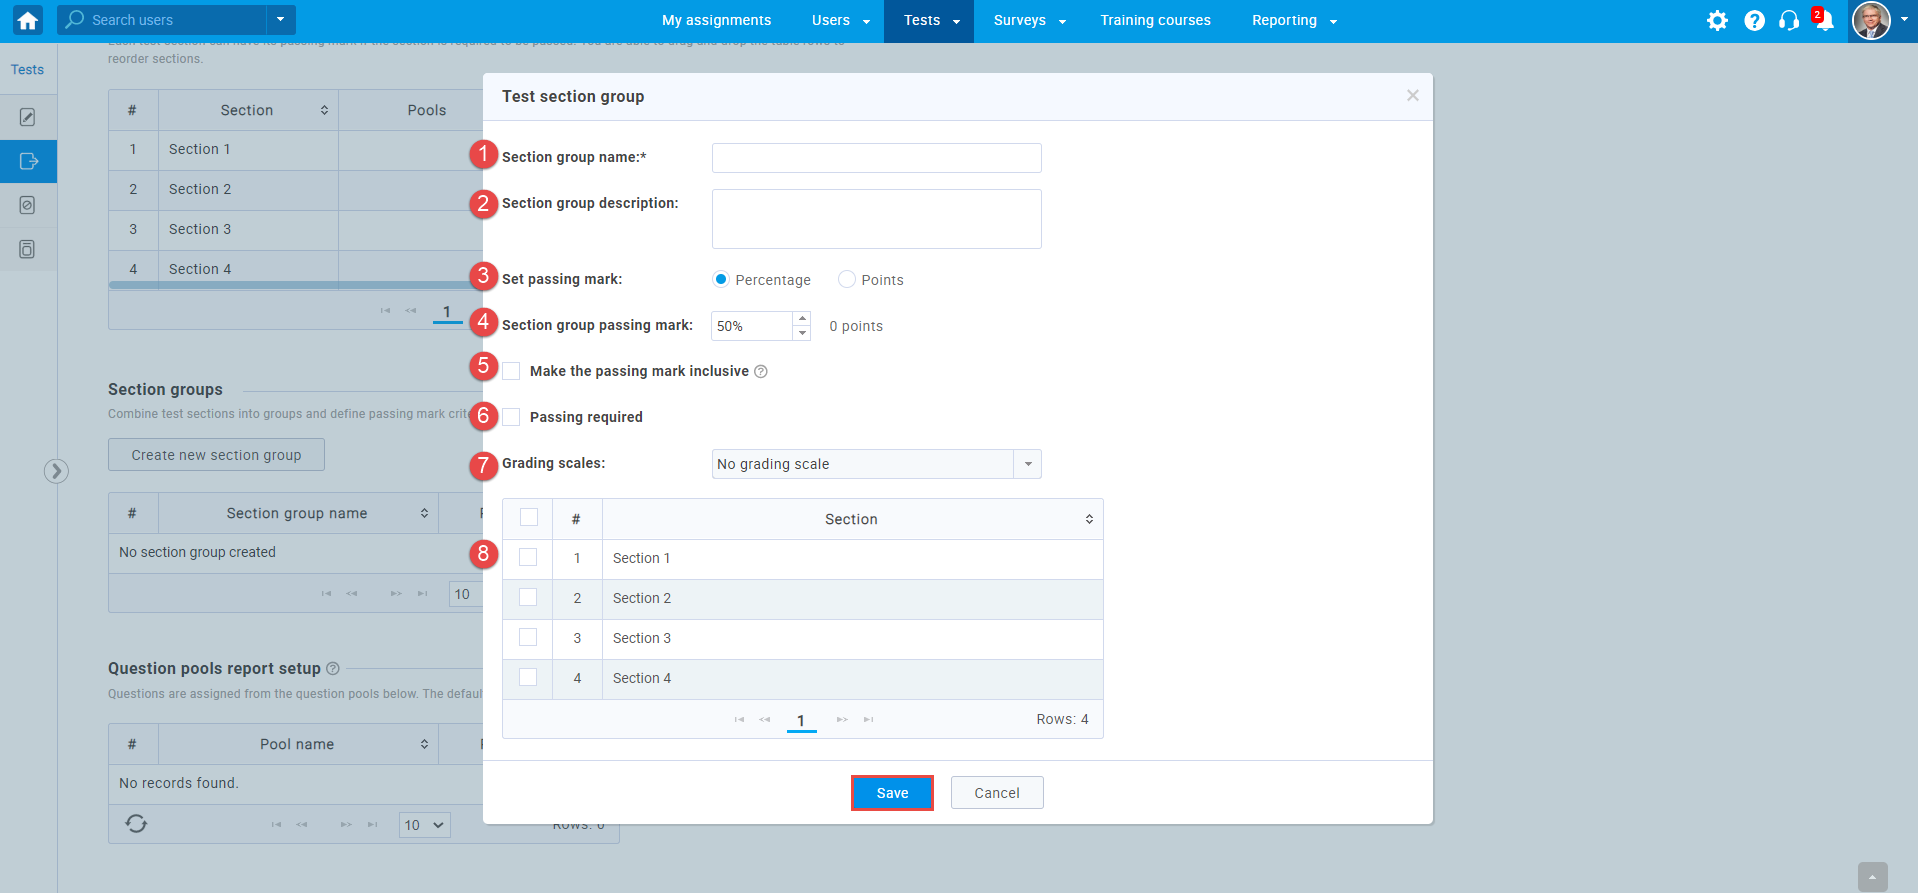
Creating section groups allows you to combine the sections and configure the grading options for that group collectively. When you click the "Create new section group" button, in the new window you can:
- Set the section group name.
- Set the section group description to give more information about the section group.
- Choose the passing mark to be in percentages or points.
- Set the passing mark to the desired value.
- Make the passing mark inclusive (candidates will pass the test if they gain a score that is equal to or greater than the passing mark).
- Check the "Passing required" option if the passing of the section group is required for passing the test.
- Select a previously created grading scale from the dropdown menu to display the test results in a standardized way, e.g. on a scale from A to F.
- Select which test section(s) to include in the section group.
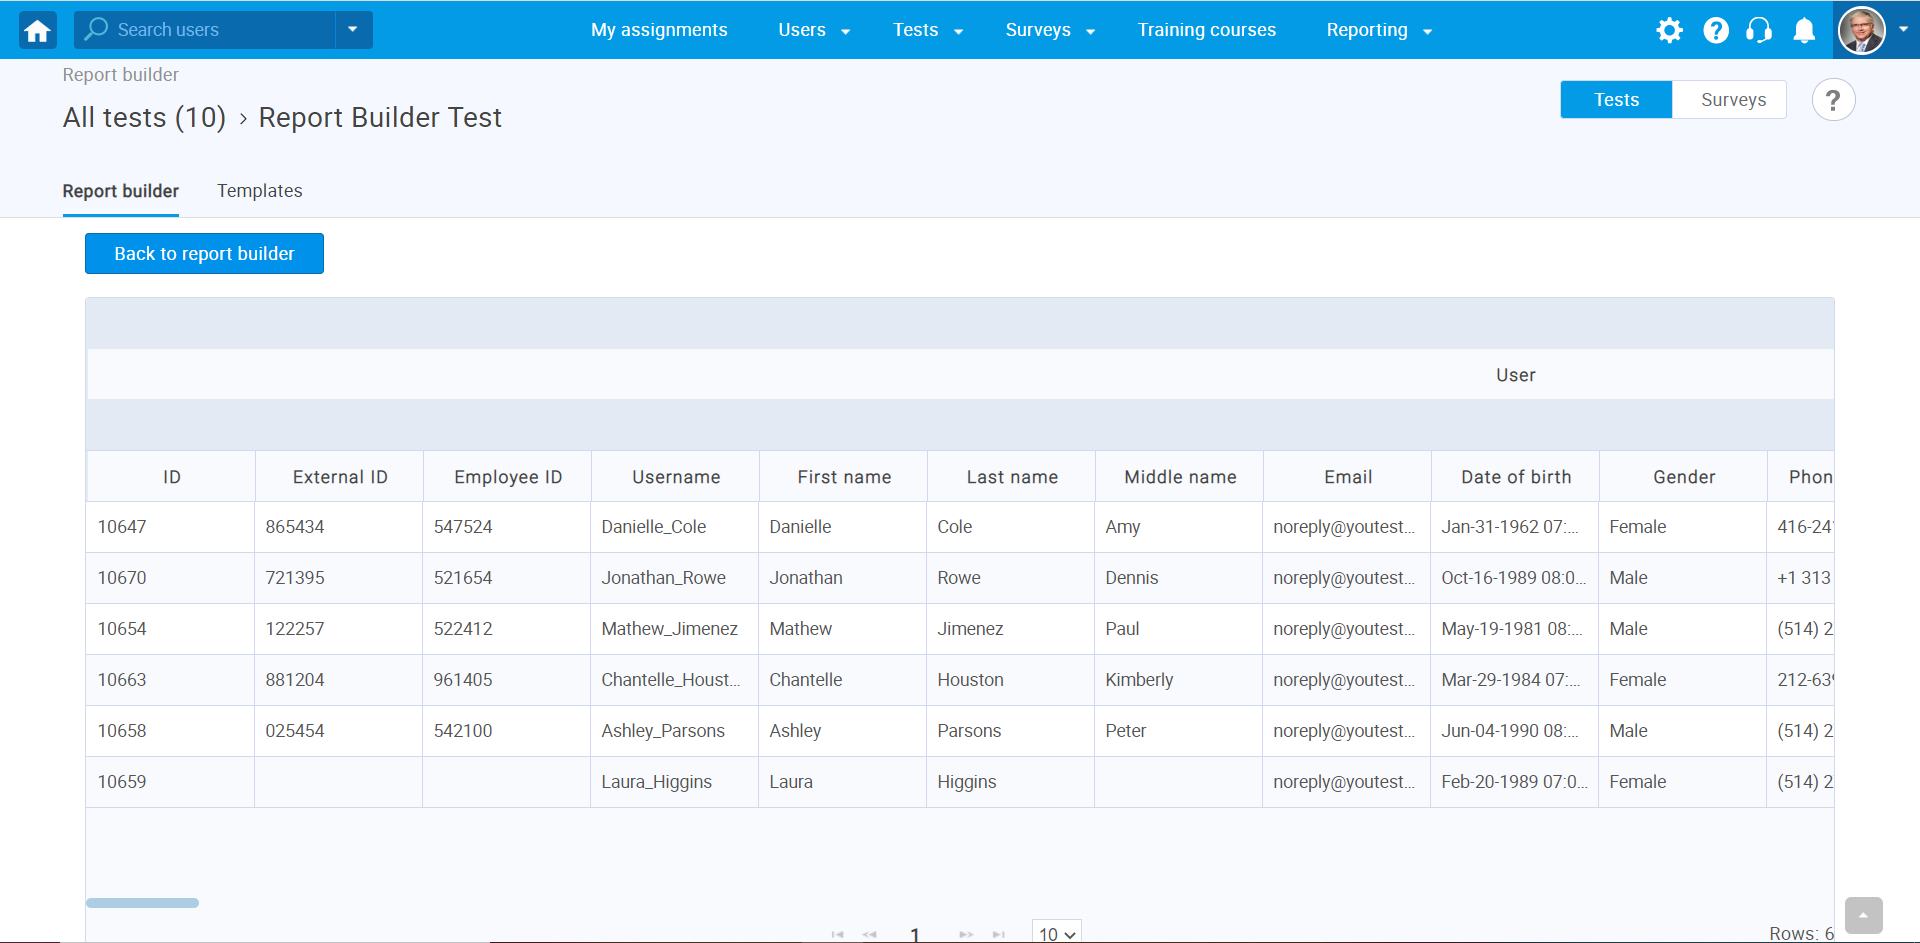
Report builder module allows you to obtain a detailed insight into test statistics and create flexible and unique reports by applying advanced search filters. This feature also enables the efficient comparison of tests/surveys and analysis of individual test items.
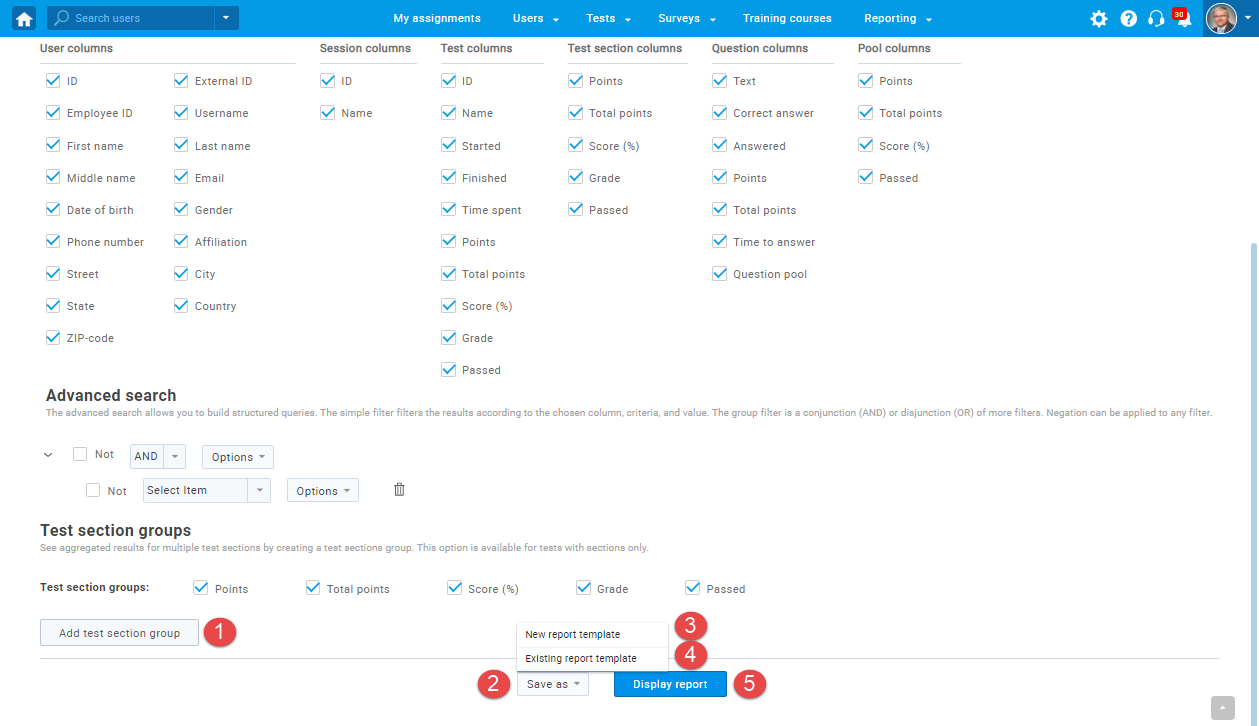
- You can load the report columns' settings from a saved report template.
- You can create a new custom report by checking the options from the list. Each selected option will be featured as a column in the report table.
- The advanced search allows you to build structured queries. The simple filter displays the results according to the chosen column, criteria, and value. The group filter represents a conjunction (AND) or disjunction (OR) of more filters. Negation can be applied to any filter.

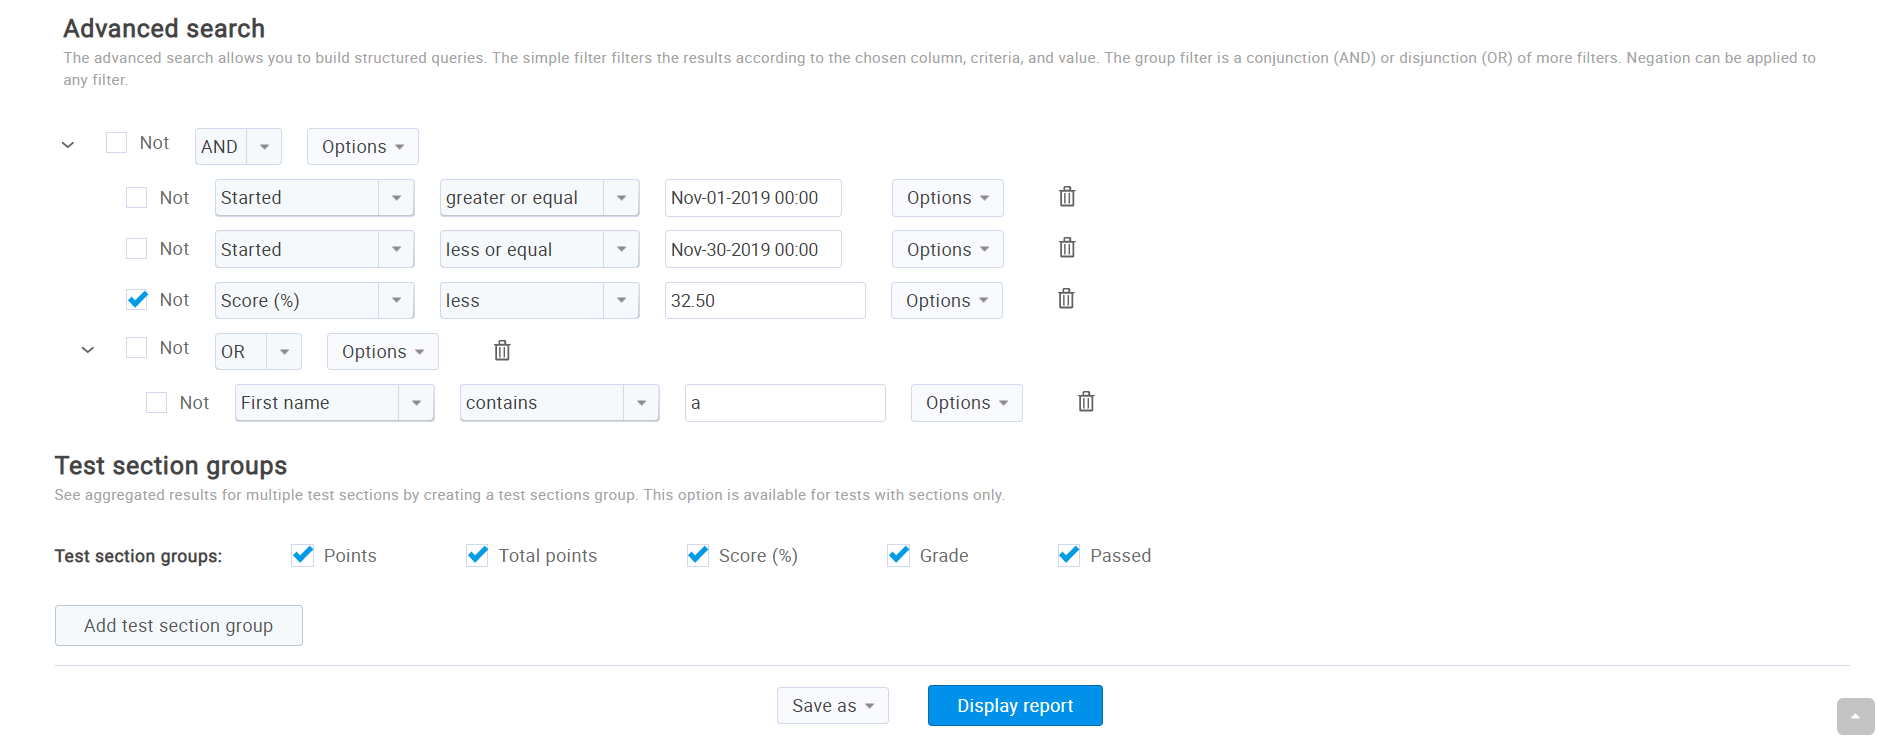
For example, the query from the picture above will produce the report which will include all test attempts taken between 1st and 31th March 2020, having scores not less than 25% (greater than 25%) and whose takers either have the first name Daisy or are not born after 7th March 1998.
- This option is available only for tests with sections. You can see the aggregated results for multiple sections by creating a section group. To do so, click the "Add section group". Enter the unique name of the section group and choose the sections you want to combine. You can select a grading scale to calculate the grade for each section group.
- You can save the chosen report settings as a new report
template or update the existing report template. Click the "Save
as..." button.
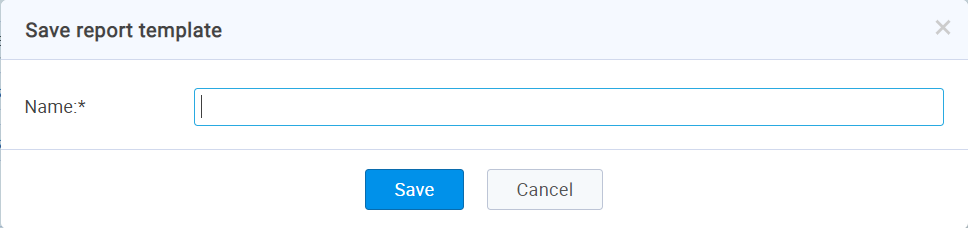
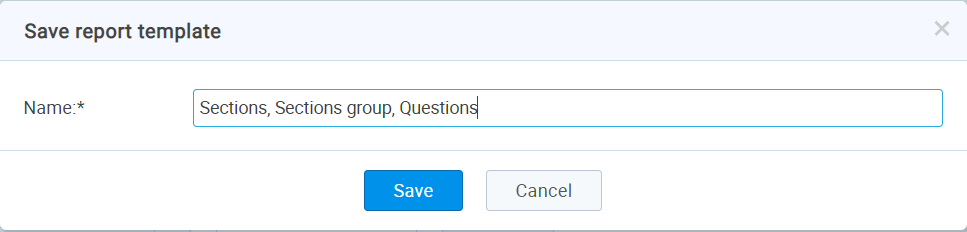
- Click the "New report template" to save the report settings as a new template. Enter the name of the template in a dialog box. To confirm the input, click the "Save" button or discard it by clicking the "Cancel" button.
- Click the Existing report template to save the report settings to the existing report template. Choose the desired report template you want to update in the dialog box. If the selected template is already loaded (see 1. step), that template will be chosen by the default. You can change the name of the selected template by editing the "Name" field. To confirm the input, click the "Save" button or close the dialog by clicking the "Cancel" button.
- After you configure the report settings, click the "Display report" button to see the report you have made.
Note: Only columns will be saved, excluding the advanced search (queries).
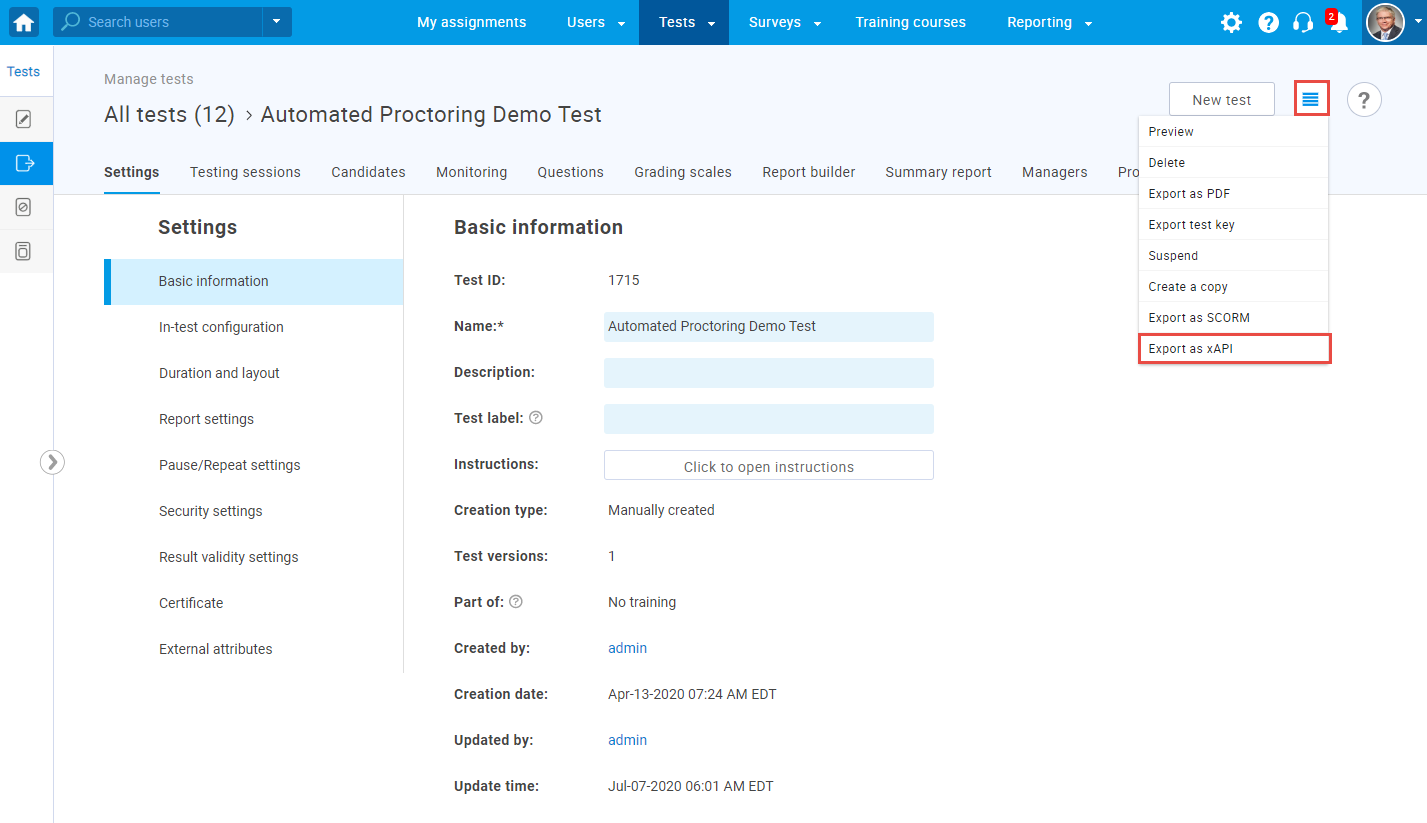
Export the test in a format that is compatible with any SCORM standard.
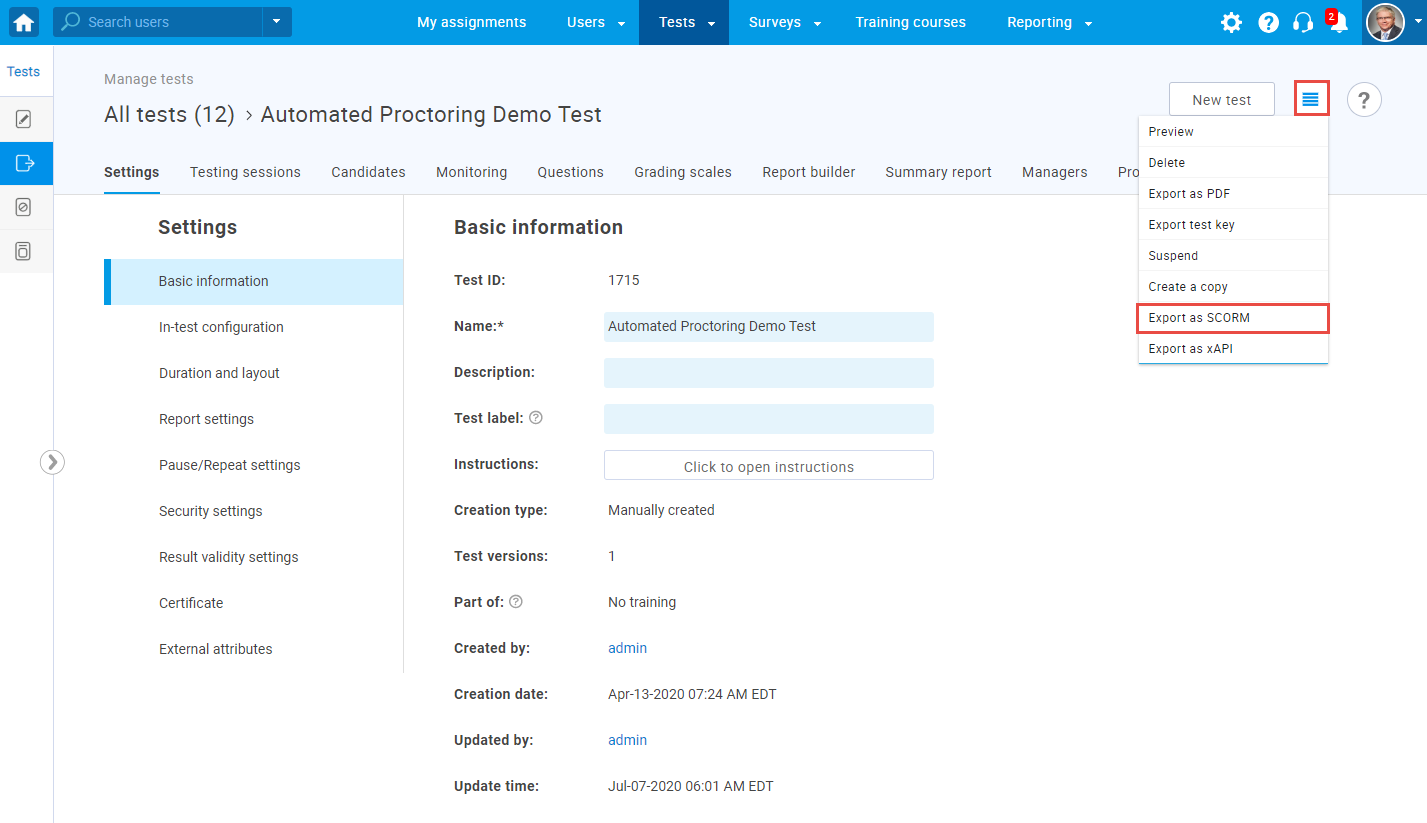
Export the test in a format that is compatible with any Tin Can API (Experience API) standard.
Test templates represent saved test configurations that can be loaded and used when creating new tests.
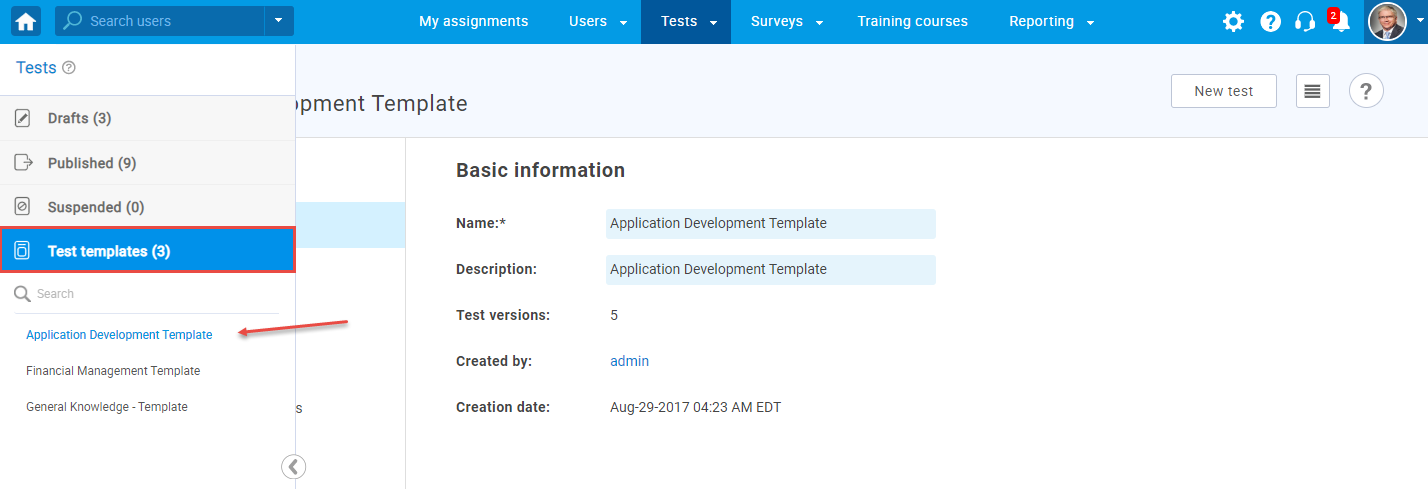
Test template settings are the same as Test settings. For further information about each option, please visit Test settings.
