User manual
System Settings
"Mail server(s)", "Internal network", "Notifications", "SFTP transfer", "System Information", "System preferences", "Theme", "Additional modules" and "System support" are located in the "System settings" page.
- Accessing the page
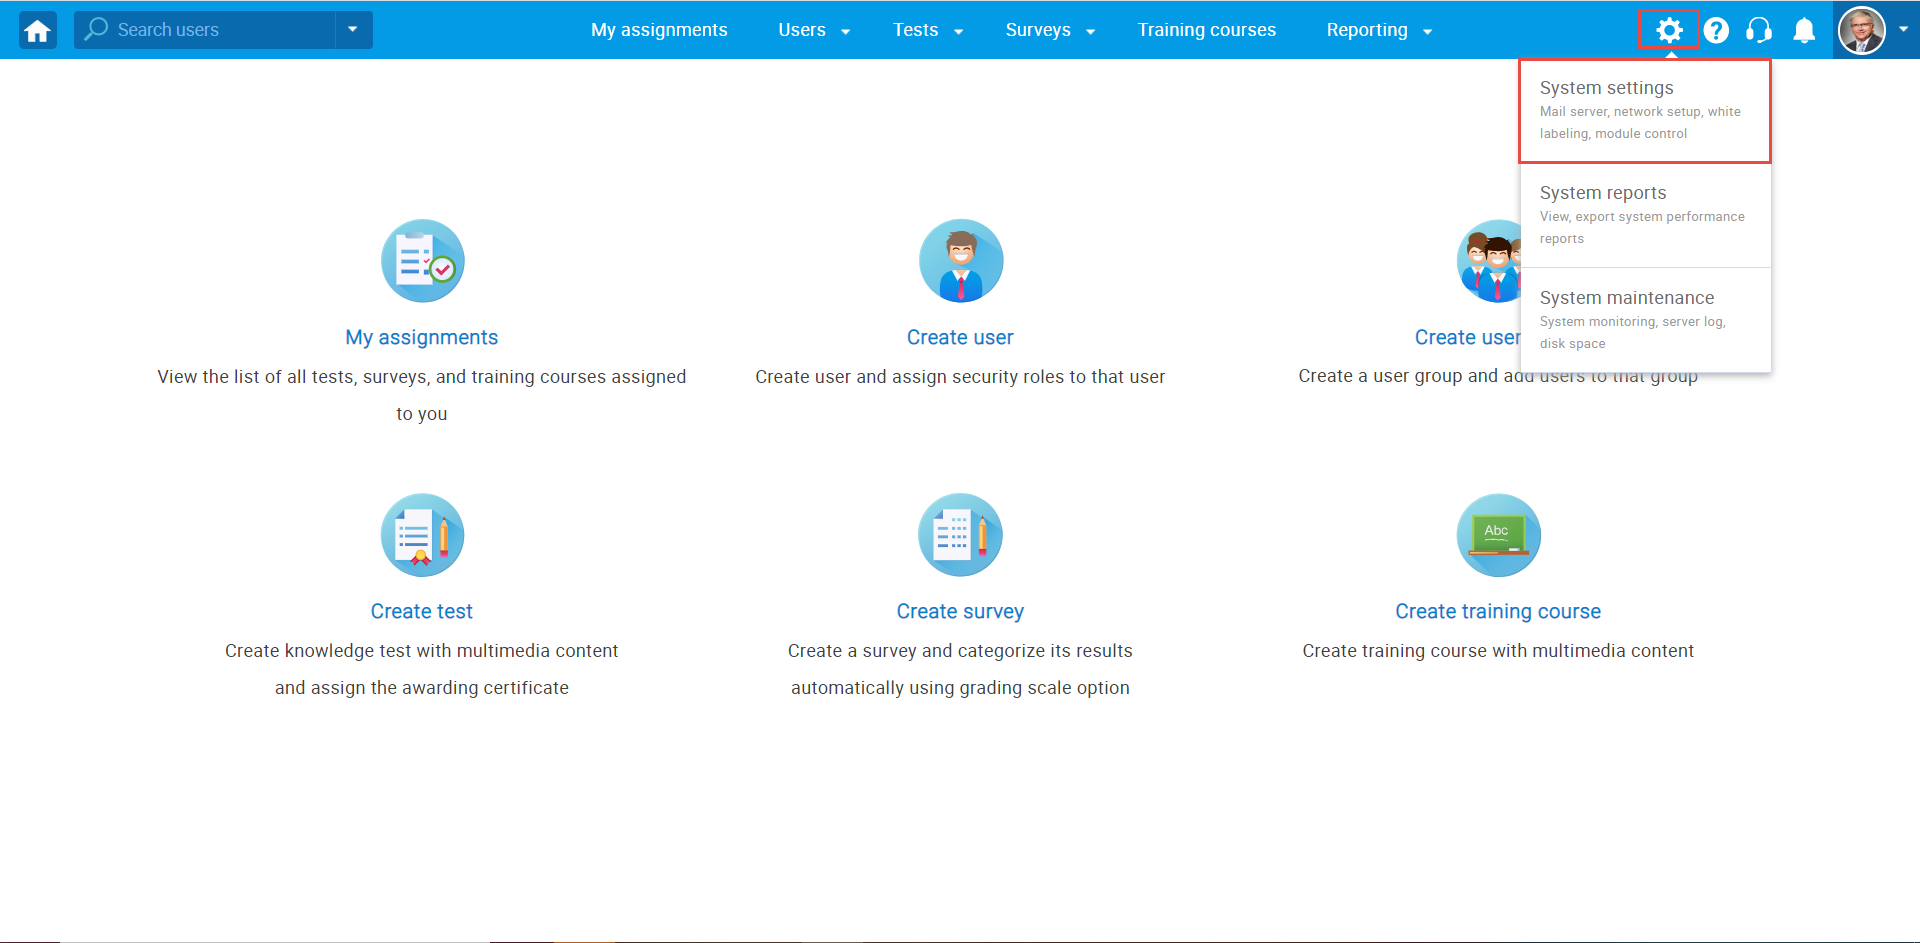
To access the "System settings" page, you should click on the "System" menu and select "System settings".
- Page layout
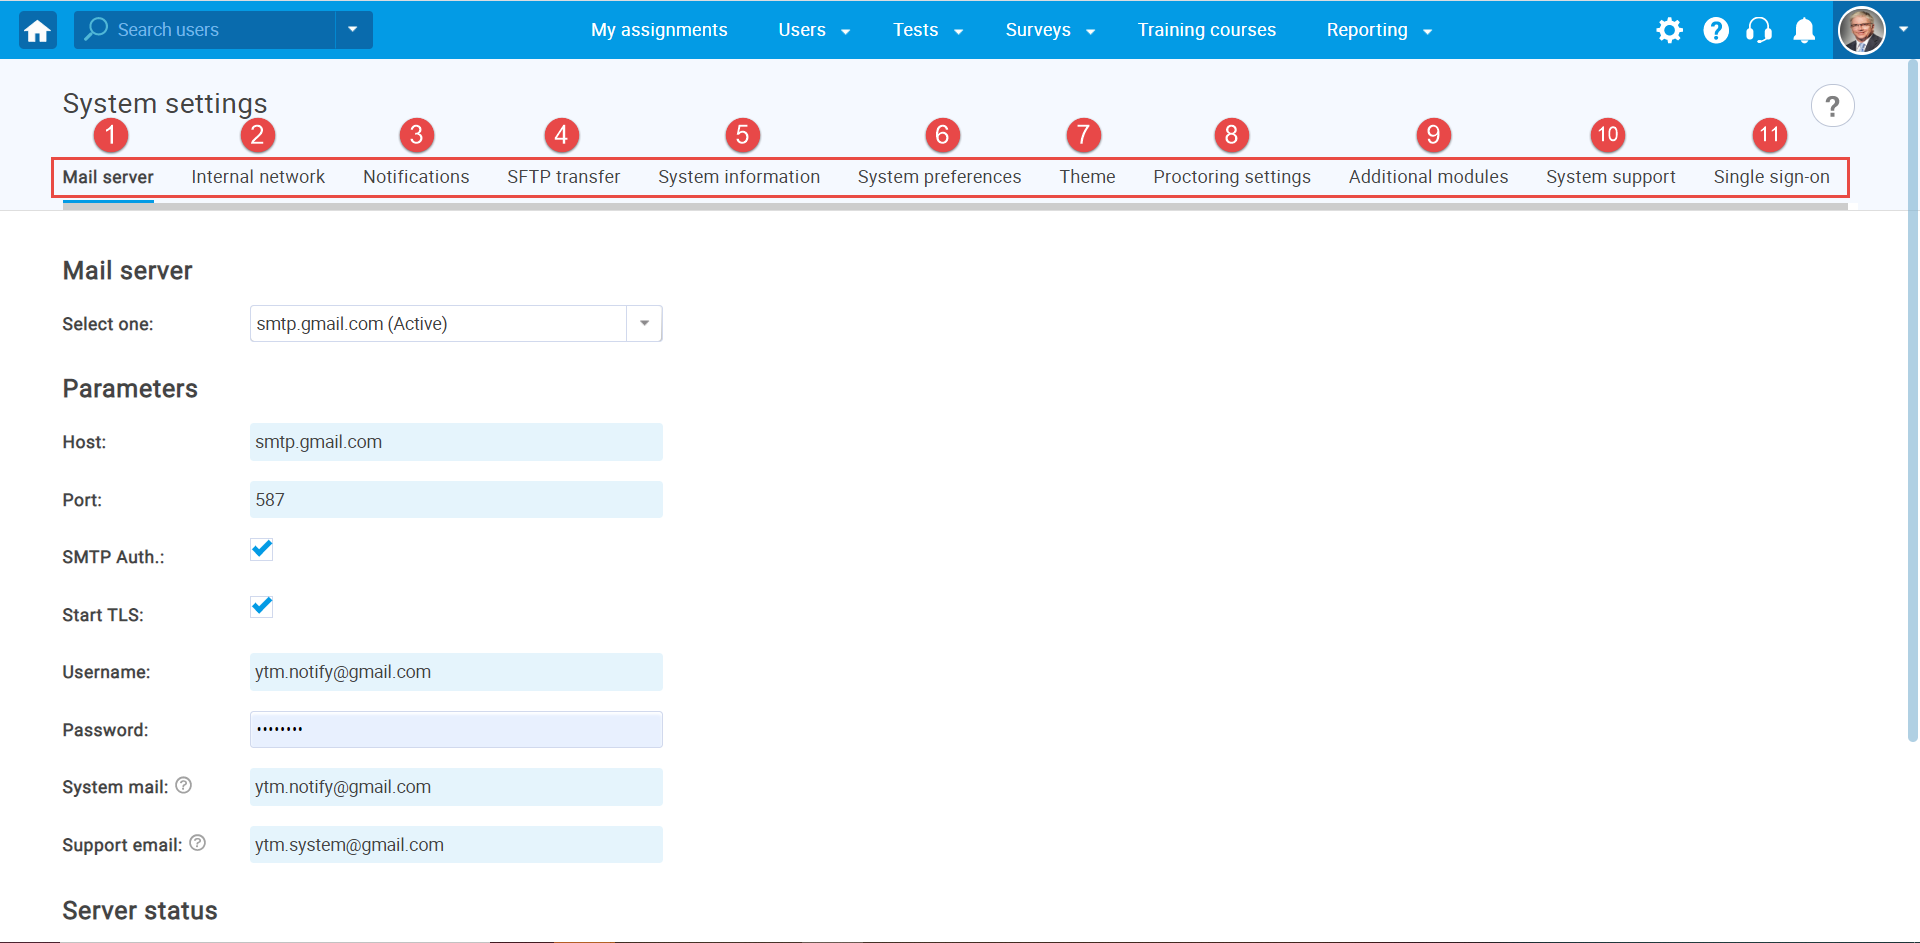
On the "System settings" page you will find nine tabs: "Mail server", "Internal network", "Notifications", "SFTP transfer", "System information", "System preferences", "Theme", "Additional modules" and "System support".
- Mail server
The "Mail server" tab serves to set parameters for a mail server that will be used for sending various notifications to administrators and users via email. There is no limit regarding the number of mail servers which can be set.
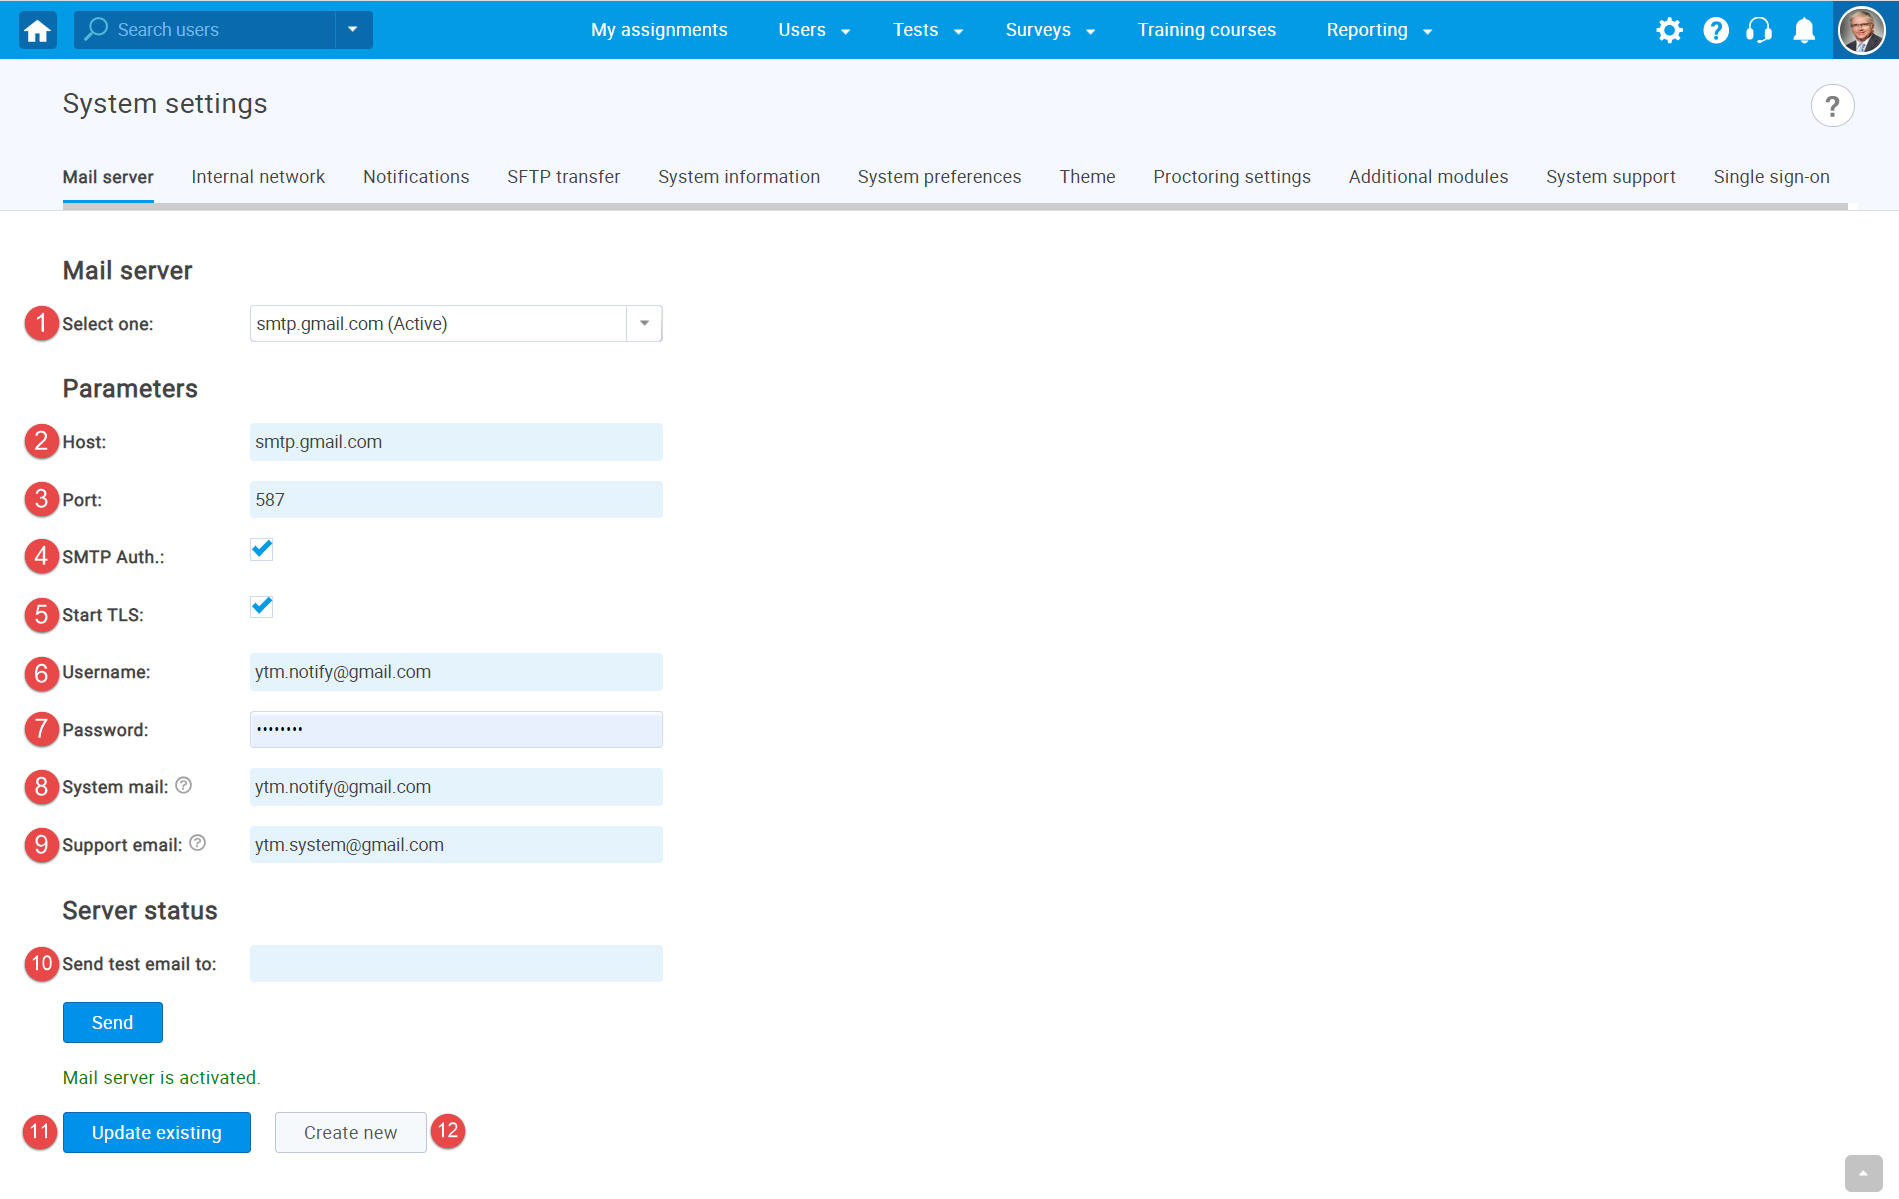
- The "Mail server" drop-down list determines
the mail server from which the parameters are displayed.
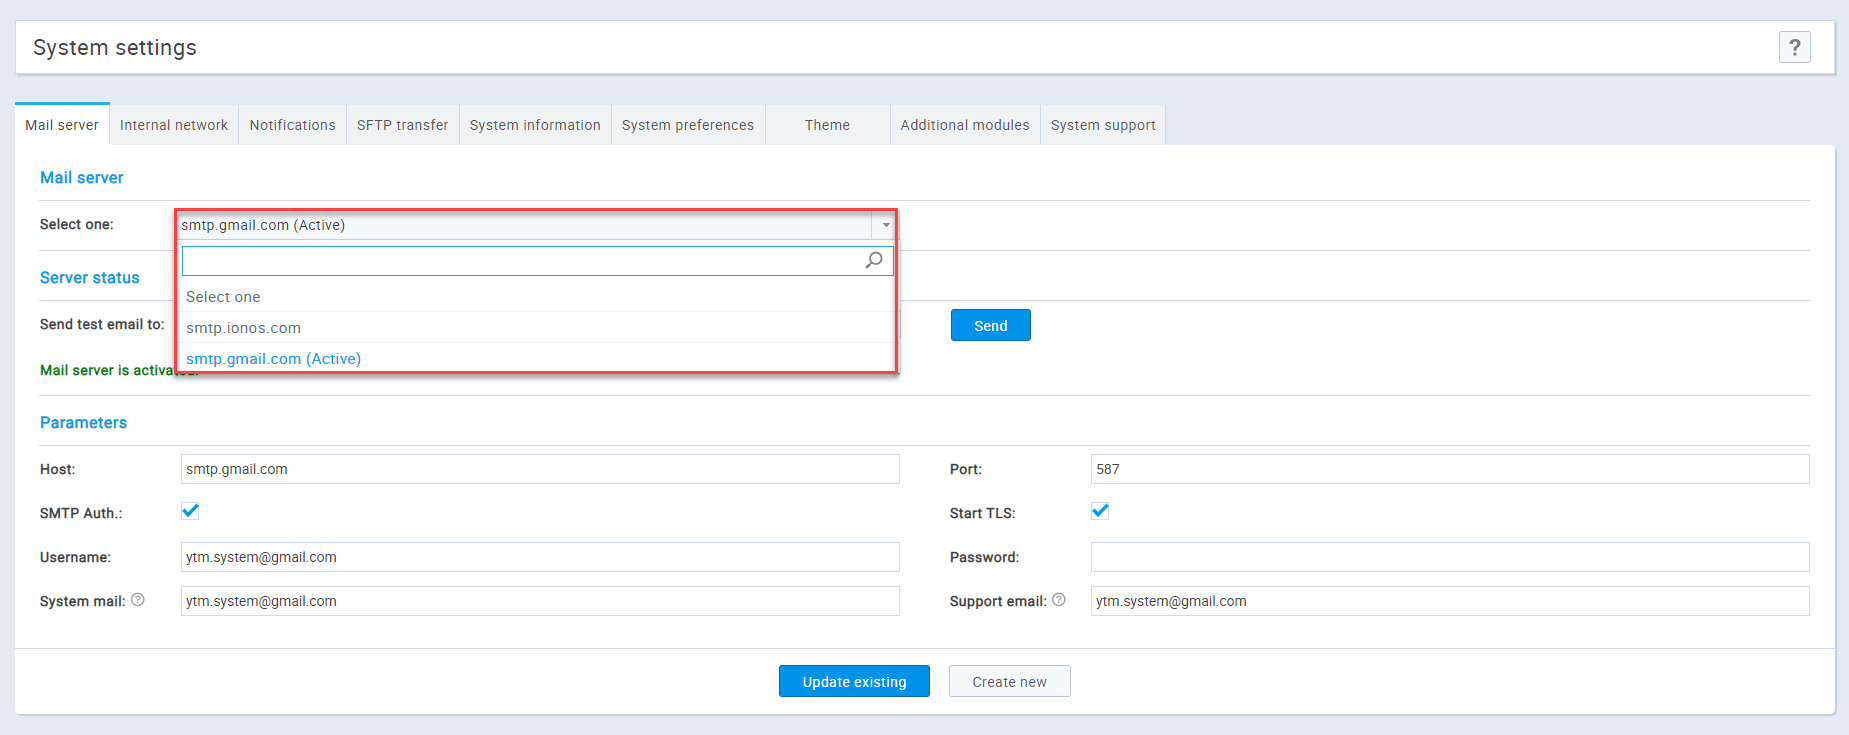
- The "Server status": only one mail server
can be active at a time. You can set a mail server to be active
by clicking on the "Activate" button in the form of
an inactive mail server.
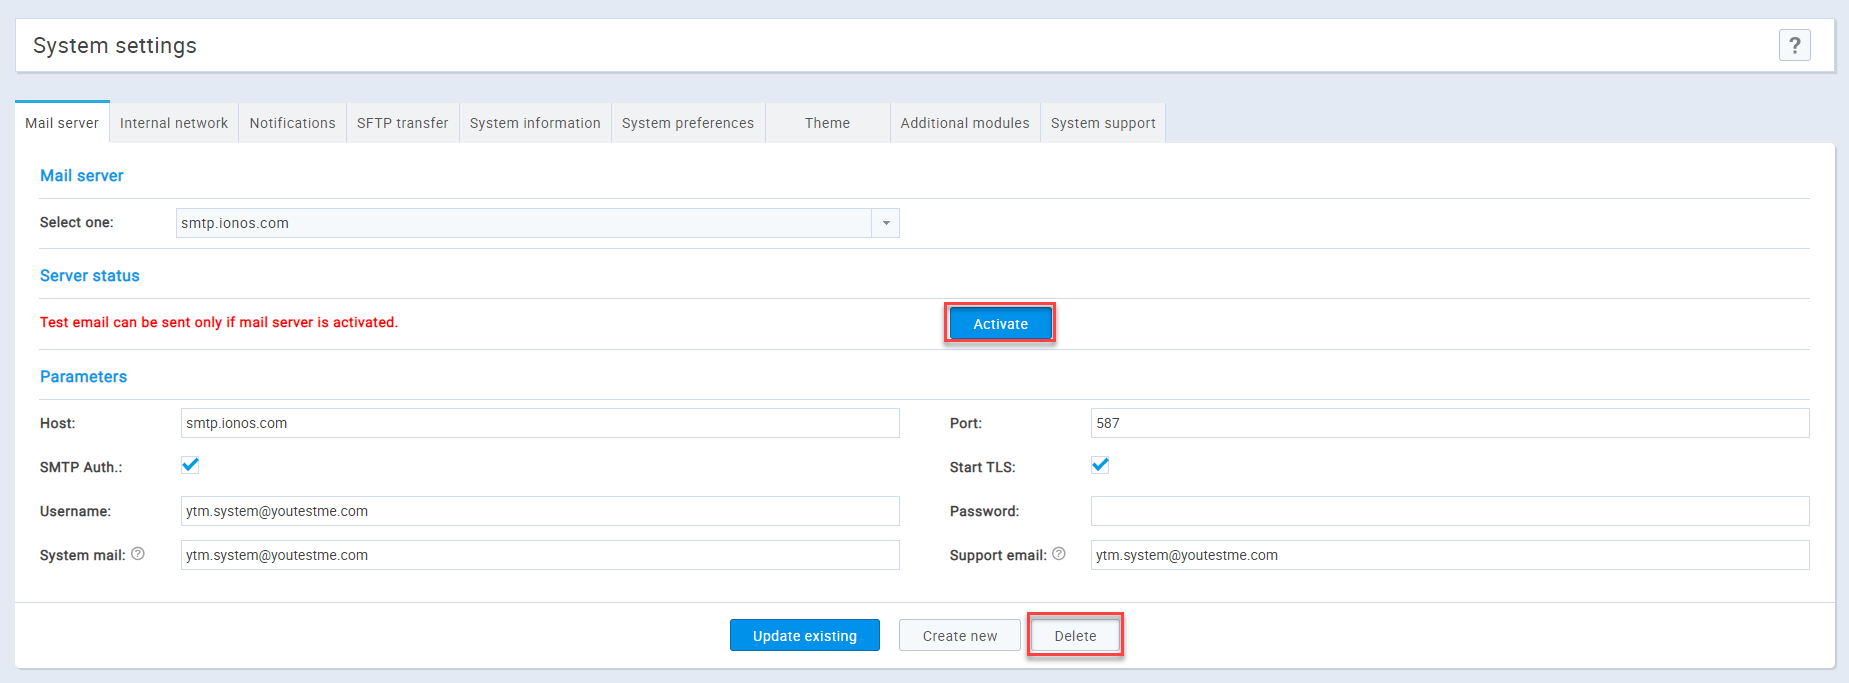 Only inactive
mail servers can be deleted by clicking on the "Delete"
button in the form of the inactive mail server.
Also, you can test if the mail server works by sending an email
to the address you specify in the
"Send test email to" field and by clicking the
"Send" button.
Only inactive
mail servers can be deleted by clicking on the "Delete"
button in the form of the inactive mail server.
Also, you can test if the mail server works by sending an email
to the address you specify in the
"Send test email to" field and by clicking the
"Send" button.
- This is the host name of the mail server.
- This is the port number of the mail server.
- These are security parameters.
- This is the username of the mail server.
- This is the password for the mail server.
- This is the system email of the mail server.
- This is the support email of the mail server. IMPORTANT: Make sure that your support email is: ytm.system@gmail.com if you want to contact the GetCertified support team.
- By clicking the "Update existing" button the entered parameters will be applied to the selected mail server.
- By clicking on the "Create new" button you will create a new mail server with the entered parameters.
- The "Mail server" drop-down list determines
the mail server from which the parameters are displayed.
- Internal network
The "Internal network" tab allows you to define the IP addresses within your local network from which certain parts of the application can be accessed.
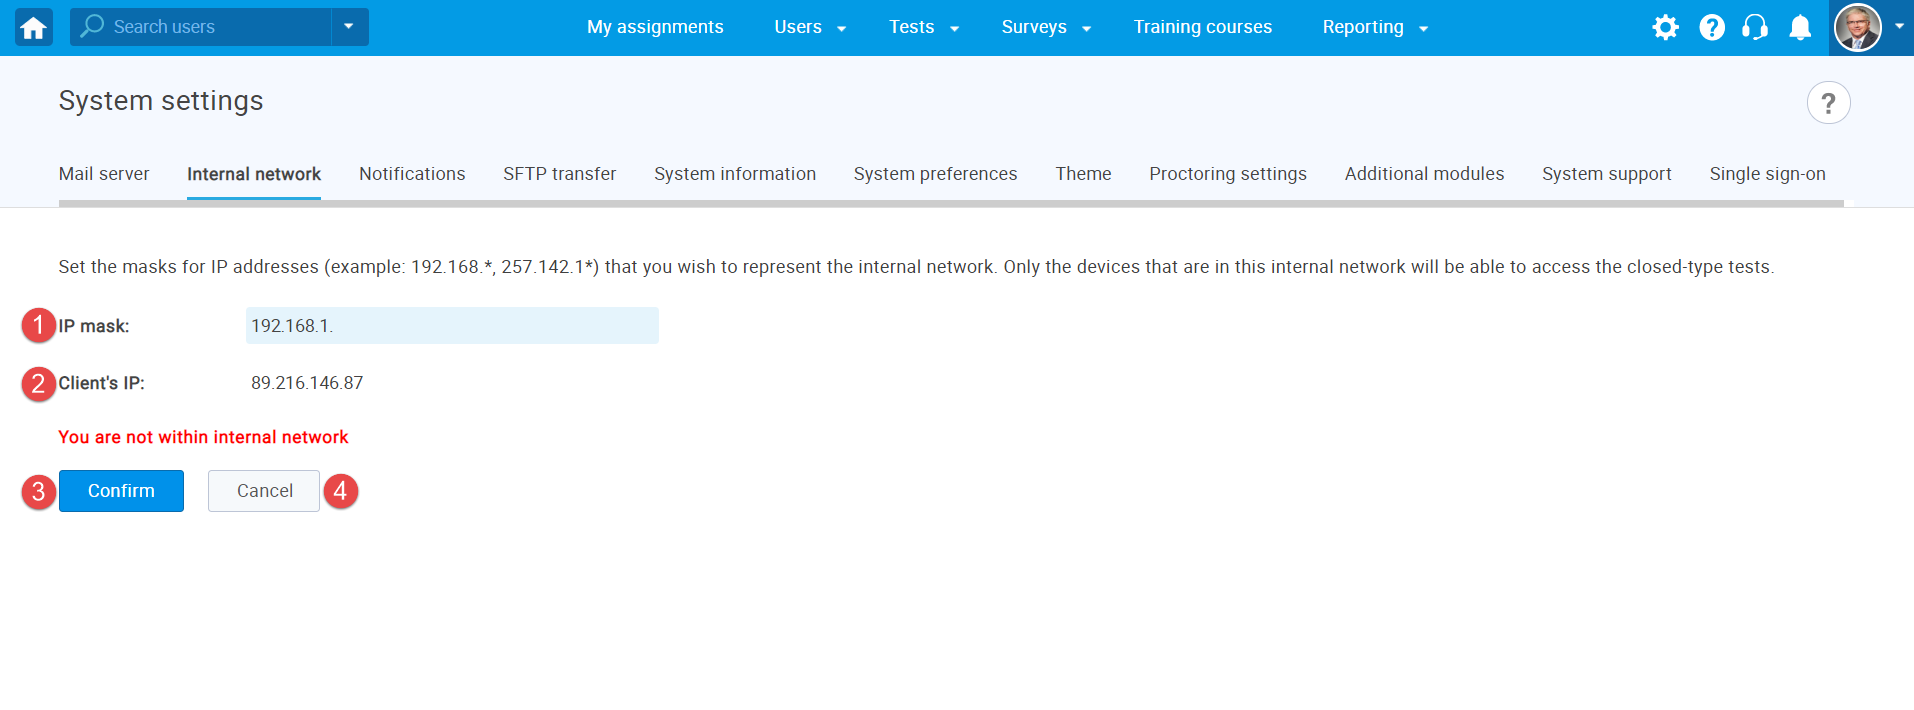
- This is the IP mask of the internal network, only machines with IP addresses starting with this prefix will be allowed access.
- This is the client's IP address.
- Clicking the "Confirm" button will save the changes you have made.
- Clicking the "Cancel" button will invalidate all the changes you have made.
- Notifications
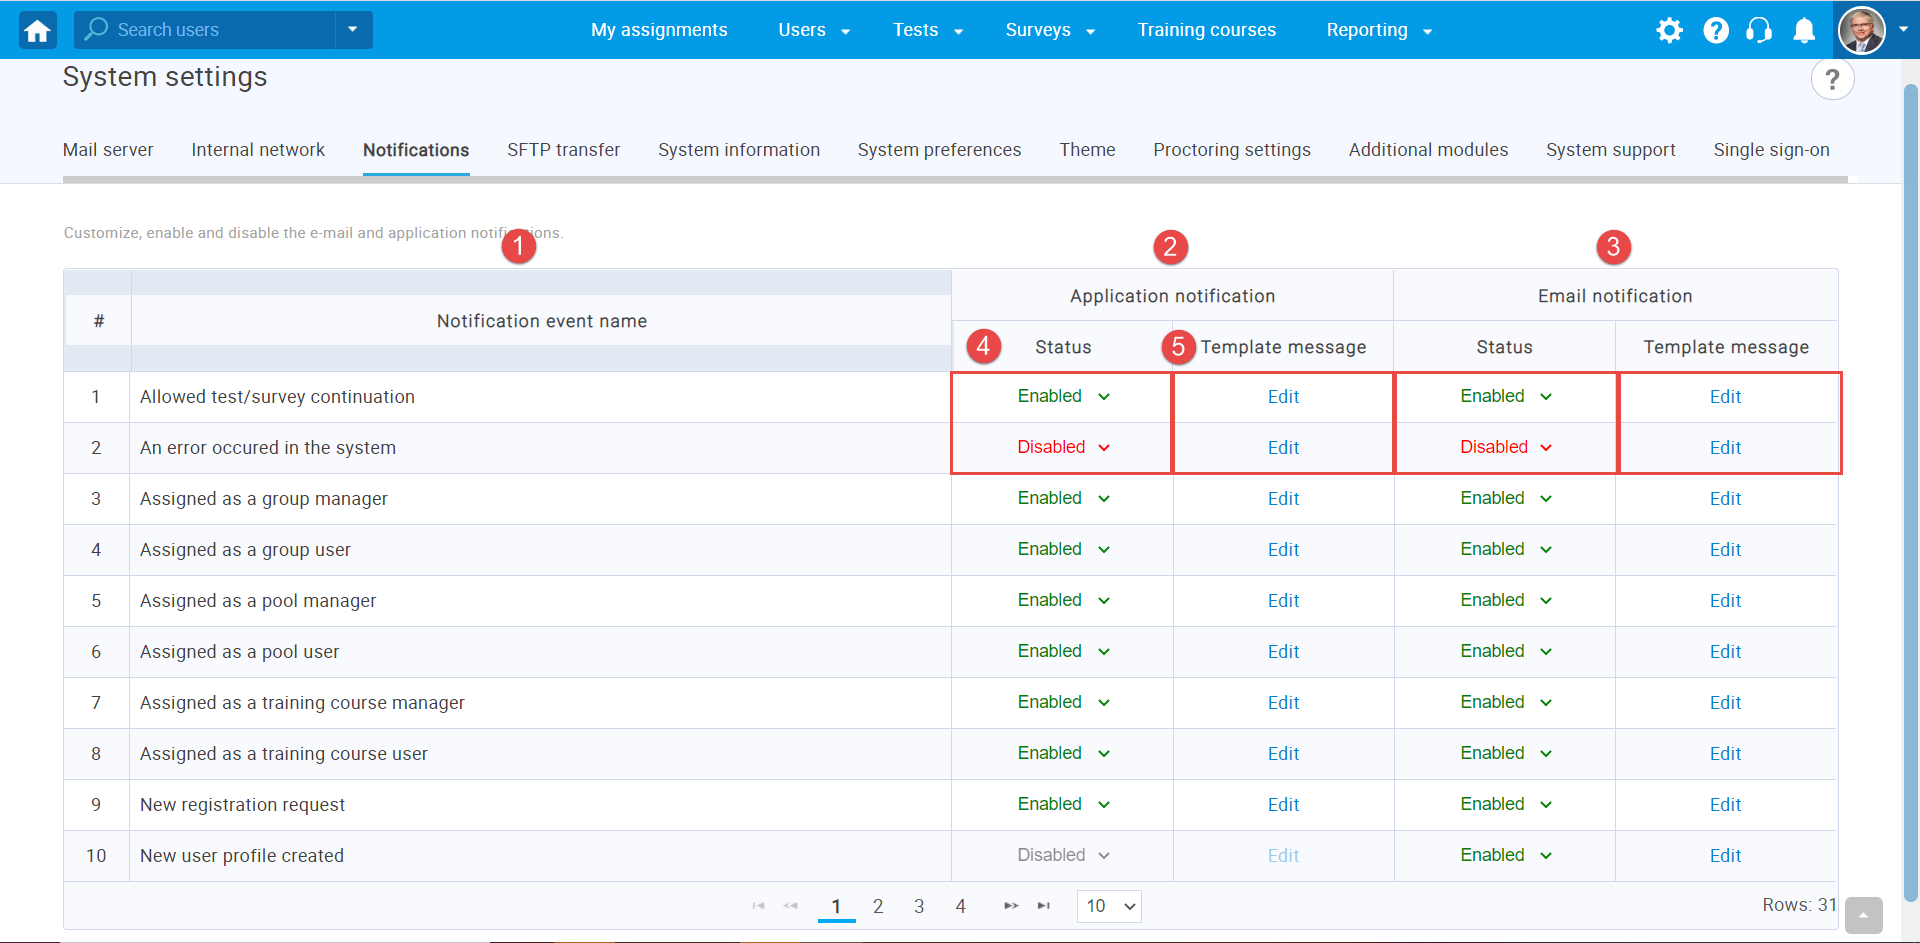
The "Notifications" tab contains email and in-application notification templates that are sent automatically when a certain action is made inside the application. The emails and application notifications are predefined but can be edited by changing email/application notification templates. When editing the templates, the variables (text between $ signs) cannot be edited, added or removed.
- The notification name serves to identify a particular event. Here you will be able to find all notifications available in the system.
- The application notification section is used to configure notifications and templates in the application.
- The email notification section is used to configure notifications and templates that will be sent to users via email.
- The "Status" column has options "Enable/Disable".
- The "Edit" option prompts a dialog for a selected mail/application notification.
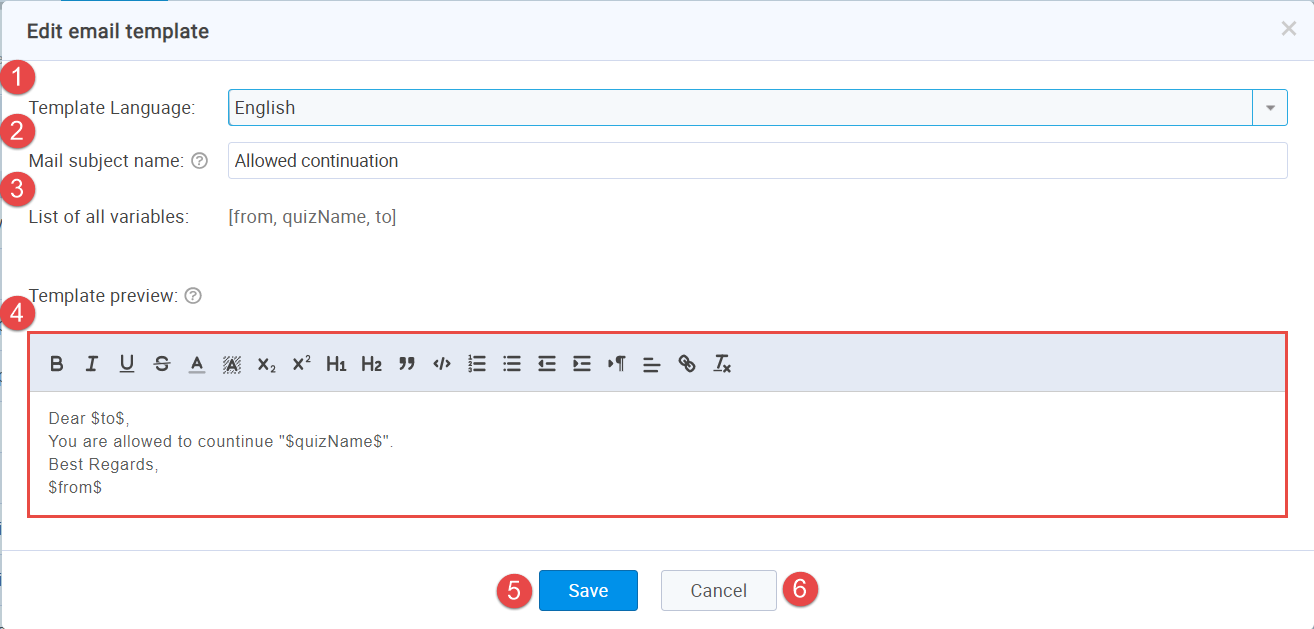
- This is the body of the email. The text can be edited, but all the variables must remain the same because the system replaces them with specific data.
- This is the list of all variables of a selected email template.
- This is the "Mail subject name" box where you can change the email subject.
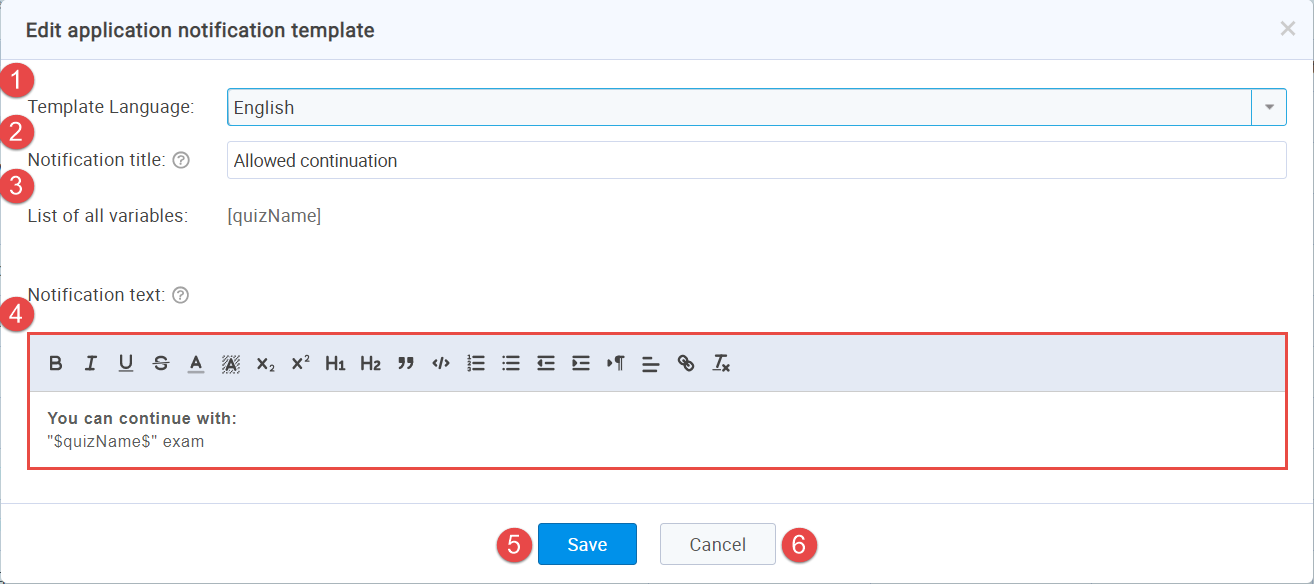
- This is the body of the application notification. The text can be edited, but all the variables must remain the same because the system replaces them with specific data.
- This is the list of all variables of a selected application notification template.
- This is the "Notification title" which can be configured for the selected notification.
To save the modified email/application template, click on the "Save" button. If some of the variables are missing, you will be prompted with an error message.
If you accidentally delete any of the variables, it will be shown in the list of the missing variables.
Clicking the "Cancel" button will close the opened dialog.
- Mail server
- SFTP transfer
On the "SFTP Transfer" tab, you can activate sending test completion reports, stored in a CSV format. If activated, reports will be sent at regular intervals and will contain information that refers to all new successfully completed test attempts (an empty CSV file will be sent if none of the test attempts were completed successfully in a defined interval).
Note: This tab is visible only to the clients who requested this module to be activated.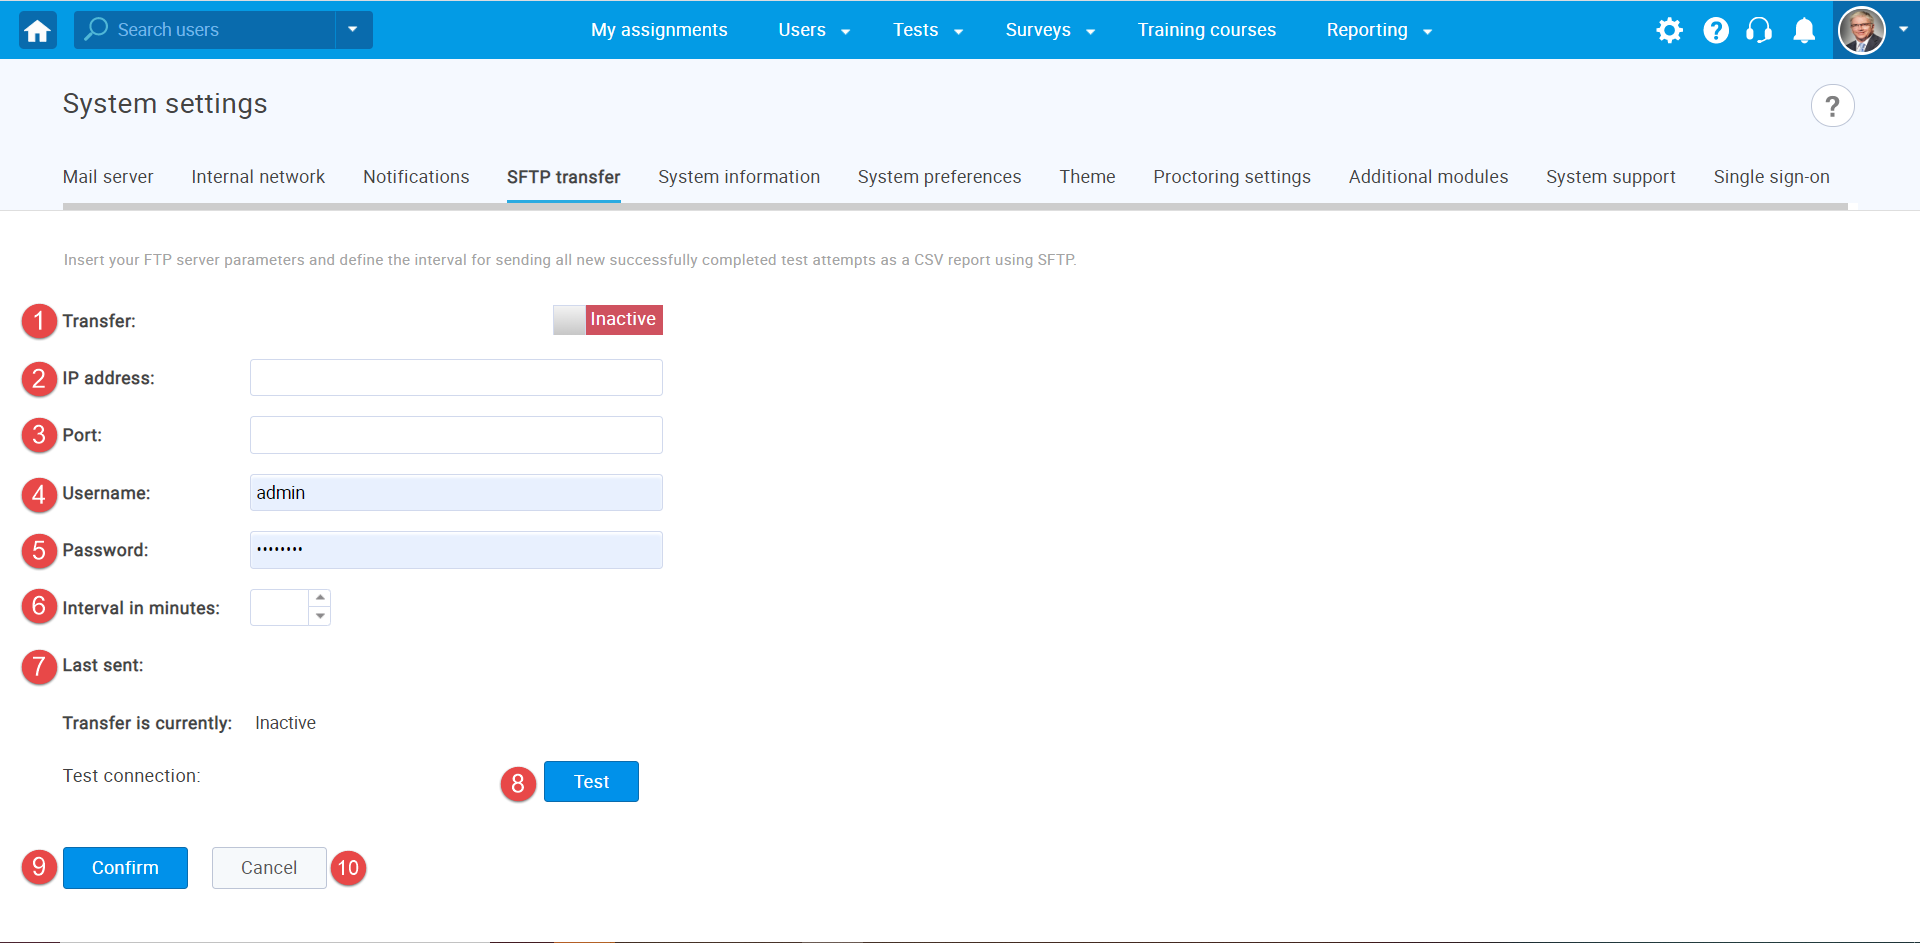
- Here you can adjust if the transfer is "Active" or "Inactive".
- Here you should enter the IP address.
- Here you should enter the port.
- Here you should enter the username.
- Here you should enter the password.
- Here you should enter the time interval (in minutes).
- Displayed here is the time when the last report was sent.
- Click the "Confirm" button if you want to save the changes you have made.
- If you are not satisfied with the changes you have made click the "Cancel" button.
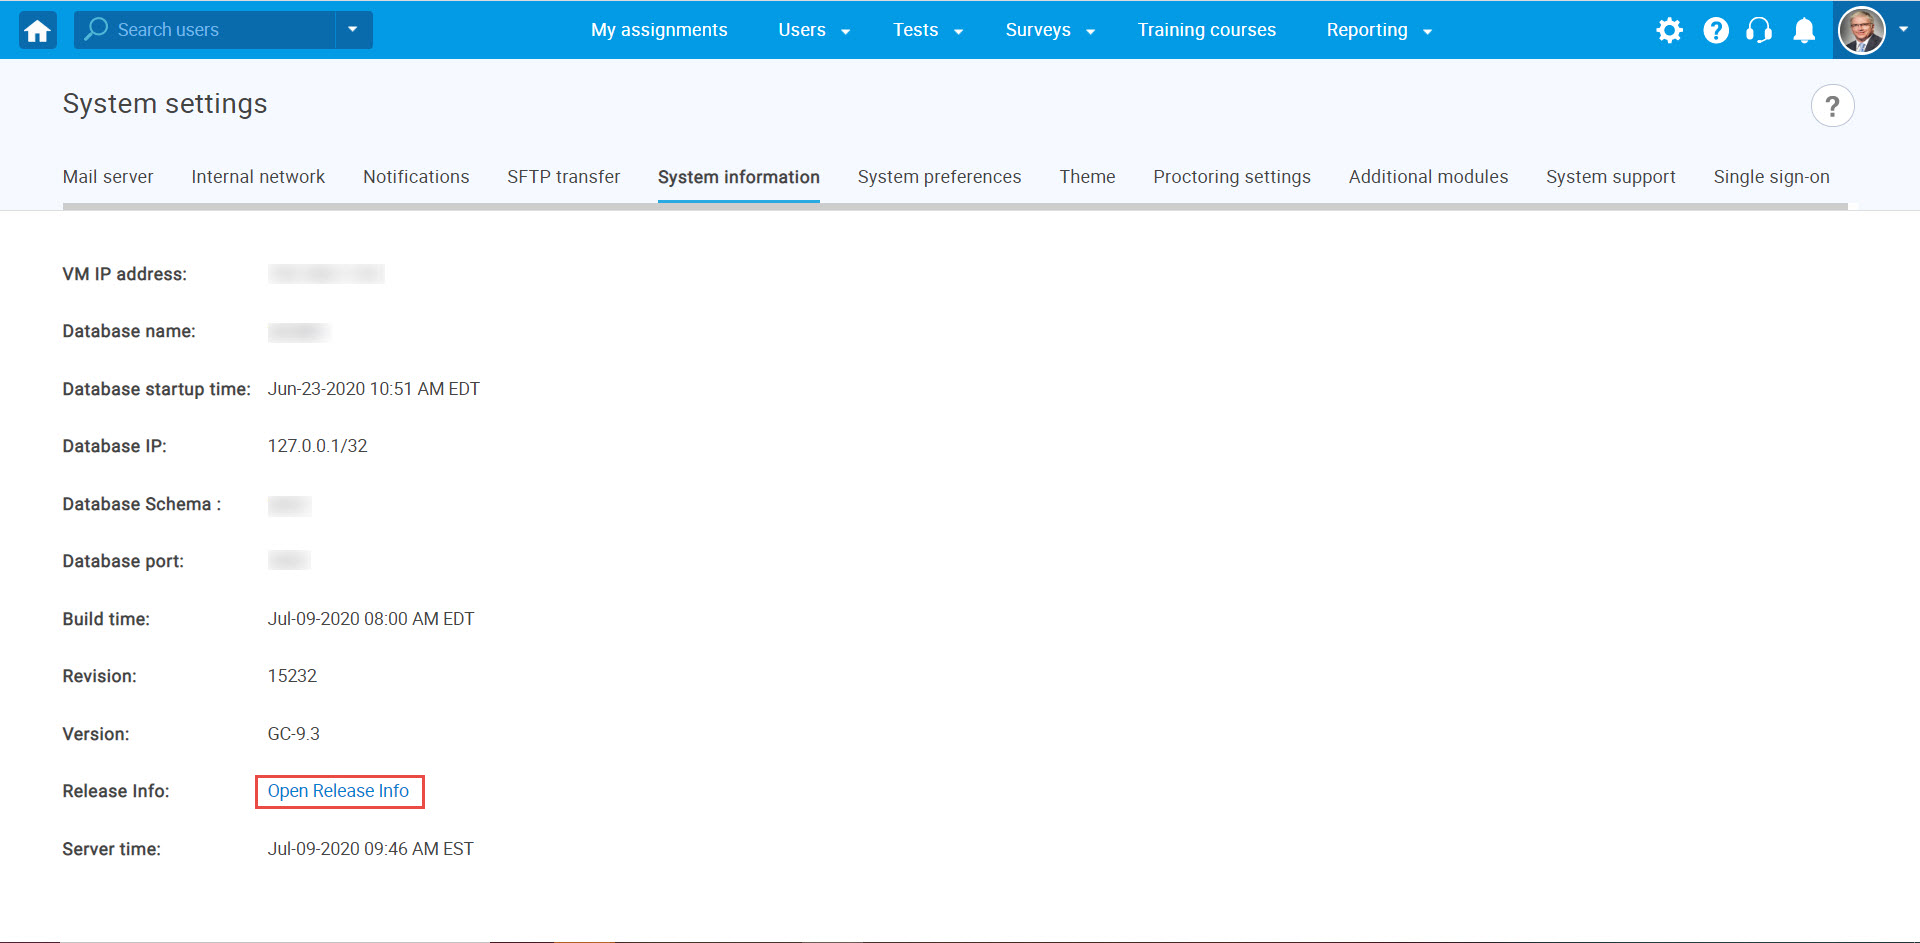
- System information
Basic information about your system is displayed on the "System information" tab.
You can access release info by clicking on the link "Open Release Info" and it will open in new tab.
- System preferences
On the "System preferences" page you can customize certain elements of the application.
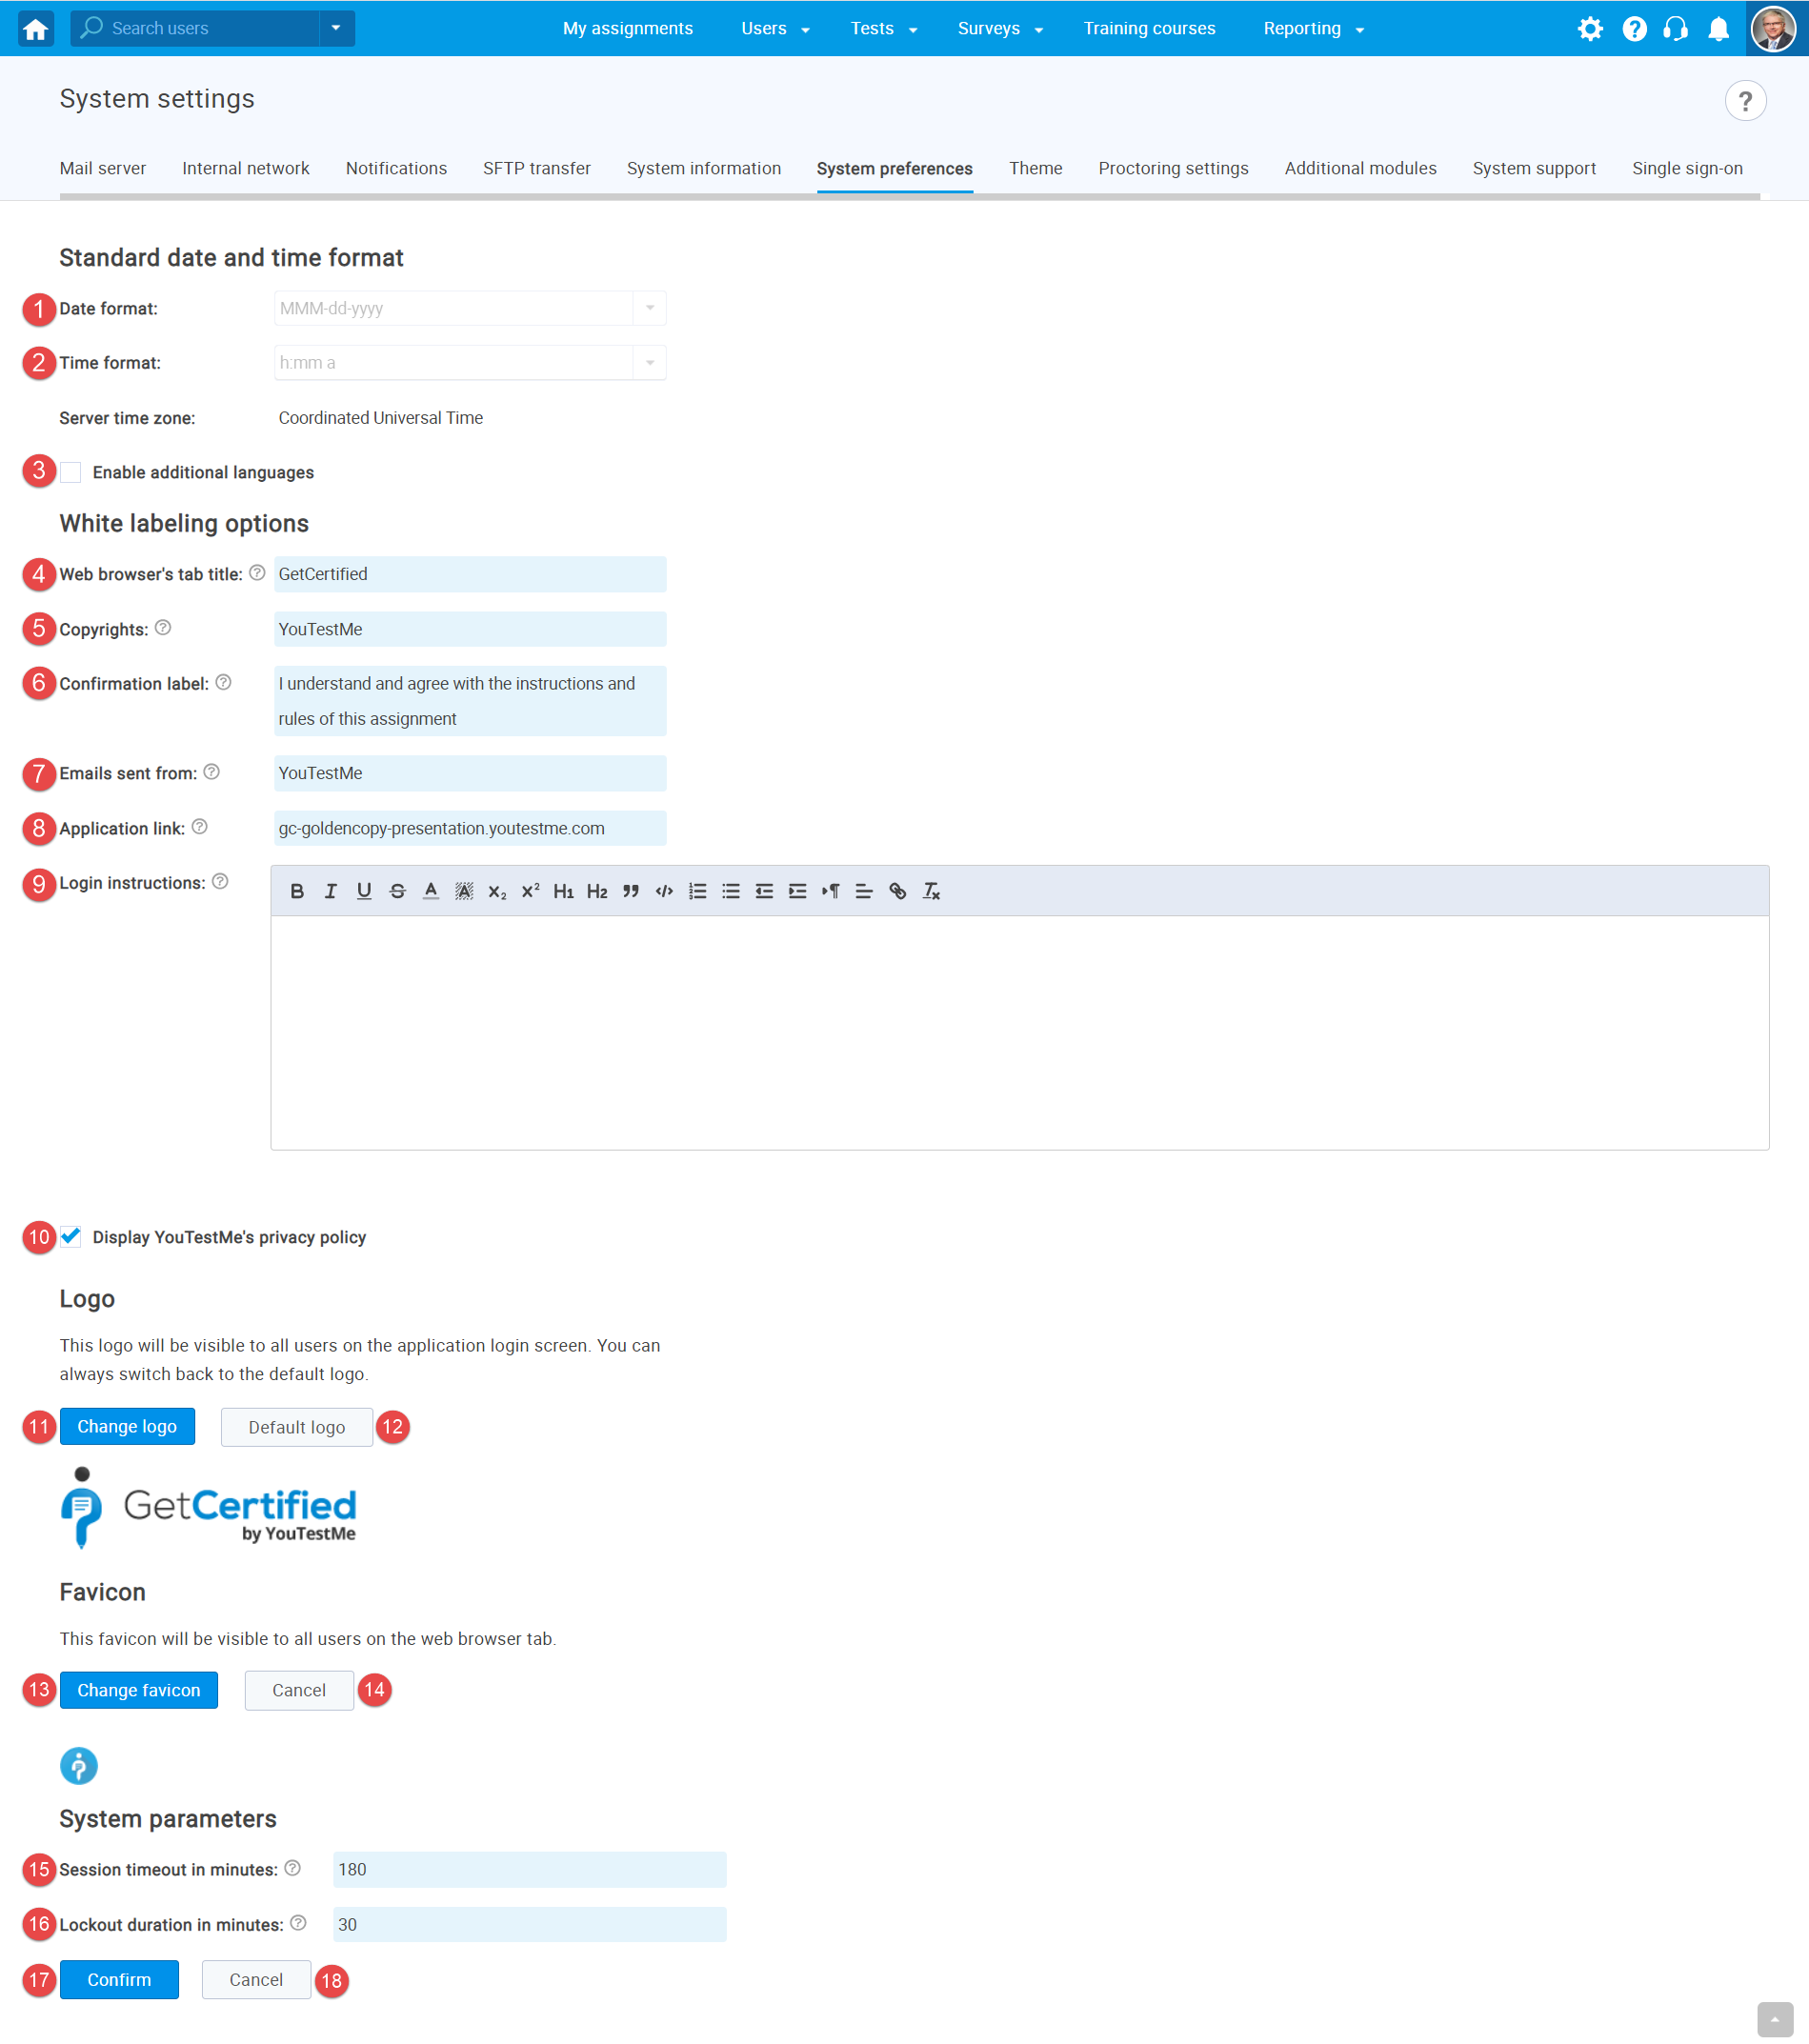
- The date format in the application is displayed here.
- The time format in the application is displayed here.
- You can modify the web browser tab title text.
- You can modify the text next to "Copyright" on the login page.
- You can modify the confirmation text on the instruction screen dialog of "All assignments".
- You can modify the $from$ parameter in the system emails for all emails sent from the application.
- You can modify the URL of the application in the emails sent from the system.
- You can choose to display the YouTestMe privacy policy.
- If you click "Change logo" you can change the logo at the login page.
- If you click "Default logo" the logo at the login page will change to the default "YouTestMe" logo.
- If you click "Change favicon" you will change the icon next to the web browser title text.
- If you click "Cancel" you will cancel the change of the favicon.
- Configure the length of the session timeout in minutes.
- Configure the length of user password lockout.
- If you are satisfied with the changes you have made click on the "Confirm" button.
- If you are not satisfied with the changes you have made click on the "Cancel" button.
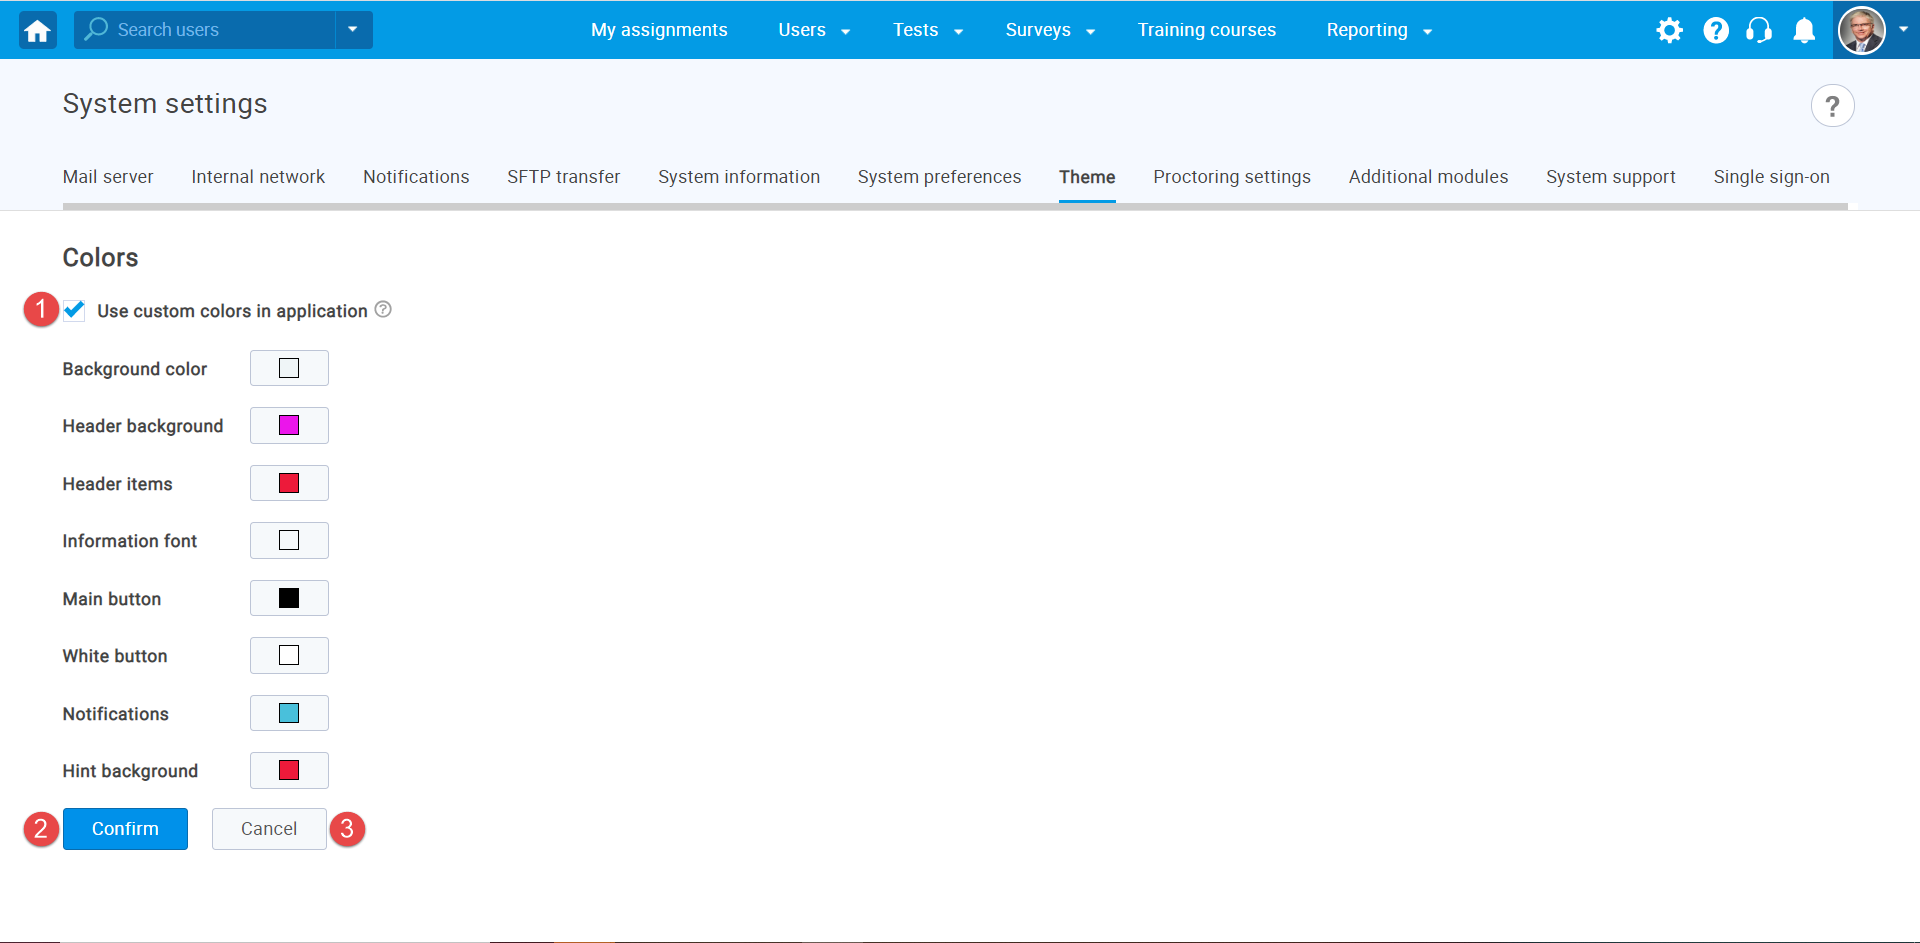
- Theme
On the "Theme" tab you can:
- Make application rebranding according to your company/organization colors.
- After making the desired changes click the "Confirm" button.
- If you want to discard your changes, click the "Cancel" button.
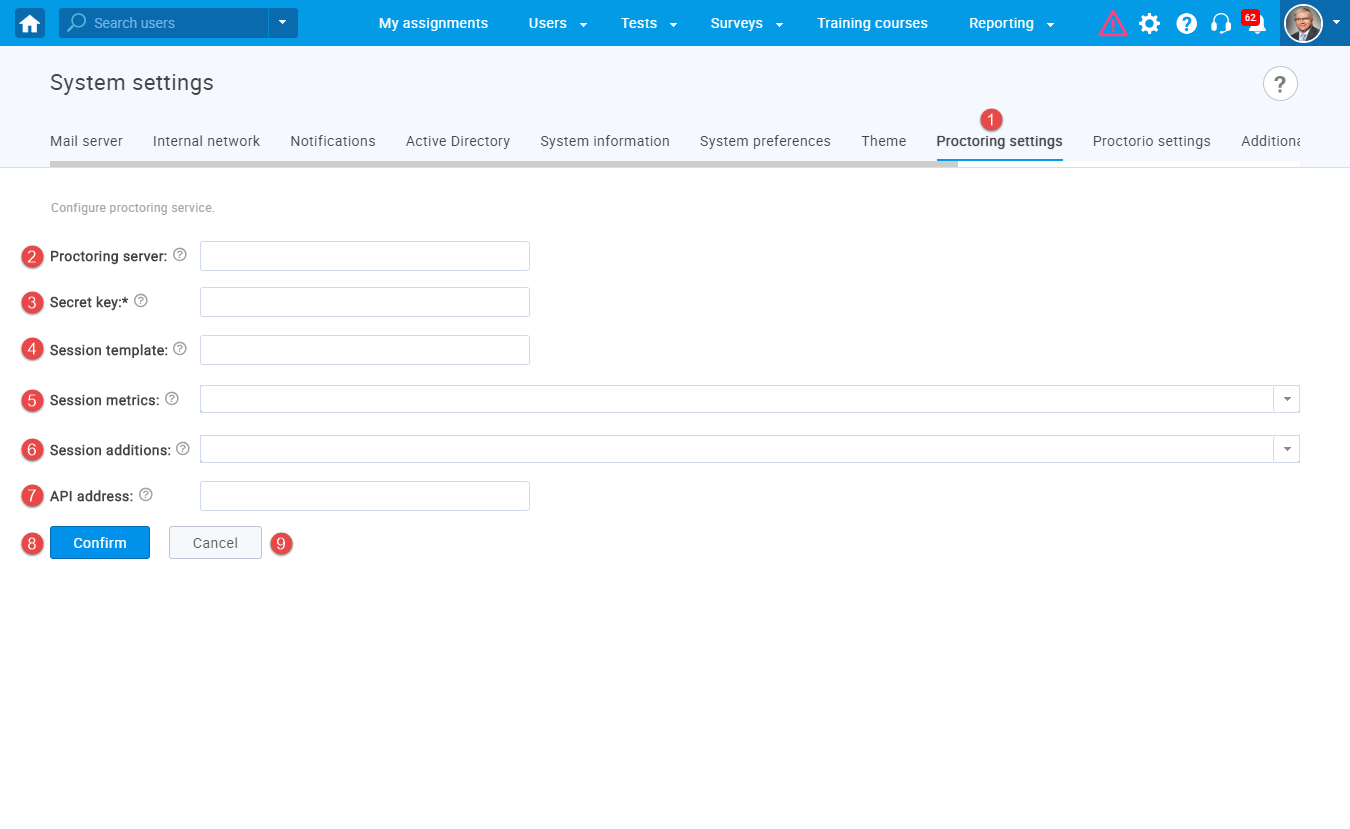
- Proctoring settings
Please note that the Proctoring service can be enabled only upon your request. For more information, contact the YouTestMe team at sales@youtestme.com. Upon the activation, you will be provided with all necessary parameters for configuring the proctoring service. In case you request the proctoring service before the application delivery, all settings will already be configured.
- To configure the Proctoring service, choose the "Proctoring settings" tab on the "System settings" page.
- Enter the "Proctoring server URL." This parameter represents the Web address of the Proctoring server, and is provided by YouTestMe.
- Enter the "Secret key." provided by YouTestMe.
- Enter the "Session template" name. This parameter represents the name of the proctoring session template created in the Proctoring application. The session template specifies additions (5) and metrics (6) of the Proctoring session. Enter the "default" for the default session template. * In the newer versions of the Proctoring service, this is the only way to specify the proctoring session, chosen additions (5), and metrics (6) will not be considered.
- Choose the "Session metrics" from the dropdown menu. The session metrics represent the events that the service tracks and penalizes during the proctoring session. * This configuration will be considered only for the older versions of the Proctoring service.
- Choose the "Session additions" from the dropdown menu. The session additions represent the additional proctoring features that will be included in the proctoring session. * This configuration will be considered only for the older versions of the Proctoring service.
- Enter the "API address." provided by YouTestMe. Typically,it is a combination of the URL address of the YouTestMe GetCertified application and one of the endpoints (/proctoringResultsNew, /proctoringResults), depending on the version of the Proctoring service.
- Click the "Confirm" button if you want to save the Proctoring configuration.
- To reset the changes you have made, click the "Cancel" button.
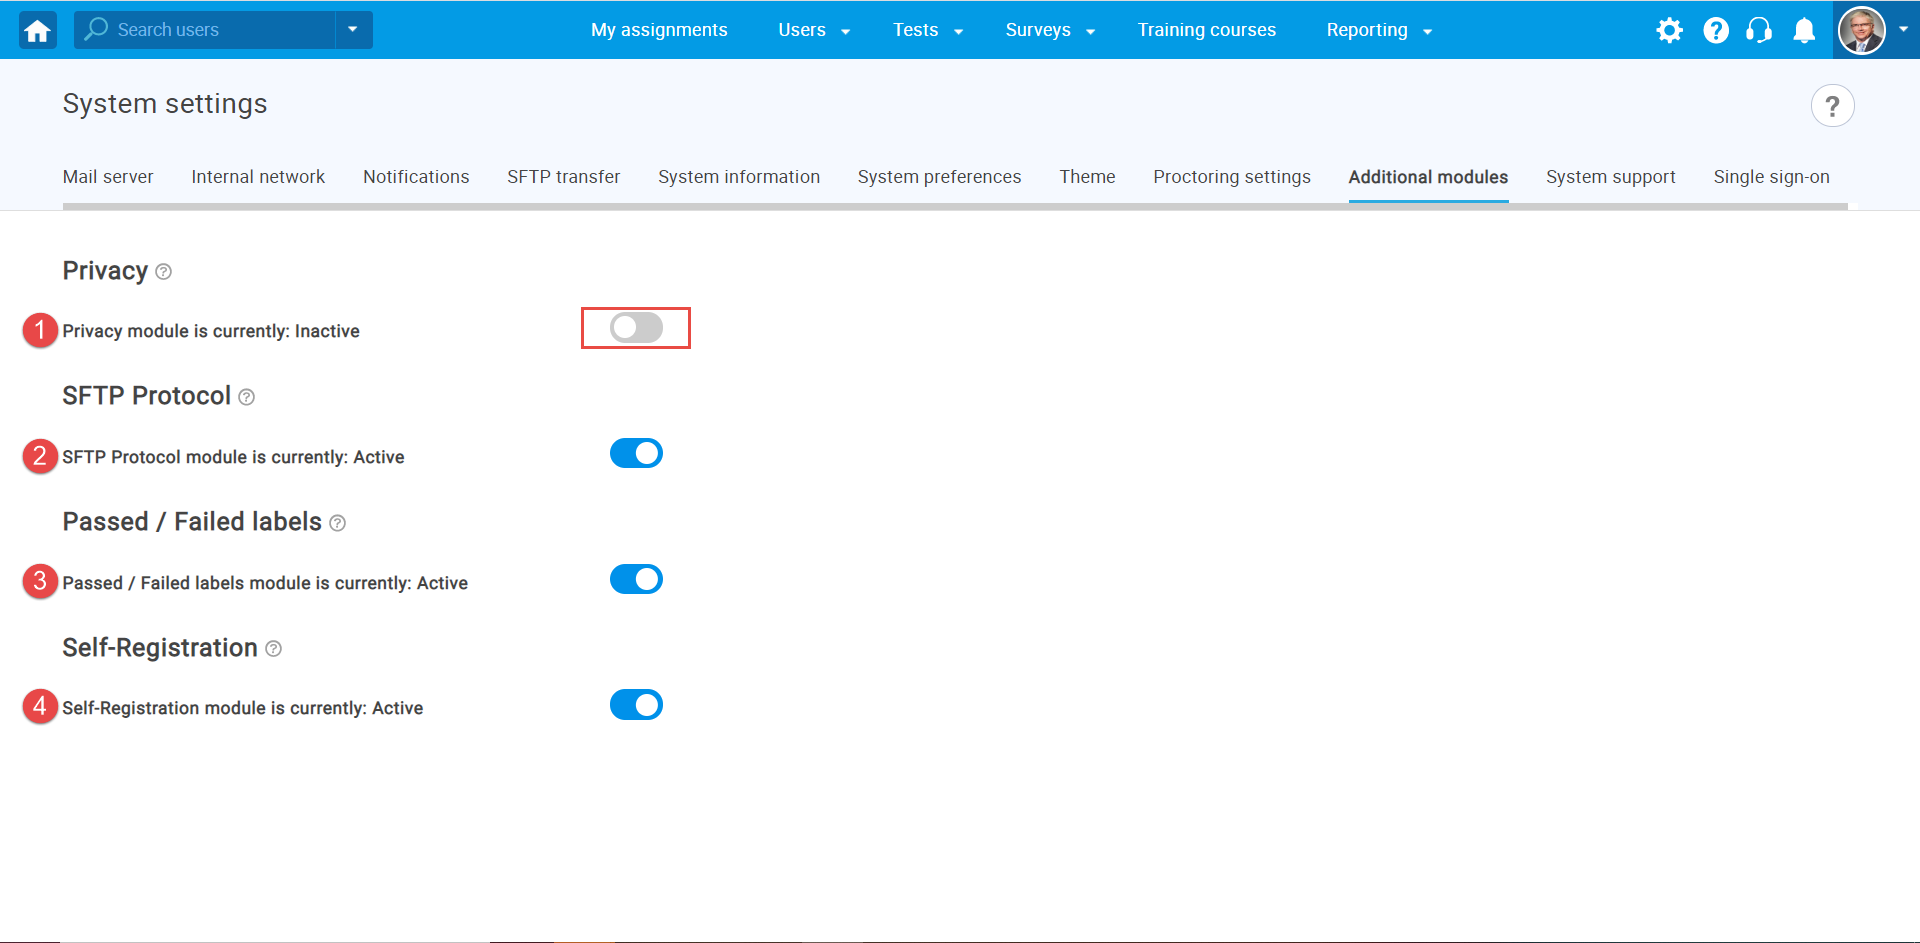
- Additional modules
On the "Additional modules" tab, by enabling next options you can:
- Hide users private information.
- Configure SFTP Protocol and automatically receive test results on your FTP server.
- Show or hide passed and failed labels through the application.
- Allow users to register in the application without administrator's approval.
- System support
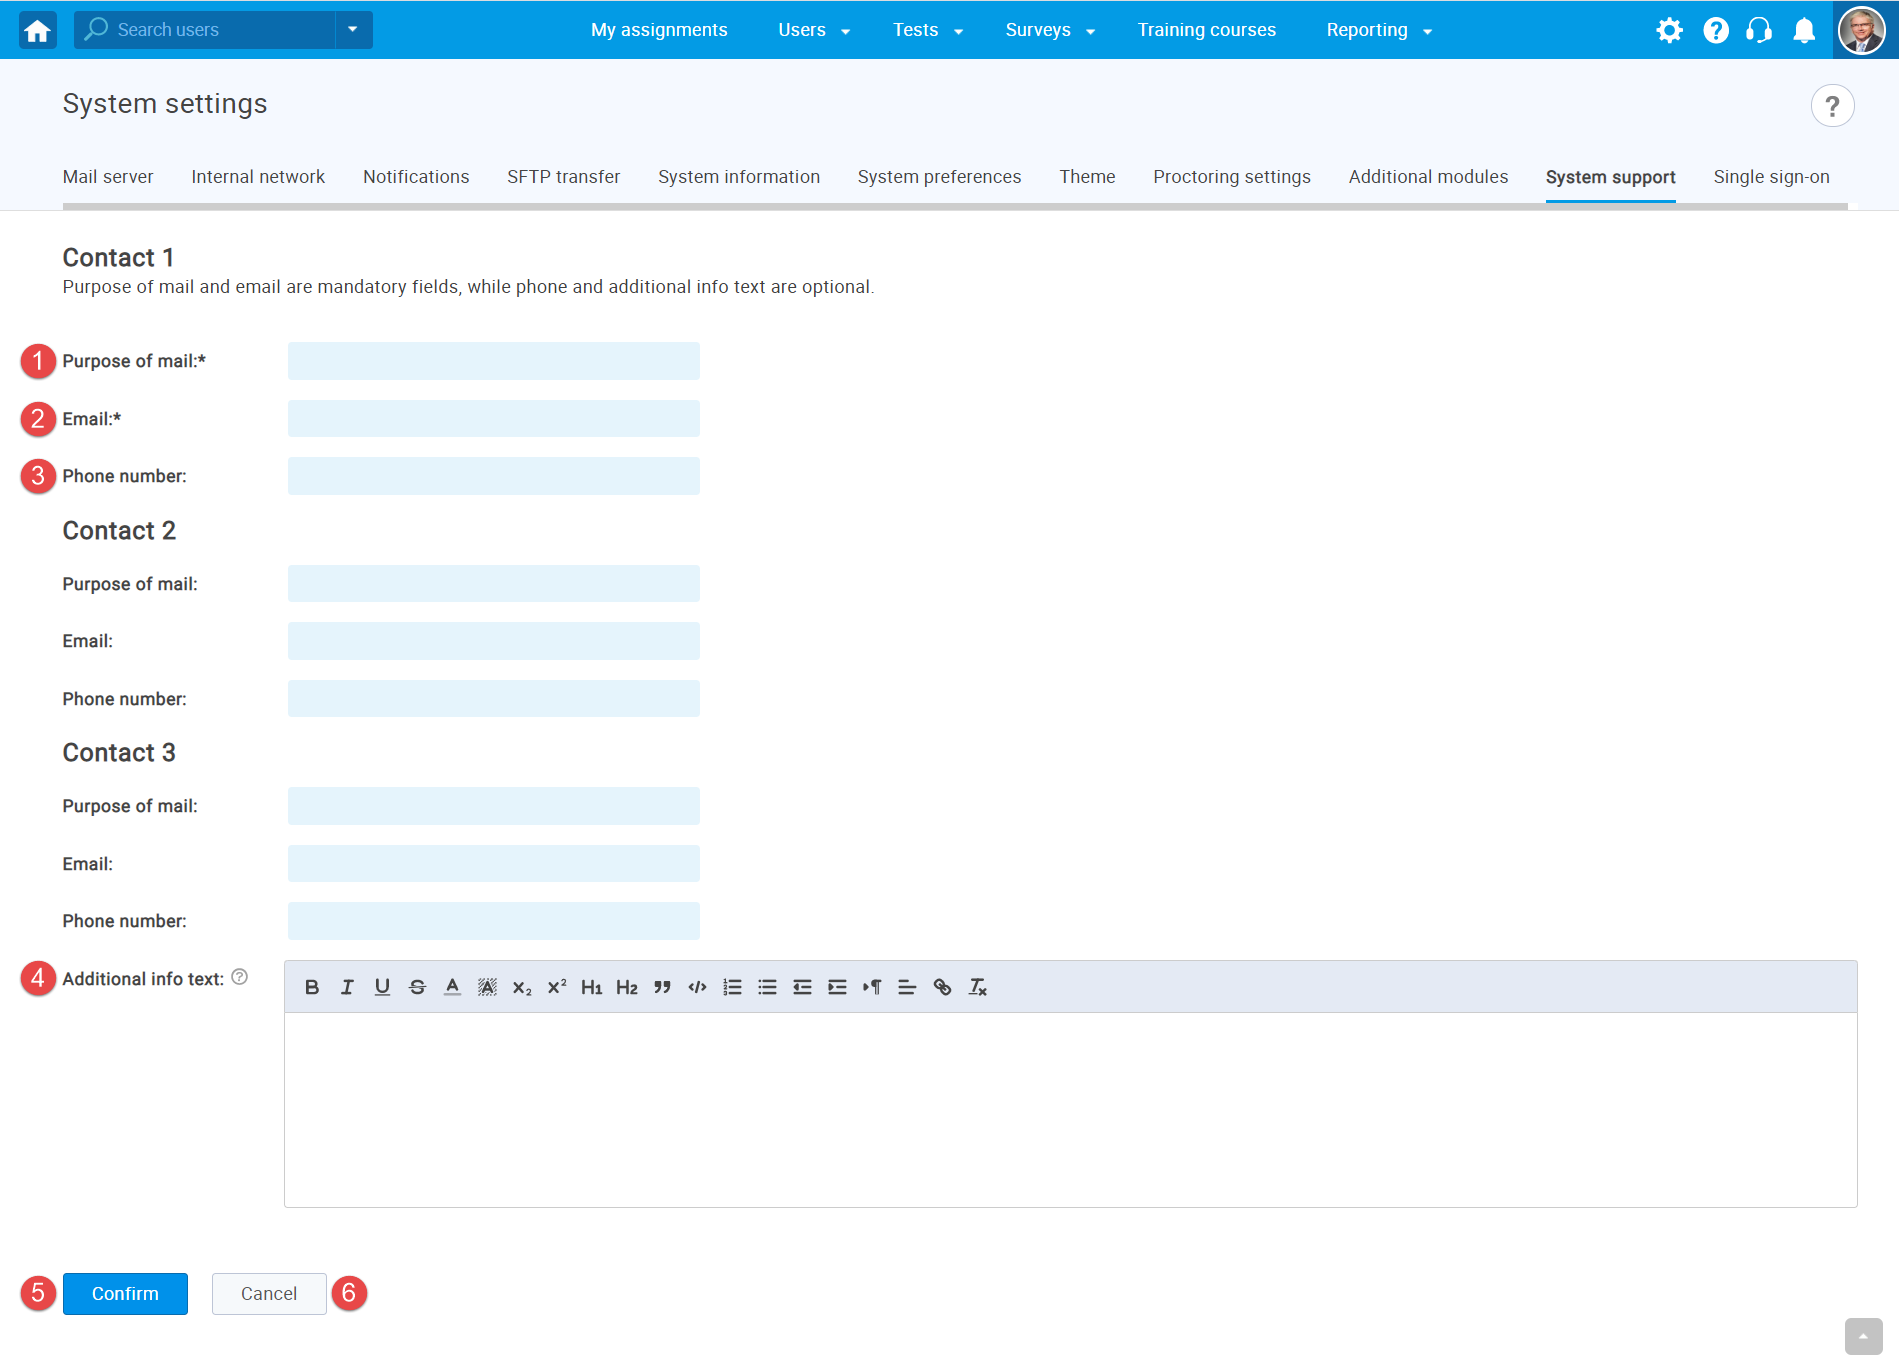
The "System support" tab serves to enable customized support. You can provide useful information such as support email, support phone number, as well as additional description for users support page.
- Describe the purpose of email and phone.
- Provide desired support email.
- Provide desired support phone number.
- Here you can define useful details about support contact. For example, expected email response time to customers' issues or business hours when support is available, etc.
- "Confirm" button will apply the changes.
- "Cancel" button will delete everything entered before saving.
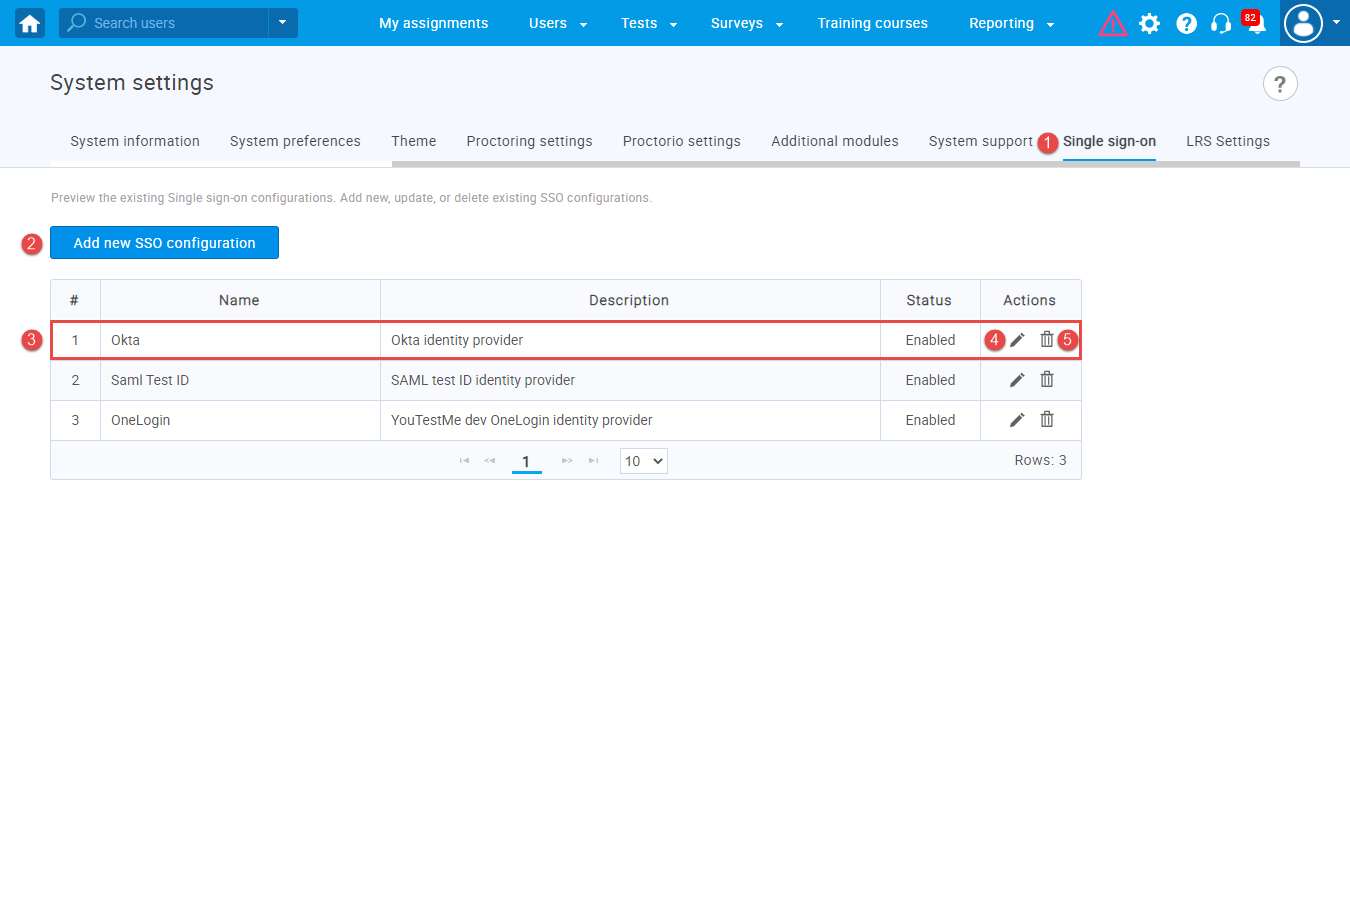
- Single sign-on
GetCertified can act as a Service Provider through the SAML 2.0 protocol, which allows the exchange of authorization data with an Identity Provider. GetCertified supports OneLogin, Okta, SSO Circle, and many other Identity Providers.
SAML 2.0 based Single Sign-on (SSO) can be configured for multiple identity providers simultaneously. You need to create a SSO configuration and define the parameters of the identity provider. Each created SSO configuration you create has an assertion consumer service end-point that will process the SAML response.
- To access the Single sign-on configuration panel, choose the "Single Sign-on" tab on the "System settings" page.
- By clicking the "Add new configuration" button, new pop-up window will appear where you can enter the parameters of the new SSO configuration.
- All existing Single sign-on configurations are displayed in the table with their names, descriptions, statuses and available actions.
- By clicking the edit icon, a pop-up window will appear, where you can change the parameters of the selected SSO configuration.
- SSO configuration can be deleted by clicking the trash can icon.
When creating a new or updating an existing SSO configuration, you need enter the parameters for configuring the service provider’s side. GetCertified provides the parameters that you need to configure the identity provider’s side..
- Enter the "Name" of the SSO configuration. The name must be unique for each SSO configuration since it identifies the SSO configuration.
- Optionally enter the "Description" of the SSO configuration.
- Choose the "Status" of the SSO configuration. If the status is "Enabled," users will be able to sign in with the identity provider specified in the configuration. Otherwise, they will not be able to do so.
- Use the provided "Service provider Entity ID" URL to configure the service provider on the identity provider’s side. The value represents the service provider’s identifier.
- Use provided "Assertion consumer service URL" to configure the service provider on the identity provider side. The field's value represents the URL of the end-point, where the SAML response from the identity provider will be returned.
- Choose the "Assertion consumer service binding" that is suitable for the identity provider. The field's value represents the SAML protocol binding to be used when returning the SAML response from the identity provider.
- Enter the "Identity provider Entity ID," identifier of the provider entity. The entered value must be an URL.
- Enter the "Single sign-on service URL," an URL of the identity provider’s single sign-on service end-point, where the service provider will send the authentication request.
- Choose the "Single sign-on service binding," a SAML protocol binding to be used when the service provider sends the authentication request to the identity provider.
- Input the "Certificate," the public x509 certificate of the identity provider. The certificate must be in a string format without headers. Use the tool on the following link to convert the certificate to a string format without headers.
- Enter the "Username attribute," the name of the assertion in the SAML response whose value will be used as the GetCertified user's username.
- Enter the "Email attribute," the name of the assertion in the SAML response whose value will be used as the GetCertified user's email.
- Optionally enter the "First name attribute," the name of the assertion in the SAML response whose value will be used as the GetCertified user's first name.
- Optionally enter the "Last name attribute," the name of the assertion in the SAML response whose value will be used as the GetCertified user's last name.

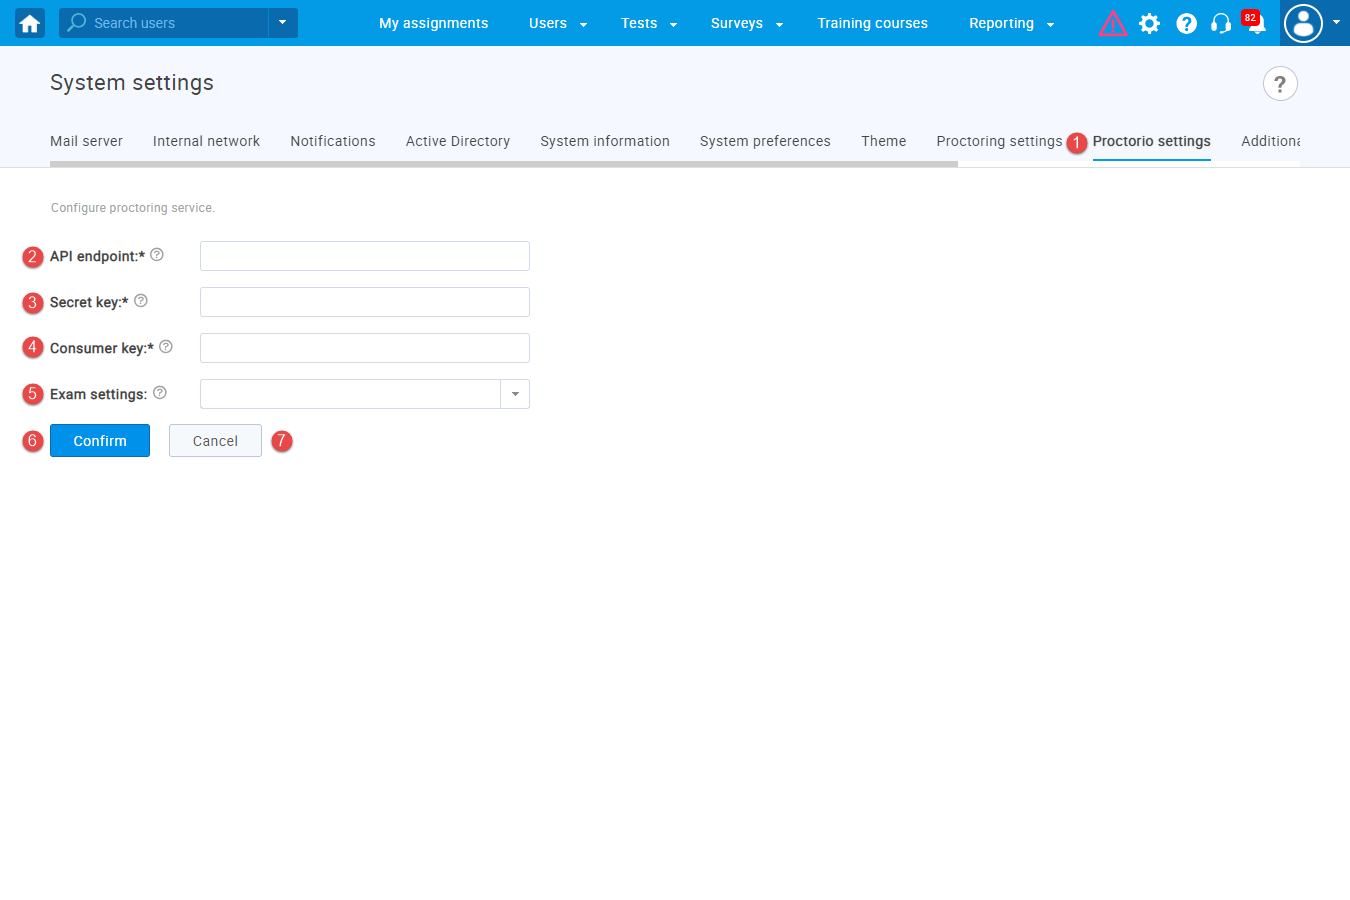
- Proctorio settings
Please note that the Proctorio can be enabled only upon your request. For more information, contact the YouTestMe team at sales@youtestme.com. Upon the activation, you will be provided with the necessary parameters to configure the integration with Proctorio.
- To configure the integration with Proctorio automated proctoring service, choose the "Proctorio settings" tab on the "System settings" page.
- Enter the "API endpoint." This parameter represents the URL of the Proctorio API endpoint, and is provided by YouTestMe or Proctorio.
- Enter the "Secret key." provided by YouTestMe or Proctorio.
- Enter the "Consumer key." provided by YouTestMe or Proctorio.
- Choose the "Exam settings" from the dropdown menu. Exam settings enable you to choose the Proctorio features you want to add and control during the proctoring session.
- Click the "Confirm" button if you want to save the Proctorio integration settings.
- To reset the changes you have made, click the "Cancel" button.
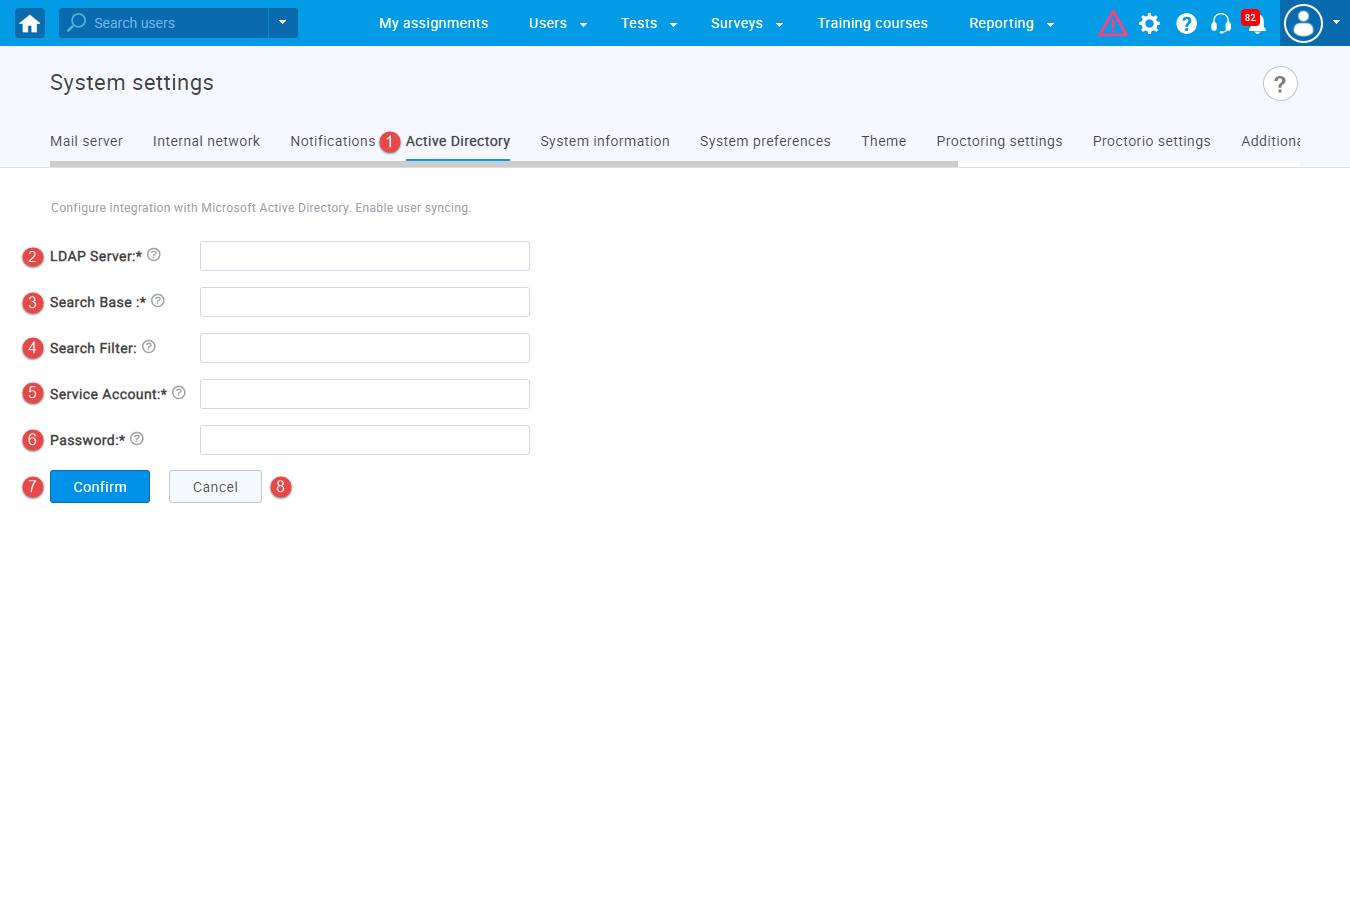
- Active Directory
Please note that the Active Directory can be enabled only upon your request. For more information, contact the YouTestMe team at sales@youtestme.com.
- To configure the integration with Active Directory or other directory services that support LDAP protocol, choose the "Active Directory" tab on the "System settings" page.
- Enter the "LDAP server" address. This parameter is the LDAP URL address of the directory’s domain controller. It is usually a combination of LDAP protocol, a host of the directory's domain controller, and the LDAP port: [ldap|ldaps]://{DOMAIN_CONTROLLER_HOST}:{LDAP_PORT} (for example: ldap://mydomain.org:389)
- Enter the "Search Base" parameter, which represents the node under which the users will be searched for. It is usually a distinguished name of a root node or a node of an organizational unit or group. For example: OU=Testing Center,DC=mydomain,DC=org
- Optionally enter the "Search filter," a parameter that is used for filtering the users for synchronization within the Search Base node to be synchronized in GetCertified. A filter has to be in the format specified here. Usually, it is a filter that will match the users from a directory group or users with specific values of attributes. By the default (&(objectClass=user)(samaccountname=*)(sn=*)(givenName=*)(mail=*)(objectGUID=*)) is applied to match only users with non-null parameters required for GetCertified user creation. For example: (memberOf=CN=YTM users,OU=Testing Center,DC=server,DC=net) - Only the users that belong to the "YTM users" group will be synchronized and able to sign into GetCertified with the Active Directory credentials. If you change the Search Filter or Search Base. In that case, all users that are synchronized and don't match the new Search Filter and Search Base will will remain in GetCertified, but will not be able to sign in using the Active Directory account credentials anymore.
- Enter the "Service account." , a distinguished Name or User Principal Name of the Active Directory account, which is used used for establishing the LDAP connection and synchronizing the users. This account does not have to match the Search Filter.
- Enter the "Password" of the service account.
- Click the "Confirm" button if you want to save the Active Directory integration settings.
- To reset the changes you have made, click the "Cancel" button.