User manual
Question types
-
Introduction
Question types are different types of questions that can be used in tests and surveys. Possible types include single choice, multiple choice, hot spot, essay, ordering, matrix, open-ended, true/false, matching, and fill in the blanks. For more information on how to create each question type, refer to the Question types chapter.
The application offers users a diverse selection of question types, specifically designed to assess comprehension levels effectively.
-
Single choice - Multiple answers are displayed while only one of them can be selected as correct.
-
Multiple choice - Multiple answers are displayed, and multiple answers can be selected as correct.
-
.
Essay - Users have to compose an answer themselves. These questions have to be graded manually
-
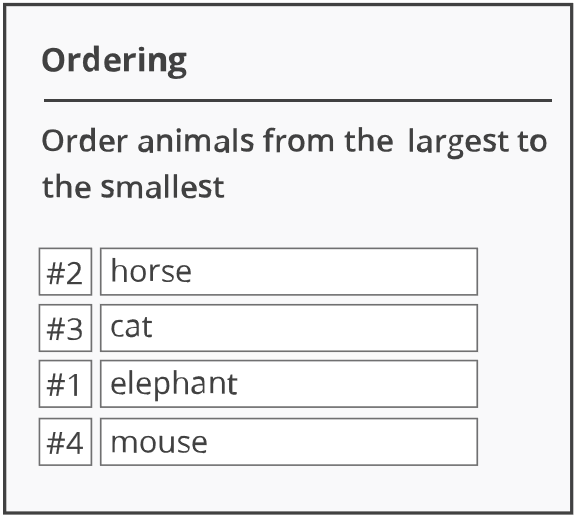
Ordering - Users need to rearrange answers in the correct order.
-
Fill in the blanks - Users need to fill in the sentence's missing parts. You can determine the format in which the candidates must provide their responses. The free text input format allows candidates to answer using characters and numbers. The numerical input format limits candidates to inputting only numbers, making it ideal for quantitative questions. Offered answers limit candidates to a set of predetermined answer options.
-
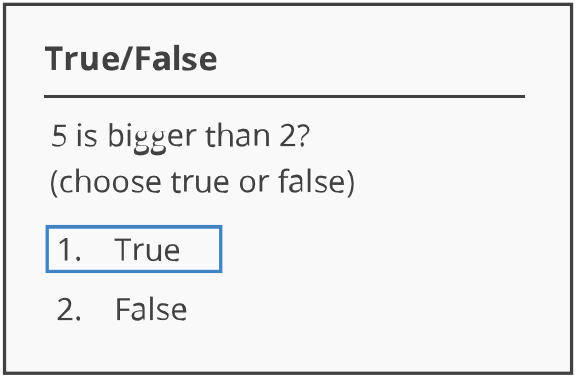
True/False - Users have to choose true or false to answer a question.
-
Matching - Users have to pair objects on the left side with the objects on the right side.
-
Matrix - Questions represented in a grid format. The rows present the questions, and the columns offer a set of predefined answer choices that apply to the questions in the row.
-
Open-ended - The blank space needs to be filled with the correct answer that the system will automatically compare with the predefined correct answer.
-
Hot spot - Users are required to mark one or multiple spots on an image as an answer.
-
-
Creating questions
Questions can be created through diverse methods. They can be created directly during the test creation process. Alternatively, questions can be created after the test is created within the Manage tests page under the Questions tab. Additionally, questions can be created and stored in a question pool.
Note: Questions created in the test creation wizard won't be accessible in other question pools and tests unless chosen for inclusion in a desired pool. Conversely, questions created in a question pool can be used in various questions and tests.
-
Creating questions directly in the test creation wizard
To create questions directly in the test creation wizard, do the following:
-
Navigate to the Tests/Manage tests tab and select New test button.
-
Proceed to step 4 and enter the test creation wizard. Choose the Pick questions from pools or create them on the spot method. This will enable you to create different types of questions for the test.
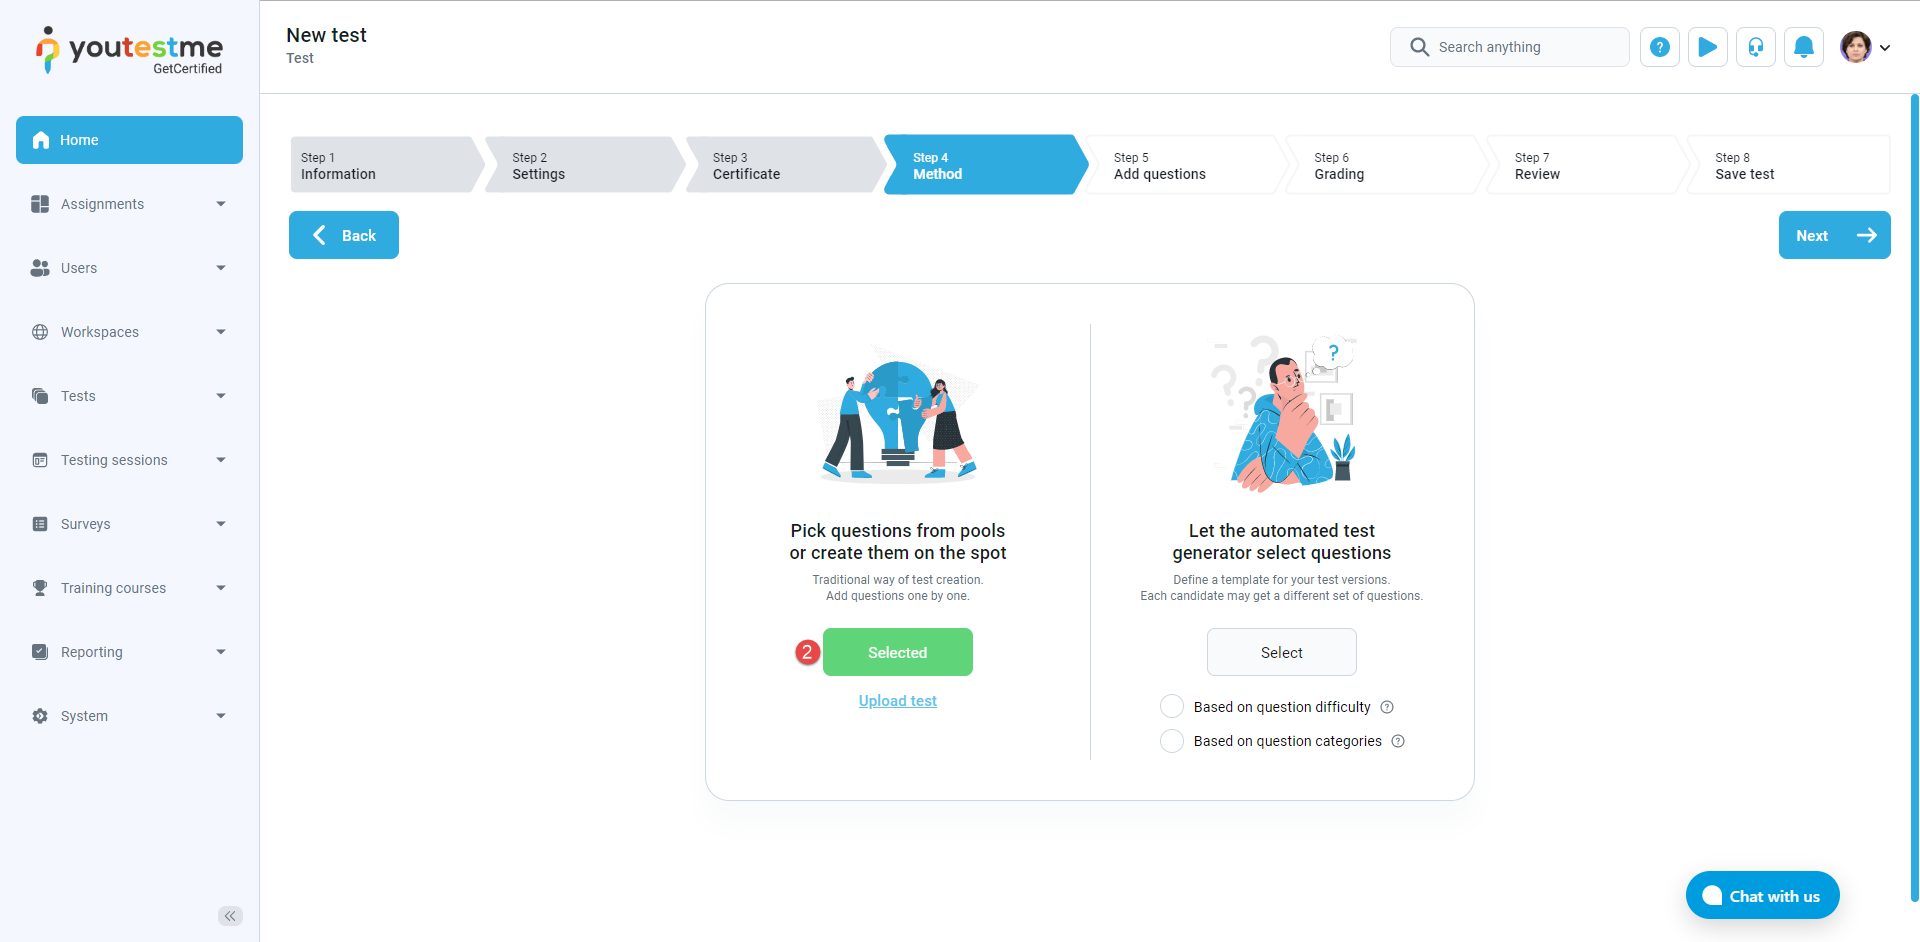
-
Click the Add new question button to be presented with the drop-down that contains all of the question types you can create.
Note: You can hover over each question type to view an example of it.
For detailed information on each question type and instructions on how to create them, please consult the Question types chapter.
-
-
Creating questions post-test creation on the Manage tests page
Note: Creating questions is only possible for tests manually created.
To create questions, follow these steps:
-
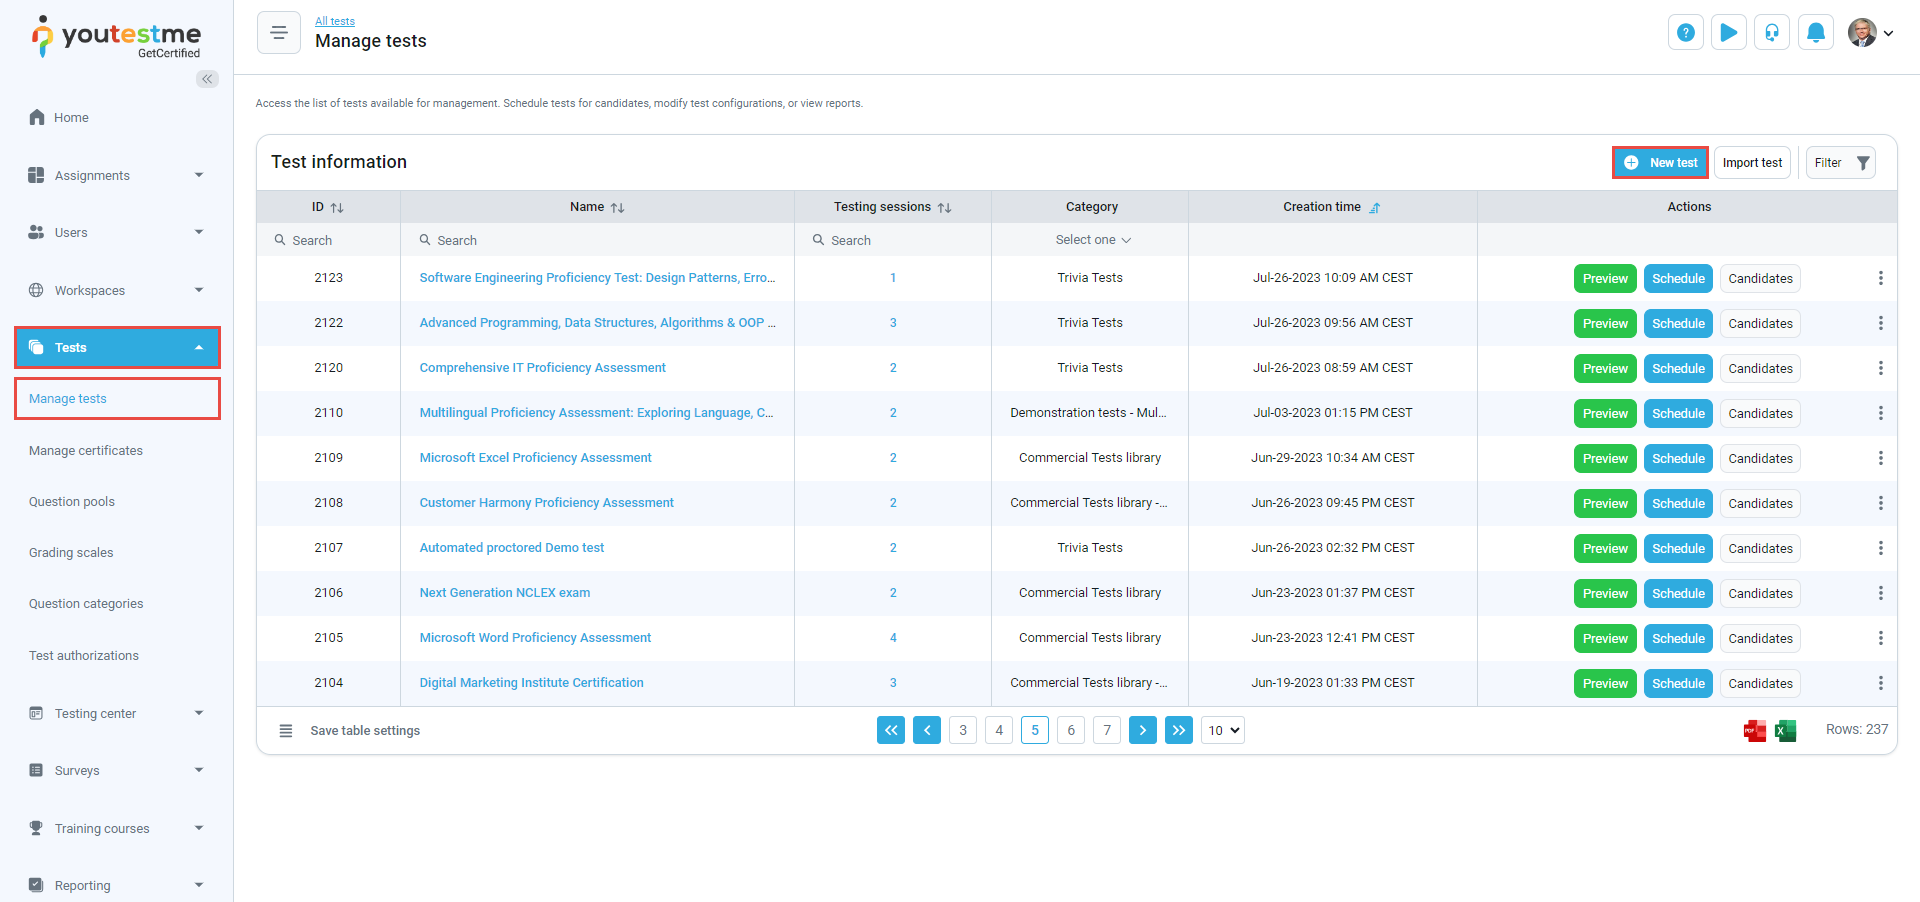
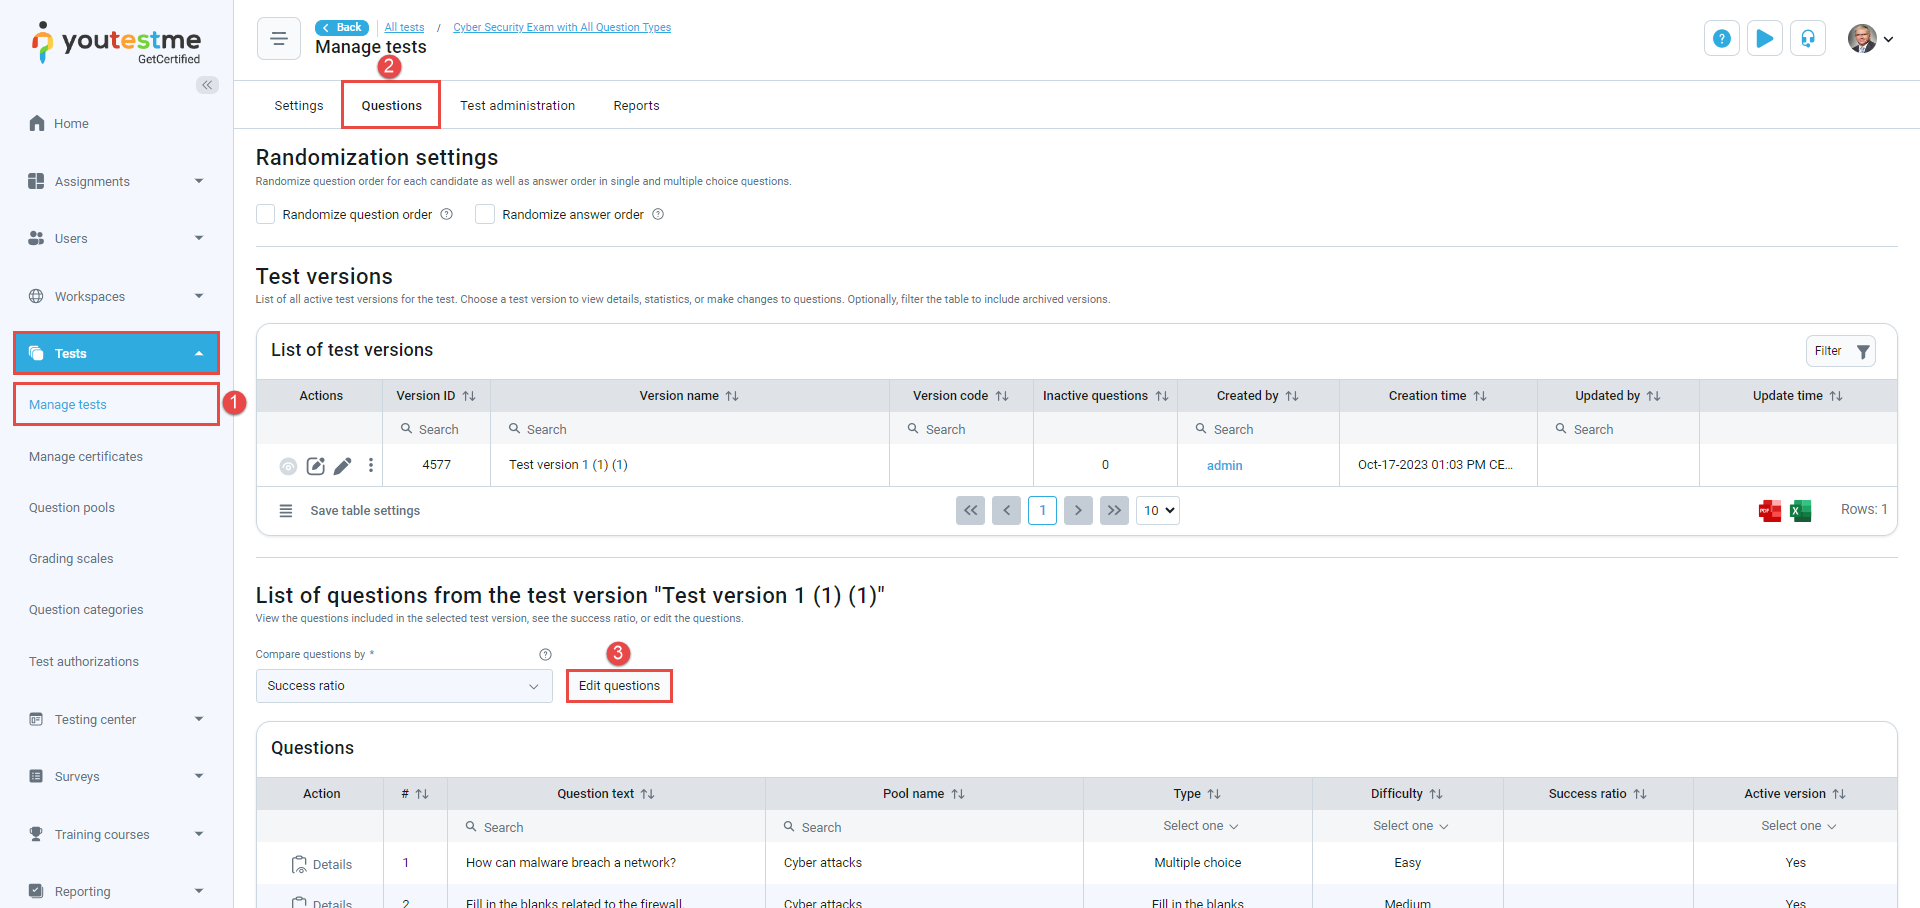
Select the Tests/Manage tests tab.
-
Open the desired test and select the Questions tab.
-
Click the Edit questions button and confirm the dialog prompt.
Note: If there are candidates who have completed this version of the test, the version will be archived, and a copy for editing will be created.
-
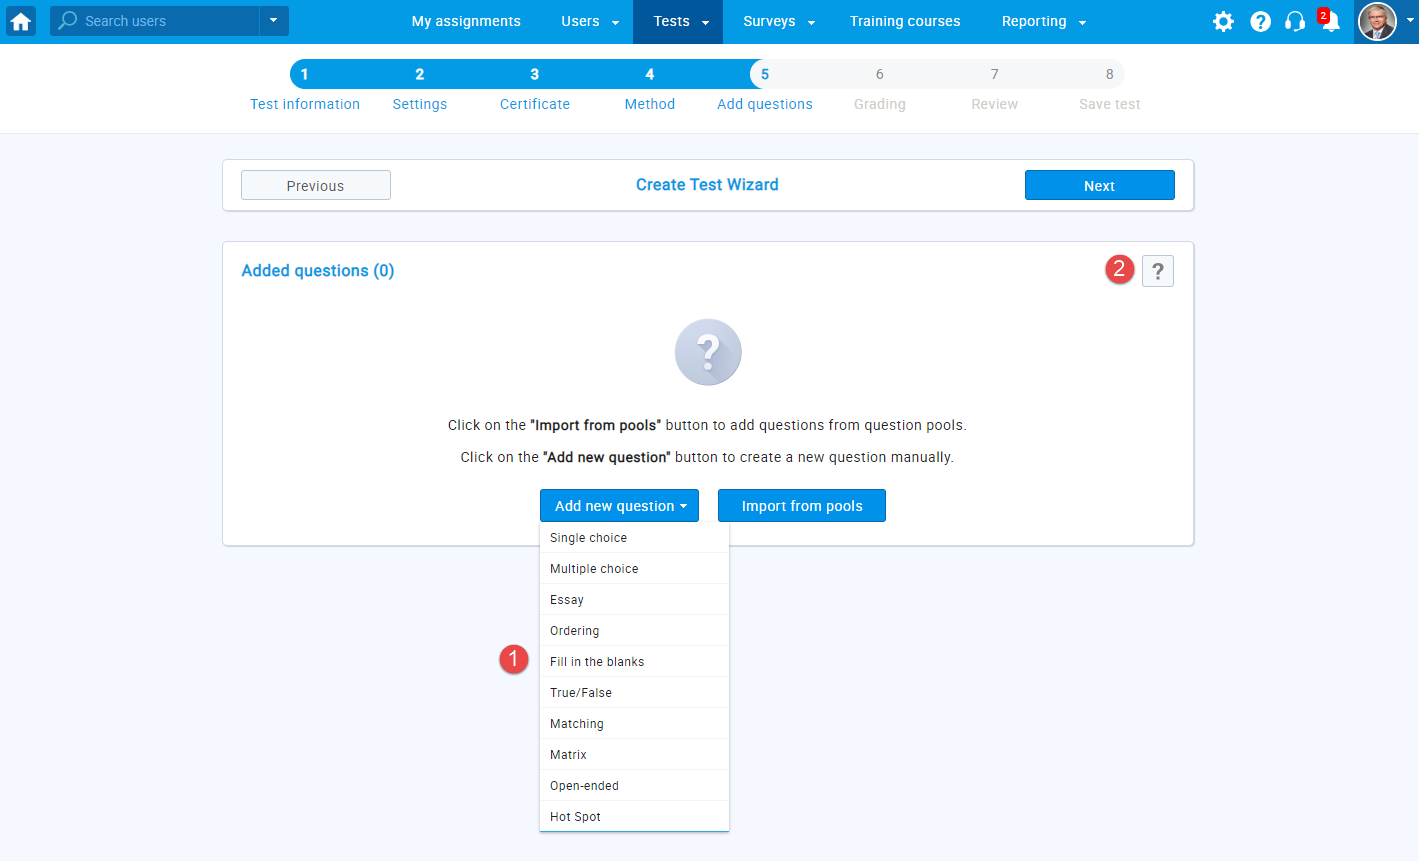
Click the New question button to be presented with the drop-down that contains all of the question types you can create.
Note: You can hover over each question type to view an example of it.
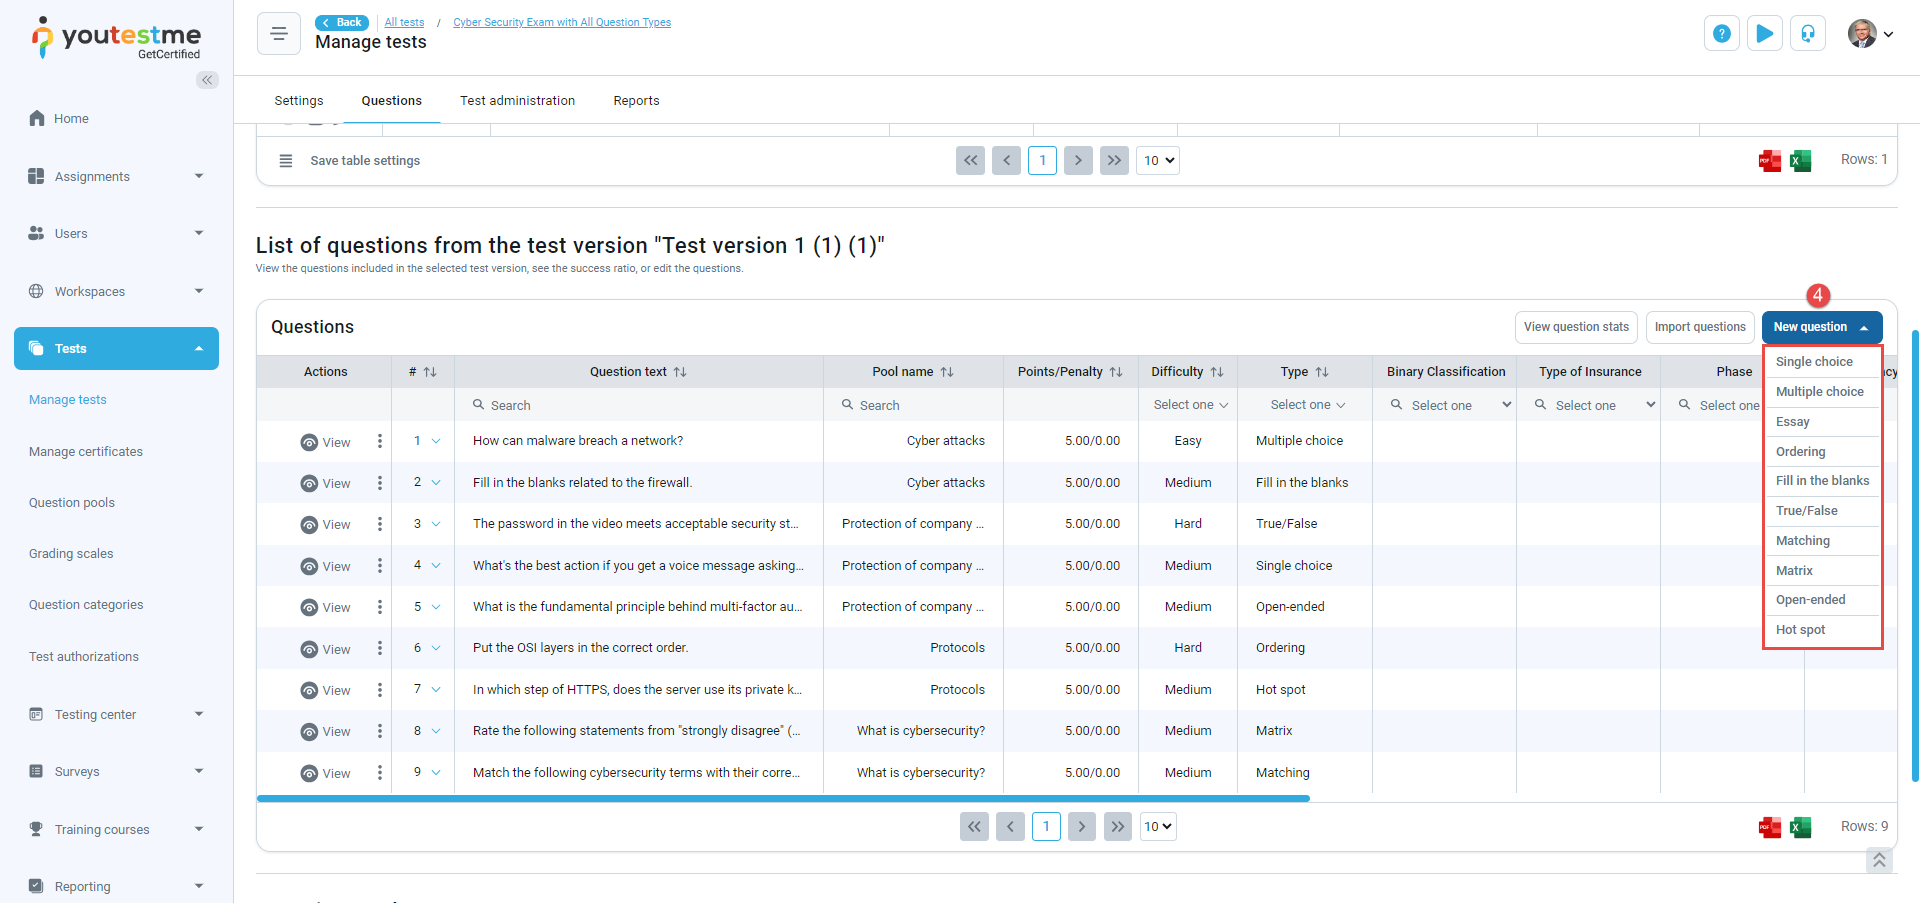
For detailed information on each question type and instructions on how to create them, please consult the Question types chapter.
-
-
Creating questions in a question pool
To create questions in a question pool, do the following:
-
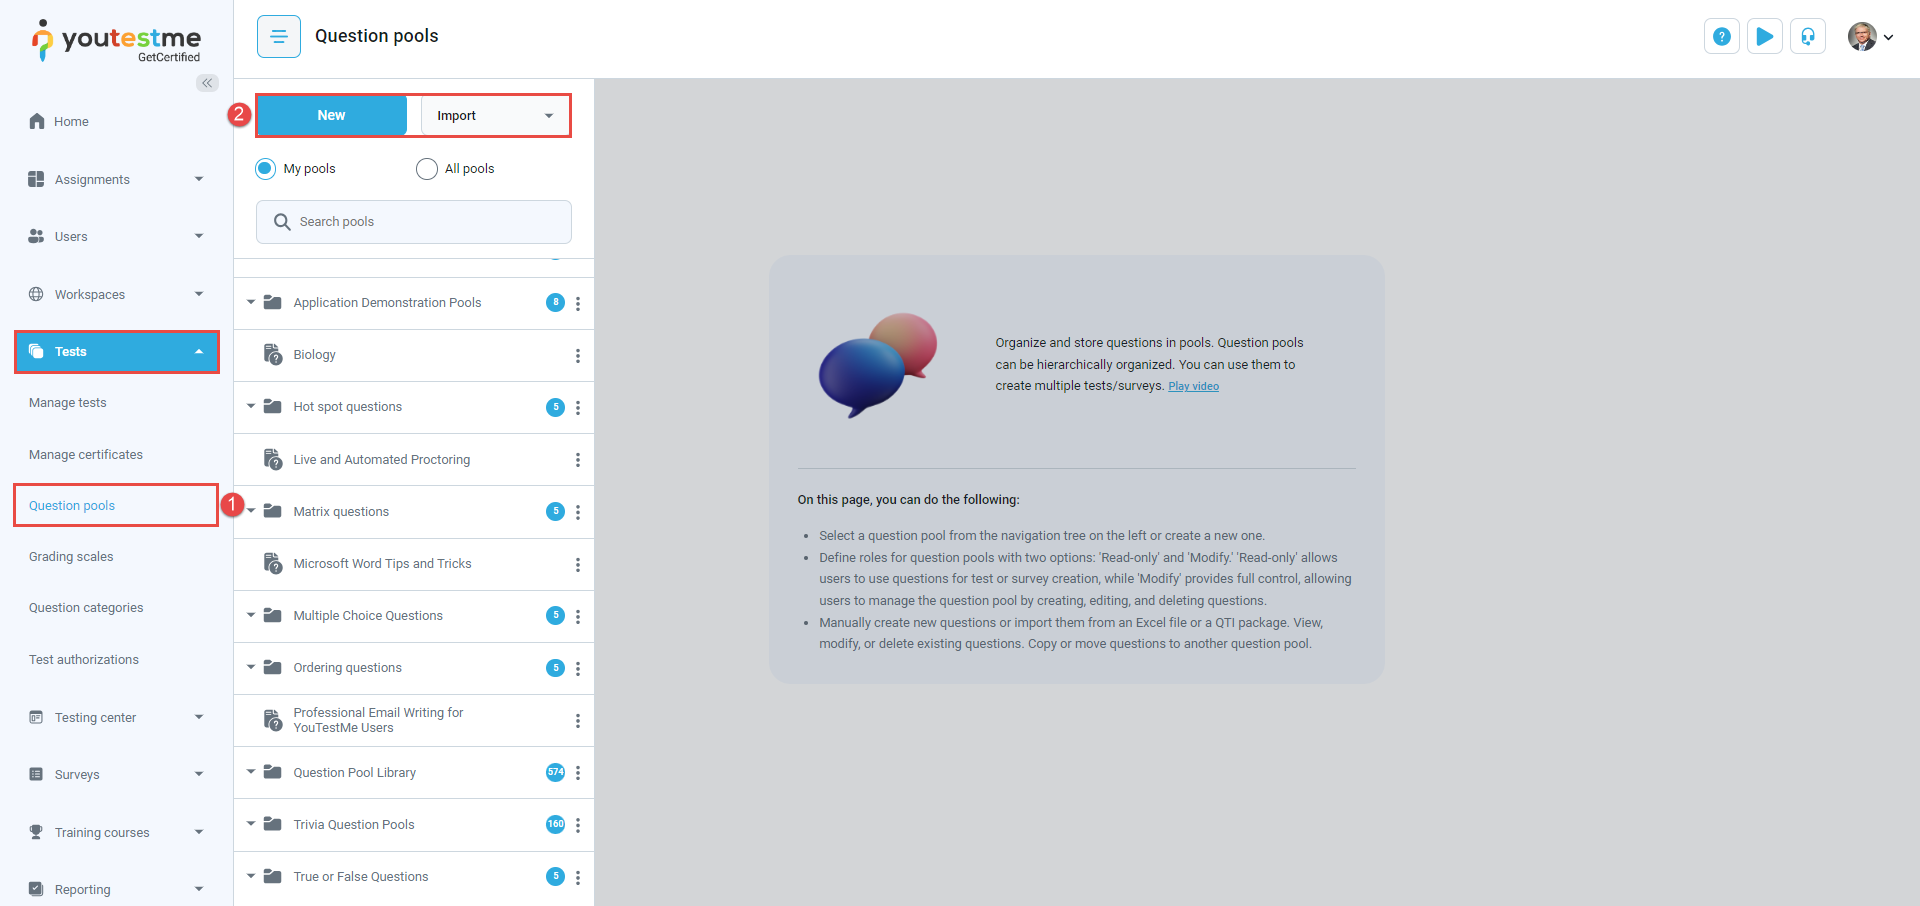
Select the Tests/Question pools tab.
-
Create a new question pool or enter an existing one.
-
Upon navigating to the Questions tab, click the Add question button to be presented with the drop-down that contains all of the question types you can create. For detailed guidance on adding questions manually, please refer to the Question pools help page, the Adding questions manually, one by one chapter.
-
Upon navigating to the Questions tab, click the Import questions button to upload questions from an Excel or a zip file. For detailed guidance on loading questions, please refer to the Question pools help page, the Importing questions chapter.
-
Upon navigating to the Questions tab, click the Generate questions with AI button to generate questions using an AI system. For detailed guidance on generating questions, please refer to the Question pools help page, the Generating questions through AI chapter. Additionally, for detailed information on each question type and instructions on how to create them, please consult the Question types chapter.
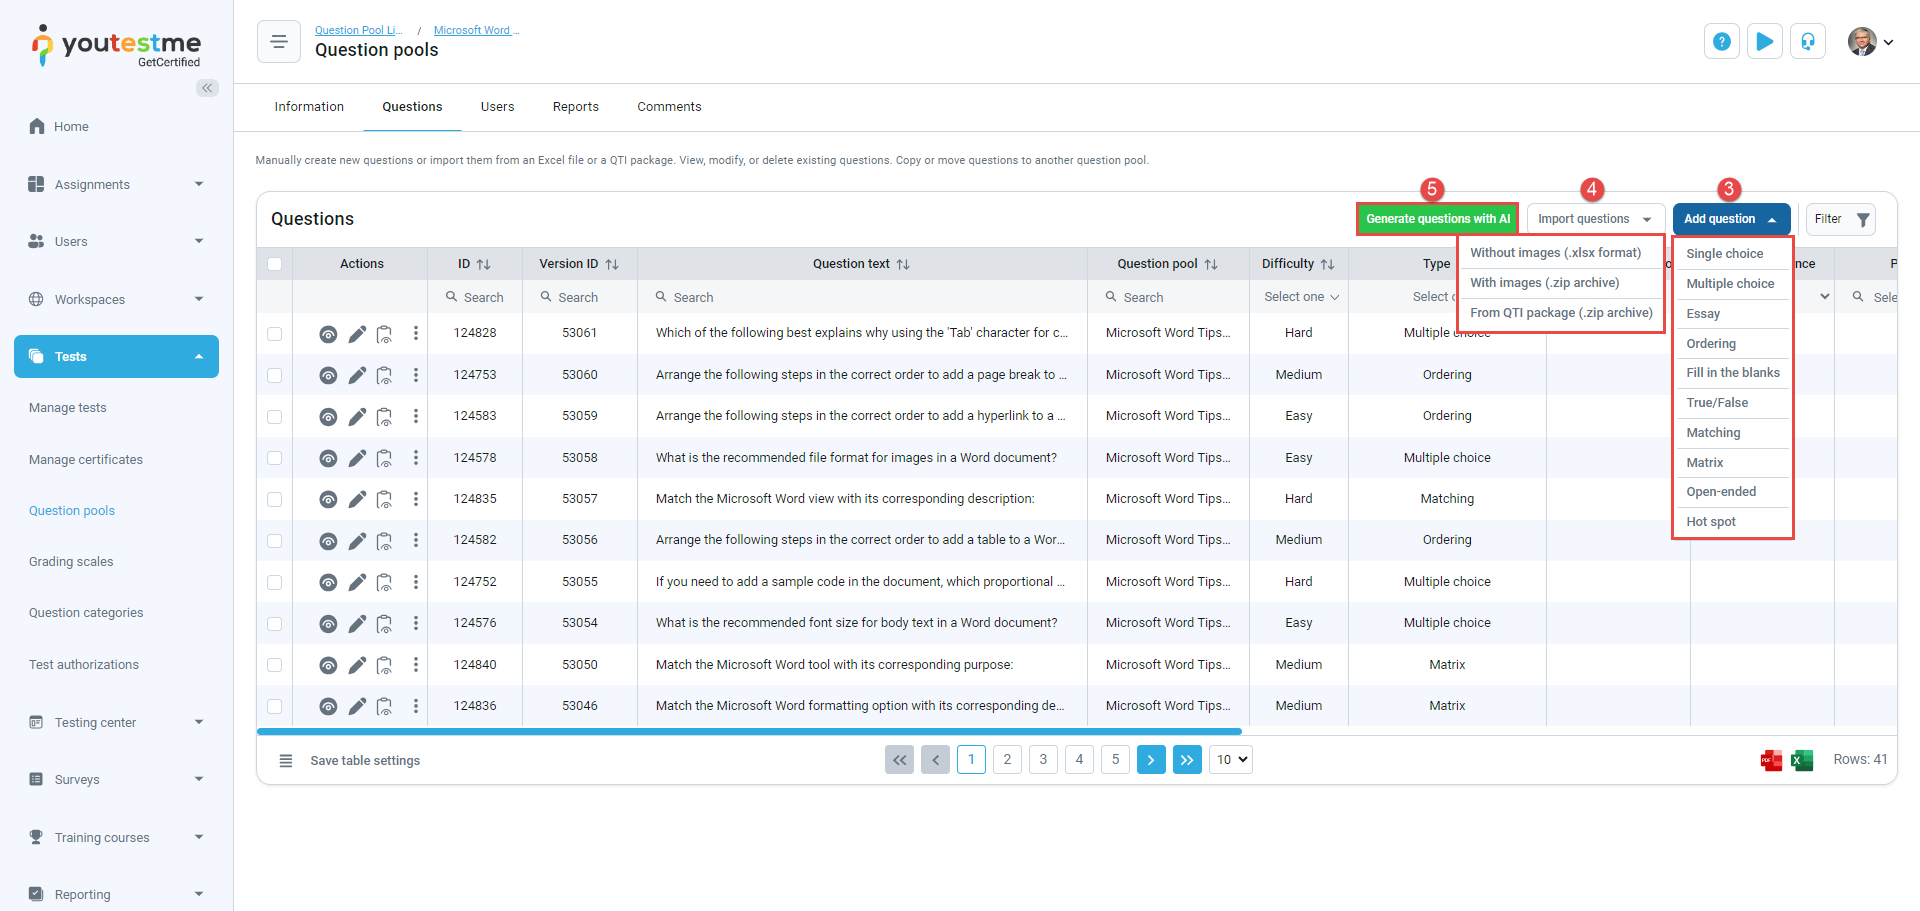
For detailed information on each question type and instructions on how to create them, please consult the Question types chapter.
-
-
-
Question types
-
Single choice questions
Single choice questions offer multiple possible answers, where only one can be selected as the correct.

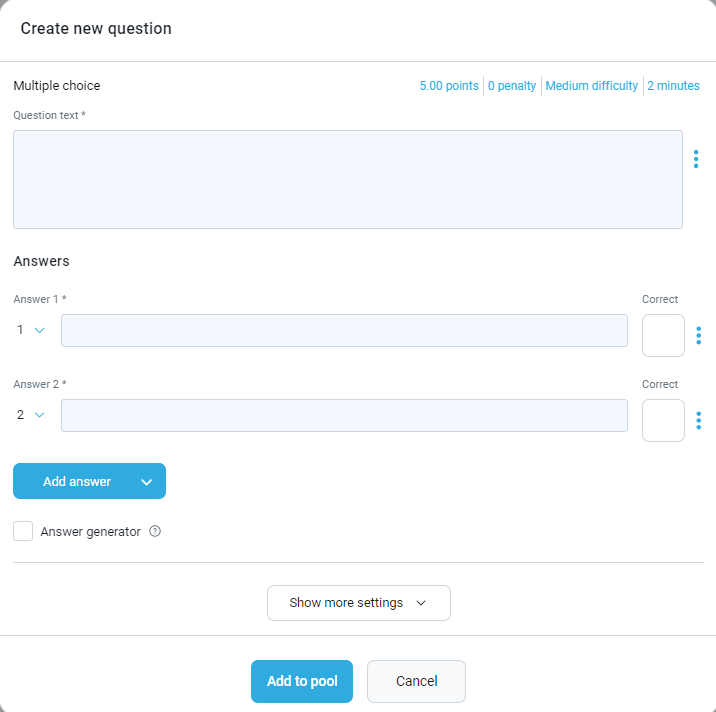
If you select a single choice question from the list of question types, the following screen will be displayed:
To create and edit a single choice question and its answers, follow these steps:
-
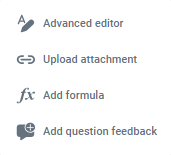
Question text - Enter the question text into this field.
By clicking on the three dots a dropdown menu will appear where you can additionally edit the question.
-
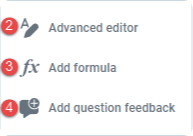
Advanced editor - Edit the format of the question or add a table.
-
Upload attachment - Add multimedia files (image, audio, video) to the question.
-
Add formula - Add formulas to the question.
-
Add question feedback - The feedback will be displayed to the candidate upon answering the question, or immediately while answering the question, depending on test settings.
-
-
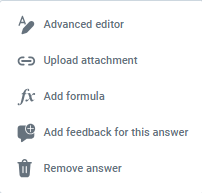
Answer text - Enter the answer text into this field.
By clicking on the three dots a dropdown menu will appear where you can edit the answer.
-
Advanced editor - Edit the format of the answer or to add a table.
-
Upload attachment - Add multimedia files to the answer (image, audio, video).
-
Add formula - Add formulas to the answer.
-
Add answer feedback - The feedback will be displayed to the candidate if they select this answer.
-
Click the Trash can icon to delete the answer.
-
-
Add answer - Add another answer to the list of offered answers.
-
Check the box next to the correct answer.
-
Click the arrow to add All of the Above or None of the Above as an answer.
-
Answer generator - Define a number of correct and incorrect answers that will be randomly selected and displayed to each candidate.
-
Add to test - Add the question you have just created to the test.
Note: If you are adding questions to the pool, you will have the Add pool button available.
-
Cancel the question creation.
-
-
Multiple choice questions
Multiple choice questions offer several possible answers, while more than one can be selected as correct.
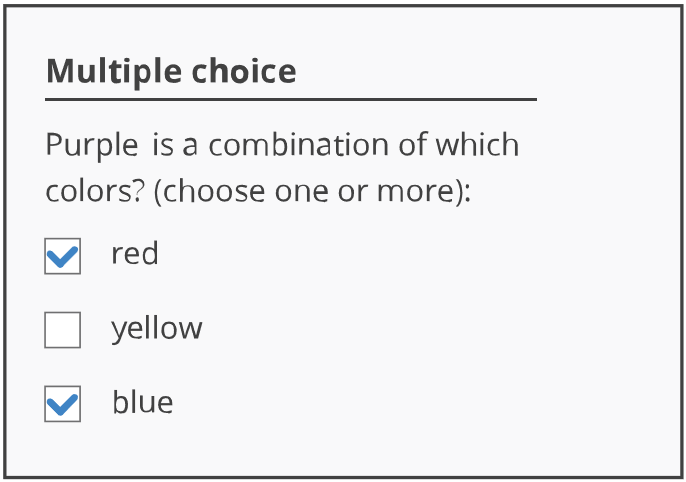
If you select a multiple choice question from the list of question types, the following screen will be displayed:
To create and edit an multiple-choice question and its answers, please refer to the Single-choice questions section.
-
Essay questions
Essay questions allow a test-taker to write a longer answer, e.g., analysis or explanation, usually of a specified length.

If you select an essay question from the list of question types, the following screen will be displayed:

By activating the Answer question by filling out a PDF document option, candidates will be required to complete the question by filling out a PDF document instead of typing their response in a standard text editor. Click the Upload file button to upload an editable PDF file.
To create and edit an essay question and its answers, please refer to the Single-choice questions section.
-
Ordering questions
When creating an ordering question type, you should enter the Question text, list the items, and order them correctly.
If you select an ordering question from the list of question types, the following screen will be displayed:
To create and edit an ordering question and its answers, please refer to the Single-choice questions section.
-
Fill in the blanks questions
Fill in the blanks questions require a test-taker to fill the blanks or select one of the offered answers to gain maximum points.
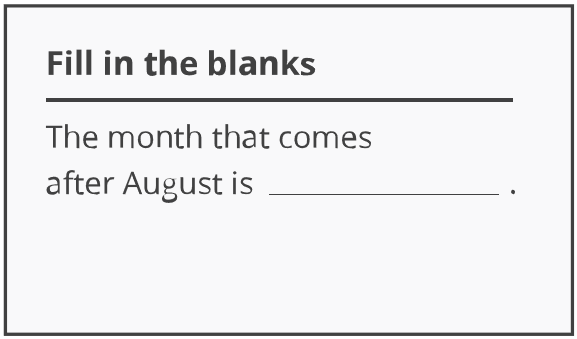
There are three ways to create this type of question. The first is to give blank places for an answer, the second is to prepare offered answers in the drop-down list, where the test-taker will select one correct and the third is the numerical input format limits candidates to inputting only numbers, making it ideal for quantitative questions.
If you select a fill in the blanks question from the list of question types, the following screen will be displayed:
-
Title - Enter the question title into this field.
By clicking on the three dots a dropdown menu will appear where you can additionally edit the question.
-
Advanced editor - Edit the format of the question or add a table.
-
Upload attachment - Add multimedia files (image, audio, video) to the question.
-
Add formula - Add formulas to the question.
-
Add question feedback - The feedback will be displayed to the candidate upon answering the question, or immediately while answering the question, depending on test settings.
-
-
In the Preview field, you will see a question preview with the correct answer. If there are multiple blank spaces in the text, the corresponding ordinal number will be indicated next to the words that should be filled in.
-
Blank text - Enter the response that the candidate should enter for an answer to be accepted as correct. The response can be textual or numerical type or selected from offered answers, depending on the input type you choose. If you leave the blank text empty, the correct answer will be to not enter any text or number.
-
Input format - Determine the format in which the candidates must provide their responses. There are three ways to create this type of question:
-
Free form text: Allows candidates to respond using both characters and numbers. For example, when asked 'What is the capital of France?,' candidates might input 'Paris' as the correct answer.
-
Numerical: Restricts candidates from entering only numerical values, making it well-suited for quantitative questions. In a question like 'What is 2 + 2?' candidates would enter '4' as the correct numerical answer.
-
Offered answers: Constrains candidates to a predefined set of answer options. In the question 'Which of the following is a primary color?' candidates would select 'Blue' as the correct offered answer from a list that includes 'Red,' 'Green,' and 'Blue.'
-
-
By clicking on the arrow, the drop-down list will open, allowing you to arrange each part of the text with its answer in the desired order.
-
Clicking on the three dots allows you to open the input configuration for Free form text and Numerical formats.
-
Matching type for free-form text format - Select the appropriate matching type for the input field to ensure accurate validation of candidate responses. Use exact matching for the entire sentence, ensuring the candidate's input precisely aligns with the correct character answer. For instance, if case sensitivity is configured, inputs such as "ABCDE" or "abcde" will not be accepted as correct for the answer "ABCDE." The provided answer must be an exact match to the text in the blank. The blank field is case-insensitive unless you configure the matching type as case-sensitive.
-
Limit the number of characters for free-form text format, and white spaces allowed for input to help candidates stay within the given limit when answering.
-
Matching type for numerical format - Choose the appropriate matching type for the input field to ensure accurate validation of candidate responses. Opt for exact value matching to ensure candidates' responses are an exact match for the correct answer. For example, if the correct answer is 545.59, only that exact input will be accepted. Alternatively, choose in-bound matching to define an acceptable range of values for input, ensuring candidates remain within the specified range. For instance, if the lower bound value is 540.00 and the upper bound value is 550.00, any input within the range of [540.00, 550.00] will be accepted.
-
Input min - Specify the minimum value allowed for input to ensure candidates stay within the acceptable range. If this field is left blank, the default value is set to -10,000,000,000,000.
-
Input max - Specify the maximum value allowed for input to ensure candidates stay within the acceptable range. If this field is left blank, the default value is set to 10,000,000,000,000.
-
Decimal places - Indicate the number of decimal places allowed for input.
-
Add offered answer - Define the number of offered answers.
-
Enter the answer in the text field.
-
Check the box next to the correct answer.
-
Delete offered answer.
-
Add part of the text with text before and after the blank field, specify the input format, and select the correct answers.
-
Remove the entire part of the text.
-
Add to test - Add the question you have just created to the test.
Note: If you are adding questions to the pool, you will have the Add pool button available.
-
Cancel the question creation.
To create and edit a fill in the blanks question and its answers, follow these steps:
-
-
True/false questions
True/false questions are used when a test-taker should evaluate a written statement as True or False.
If you select a true/false question from the list of question types, the following screen will be displayed:

To create and edit an true/false question and its answers, please refer to the Single-choice questions section.
Note: The answer is automatically generated (True or False).
-
Matching questions
Matching questions require a test-taker to match an item on the left side with an item on the right side.
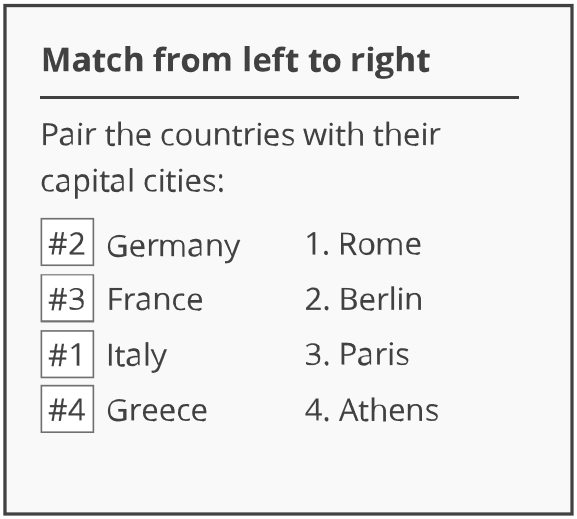
If you select a matching question from the list of question types, the following screen will be displayed:
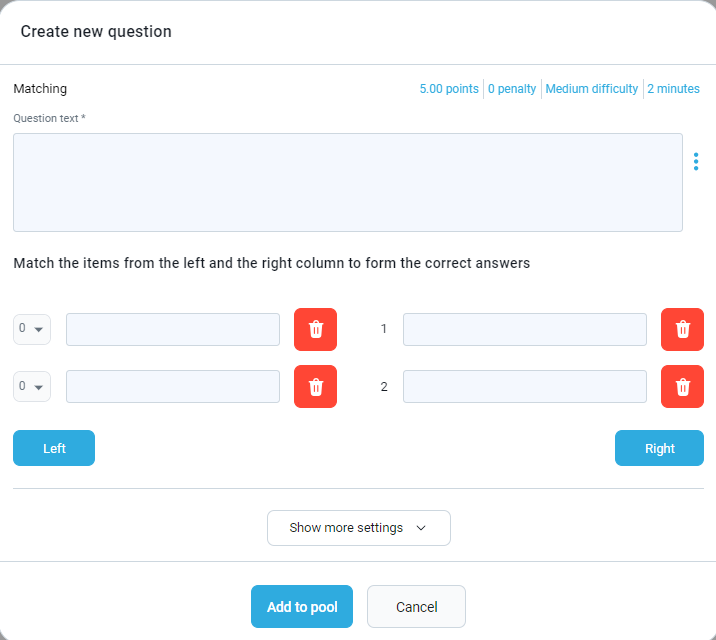
To create and edit an matching question and its answers, please refer to the Single-choice questions section.
-
Matrix questions
Matrix questions consist of several statements within and have only one correct answer.
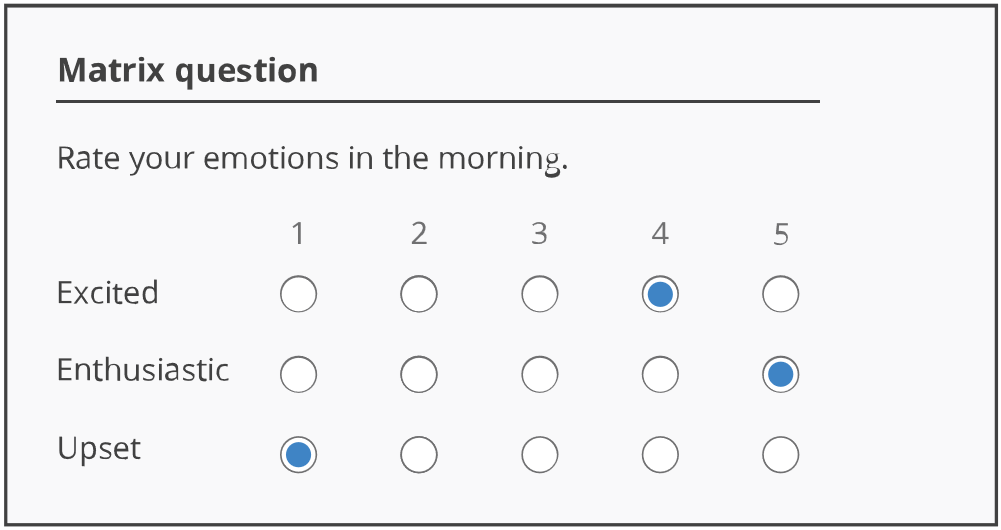
If you select a matrix question from the list of question types, the following screen will be displayed:
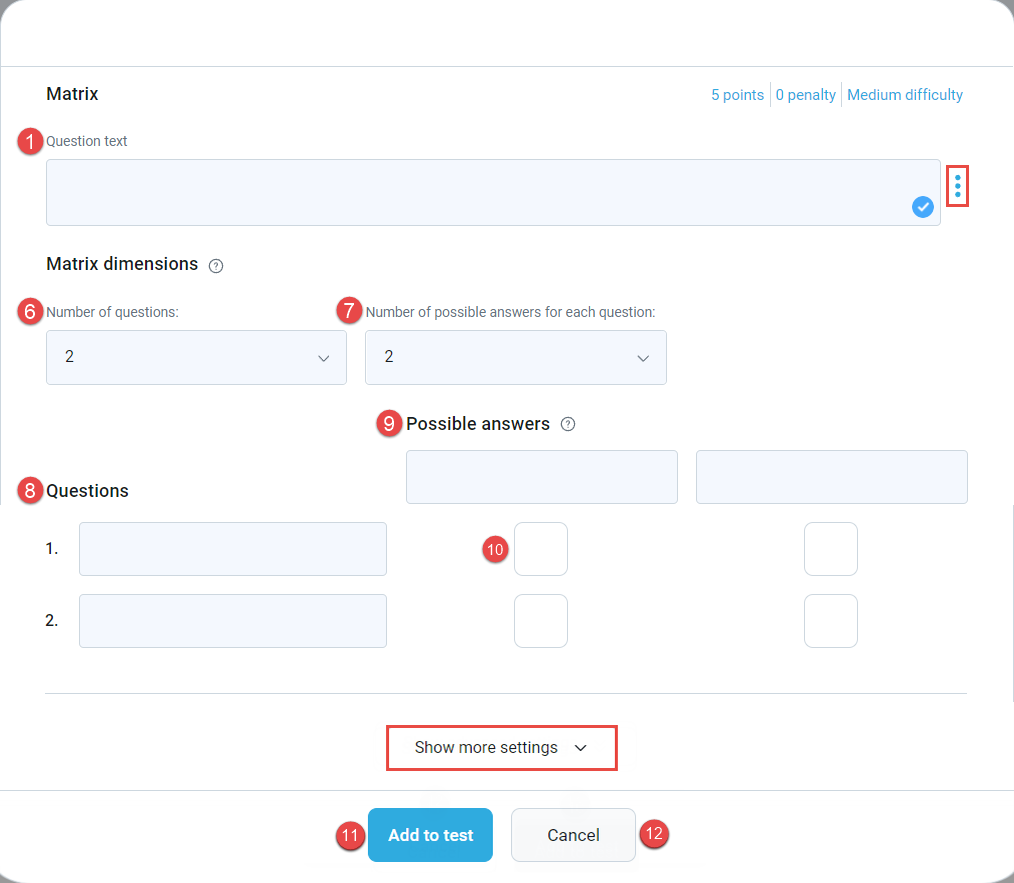
To create and edit an matrix question and its answers, please refer to the Single-choice questions section.
-
Open-ended questions
Open-ended questions are used when a test-taker should give an answer directly related to the given statement.
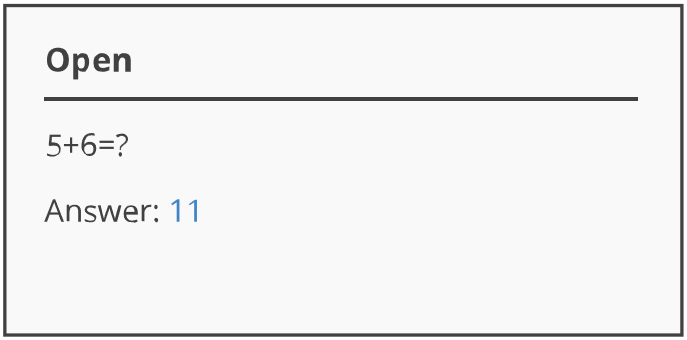
If you select an open-ended question from the list of question types, the following screen will be displayed:
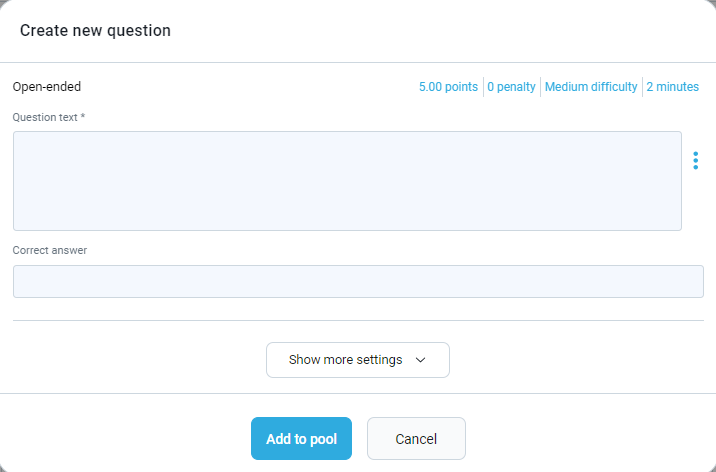
To create and edit an open-ended question and its answers, please refer to the Single-choice questions section.
-
Hot spot questions
Hot spot questions are used when a test-taker should answer a question by marking the image's spots.
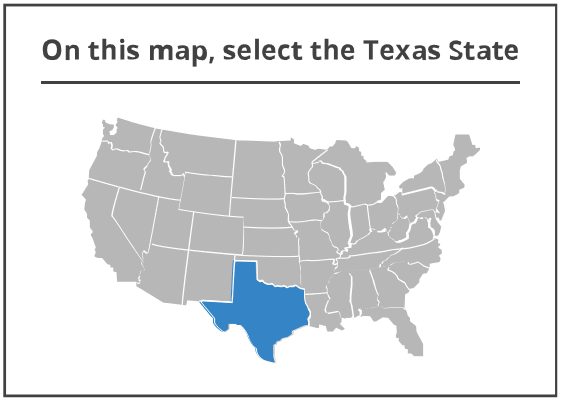
If you select a hot spot question from the list of question types, the following screen will be displayed:
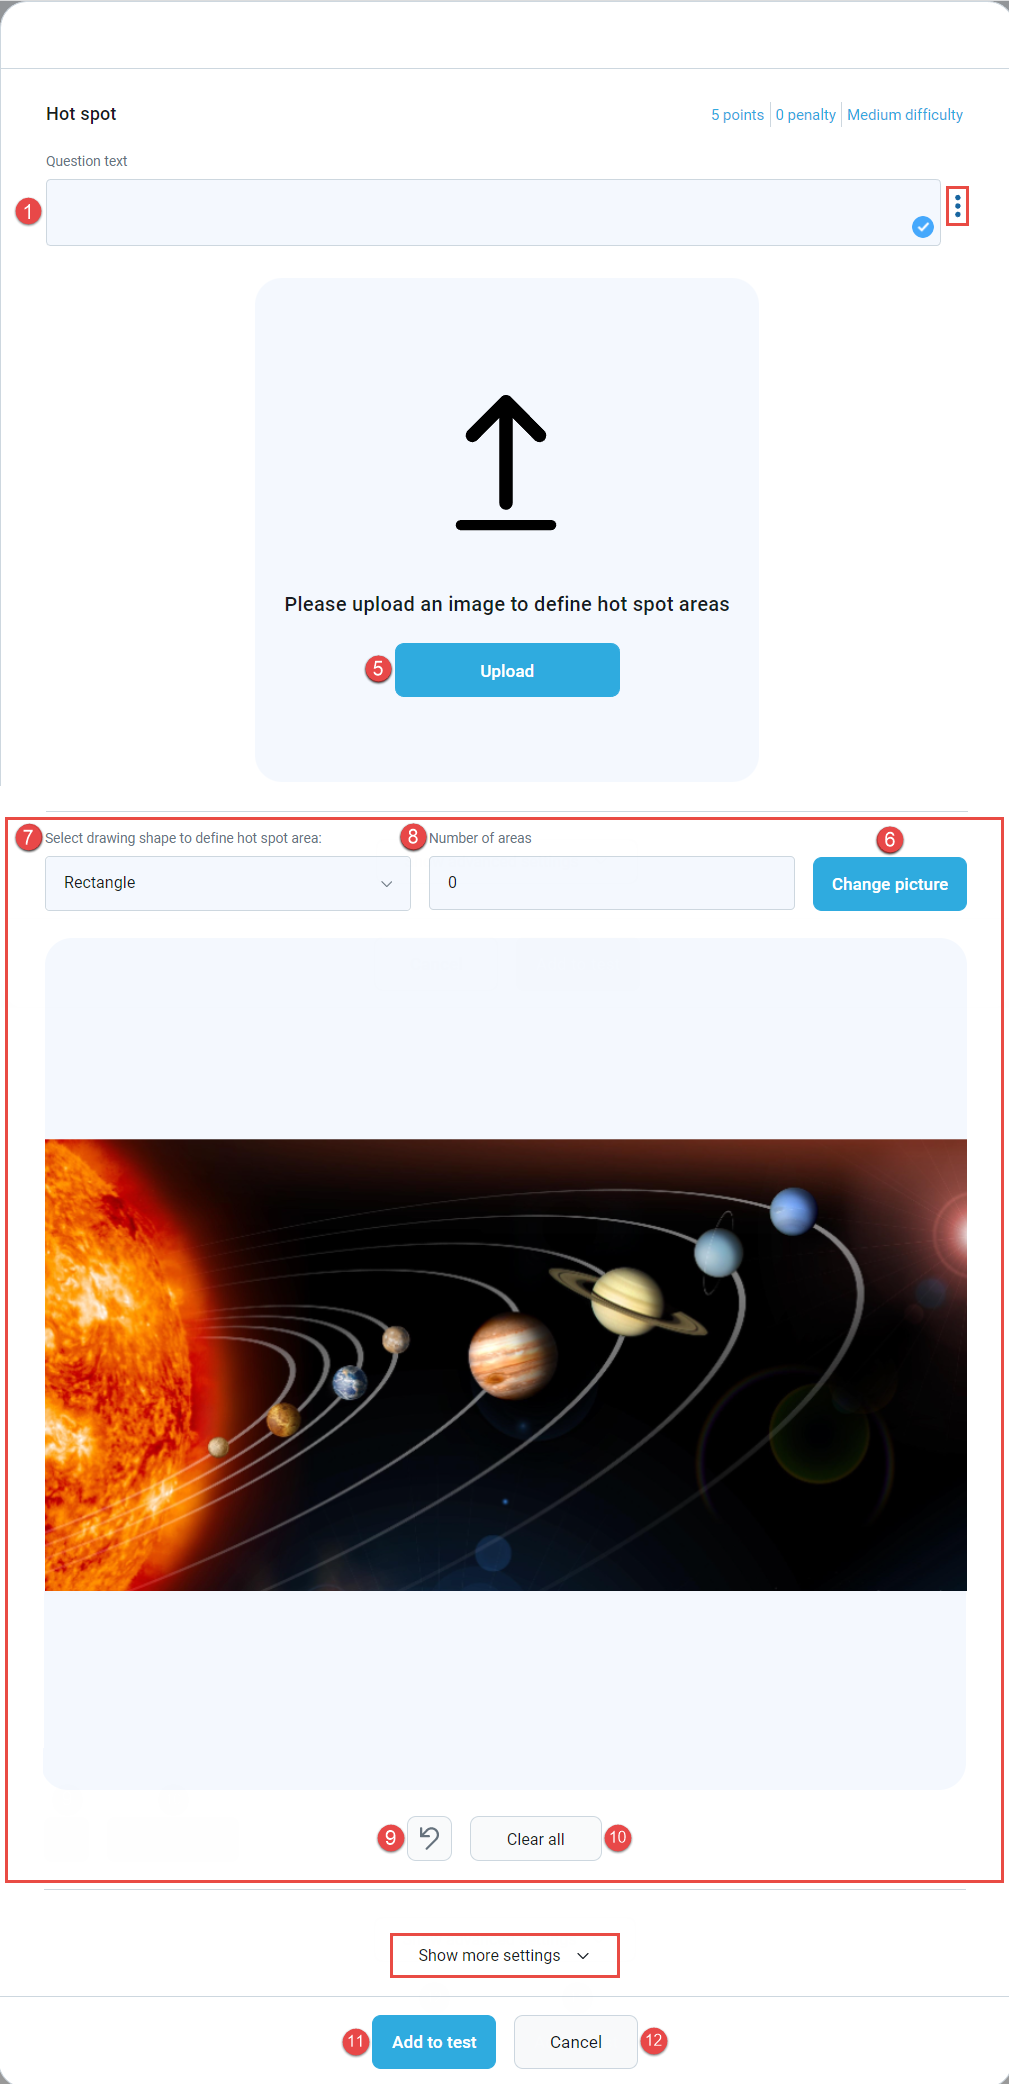
To create and edit a hot spot question and its answers, follow these steps:
-
Question text - Enter the question into this field.
By clicking on the three dots a dropdown menu will appear where you can additionally edit the question.
-
Advanced editor - Edit the format of the question or add a table.
-
Upload attachment - Add multimedia files (image, audio, video) to the question.
-
Add formula - Add formulas to the question.
-
-
Upload - Insert the picture.
Once you upload the desired picture, the following settings will be displayed:
-
You can change the picture anytime while creating the Hot Spot question.
-
Select a drawing shape to define a hot spot area - Choose a drawing shape - rectangle or circle, to mark the exact spot on the picture a user will need to select when answering the question.
-
Set the number of areas which will be demanded to be selected.
-
You can undo the changes after selecting the hot spot area on the uploaded photo.
-
Clear all - You can erase all hot spot areas you selected and mark new ones.
-
Add to test - Add the question you have just created to the test.
Note: If you are adding questions to the pool, you will have the Add pool button available.
-
Cancel the question creation.
-
-
Accounting questions
Accounting questions are used for specific account balancing. Instructions on how to use this type of questions can be found here.
-
-
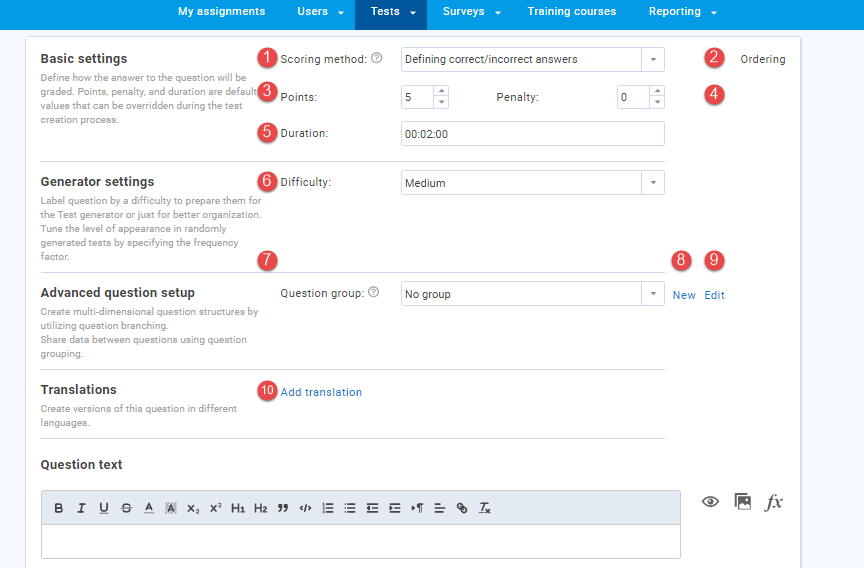
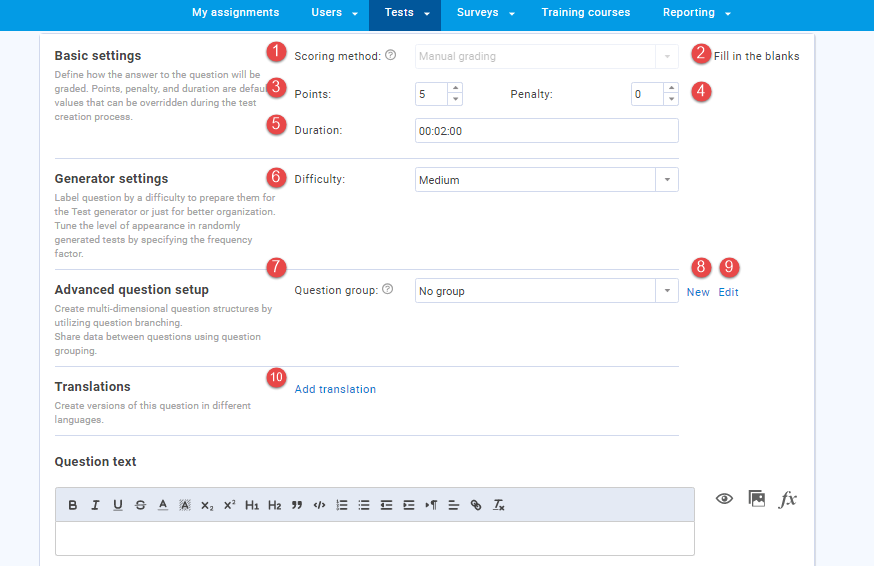
Advanced settings
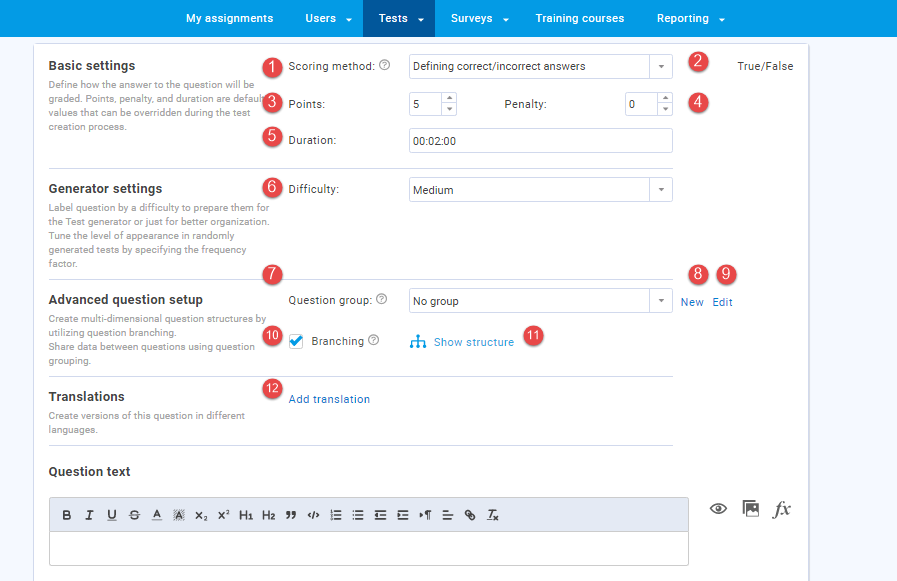
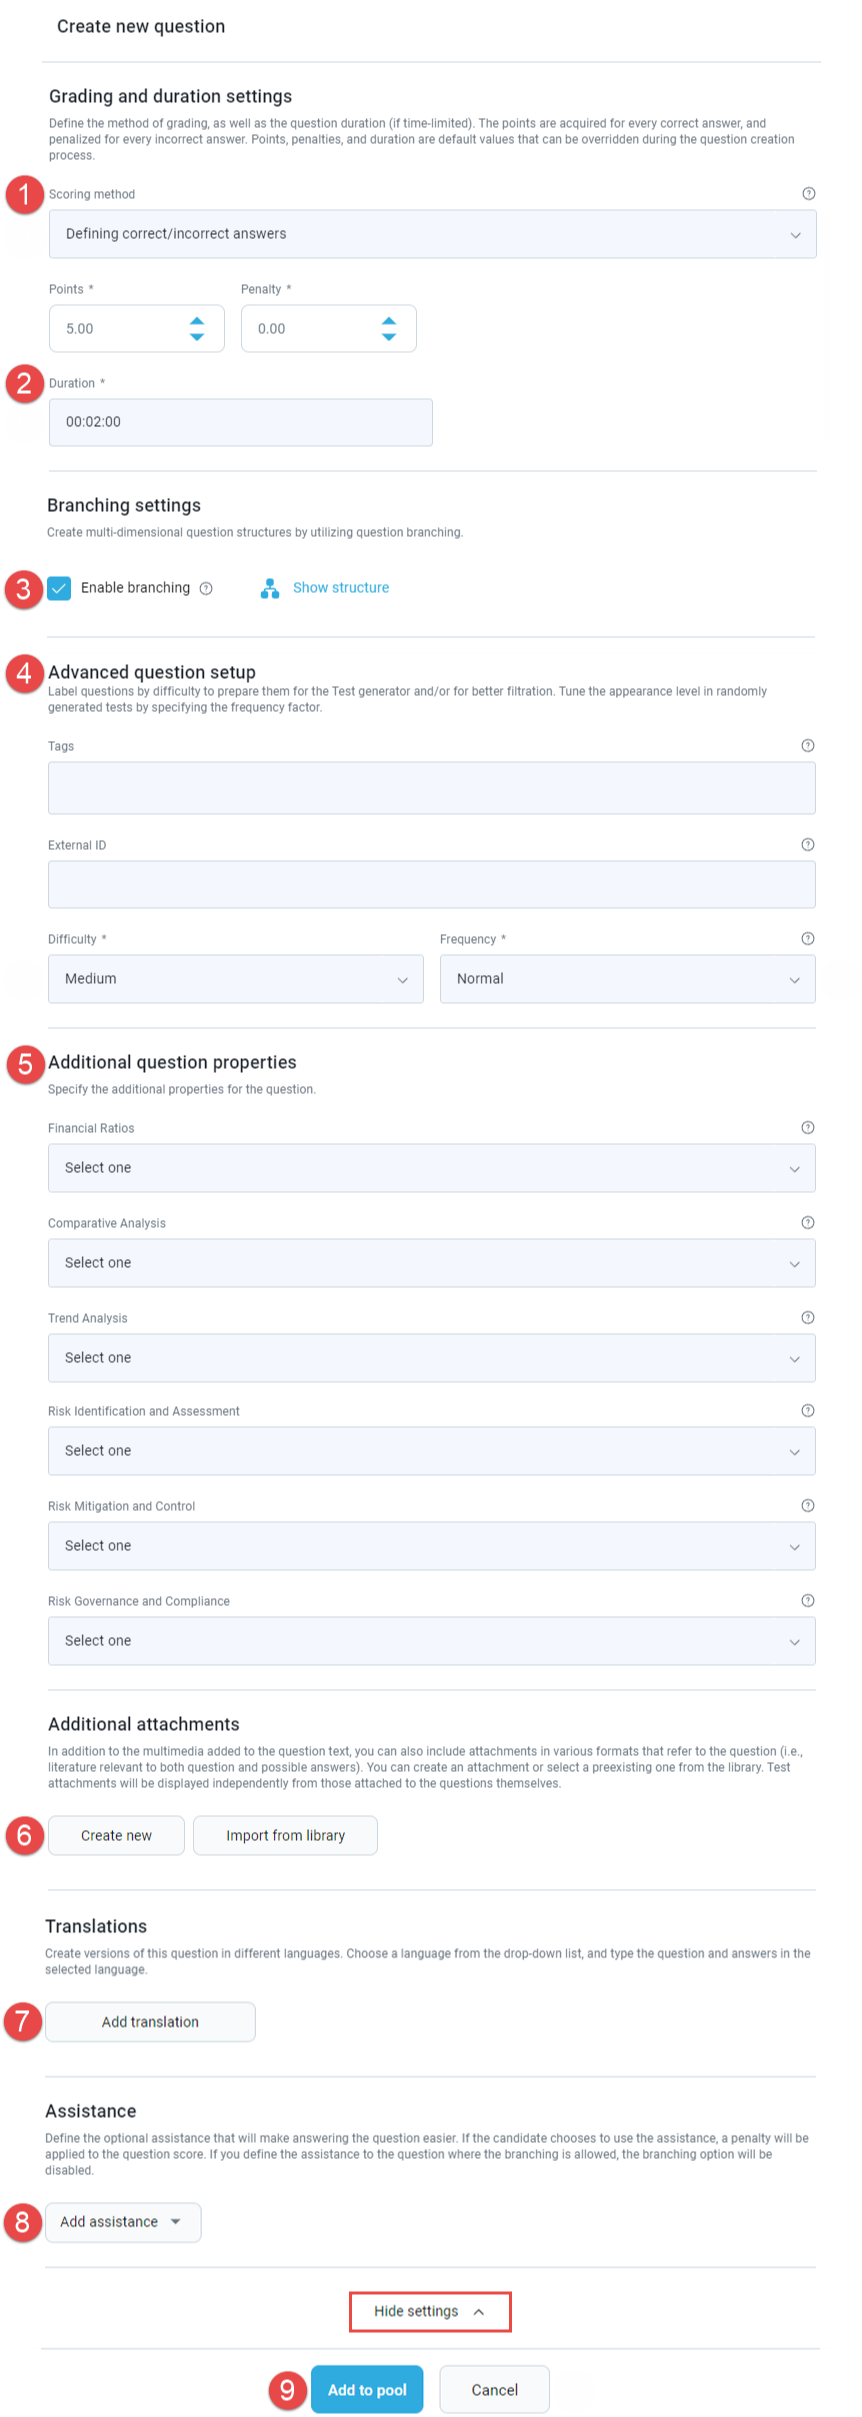
If you click the Show advanced settings button the following screen will be displayed:
Note: Some fields in the Advanced settings may vary depending on the question type.
-
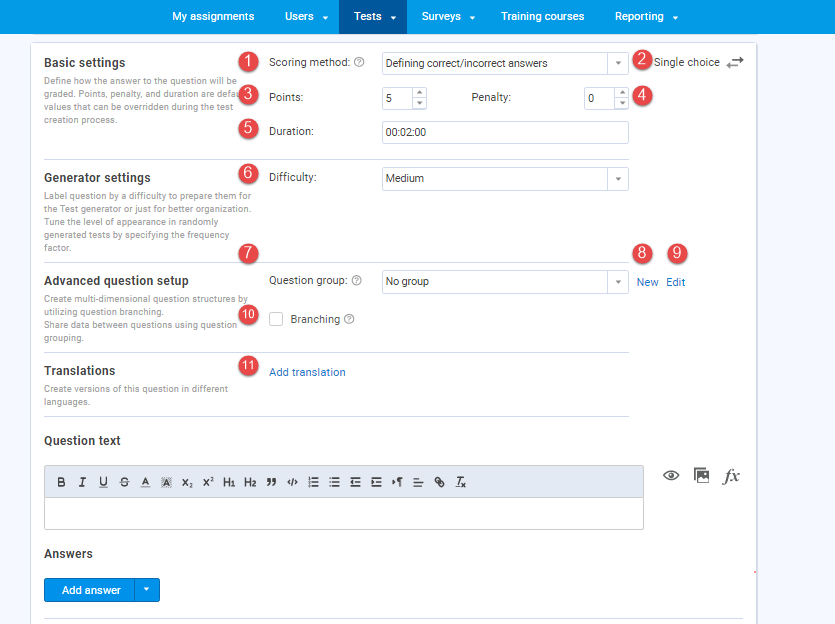
Scoring method - Choose between these options:
-
Defining correct/incorrect answers - Check the correct answer while creating the question. The candidate will obtain points only if they choose the correct answer. This method will require you to set:
-
· Set the number of points a question is worth.
-
· Set the number of negative points for incorrect answers.
-
-
By answer weight - Define points for each answer. A candidate will be awarded different points depending on the chosen answer.
-
By combination of answers - Define the combination of answers of which the correct answer consists.
Note: The number of answers a candidate can select can be limited.
-
Manual grading - The test manager grades each candidate's tests manually. The highest number of points offered is equal to the number defined for points, and the lowest number is equal to the number defined for penalties.
For more information on using question grading templates for question grading, refer to this article. -
By grading rules - Define points candidate will be assigned for specific number of correct answers. If candidate answers X number of answers correct, but that number is not defined in a configuration - zero points will be assigned.
This scoring method is available only for question types with multiple choice answers.
-
-
Duration - Define the time-frame within which the candidate must provide an answer to the question. Once the limit has been reached, the candidate will automatically be redirected to the next question. This will prevent the candidate from returning to the question once they have moved onto the next question.
-
Branching is an optional feature that allows you to add a follow-up question to each answer in the original question.
Note: The branching option is available only for Single-choice, Multiple-choice when the By combination of answers scoring method is defined and for True/False question types.
Note: By selecting the option Show structure, you can examine the diagram that shows the relations between question branches and answers.
Note: If the following options are checked: Answer generator or Add assistance, the branching option will not exist.
-
Advanced question setup - These fields serve to group questions by characteristics to be used for filtering in generated tests.
-
Additional question properties - These fields do not exist in the application by default, but can be added manually. They will be displayed when creating questions and can be used for easier searching and filtering. For more explanation, click this link.
-
Additional attachments - Create new or Import from library - Create new attachments for the question or import existing attachments from the library.
-
Translations - Create versions of this question in different languages. Choose a language from the drop-down list, and type the question and answers in the selected language. Providing the Google Translate API key in the system settings can enable the auto-translate option which translates question and answer text with a single button click using the API.
-
Assistance - Enable a form of assistance for the candidate:
-
Hint - If you choose this option, you will see an additional field to enter the hint for the candidate.
-
Additional time - Enter the hint a candidate can use in solving the question.
-
Minus one wrong answer - Allow additional time for answering the question.
Note: You can set penalty points for using each type of assistance.
-
-
Add to pool - By checking this option, you can add the question to one of the existing pools you manage. Choose the desired pool from a drop-down list.
-
