User manual
Question pools
-
Introduction
Question pools are sets of questions used for generating tests or surveys. They can be structured hierarchically, enabling users to create sub-pools that are visible within the main question pool.
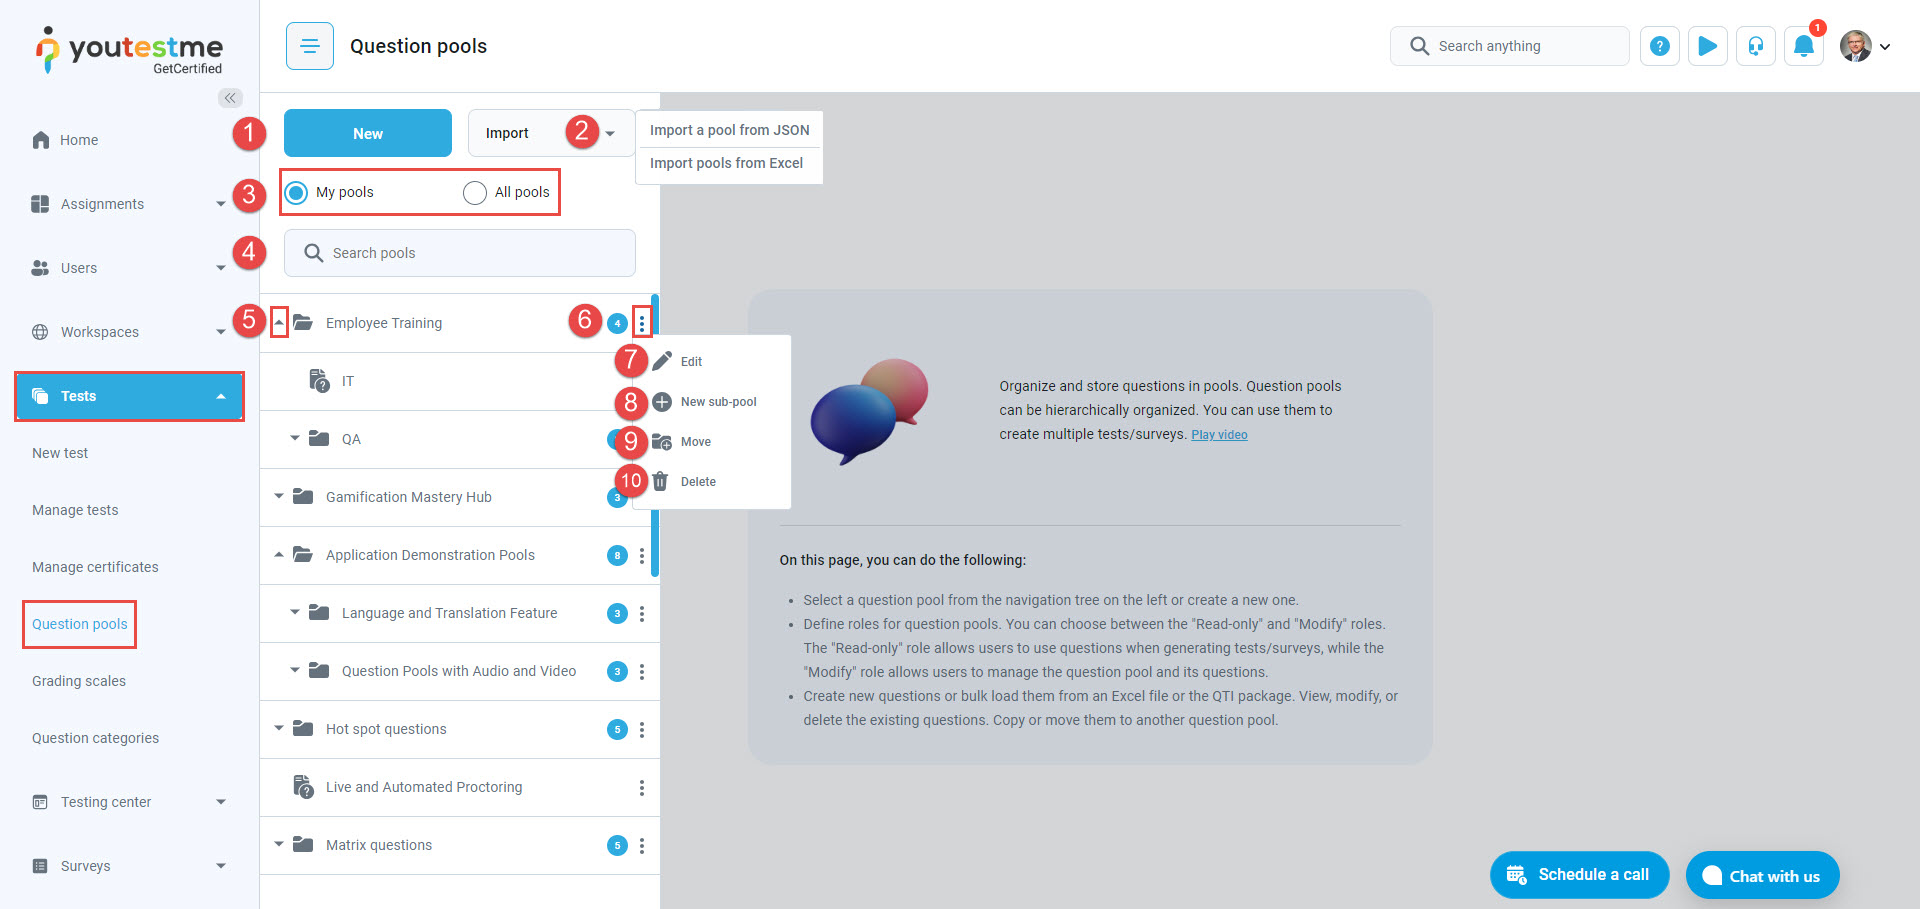
Navigate to the Tests section in the left-side menu and select Question pools. On the left side of the screen, you will find a sidebar where you can:
-
Create a New question pool. For more information, check this article.
-
Import question pools from JSON and Excel files. For more information, check this article.
Filter question pools to view your pools (those you've created or been assigned to as a question pool user) or all pools in the system.
-
Search for a specific question pool.
-
Preview sub-pools by clicking the dropdown arrow next to the question pool name.
-
View the total number of sub-pools inside the question pool.
-
Edit a question pool - Modify details, questions, etc. Find additional information about each field in the Information chapter.
-
Create a sub-pool under the desired question pool. For more information, check this article.
-
Move a question pool and its sub-pools to another designated pool. For more information, check this article.
-
Delete permanently a question pool and all its sub-pools from the system.
Note: Question pools and sub-pools can only be permanently deleted or moved to other question pools if they are not assigned to any test or survey. Additionally, if the Integrity check for generated tests option is enabled in the system section, it validates whether there are sufficient questions for generating tests when someone attempts to move, or delete questions from the question pool.
-
-
Information
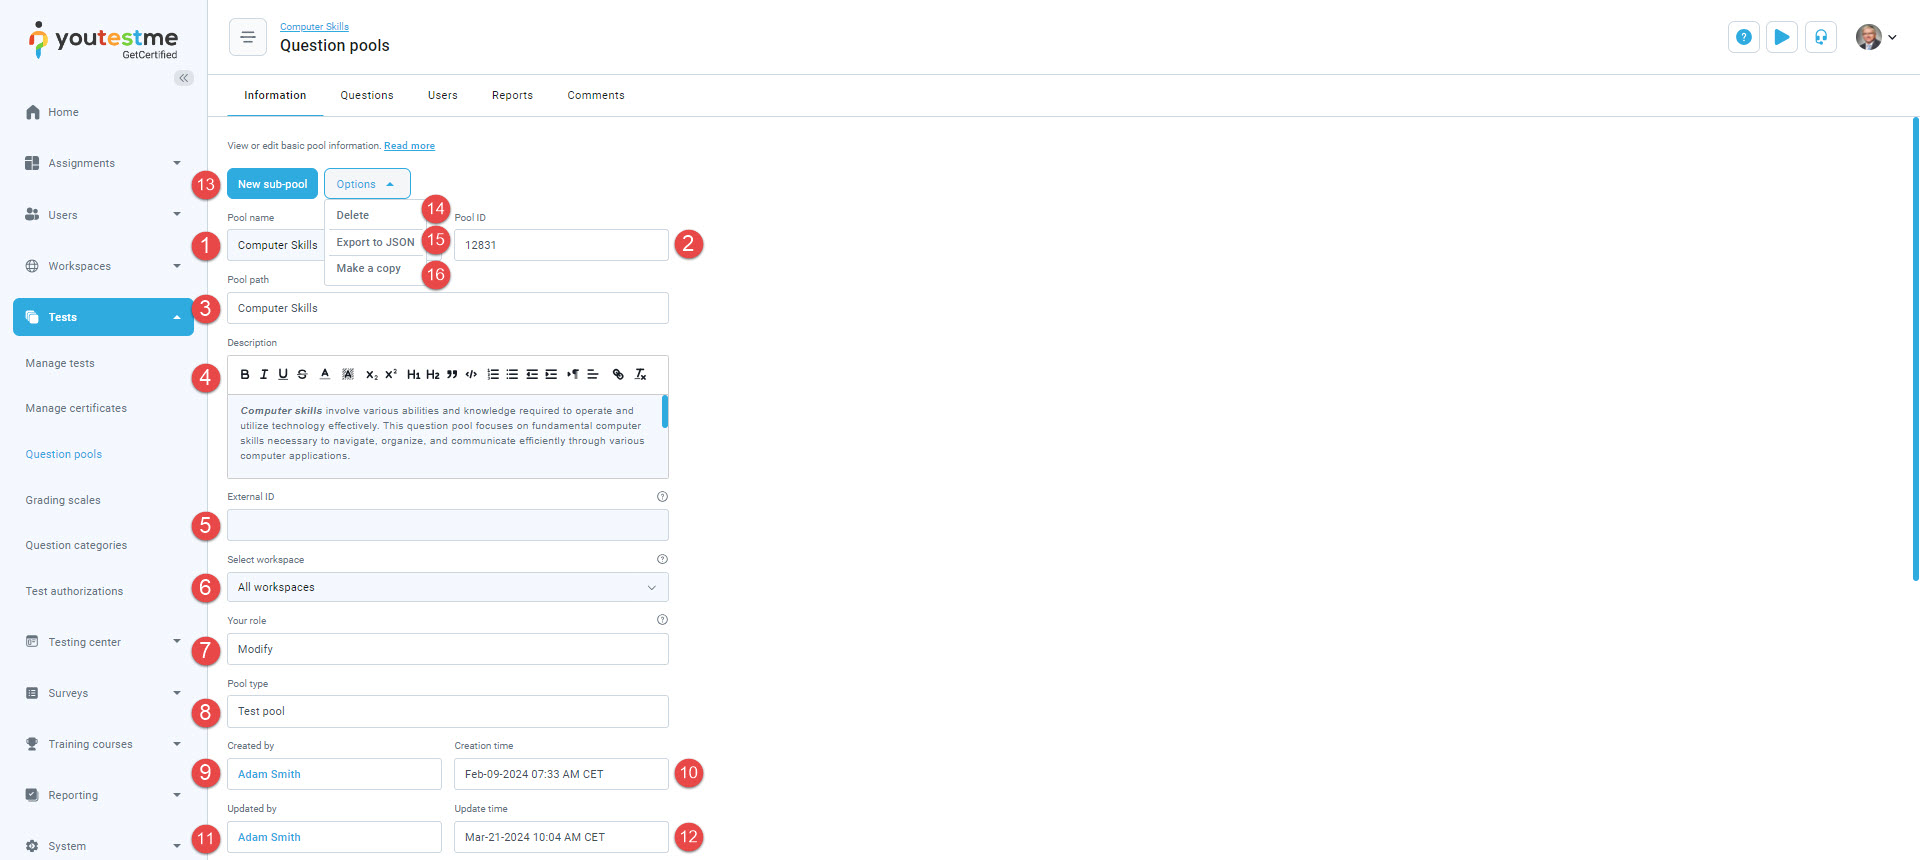
The default panel is the Information tab, offering details including:
-
Pool name - A unique name for the question pool.
-
Pool ID - Unique numerical identifier of the question pool.
-
Pool path - Shows higher-level pools (parent) to which the question pool belongs.
-
Pool description - Provides additional information about the purpose or content of the question pool.
-
External ID - A unique identifier assigned to a question pool that can be used to integrate with other external systems. This identifier allows the external systems to access the question pool's information and reference it without using the ID assigned within the original database.
-
Workspace - Access to the pool is restricted to users from the chosen workspace. Sub-pools cannot have individual workspaces; they inherit the workspace of their parent pool.
-
Your role - Defines the user's role within the question pool.
-
Modify - Users with this role can manage the question pool and its questions. When a user creates a pool, the Modify role is automatically assigned.
-
Read-only - User can use questions from the question pool in their tests/surveys but do not have permission to make any modifications in question pool settings and question configurations.
-
-
Pool type - Indicates whether the question pool belongs to a test or survey.
-
Created by - Displays the name of the user who created the pool.
-
Creation date - Displays the date and time when the pool was created.
-
Updated by - Displays the name of the user who last updated the question pool.
-
Update time - Displays the date and time of the question pool's last update.
-
Create a sub-pool under the desired question pool. For more information, check this article.
-
Permanently delete the question pool and its sub-pools from the system.
-
Export the question pool as a JSON file, suitable for data migration between different GetCertified environments. For instructions on importing a JSON file, check this article.
-
Make a copy of the question pool, including all sub-pools. Ensure that the name of the copied question pool is unique.
Additional actions that can be performed:
-
-
Questions
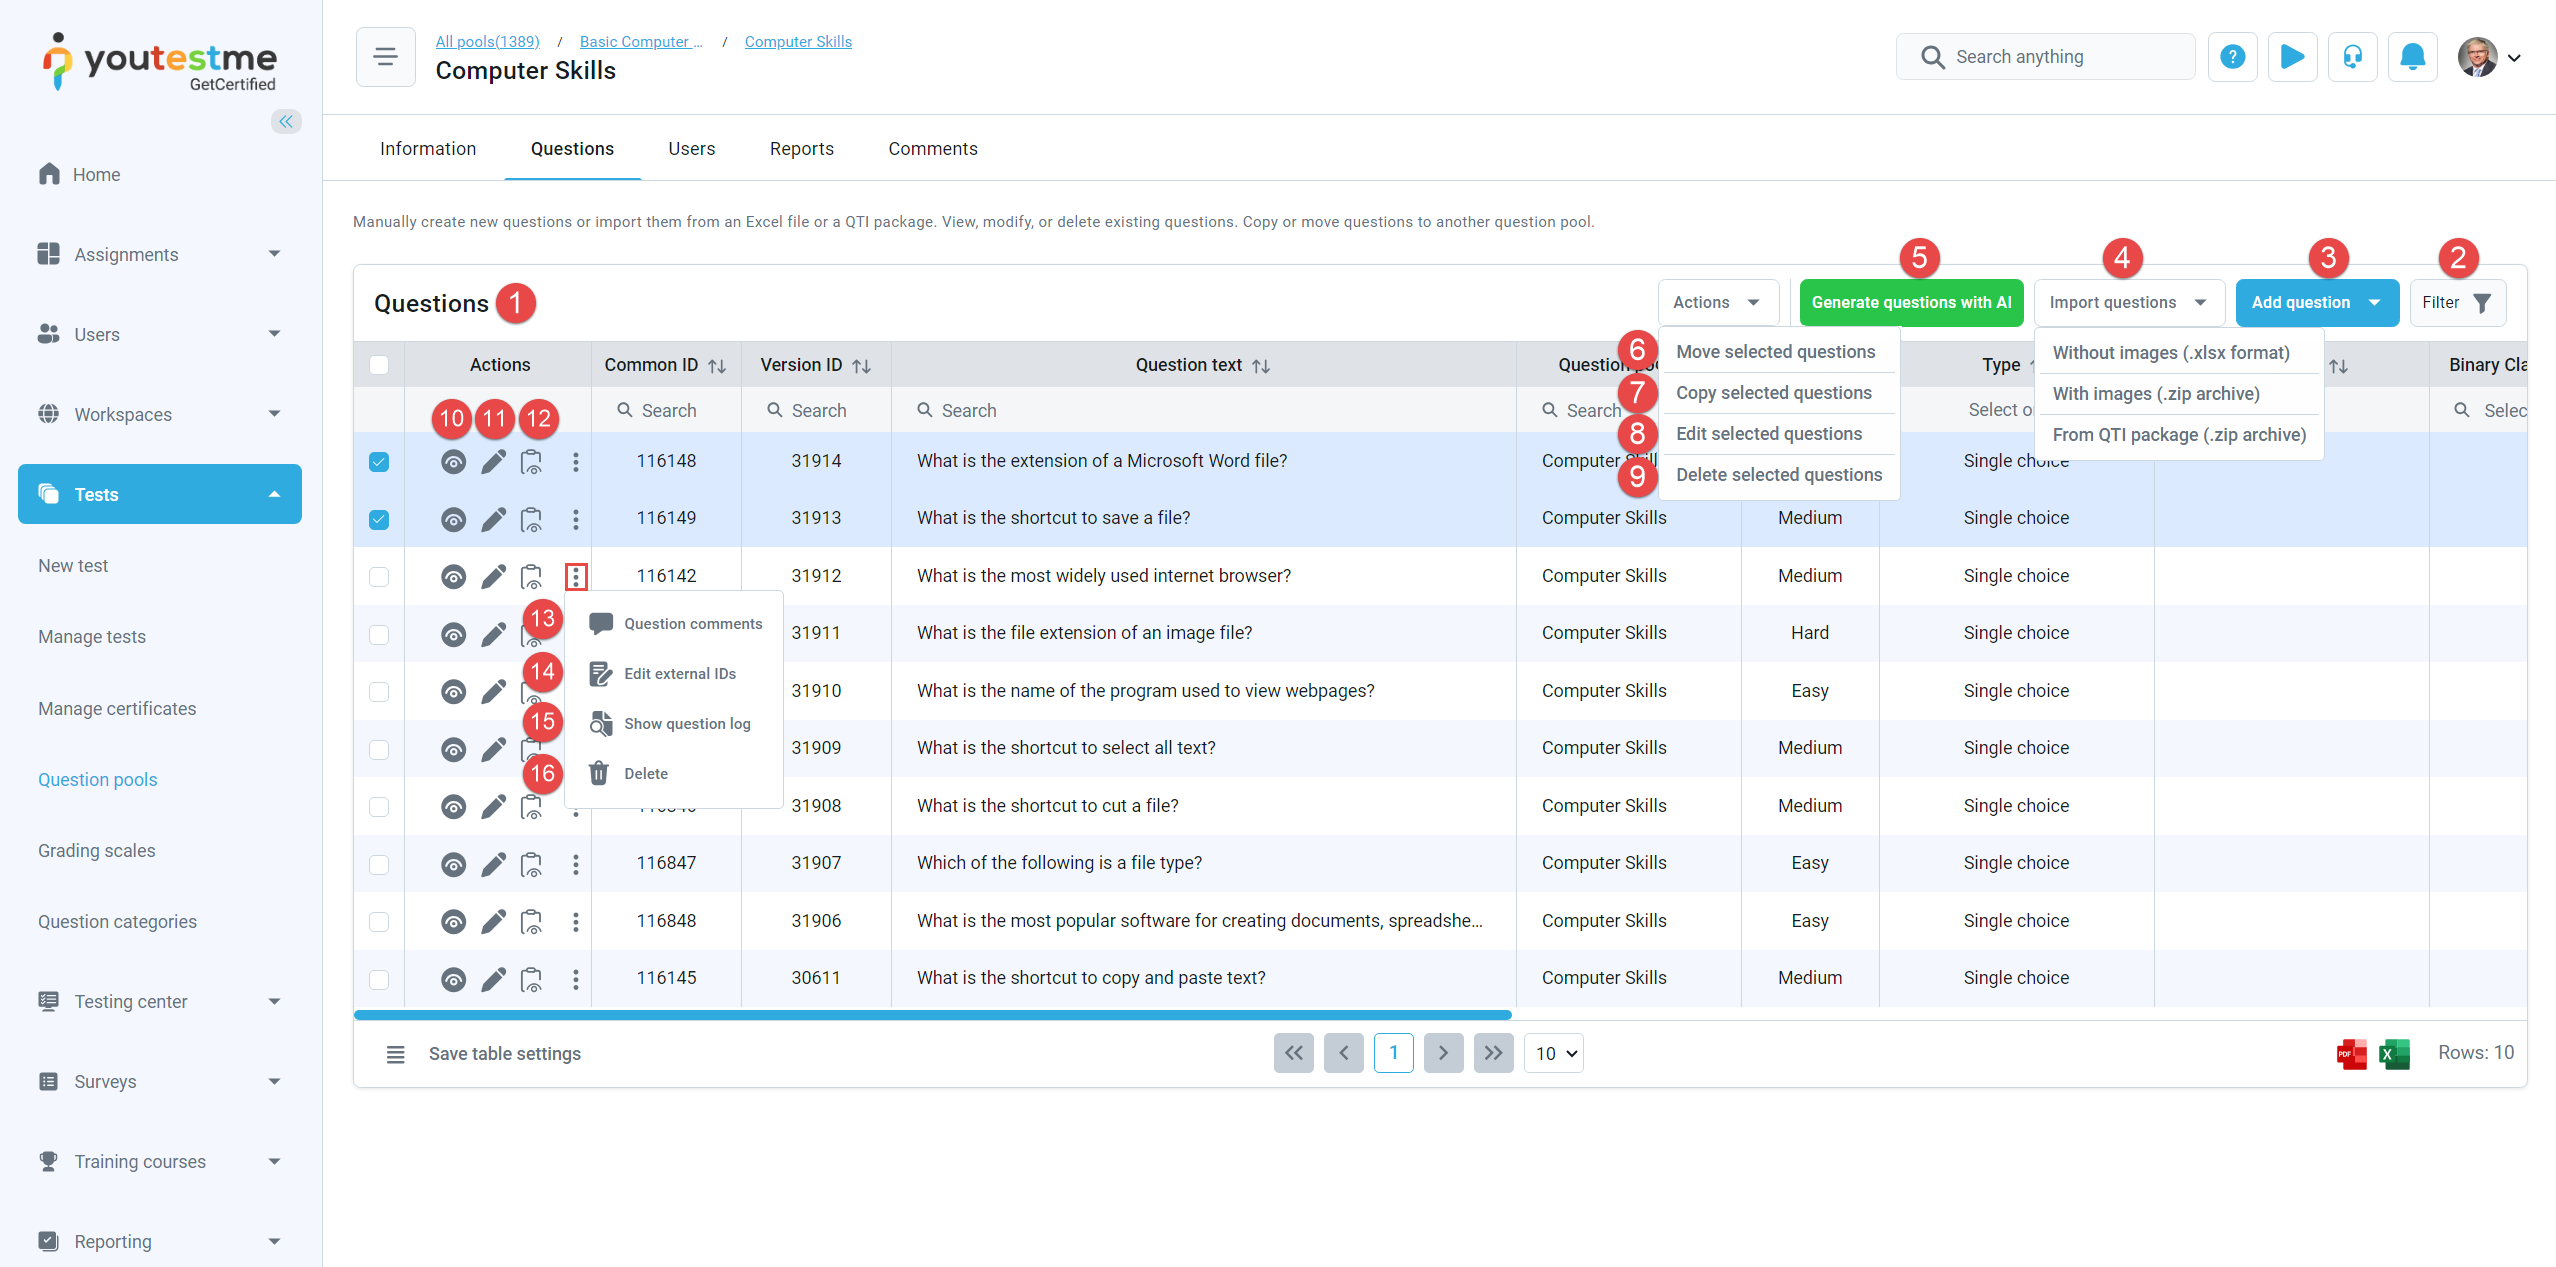
On the Questions tab, you can:
-
View the list of questions in the question pool. Refer to the Table layout chapter for information on each table column.
-
Filter the list of questions:
-
By Tags added to questions. When you enter text or part of text, matching tags will be displayed, and you can select them to confirm your selection. You can add as many tags as you like by pressing the Enter key after adding each one.
-
By custom questions categories added to questions. You can select one or more category values.
Click the Apply button to filter the table. To clear the filtered questions, click the Clear filter button.
When using two filtering criteria, the AND rule is applied. Within a single criterion, the OR rule is applied if more than one value is entered/selected. If two tags are entered, questions containing either of those tags or both will be shown. If two category values are selected within the same question category, questions containing either or both of those categories will be displayed. However, if a category value is selected along with a tag, only questions meeting both criteria (having both the added tag and an assigned category value) will be shown. The same rule applies when selecting a value from Category 1 and some value from Category 2; only questions meeting both criteria will be displayed. -
-
Add a question to the question pool. For instructions on creating each question type, refer to the Question types help page. After saving the question, a pop-up dialog may appear where you can enter the external ID of the question and add a comment, e.g. to explain its purpose or goal.
The confirmation dialog will not appear if the Question create confirmation dialog option is disabled in the Settings and customization page, under the Question create/edit option tab.
-
Move question to another pool. Select checkboxes next to the desired questions, click the Actions button, click the Move questions button, select the question pool where you want to move the questions, and confirm moving process. If the Integrity check for generated tests option is enabled in the Settings and customization page, questions cannot be moved if used in any test.
Note: Questions used in tests can be moved to other pools when the Integrity Check for Generated Tests module is disabled. This does not affect test results by pools.
-
Copy question to another pool. Select checkboxes next to the desired questions, click the Actions button, click the Copy questions button, select the question pool where you want to copy the questions, and confirm copying process.
-
Delete multiple questions at once. Select checkboxes next to the desired questions, click the Actions button, click the Remove selected button and confirm the deletion. If the Integrity check for generated tests option is enabled in the Settings and customization page, questions cannot be deleted if used in any test.
-
Preview how a specific question looks in the test-taking process. You'll see question details such as question text, penalty and points achievable, question type, etc.
-
Edit a specific question. Refer to the Question types help page for instructions on creating each question type. After saving changes to the question, a pop-up dialog may appear where you can enter the external ID of the question version, add a comment to explain changes, and define question version activation time. For more information on defining question version activation time, refer to this article.
The confirmation dialog will not appear if the Question edit confirmation dialog option is disabled in the Settings and customization page, under the Question create/edit option tab.
Note: The edit option will not appear if the Enable direct editing of active question versions option is disabled in the Settings and customization page, under the Additional modules setup tab.
-
View all versions of a question.
-
Show question comments.
-
Edit external IDs of a specific question.
-
Show question log for a question.
-
Delete a specific question from the question pool. If the Integrity check for generated tests option is enabled in the Settings and customization page, the question cannot be deleted if it is used in any test.
-
Export the list of questions in PDF and Excel format. When exporting in Excel format, you have two export templates. Select the desired export template and confirm the export.
If you want to preserve HTML structure in the question and answer texts, select the Preserve HTML option. This may reduce human readability in the exported Excel file but preserves HTML styling if questions need to be imported elsewhere.
-
YOUTESTME import/export template contains two sheets: one for questions and one for answers. The same format is used for importing questions into question pools, so you can use this template to export the list of questions from one question pool and import questions into another YouTestMe application.
Export to Excel is supported only for scoring methods Defining correct/incorrect answers and Manual grading, and the following question types: Single choice, Multiple choice, True/False, Matching, Ordering, Fill in the blanks, Essay, and Open-ended.
Note: Non-supported question types will not prevent the export but will not be visible in the exported Excel file.
-
Inline questions and answers display all answers in the same row as the question.
Export to Excel is fully supported only for scoring methods Defining correct/incorrect answers and Manual grading, and the following question types: Single choice, Multiple choice, True/False, and Open-ended.
Note: The exported Excel file will contain both supported and non-supported questions. However, some information for non-supported question types may not be visible.
-
-
Table layout
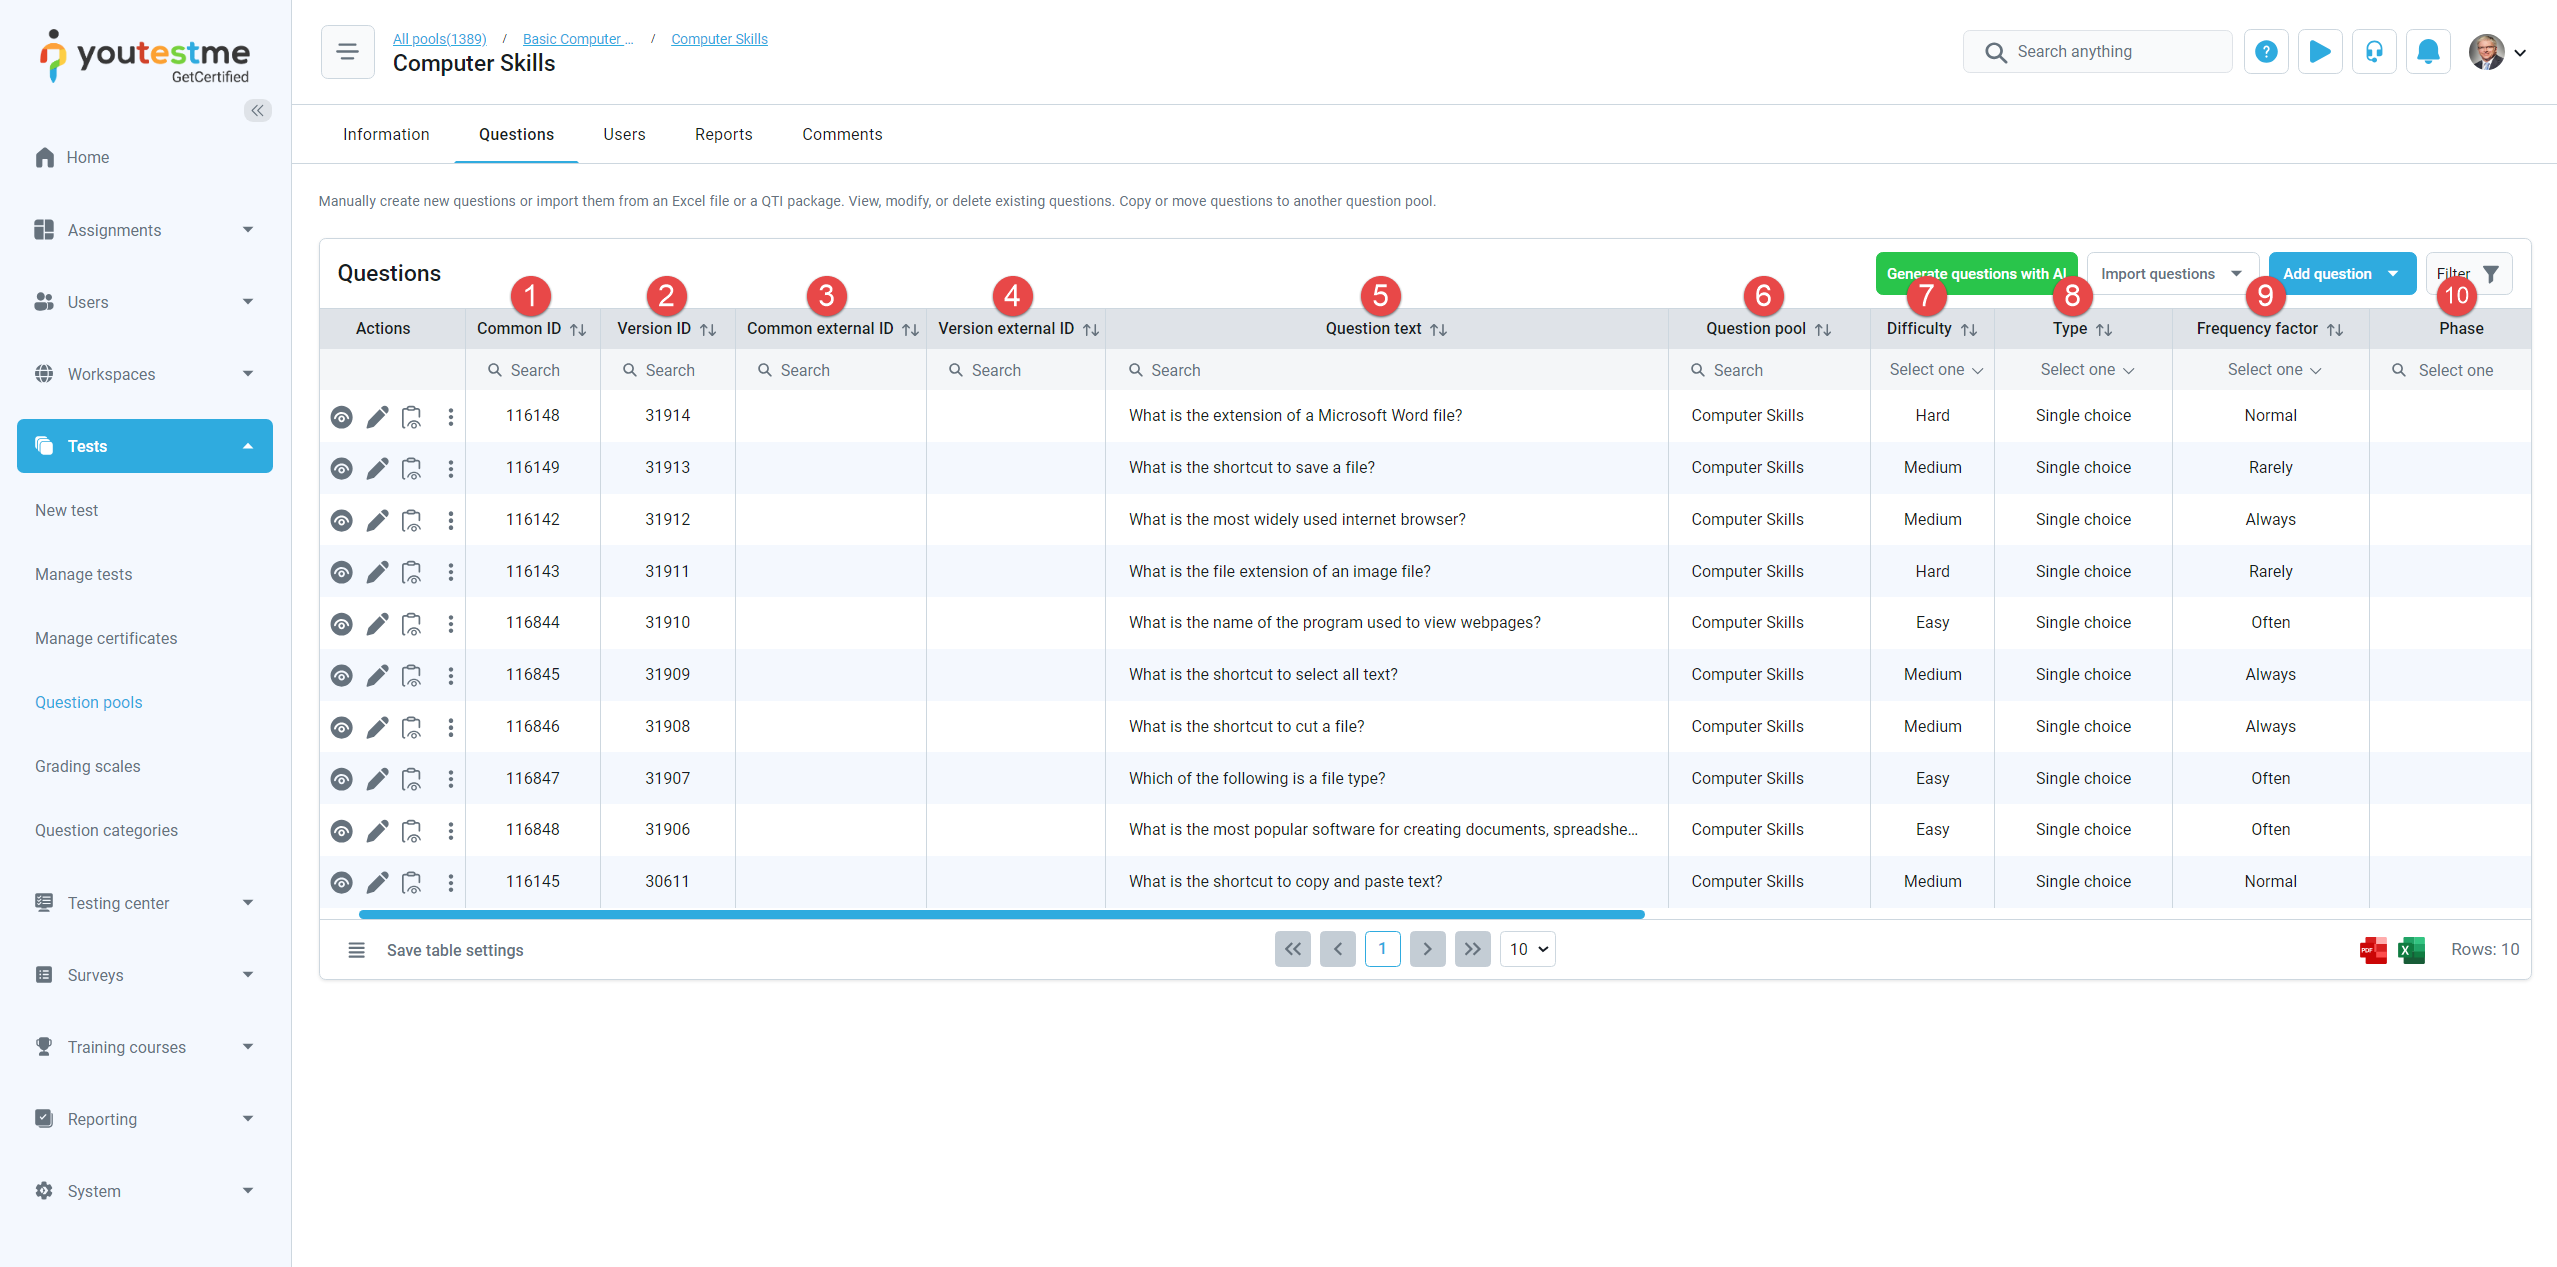
The table displays a list of all questions contained in the question pool along with the most important information about each question.
The columns in this table provide the following information:
-
Version ID - A unique identifier for a specific version of the question. Each time the question is edited, a new Version ID is generated while the question ID remains the same.
-
Common ID - A unique identifier for the question generated upon its creation.
-
External ID - A unique identifier for the question used for integration with an external system. This External ID must be unique and can only be added during question creation. If you edit a question and add a new External ID, it will become the External ID for that version of the question.
-
Version external ID - A unique identifier for the question version used in integration with external systems. This Version external ID must also be unique. When creating a question and adding an external ID, it will be added to both the External ID and Version external ID fields. However, when editing a question and adding an external ID, it will be added as the Version External ID while the question External ID remains the same if defined during question creation or will be empty if not defined during creation.
-
The Text of the question.
-
Question pool - Indicates the name of the question pool to which the question belongs. As question pool can contain sub-pools, in this column you will see if the question belongs to the current question pool or its sub-pool.
-
Difficulty - Indicates the difficulty level of the question.
-
Type - Specifies the type of question. For more information about each question type, please refer to the Question types help page.
-
Frequency factor - Indicates how often a question appear in the test. In order for frequency factor to be taken into consideration during the test generation process, the Include frequency factor must be enabled when creating tests generated based on question difficulties and tests generated based on question categories.
-
Question properties created in the application with their values added to questions.
-
-
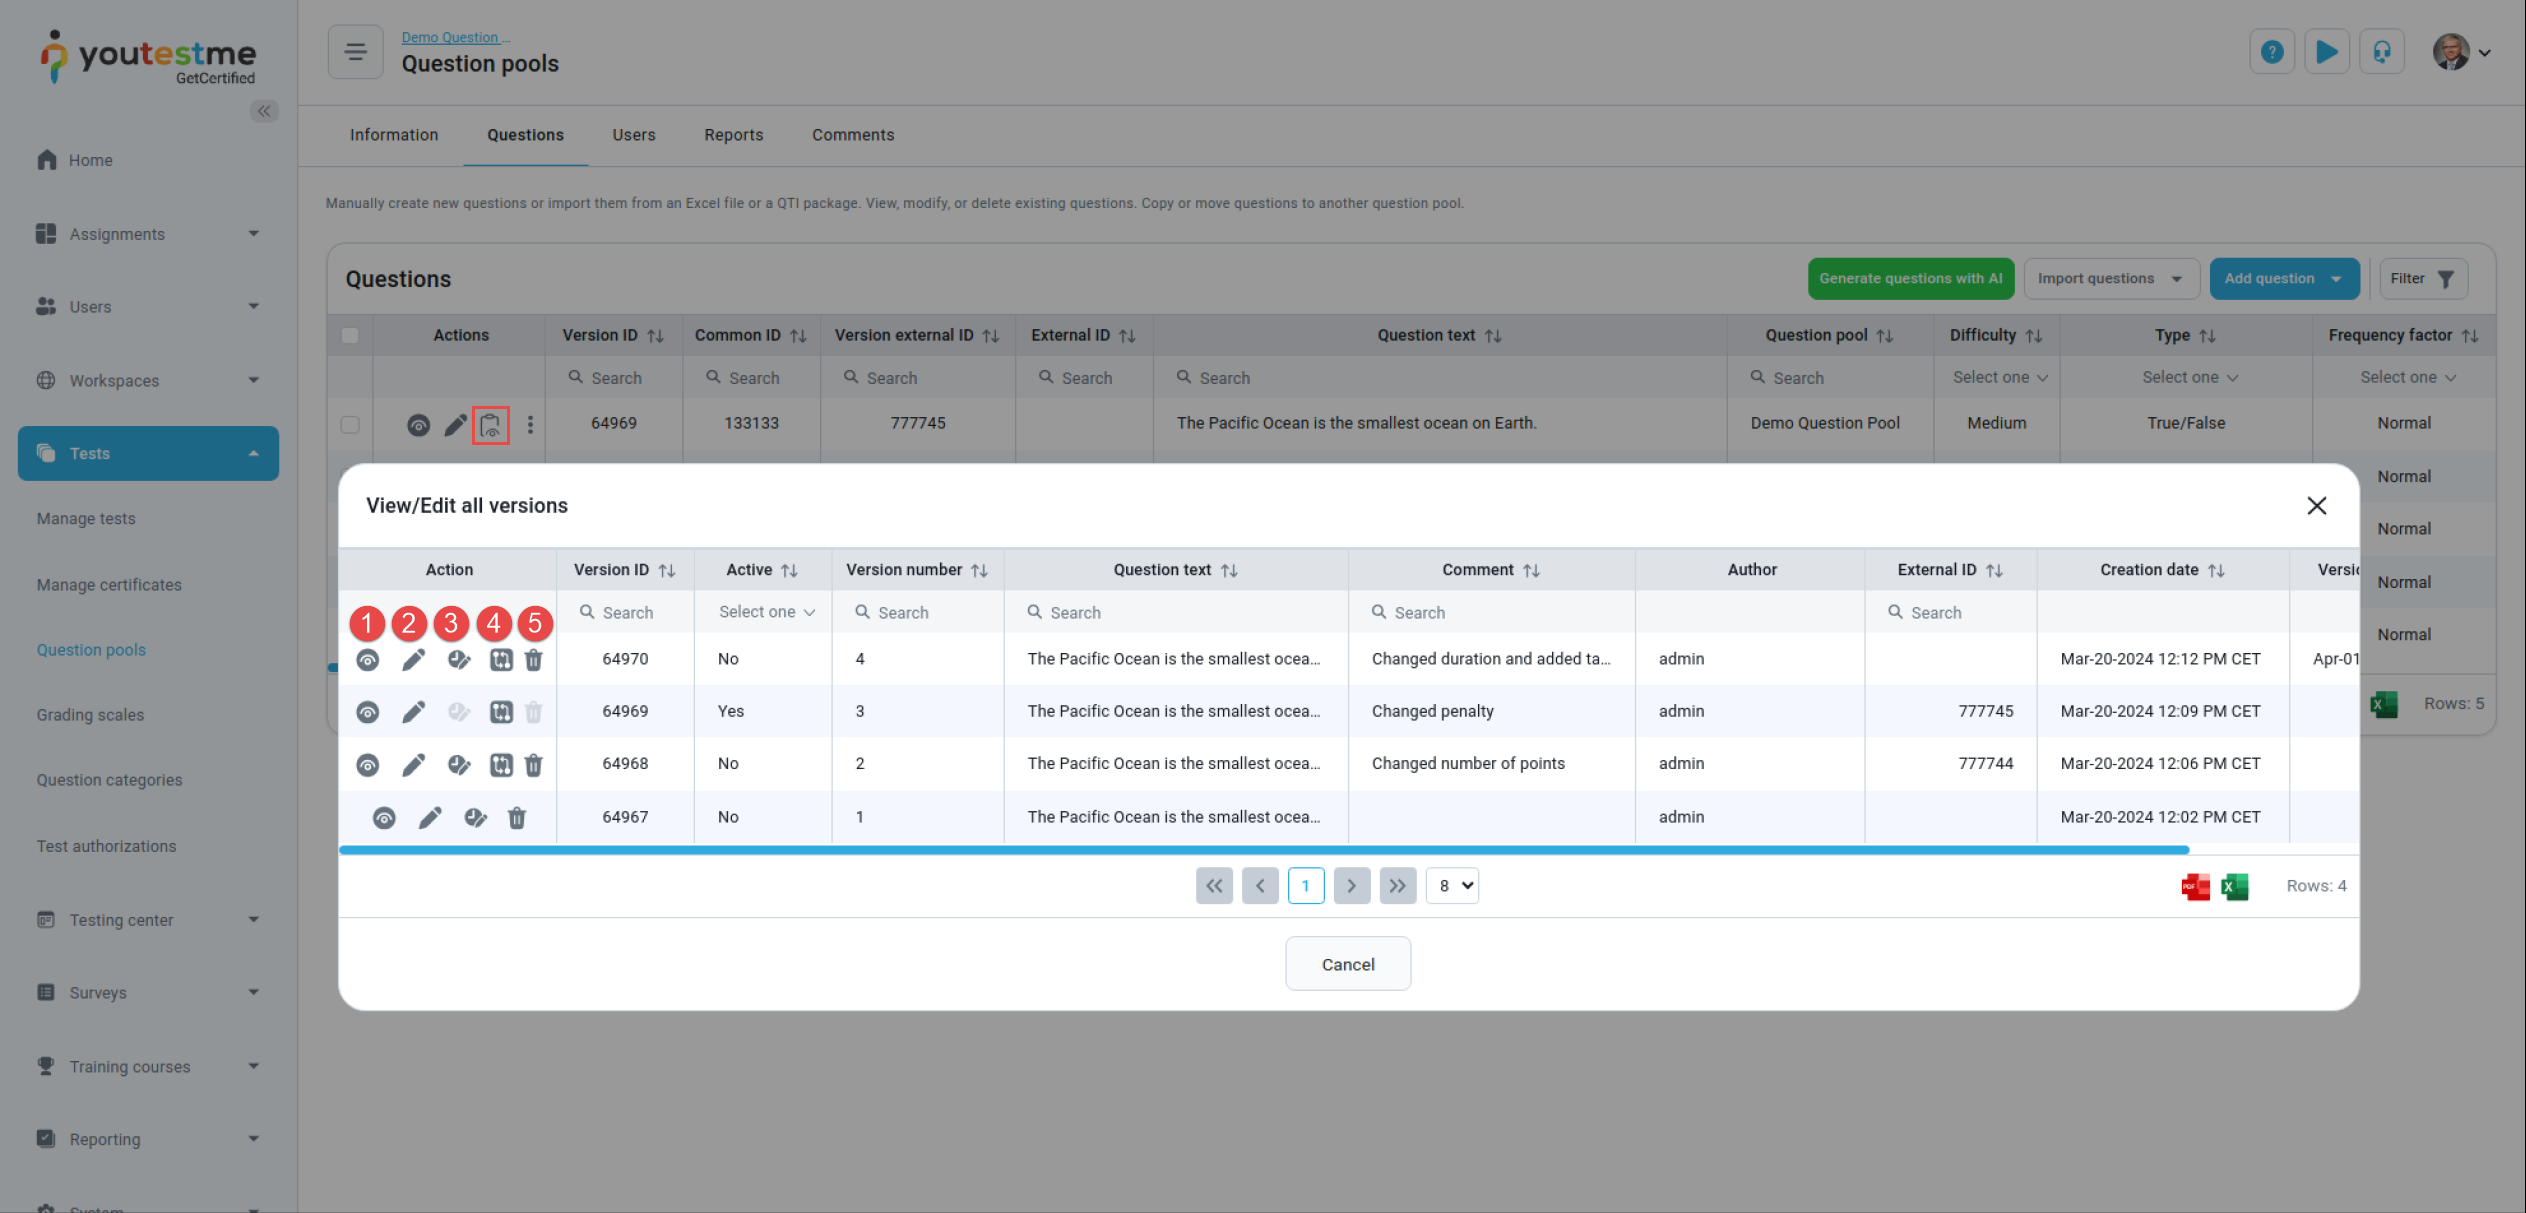
View all versions
When you click on the View all versions button, a list of all versions for the question will open. This list includes information about the currently active version, the user who made changes to the question, comments, dates of version creation and activation, and more.
The table columns are similar to the question table layout. Additional columns include:
-
Active - Indicates whether the version of the question is currently active or not.
-
Version number - Displays the version number of the question. The first version of the question after creation is numbered 1.
-
Creation time - Shows when the version of the question was created.
-
Version activation time - Displays the time when the version of the question will become active if defined during question version editing. If not defined, the version becomes active immediately. When the specified activation time arrives, the version becomes active, and Yes is written in the Active column. The previously active version of the question becomes inactive.
Within the dialog, you can:
-
View the details of the question. The same dialog as when creating/editing a question will open.
-
Edit a version of the question. If the version is not used in any test, you will edit the current version of the question. If the question is used in a test, a new version of the question will be created, and you can schedule its activation time.
In order to allow setting question version activation time, the Question edit confirmation dialog option must be enabled in the Settings and customization page, under the Question create/edit option tab. If this option is disabled, the confirmation dialog after question edit will not appear, and you cannot set activation time.
-
Set the time for automatic activation of the question version using the Question version activation job or activate the version immediately. Refer to this article for more information on the scheduling job.
-
Compare the question version with the previous version. This allows you to see the differences between the question versions side by side, with color markers indicating changes.
-
Delete the question version of the question. Only question versions that are not used in any test versions can be deleted.
-
-
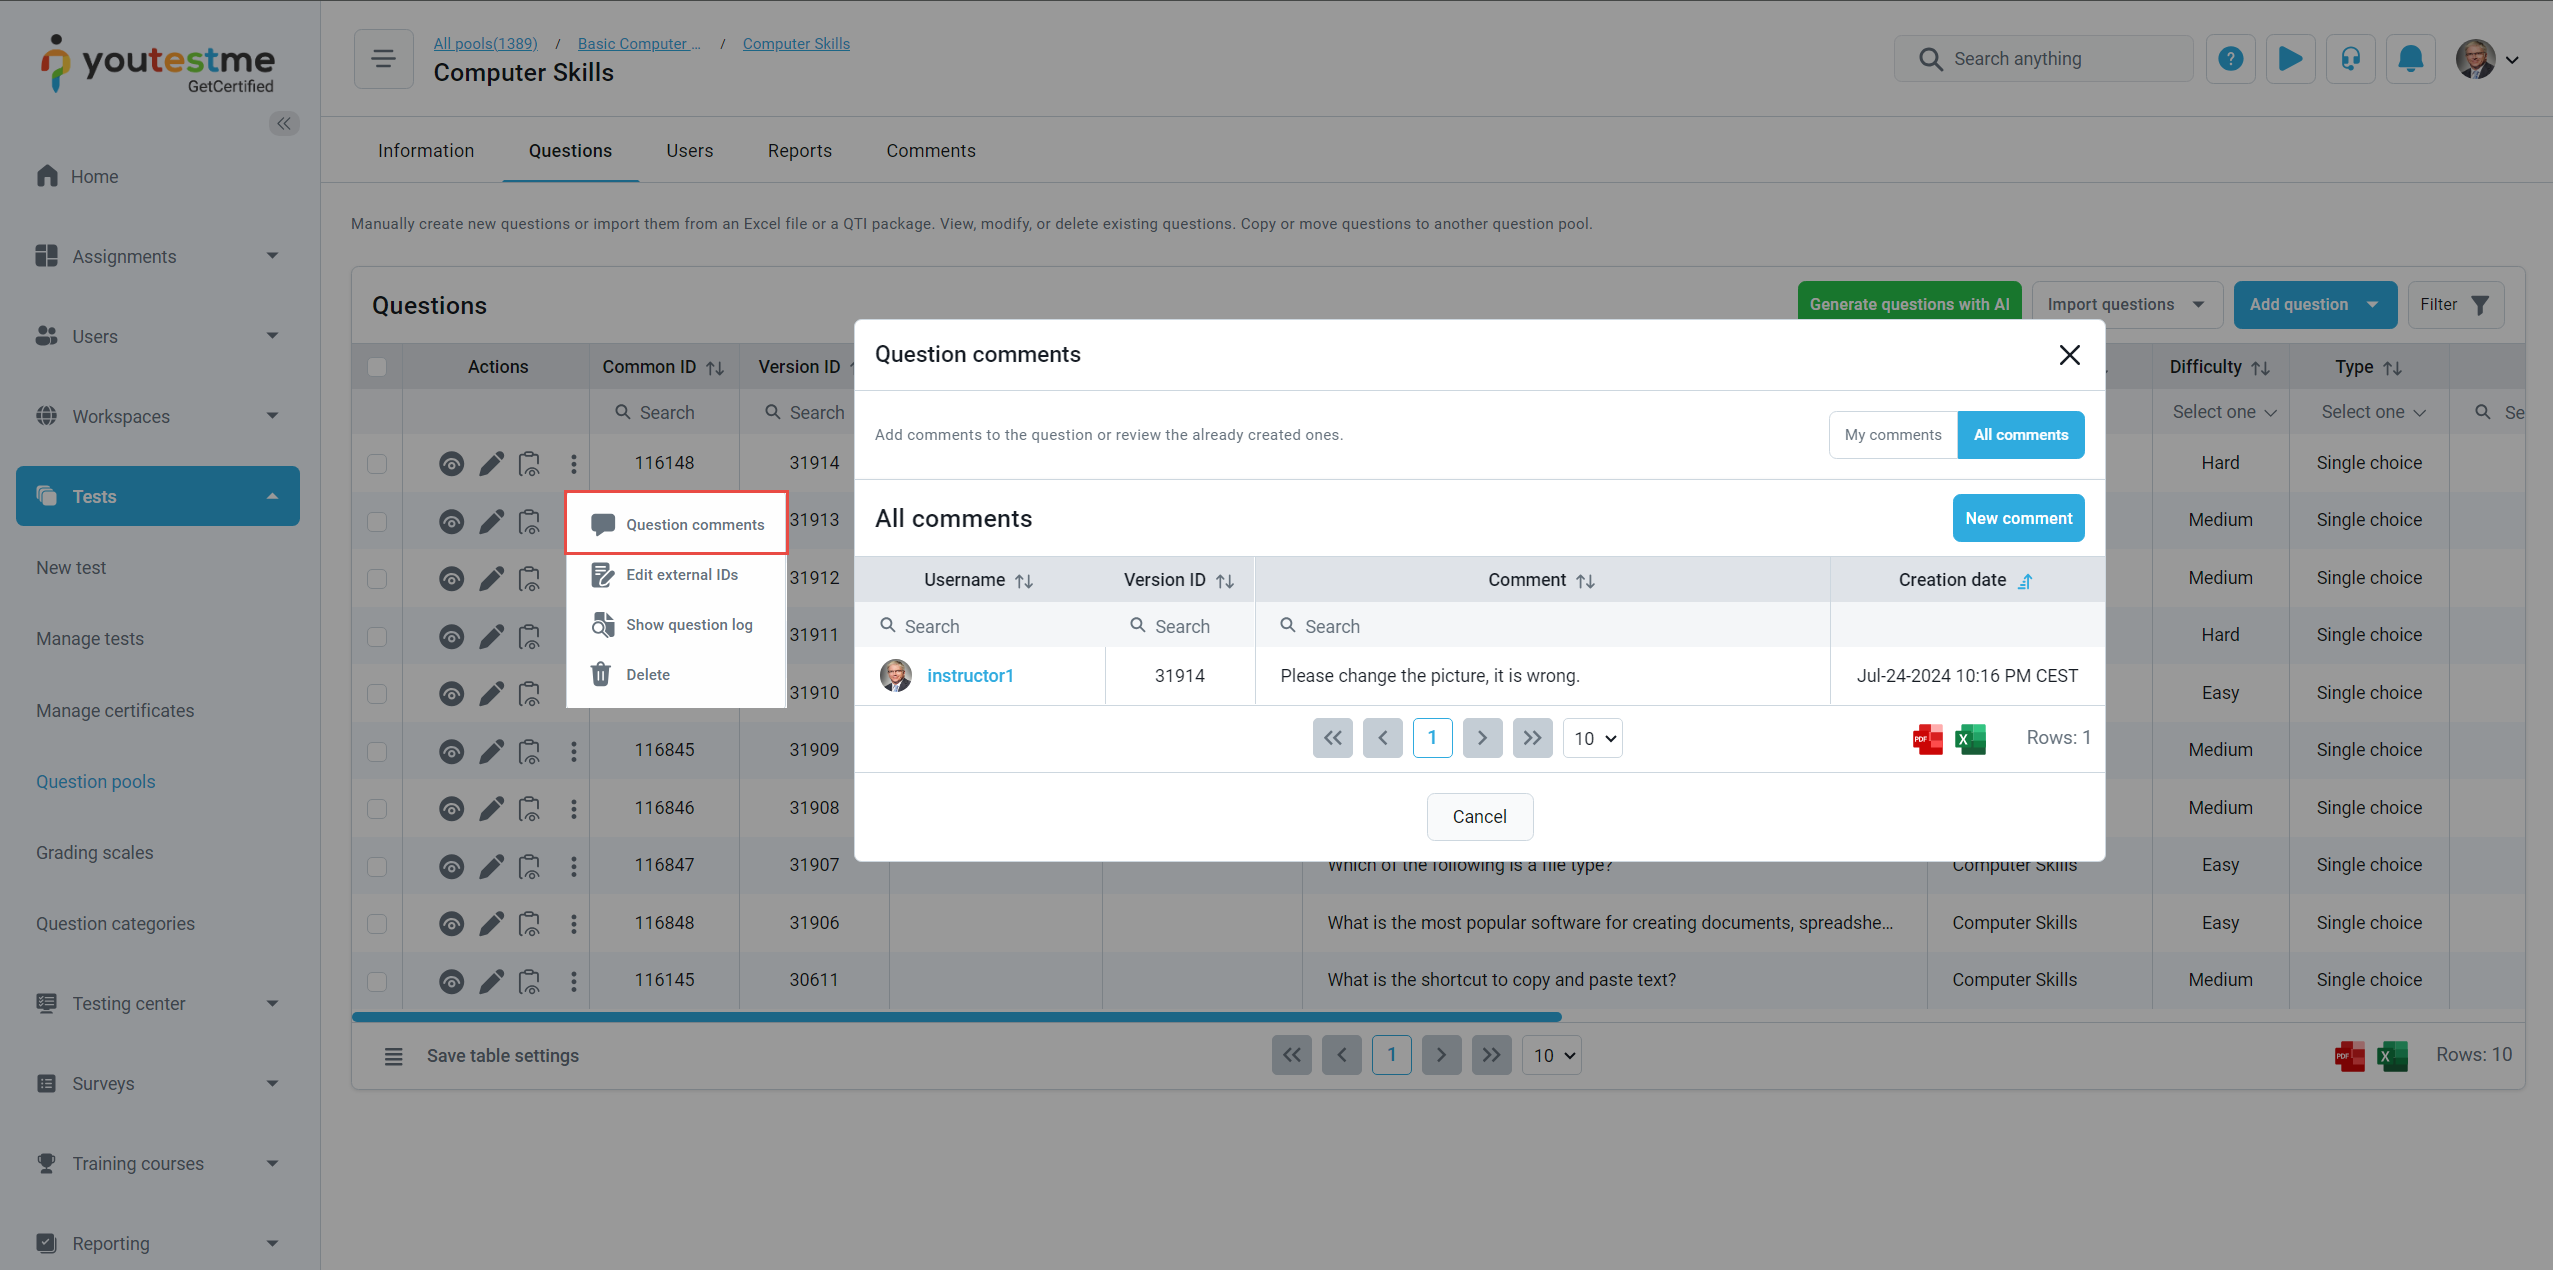
Question comments
The Question comments option allows users to add comments to the currently active version of a question or to review already created comments.
-
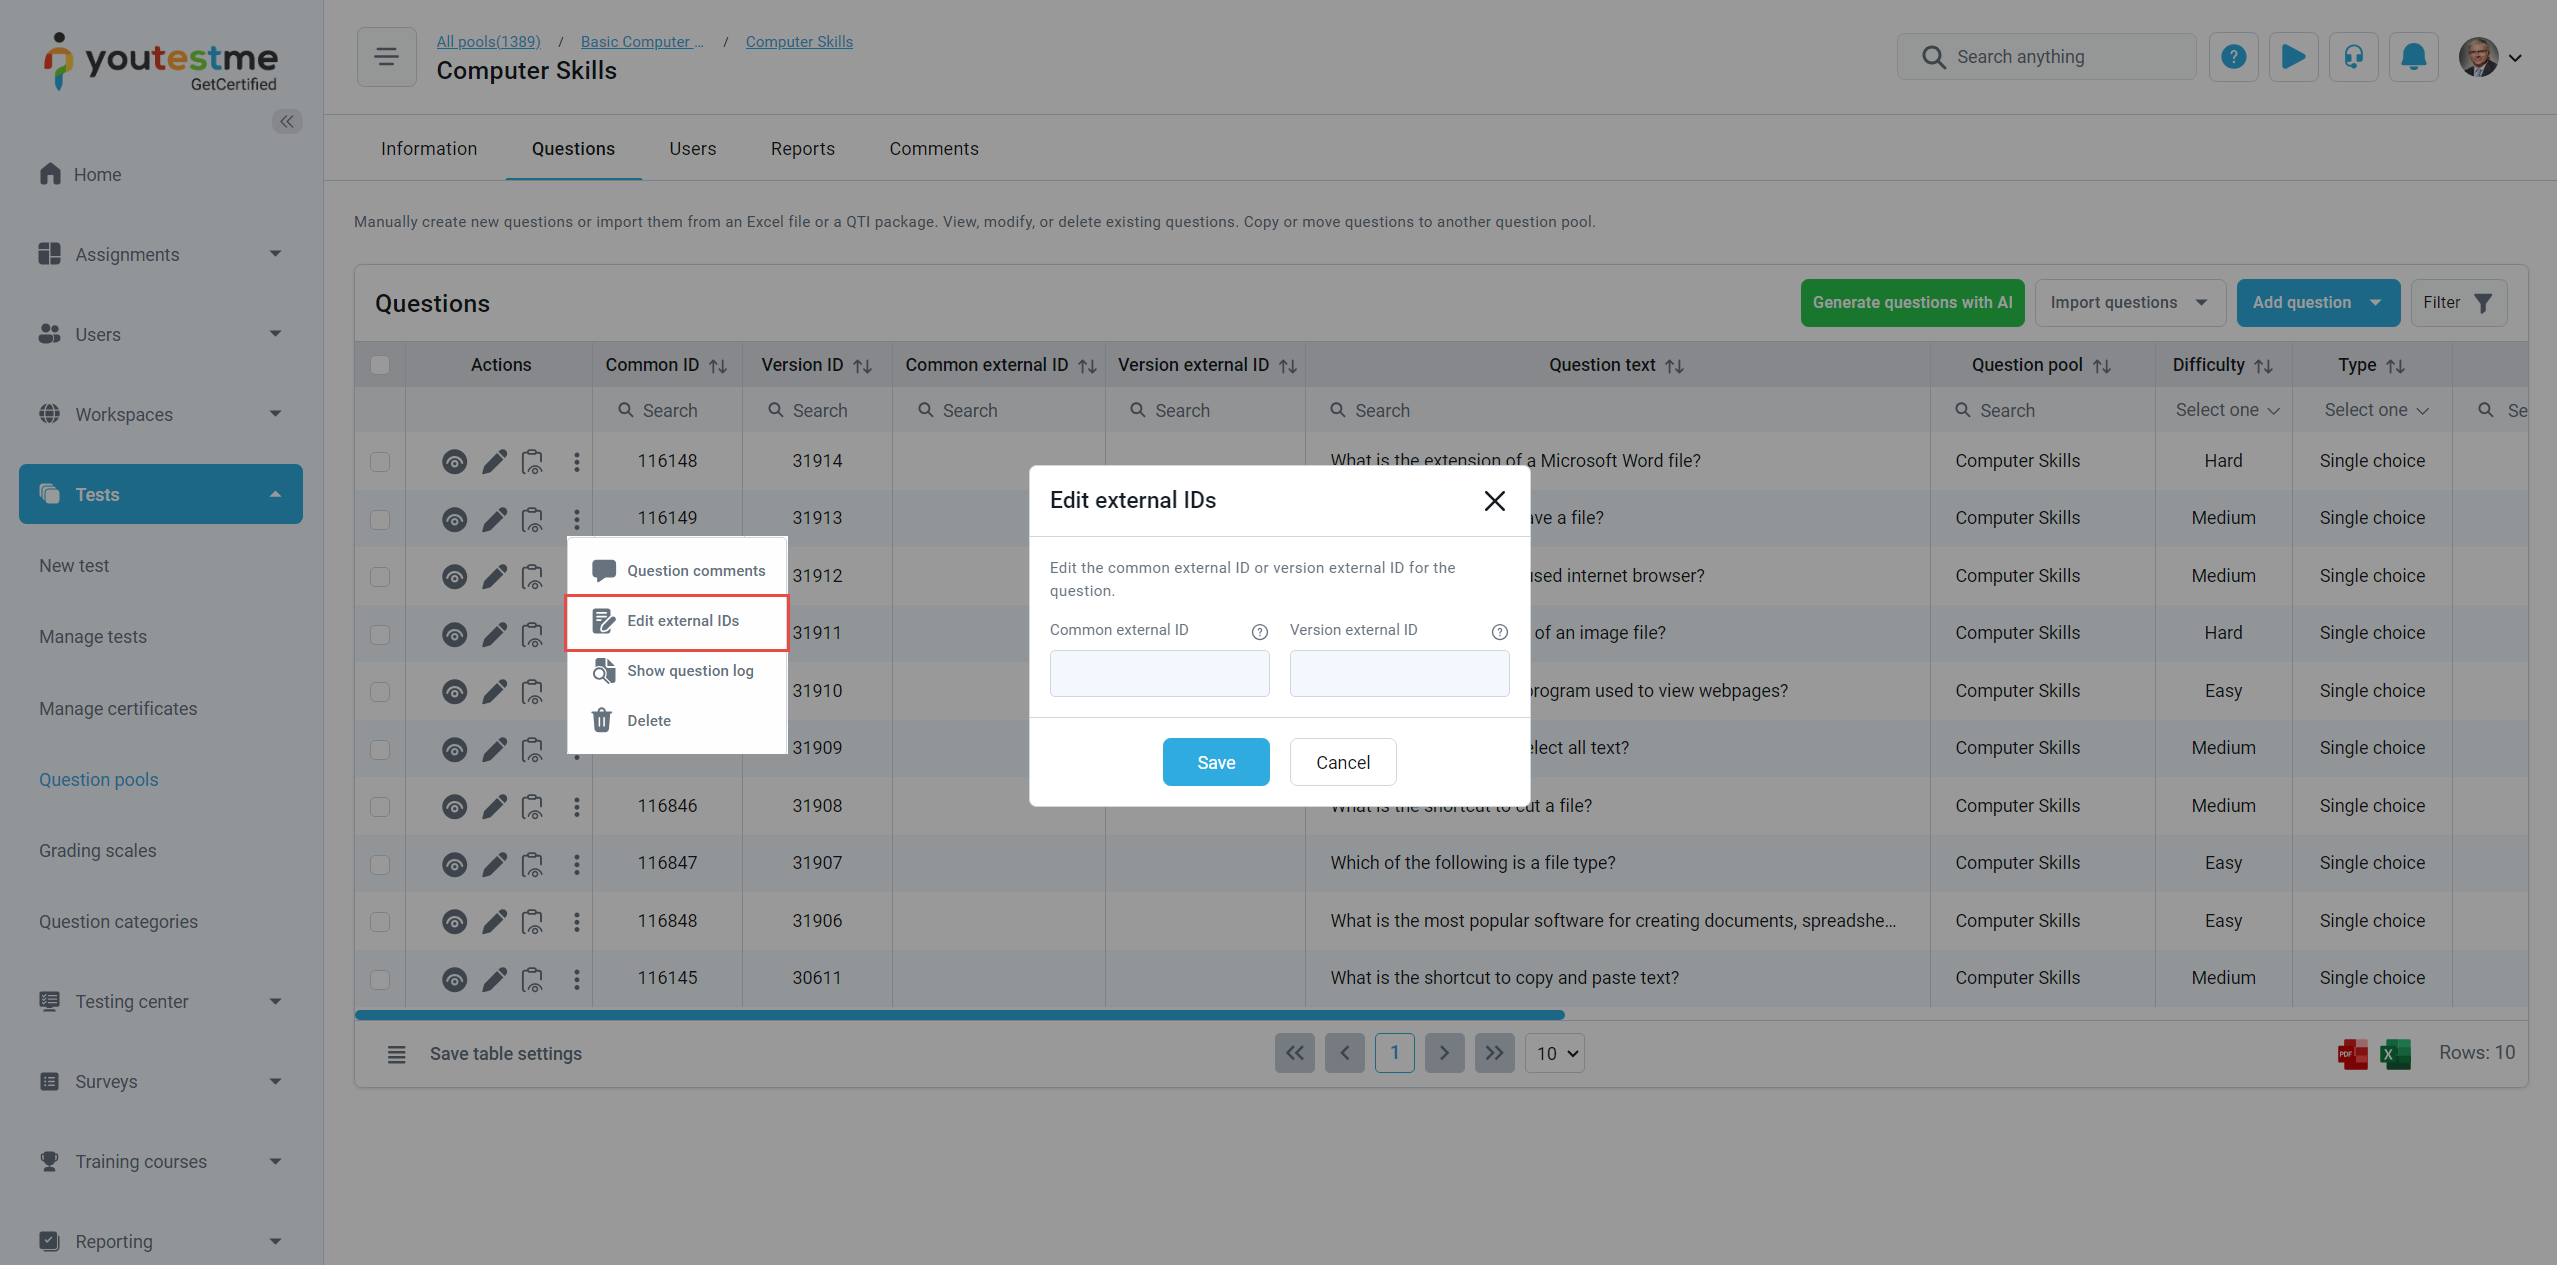
Edit external IDs
The Edit external IDs option allows users to edit the Common external ID and/or Version external ID of a question.
-
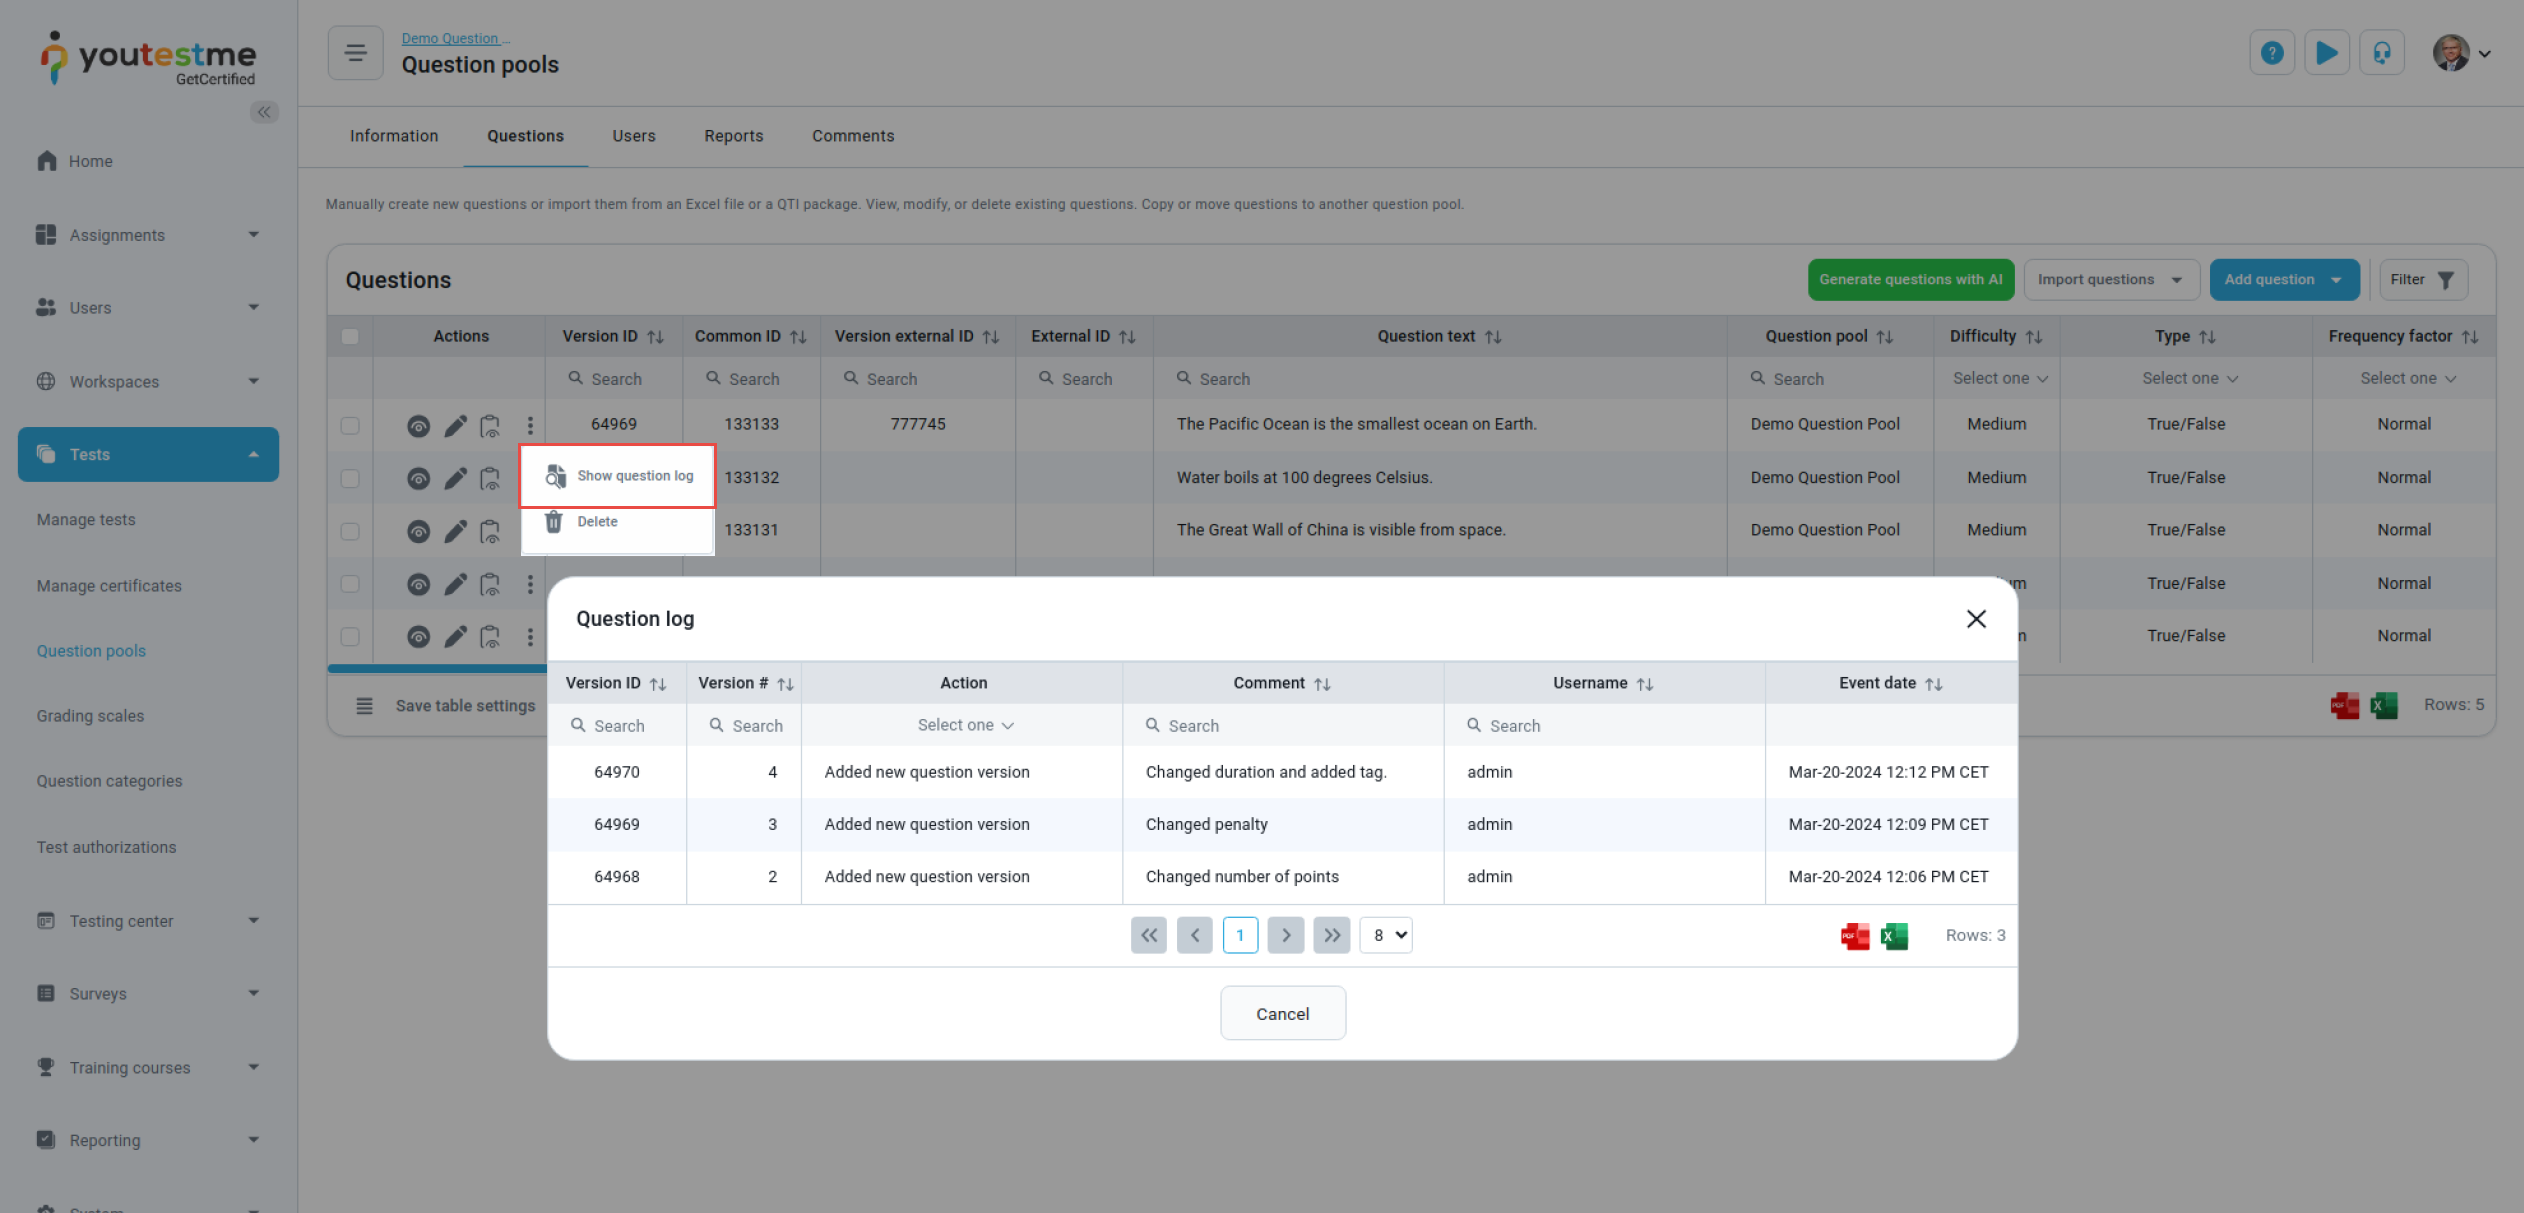
Question log
The Question log option provides a detailed history of a specific question and its various versions. It records actions such as creating new question versions, updating existing versions, activating or scheduling versions, and deleting versions, along with the user responsible for each action. This log offers valuable insight into the management of individual questions over time.
-
Generating questions with AI
ChatGPT allows you to generate multiple questions at once on a selected topic easily. You can either enter a topic for generating questions or add the desired document to the local library based on which the questions will be generated.
There are 7 supported question types:
-
Single choice.
-
Multiple choice.
-
Ordering.
-
Fill in the blanks.
-
True/False.
-
Matching.
-
Open-ended.
To generate questions:
-
Click the Generate questions with AI button.
-
Select where you'd like to generate questions from, either the Global knowledge base or the Local library.
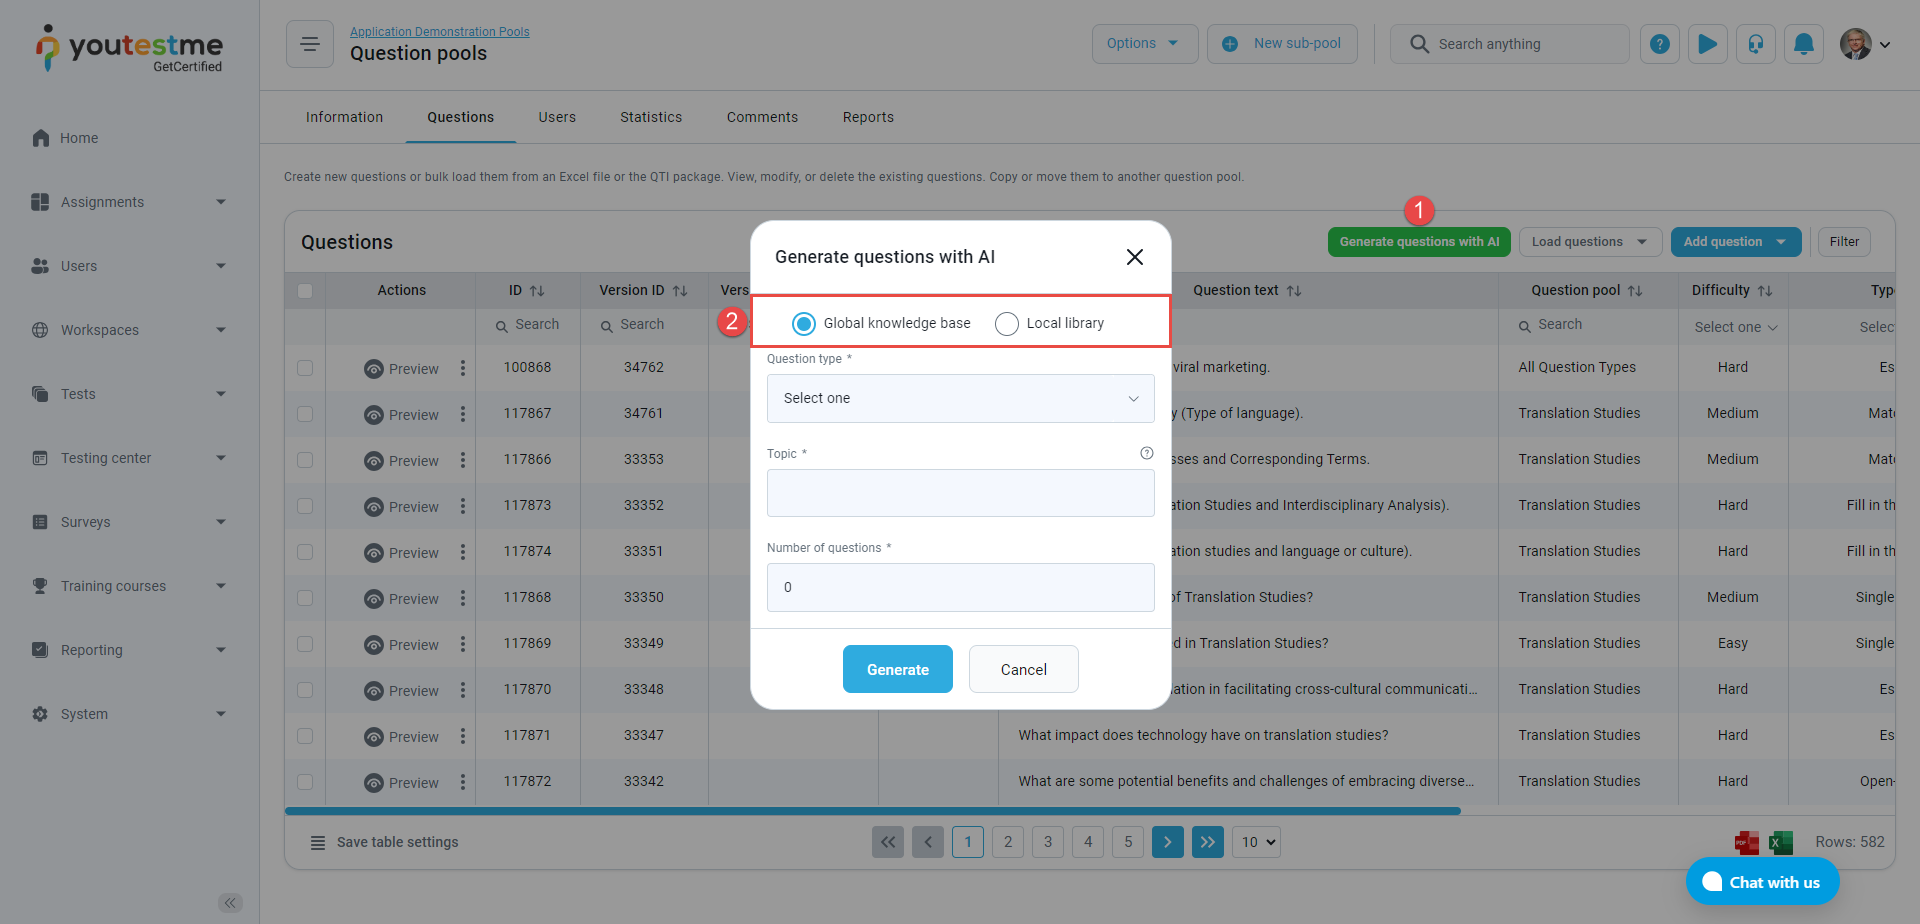
To generate questions from the Global knowledge base:
-
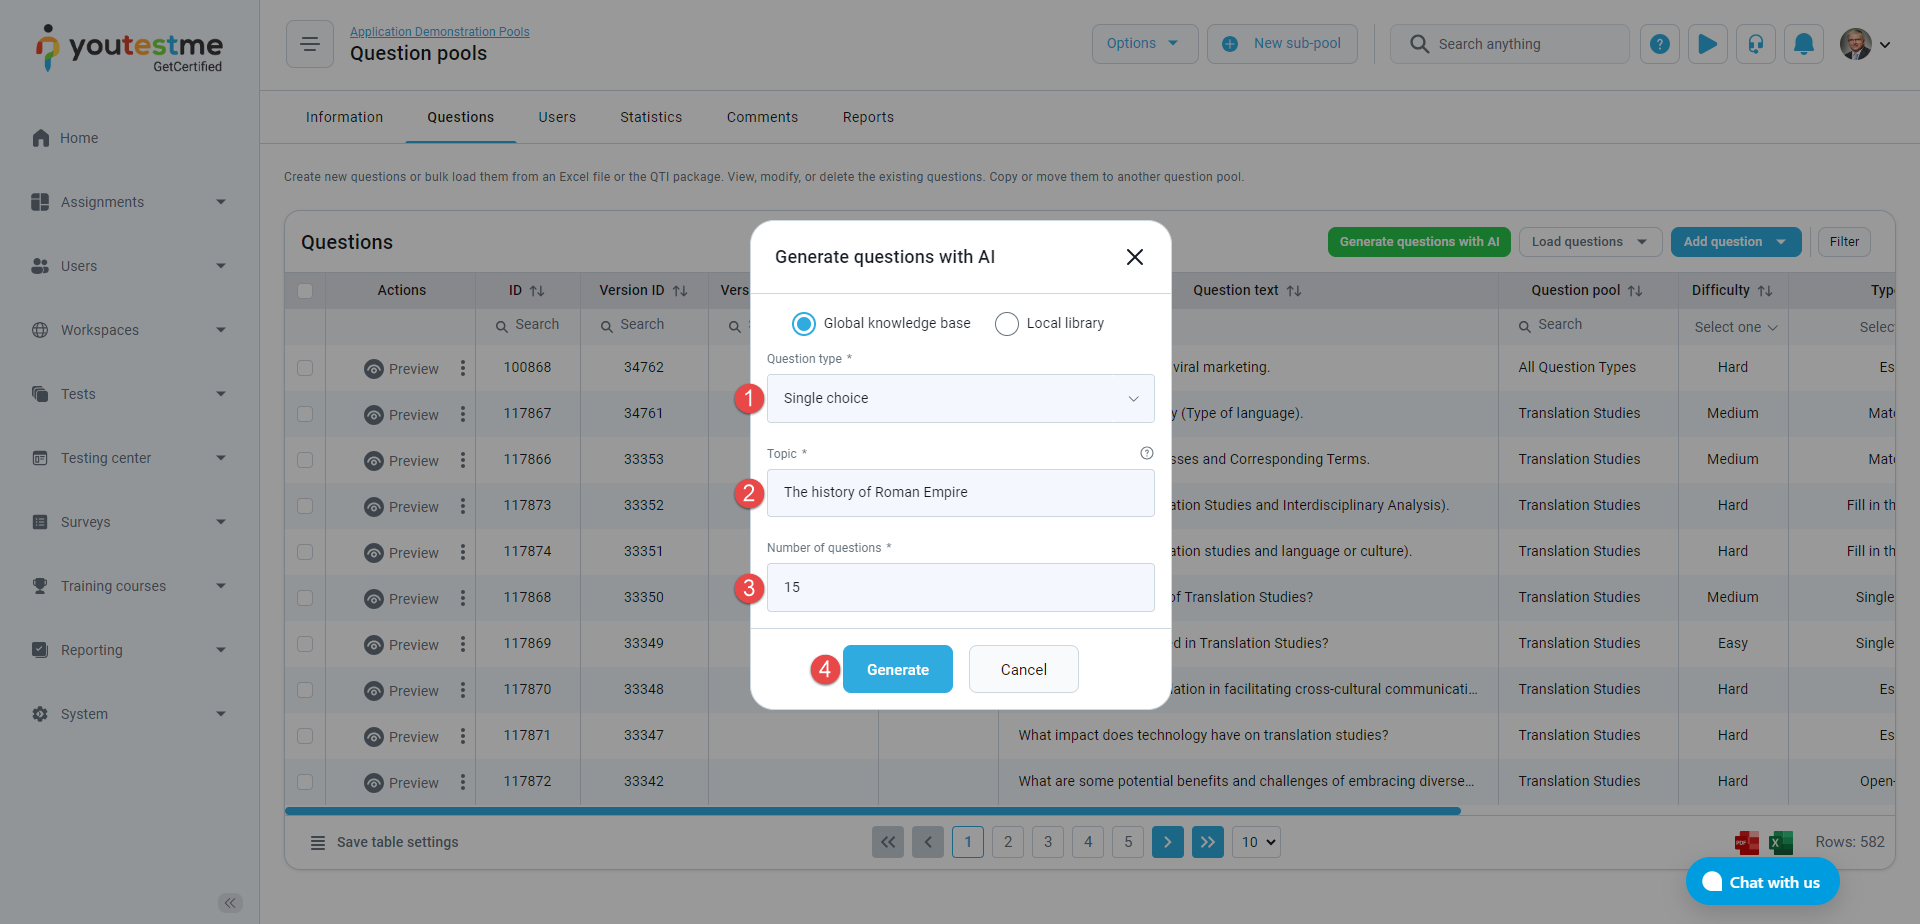
Choose the type of questions you wish to create.
-
Specify the topic on which you'd like the AI to generate questions.
Useful tip: Get creative with the Topic field! If you’re basing the questions on written content – instructions, book snippets, etc., you can copy the text in the field and prompt the generator to create questions based on it.
-
Specify the number of questions you'd like the AI to generate.
-
Once you click Generate, it may take a few minutes to see questions in the list.
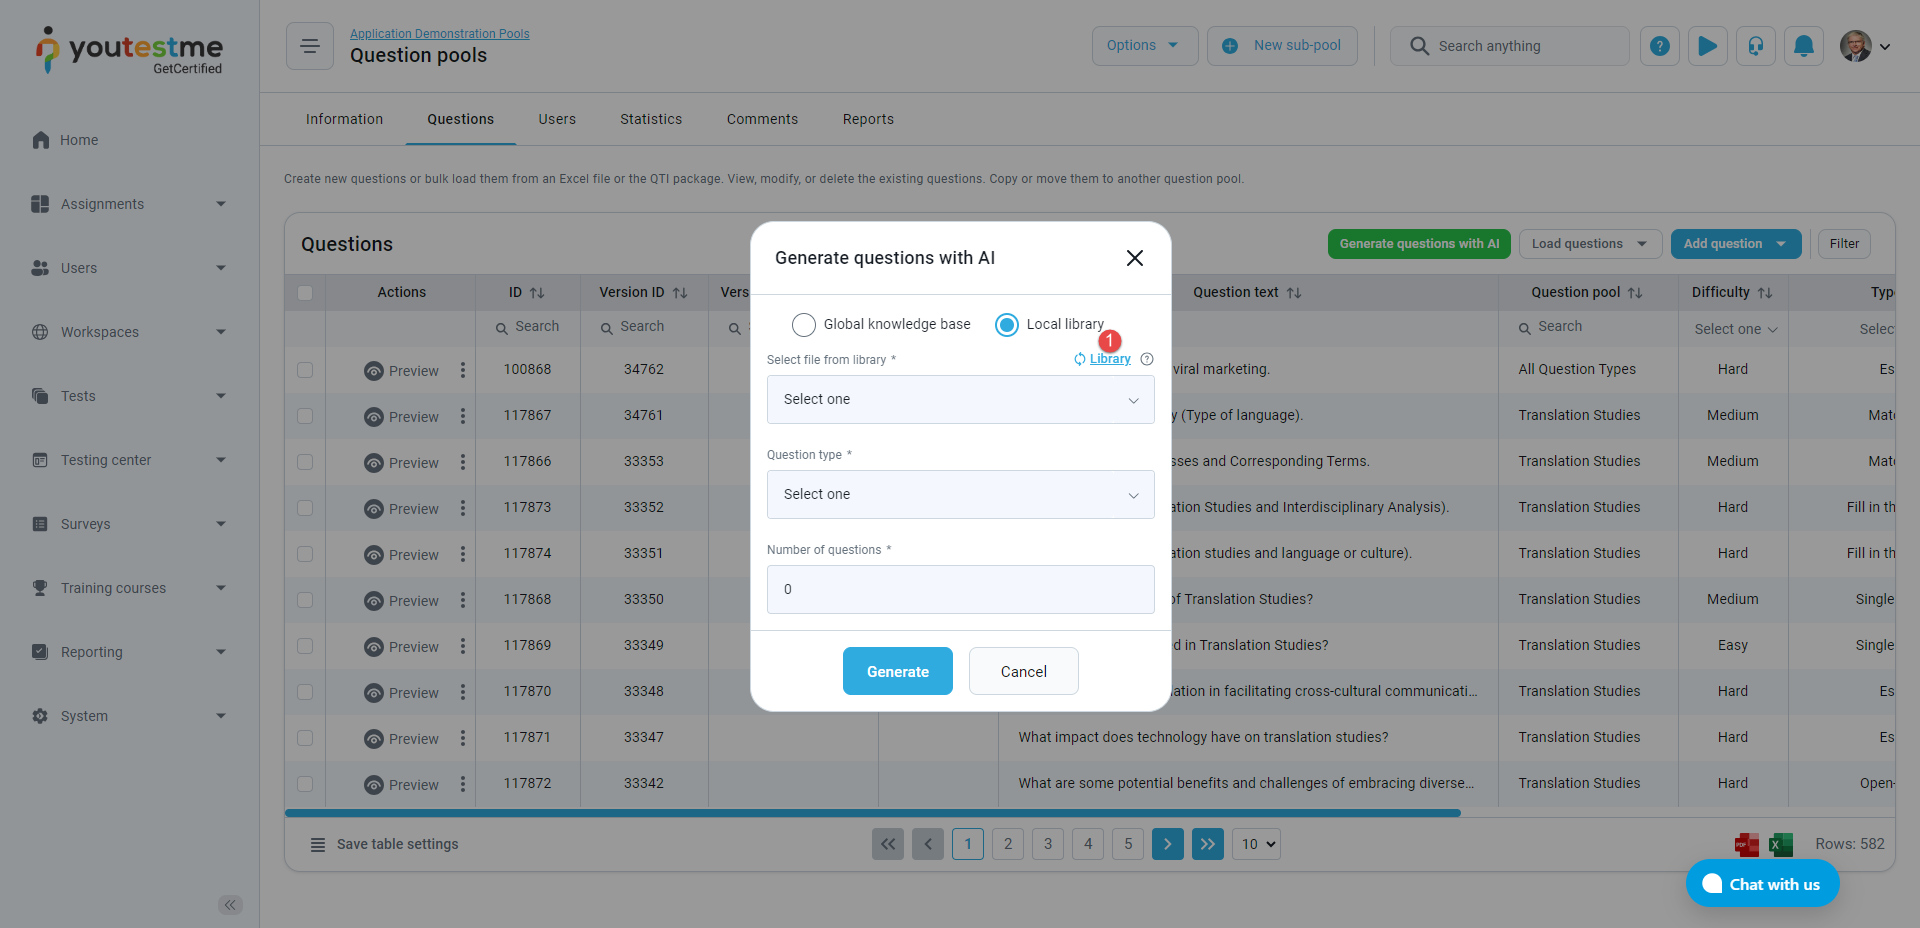
To generate questions from Local library:
-
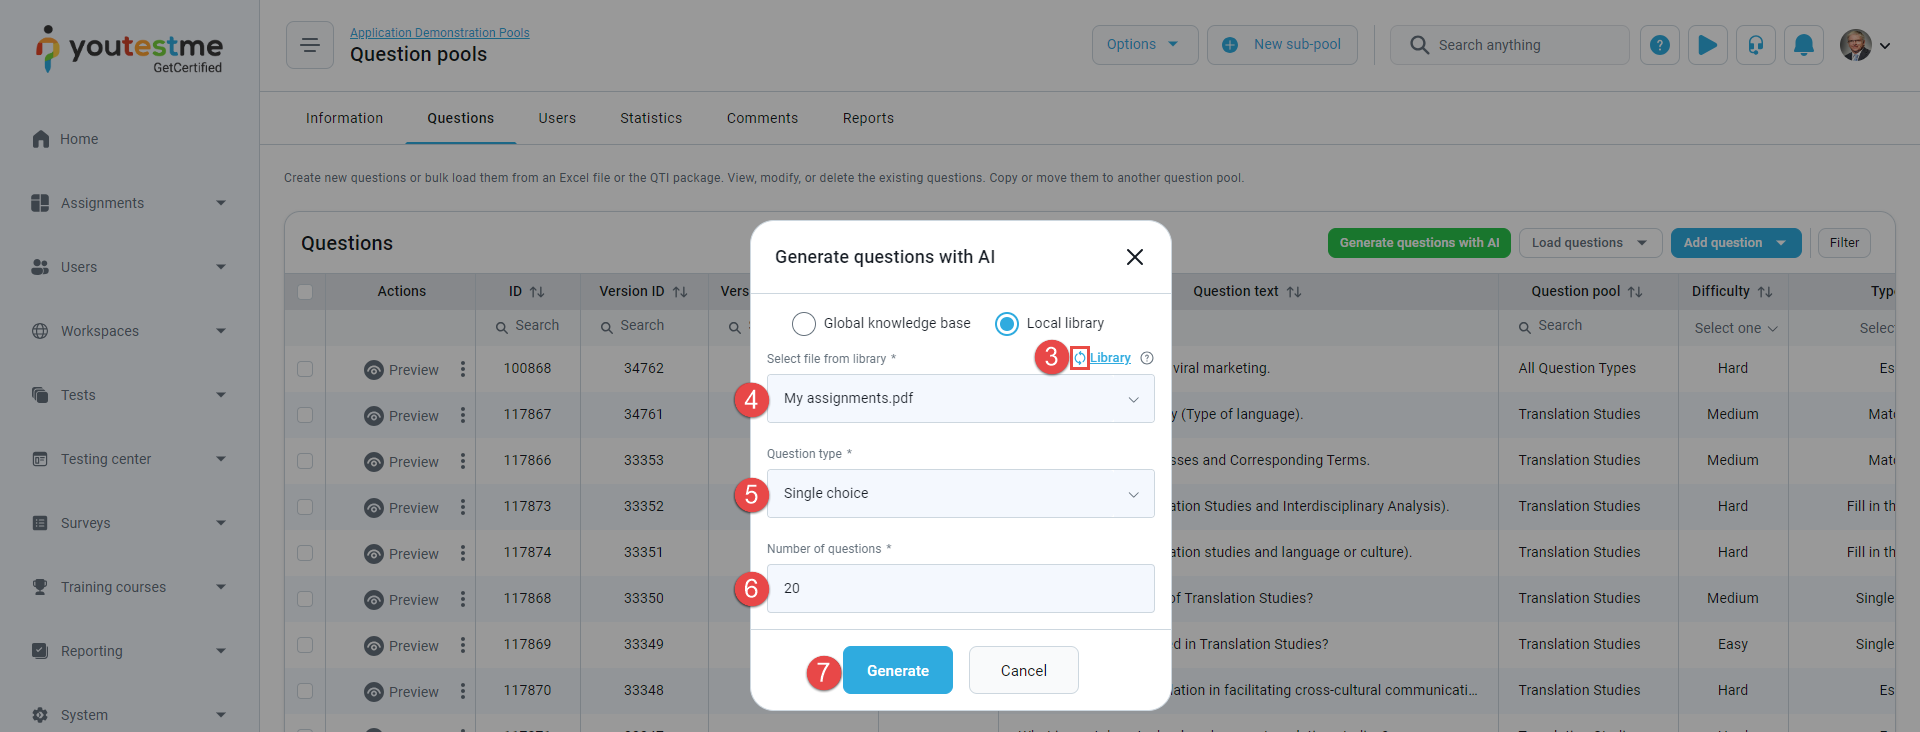
If you wish to upload new test material, click the Library button.
-
Upload test material by clicking the Browse files button.

-
After uploading a file from the local library, return to the YouTestMe GetCertified application and click the Refresh button to update the list of materials for question generation.
-
Choose the file you previously uploaded.
-
Choose the type of questions you wish to create.
-
Specify the number of questions you'd like the AI to generate.
-
Once you click Generate, it may take a few minutes to see questions in the list.
-
-
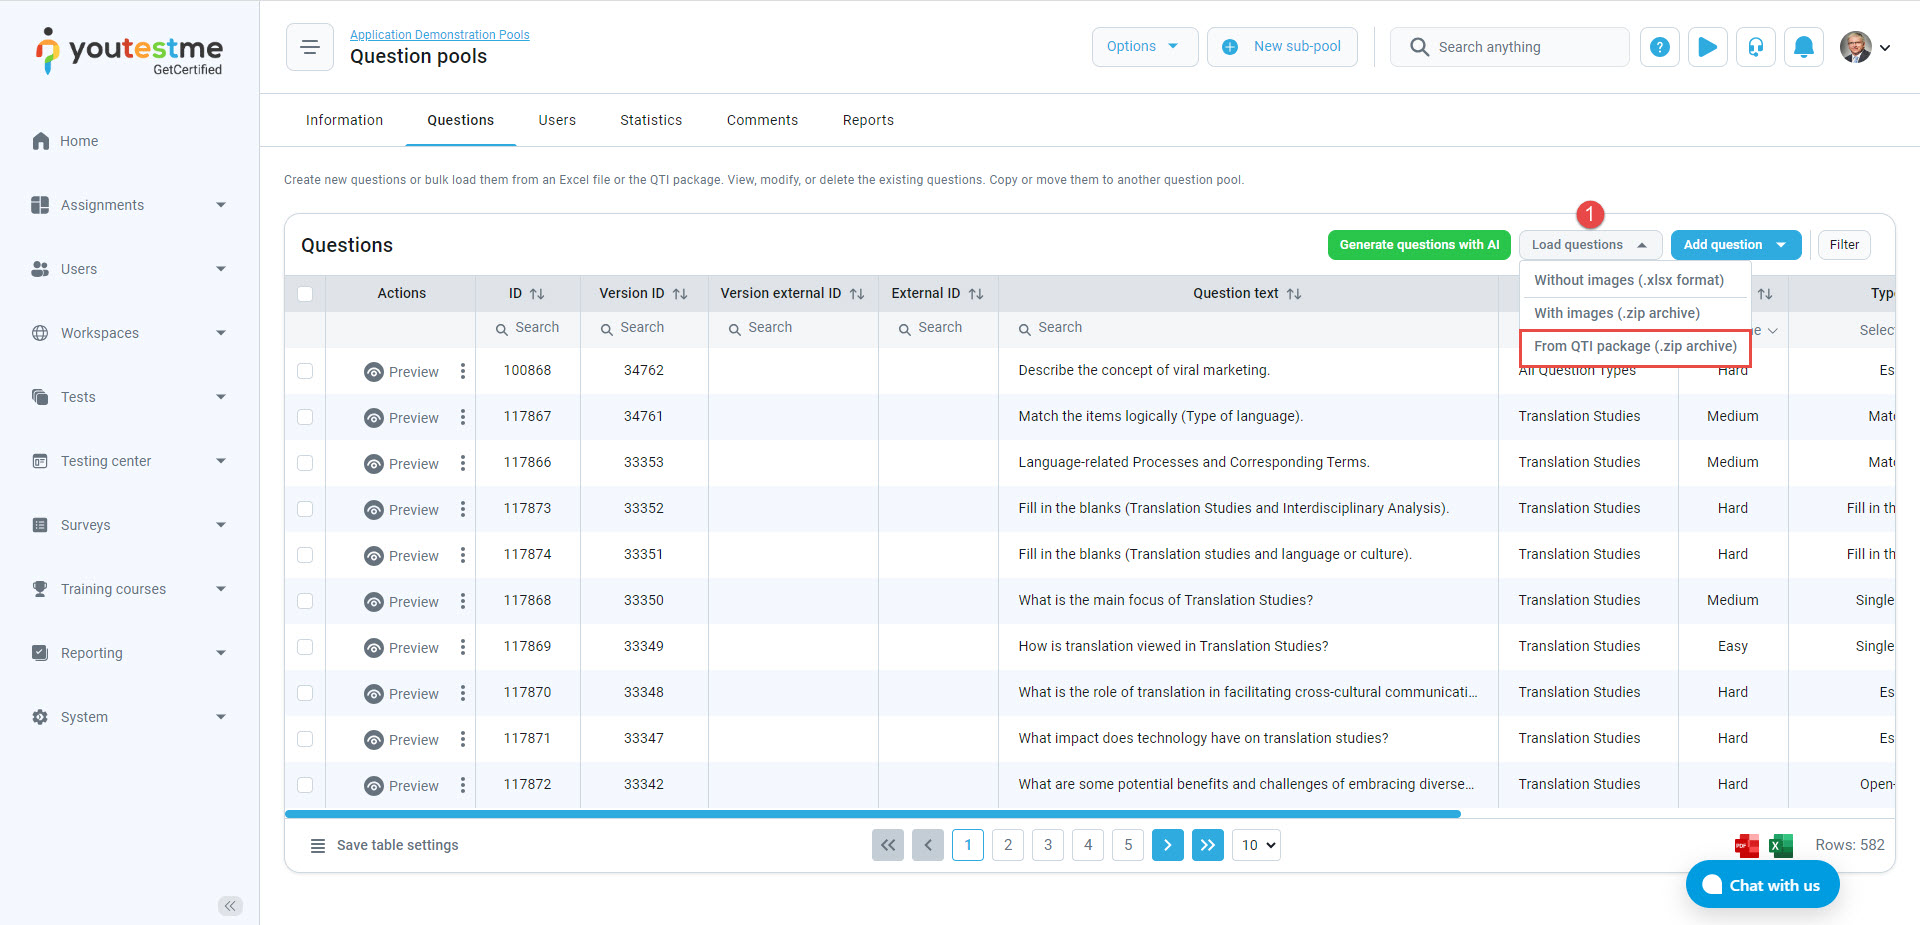
Load questions
You can load questions into the selected question pool using three methods:
-
From QTI package (in .zip archive).
Note: This package is not intended to be manually created.

-
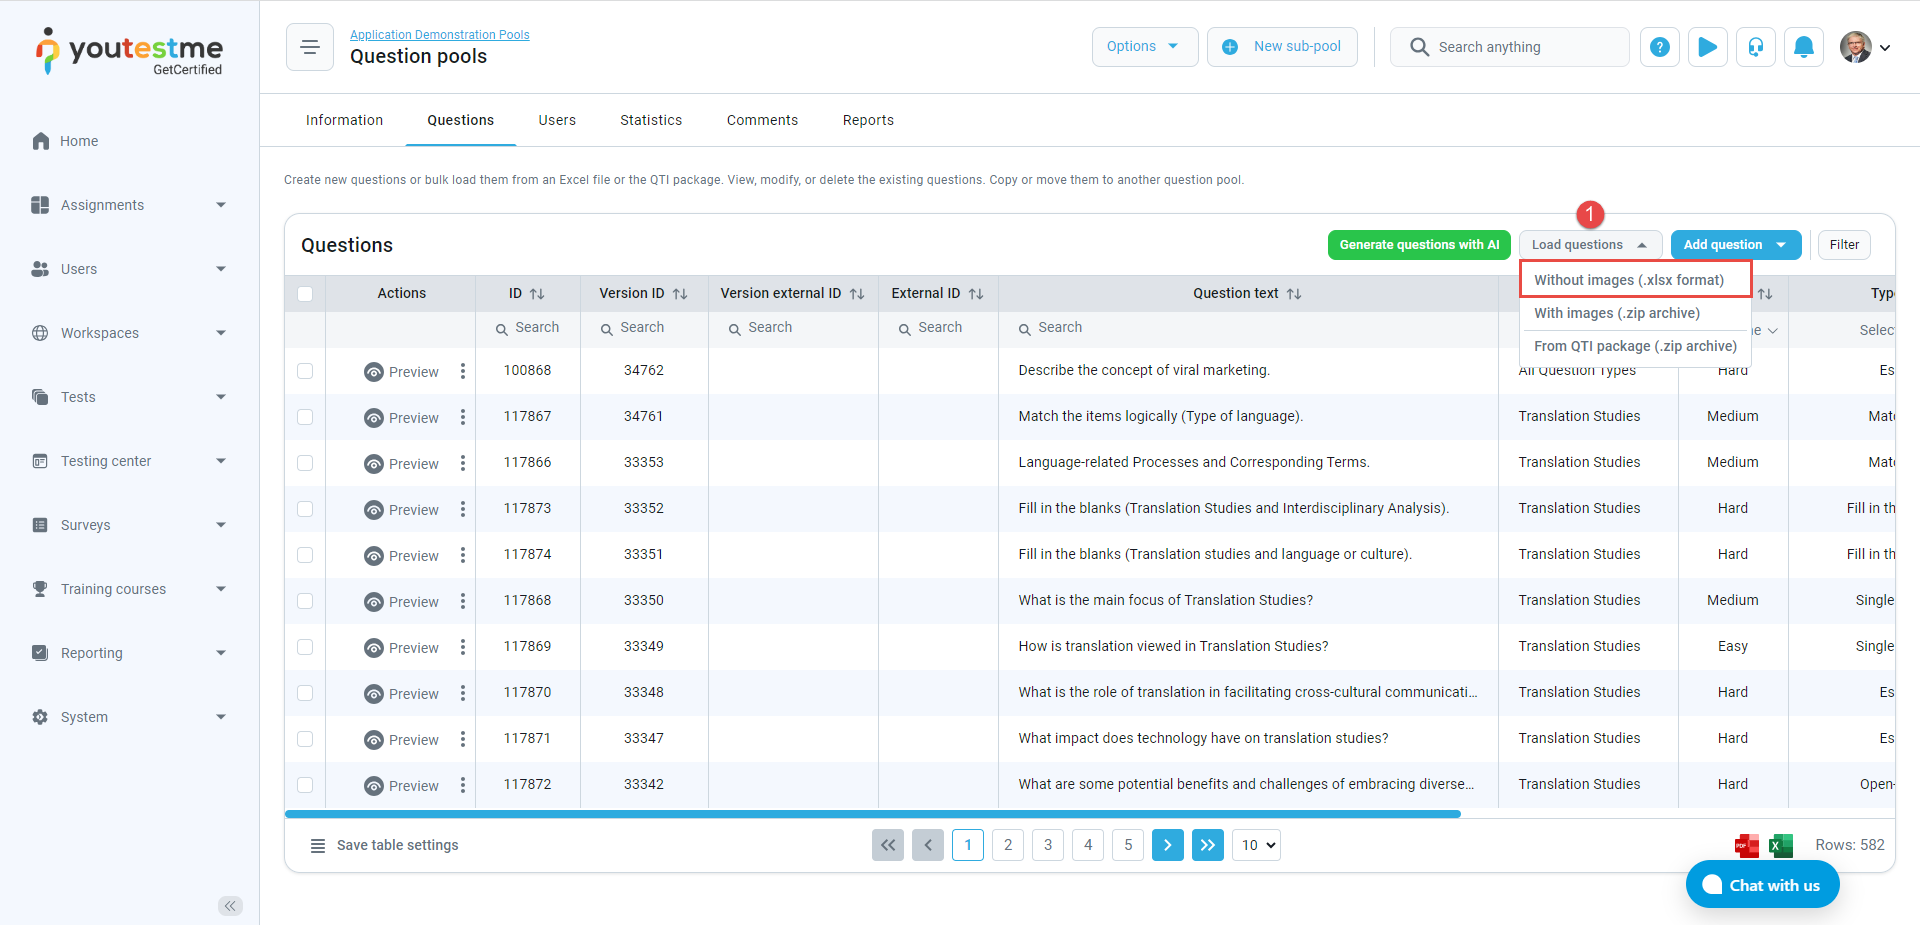
Load questions without images
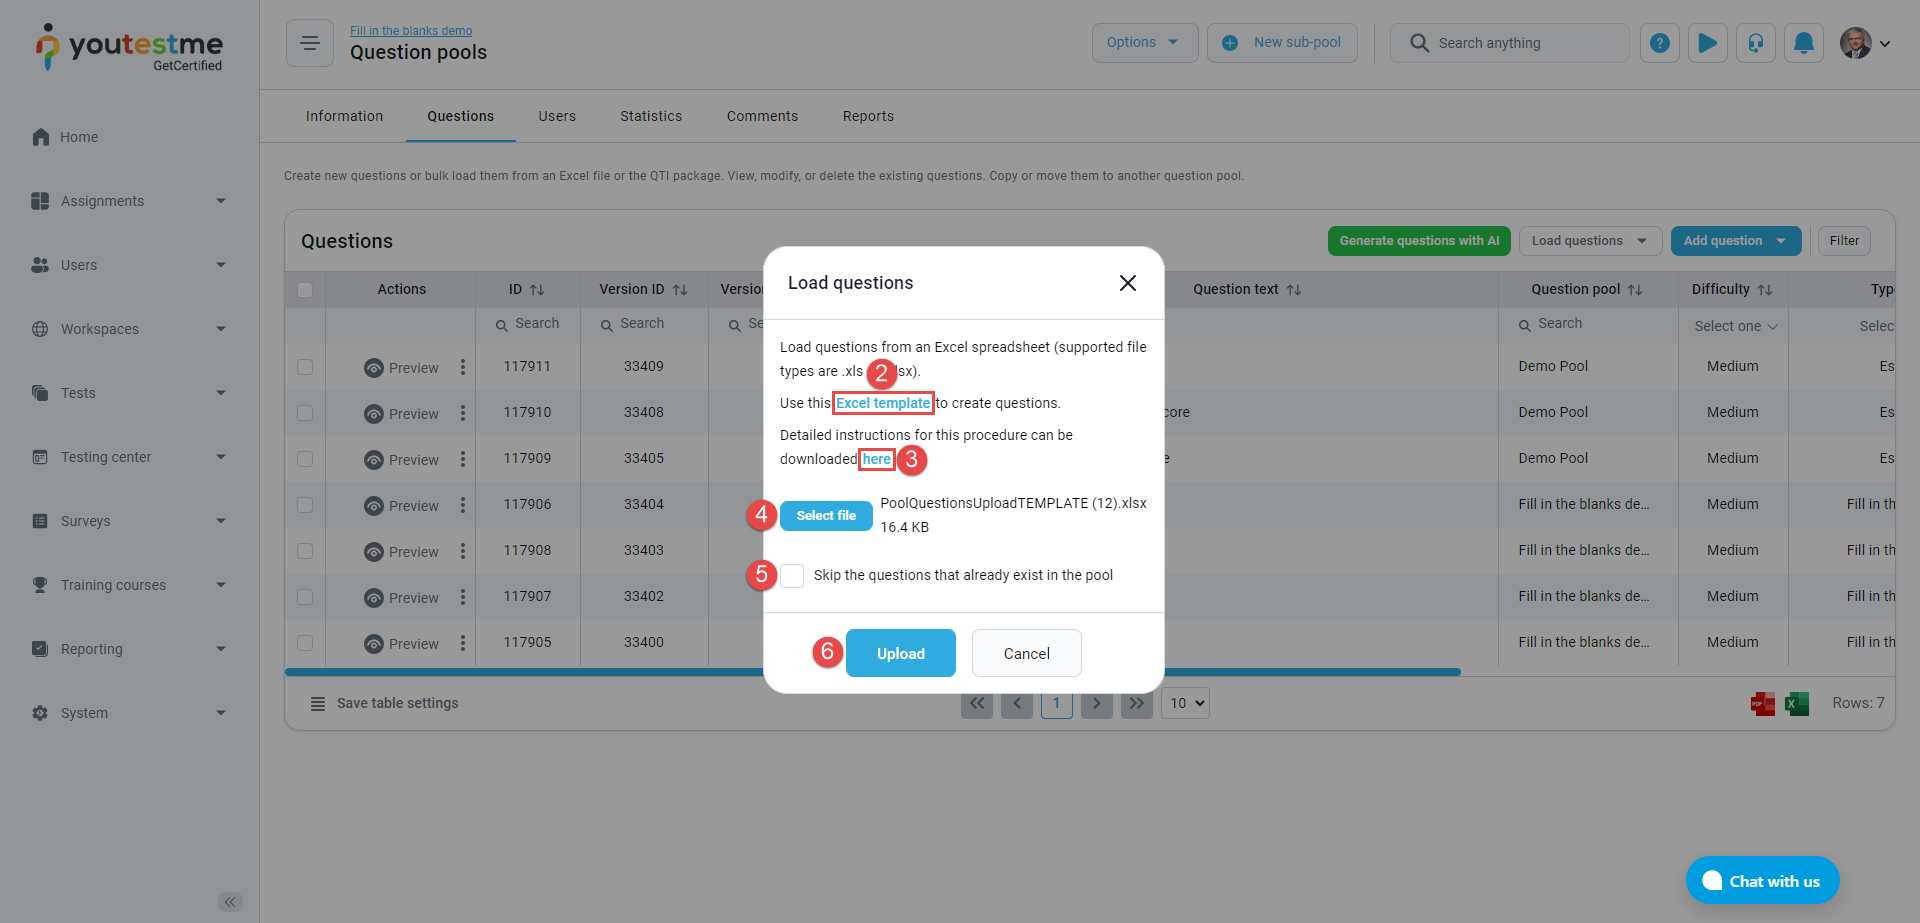
To load multiple questions into the question pool using an Excel file, follow these steps:
-
Click the Load questions button, and select the option Without images.
-
Download the Excel template by clicking the provided link.
-
Refer to the detailed instructions for filling in the template.
-
Add an Excel file with questions by clicking the Select file button.
Note: Supported file types are .xls or .xlsx.
-
Check the box if you want to skip importing questions that already exist in the question pool. This means that questions with identical text to existing ones will not be imported.
-
Click the Upload button to load questions into the system.
-
-
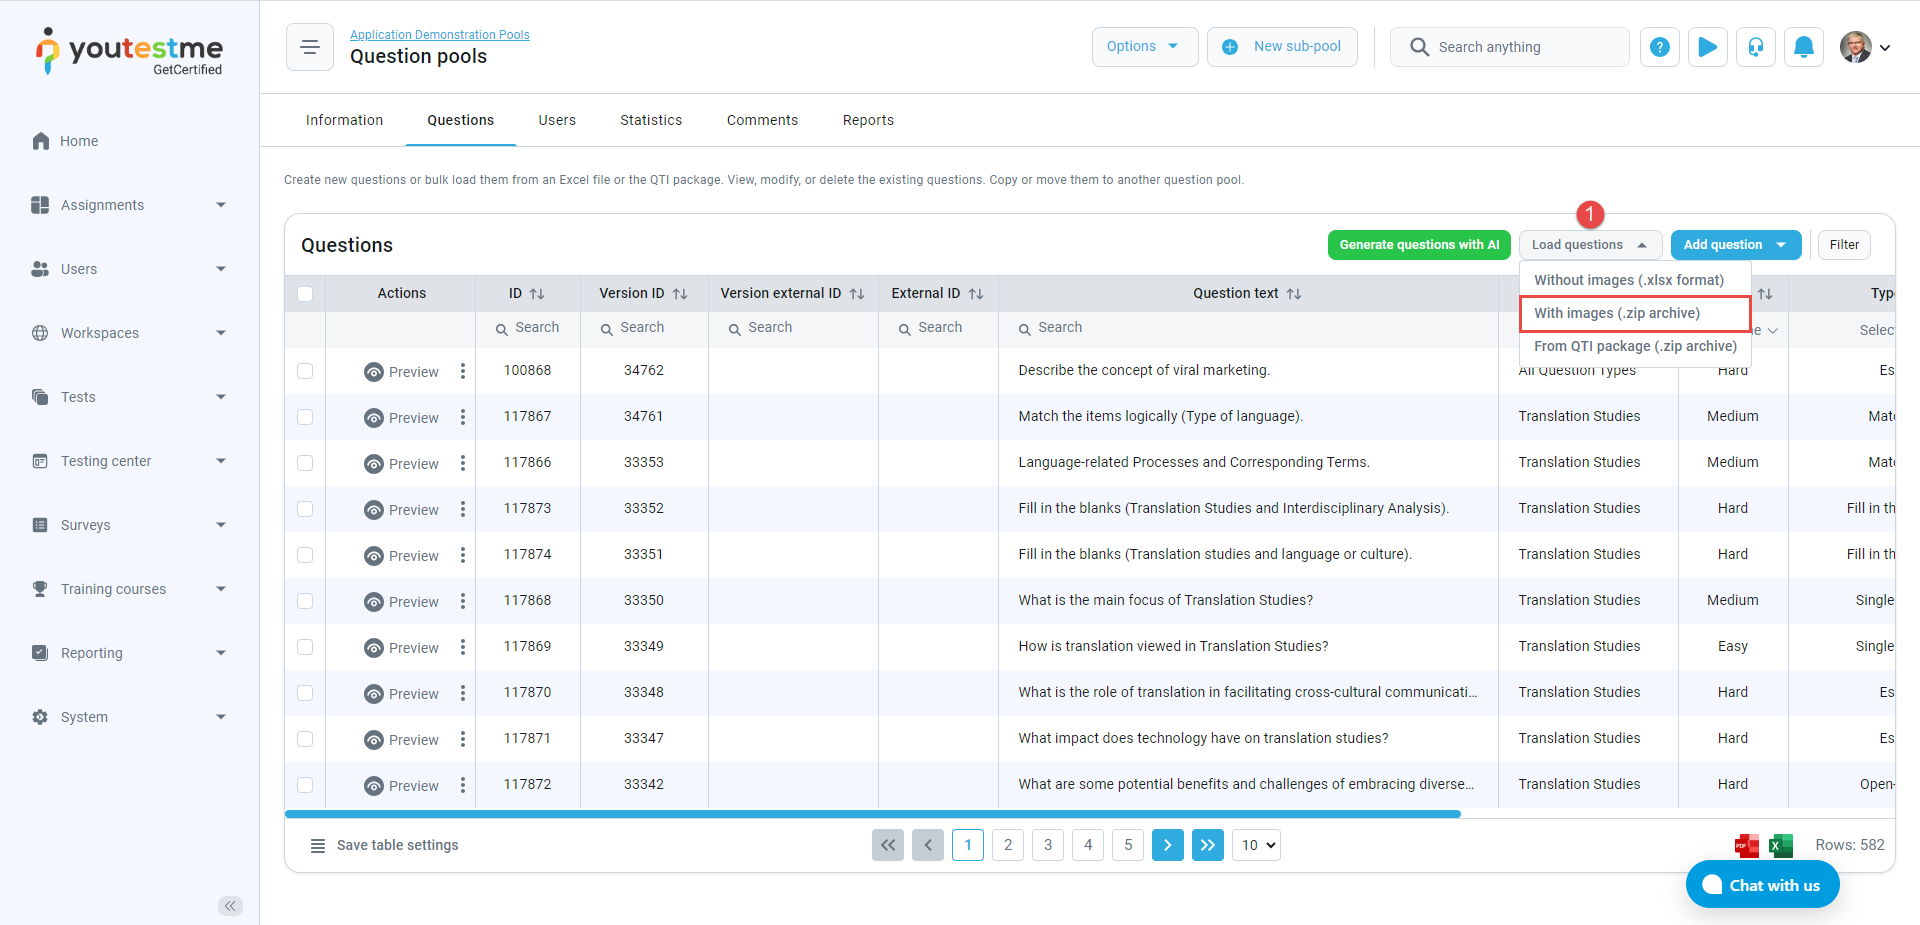
Load questions with images
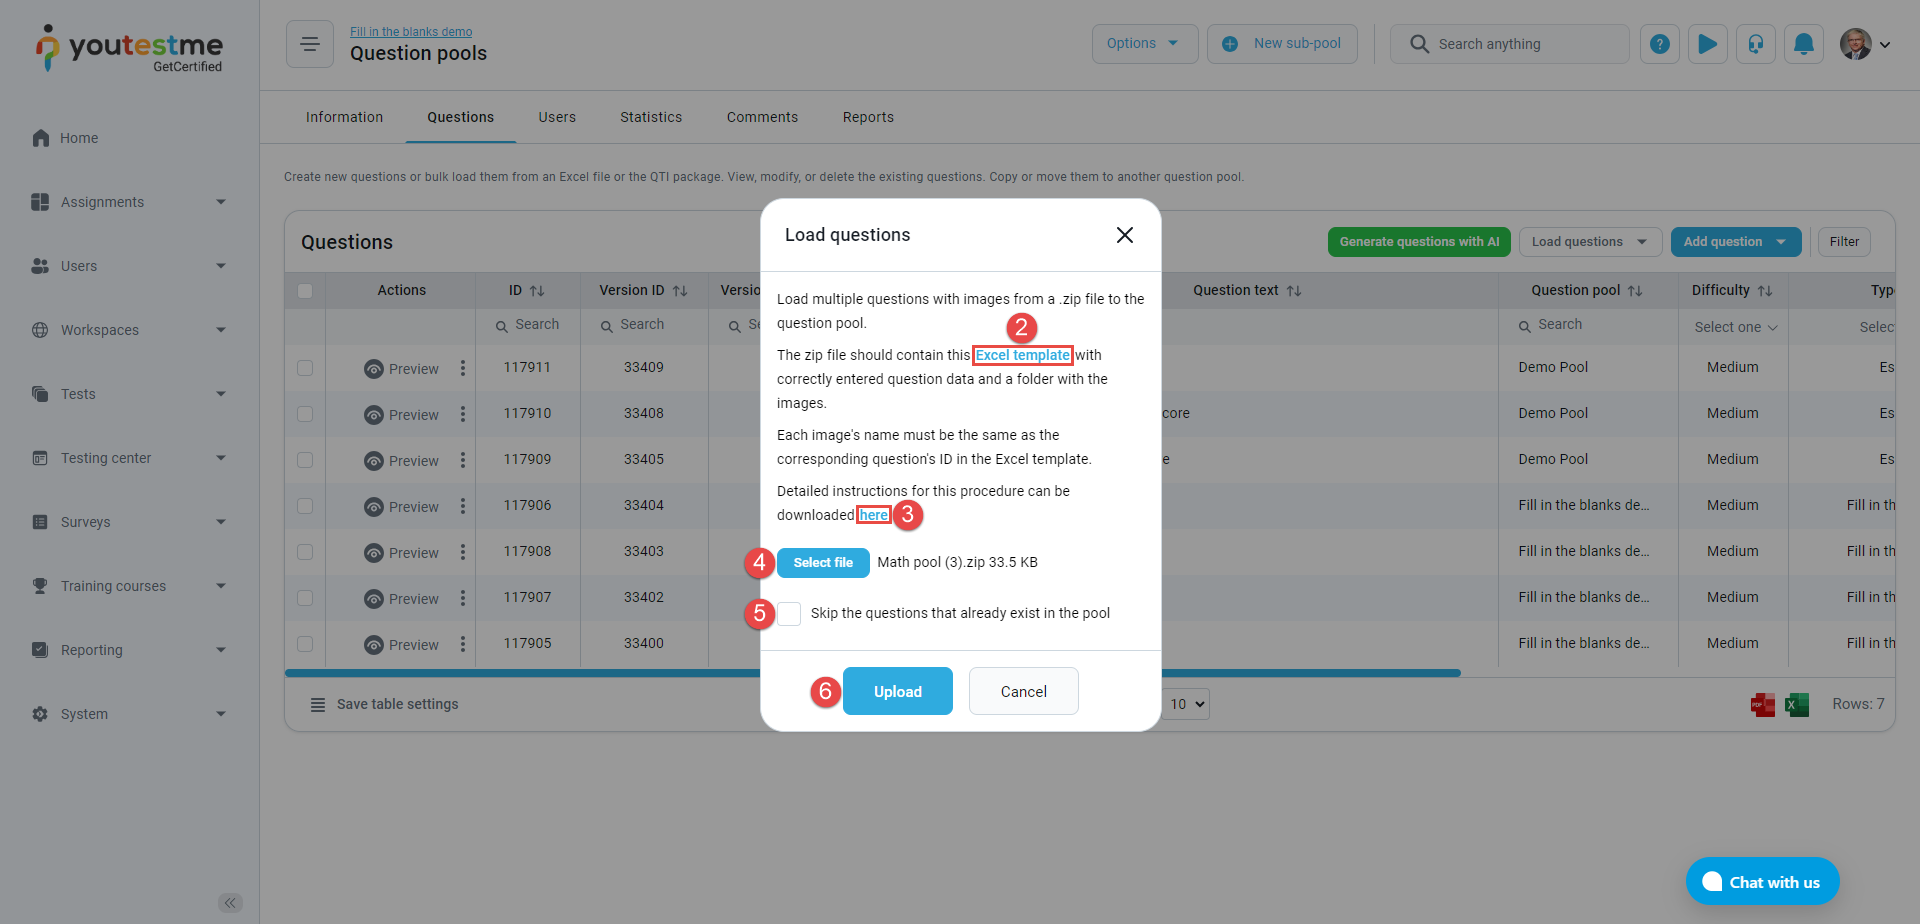
To load multiple questions with images into the question pool using a .zip file, follow these steps:
-
Click the Load questions button, and select the option With images.
-
Download the Excel template by clicking the provided link.
-
Refer to the detailed instructions for filling in the template.
-
Add a .zip file containing the Excel file with questions and a folder with images by clicking the Select file button.
Note: Ensure that each image's name matches the corresponding Question ID in the Excel template.
-
Check the box if you want to skip importing questions that already exist in the question pool. This means that questions with identical text to existing ones will not be imported.
-
Click the Upload button to load questions into the system.
For more information about loading questions with images, please refer to the this article.
-
-
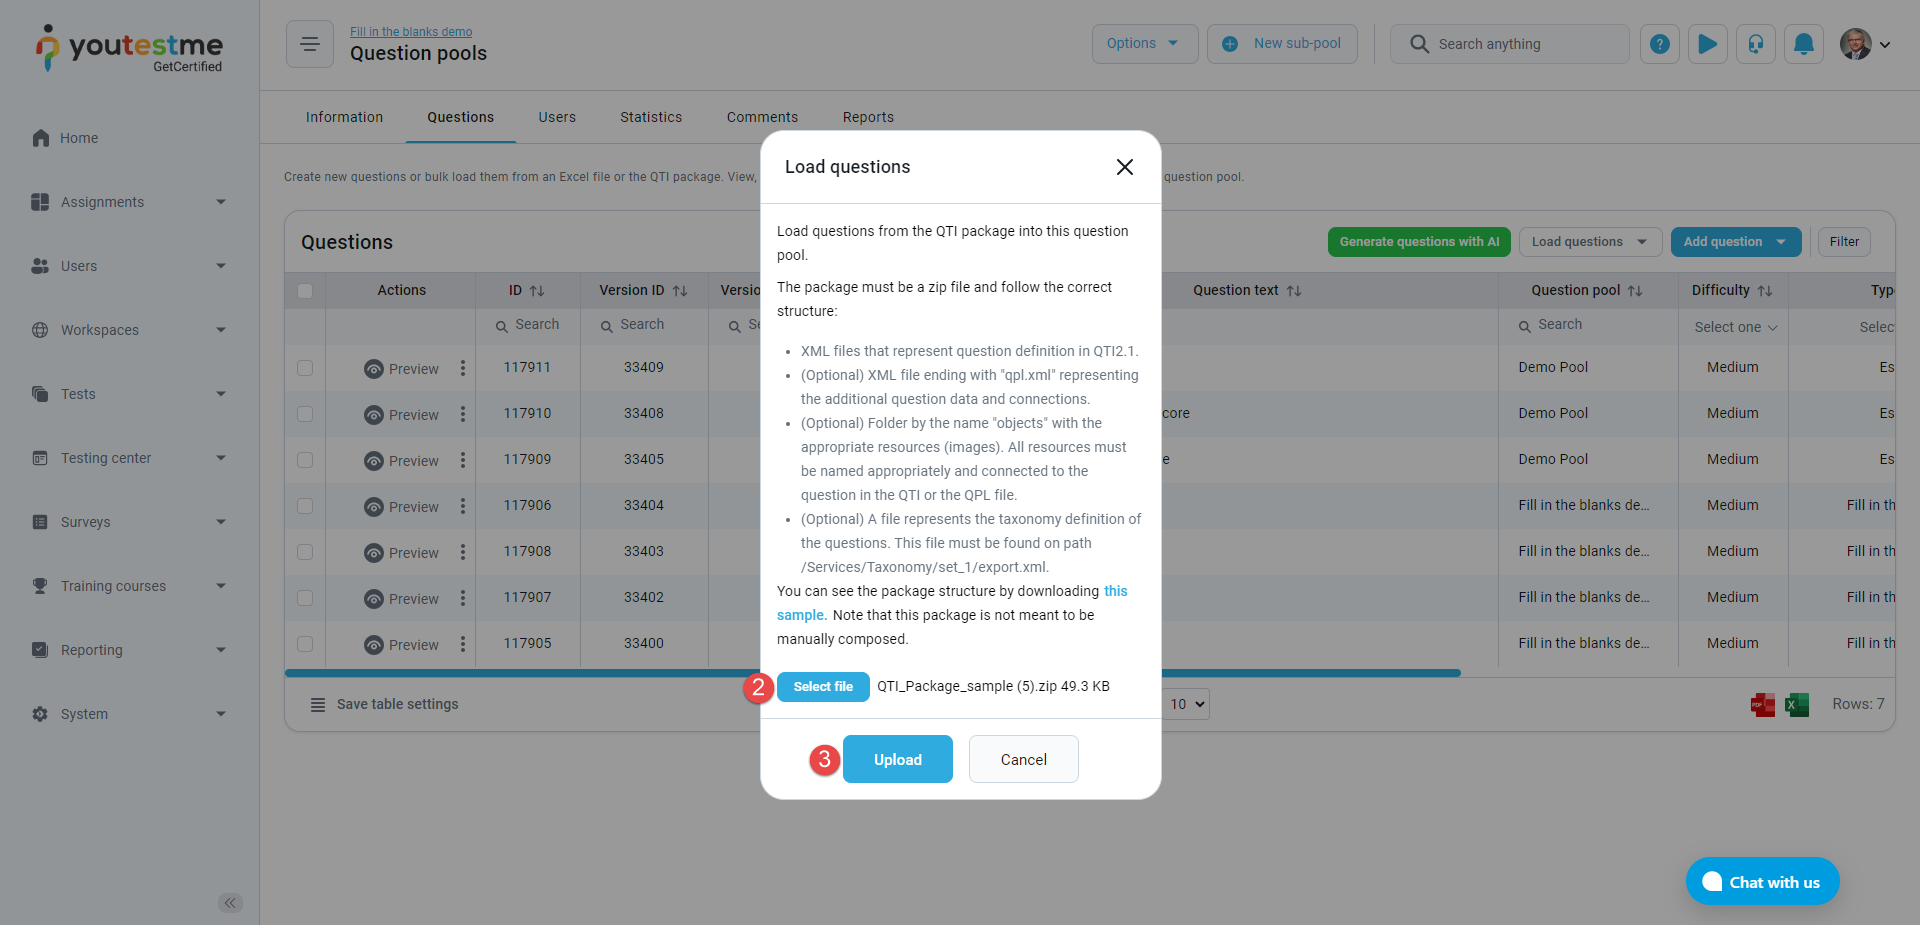
Load questions from QTI package
To load multiple questions from the QTI package, follow these steps:
-
Click the Load questions button, and select the option From QTI package.
-
You can view the package structure by downloading a sample file.
-
Click the Select file button to choose the QTI file from your device.
-
Click the Upload button to load the questions into the system.
-
-
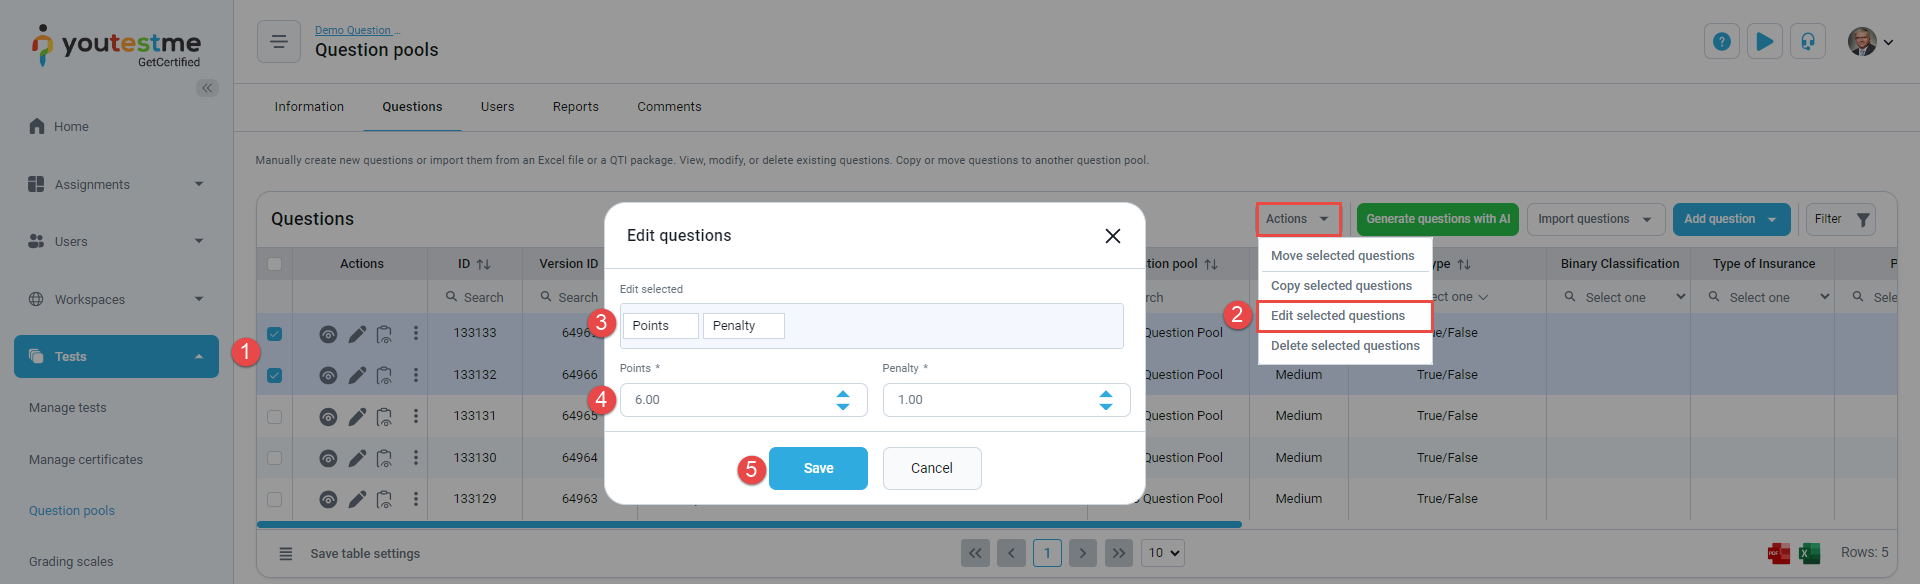
Edit selected questions
This option allows you to edit multiple questions at once.
-
Select the questions you want to edit.
-
Click the Actions button, then choose Edit selected questions.
-
Select the question settings you want to change. You can select multiple settings.
-
Update the question settings with the desired values.
-
Click the Save button to update the questions.
For more information about bulk editing option, refer to this article.
-
-
-
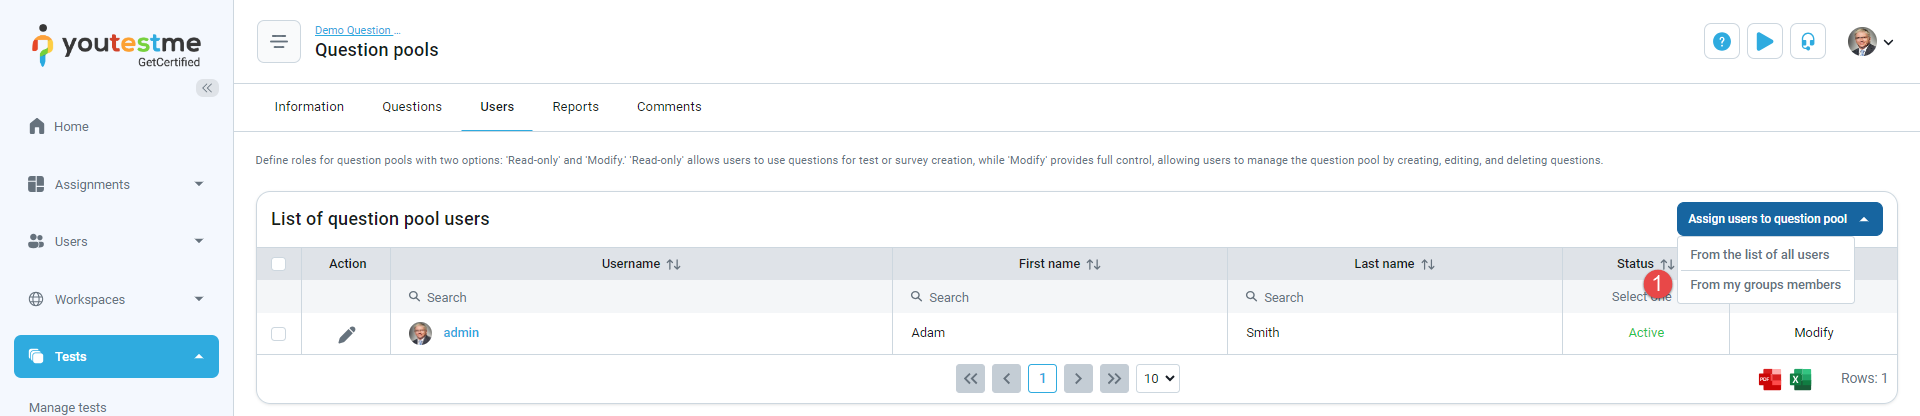
Users
The Users provides an overview of all question pool users and allows you to add new users and remove existing ones.
Question pool users can have two roles:
-
Read-only - Allows users to use questions from the question pool in tests/surveys but does not permit any modifications in question pool settings and question configuration. Users with the Manage any pool permission will still be able to modify the question pool.
-
Modify - Allows users to manage the question pool and its questions. When a user creates a question pool, the Modify role is automatically assigned.
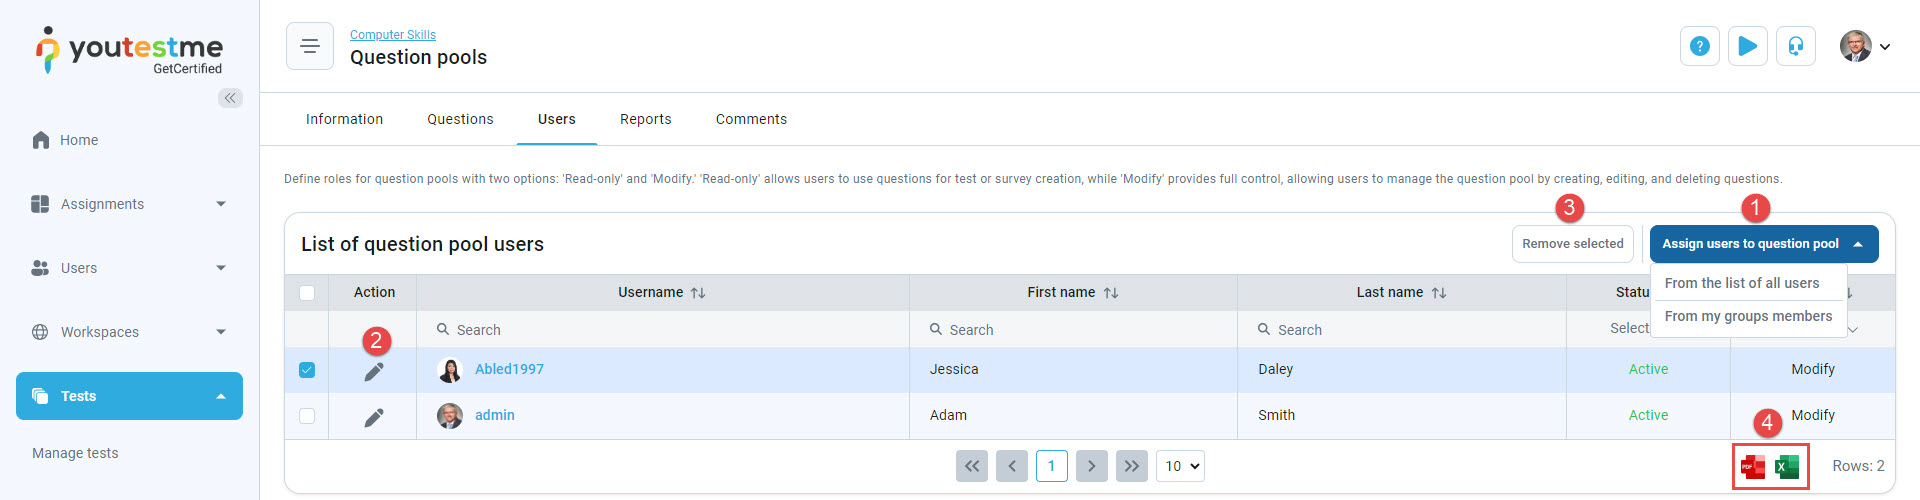
On this tab, you can:
-
Assign users to question pool from the list of all users or a specific user group (which you manage or created).
Note: The question pool user automatically becomes a sub-pool user. If the user has a Read-only role in the parent pool, they can have a Modify role in the sub-pool, but not vice versa.
-
Edit the role of already assigned users. Click the pencil icon, choose the desired role, and confirm the change.
-
Remove selected users from the list of question pool users.
-
Export the list of users as PDF and Excel.
-
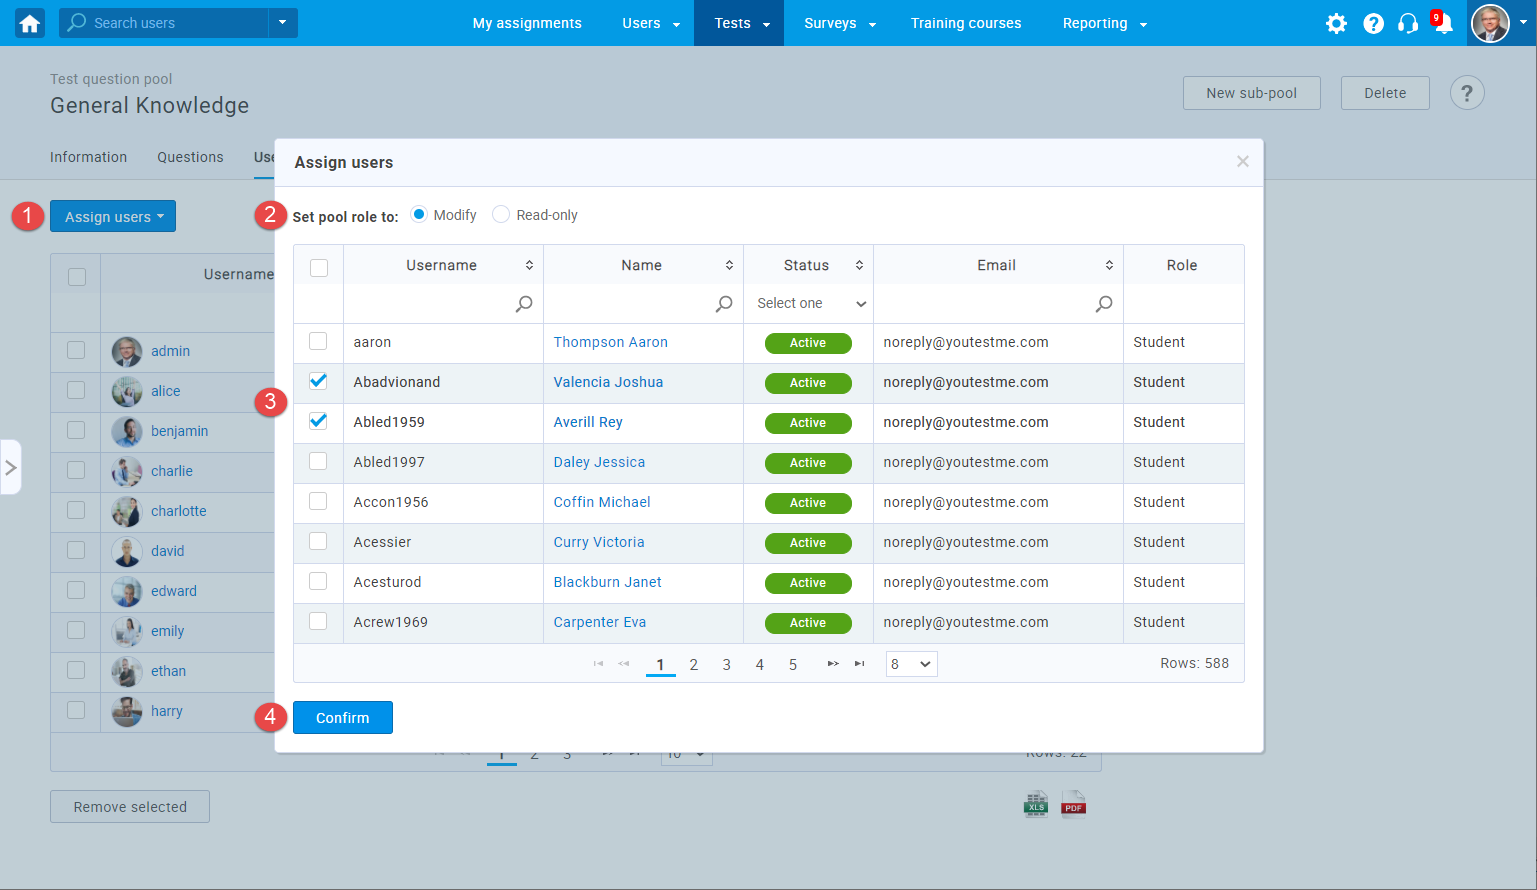
Assigning users from the list of all users
To assign new users from the list of all users:
-
Click the Assign users to question pool button and choose From the list of all users.
-
Set the question pool role to Modify or Read-only.
-
Select the users you want to assign.
-
Click the Confirm button.

-
-
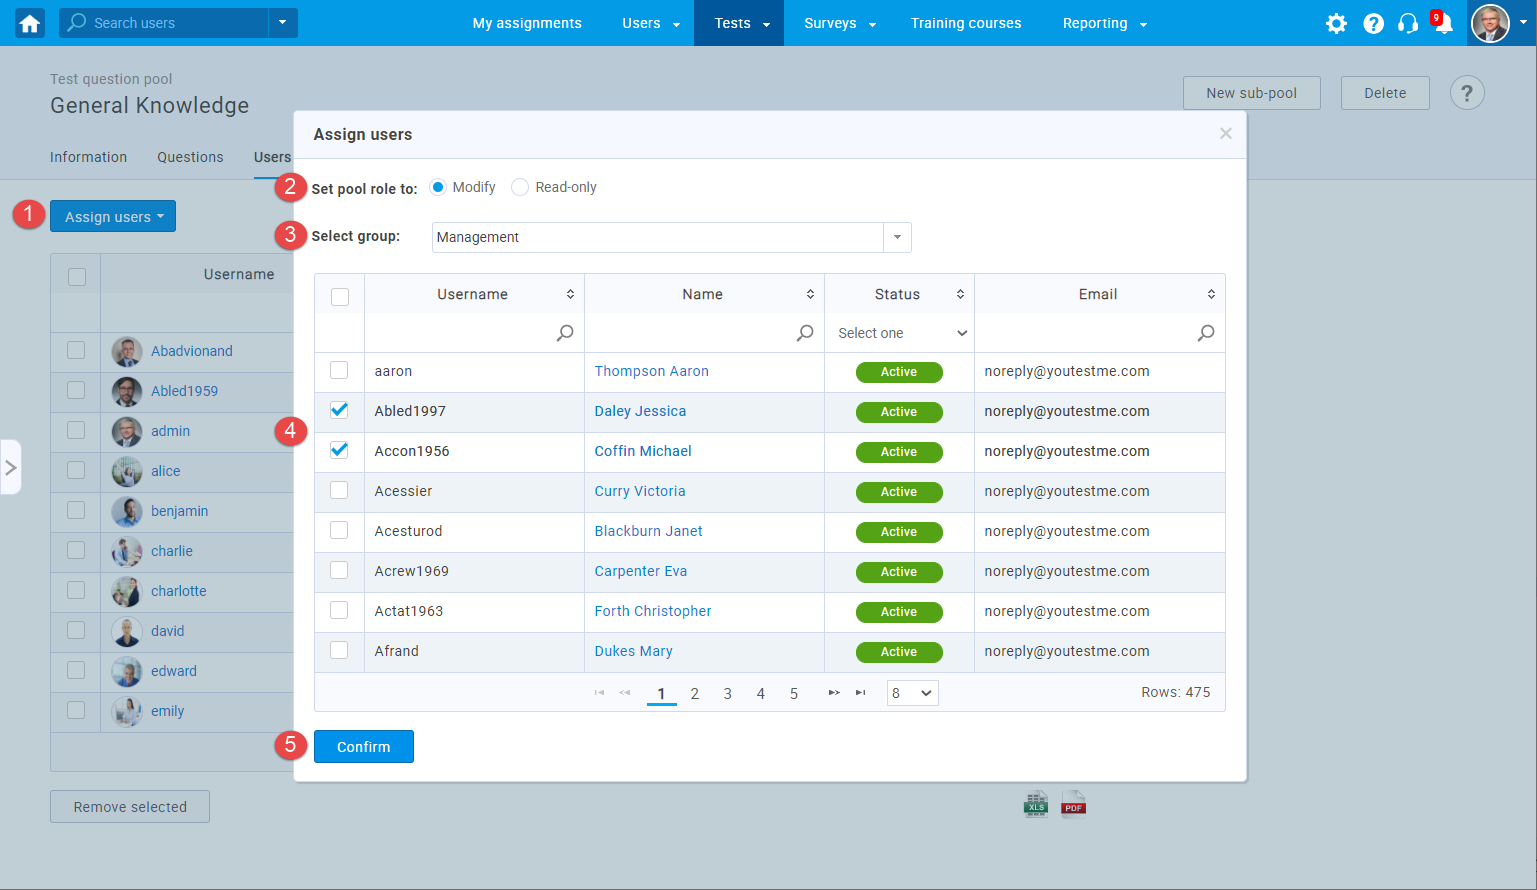
Assigning users from a user group
To assign new users from user groups you created or manage:
-
Click the Assign users to question pool button and choose From my groups members.
-
Set the question pool role to Modify or Read-only.
-
Select the group from which you want to assign users.
-
Select the users you want to assign.
-
Click the Confirm button.
-
-
-
Reports
In the Reports tab, you can access different reports categorized into three sections. For more information about each section, please refer to the chapters below.
-
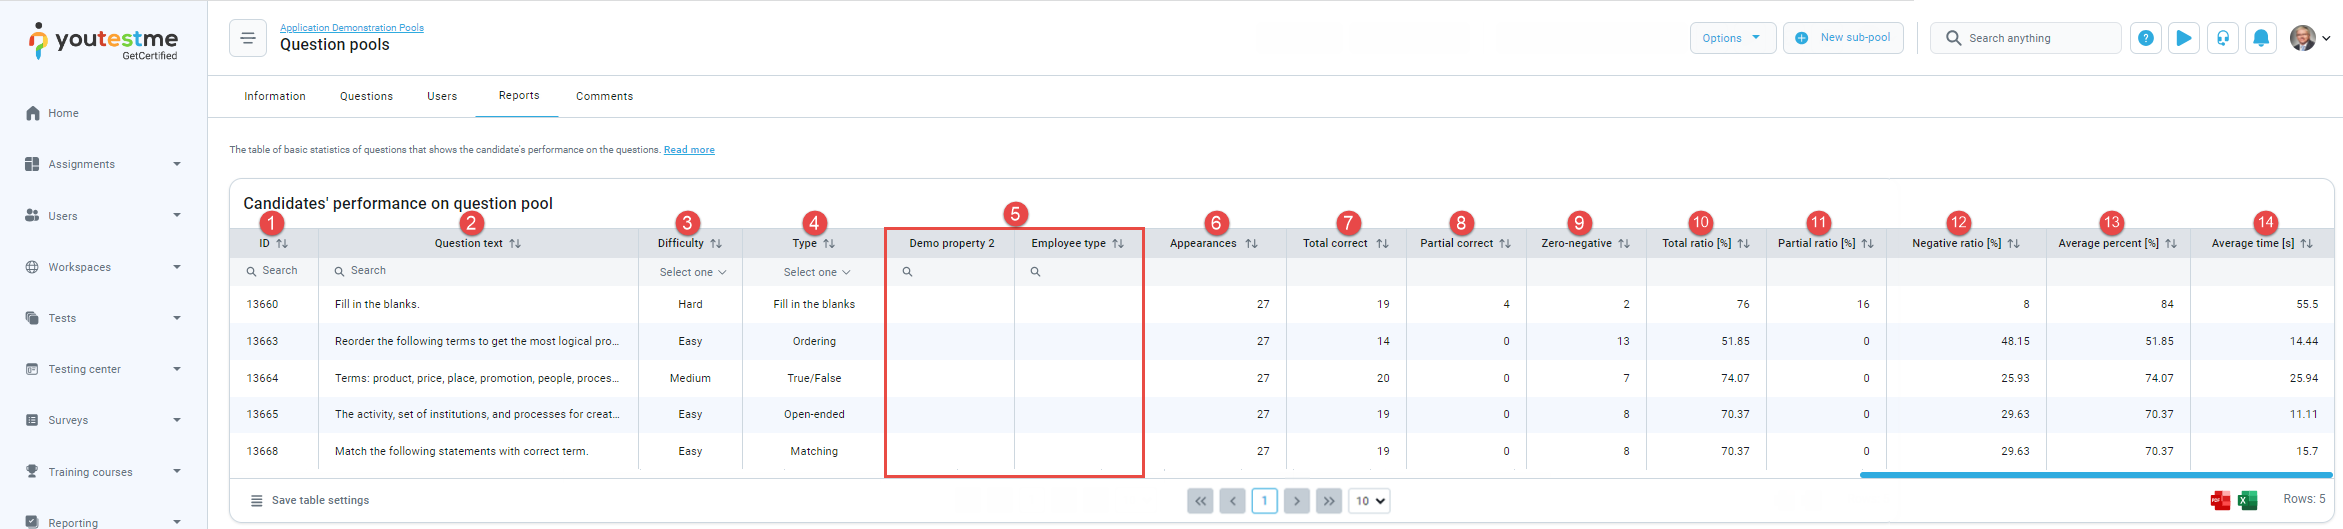
Question statistics
This section provides information about questions to assess candidates' performance. The table shows performance data for currently active question versions only. If a question's active version hasn't been used in any test, it won't appear in the table. Similarly, if a question has been edited but its new version hasn't been used in any test since the edit, it won't appear in the table (even if its previous version was used). Therefore, the statistics displayed do not indicate that the question has never been used in tests; rather, its latest active version has not yet been included in any test version.
The table includes the following information:
-
ID - The unique identifier of the question created upon its creation.
-
The Text of the question.
-
The Difficulty level of the question which can be categorized as easy, medium, or hard.
-
Question properties created in the application with their values added to questions.
-
Appearances - The total number of occurrences of the question in all tests.
-
Total correct - Number of times the question was answered correctly in all tests.
-
Partial correct - The number of times the question was partially answered correctly in all tests, i.e., where the number of points was between zero and the maximum number of points for the question.
-
Zero-negative - The number of times the question was answered incorrectly in all tests, i.e., where the number of points was zero or less.
-
Total ratio - The percentage representation of the ratio between the Total correct and Appearances columns.
-
Partial ratio - The percentage representation of the ratio between Partial correct and Appearances columns.
-
Negative ratio - The percentage representation of the ratio between Zero-negative and Appearances columns.
-
Average percent - The average percentage of points scored on the question.
-
Average time - The average time spent on answering the question.
-
-
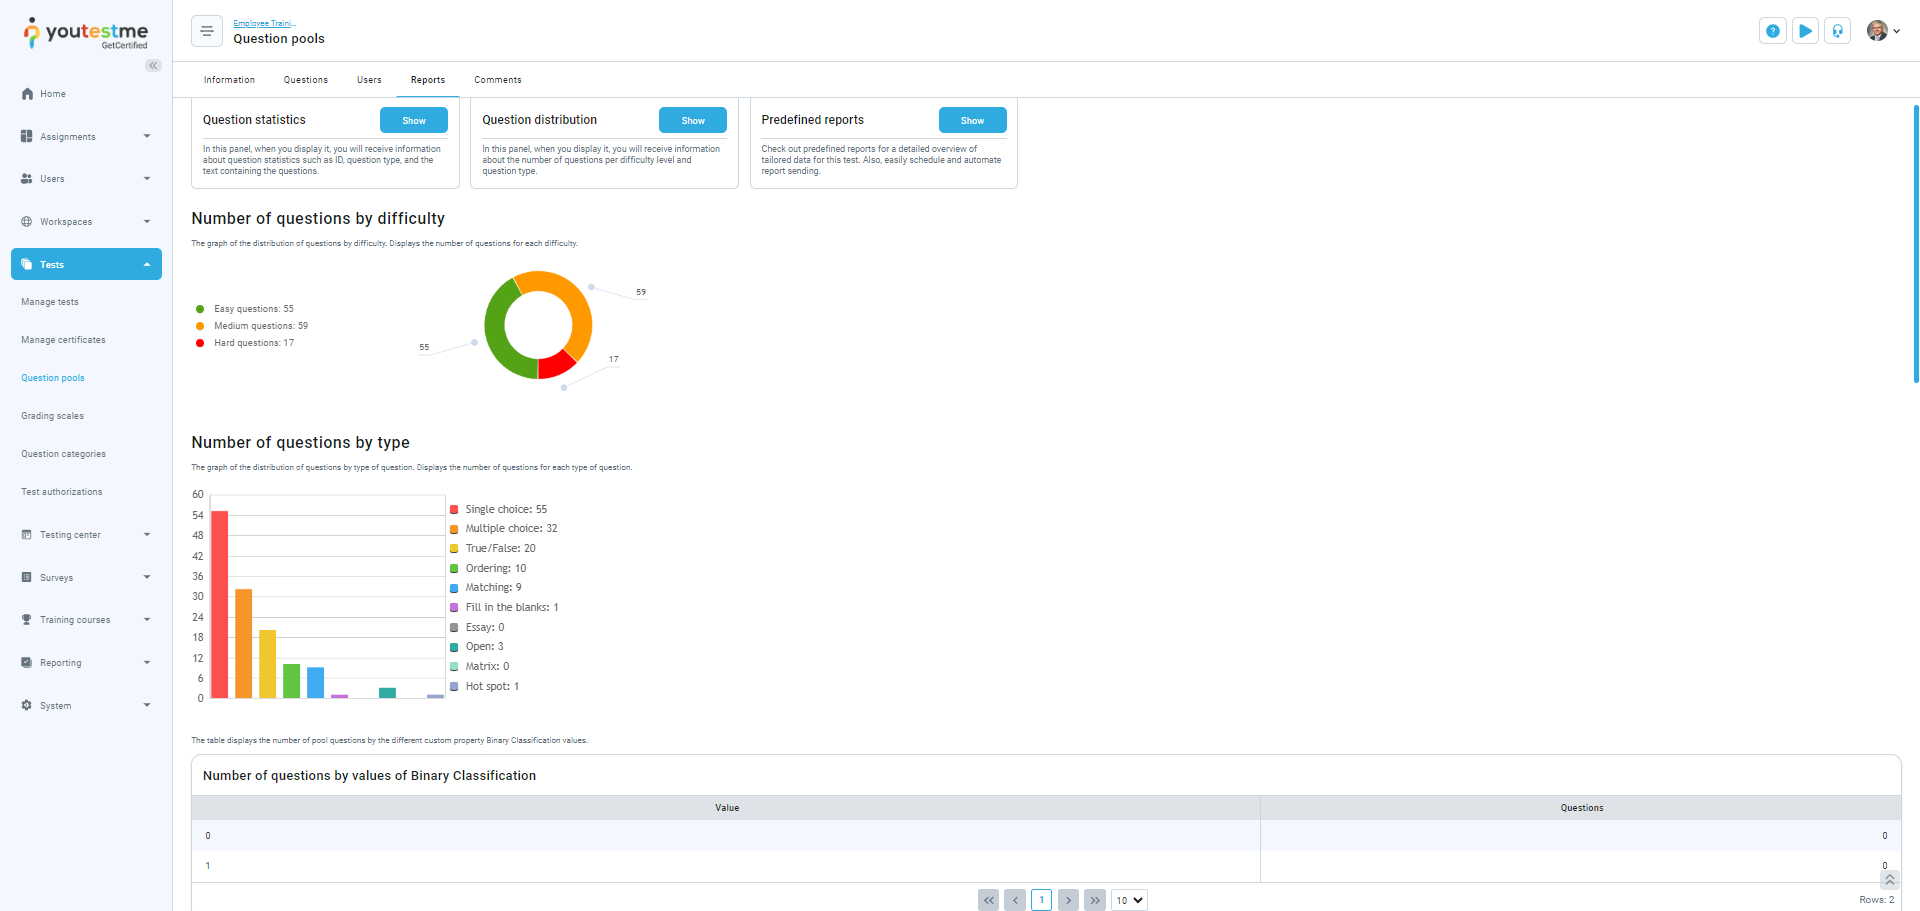
Question distribution
In this section you can review the distribution of questions within the question pool by analyzing graphs illustrating the number of questions per question type, different difficulty levels, or question property values added to the questions.
-
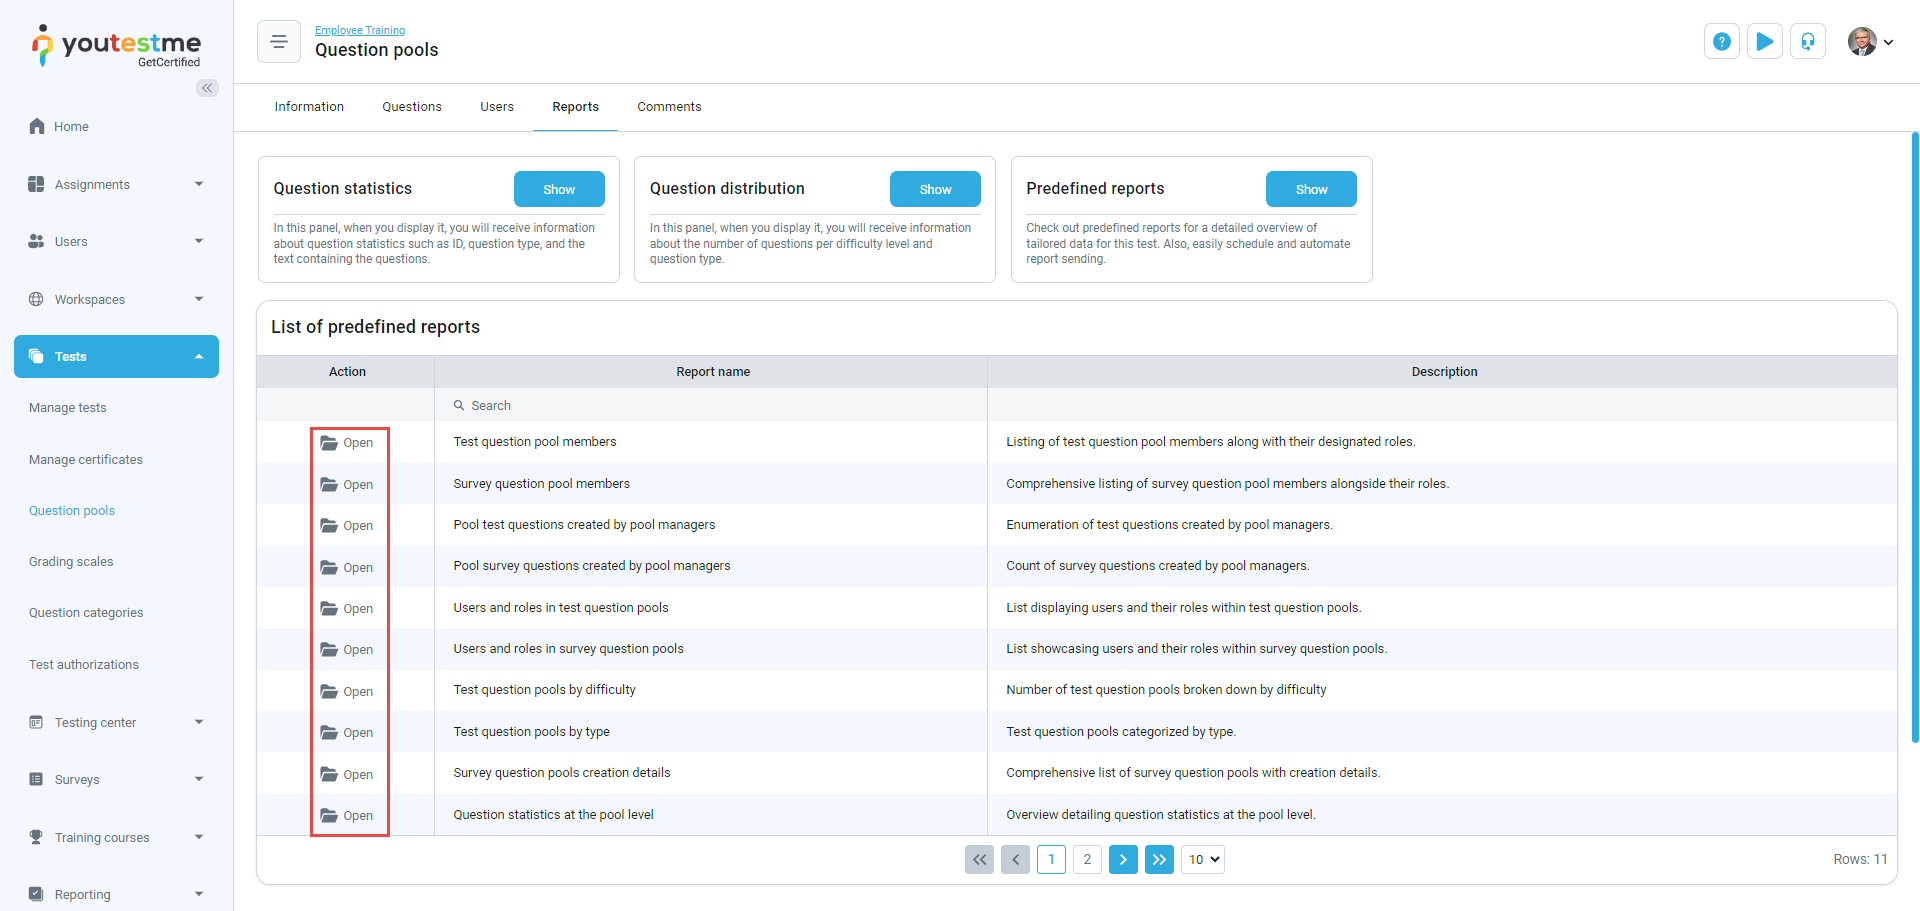
Predefined reports
This section allows you to access predefined reports for a comprehensive overview of organized and summarized data. You can also choose to open the report and schedule it for regular automated sending.
To open a report, click the Open button next to the report you want to access.
-
-
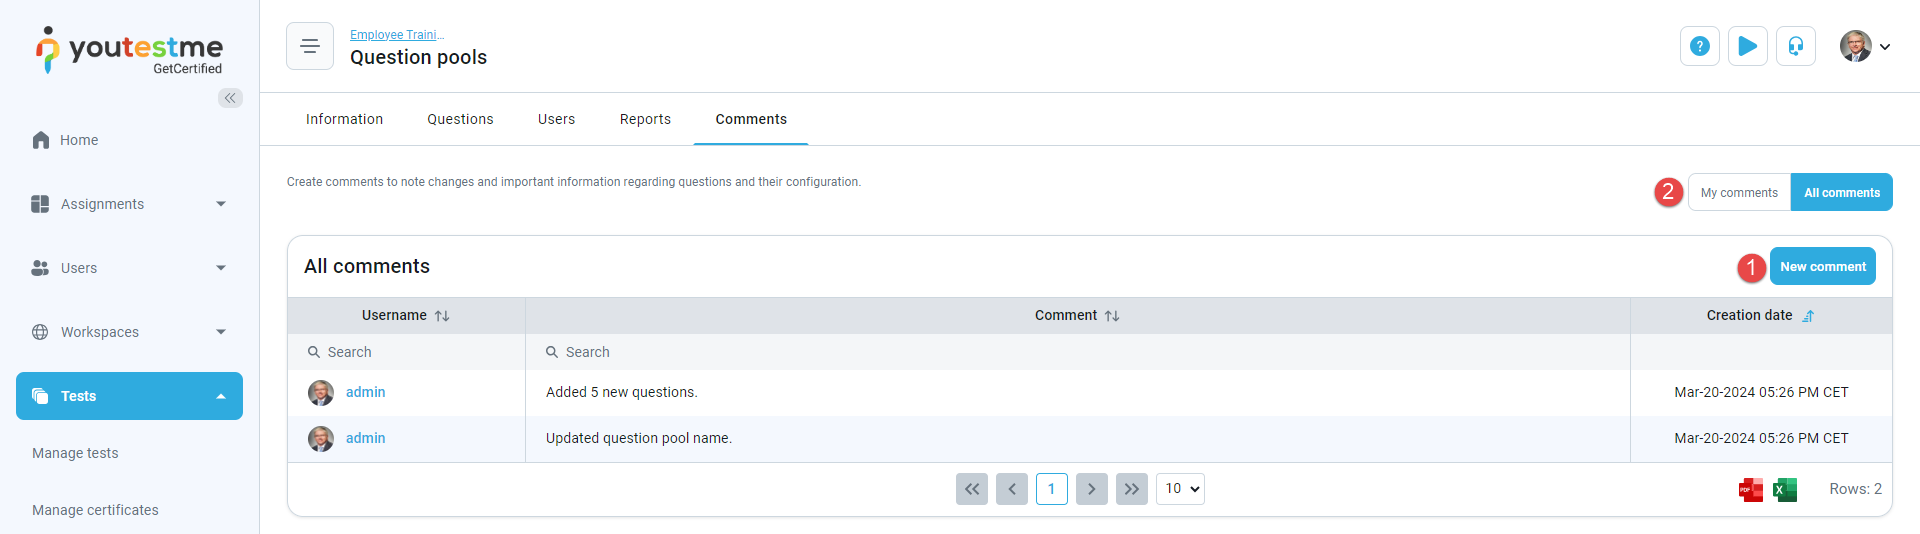
Comments
The Comments tab shows all comments added to the question pool. Comments can be used to note who, when and why made changes in question pool or questions configuration. On this tab, you can:
-
Create New comment by clicking the corresponding button, entering the desired text, and confirming the comment creation.
-
Filter the list of comments to display only your comments or all comments created by all users.
-
