User manual
Integrations
-
Introduction
The Integrations page serves for managing various integrations. From this page, you can view and manage available integrations, configure and access their features. The page can be accessed from the System panel in the left side menu.
On the Integrations page you will find these tabs:
-
Single sign-on - Set up an authentication scheme allowing users to log in with an external system's ID.
-
Webex settings - Configure the Webex integration and authenticate the Webex hosting account.
-
LRS settings - Set up automated sending test results to your Learning Record Store (LRS) and enable efficient progress tracking.
-
Active directory - Integrate YouTestMe seamlessly with Azure Active Directory using the OpenID Connect (OIDC) protocol to streamline user authentication processes. This integration empowers organizations to ensure secure and unified login experiences across various applications.
-
Proctoring settings - Configure parameters of proctoring service.
-
Proctorio settings - Configure parameters of Proctorio proctoring service.
-
E-commerce - Connect the system with a Stripe account.
-
LTI settings - Set up LTI integrations with external applications.
-
OpenID settings - Set up an authentication and authorization scheme allowing users to log in with an external system's ID.
-
Web API settings - Used to programmatically access the data from the YouTestMe application and store it in an external database or display it in another system.
-
REST API settings - See the REST API module details.
-
Greenhouse integration - Enable and setup the integration with Greenhouse.
-
OpenAI API - Configure parameters of OpenAI API.
-
-
Integrations
-
Single sign-on
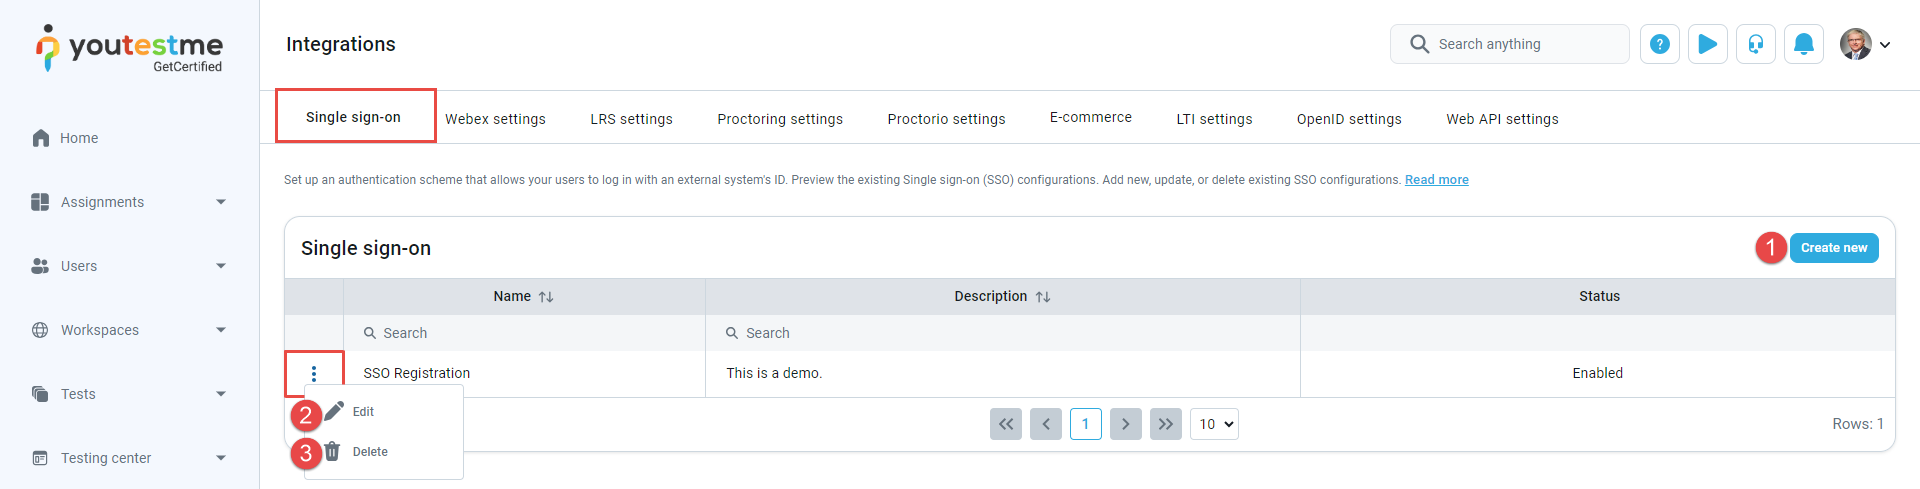
GetCertified can function as a Service Provider using the SAML 2.0 protocol, facilitating the exchange of authorization data with an Identity Provider. GetCertified is compatible with a range of Identity Providers, such as OneLogin, Okta, SSO Circle, and numerous others. With SAML 2.0-based Single Sign-on (SSO), you can configure multiple identity providers concurrently. Setting up SSO involves creating an SSO configuration and specifying the parameters of the identity provider. Each SSO configuration you establish includes an assertion consumer service endpoint responsible for handling the SAML response.
On this tab, you can view all existing Single Sign-on configurations displayed in the table, including their names, descriptions, statuses, and available actions. Additionally, you can perform the following actions:
-
Create new SSO configuration.
-
Edit an existing SSO configuration.
-
Delete an SSO configuration.
-
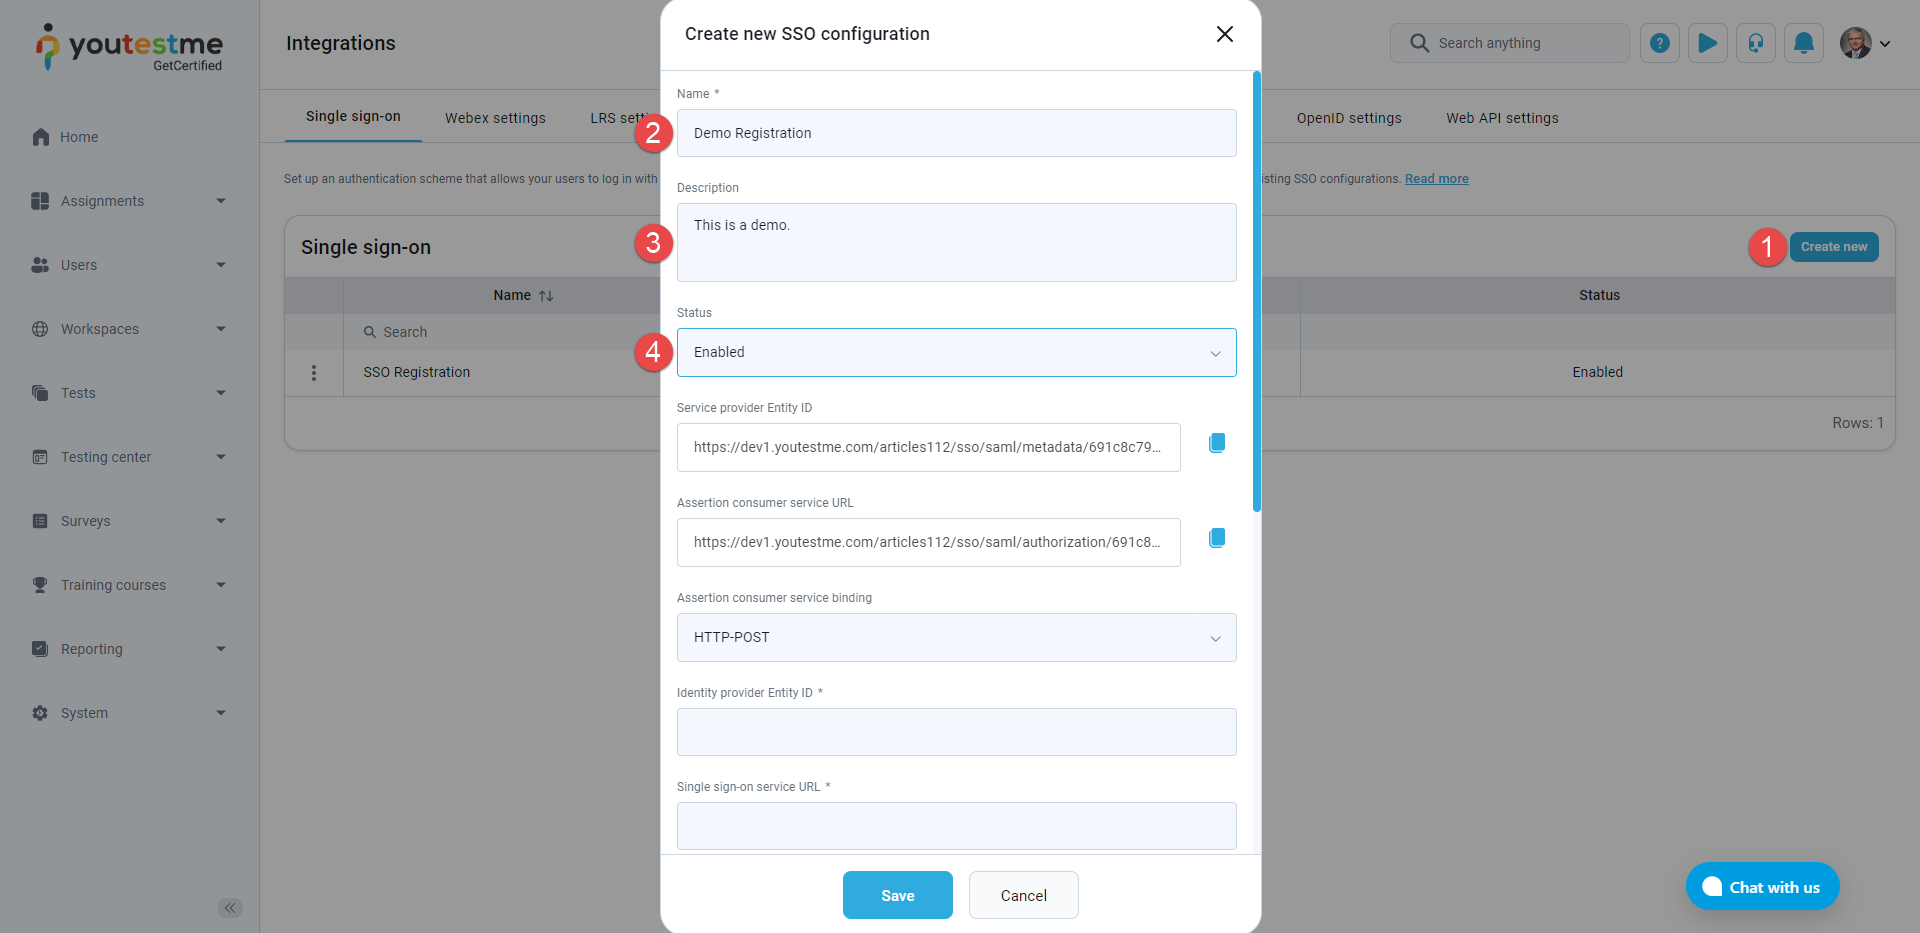
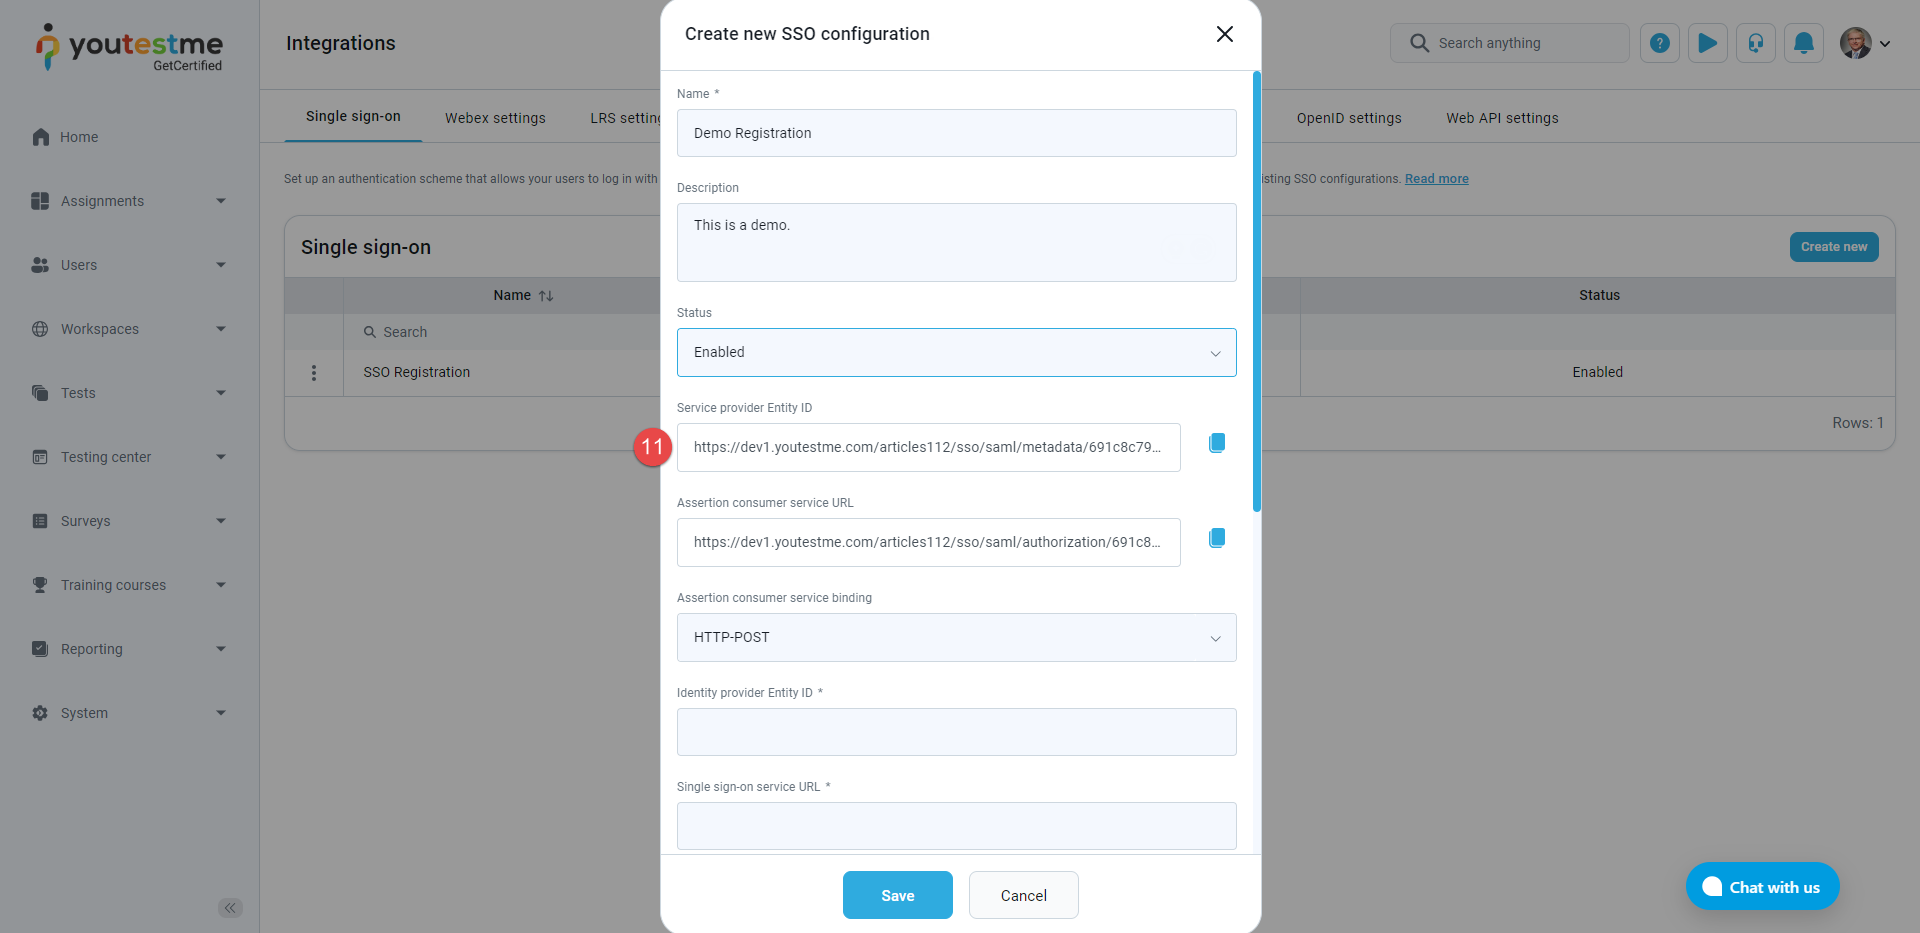
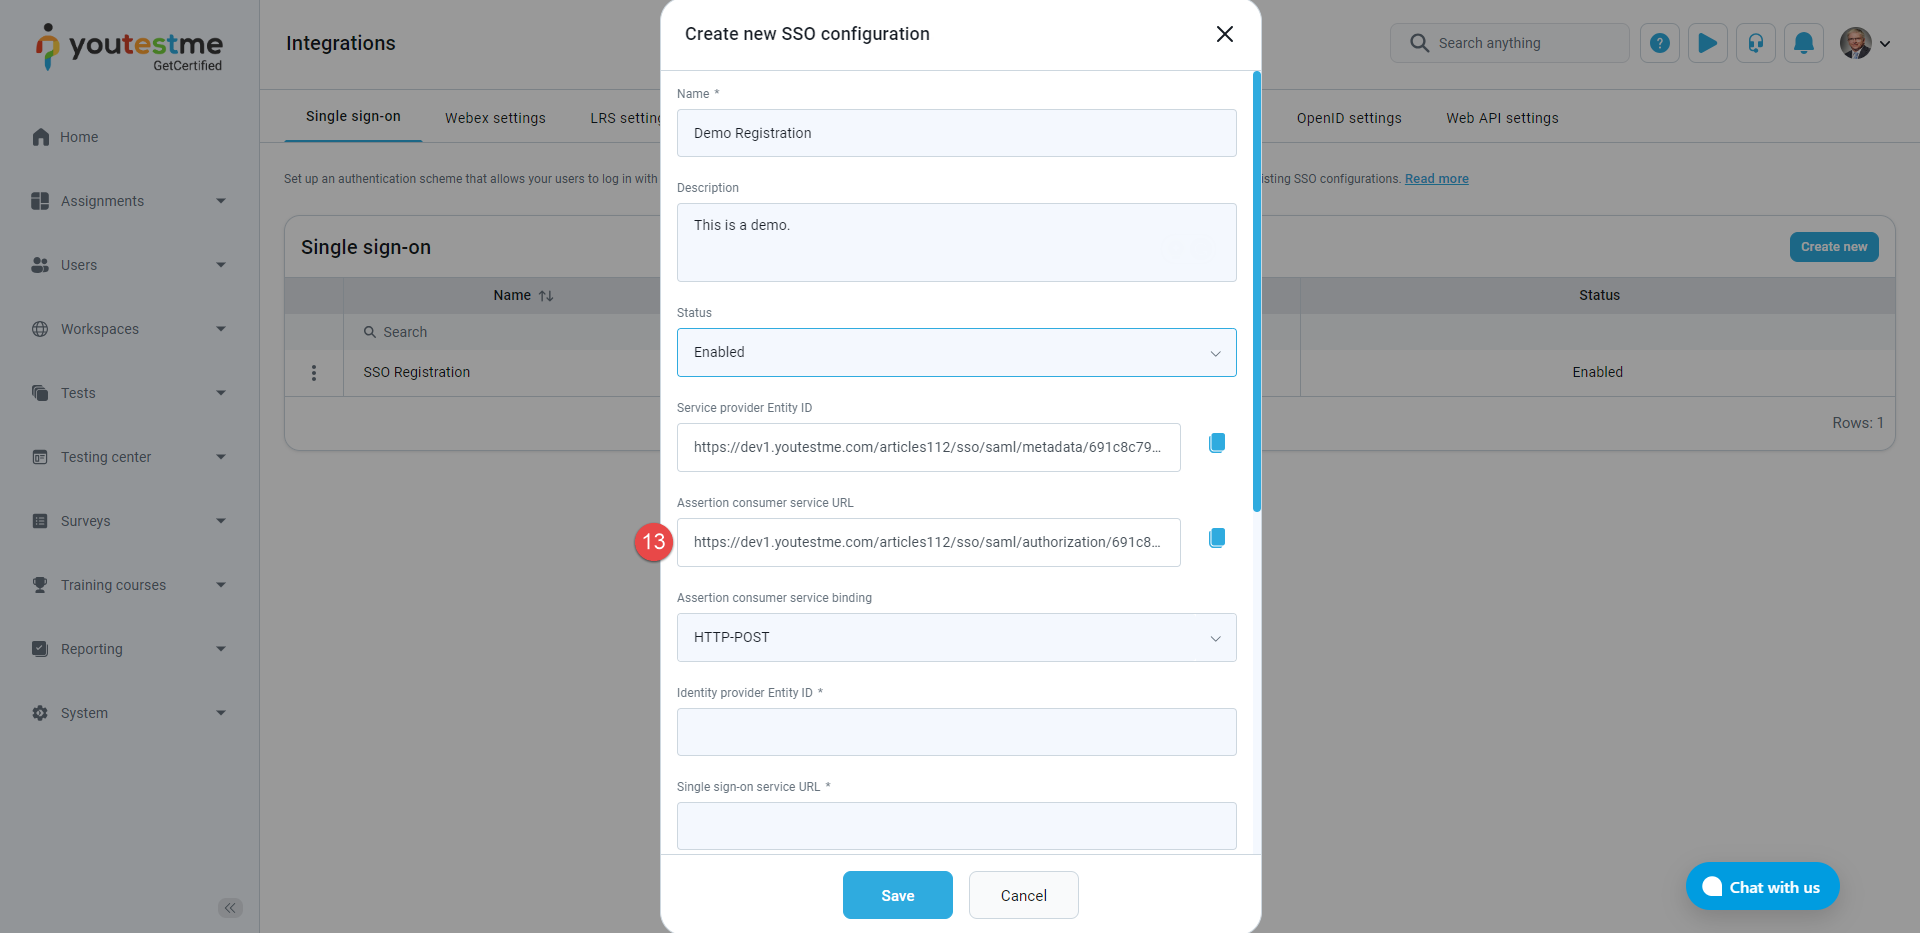
Click the Create new button, and a pop-up window will appear where you can enter the parameters of the new SSO configuration.
-
Enter the Name of the SSO configuration. The name must be unique for each SSO configuration since it identifies the SSO configuration.
-
Optionally enter the Description of the SSO configuration.
-
Choose the Status of the SSO configuration. If the status is Enabled, users will be able to log in with the identity provider specified in the configuration. Otherwise, they will not be able to do so.
-
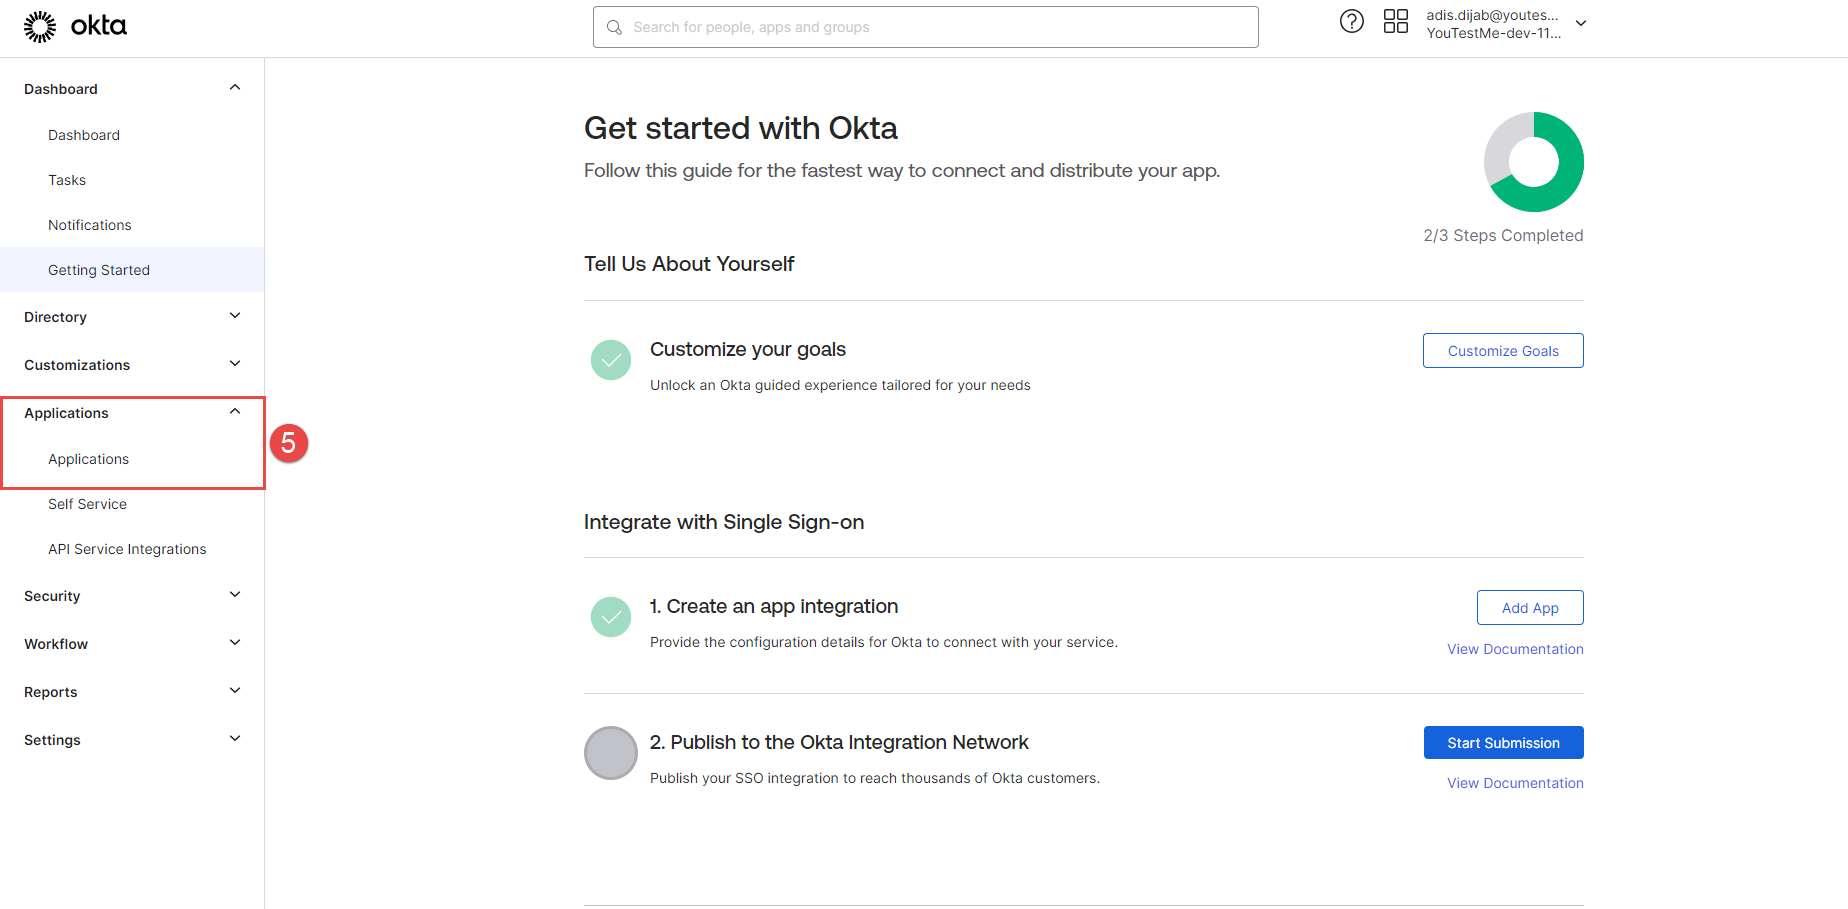
Go to the Okta app and log in. Then, navigate to the Applications tab and choose the Applications option from the drop-down menu.
-
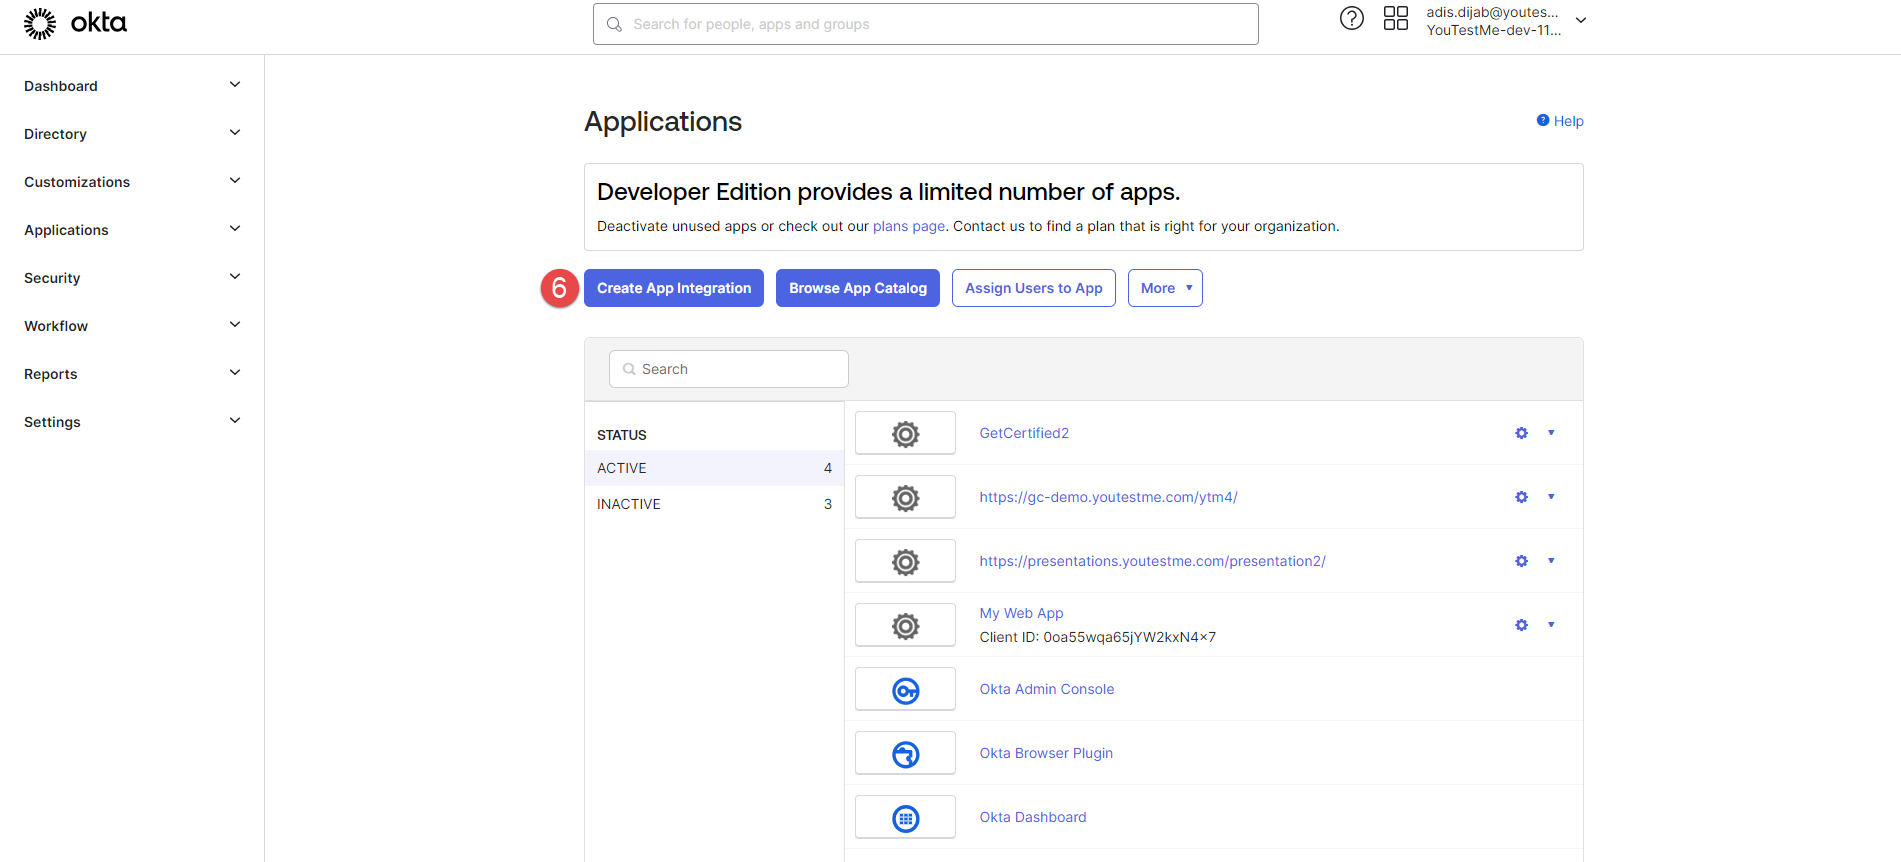
Click the Create App Integration button.
-
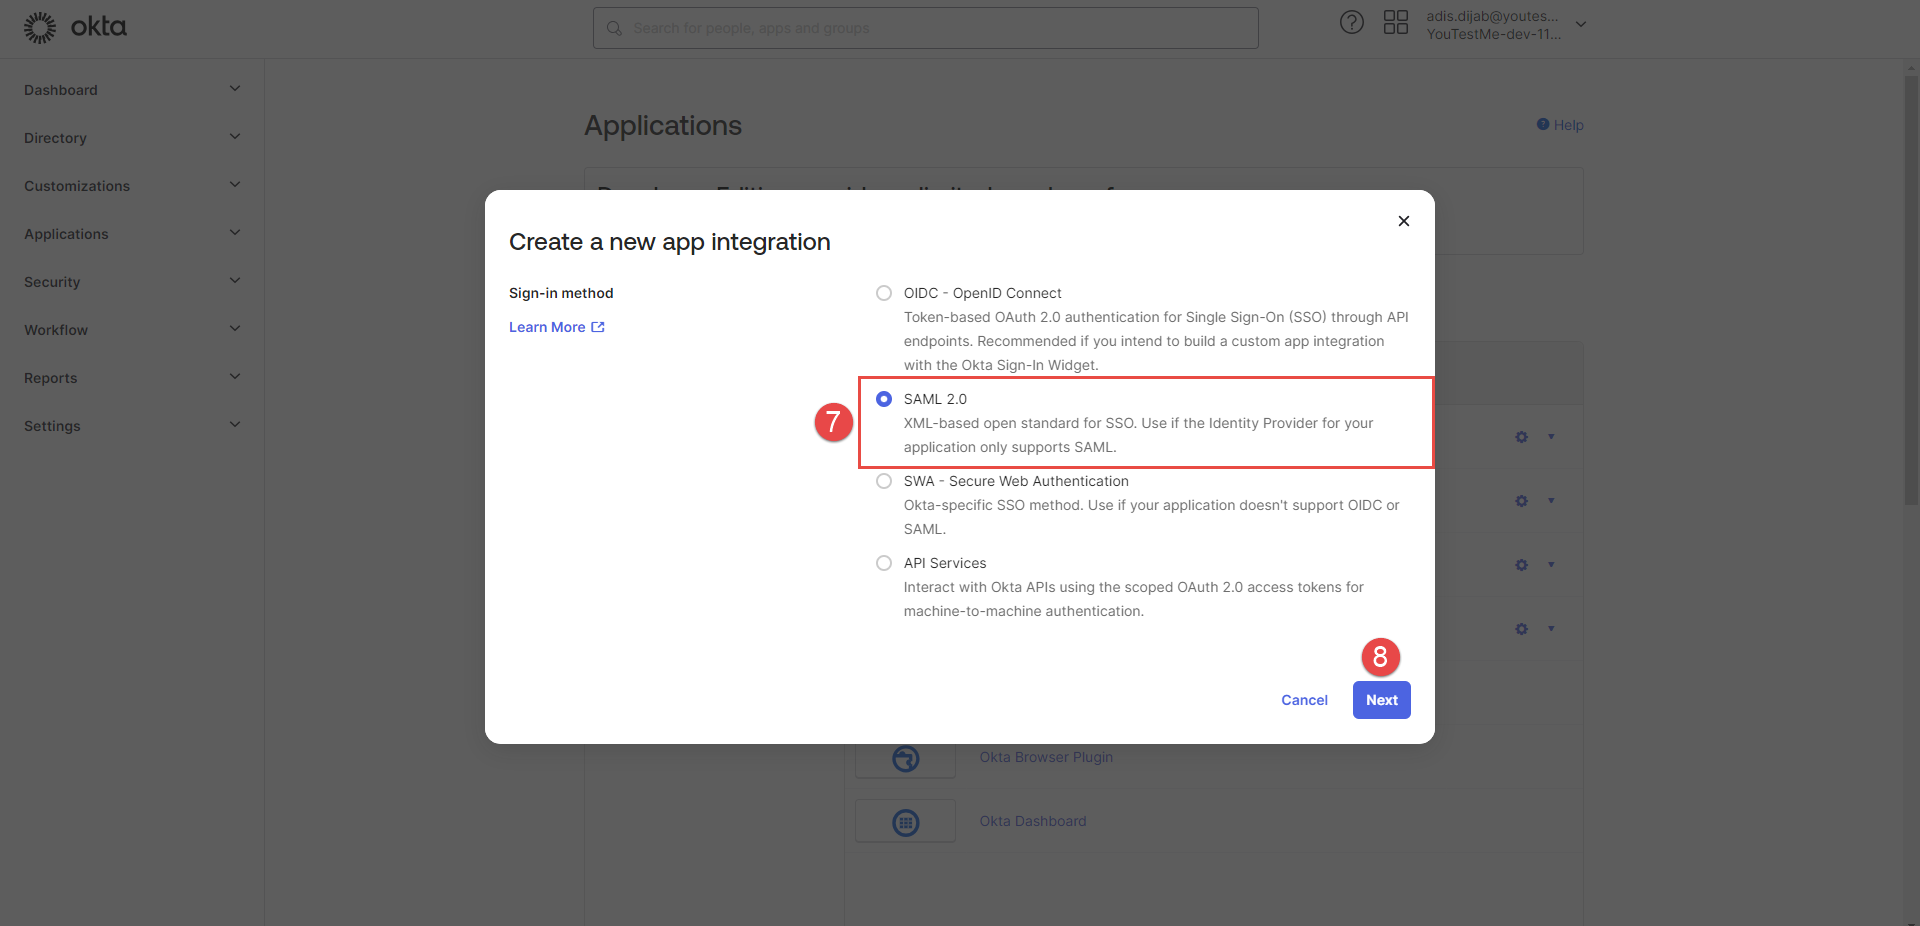
Choose the SAML 2.0 option.
-
Click the Next button.
-
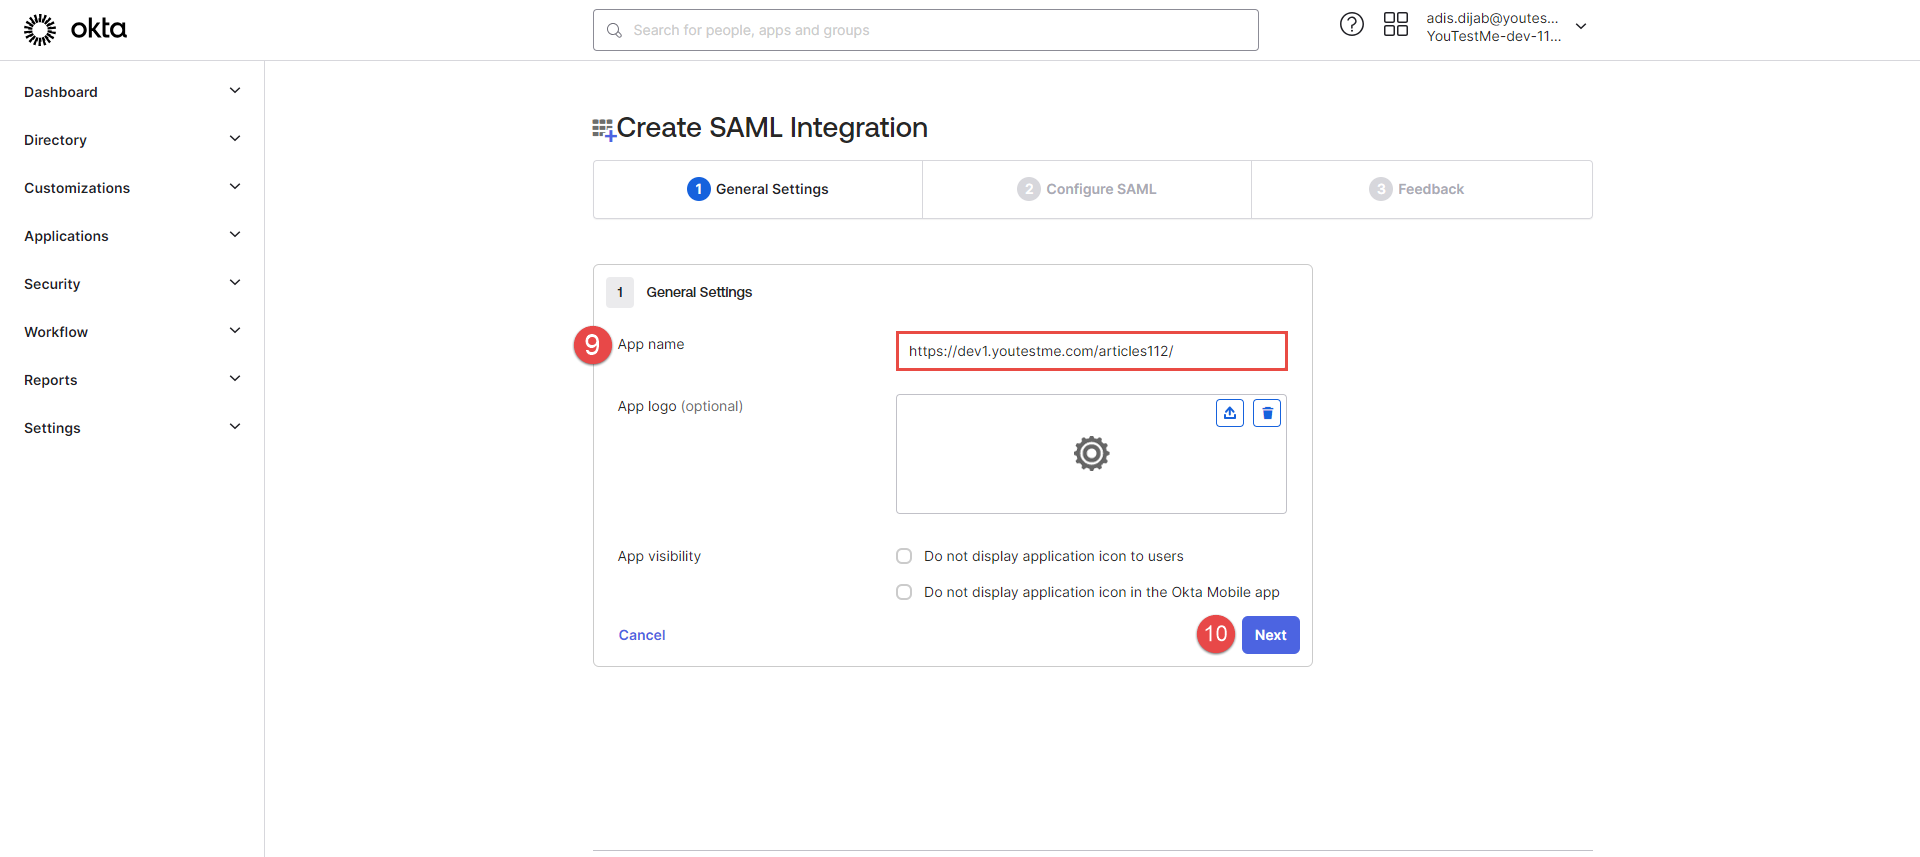
When the creation window appears, add App name - application URL.
-
Click the Next button.
-
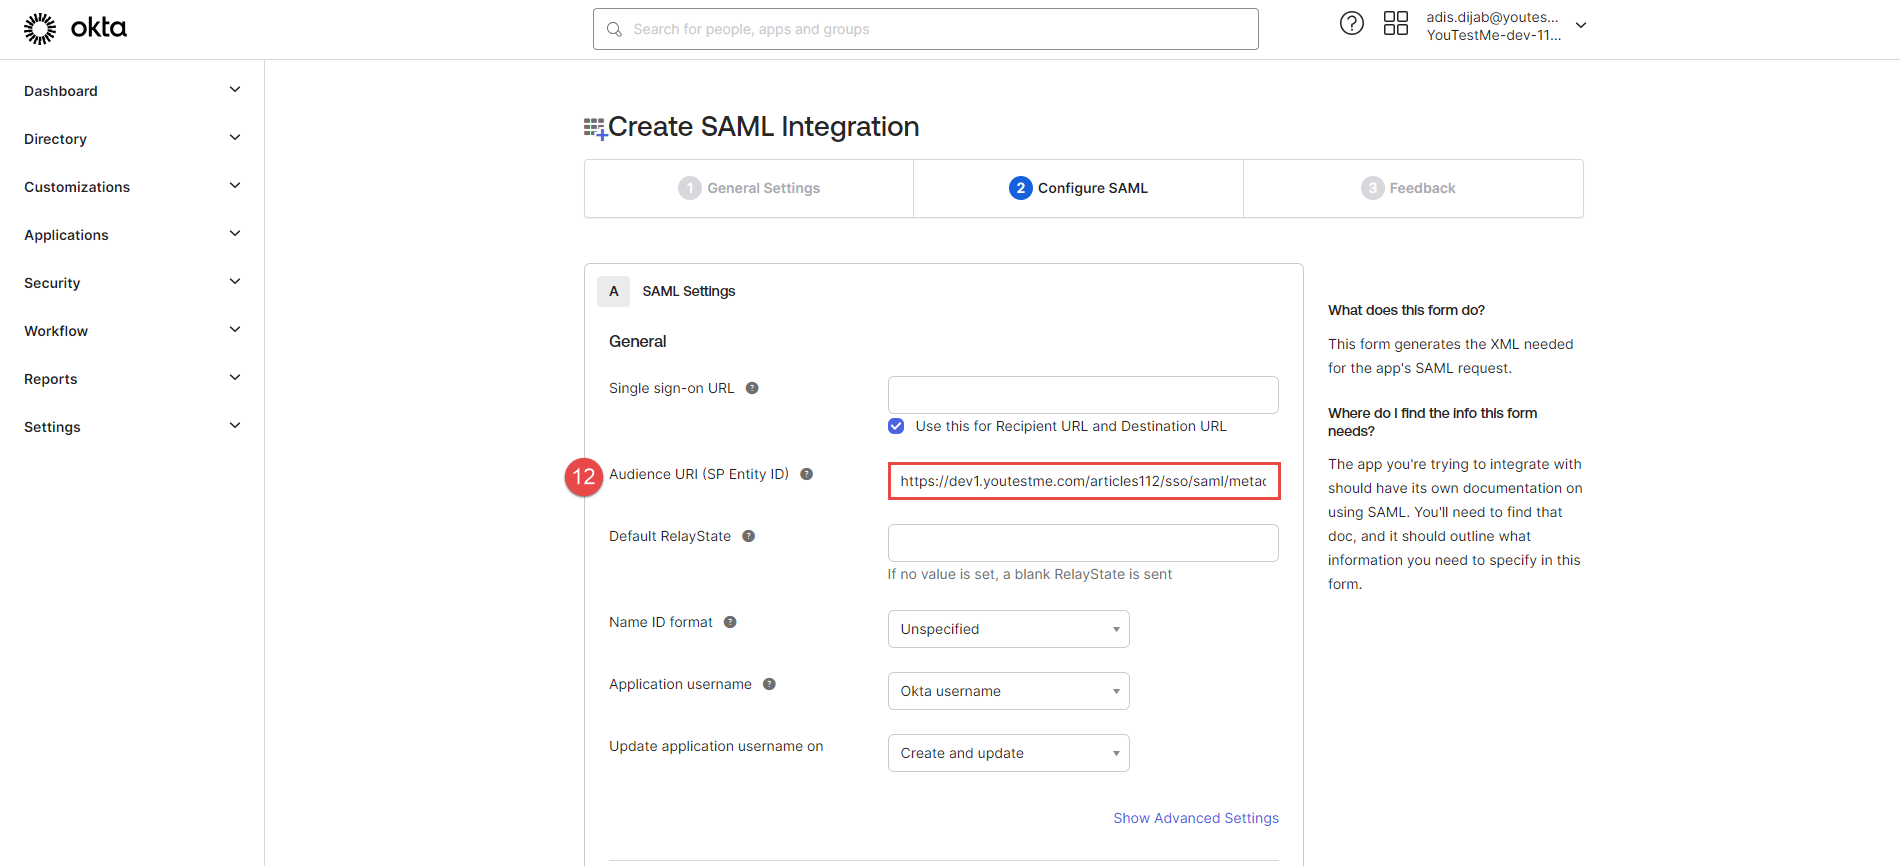
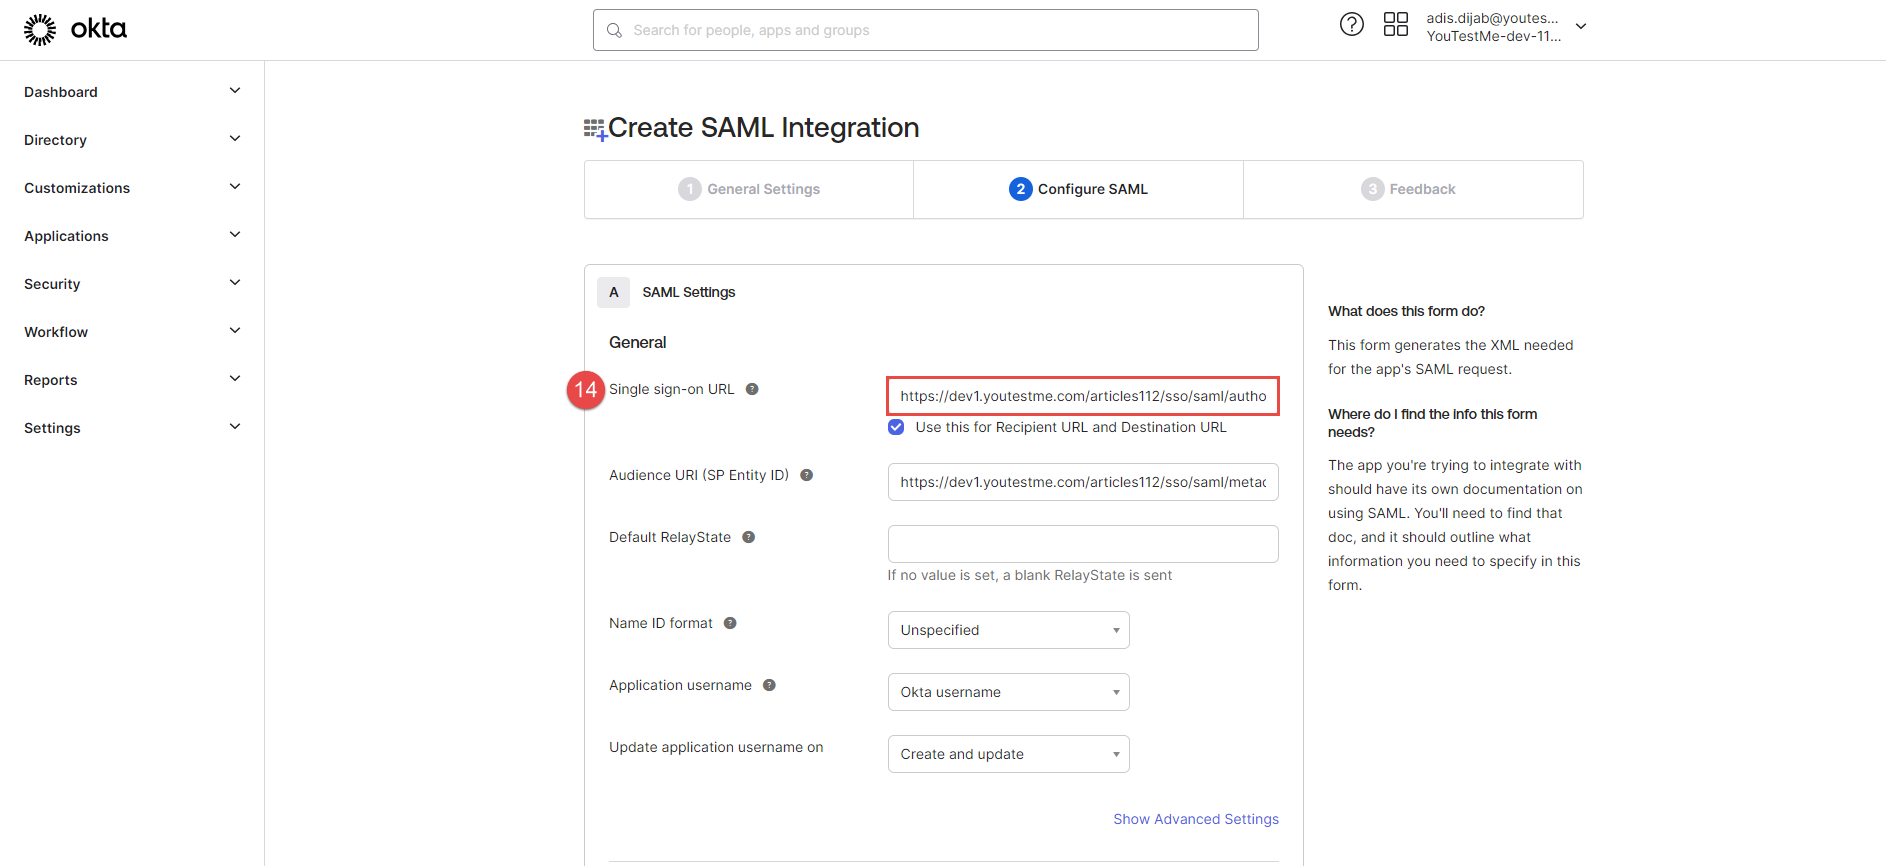
Service provider Entity ID - The value represents the service provider's identifier. To easily copy the provided Service provider Entity ID URL from the GetCertified application for configuration with Okta, click the Copy to clipboard icon.
-
Paste it to the Audience URI (SP Entity ID) field in Okta.
-
Assertion consumer service URL - The field's value represents the end-point URL, where the SAML response from the identity provider will be returned. To easily copy the provided Assertion consumer service URL from the GetCertified application for configuration with Okta, click the Copy to clipboard icon.
-
Paste it to the Single sign-on URL field in Okta.
-
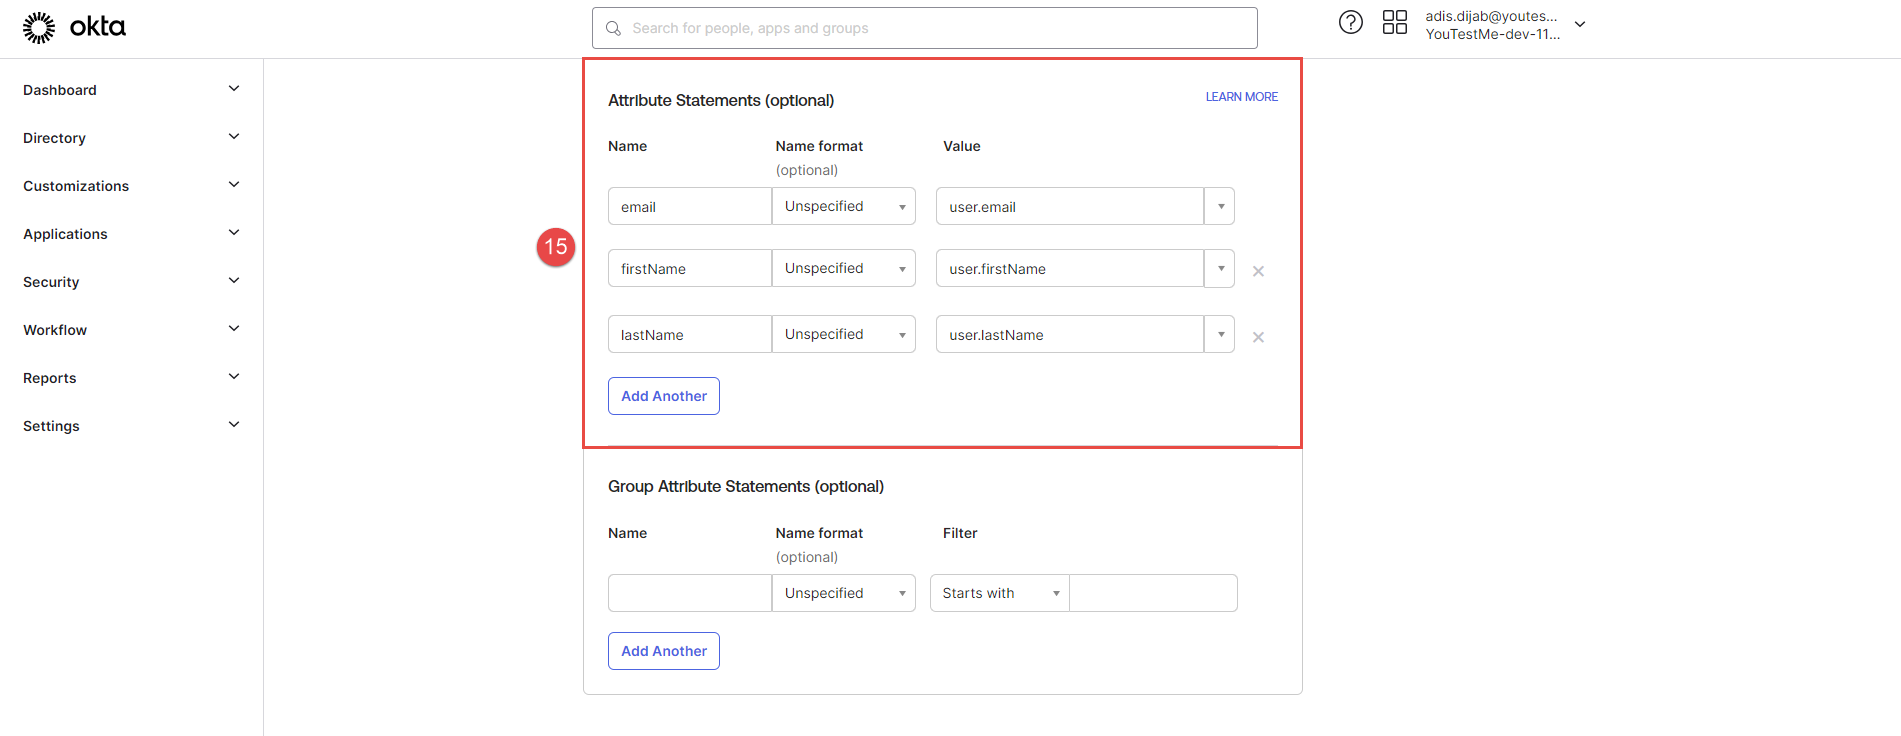
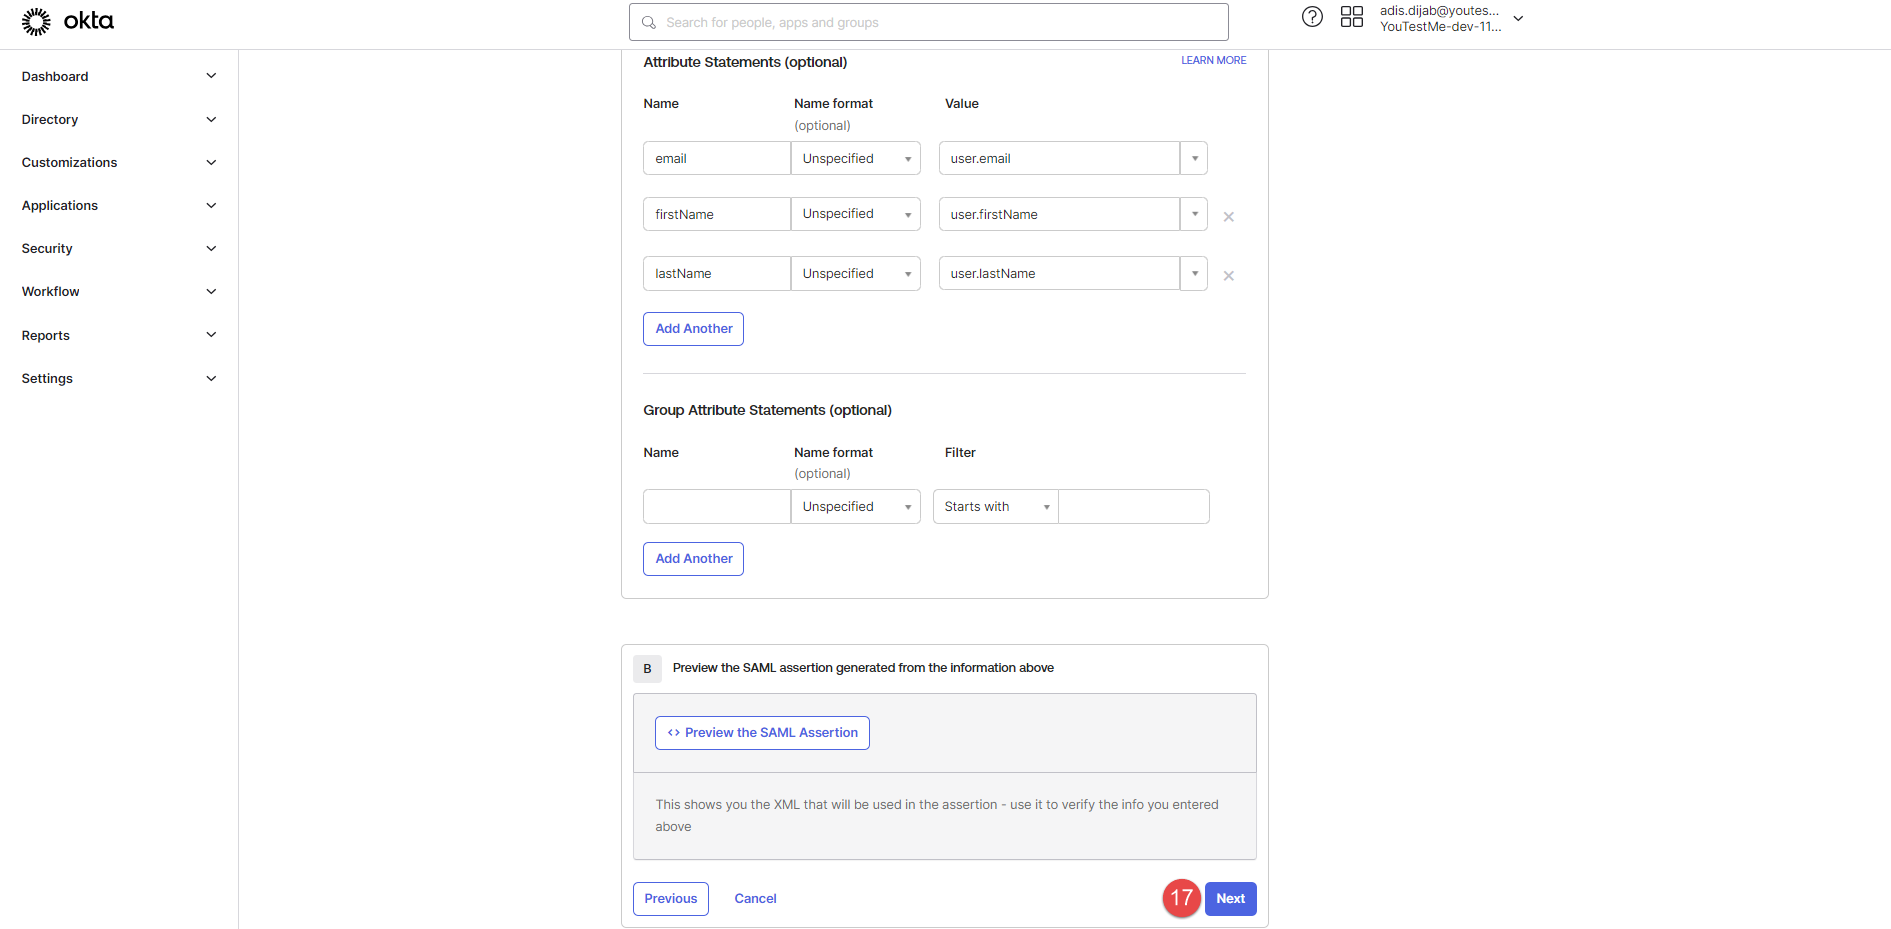
Add the Attribute statements from the example picture below to Okta.
-
Use Attribute statements in the GetCertified application. (For an example, see the picture below).
-
When you add Attribute statements in the GetCertified application, click the Next button in Okta.
-
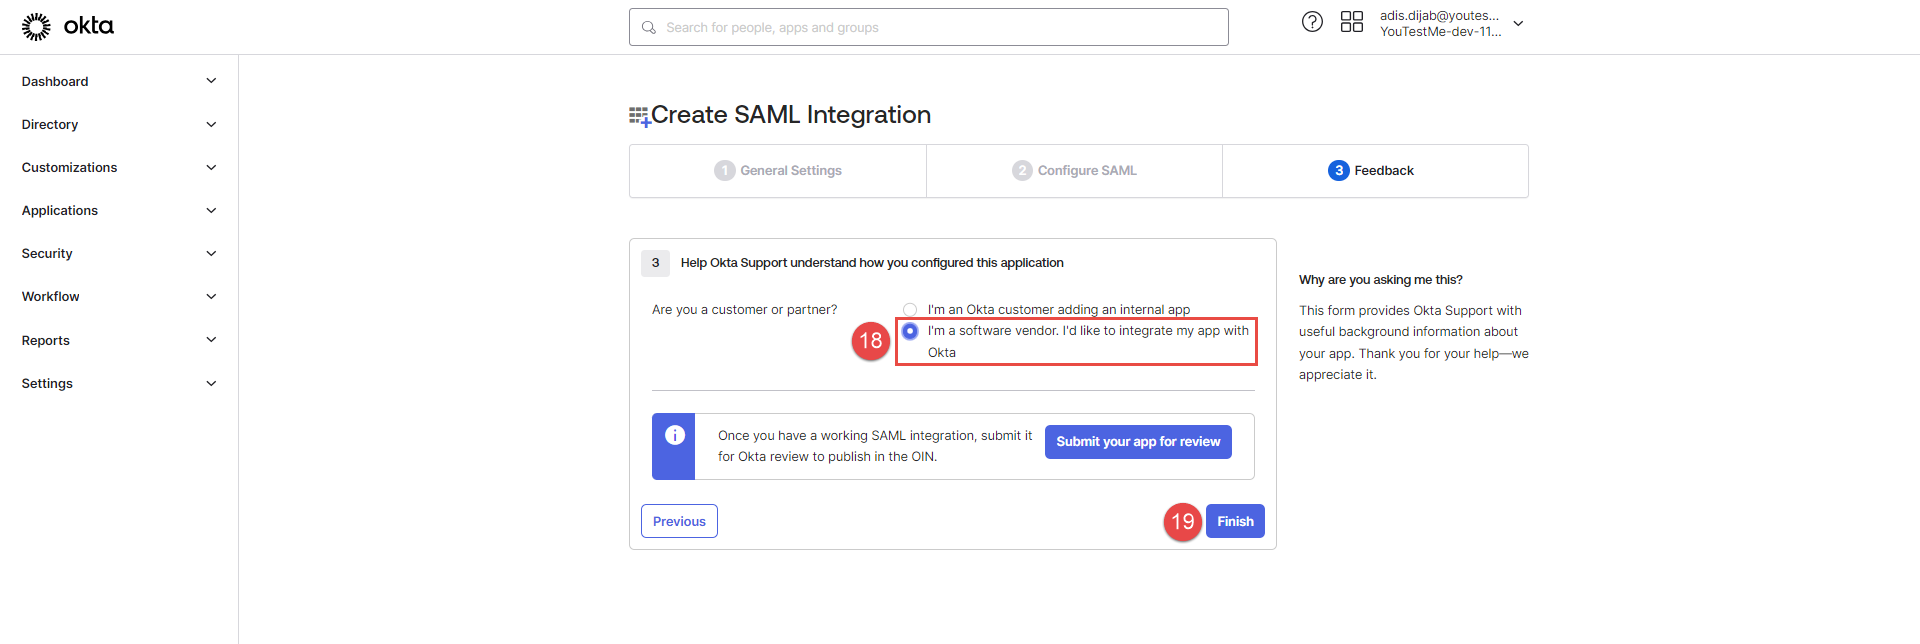
The next step in Okta is the last one. Choose the second option: I’m a software vendor. I’d like to integrate my app with Okta.
-
Click the Finish button.
-
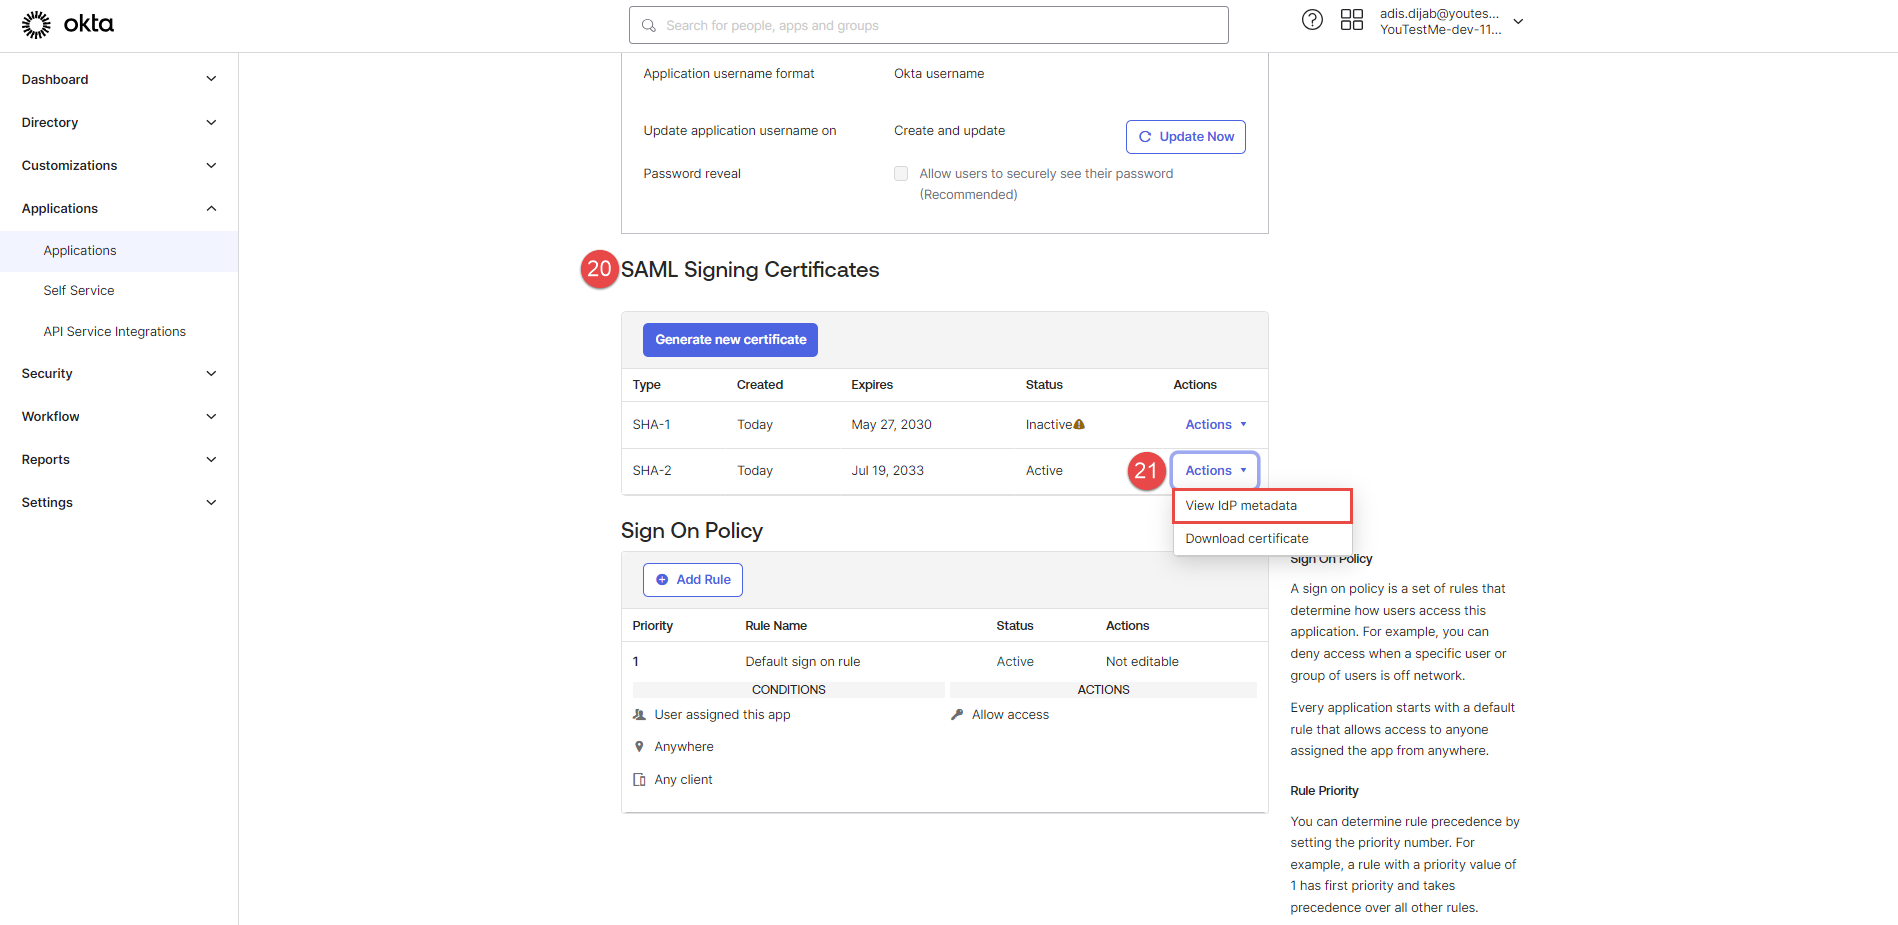
After finishing, navigate to the SAML Certificates below the page.
-
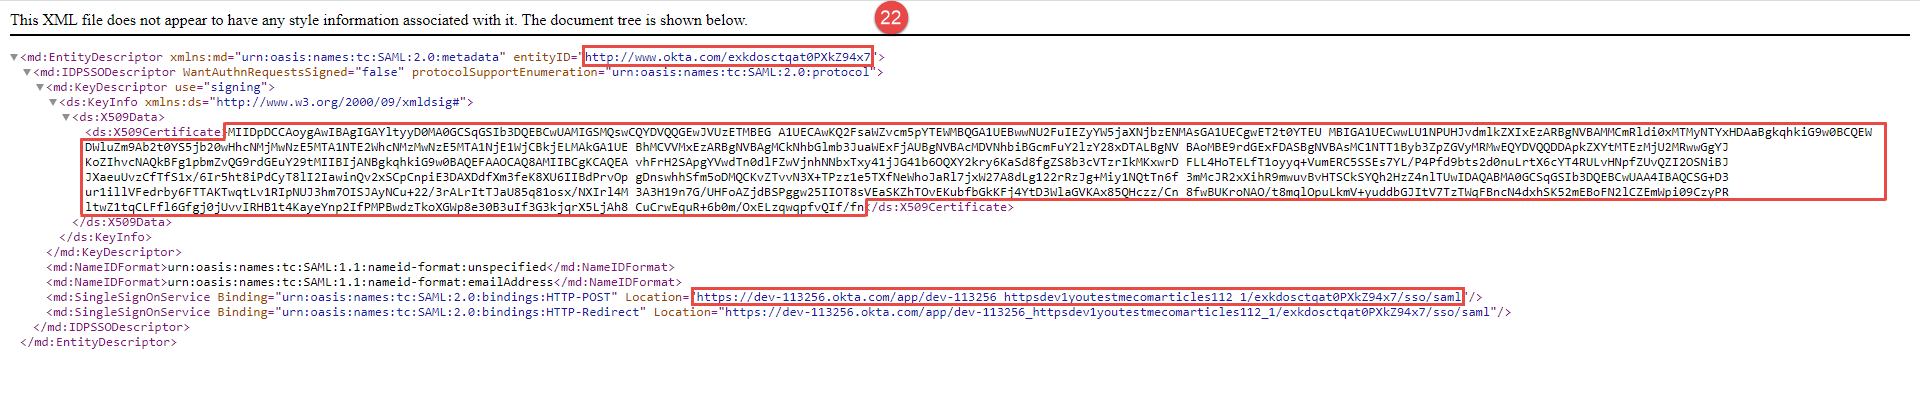
Click the Actions, and choose View IdP metadata for additional data, which has a status of Active.
-
The XML file should open in a new tab, and you should copy the following marked information one by one from the file in the GetCertified application.
-
EntityID.
-
X509Certificate.
-
Location.
-
-
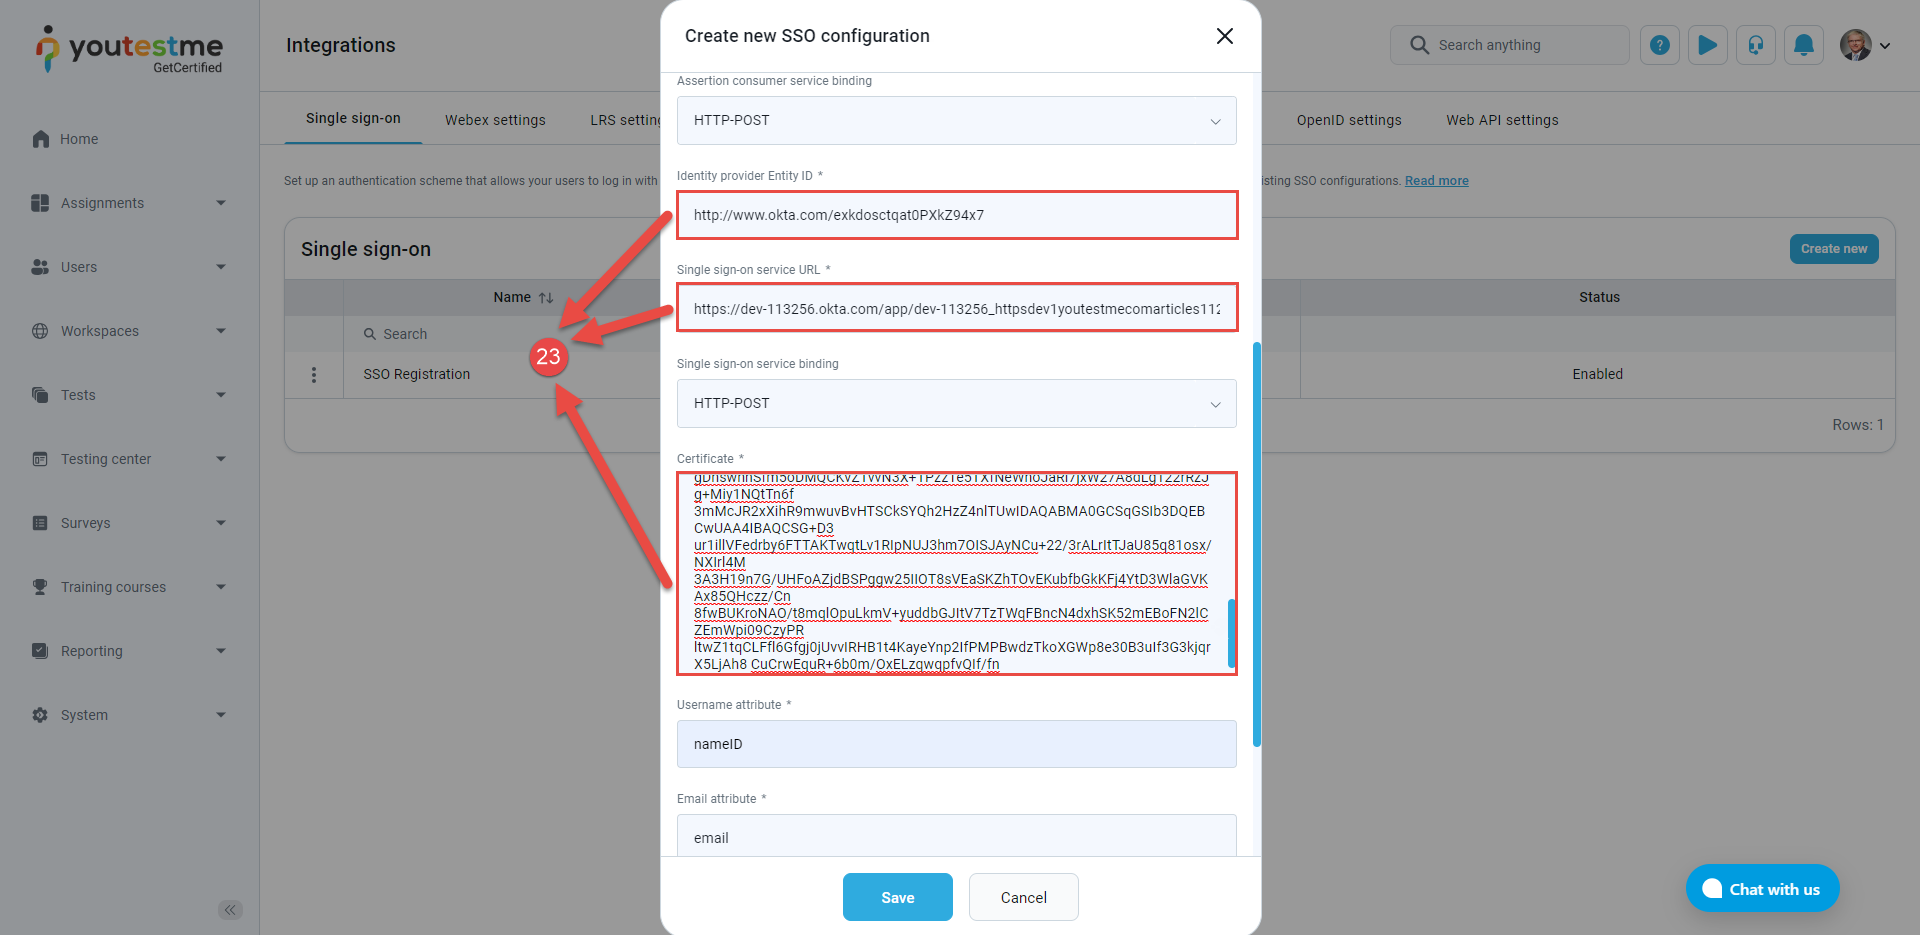
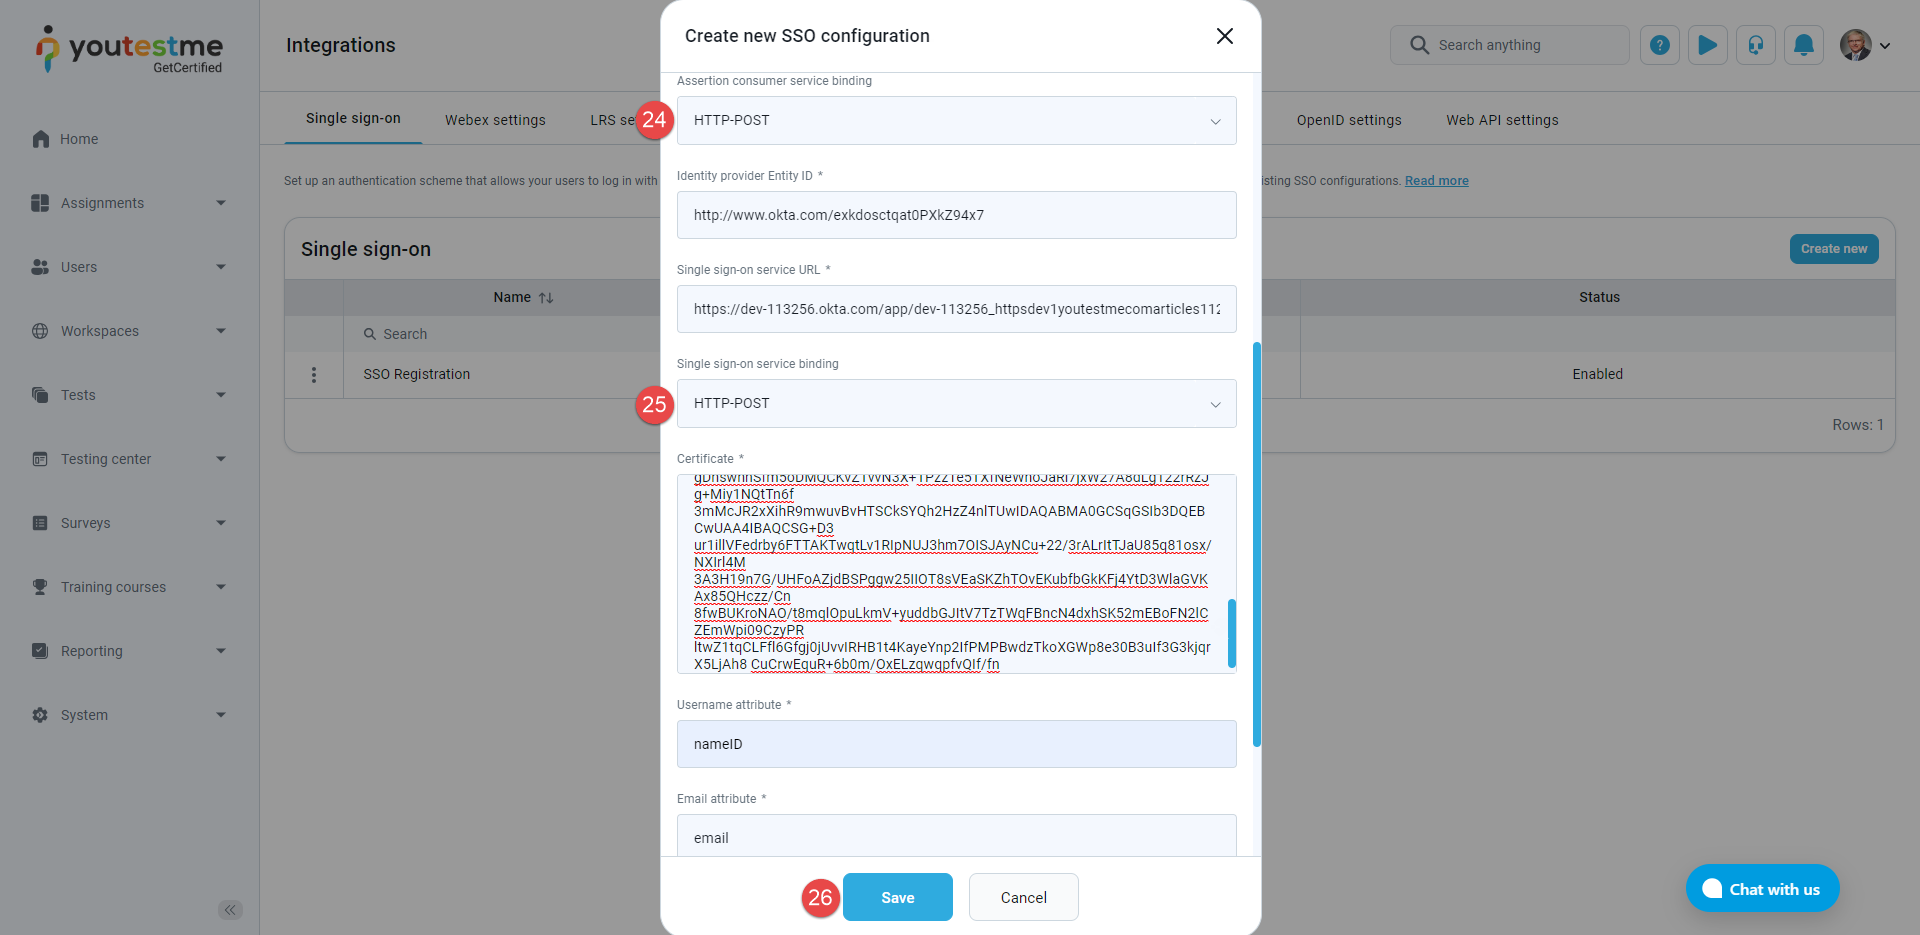
Paste the copied information to the following:
-
Enter the Identity provider Entity ID, the identifier of the provider entity.
-
Enter the Single sign-on service URL.
-
Enter the Certificate, the public x509 certificate of the identity provider.
-
-
Ensure that the Assertion consumer service binding is set on the HTTP-POST.
-
Ensure that the Single sign-on service binding is set on the HTTP-POST.
-
Click the Save button.
In this example, we will demonstrate the configuration using Okta as the Identity Provider. Before proceeding with this configuration, make sure that you have shared credentials for Okta and can log in.
When creating a new SSO configuration or updating an existing one, you must enter the parameters to configure the service provider's side. GetCertified provides the parameters you need to configure the identity provider's side.
To create a Single Sign-On (SSO) configuration:
In the next step, you will use data from the GetCertified application to integrate with Okta.

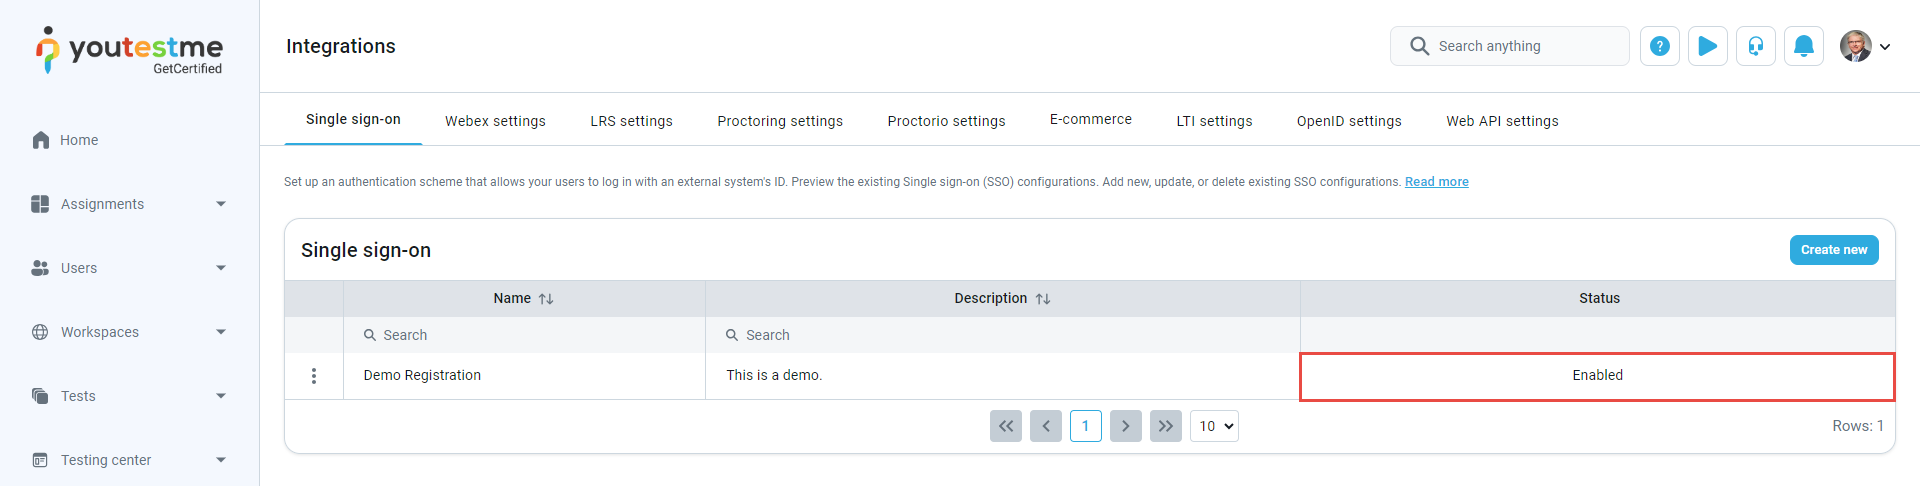
The new SSO configuration should be created and displayed as Enabled.
To access the application, the user needs first to be assigned to Okta. Navigate to the Assignments tab and Assign the user.
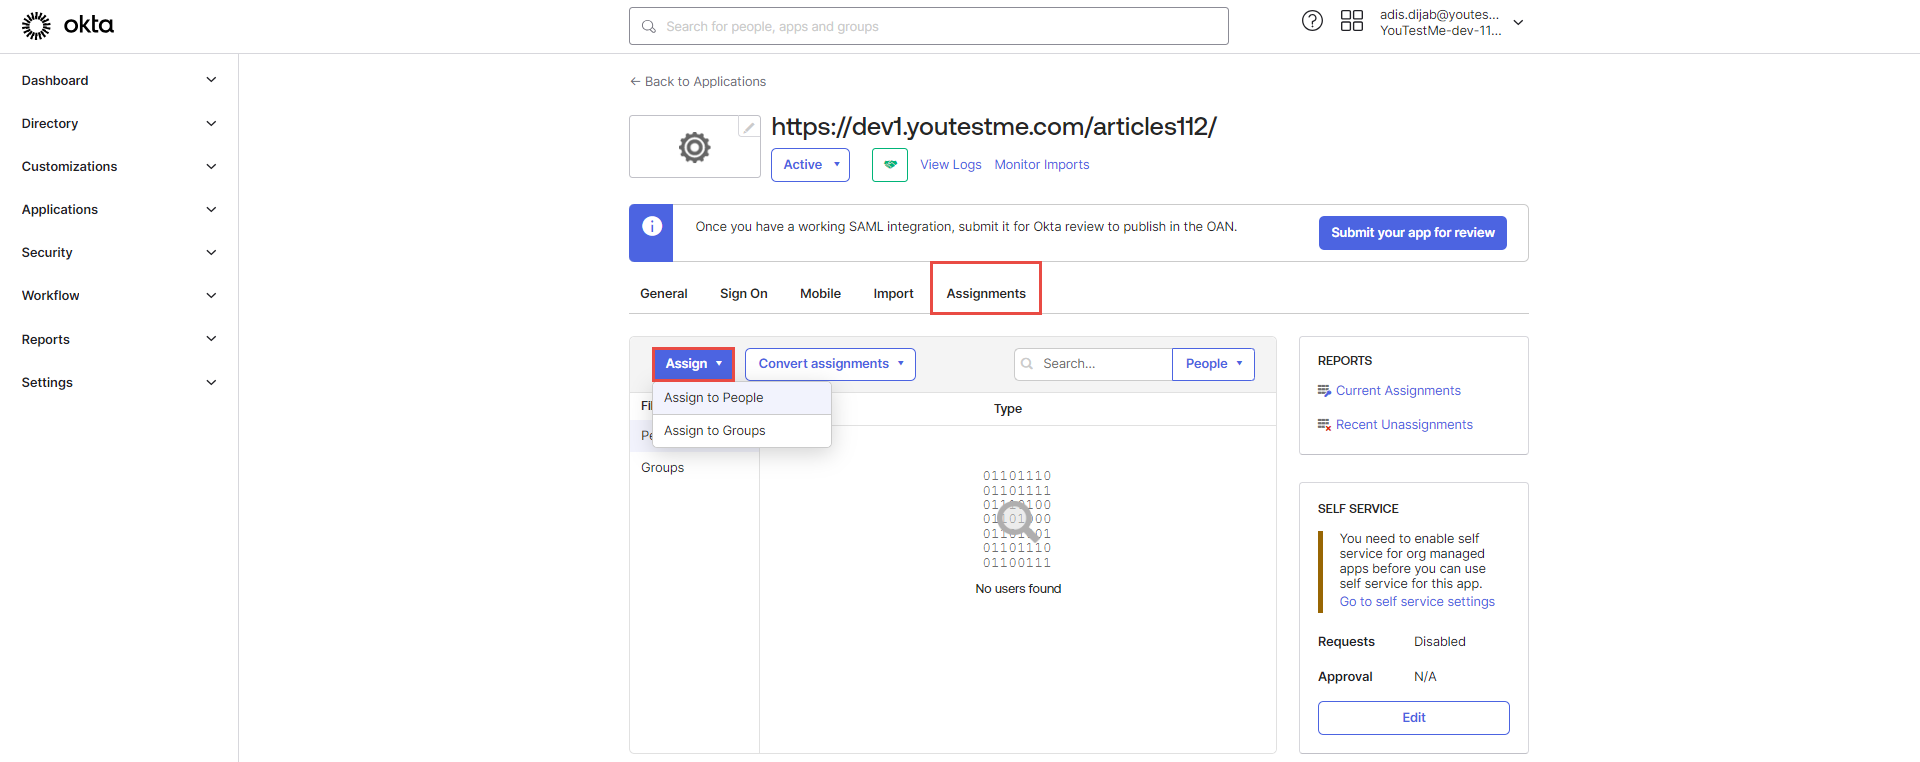
If you configured everything appropriately, the option to log in with SSO should be visible on the login page. Users can choose to log in with the newly created SSO integration.

These are the first-time login steps.
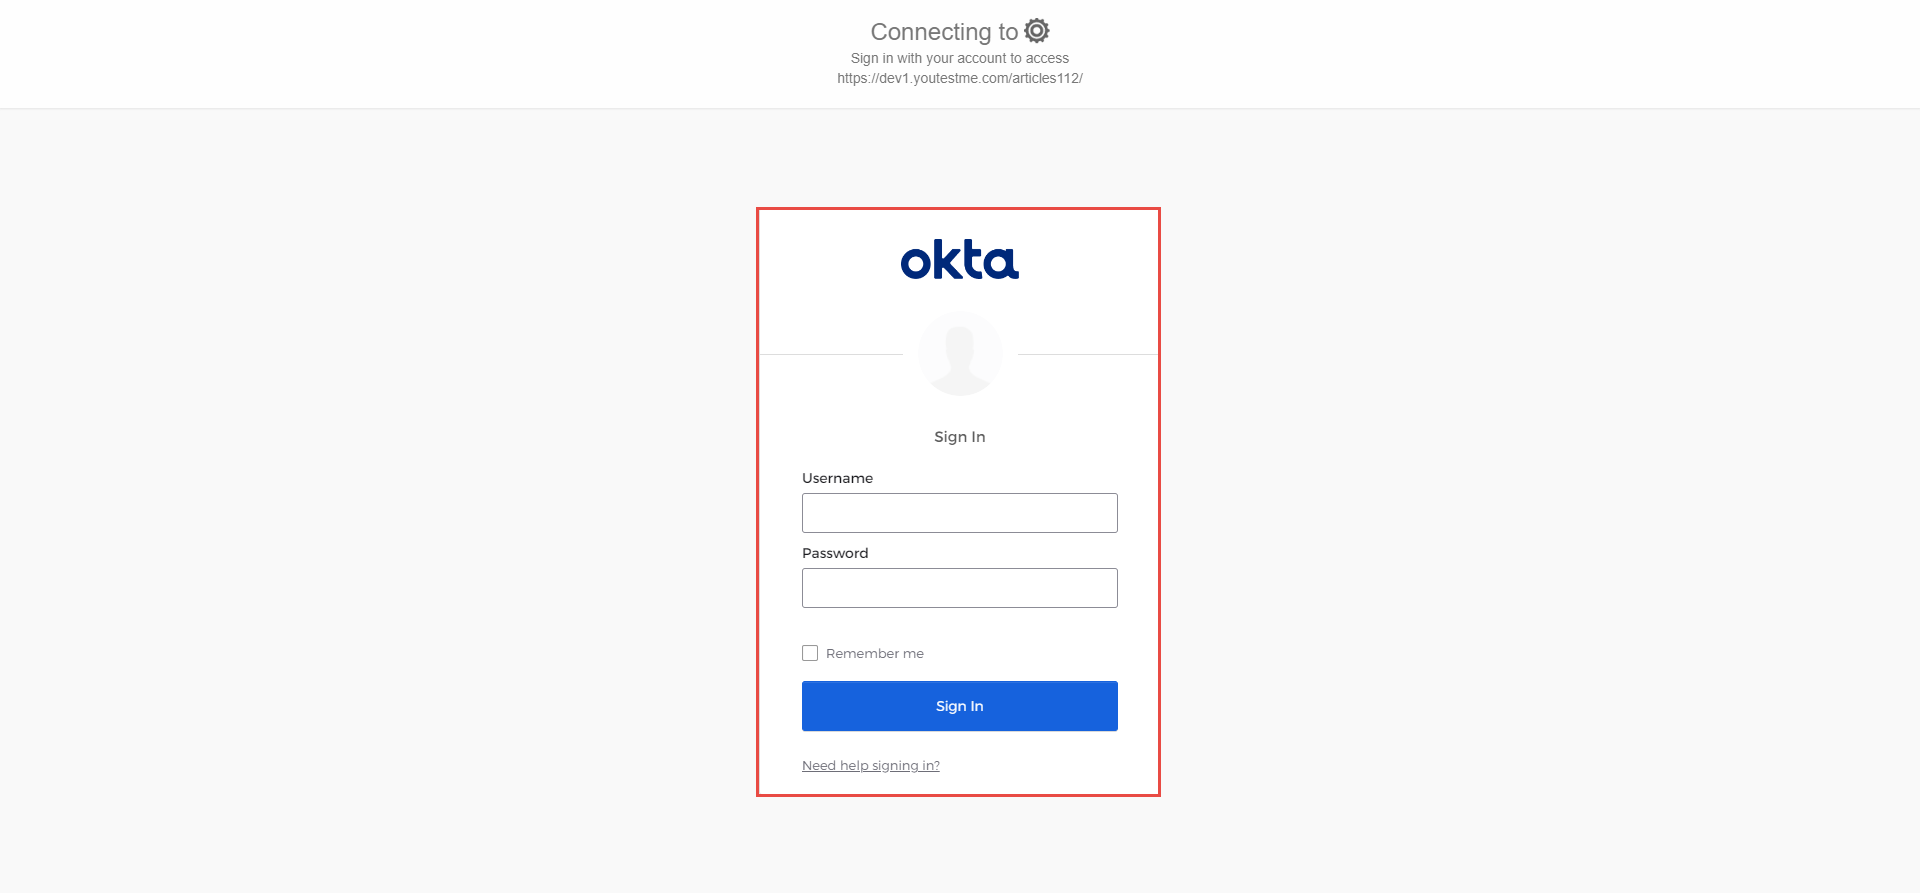 Once the student has passed the validation
steps, he will be directed to the GetCertified
application.
Once the student has passed the validation
steps, he will be directed to the GetCertified
application. Note: Contact our support team at support@minervakb.youtestme.com if you have trouble configuring your SSO configuration.
Check the link below for more information on how to configure Single Sign-on integration.

Configuring SSO (SAML 2.0)
-
-
Webex settings
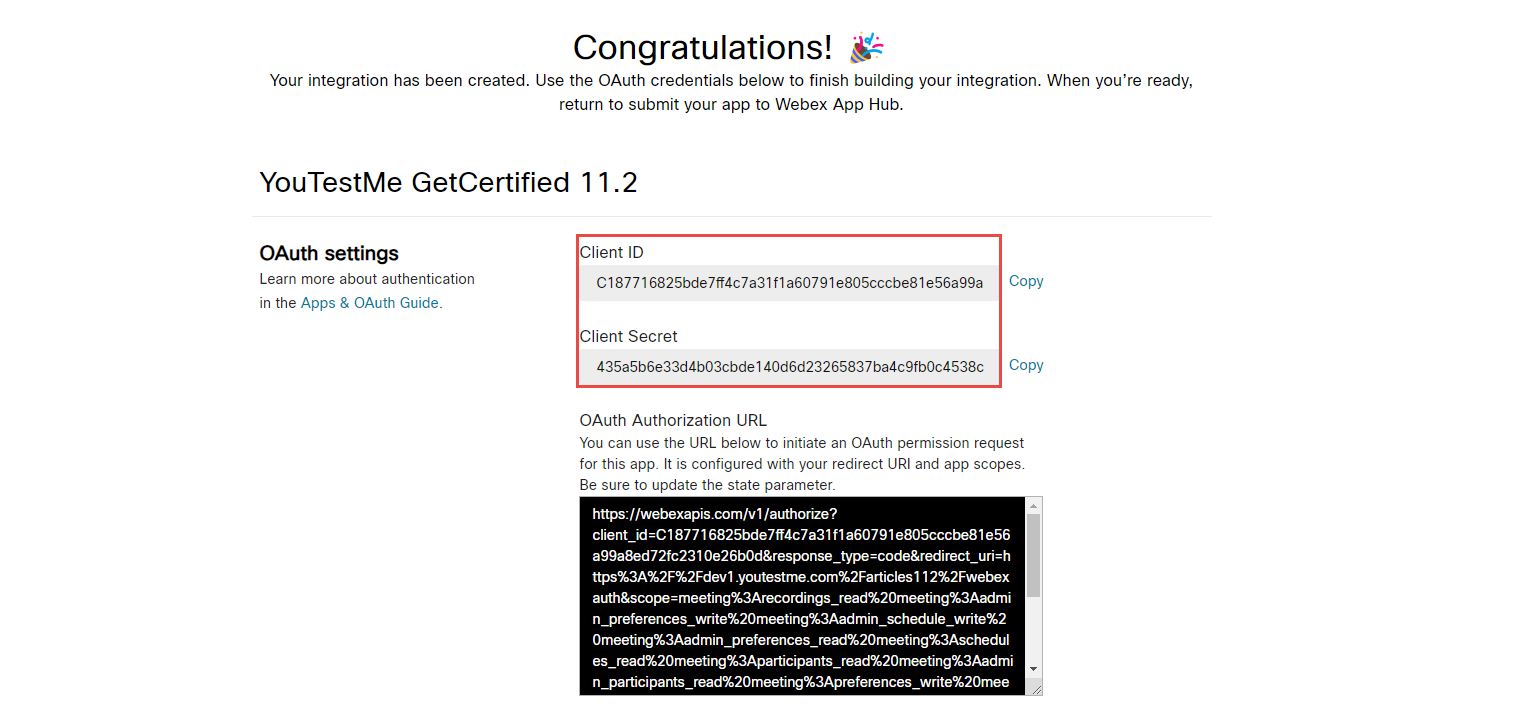
Webex settings enable seamless integration and efficient proctoring for instructors and candidates, which involves authenticating the Webex hosting account.
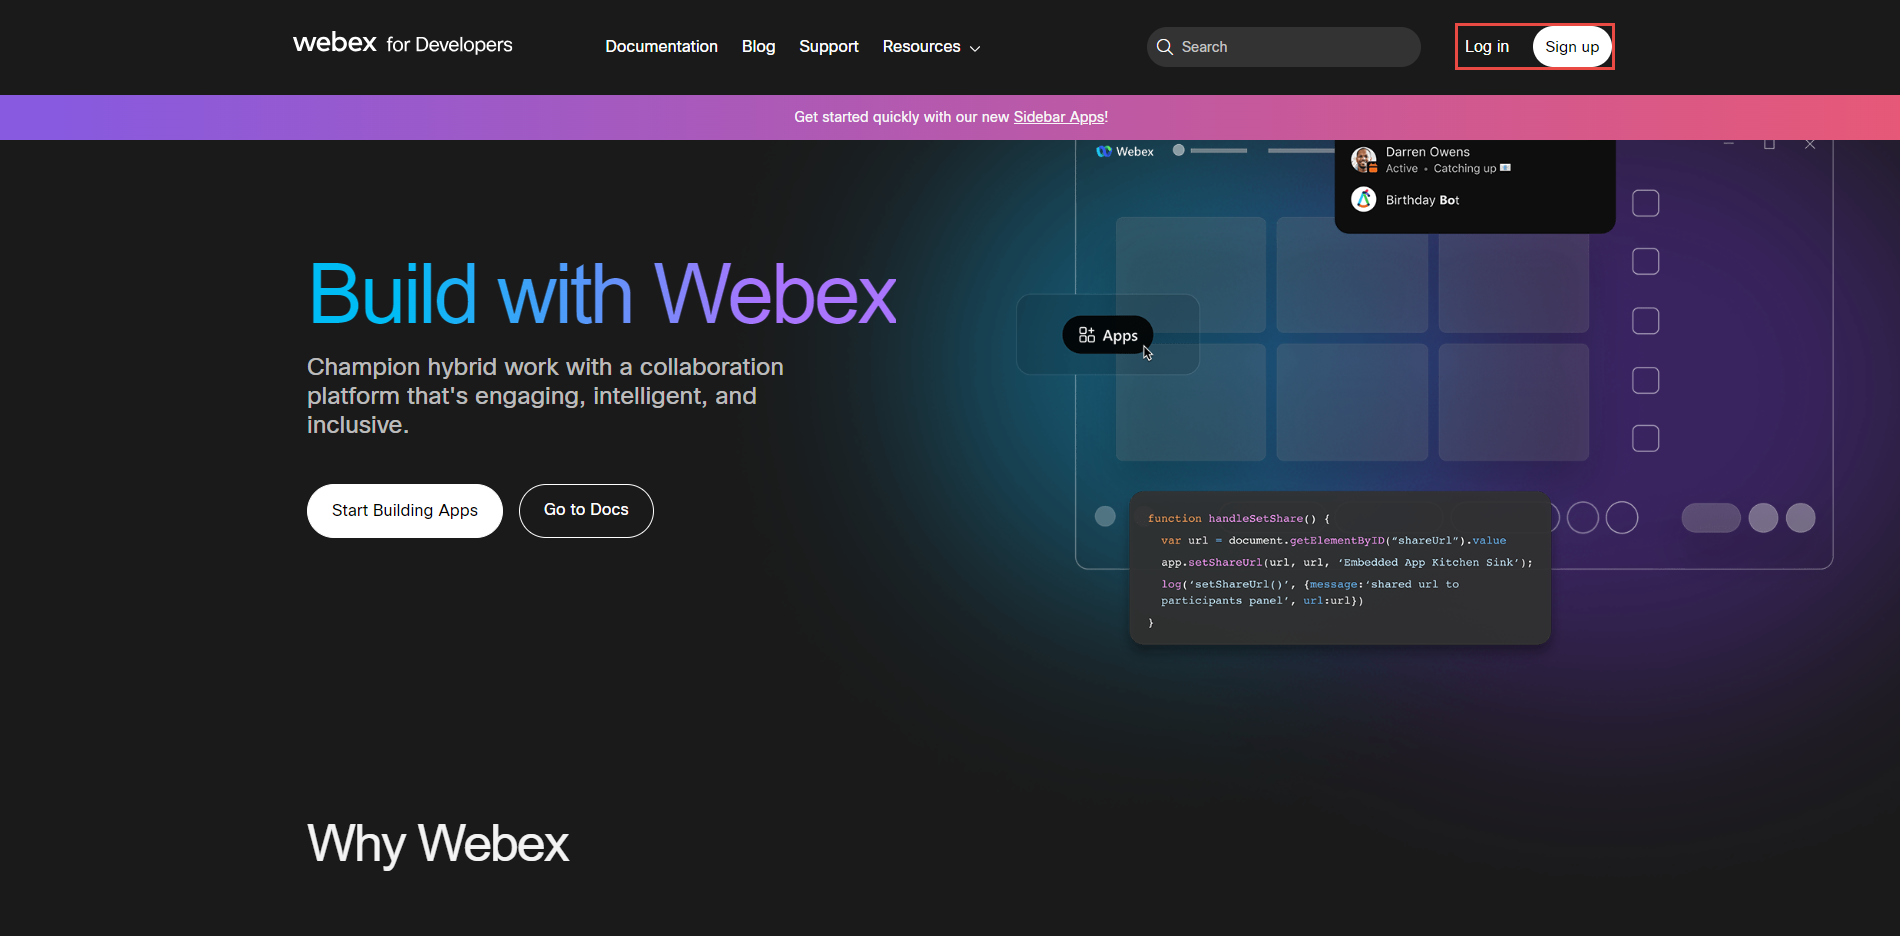
To set up the Webex integration, the first step is to register if you don't have an account or log in if you already have an account on the Webex for Developers application.
Once logged into the app, click on your profile icon and select My Webex Apps.
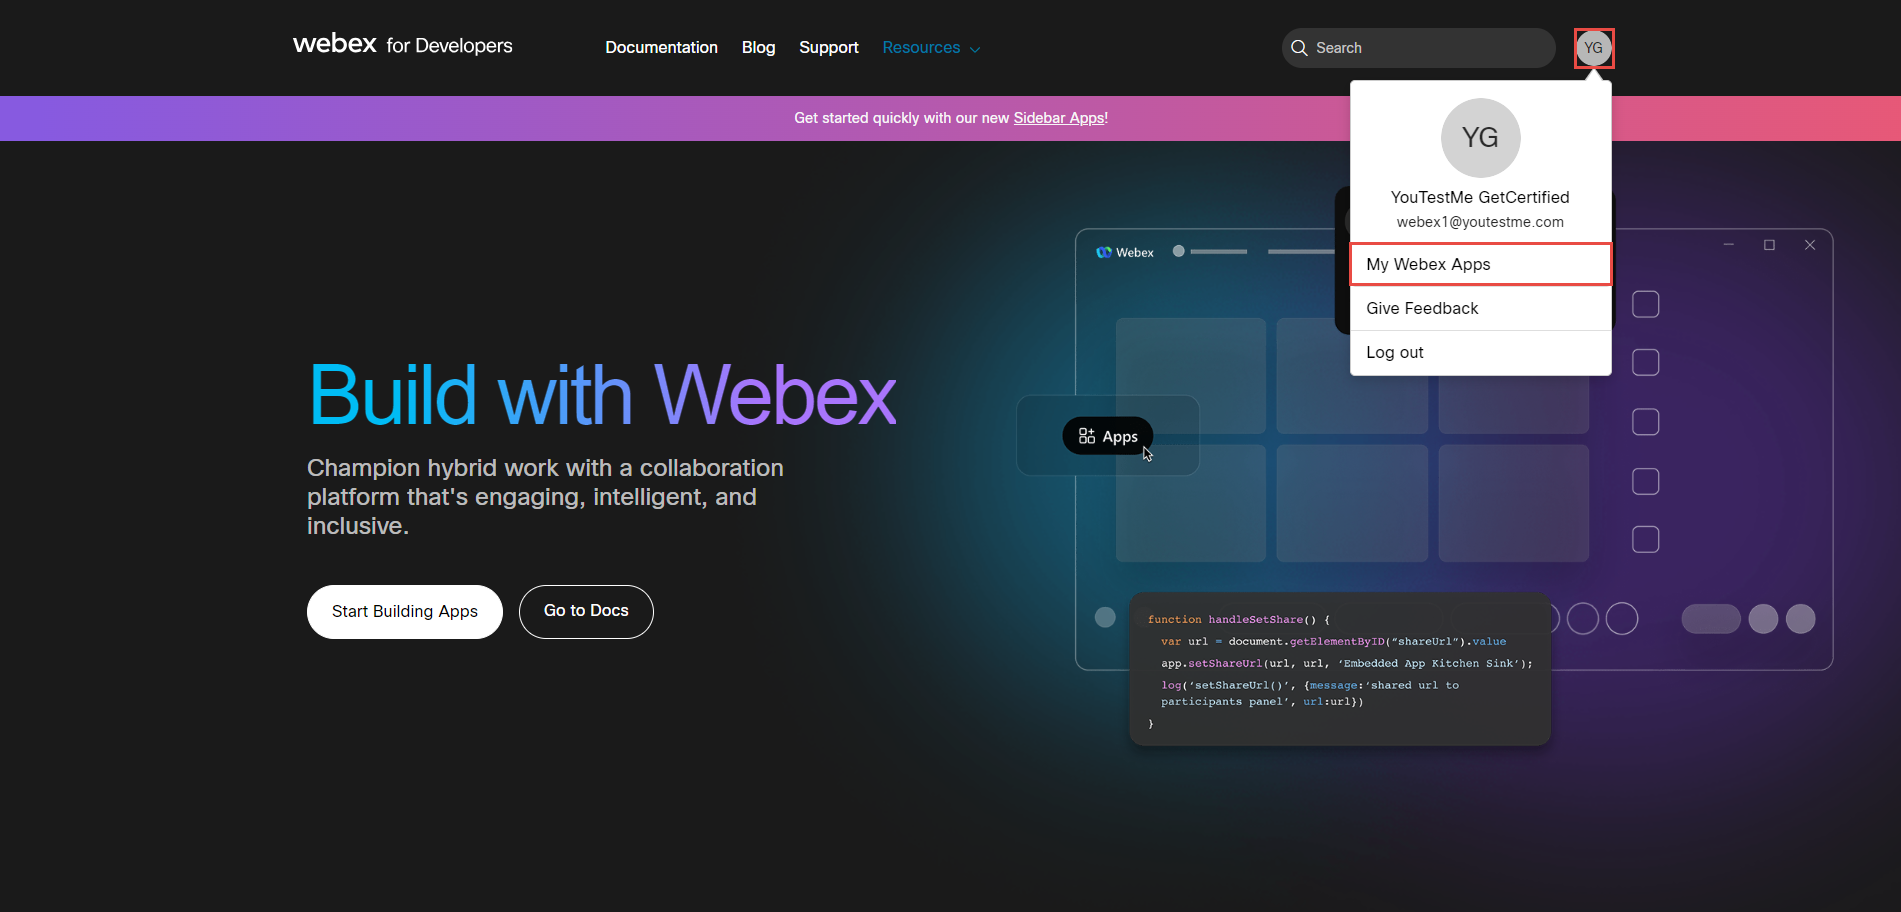
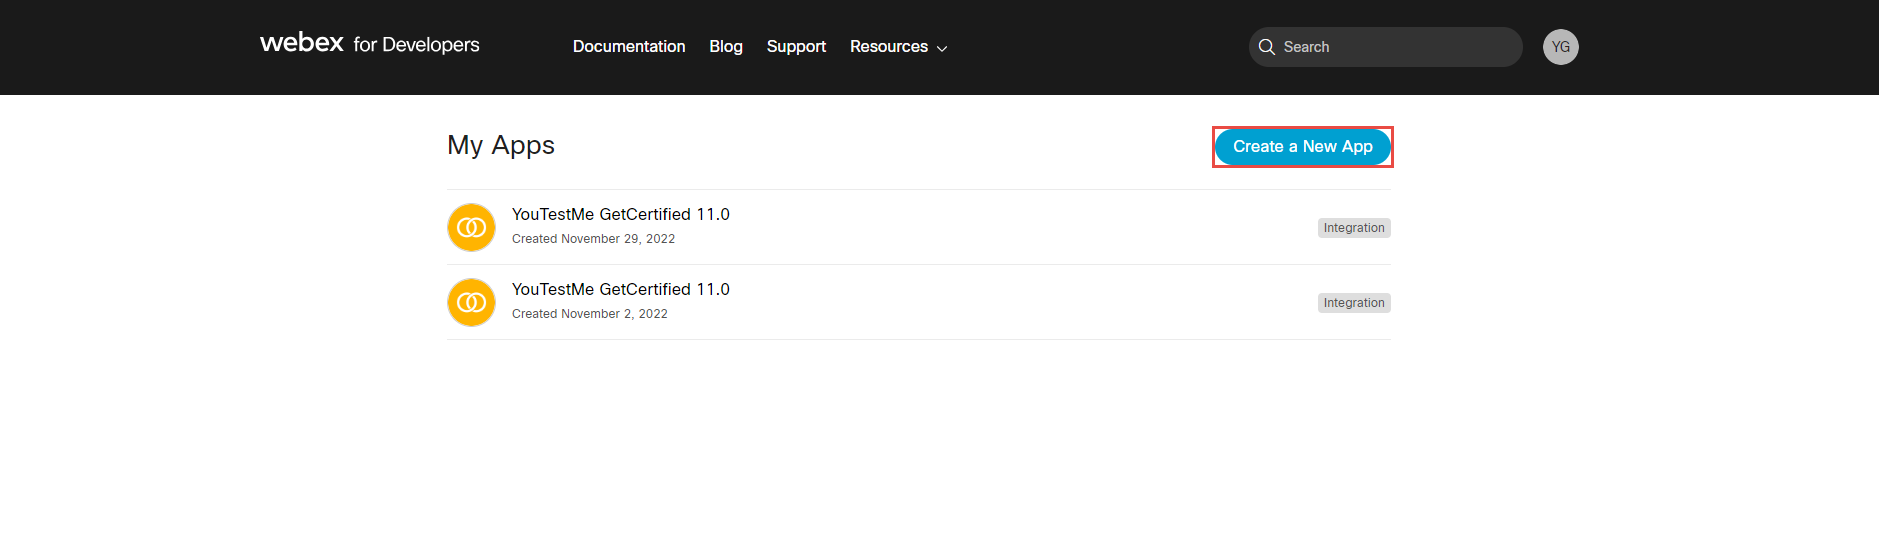
Click the Create a New App button.
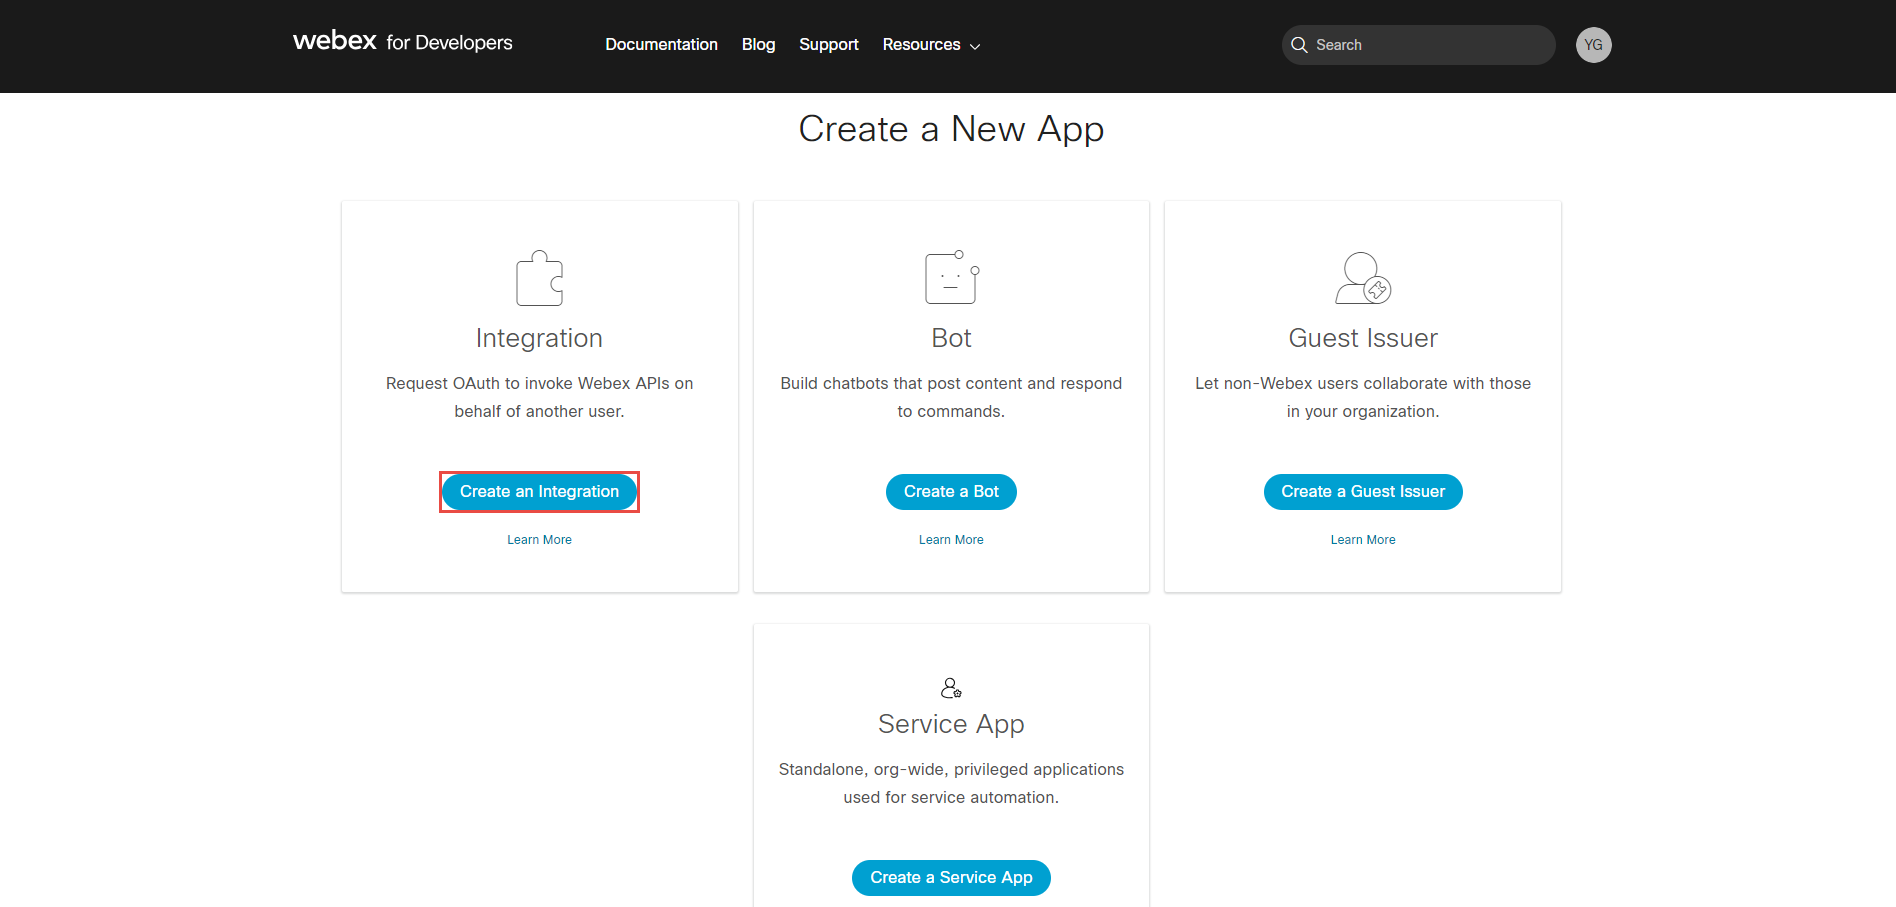
Click the Create an Integration button.
-
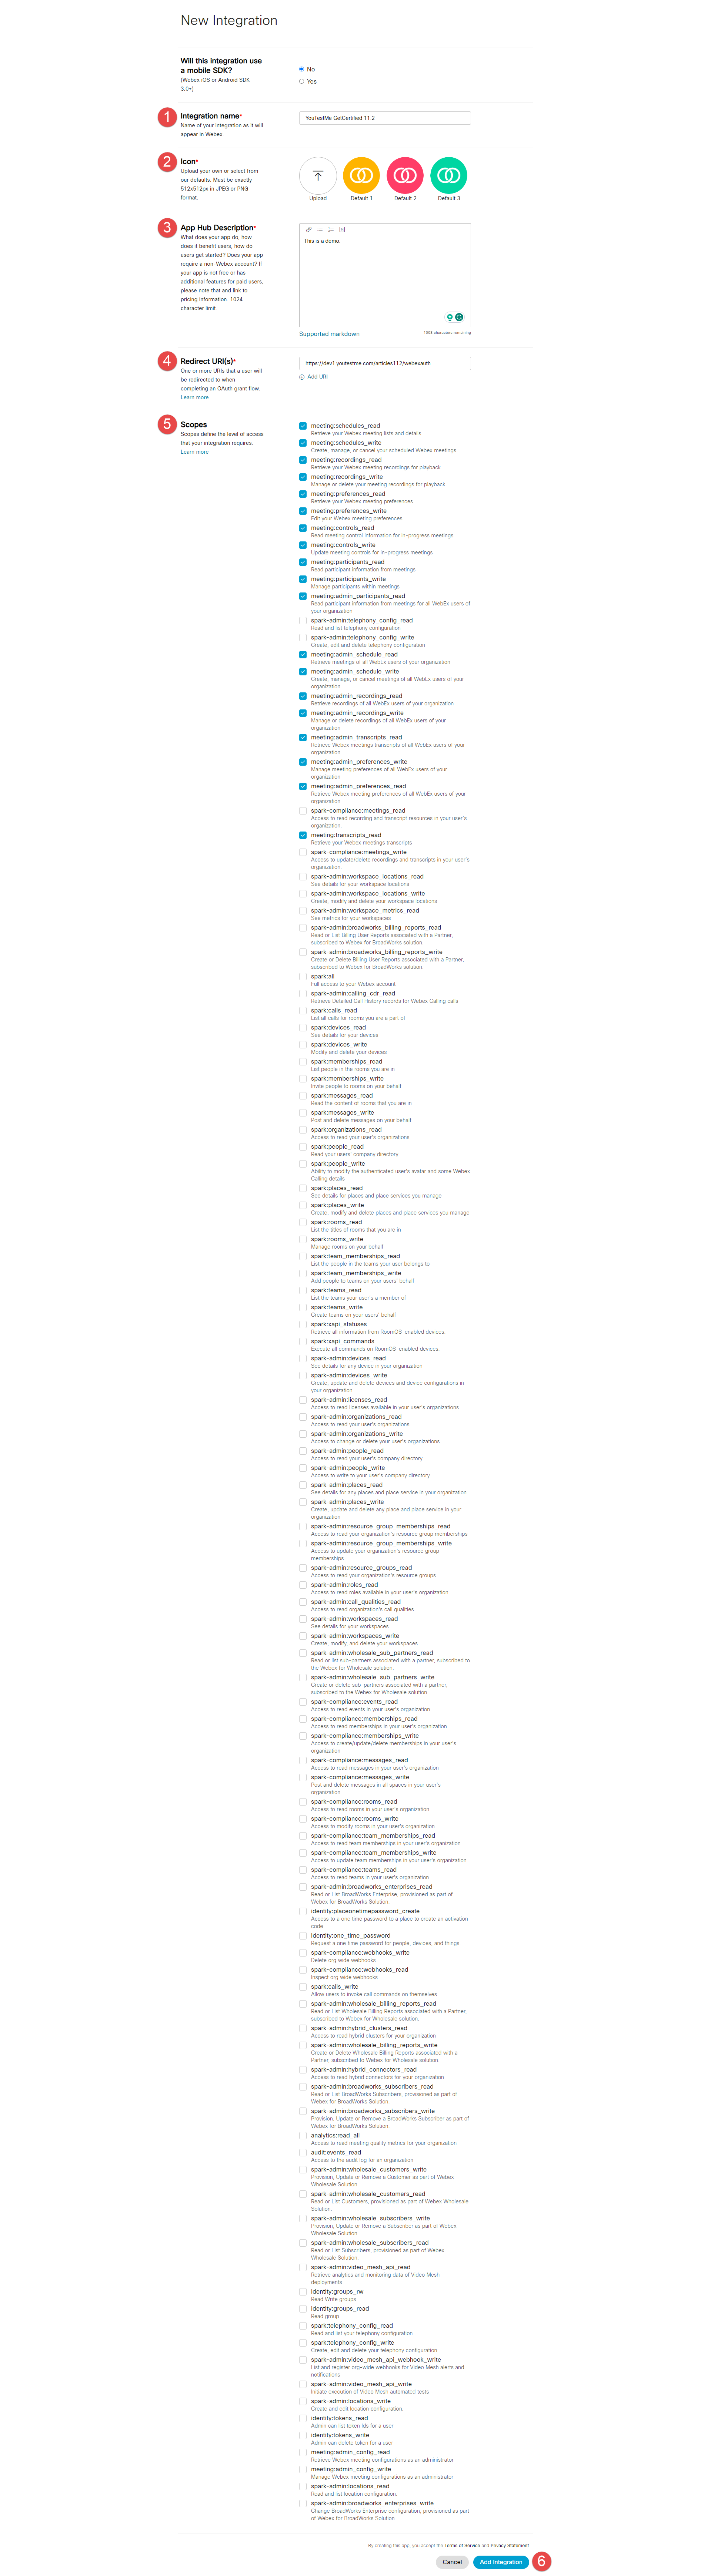
Enter Integration name.
-
Choose Icon.
-
Enter App Hub Description.
-
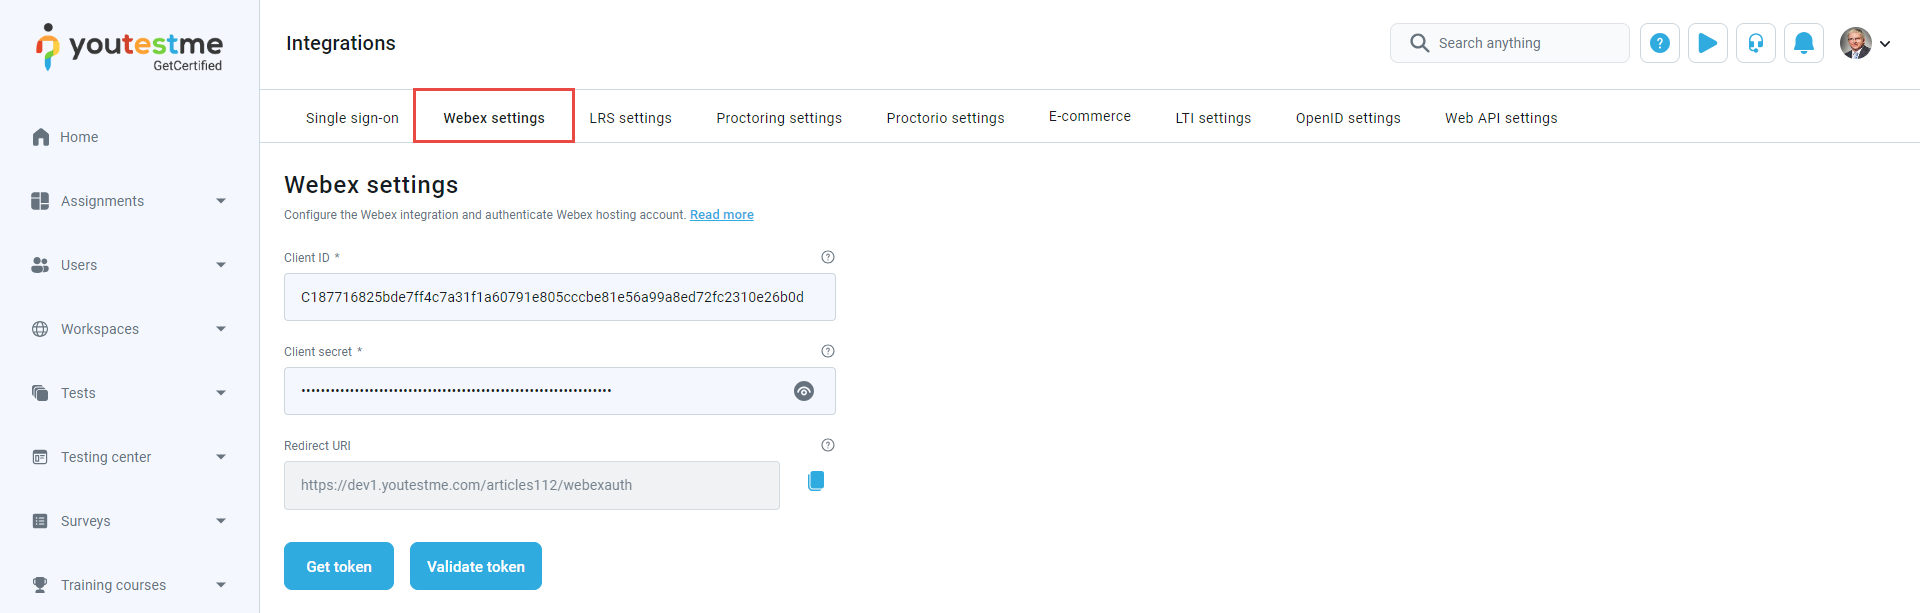
Enter Redirect URl(s). Copy the Redirect URI parameter from the Webex settings tab within the GetCertified Application and paste it here.
-
Select all meetings Scopes.
-
Click the Add integration button.
Once you create an integration, you will get the Client ID and Client Secret.
-
Copy the Client ID from the Webex for Developers application and paste it into the Webex settings tab within the GetCertified Application.
-
Copy the Client Secret from the Webex for Developers application and paste it into the Webex settings tab within the GetCertified Application.
-
Redirect URI - Used to copy this parameter and paste it on the Webex for Developers application.
-
Click the Save button.
-
Click on the Get token button, and you will be redirected to the Webex page, where you should log in again with the hosting Webex account.
-
Once you are logged in, click the Accept button.
To configure Webex settings, do the following:
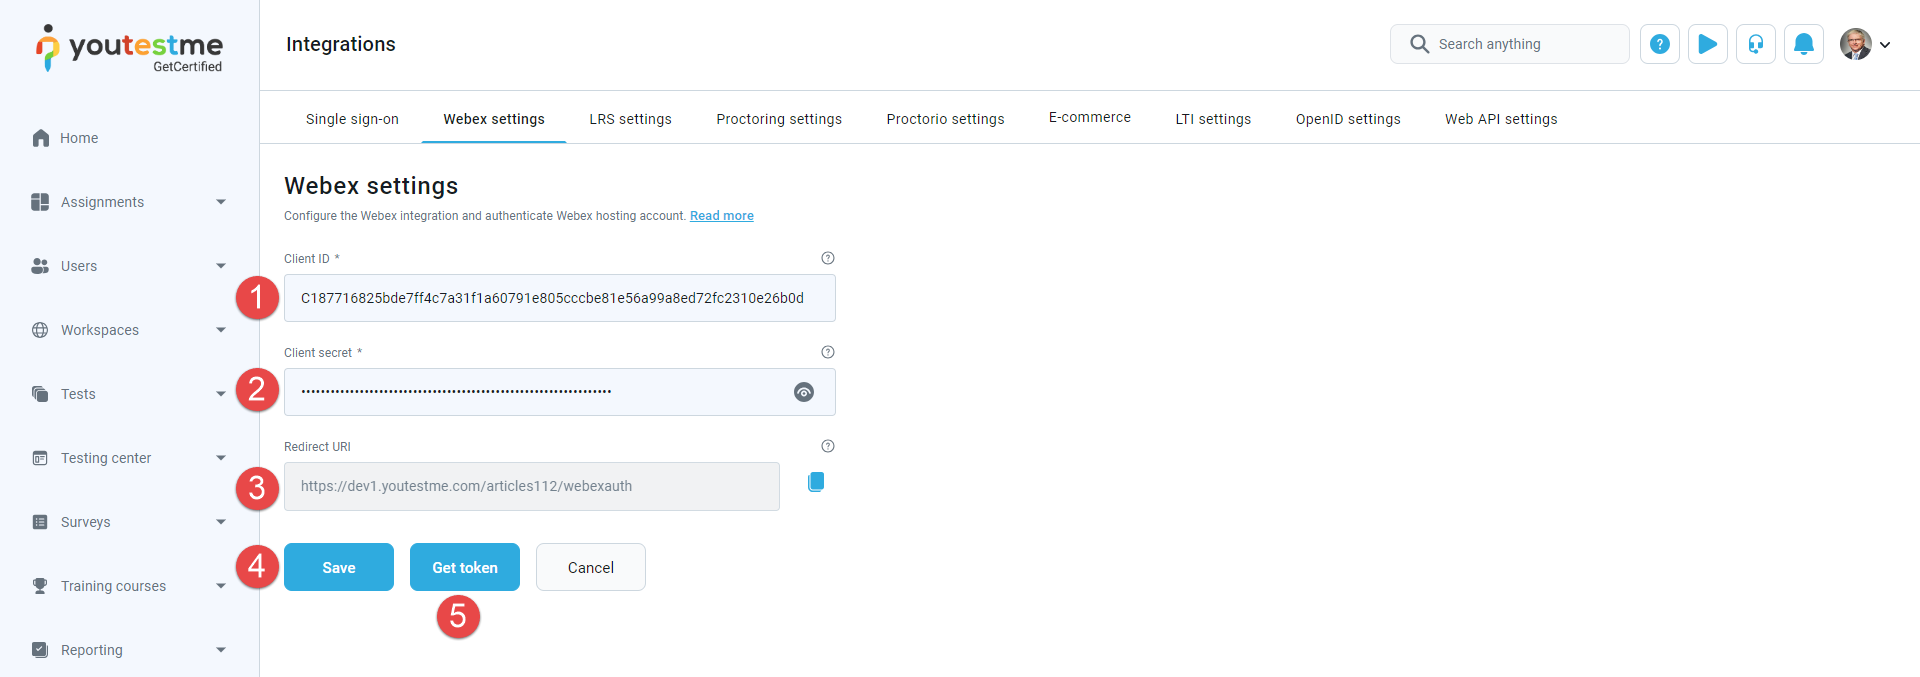
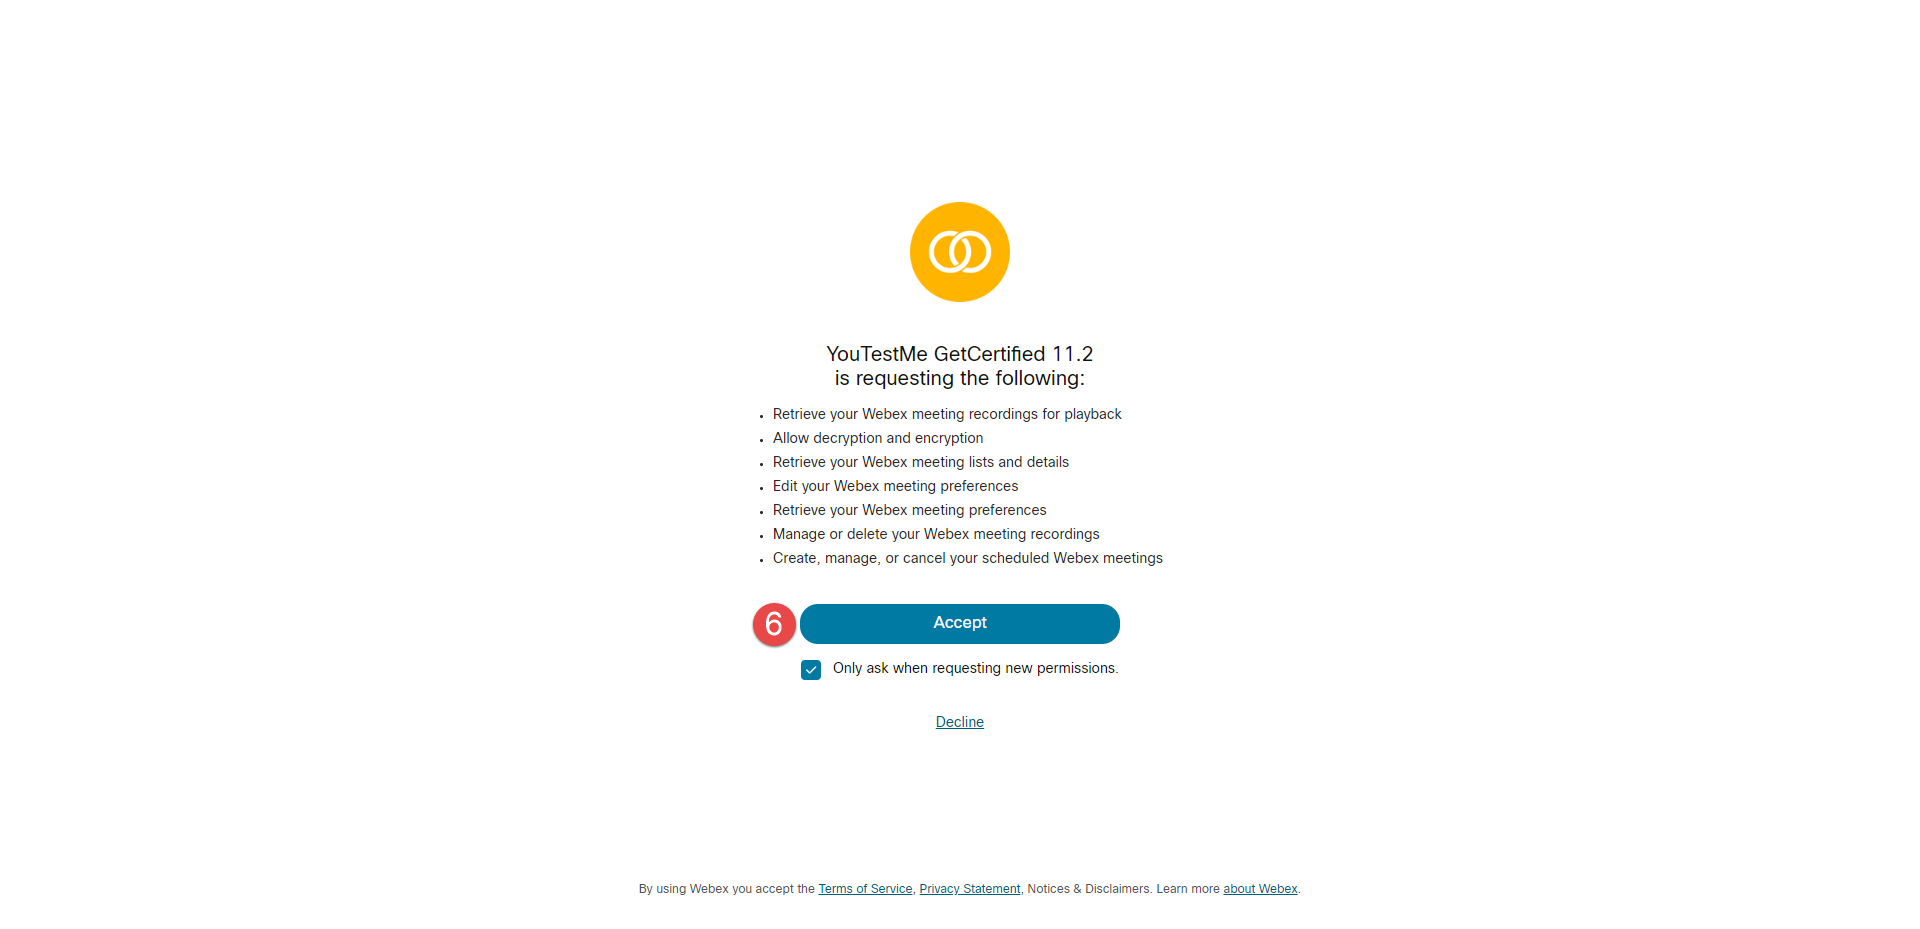
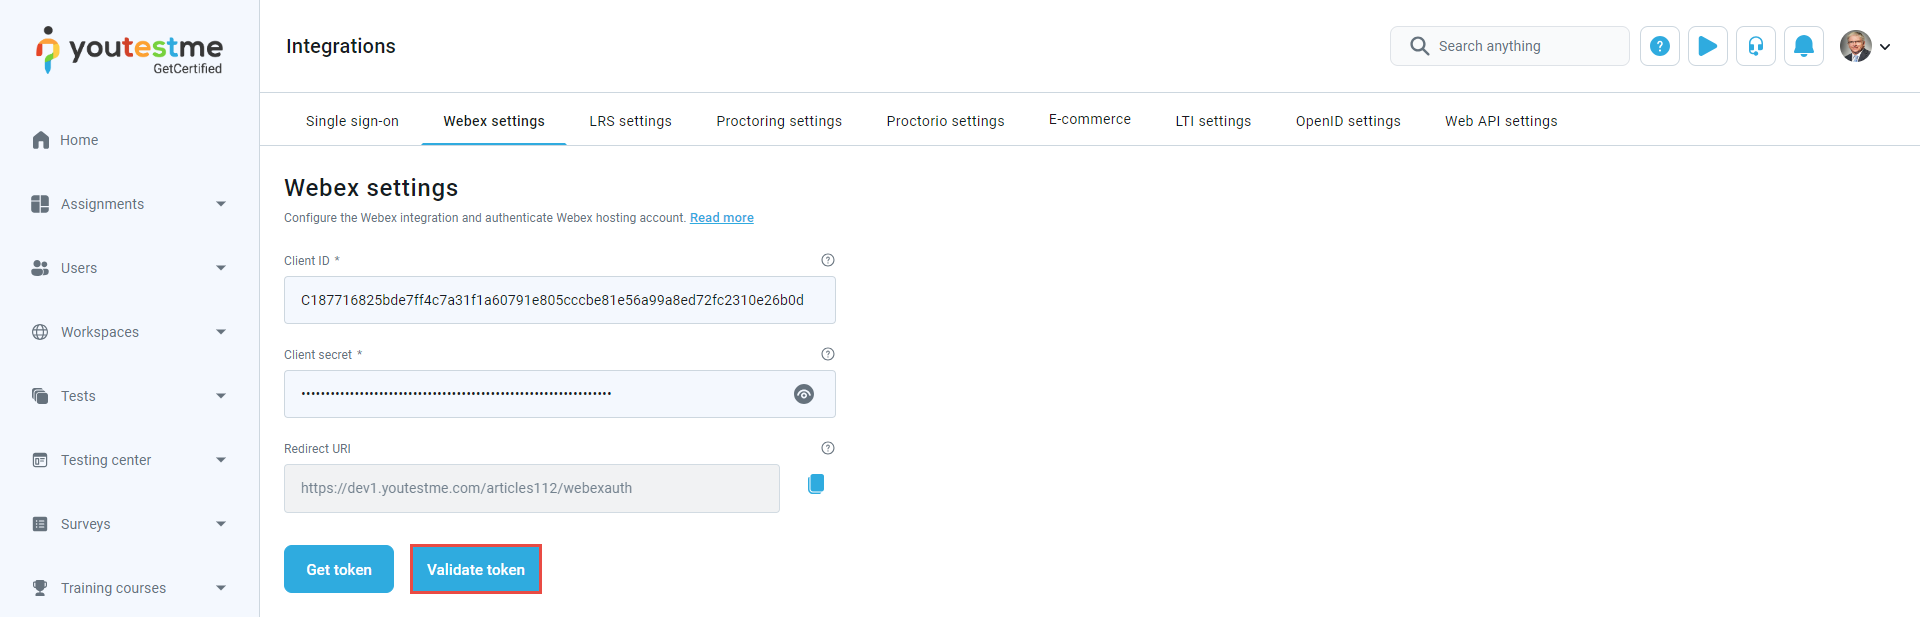
Once you accept, the Validate token button will appear in the GetCertified application, which is an indication that you have access to this token.
Proctoring by meeting tools is configured while creating a Testing session. After you have completed the Test Creation Wizard, you should navigate to the Testing session tab to schedule a test. For more instruction on how to organize tests with a Webex meeting, visit this Using Meeting Tools to Proctor Online Tests article.
Check the links below for more information on how proctoring using Webex works.
Live Proctoring with Conference Tools: Webex, Zoom, Skype, Google Meet
Webex Proctoring (Candidate's Perspective)
Webex Proctoring
-
-
LRS settings
LRS integration with GetCertified ensures that the test results sending process goes successfully.
-
Uploading all the results candidates made on the test.
-
Making the test results available as the statements recorded by LRS.
Sending the test results to LRS ensures:
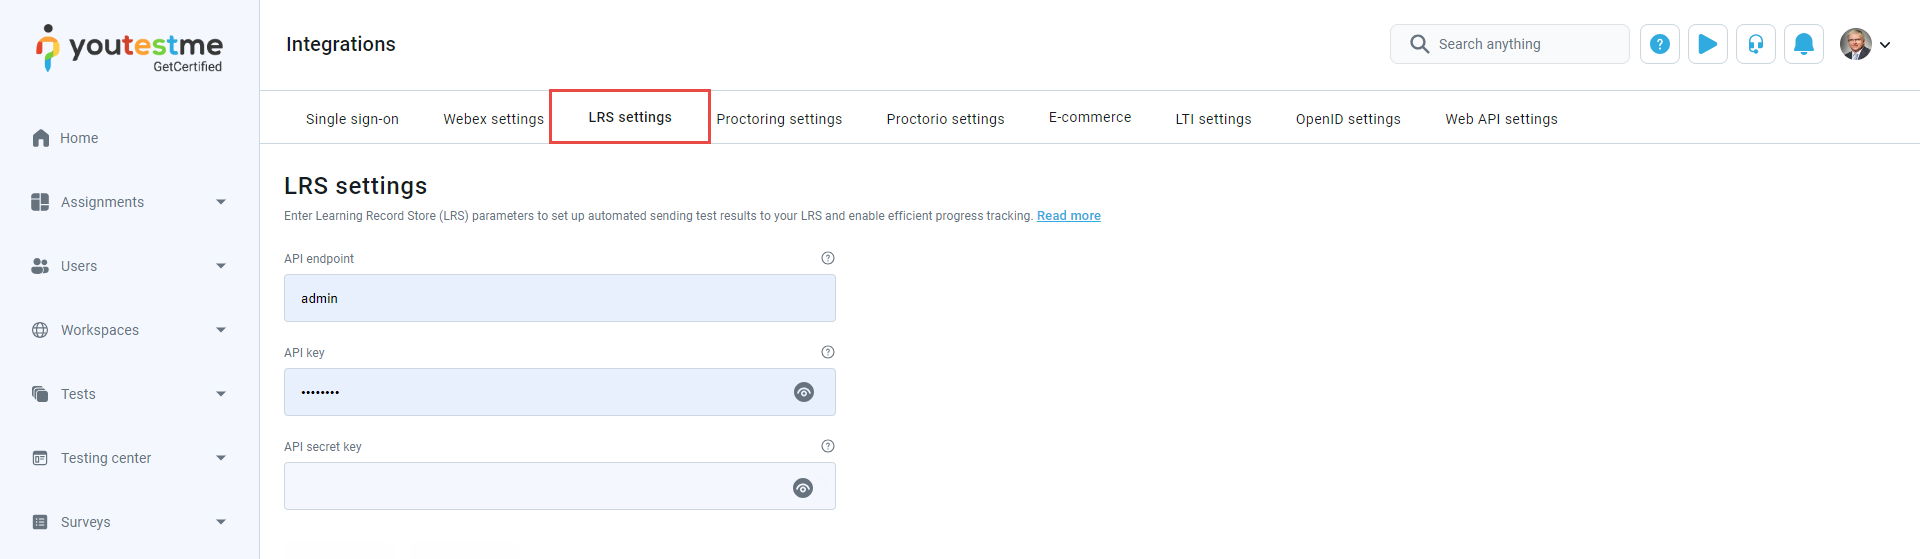
The LRS settings assure the manager of a test to send each candidate's test results into the LRS system and track each candidate's success. The explanation is just an example of the SCORM Cloud integration with GetCertified. You can use any other Learning Record Store that supports Tin Can API (xAPI).
Before you start configuring LRS parameters in the Integrations, you need to log in to the LRS system.
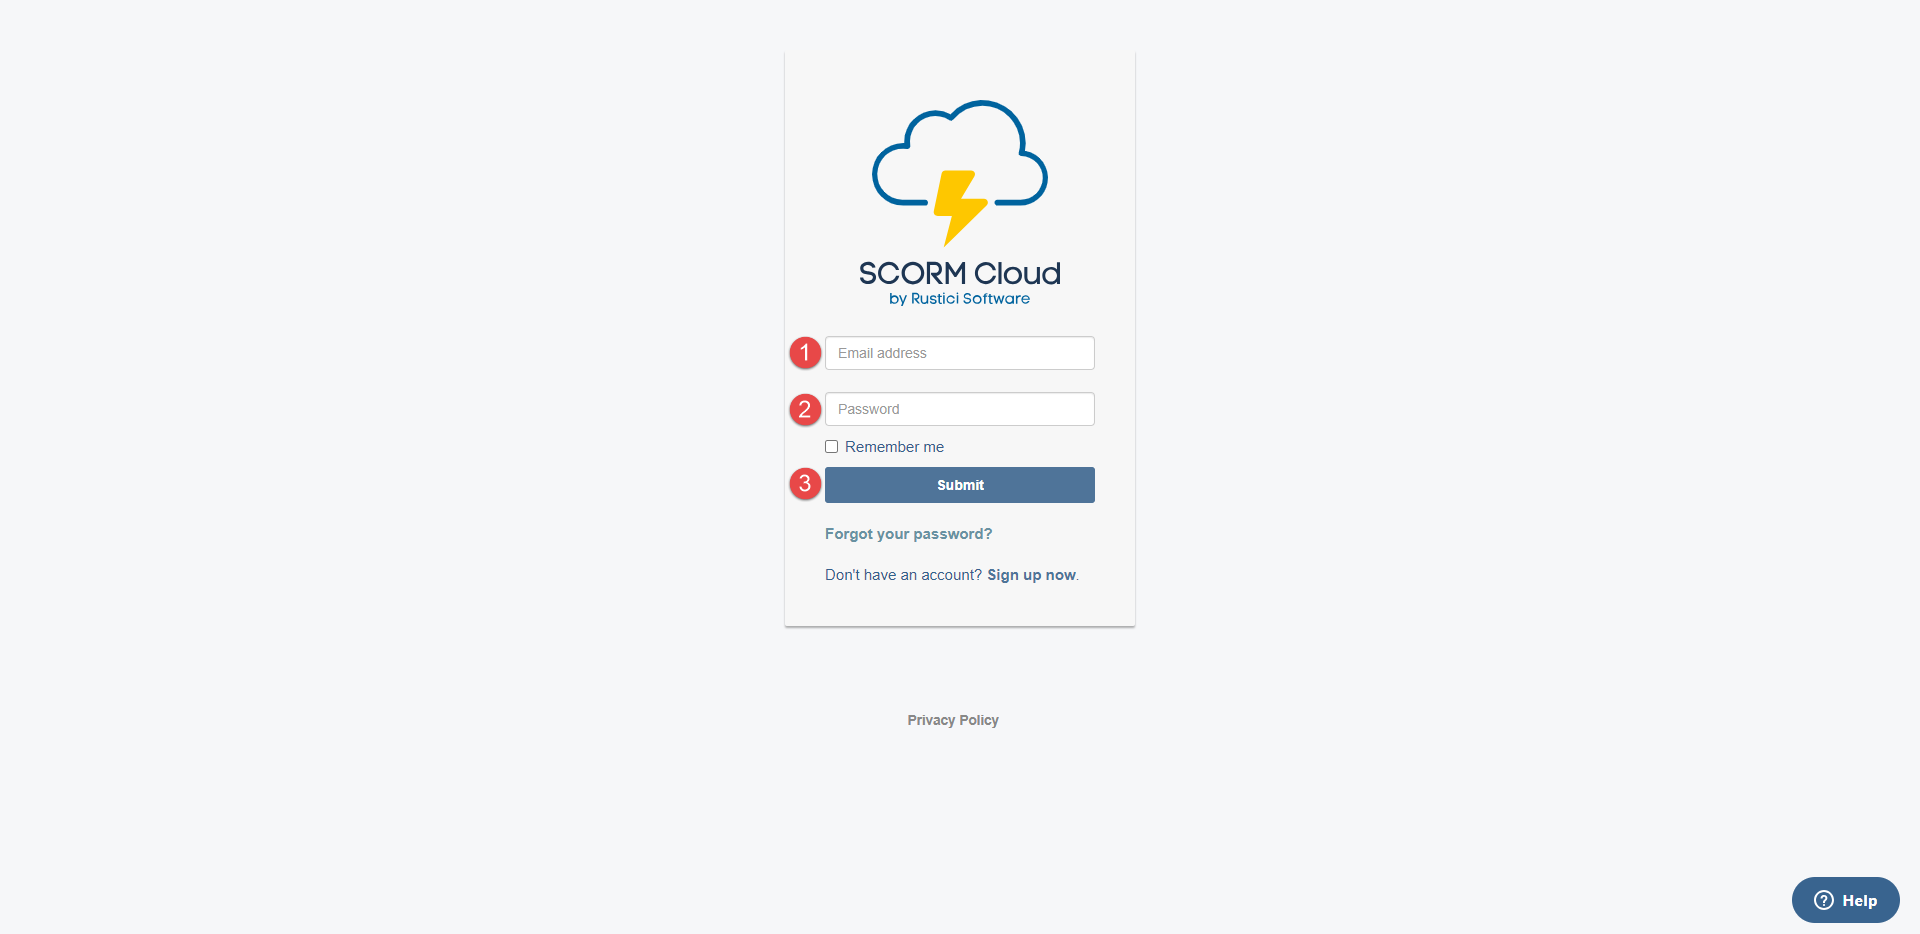
To set up your LRS parameters, visit the SCORM Cloud link and create an account if you don't already have one.
-
Enter your email.
-
Enter password.
-
Click the Submit button.
After the successful signing up, you can log in to the SCORM Cloud.
-
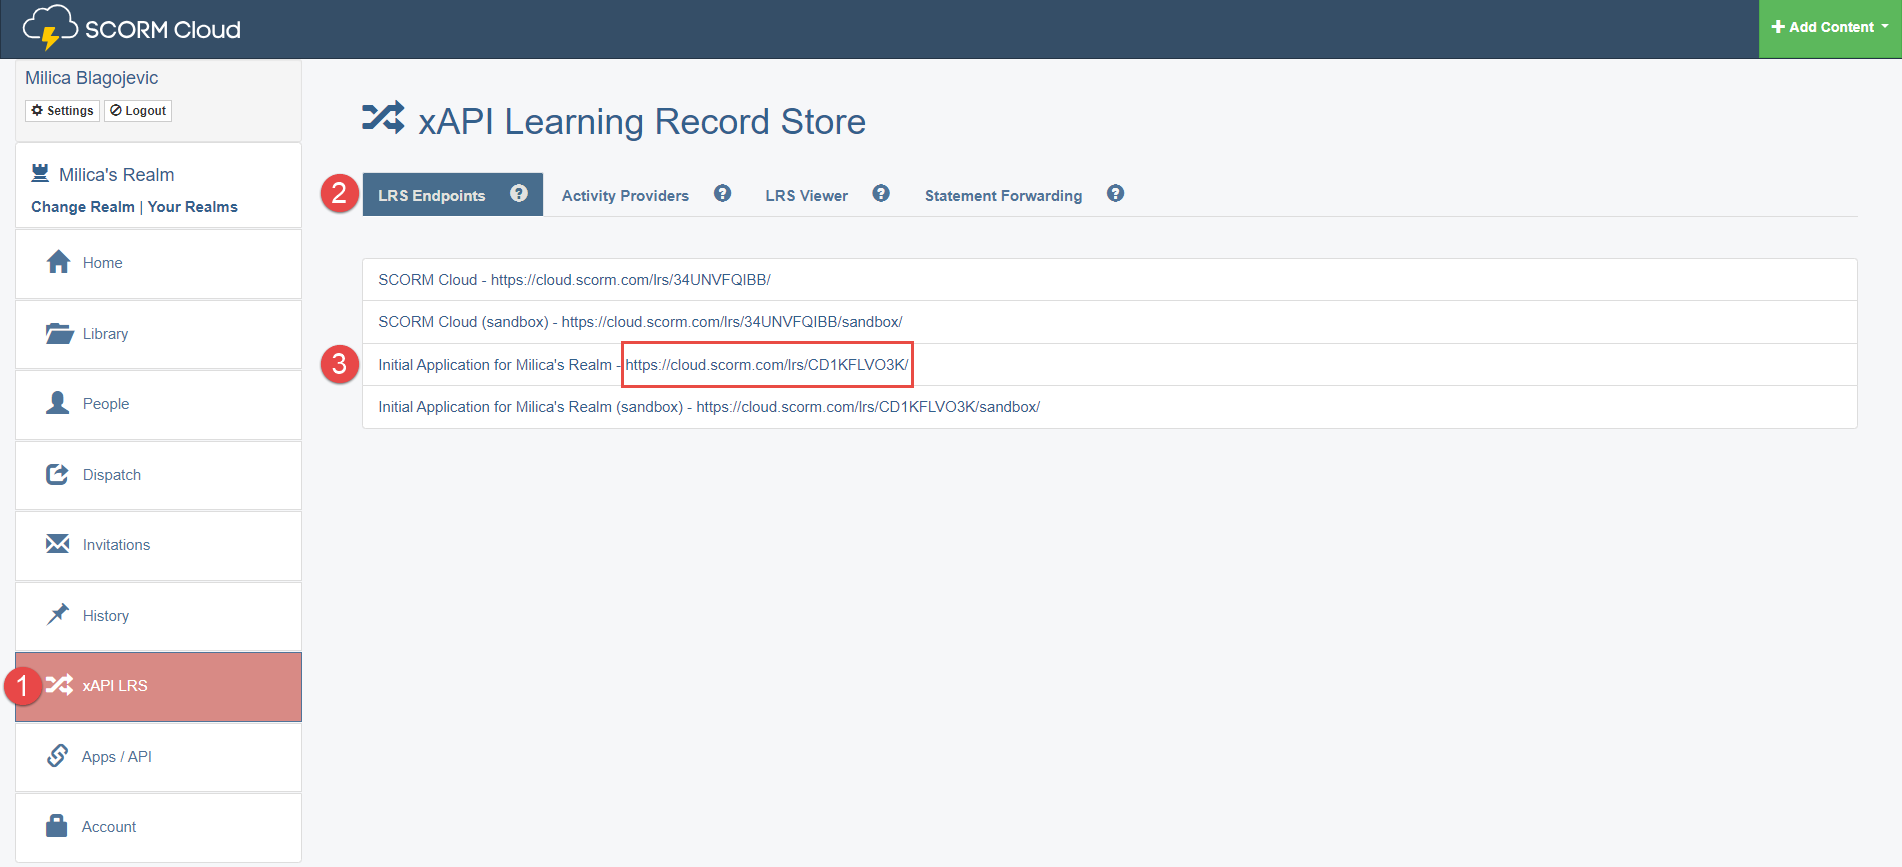
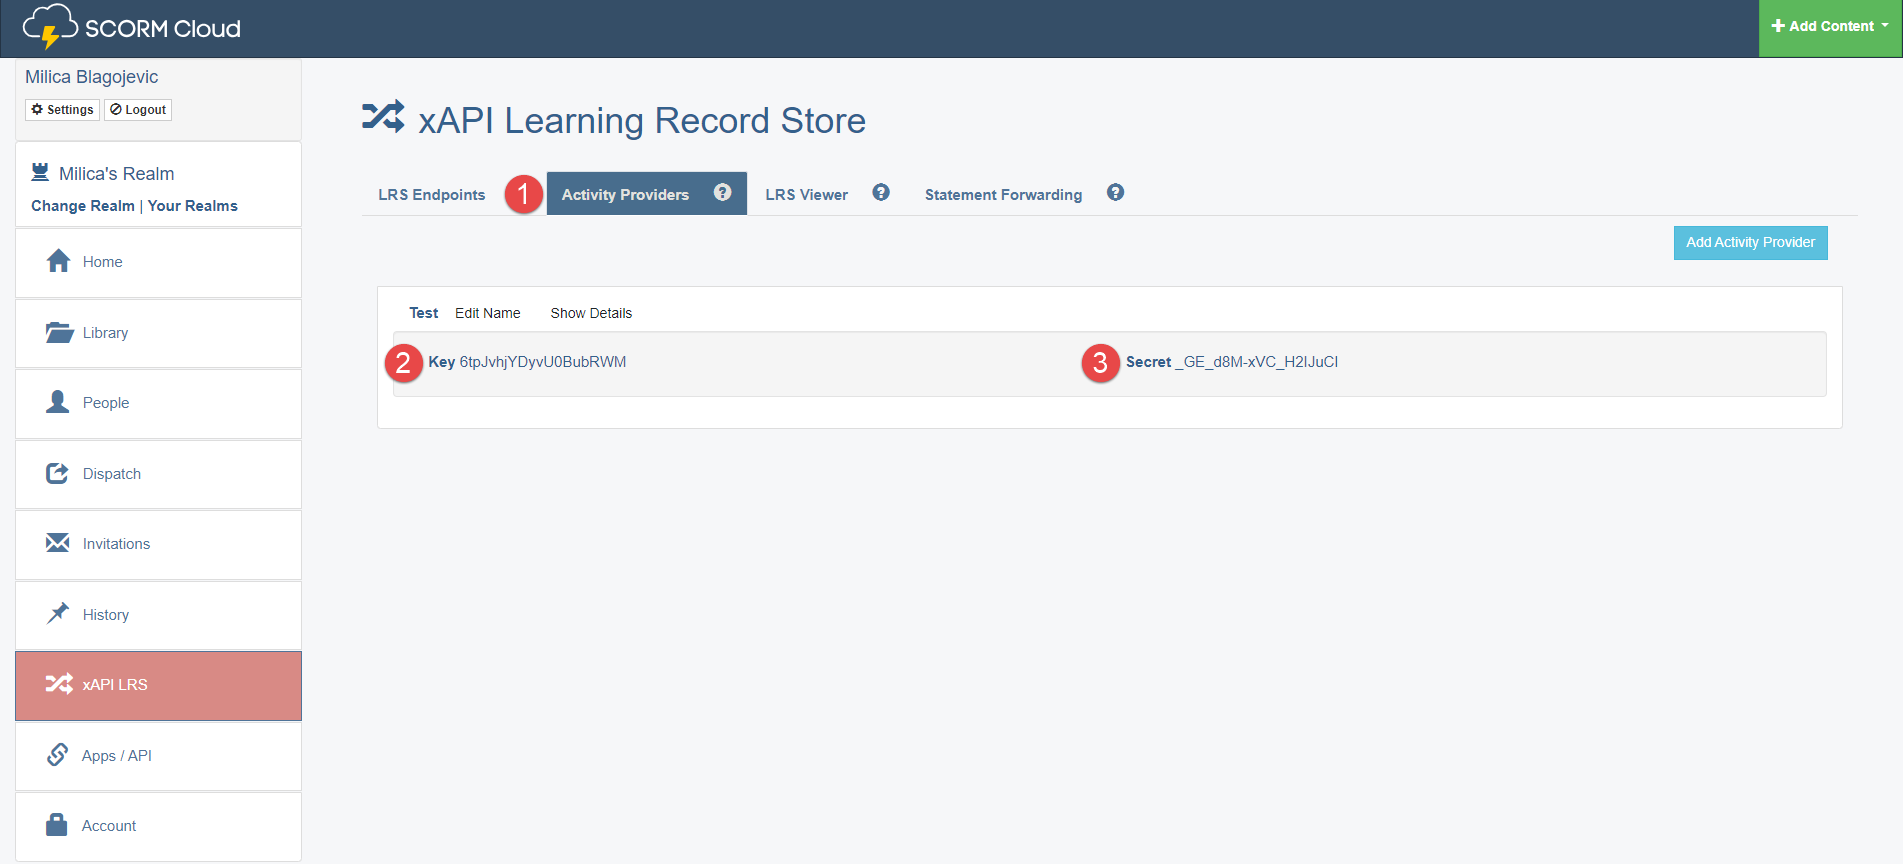
When you log in to the SCORM Cloud, open the xAPI LRS tab.
-
Click the LRS Endpoints tab.
-
Copy the Initial Application Realm URL.
-
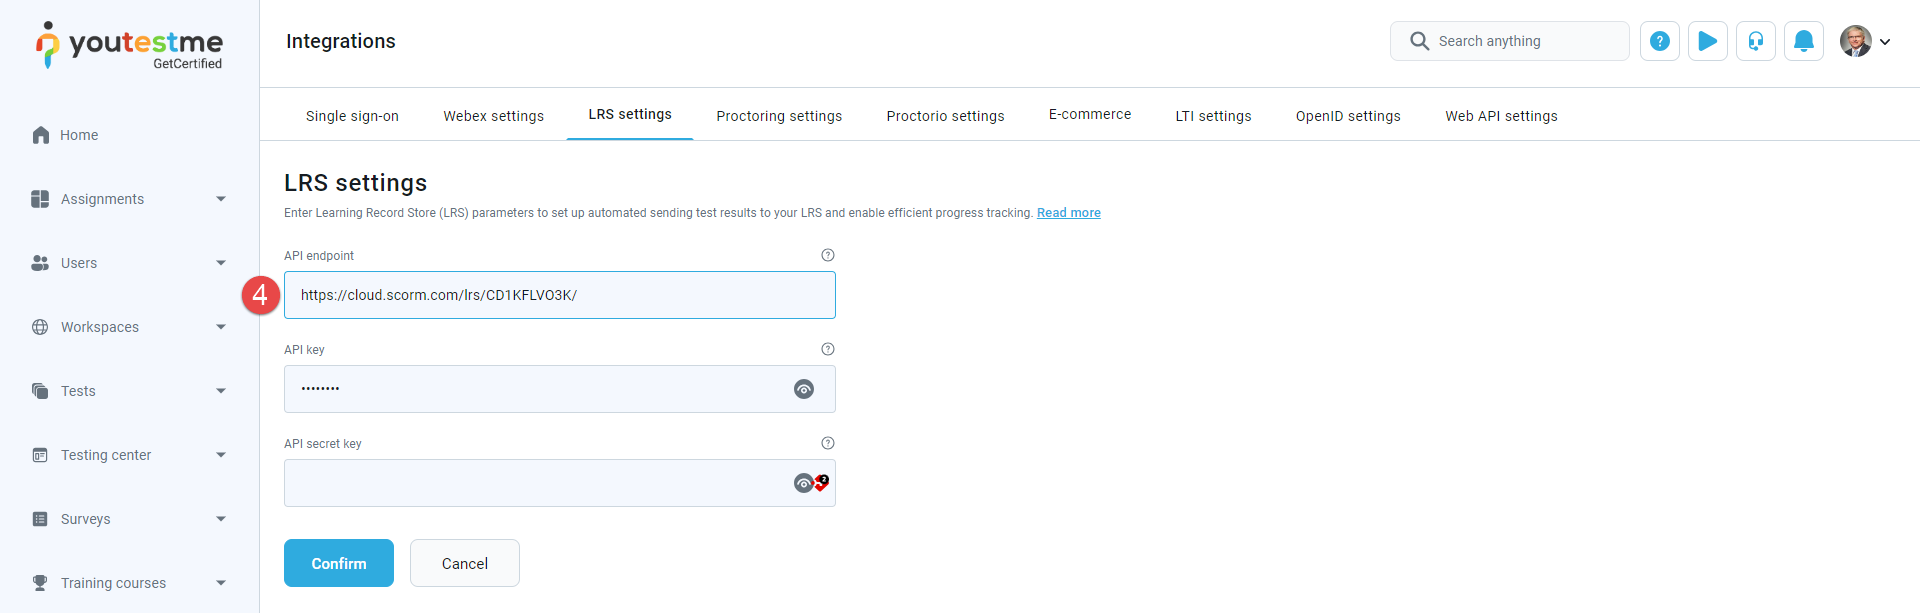
Paste it to the GetCertified application into the API endpoint field.
To configure API endpoint, do the following:
-
When you set the API endpoint, click the Activity Provider tab.
-
Copy the created key.
-
Copy the created secret key.
-
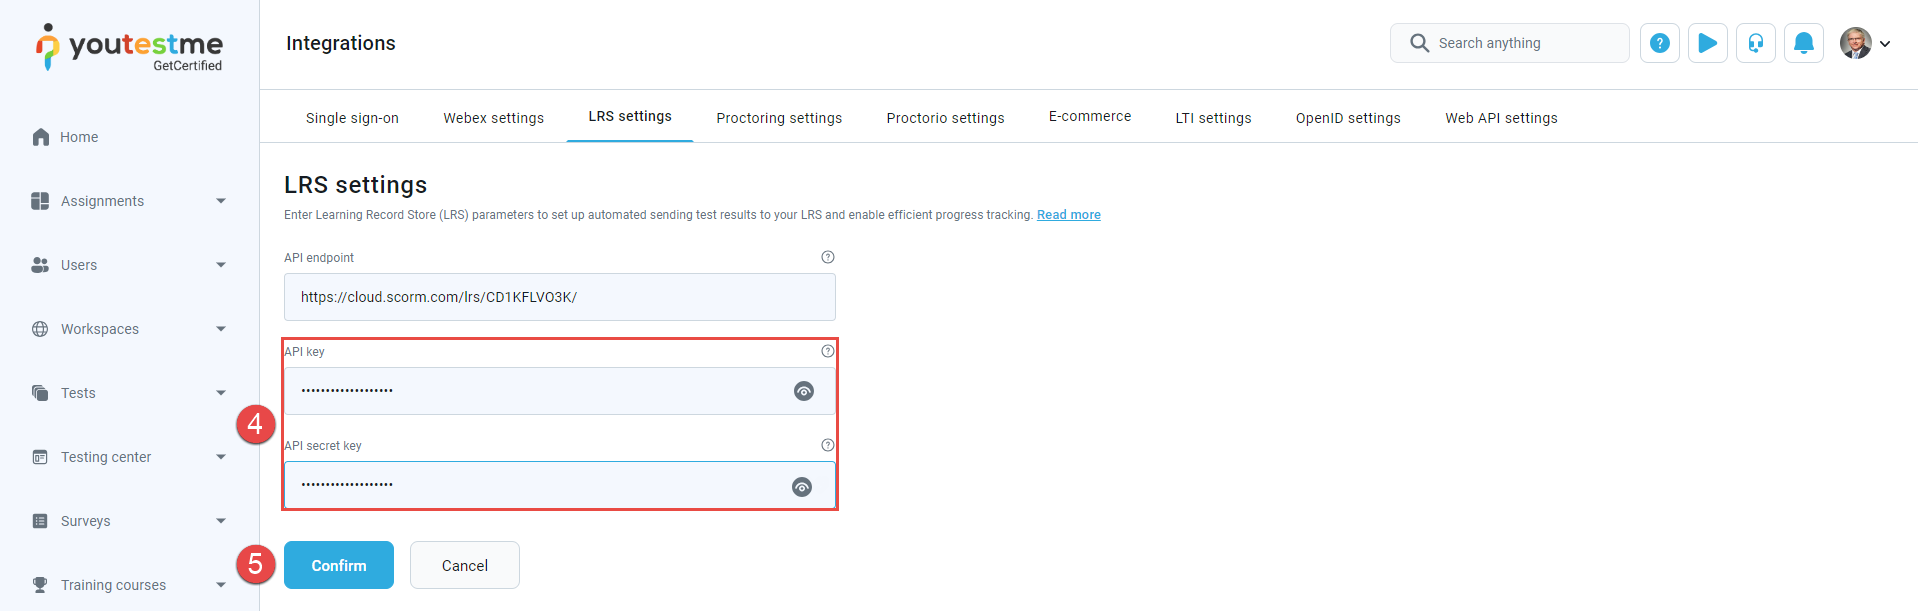
Paste it to the GetCertified application into the API key and API secret key fields.
-
When entering all configuration data, save the changes by clicking the Confirm button.
To configure API key and API secret key, do the following:
-
Select the Testing center/Candidates/Test attempts tab.
-
Select the desired test and session.
-
Select on the Data transfer option and choose Send test results to LRS.
To send test results, follow these steps:
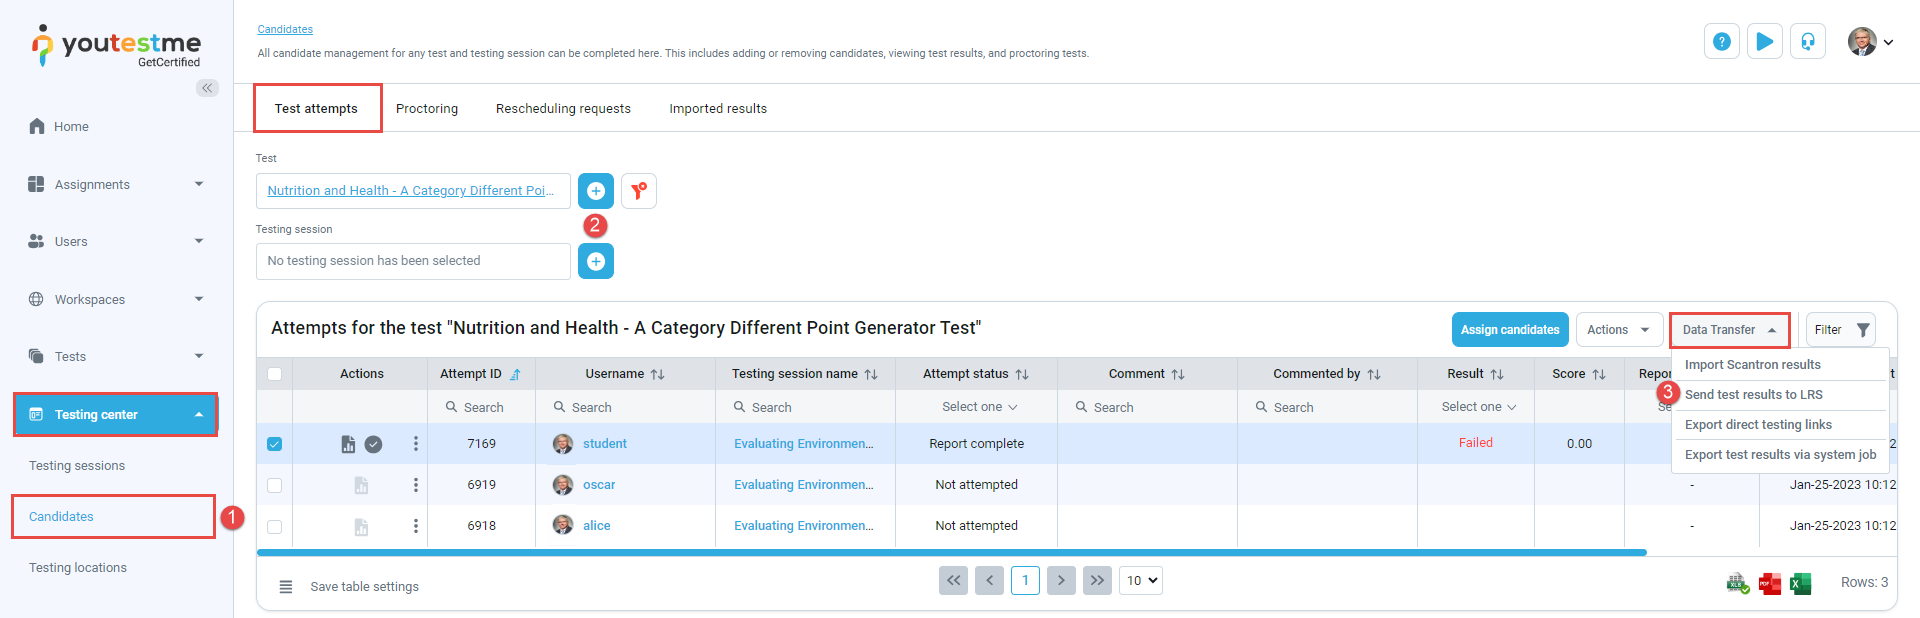
Note: The important is that candidates already took the test, so the results already exist in the application.
-
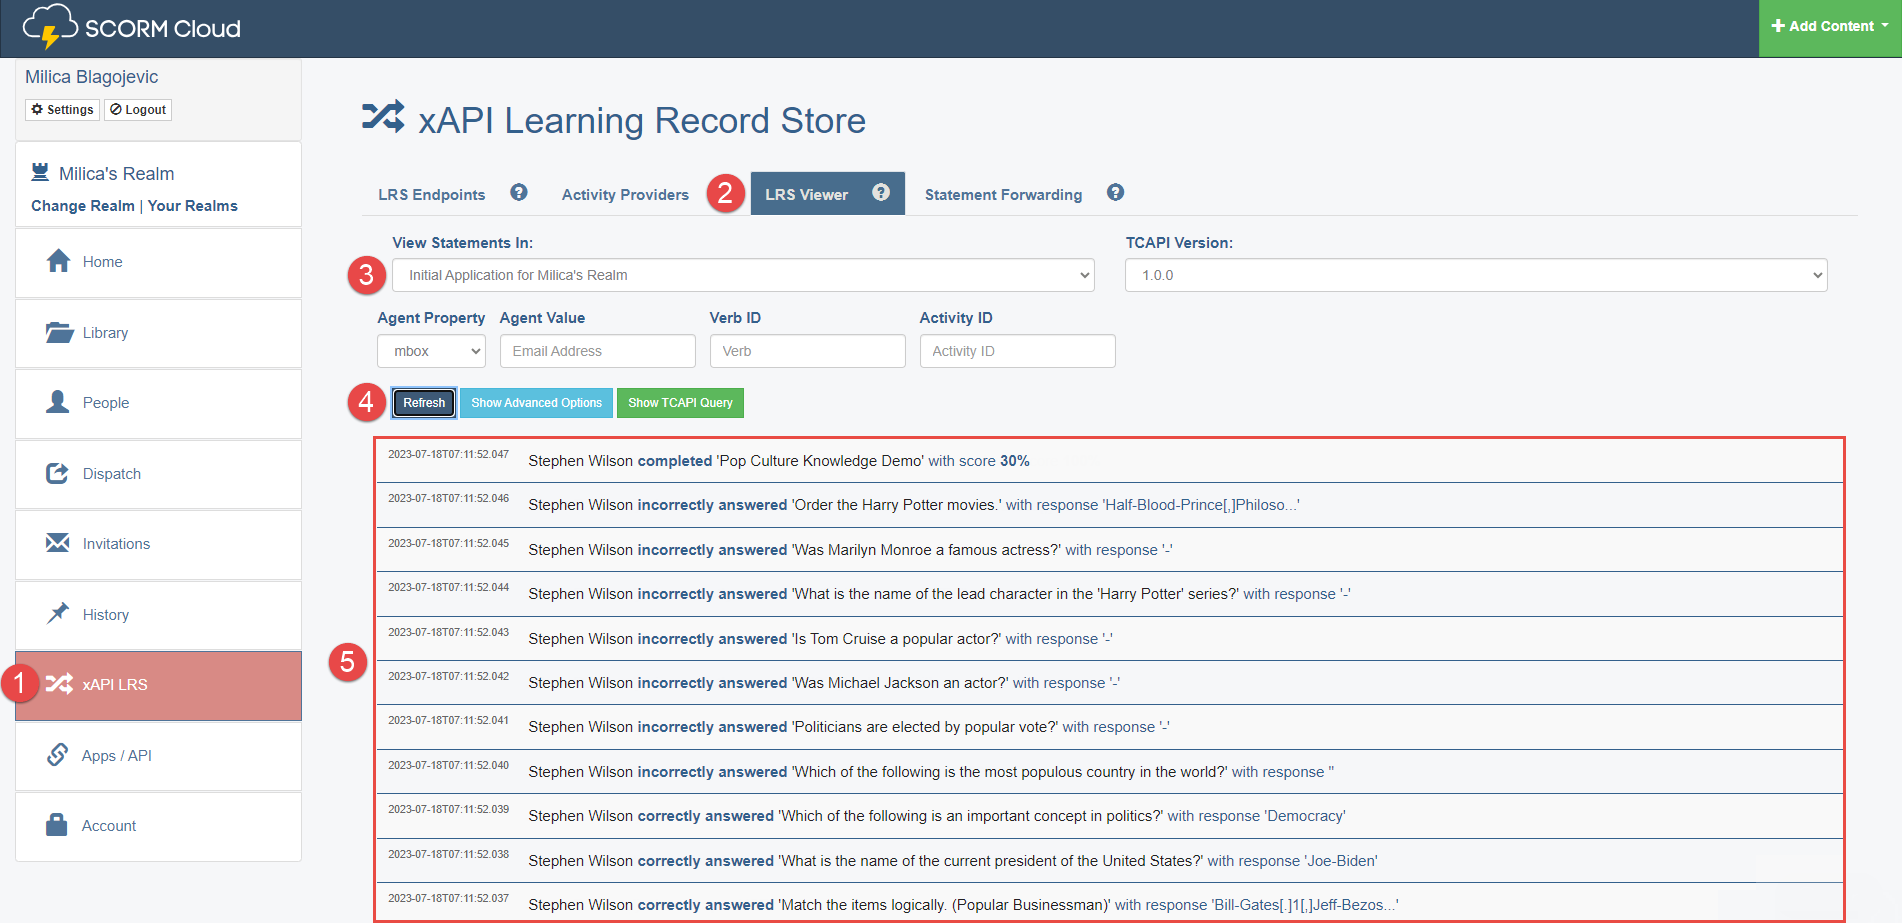
Click the xAPI LRS tab in the main menu.
-
Open the LRS Viewer tab.
-
Choose the right endpoint from the drop-down menu (the one we used for integration).
-
Click the Refresh button.
-
The list of information about which questions the candidate has answered and that the candidate has completed the test should appear.
Once you send the results, go to the SCORM Cloud.
-
-
Active directory
Active directory integration offers a robust solution for managing user authentication and access control within your network infrastructure. By seamlessly connecting YouTestMe to Azure Active Directory through the OpenID Connect (OIDC) protocol, organizations can streamline user authentication processes and ensure secure, unified login experiences across applications. Additionally, synchronization with LDAP directories simplifies user management by maintaining accurate user profiles and enabling efficient authentication within YouTestMe.
To enable user syncing configure integration, fill in the following fields:
LDAP Server - The LDAP (Lightweight Directory Access Protocol) server hosts the directory service where user information is stored. This information is essential for authenticating users and managing access to resources within the network.
Search Base - The search base specifies the starting point in the directory hierarchy where searches for user information will begin. It helps narrow the search scope and ensures efficient retrieval of relevant data.
Search Filter - The search filter defines the criteria for searching for specific user entries within the directory service. It allows administrators to customize the search based on attributes such as usernames, group memberships, or organizational units.
Service Account - The service account is a dedicated user account with permissions to access the directory service and perform necessary operations, such as querying user data. The integration system typically uses this account to authenticate and retrieve user information.
Password - The password is the authentication credential associated with the Service Account. It is required to authenticate the Service Account and establish a secure connection with the LDAP Server for user synchronization and management tasks.
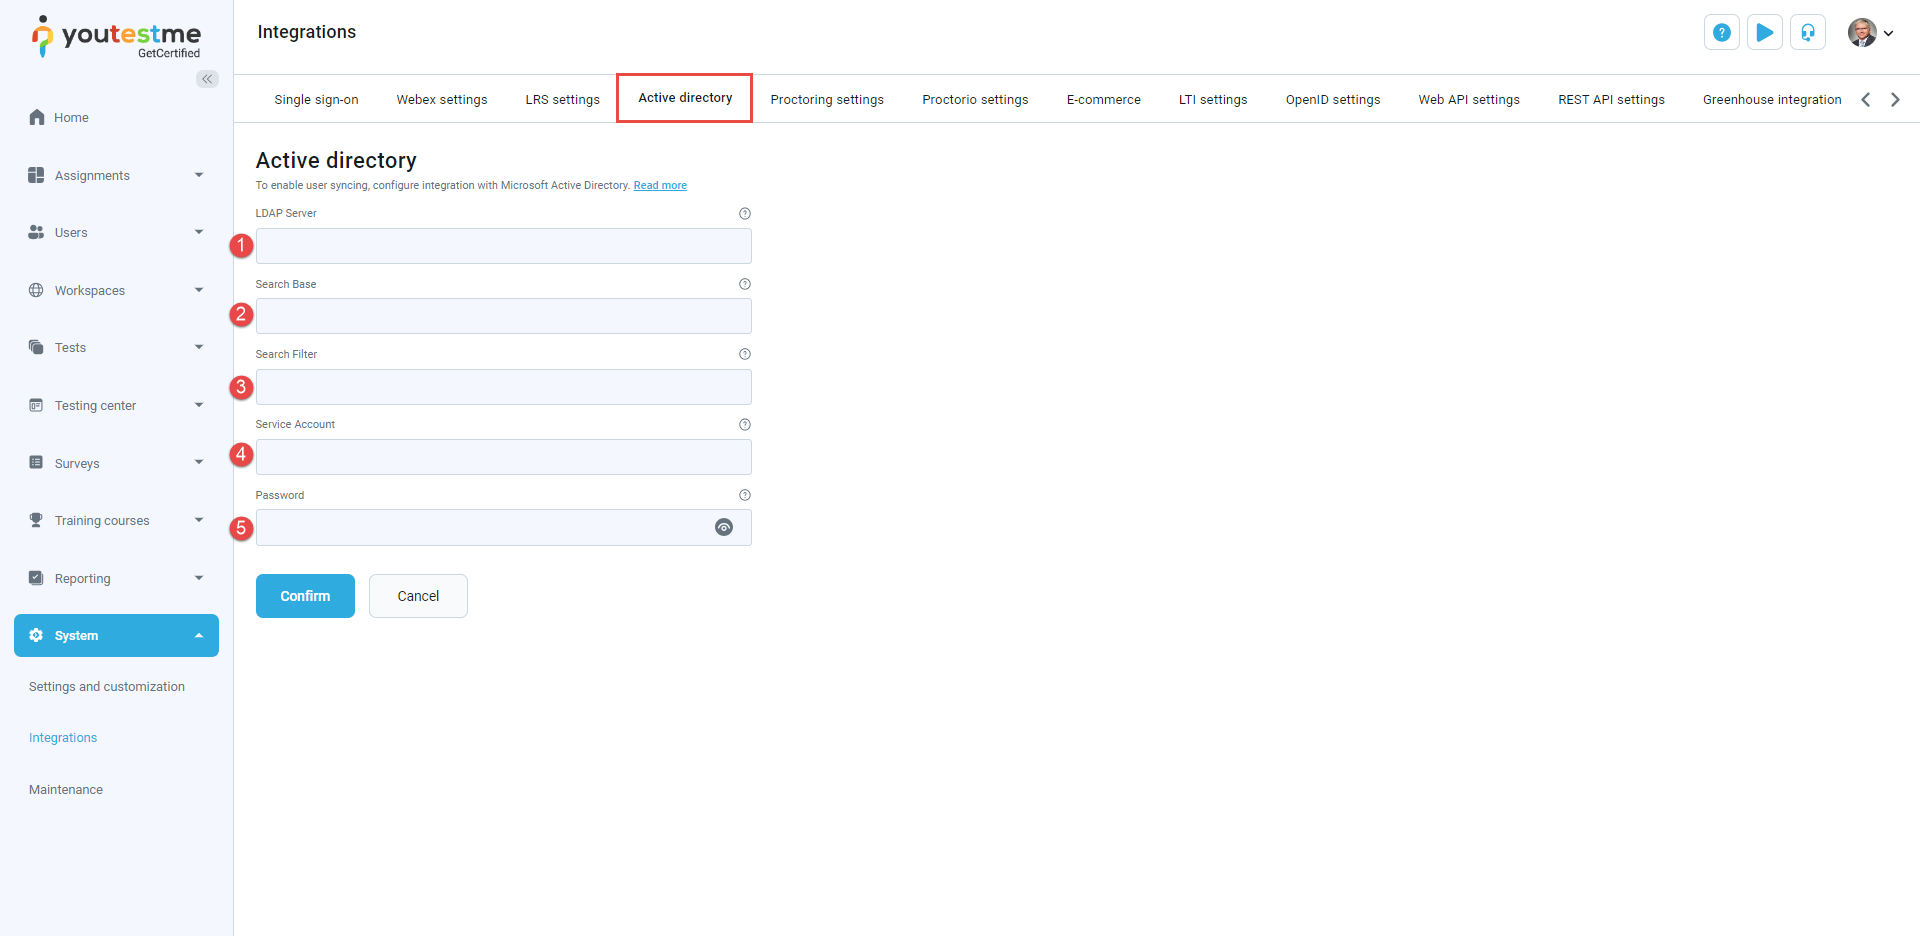
Please visit this page for more detailed instructions on enabling user syncing and configuring integration with Microsoft Active Directory.
-
Proctoring settings
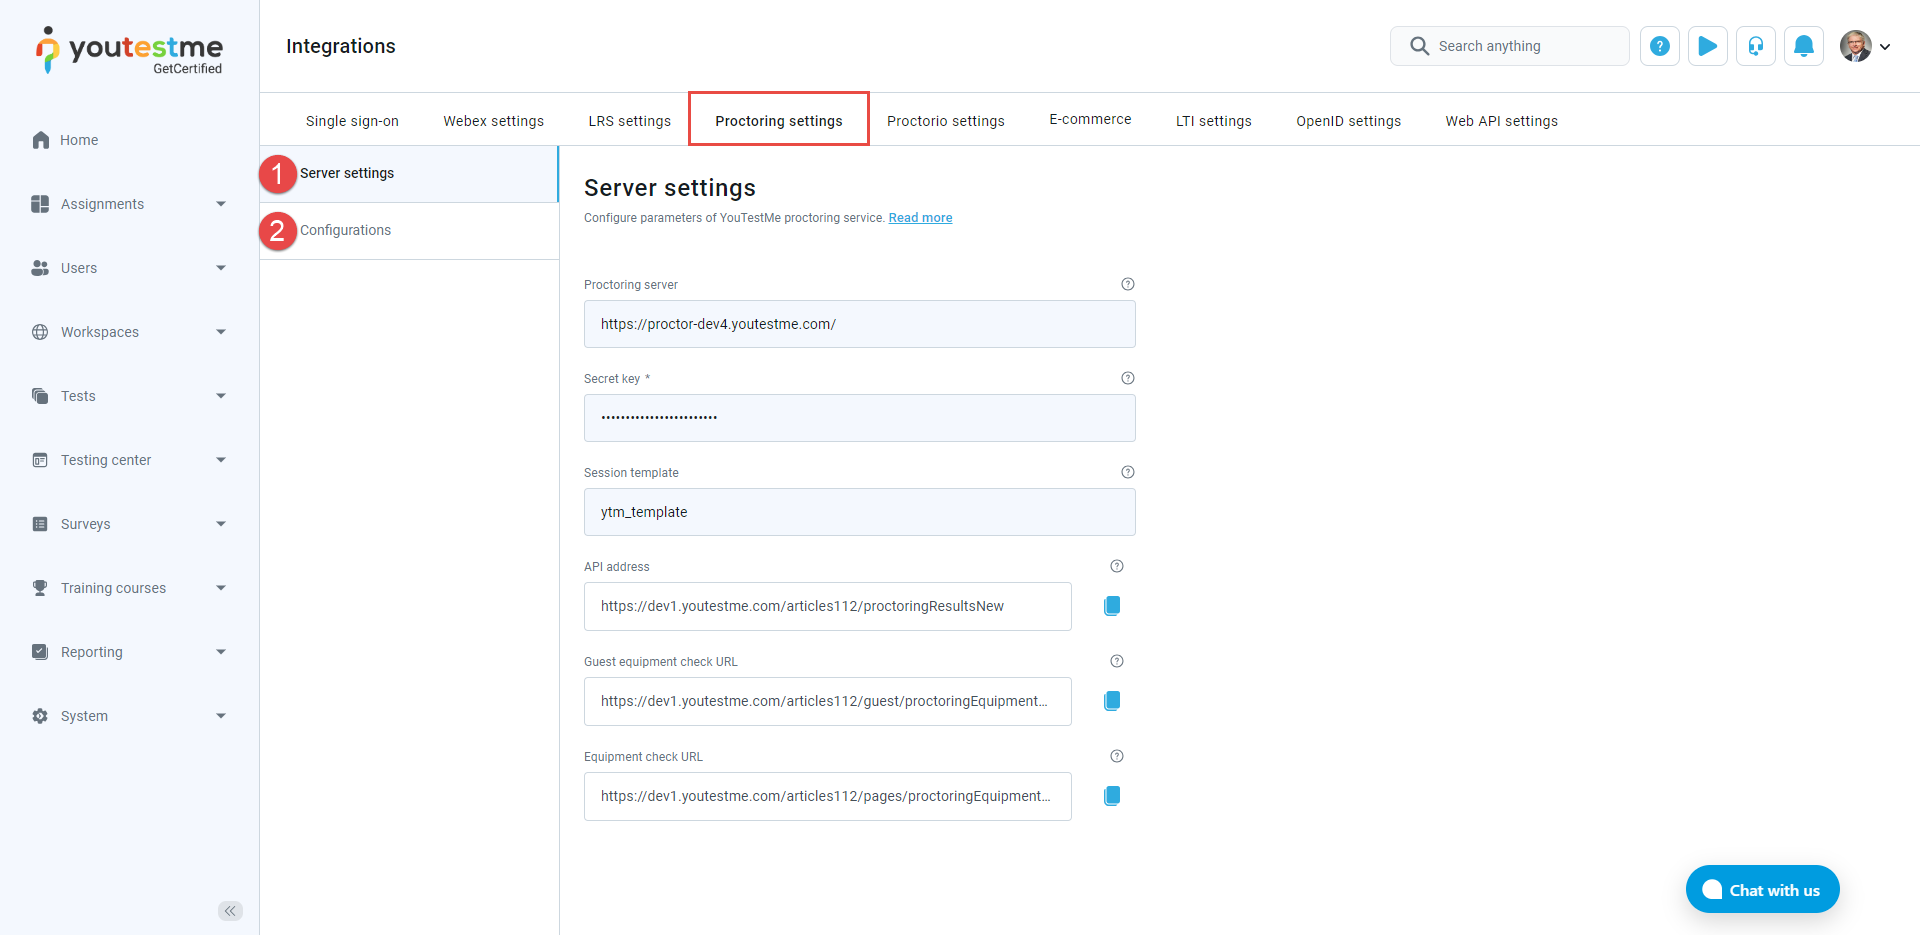
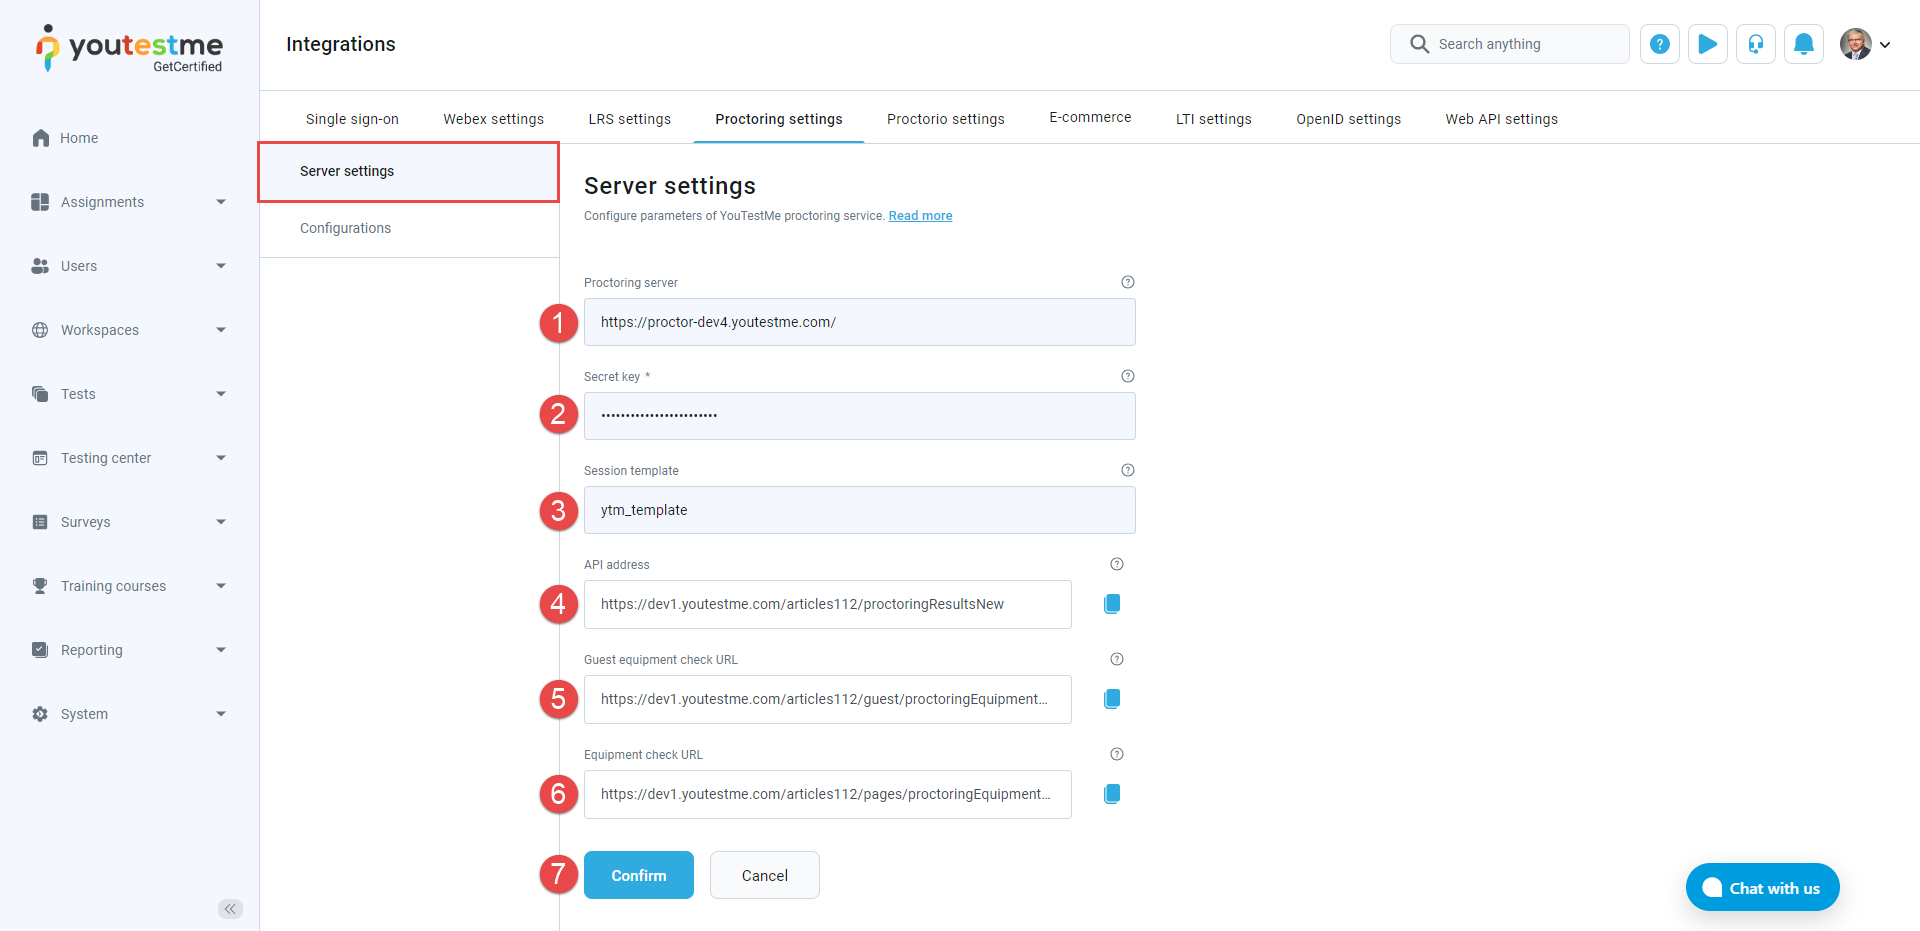
The GetCertified AI proctoring solution provides a completely secure and transparent exam delivery and test-taking process. Upon activation, you will be provided with all the parameters for configuring the Proctoring service. If you request the Proctoring service before the application delivery, all settings will already be configured.
Note: Proctoring service can be enabled upon request. For more information, contact the YouTestMe team at sales@youtestme.com.
-
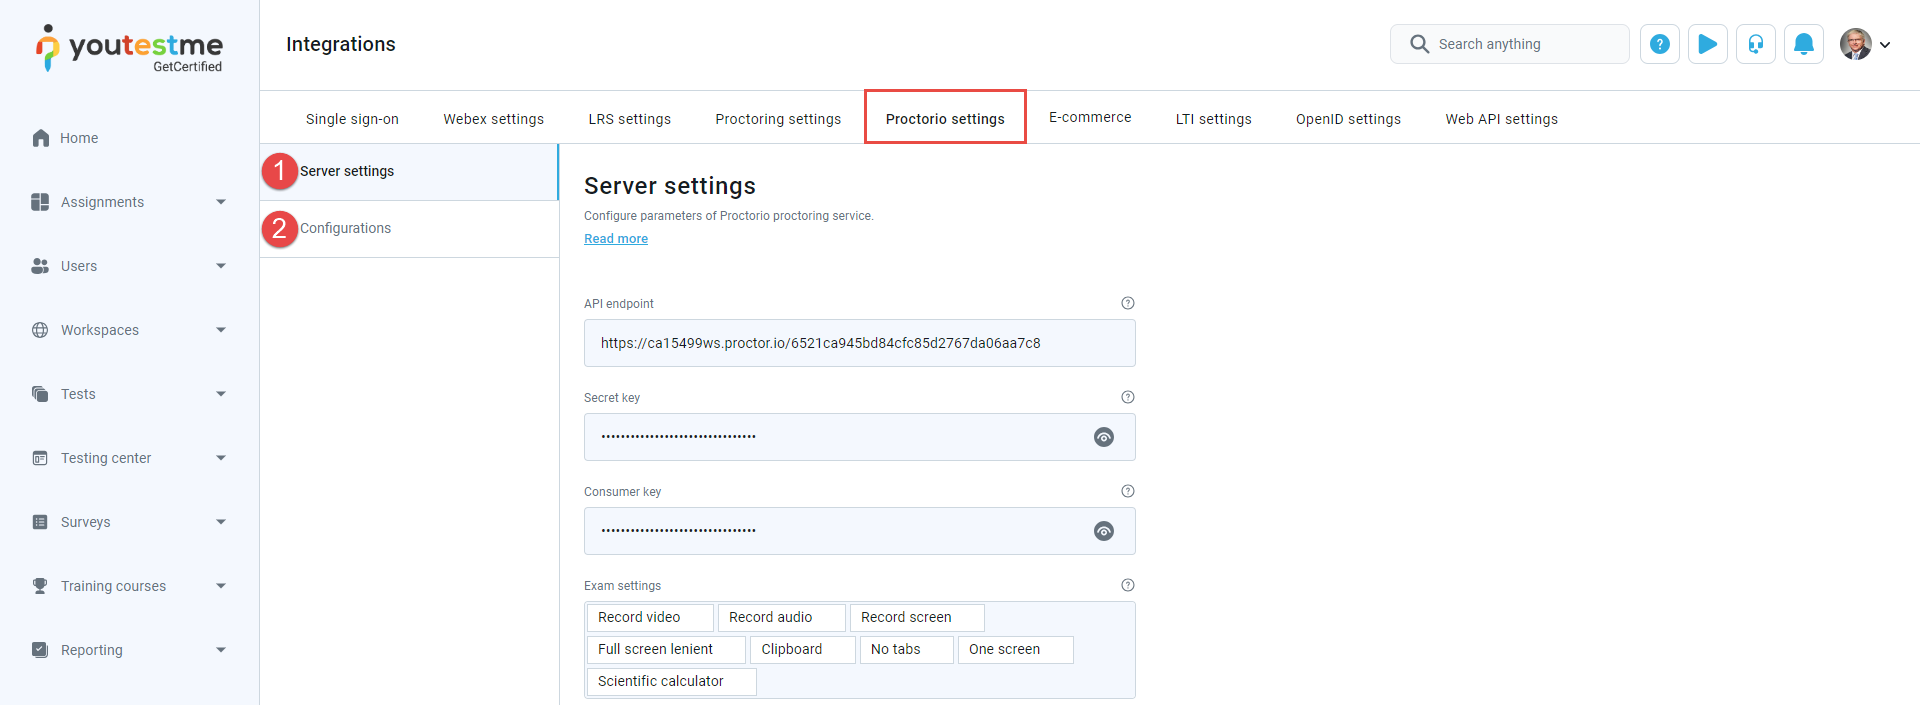
Configure Server settings.
-
Preview the existing proctoring configurations.
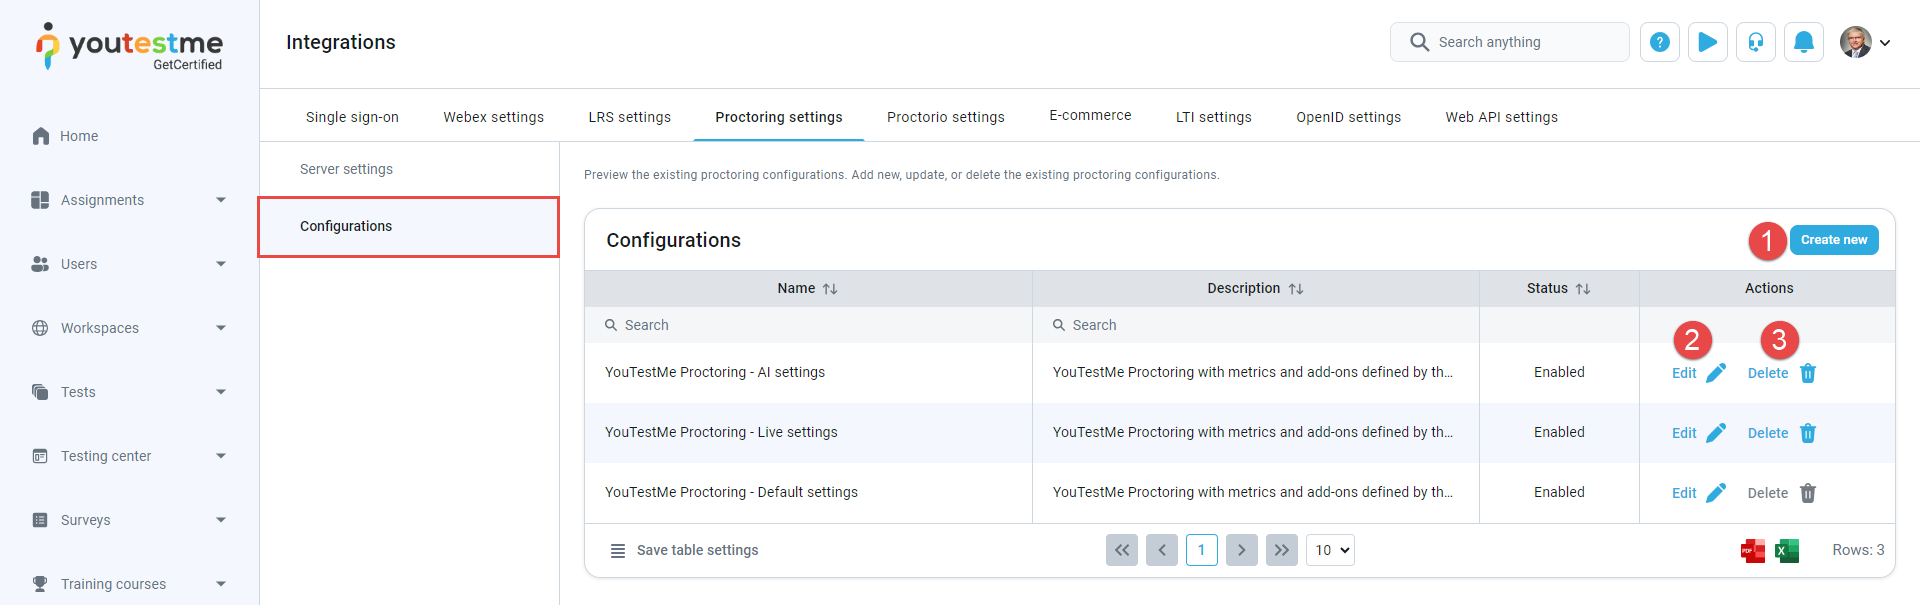
On Proctoring settings tab, you can perform the following actions:
-
Enter the Proctoring server URL. This parameter represents the web address of the Proctoring server and will be provided by YouTestMe (e.g., https://demo.proctoring.com).
-
Enter the Secret key provided by YouTestMe. Secret key is used for authenticating JWT and will be sent to the Proctoring server.
-
Enter the Session template name. This parameter represents the name of the Proctoring session template created in the Proctoring application. The session template specifies the settings and metrics for the Proctoring session. Enter the default for the default session template.
-
Use the API address of your server to receive proctoring results for each completed test. This API address is provided by YouTestMe and usually consists of a combination of the URL address of the GetCertified application and one of the endpoints (/proctoringResultsNew, /proctoringResults) of the Proctoring service. This address represents the server where the proctoring results will be sent. To easily copy the API address to the clipboard, click the Copy to clipboard icon.
-
Use the Guest equipment check URL provided by YouTestMe. At this link, the user can check the equipment for a proctored test without signing in to the system. The link is a parameter of the email notifications and can be sent or shared with users to check their equipment without signing in to the system.
-
Use the Equipment check URL provided by YouTestMe. At this link, the user can check the equipment for a proctored test but must be signed in to the system. The link is available on the Assignments page.
-
Click the Confirm button if you want to save the Proctoring configuration.
To configure proctoring server settings, do the following:
-
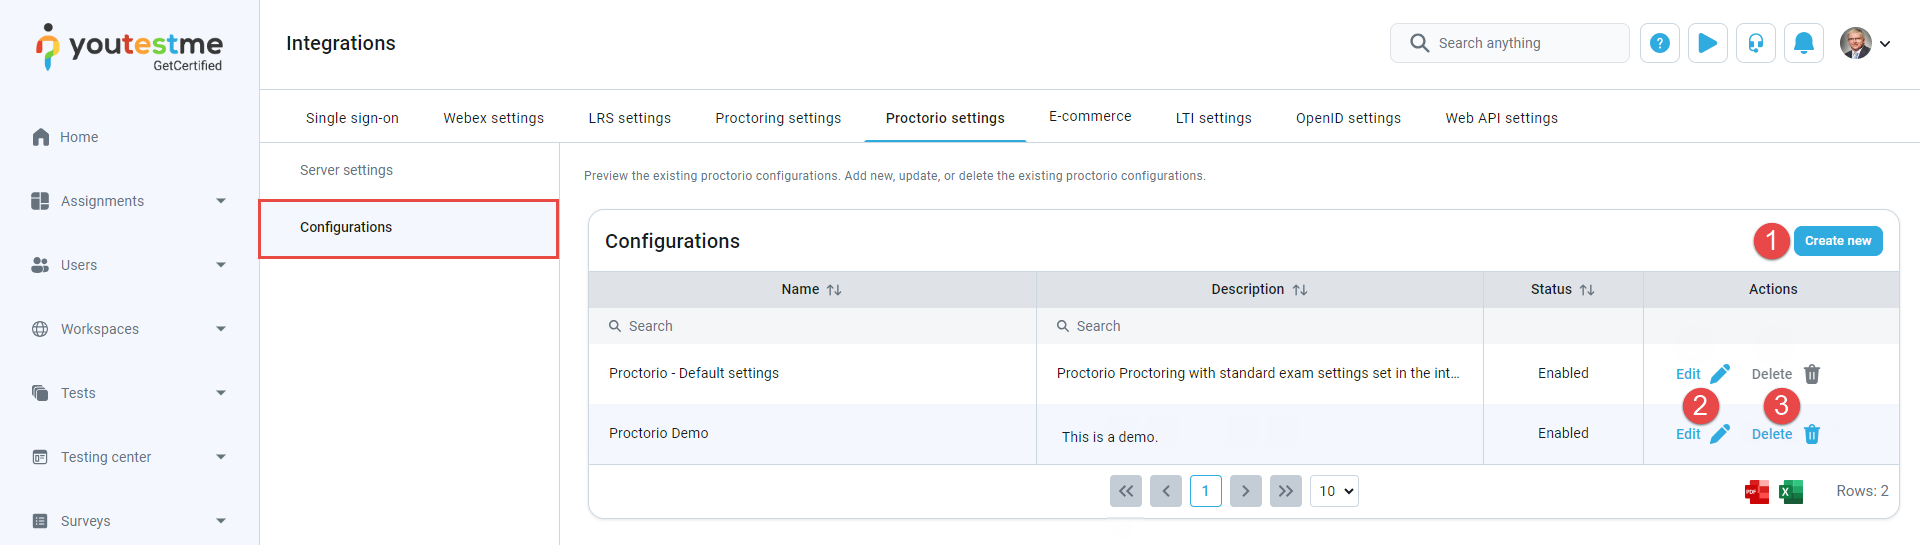
Add new configurations. Click the Create new button to initiate the creation of a new Proctoring configuration. A new pop-up window will appear, allowing you to enter the necessary parameters for the configuration.
-
Preview or edit the existing configurations. Click the Edit button to preview or edit an existing Proctoring configuration. A new pop-up window will open, displaying the configuration parameters you can preview or edit as needed.
-
Delete existing configurations. Click the Delete button if you wish to remove a Proctoring configuration. Confirm the deletion when prompted to delete the configuration permanently.
On the Configurations tab, you will find a table displaying all proctoring configurations. The table includes information such as configuration names, descriptions, statuses, and available actions. Here are the actions you can perform related to proctoring configurations:
-
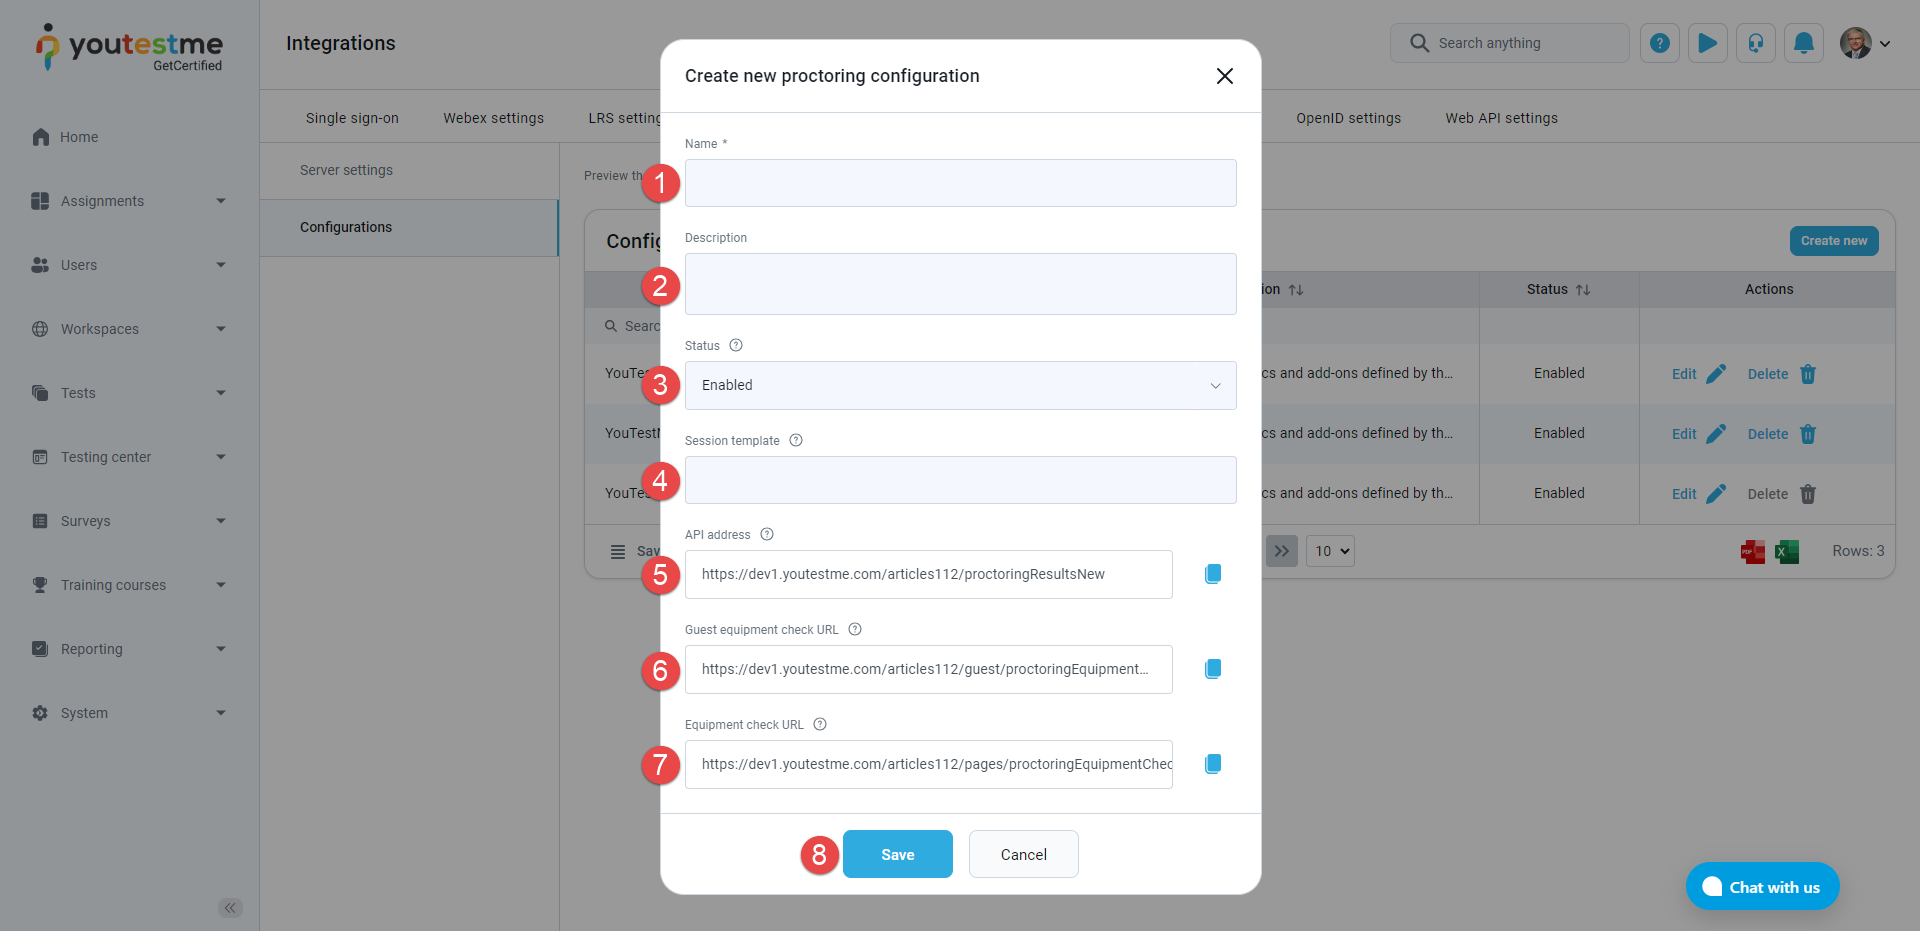
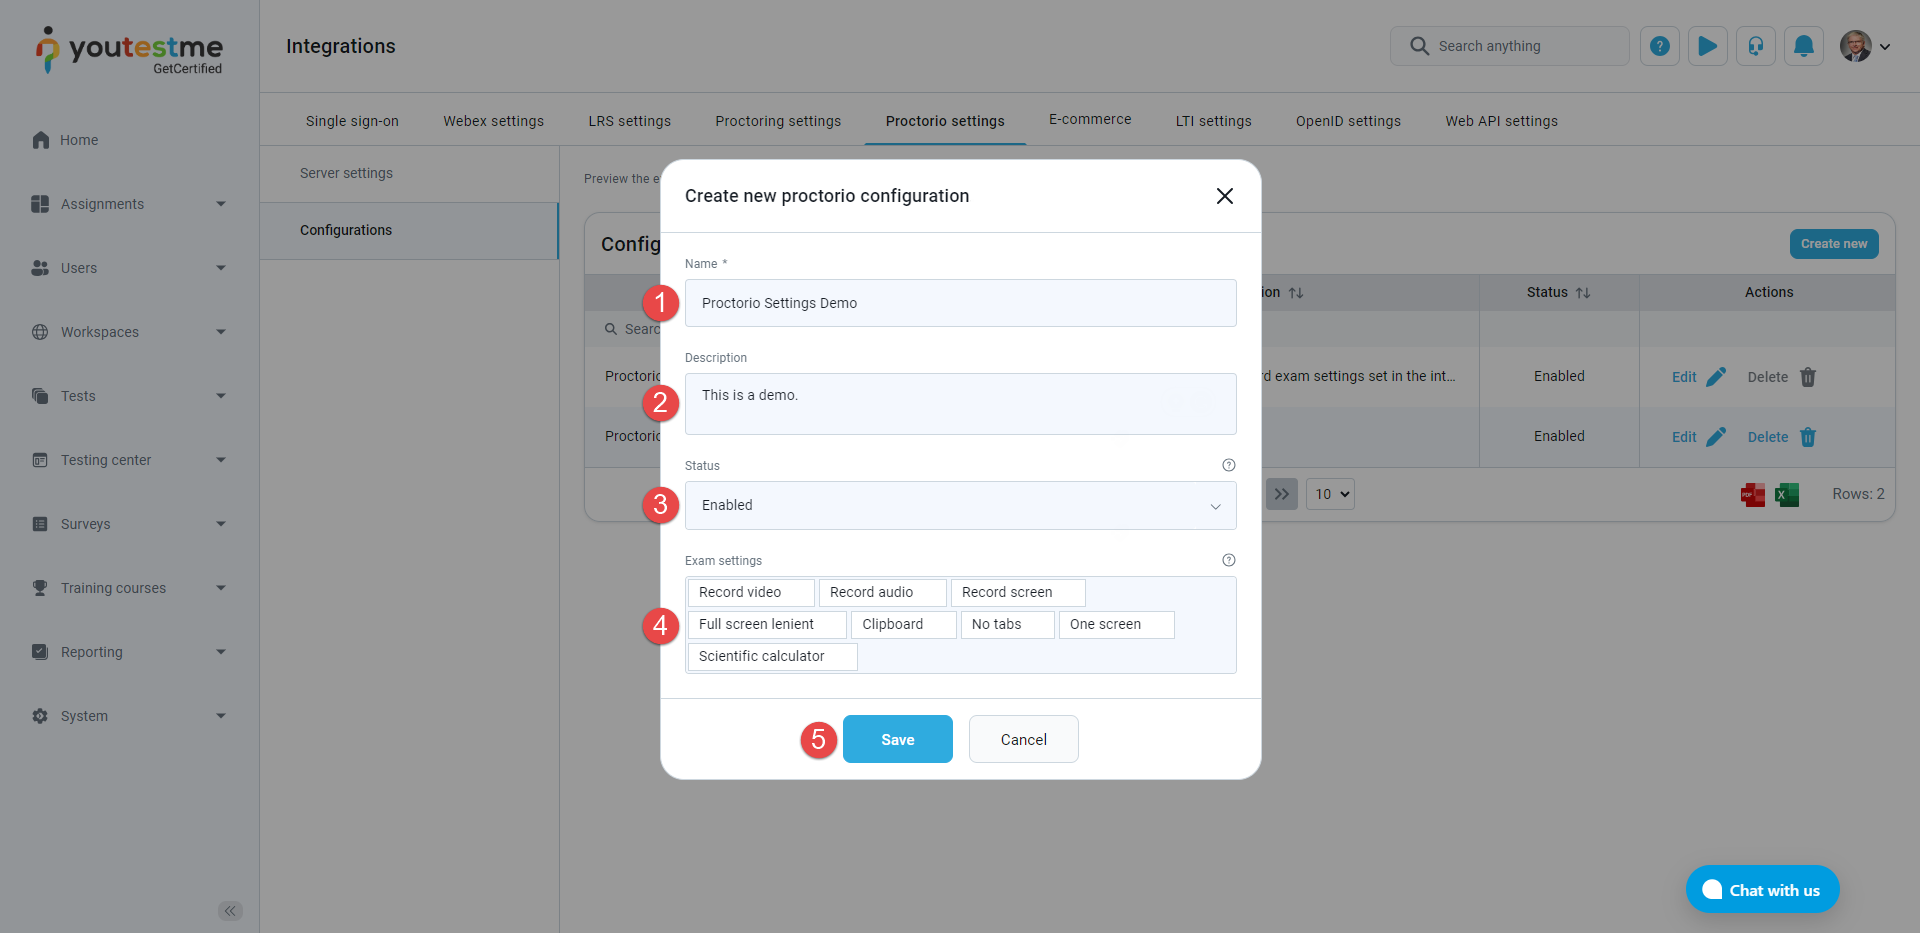
Enter the Name of the Proctoring configuration.
-
Optionally enter the Description of the Proctoring configuration.
-
Choose the Status of the Proctoring configuration. If the status is Enabled, the configuration can be used, otherwise not.
-
Enter the Session template name. This parameter represents the name of the Proctoring session template created in the Proctoring application. The session template specifies the settings and metrics for the Proctoring session. When creating a new configuration, the default value is equal to the Session template in Server settings.
-
Use the API address of your server to receive proctoring results for each completed test. This API address is provided by YouTestMe and usually consists of a combination of the URL address of the GetCertified application and one of the endpoints (/proctoringResultsNew, /proctoringResults) of the Proctoring service. This address represents the server where the proctoring results will be sent. To easily copy the API address to the clipboard, click the Copy to clipboard icon.
-
Use the Guest equipment check URL provided by YouTestMe. At this link, the user can check the equipment for a proctored test without signing in to the system. The link is a parameter of the email notifications and can be sent or shared with users to check their equipment without signing in to the system.
-
Use the Equipment check URL provided by YouTestMe. At this link, the user can check the equipment for a proctored test but must be signed in to the system. The link is available on the Assignments page.
-
Click the Save button to save the Proctoring configuration.
The steps to create a new, or update an existing Proctoring configuration are listed below and marked on the image below:
Check the links below for more information on how proctoring works.
Test from the proctor’s perspective
Test from a candidate’s perspective
Create Proctored Test & Assign Proctors
-
-
Proctorio settings
Proctorio is an automated proctoring tool integrated with the GetCertified application. This integration ensures the total learning integrity of every assessment using state-of-the-art technology. It eliminates human error, bias, and much of the expense associated with remote proctoring and identity verification. The system automatically monitors the test attempt using behavioral trackers and records the entire process, marking the moments of suspicious behaviors. Once the exam is finished, the system stores the footage for subsequent human review and validation. Upon the activation, you will be provided with the necessary parameters to configure the integration with Proctorio.
Note: Proctorio service can be enabled upon request. For more information, contact the YouTestMe team at sales@youtestme.com.
-
Configure Server settings.
-
Preview the existing proctorio configurations.
On Proctorio settings tab, you can perform the following actions:
-
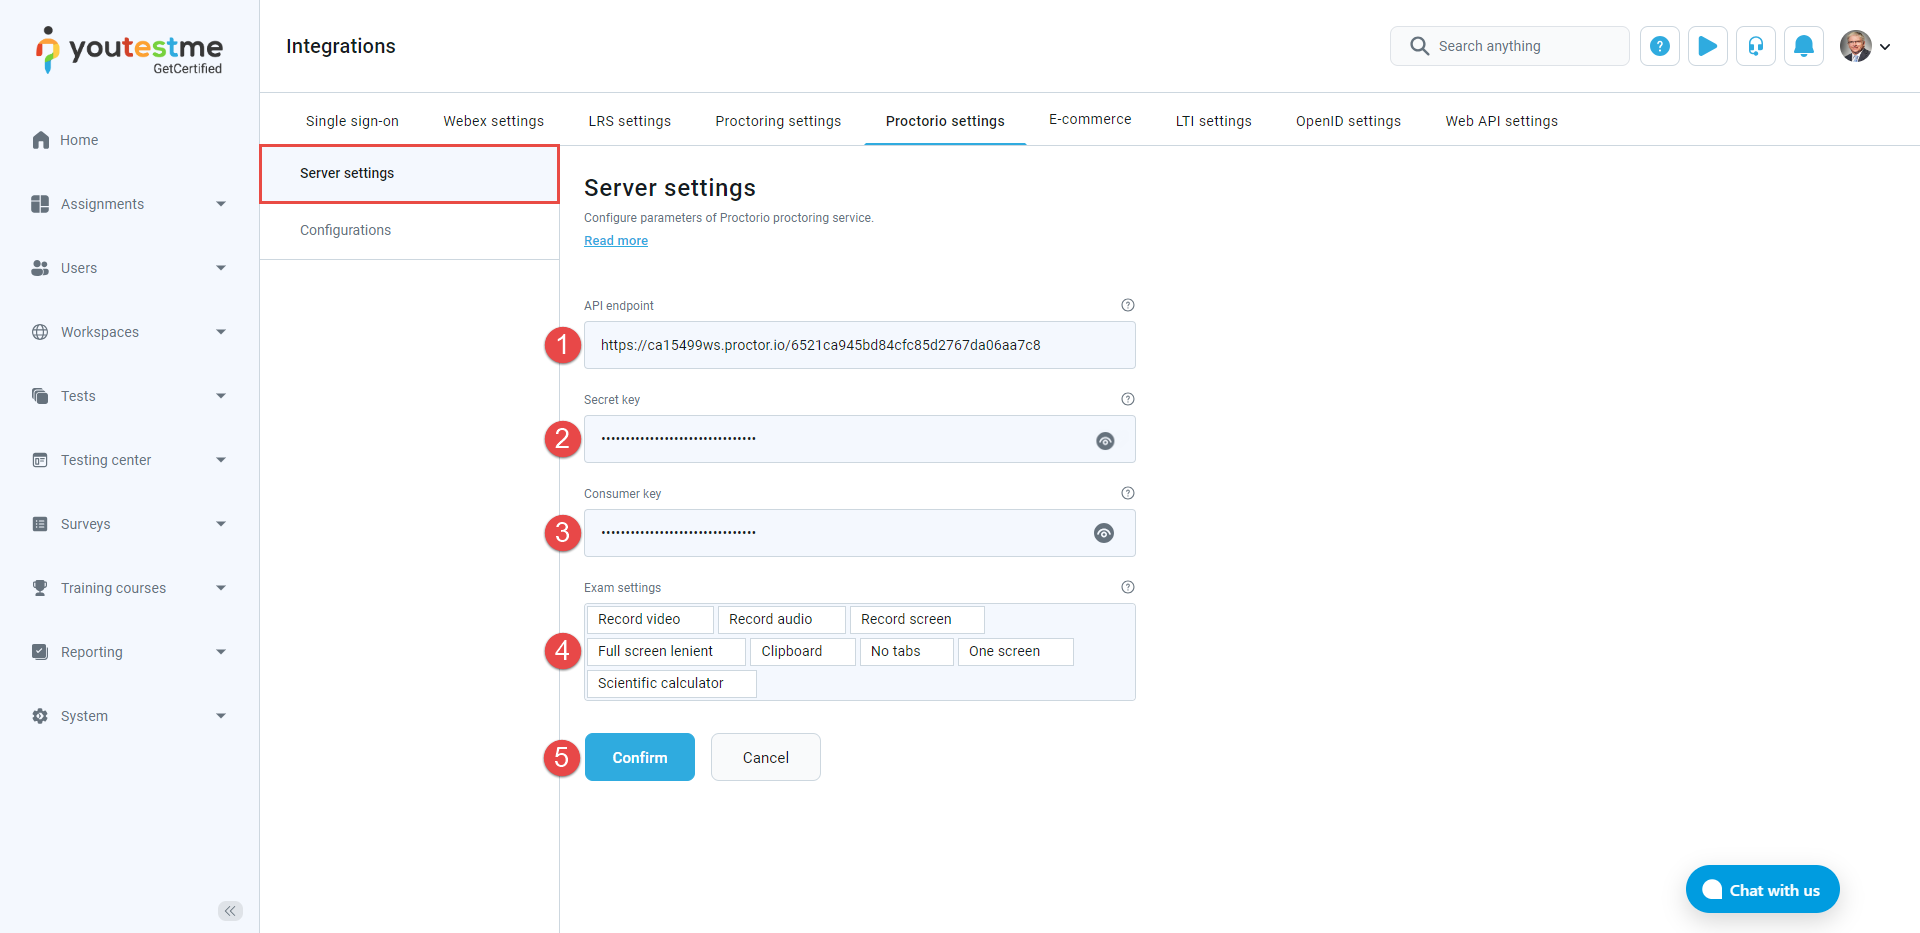
Enter the API endpoint. This parameter represents the URL of the Proctorio API endpoint to create exam URLs.
-
Enter the Secret key provided by GetCertified or Proctorio.
-
Enter the Consumer key provided by GetCertified or Proctorio.
-
Choose the Exam settings from the dropdown menu. Exam settings enable you to choose the Proctorio features you want to add and control during the proctoring session.
-
Click the Confirm button if you want to save the Proctorio integration settings.
To configure Proctorio server settings, do the following:
Note: Contact your Proctorio representative to get these parameters.
-
Add new configurations. Click the Create new button to initiate the creation of a new Proctorio configuration. A new pop-up window will appear, allowing you to enter the necessary parameters for the configuration.
-
Preview or edit the existing configurations. Click the Edit button to preview or edit an existing Proctorio configuration. A new pop-up window will open, displaying the configuration parameters you can preview or edit as needed.
-
Delete existing configurations. Click the Delete button if you wish to remove a Proctorio configuration. Confirm the deletion when prompted to delete the configuration permanently.
On the Configurations tab, you will find a table displaying all Proctorio configurations. The table includes information such as configuration names, descriptions, statuses, and available actions. Here are the actions you can perform related to Proctorio configurations:
-
Enter the Name of the Proctorio configuration.
-
Optionally enter the Description of the Proctorio configuration.
-
Choose the Status of the Proctorio configuration. If the status is Enabled, the configuration can be used, otherwise not.
-
Choose the Exam settings from the dropdown menu. Exam settings enable you to choose the Proctorio features you want to add and control during the proctoring session. When creating a new configuration, the default value is equal to the Exam settings in Server settings.
-
Click the Save button to save the Proctorio configuration.
The steps to create a new, or update an existing Proctorio configuration are listed below and marked on the image below:
Check the links below for more information on how proctorio works.
-
-
E-commerce
The E-commerce functionality on GetCertified, allows you to handle payments for registration fees and course and session enrollments using Stripe as the payment gateway.
Note: E-commerce feature can be enabled upon request. For more information, contact the YouTestMe team at sales@youtestme.com.
On the E-commerce tab, you can set the prices for exam booking and training courses.
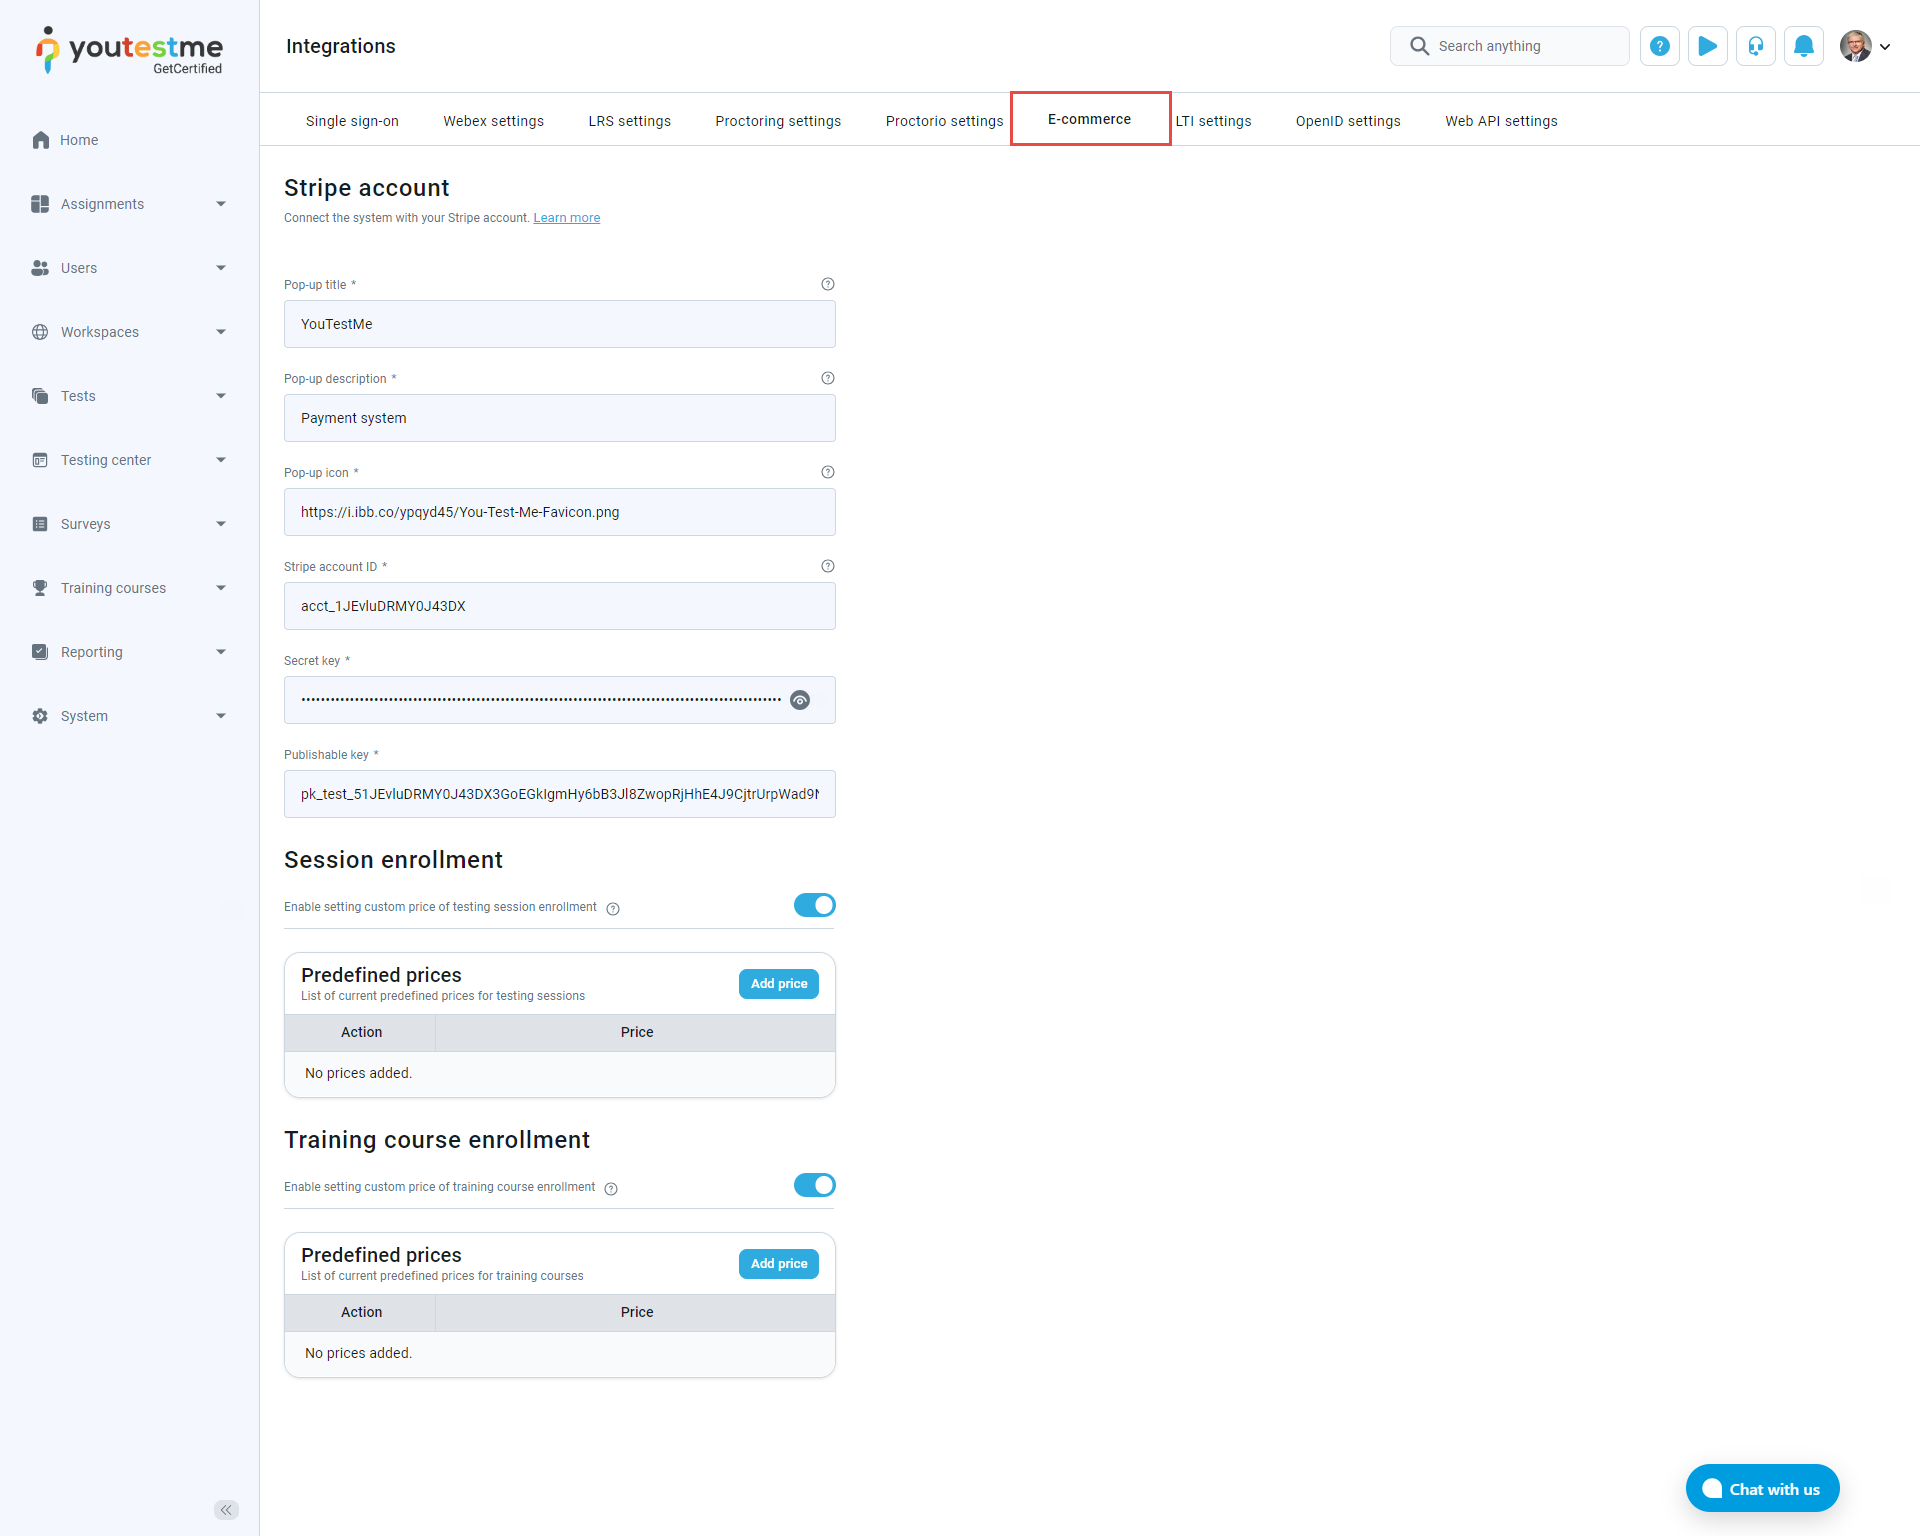
To set up E-commerce, you must have a Stripe account and connect it with GetCertified.
-
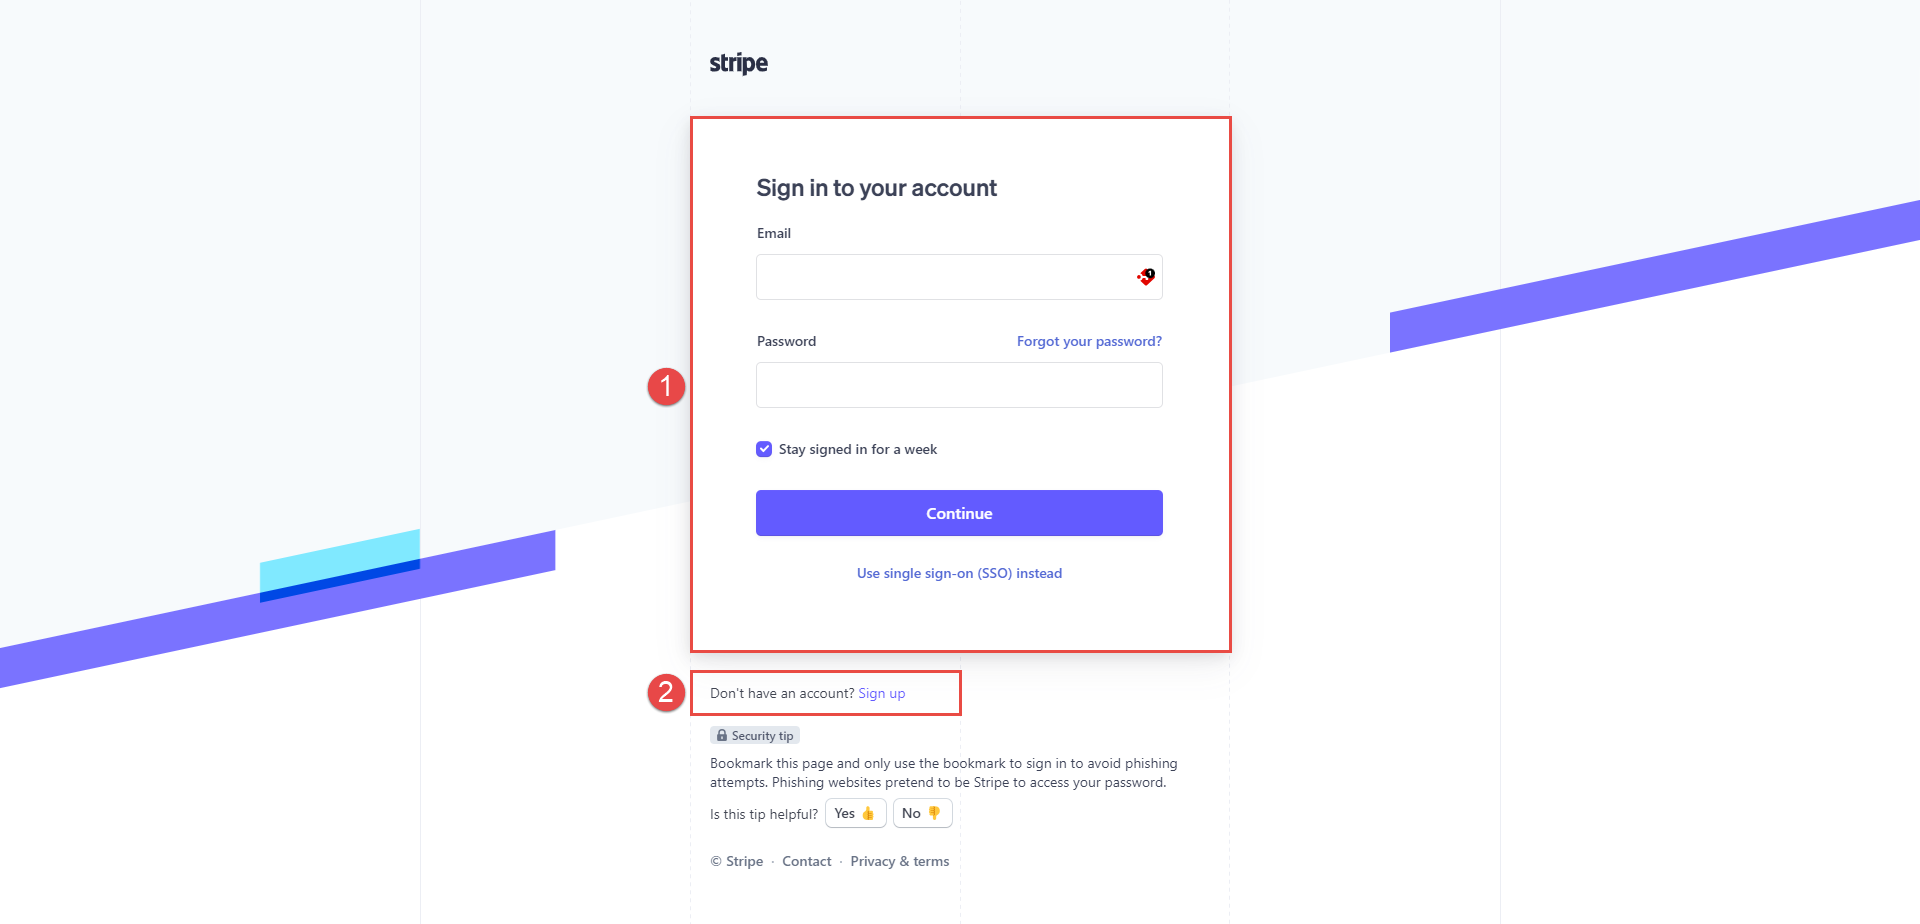
Log in to the existing Stripe account.
-
Or, create a new account by clicking the Sign up option. For instructions on creating a new Stripe account, visit Creating a Stripe account chapter from the article.
-
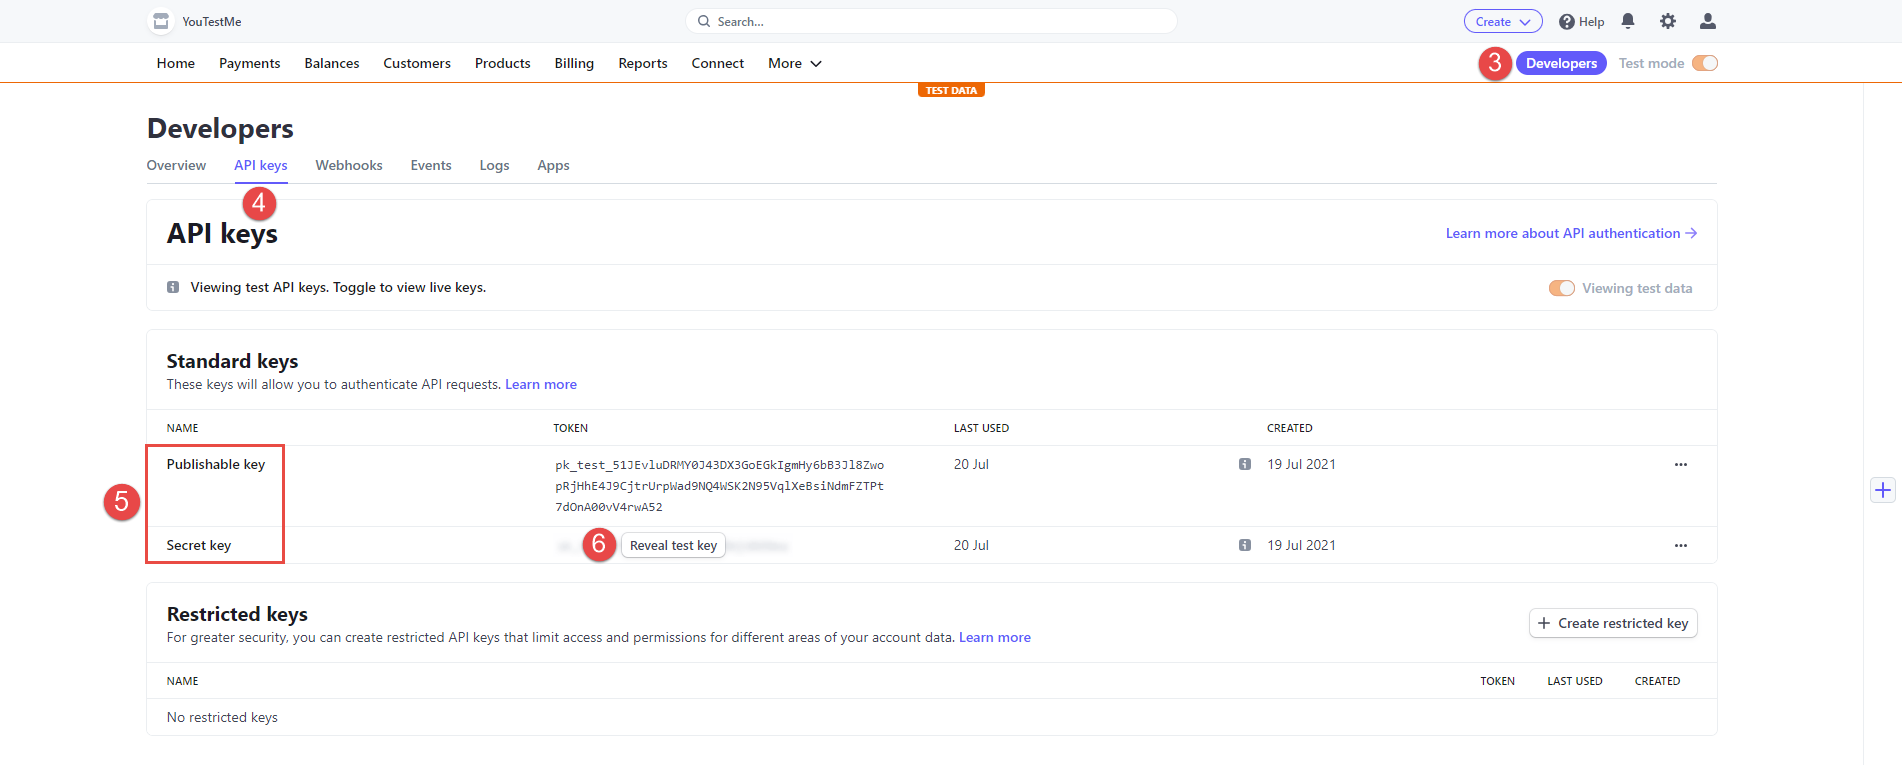
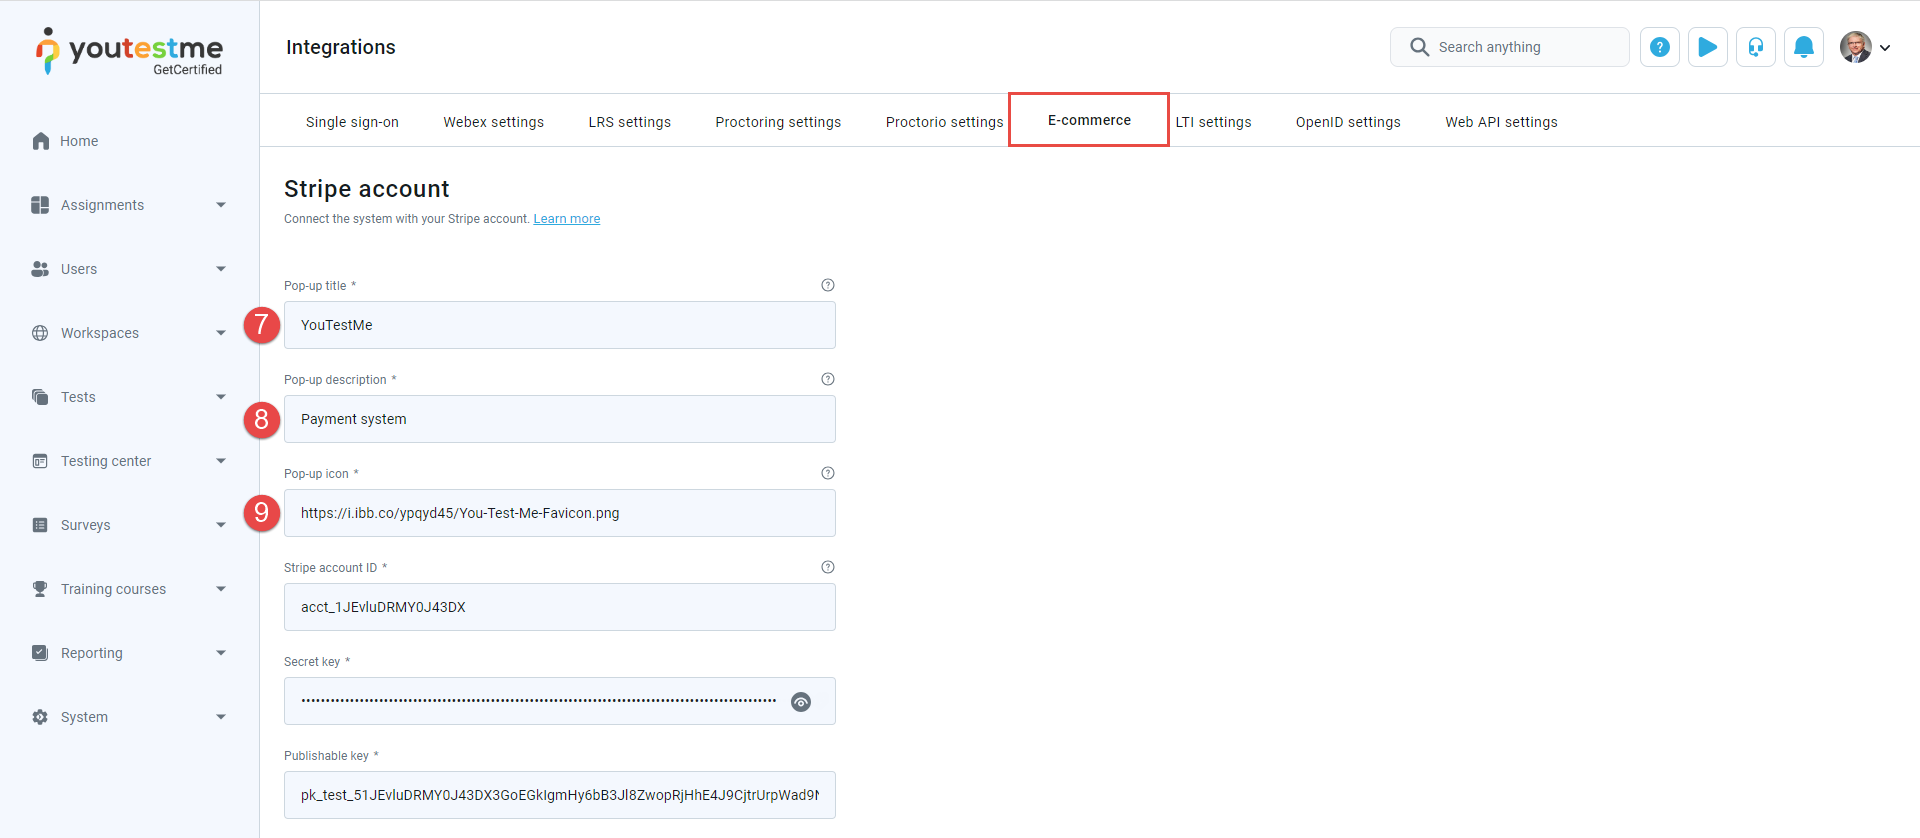
Once you log in to the Stripe, click the Developers tab.
-
Open API Keys tab.
-
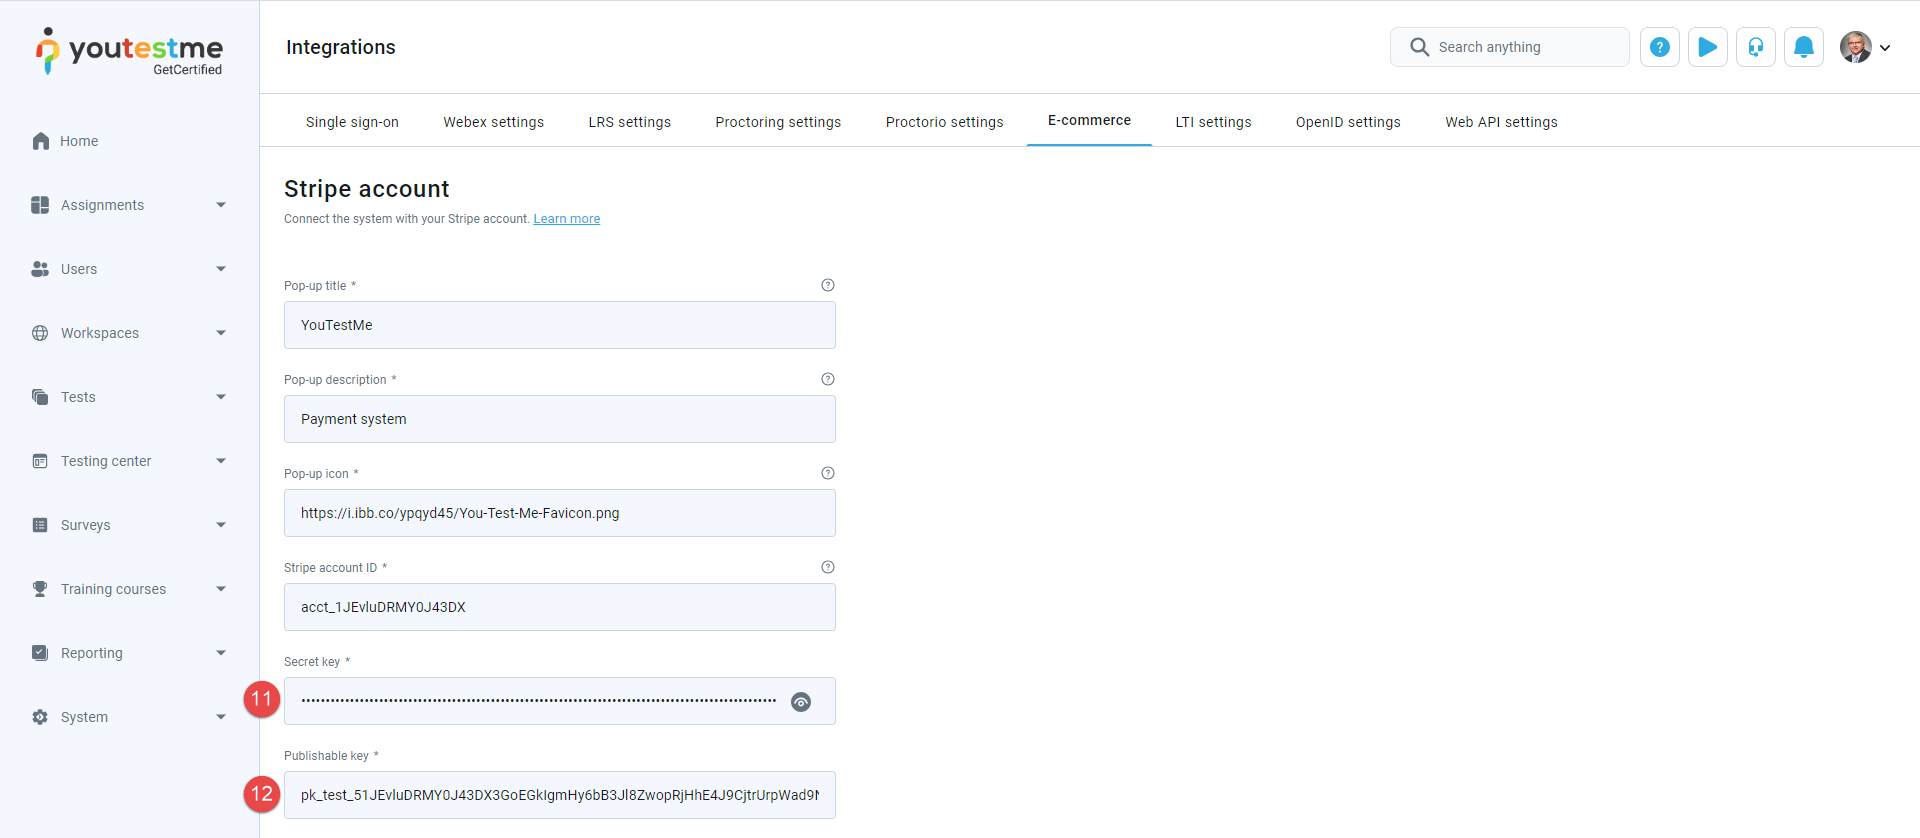
On that tab, you will see Publishable key and Secret key. Those keys will be used to connect your Stripe account with the GetCertified application.
-
To display the Secret key, click the Reveal test key button.
-
Enter the Pop-up title. This title will be displayed when entering a payment card by the candidate.
-
Enter the Pop-up description. This text will be displayed when entering a payment card by the candidate.
-
Enter the Pop-up icon. This text will be displayed when entering a payment card by the candidate.
-
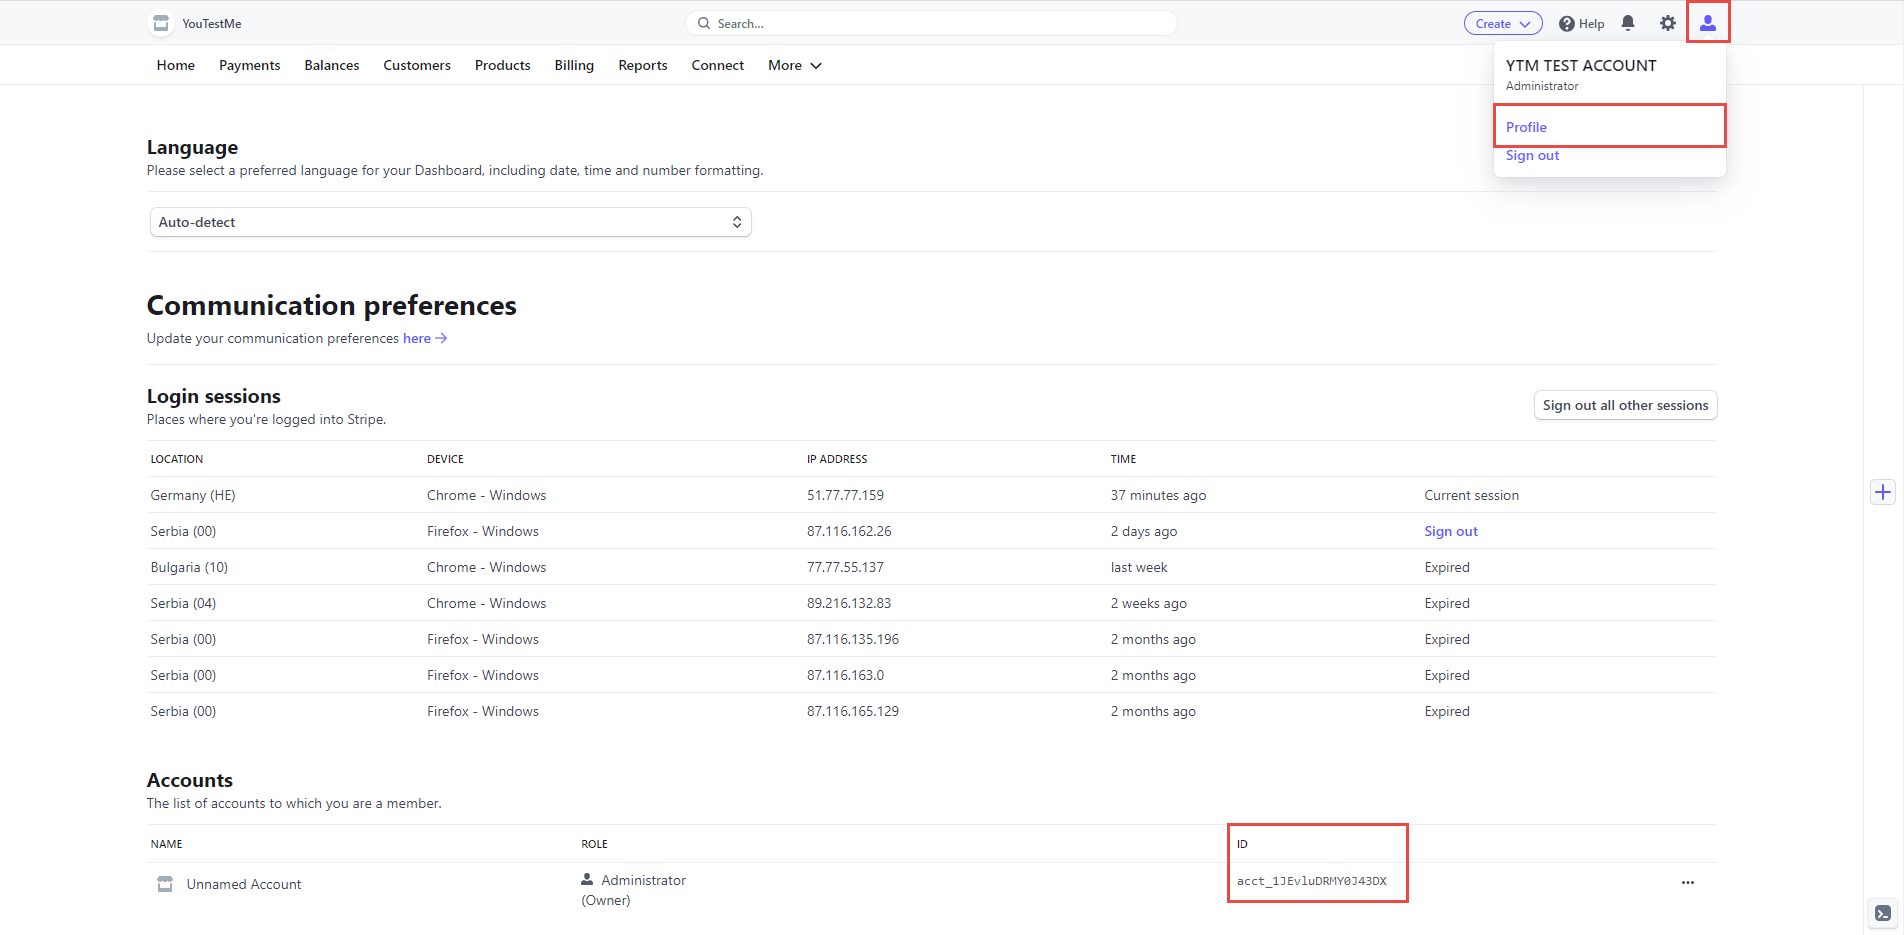
Enter Stripe account ID from the Stripe application.
-
Enter the Publishable key from the Stripe application.
-
Enter the Secret key from the Stripe application.
Navigate to the Stripe application, and do the following:
To set up Stripe account, navigate to the E-commerce tab, in the GetCertified application.
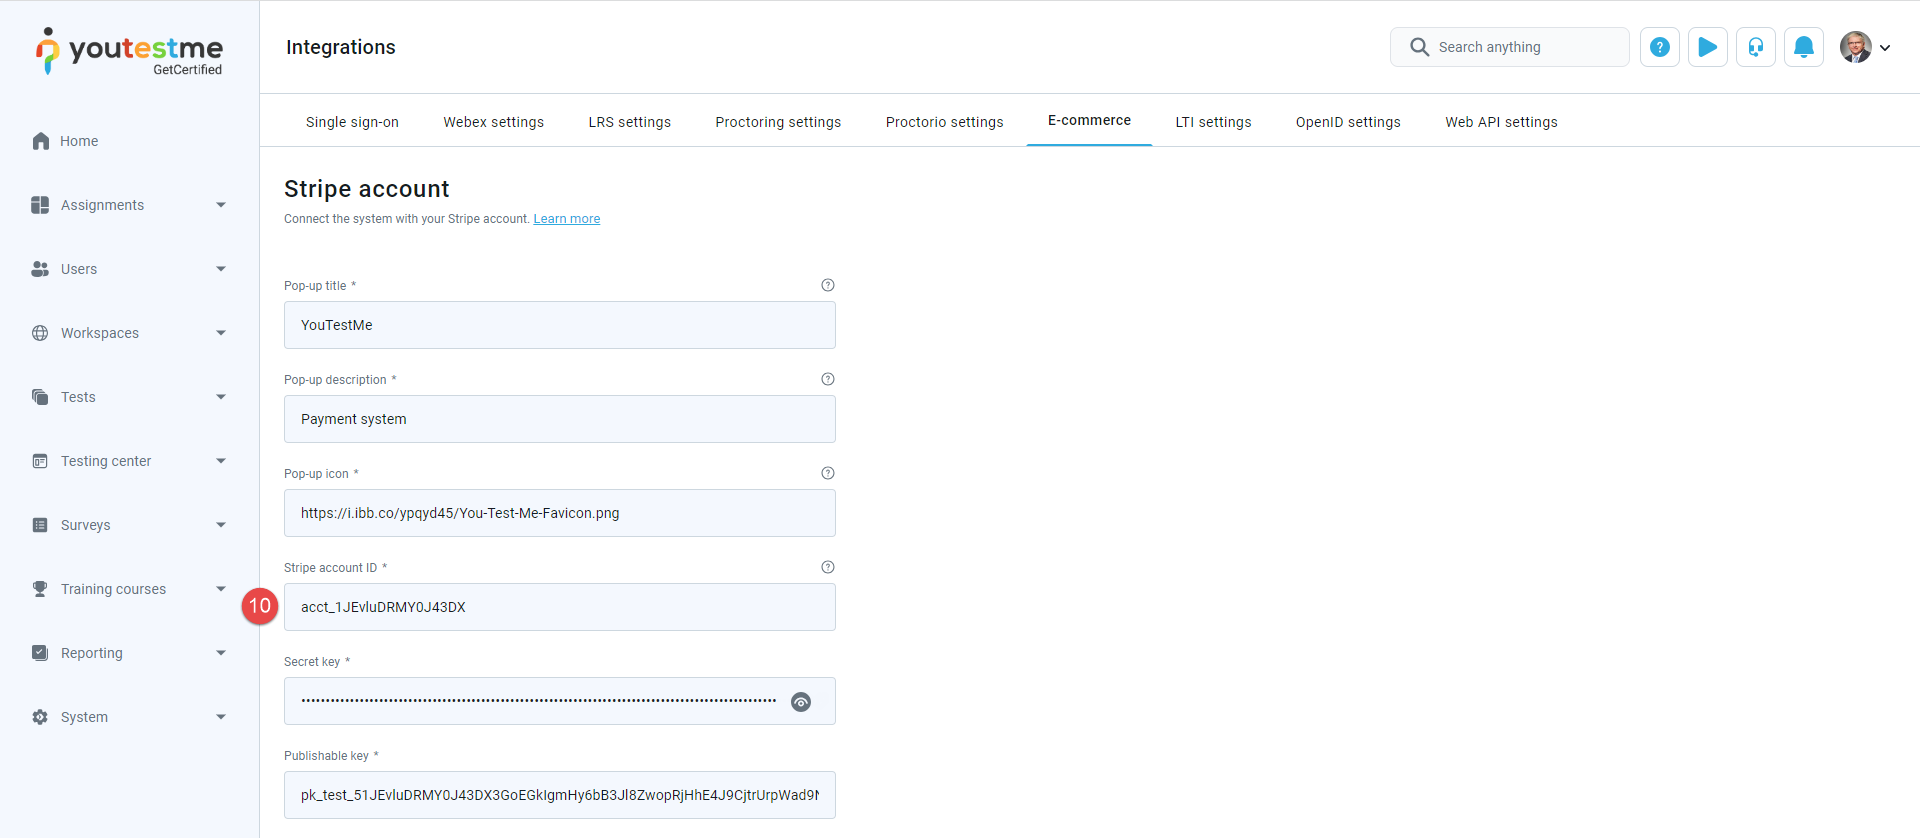
Note: You can find the Stripe account ID on the Stripe Application's Profile page.
-
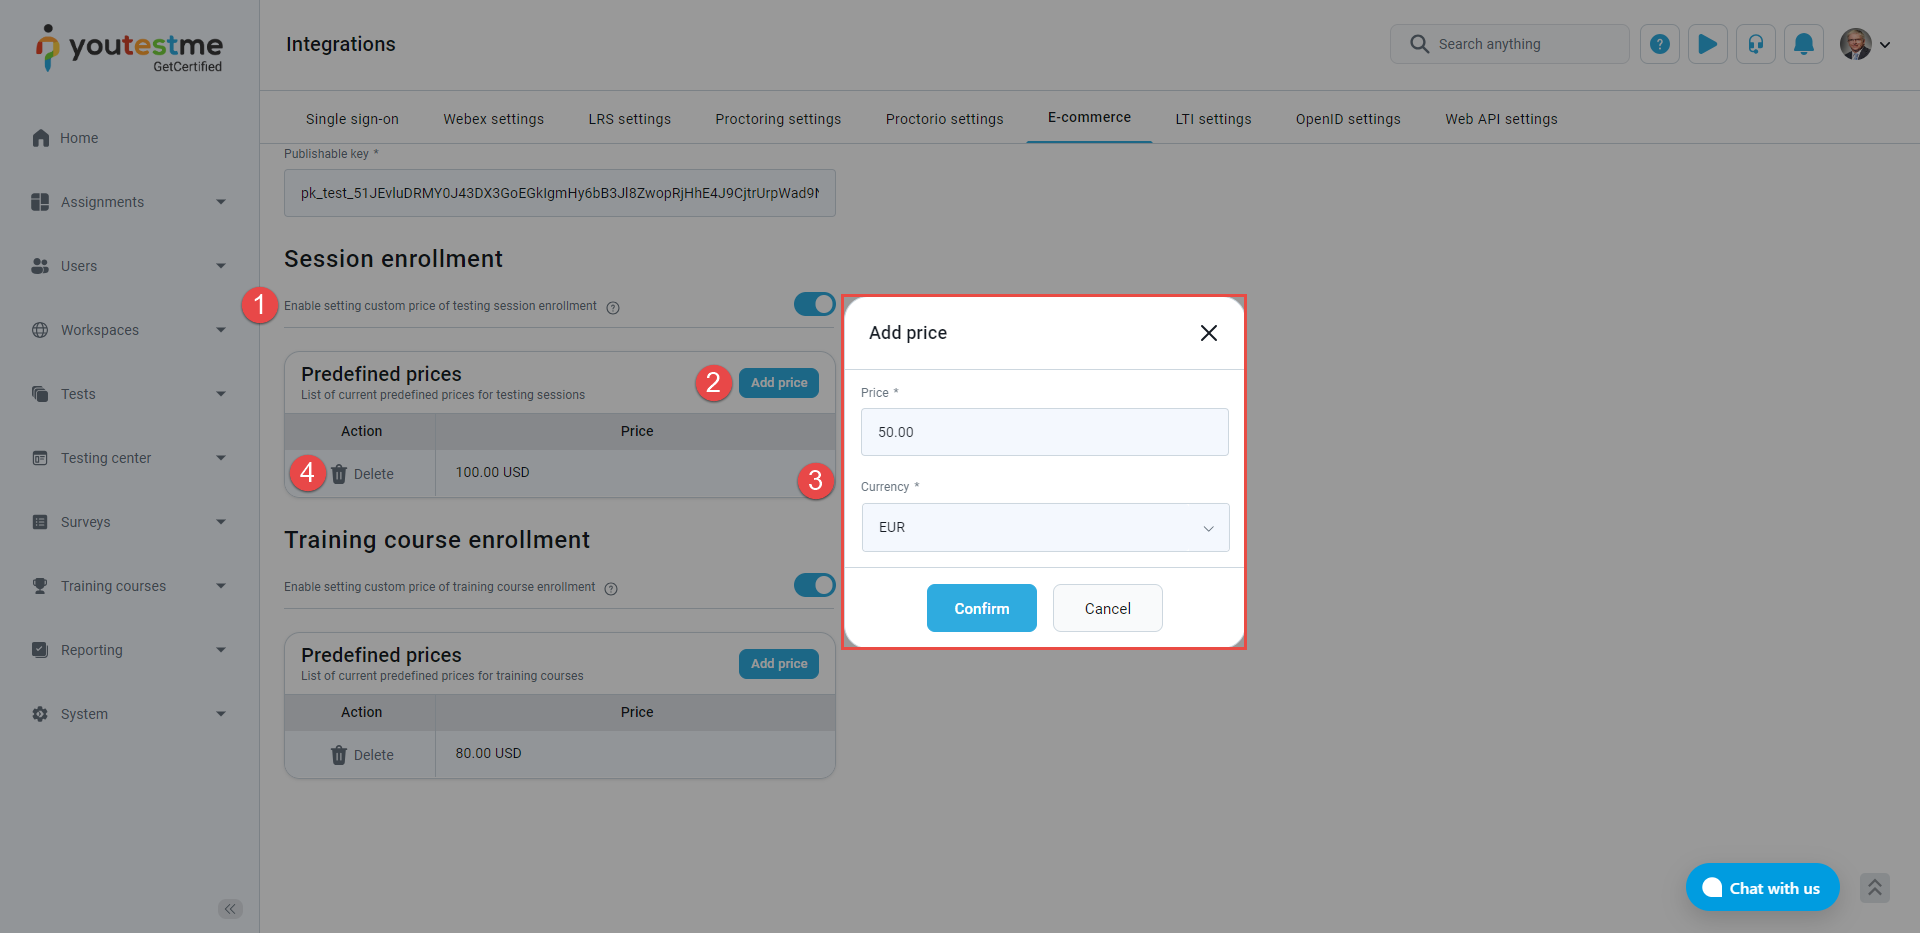
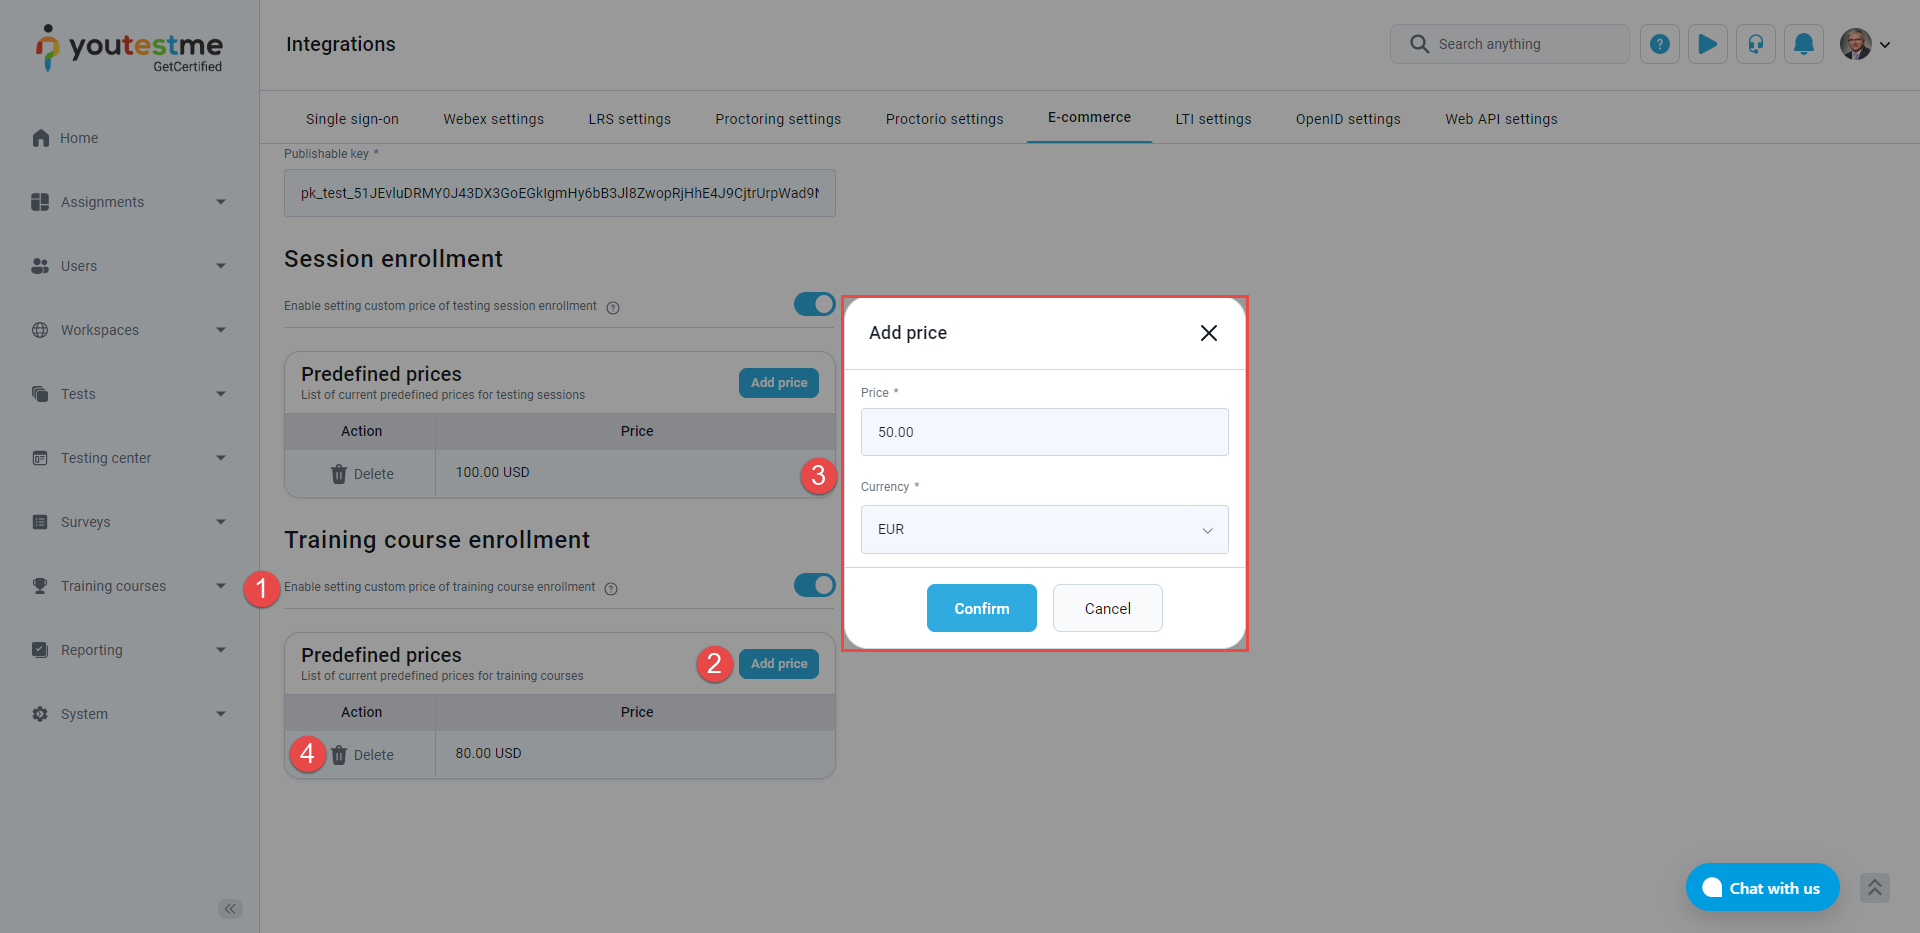
Enable setting custom price of testing session enrollment – Indicates if test managers can specify a custom price for session enrollment.
-
Click the Add price option.
-
Enter the Price and choose the price Currency.
-
Remove the price by clicking on the Delete option.
To set up sessions enrollment and prices, follow the next steps:
-
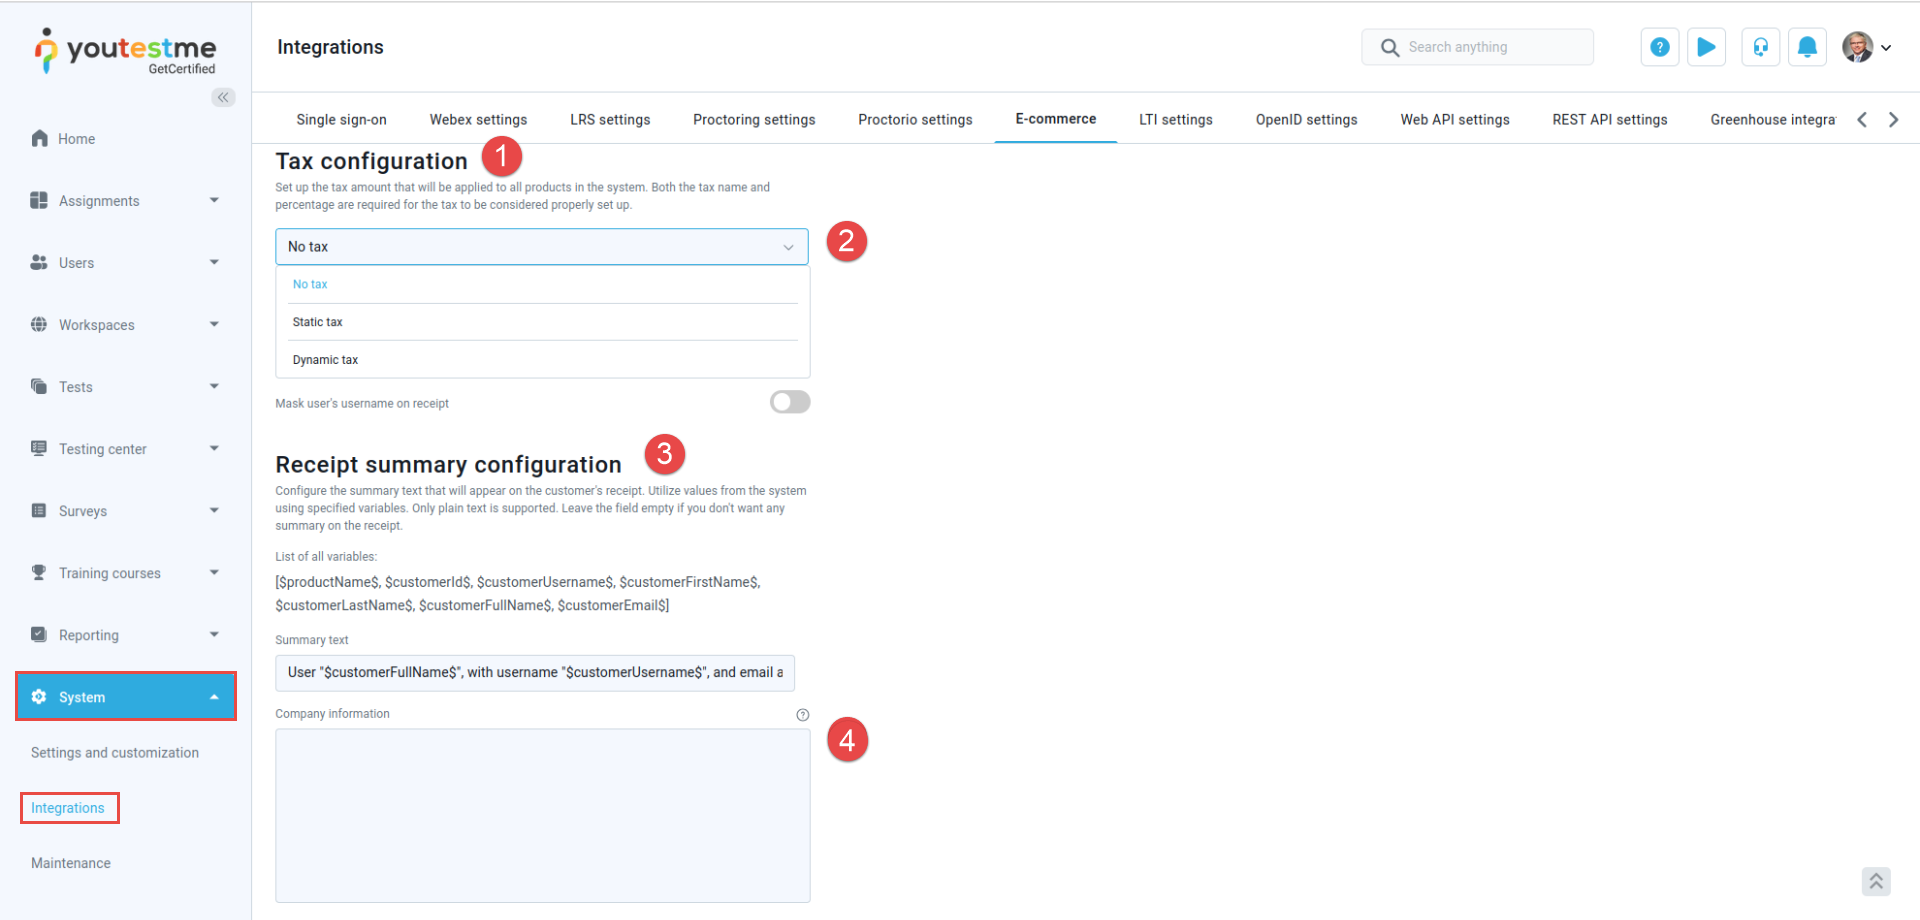
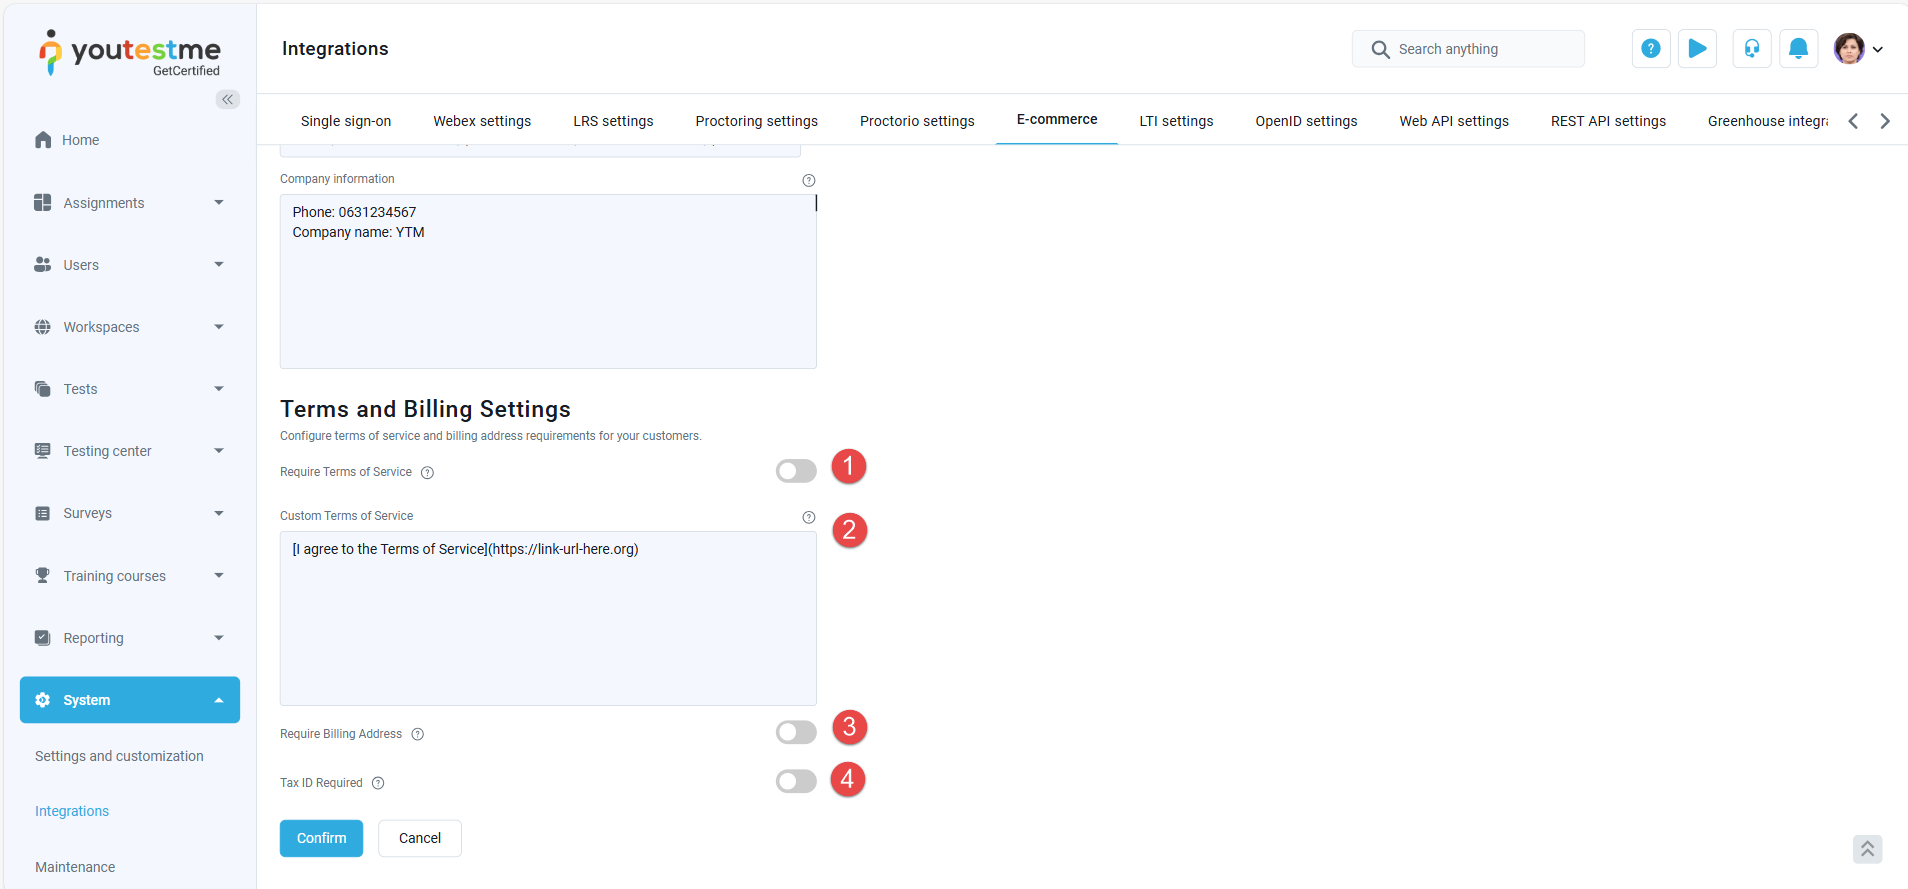
Tax Configuration: Choose how taxes are applied: No Tax (no tax is added), Static Tax (a single rate for all purchases), or Dynamic Tax per Country (different rates per supported country).
-
Tax Dropdown: Use this dropdown to select your preferred tax option. Depending on your choice, additional fields may appear for setting a specific tax rate or configuring per-country tax rules.
-
Receipt Summary Configuration: This section may show you how your placeholders and text will appear on the final receipt.
-
Company Information: Enter your full company details in the multiline text box. This information (e.g., company name, address, phone number, VAT number) will appear below YTM logo on the receipt.
To configure Stripe tax settings and company information, refer to the numbered sections in the screenshot below and follow these steps:
After configuring your tax and company information, scroll down to the bottom of the page and click Confirm to save your changes. Once saved, your new tax settings and full company details will be applied to all future receipts.
-
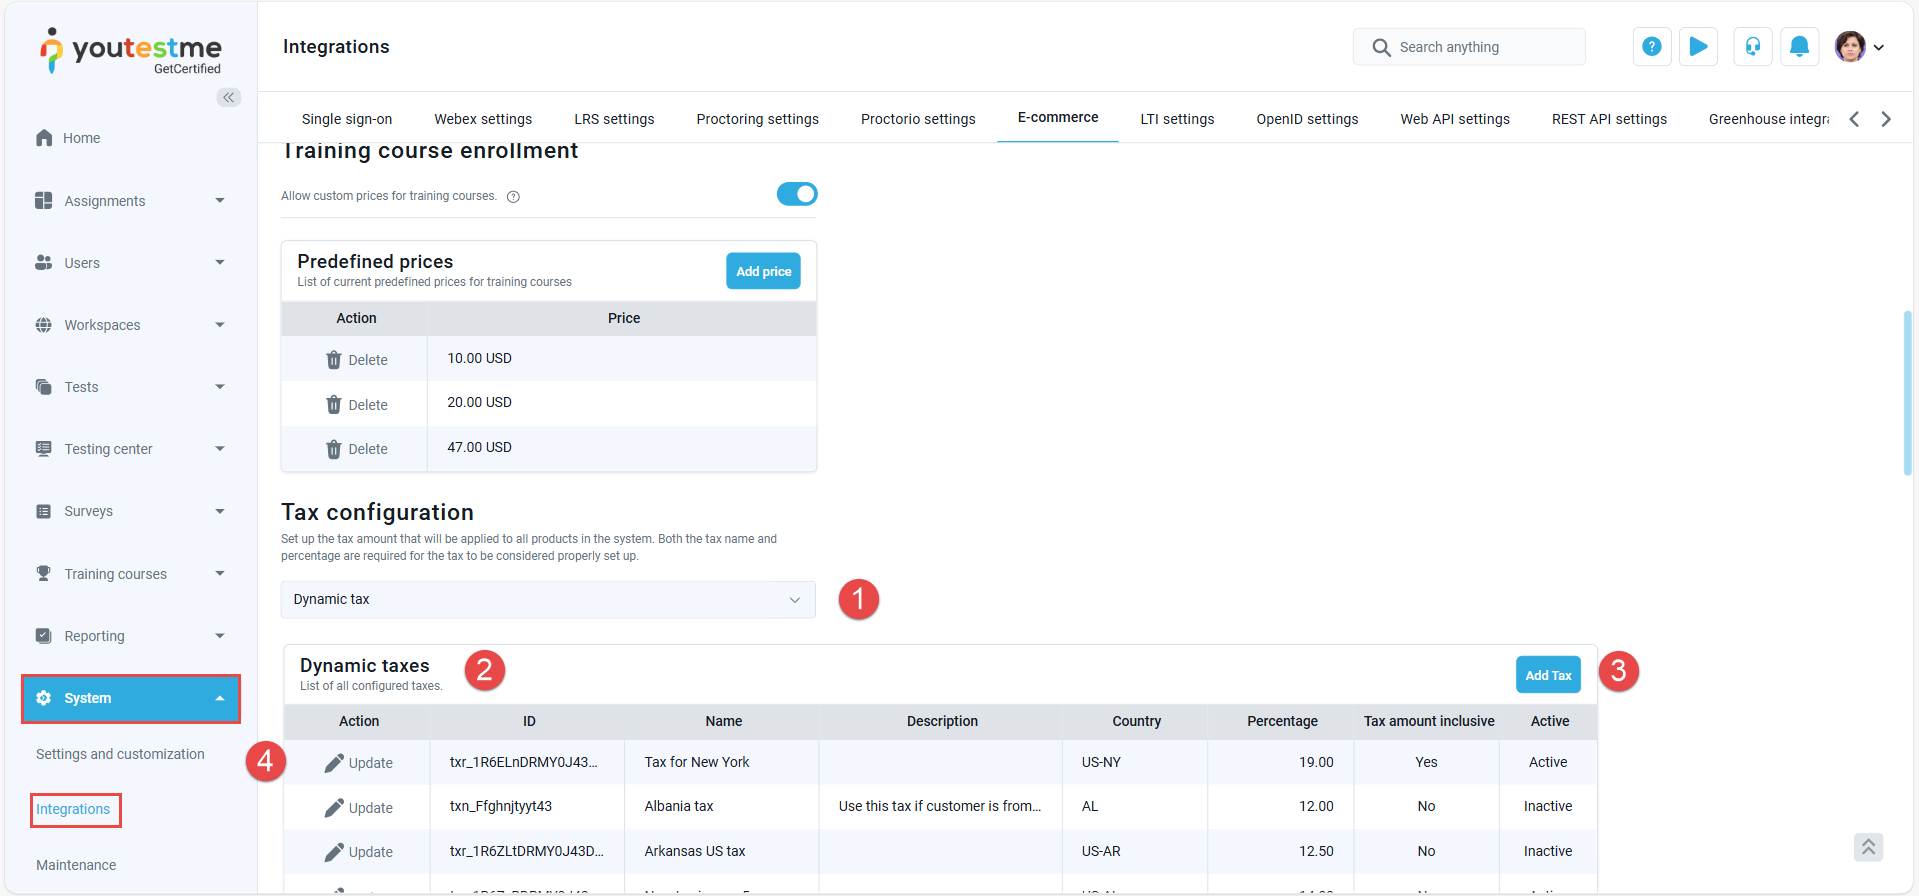
Select Dynamic Tax: From the tax dropdown, choose Dynamic Tax. Once this option is selected, the dynamic tax table will be displayed.
-
Dynamic Taxes Table: This table lists all configured dynamic taxes. Each row displays the tax's name, description, applicable country, tax rate percentage, and whether the tax is set as inclusive or exclusive.
-
Add Tax: Click the Add tax button to open a form where you can define a new dynamic tax. Enter the tax name, description, country, and rate percentage to ensure the correct tax is applied during checkout. Note that Dynamic taxes is only available for Stripe-supported official countries. For more details, refer to the official list here: Supported Tax Rate Countries.
-
Active/Inactive Tax: Each dynamic tax can be marked as active or inactive. Update button is provided to change the tax status. If a tax is marked as inactive, it will not be applied during the checkout process.
To configure dynamic taxes, follow these steps:
-
Require Terms of Service: Enable this option to require customers to accept your Terms and Service before proceeding the checkout.
-
Require Terms of Service: Enter your Terms of Service text in the multiline text box. You can use markdown format for linking (e.g.,
[Terms and
									Service](https://your-terms-service-link)
) your custom text. -
Require Billing Address: When enabled, customers will be prompted to enter their billing address during checkout.
-
Require Tax ID: When enabled, customers will be prompted to provide their Tax ID. Note that Tax ID collection is only available for Stripe-supported official countries. For more details, refer to the official list here: Supported Tax ID Countries .
To configure billing address, Tax ID, and service terms, follow these steps:
-
Enable setting custom price of training course enrollment – Indicates if training course managers can specify a custom price for training course enrollment.
-
Click the Add price option.
-
Enter the Price and choose the price Currency.
-
Remove the price by clicking on the Delete option.
-
Dummy credit card number for testing purposes
To set up training course enrollment and prices, follow the next steps:
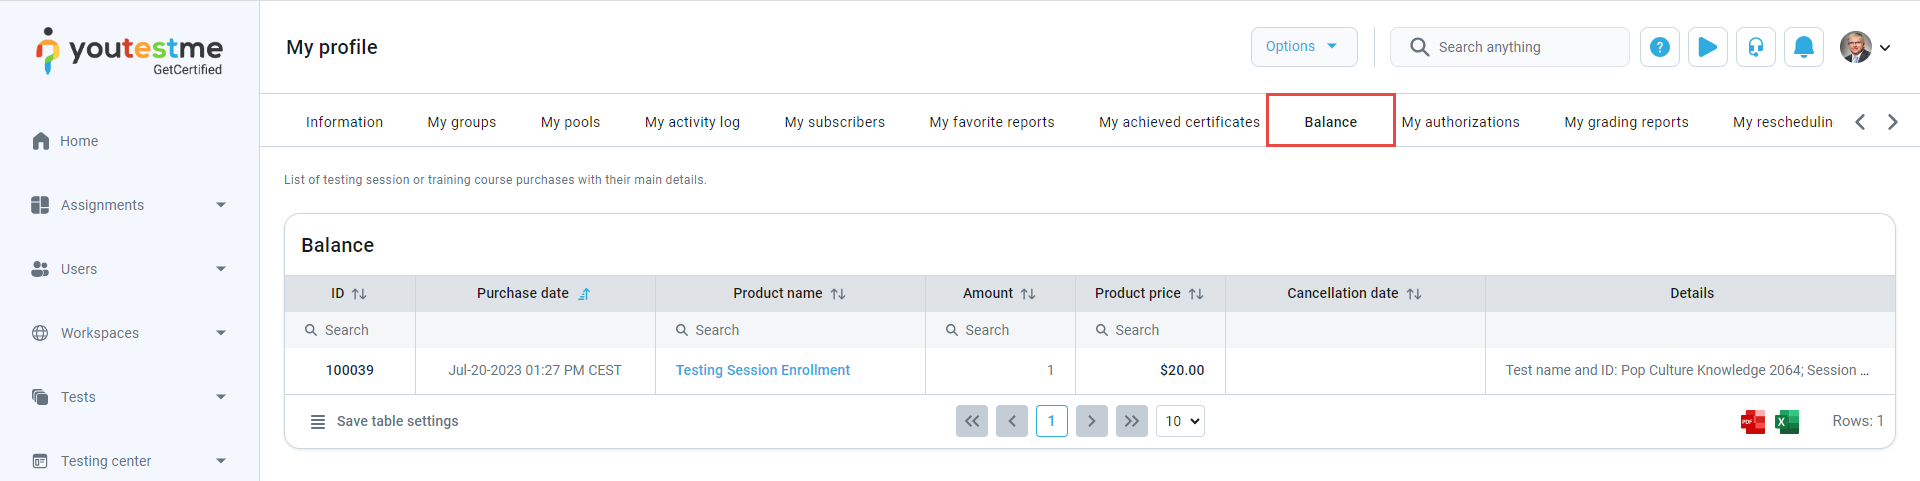
Once e-commerce is set up, the administrator can check the candidate’s balance.
For more instructions on how the candidates pay a registration fee, check How to Pay the registration fee article.
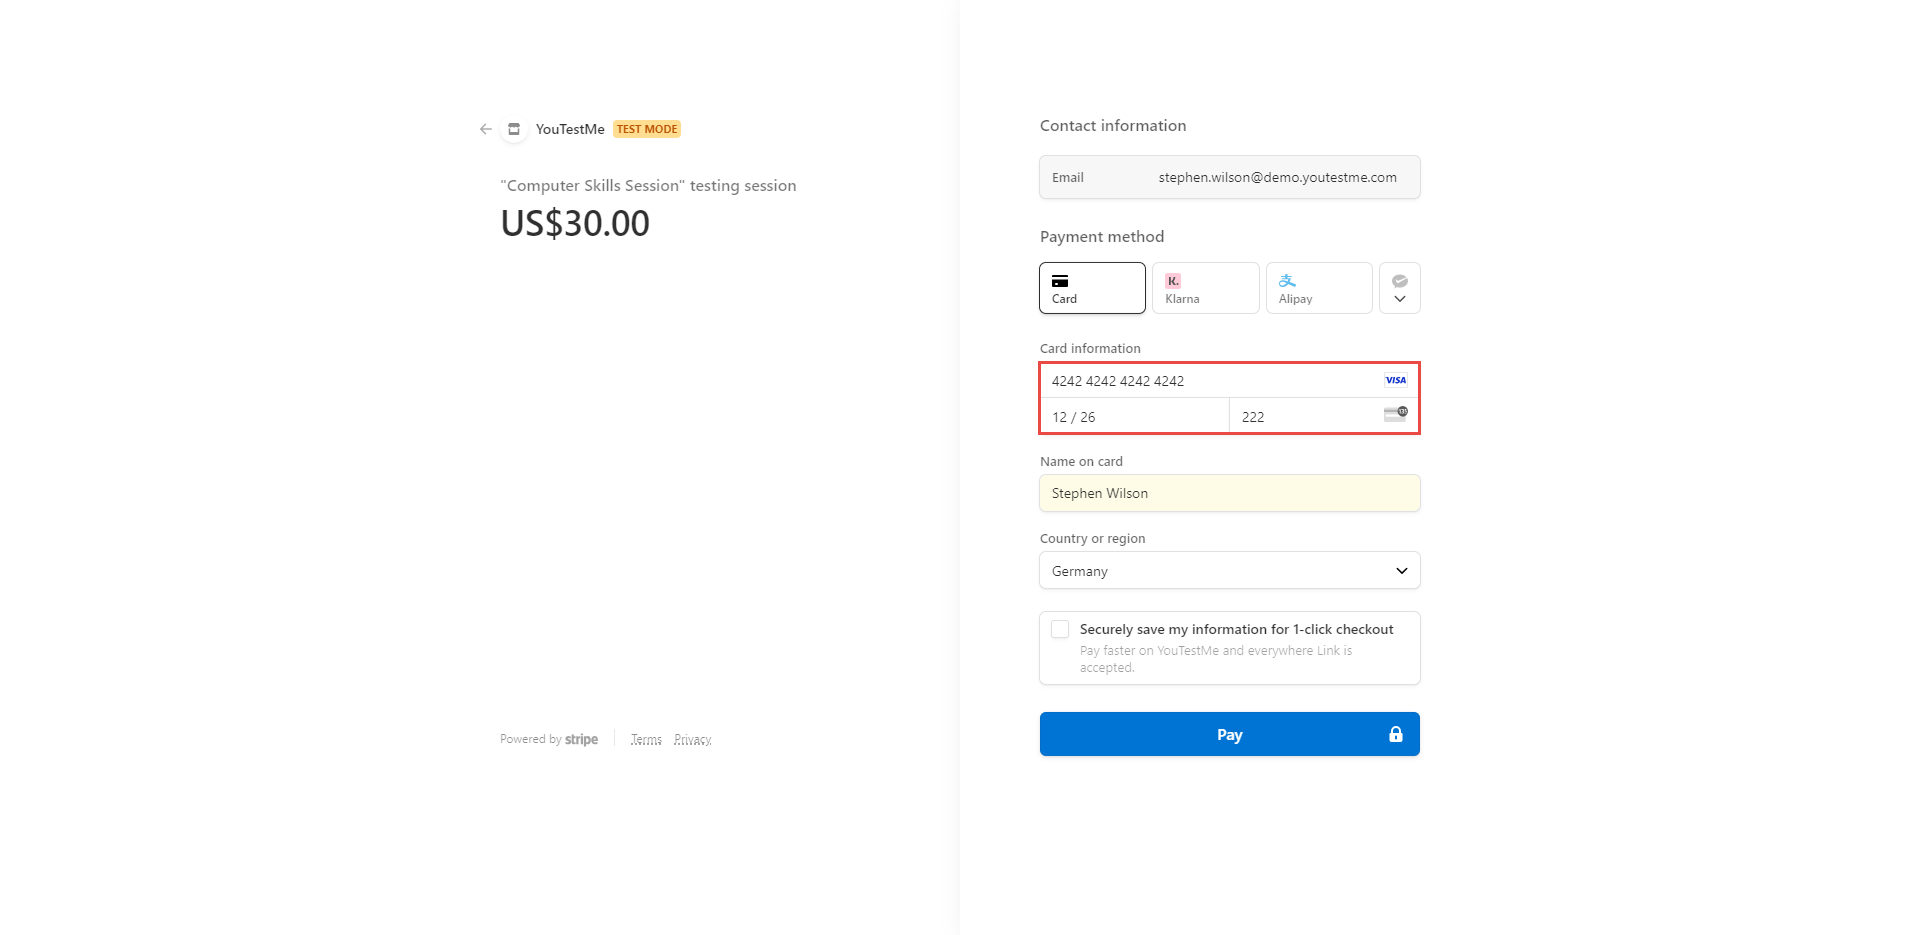
Note: For testing purposes, use a dummy credit card number – 4242 4242 4242. Enter a random future date in the MM/YY field and three random numbers in the CVC field.
Example:
Check the links below for more information about e-commerce.
-
-
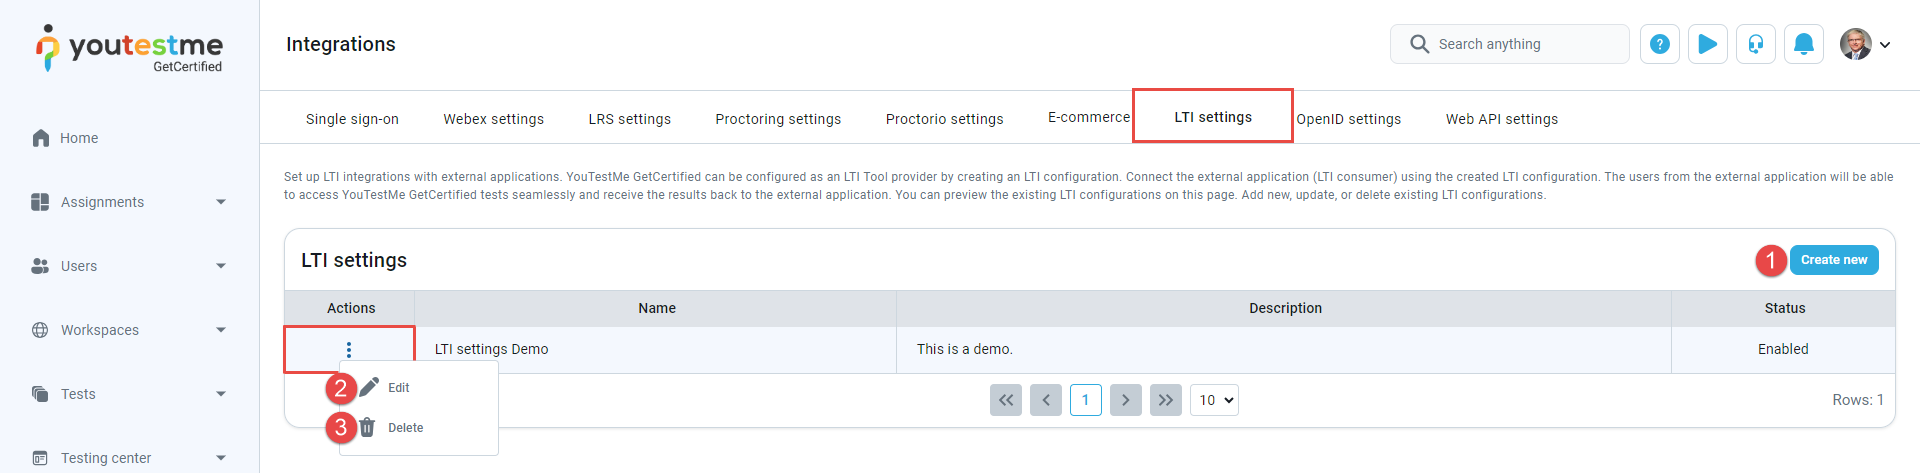
LTI settings
To connect an external application (LTI tool consumer) with GetCertified, you can configure GetCertified as an LTI Tool provider by creating an LTI configuration. LTI is the standard for linking learning tools with platforms like learning management systems. Through this setup, users from the external application can seamlessly access GetCertified tests and receive the results back within the LTI tool consumer interface. The entire process begins within the GetCertified application, ensuring smooth integration and data exchange between both systems.
-
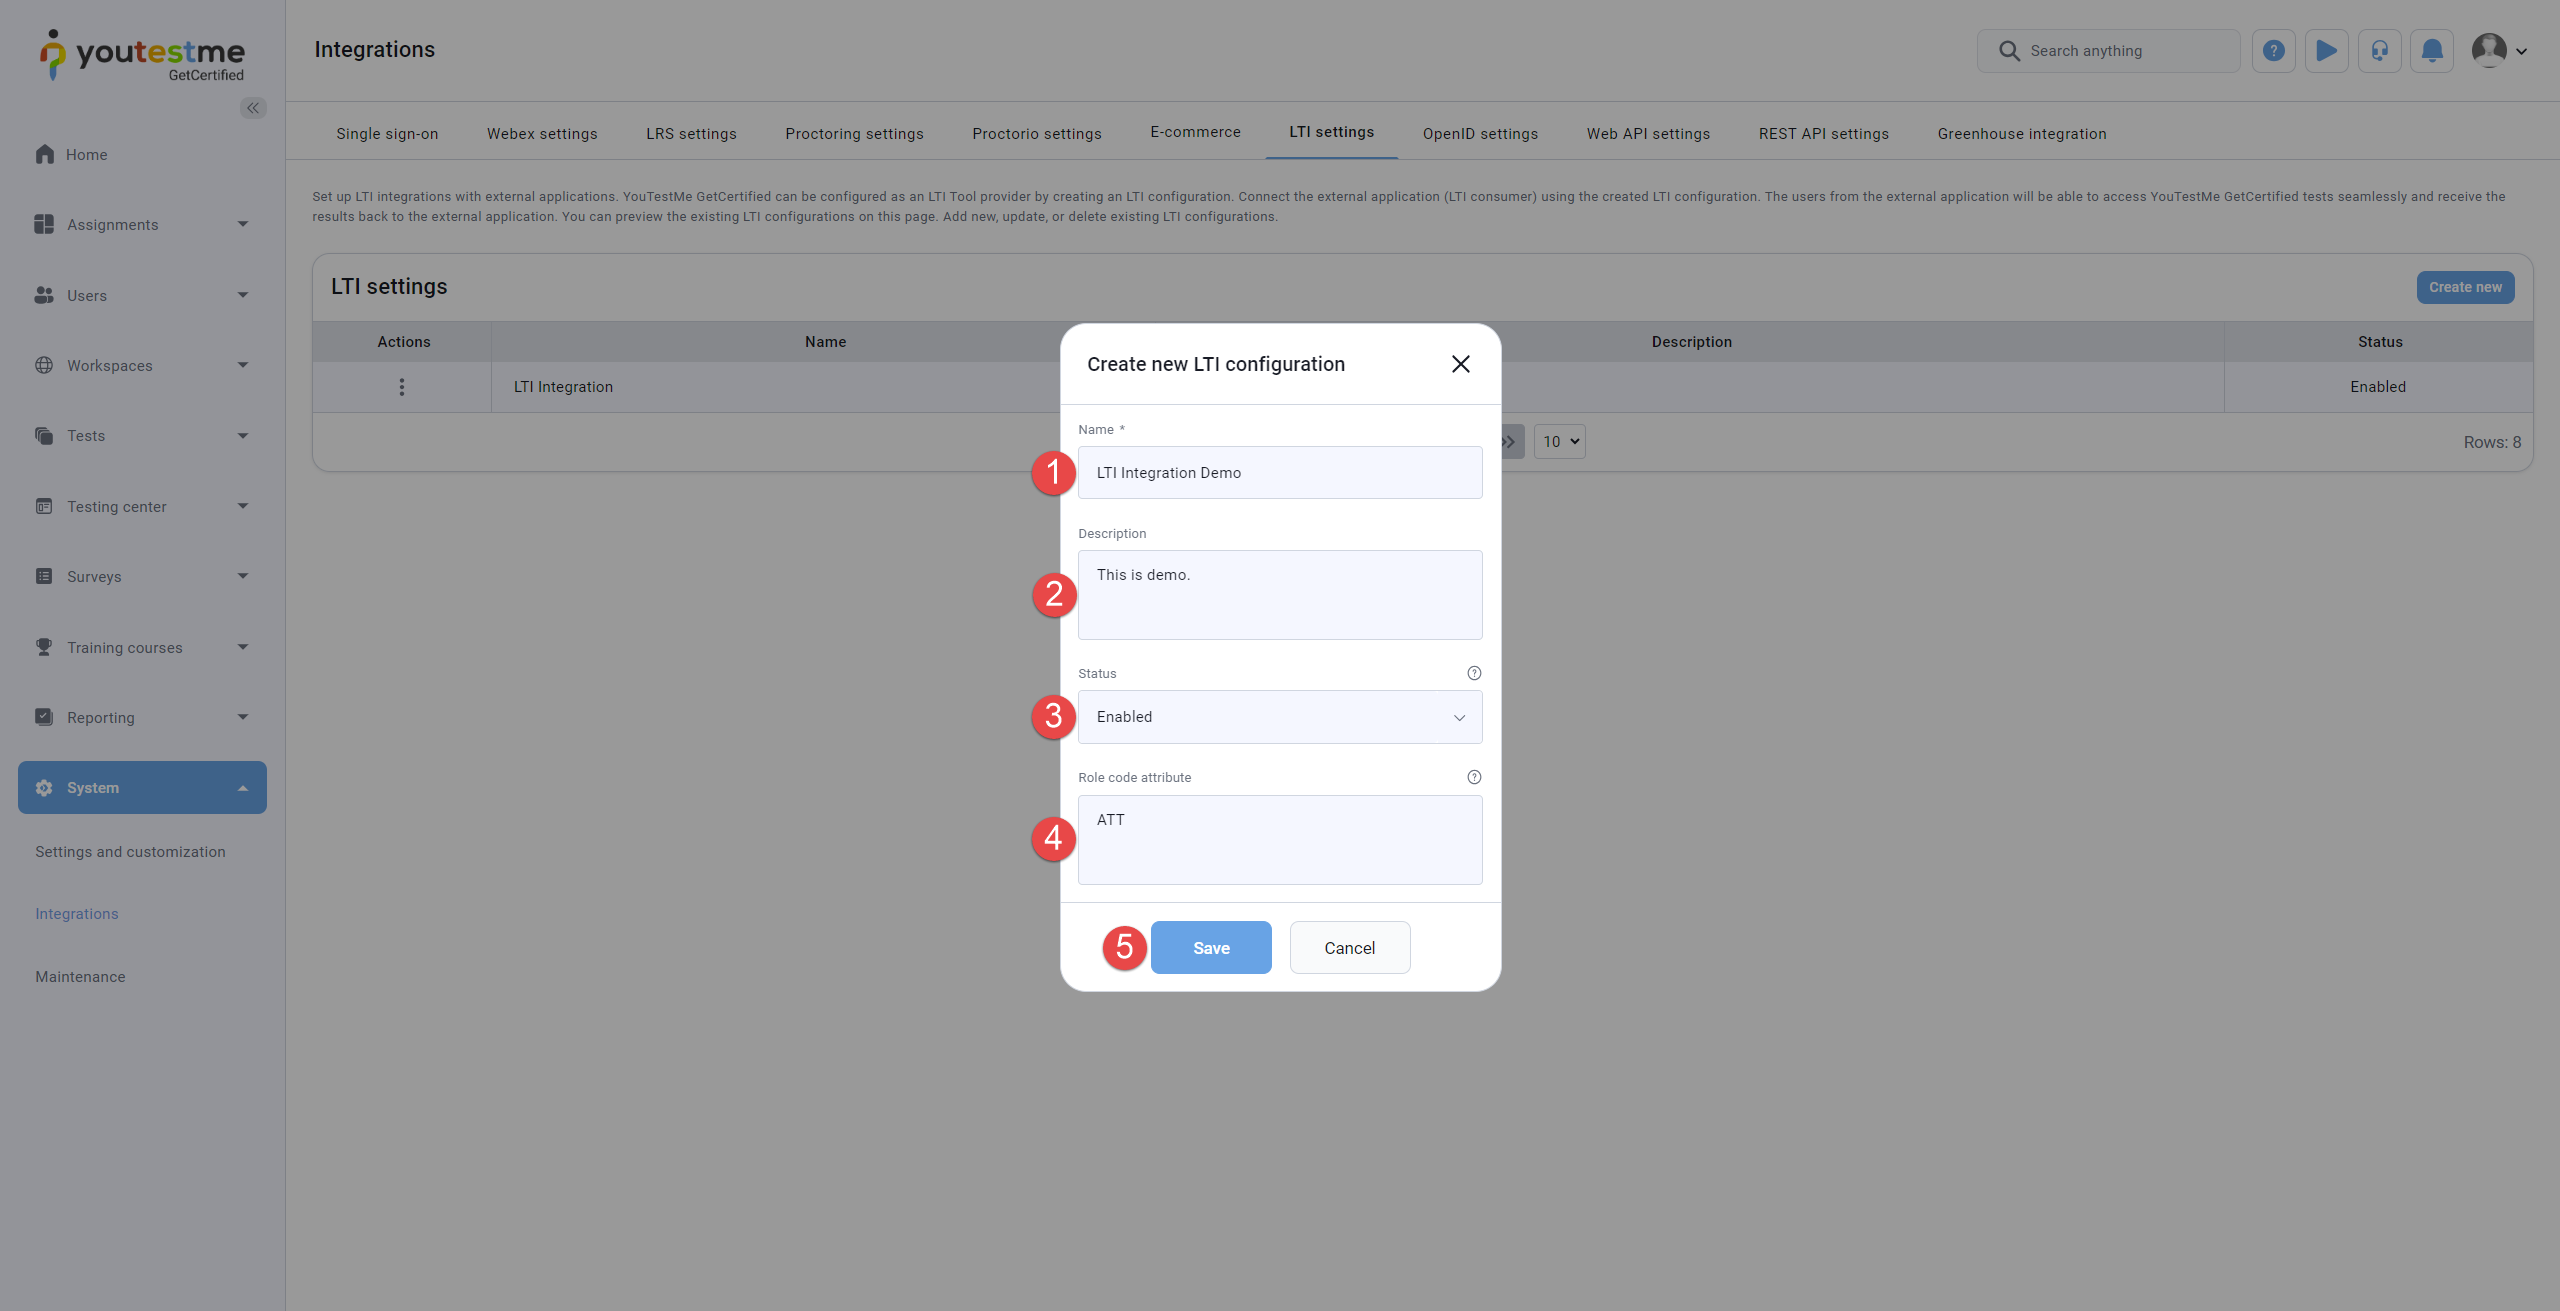
You can add a new configuration by clicking the Create new button, which initiates the creation of a new LTI configuration. This action opens a pop-up dialog.
-
Click the Edit button to preview or edit existing configurations. This action opens a new pop-up dialog where you can review and modify the configuration parameters according to your requirements.
-
To delete existing configurations, click the Delet button associated with the configuration you wish to remove. Upon clicking, you will be prompted to confirm the deletion, ensuring you intend to delete the configuration permanently.
You'll find a table on the LTI settings tab showcasing all current LTI configurations, providing details such as their names, descriptions, statuses, and available actions. From this interface, users can take several actions, including:
-
Enter the Name of the LTI configuration. The name must be unique for each LTI configuration.
-
Optionally enter the Description of the LTI configuration.
-
Choose the Status of the LTI configuration. If the status is Enabled,the configuration can be used for LTI Launch from the LTI Tool consumer. Otherwise, not.
-
The Role code attribute is used to specify the role code corresponding to the role that will be assigned to users accessing the application via LTI. You can use the role code from the relevant role in the Roles and Permissions tab.
Note: If this field is left blank, user role assignment follows these rules: If a role code is not set here, the system will use the role defined in the external system attempting to access our application via LTI. If no role is defined there either, the default role Student will be assigned.
-
Click the Save button to save the LTI configuration. The Edit dialog will appear where you can see and update the parameters of the LTI configuration.
The steps to create a new LTI configuration are listed below and marked in the image below:
-
Enter the Name of the LTI configuration. The name must be unique for each LTI configuration.
-
Optionally enter the Description of the LTI configuration.
-
Choose the Status of the LTI configuration. If the status is Enabled, the configuration can be used for LTI Launch from the LTI Tool consumer. Otherwise not.
-
The Role code attribute is used to specify the role code corresponding to the role that will be assigned to users accessing the application via LTI. You can use the role code from the relevant role in the Roles and Permissions tab.
Note: If this field is left blank, user role assignment follows these rules: If a role code is not set here, the system will use the role defined in the external system attempting to access our application via LTI. If no role is defined there either, the default role Student will be assigned.
-
Use the provided Consumer key to configure the LTI Tool consumer. It represents the unique ID of the LTI configuration and, together with the provided Secret key, is used to verify the LTI Launch request. The LTI Launch request must contain provided Consumer key value in the oauth_consumer_key parameter. Click the Copy to clipboard icon to copy the Consumer key to the clipboard.
-
Use the provided Secret key to configure the LTI Tool consumer. It represents the secret key an LTI Tool consumer uses to sign the LTI Launch request and the LTI tool provider GetCertified to verify the signature. Click the Copy to clipboard icon to copy the Secret key to the clipboard.
-
Use the provided Signature method to configure the LTI Tool consumer. It represents the signature algorithm an LTI Tool consumer must use to sign the LTI Launch request. The LTI Launch request must contain provided Signature method value in the oauth_signature_method parameter. The only supported signature method is HMAC-SHA1.
-
Use the provided Message URL to configure the LTI Tool consumer. It represents the LTI endpoint where should LTI Tool consumer send the LTI Launch request.
-
Use the provided LTI version to configure the LTI Tool consumer. It represents the LTI version that an LTI Tool consumer must use to send the LTI Launch request. The only supported version is LTI-1po. Click the Copy to clipboard icon to copy the Message URL to the clipboard.
-
Click on the Save button to save the LTI configuration.
The steps to edit or use the LTI configuration to configure the LTI Tool consumer are listed below and marked in the image below:
Note: For all of these parameters, you need to copy them to the appropriate field explained below.

The next important step is to create a test. You can check the following link for help with the test creation.
Note: It is important to create active self-enrollment sessions and publish the test to allow test-taking through LMS.
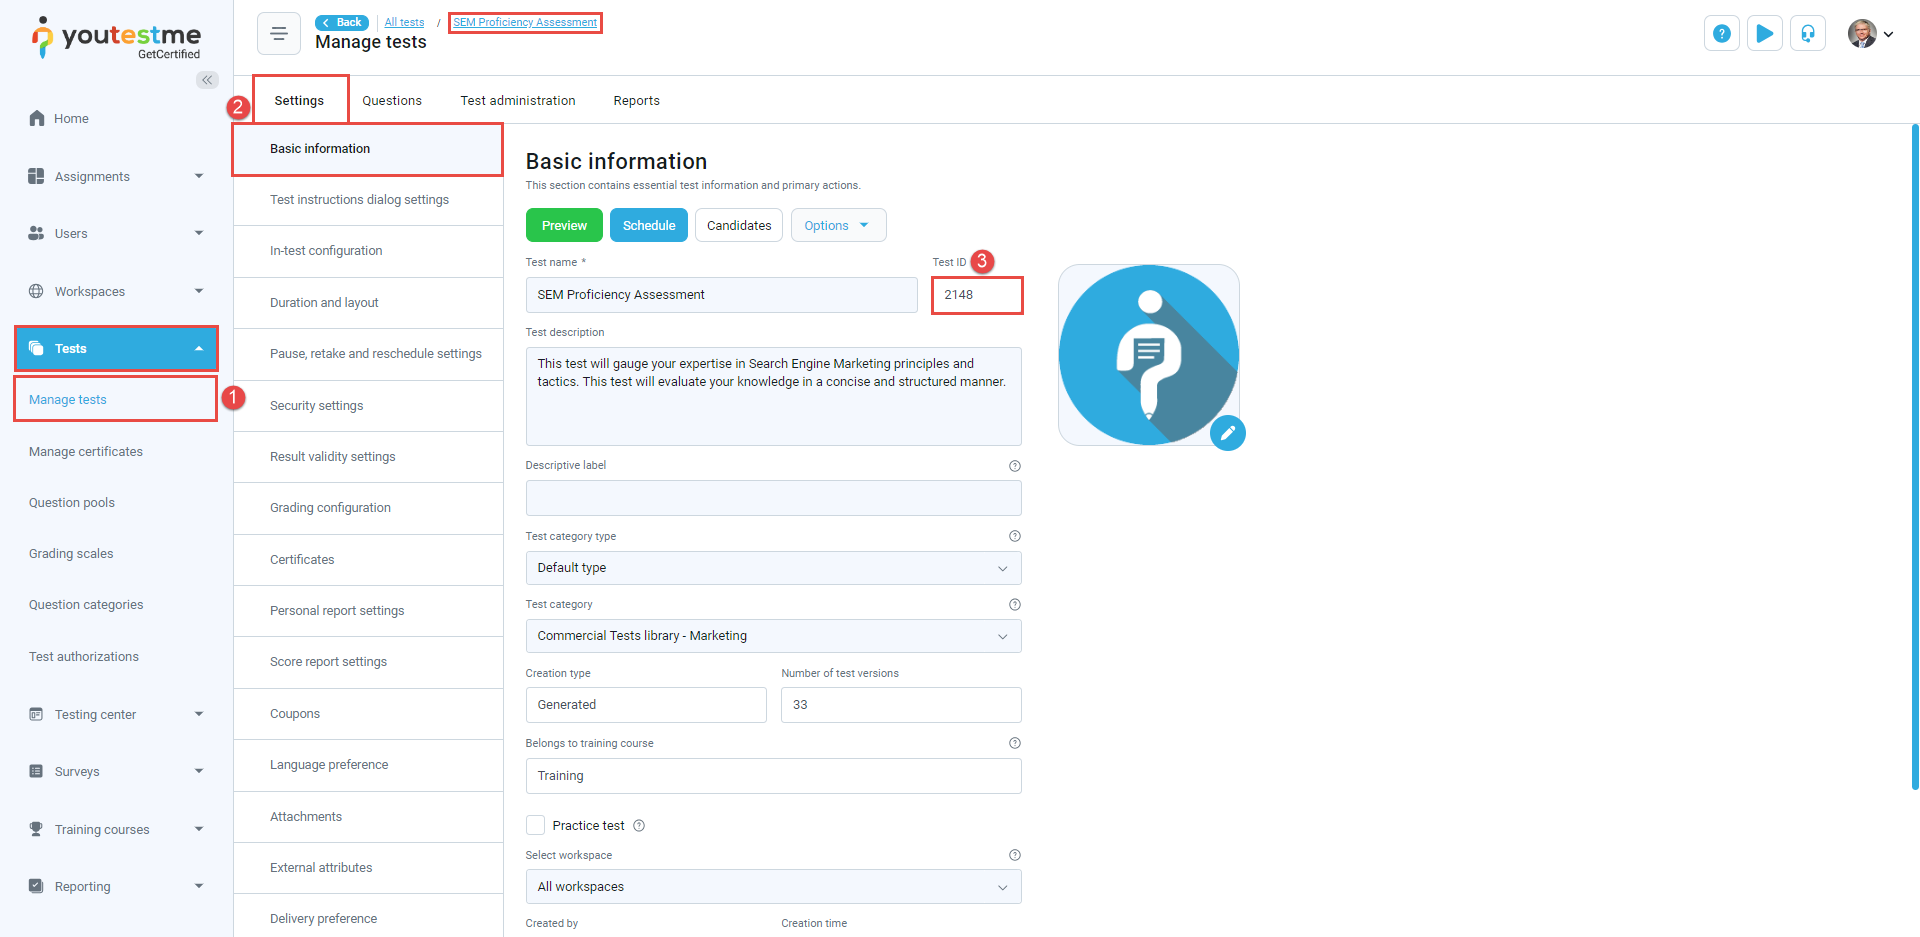
Important information is the Test ID and a Testing session ID since you can set the integration to assign the candidates to the testing session directly or give them access to the test where they can choose in which testing session they want to start the test.
-
Select Tests/Manage tests tab and open desired test.
-
Navigate to the Settings/Basic information tab.
-
The test ID will be displayed in the Test ID field.
To view the Test ID, follow these steps:
-
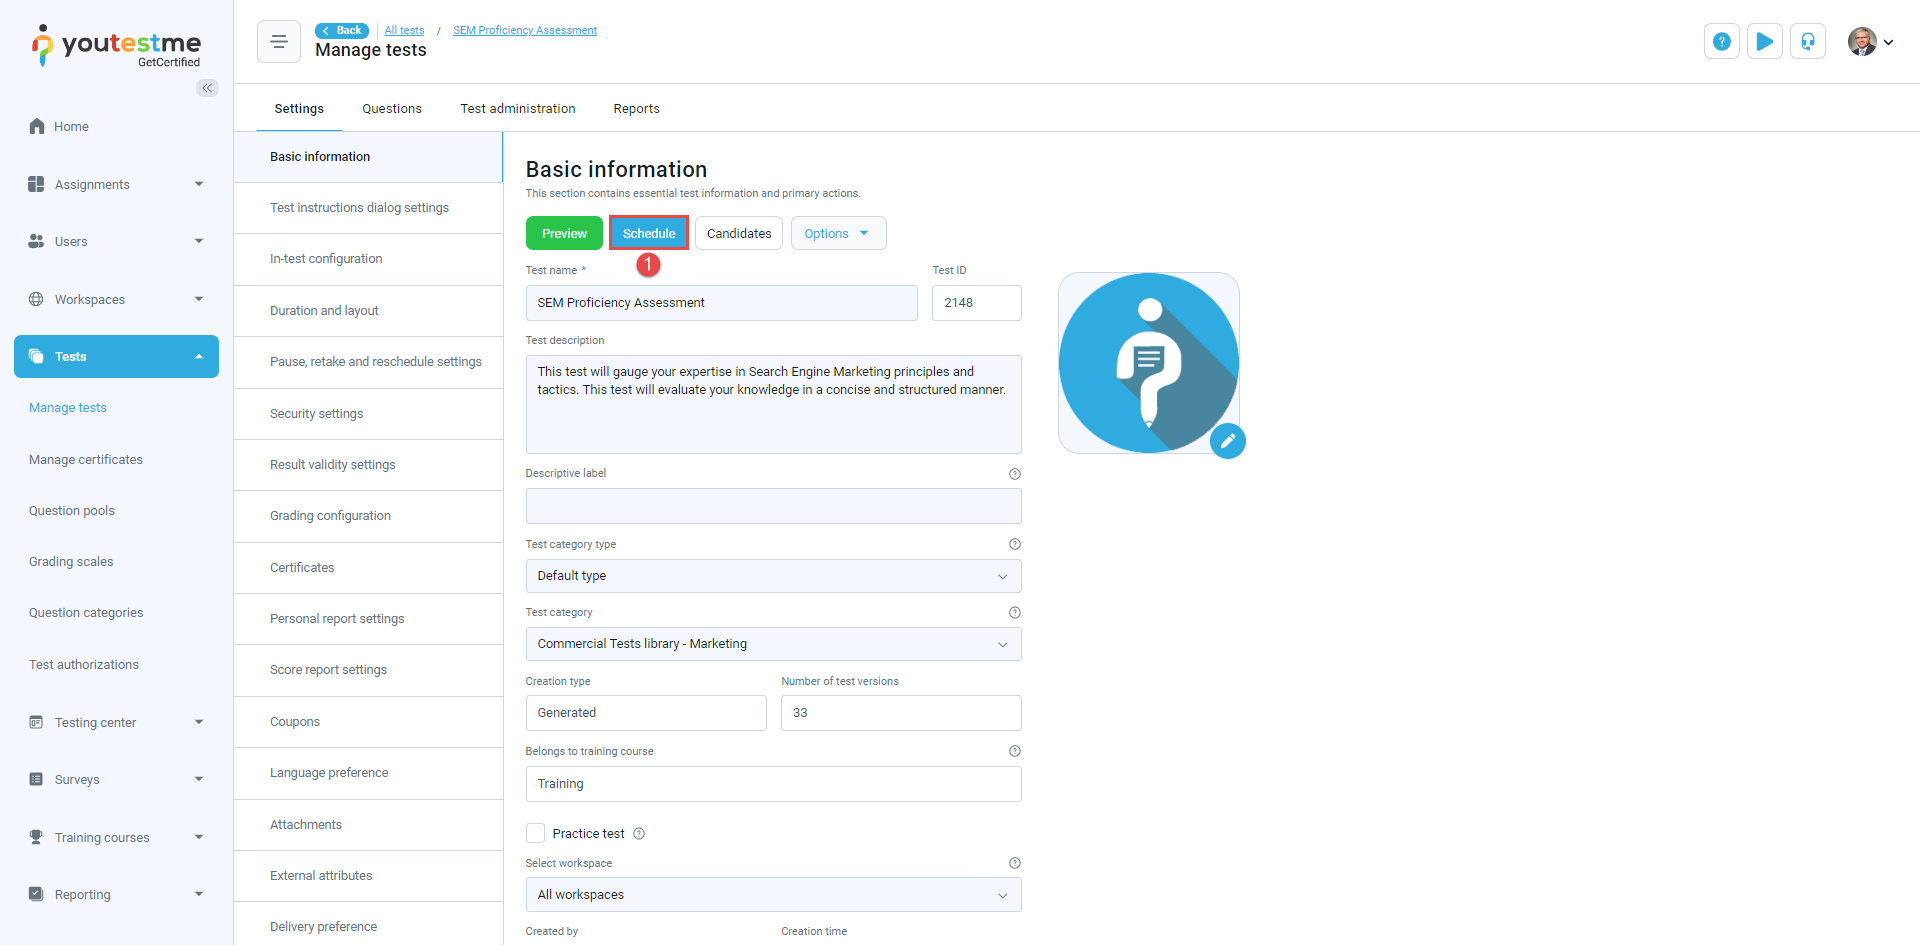
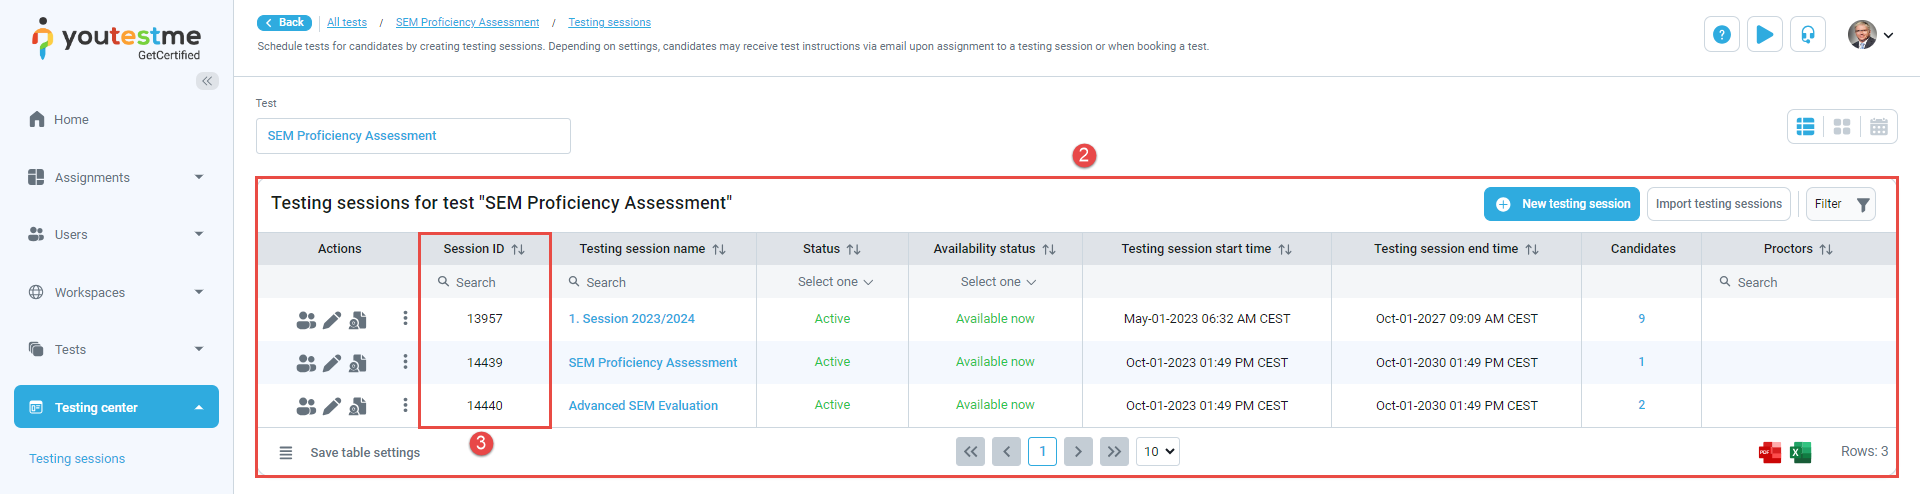
Select the Schedule button of the desired test.
-
In the Testing sessions tab, you'll find a list of all scheduled testing sessions for the selected test.
-
Locate the Session ID column within the table to find the respective Testing Session ID.
To view the testing session ID, follow these steps:
-
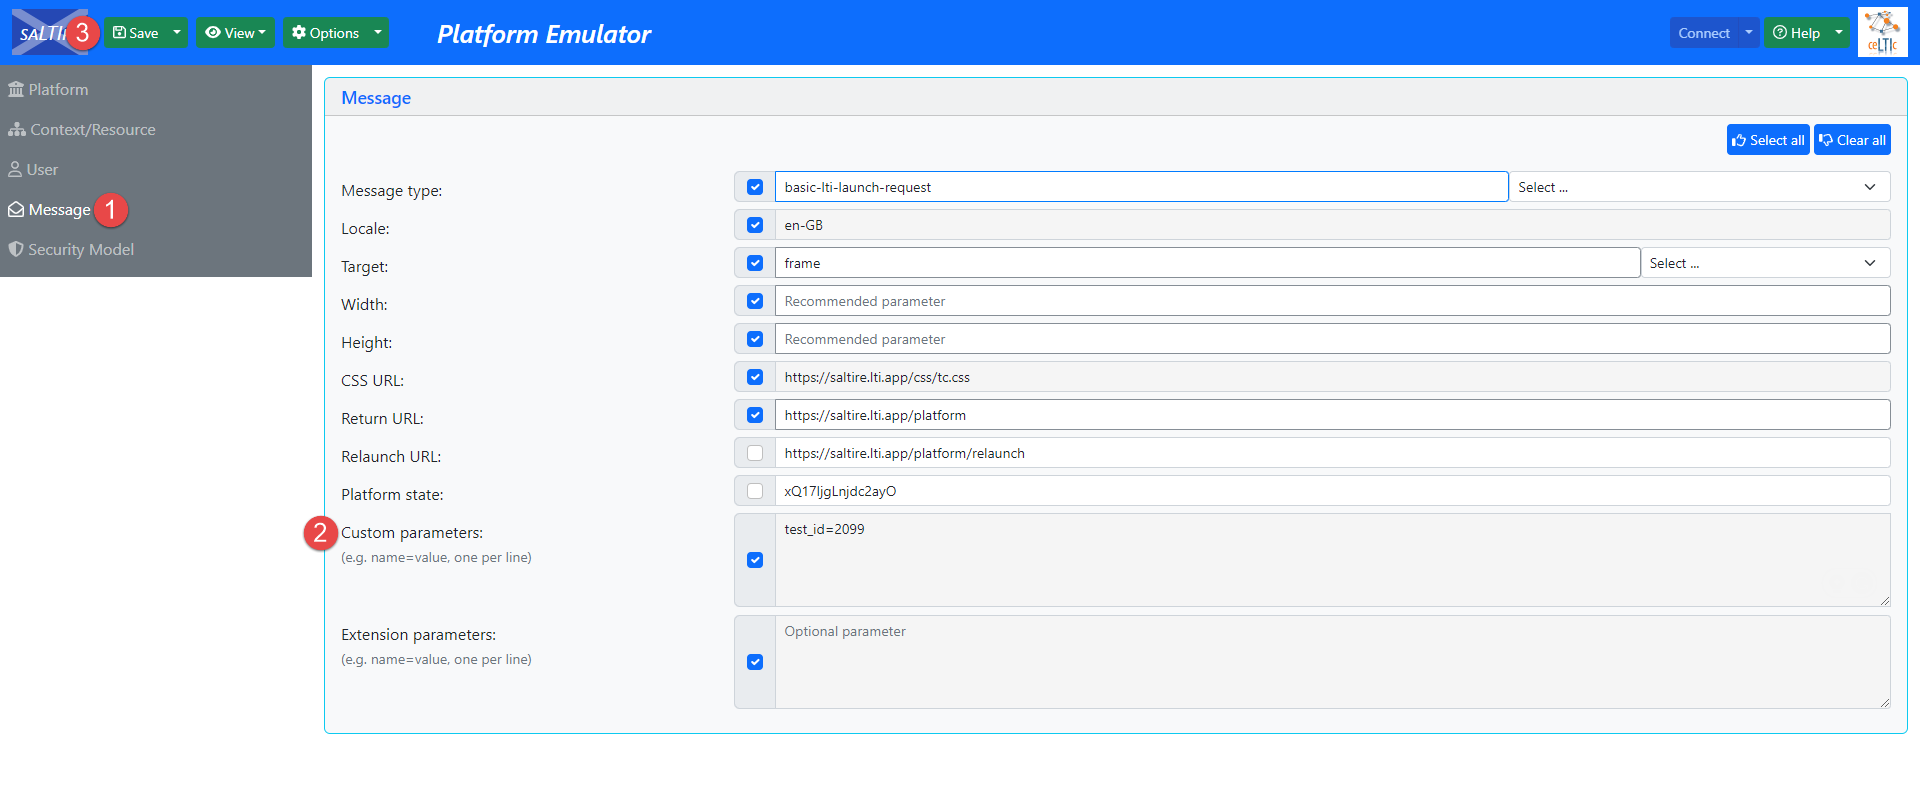
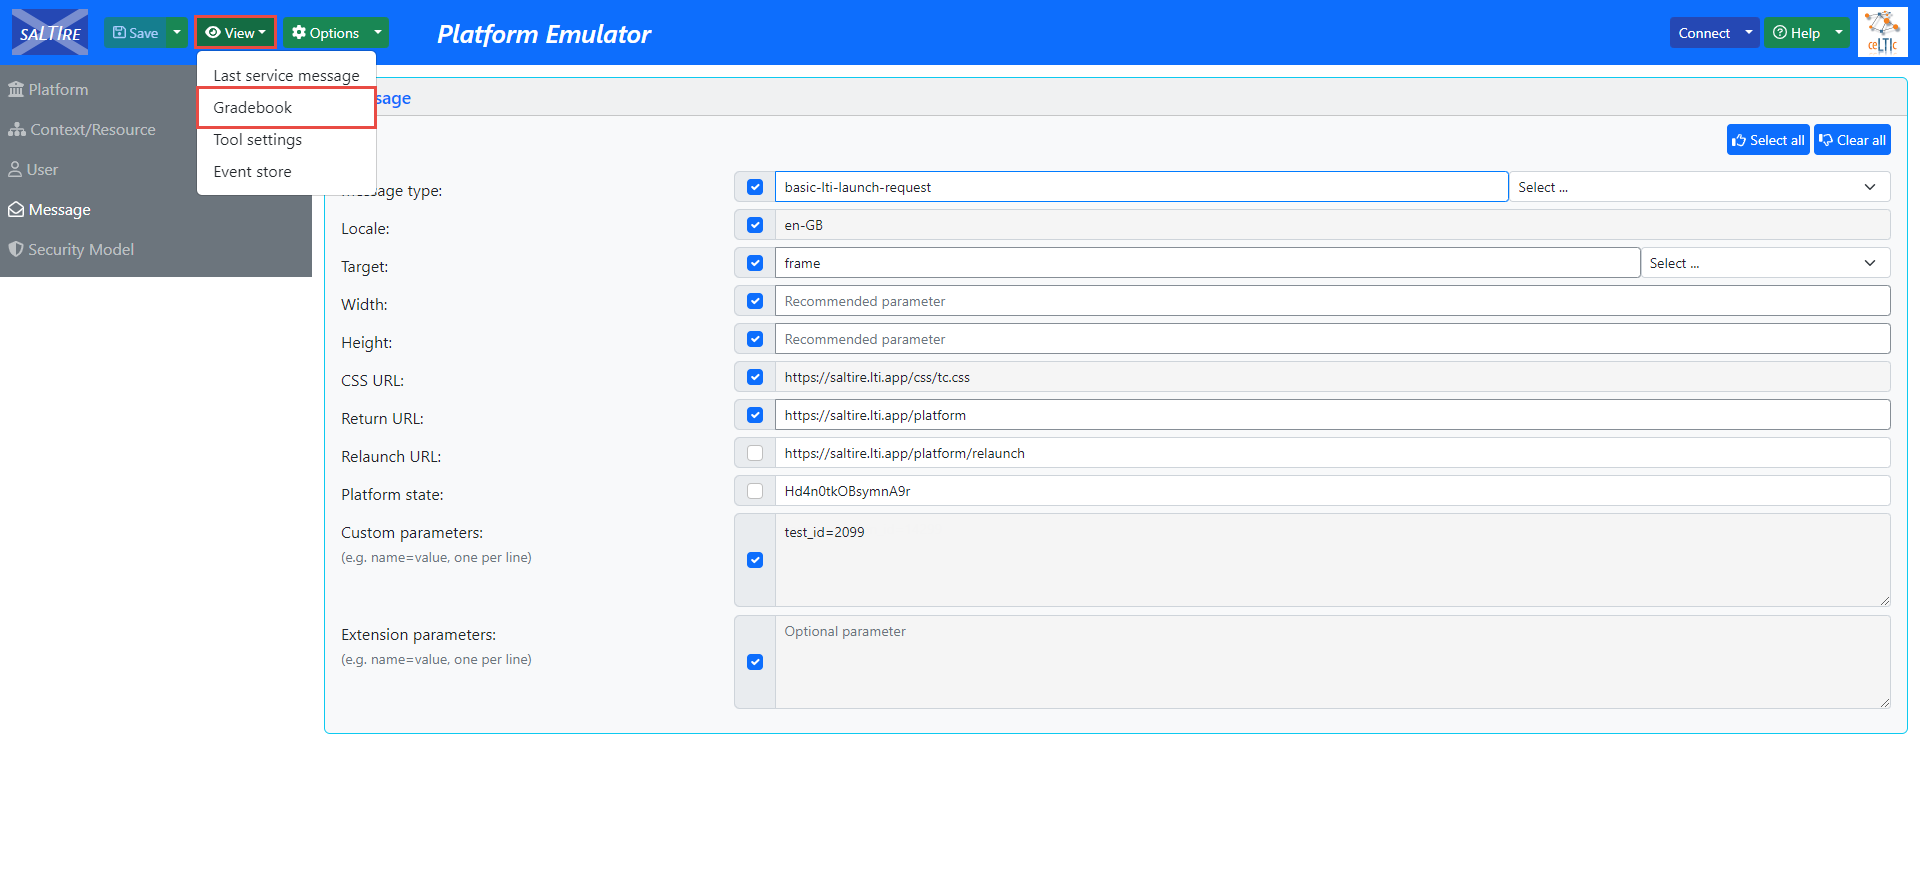
Access the Platform Emulator.
-
Navigate to the Security Model tab.
-
In the Message URL field, enter the Message URL text from the GetCertified application.
-
In the Consumer key field, enter the Consumer key text from the GetCertified application.
-
In the Shared secret field, enter the Secret key text from the GetCertified application.
-
Click the Save button on the top left corner.
More information on how to set both integration settings will be explained below. For the demonstration, LMS Emulator will be used.

-
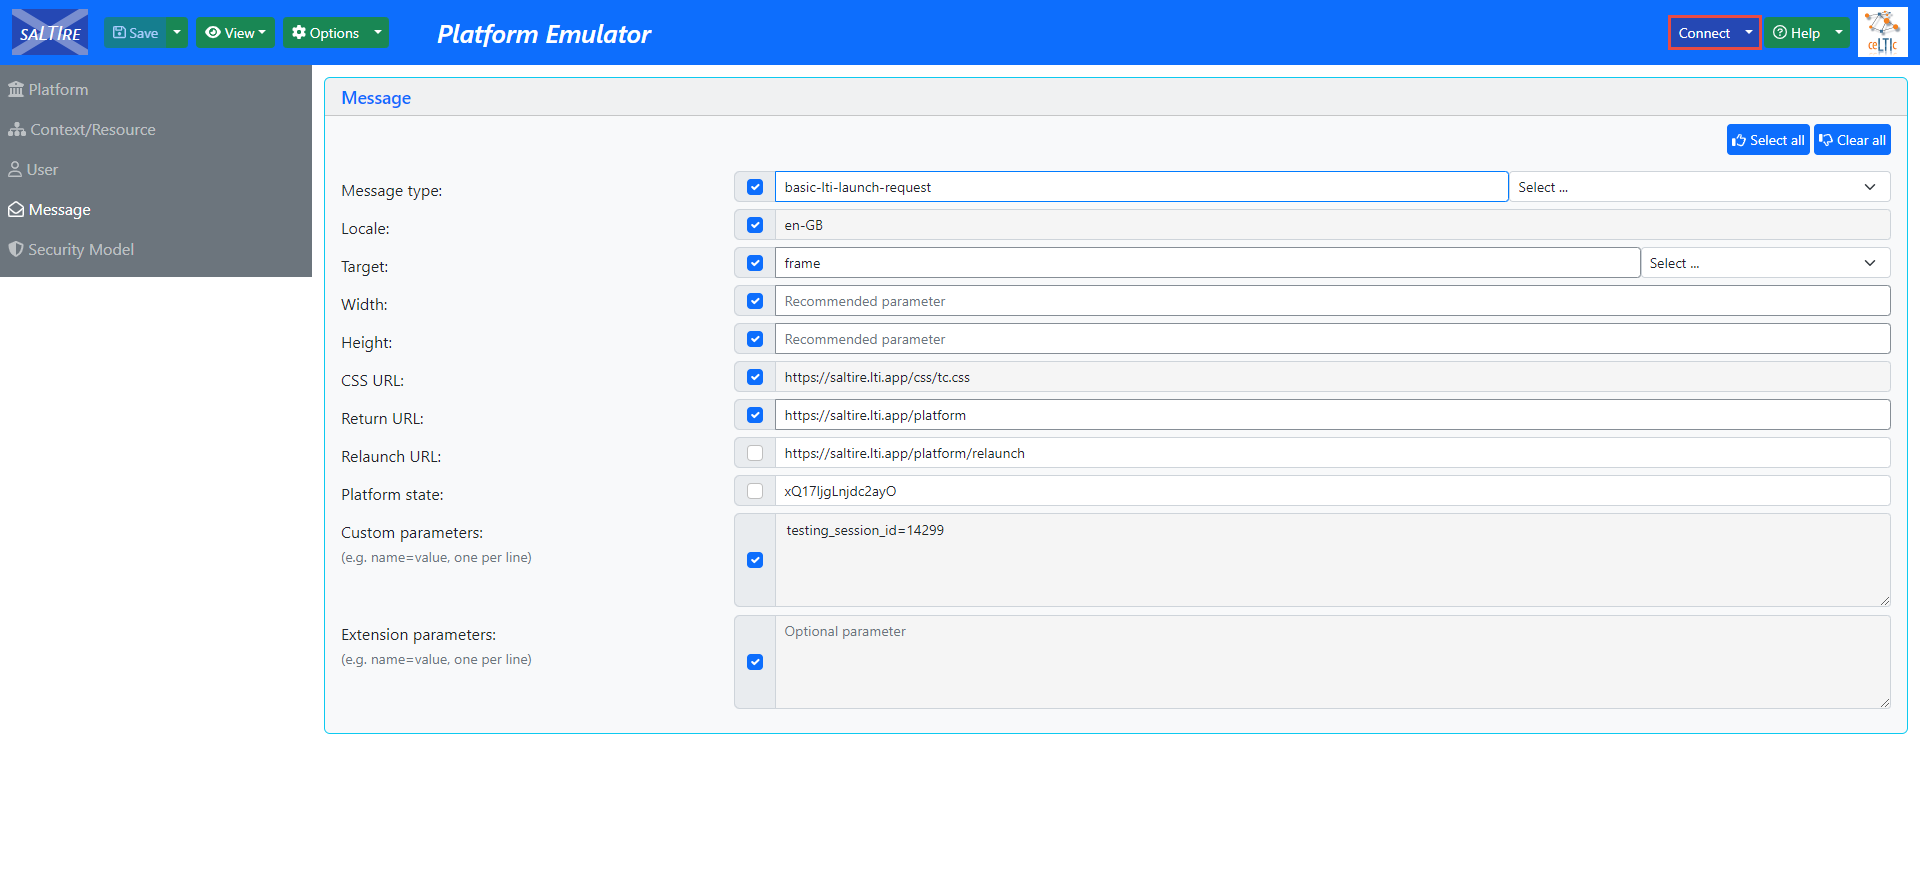
Navigate to the Message tab.
-
In the Custom parameters field, enter the test_id=desired_test_id.
-
Click the Save button.
To give candidates access to the test where they can choose in which testing session they want to start the test, you should do the following:
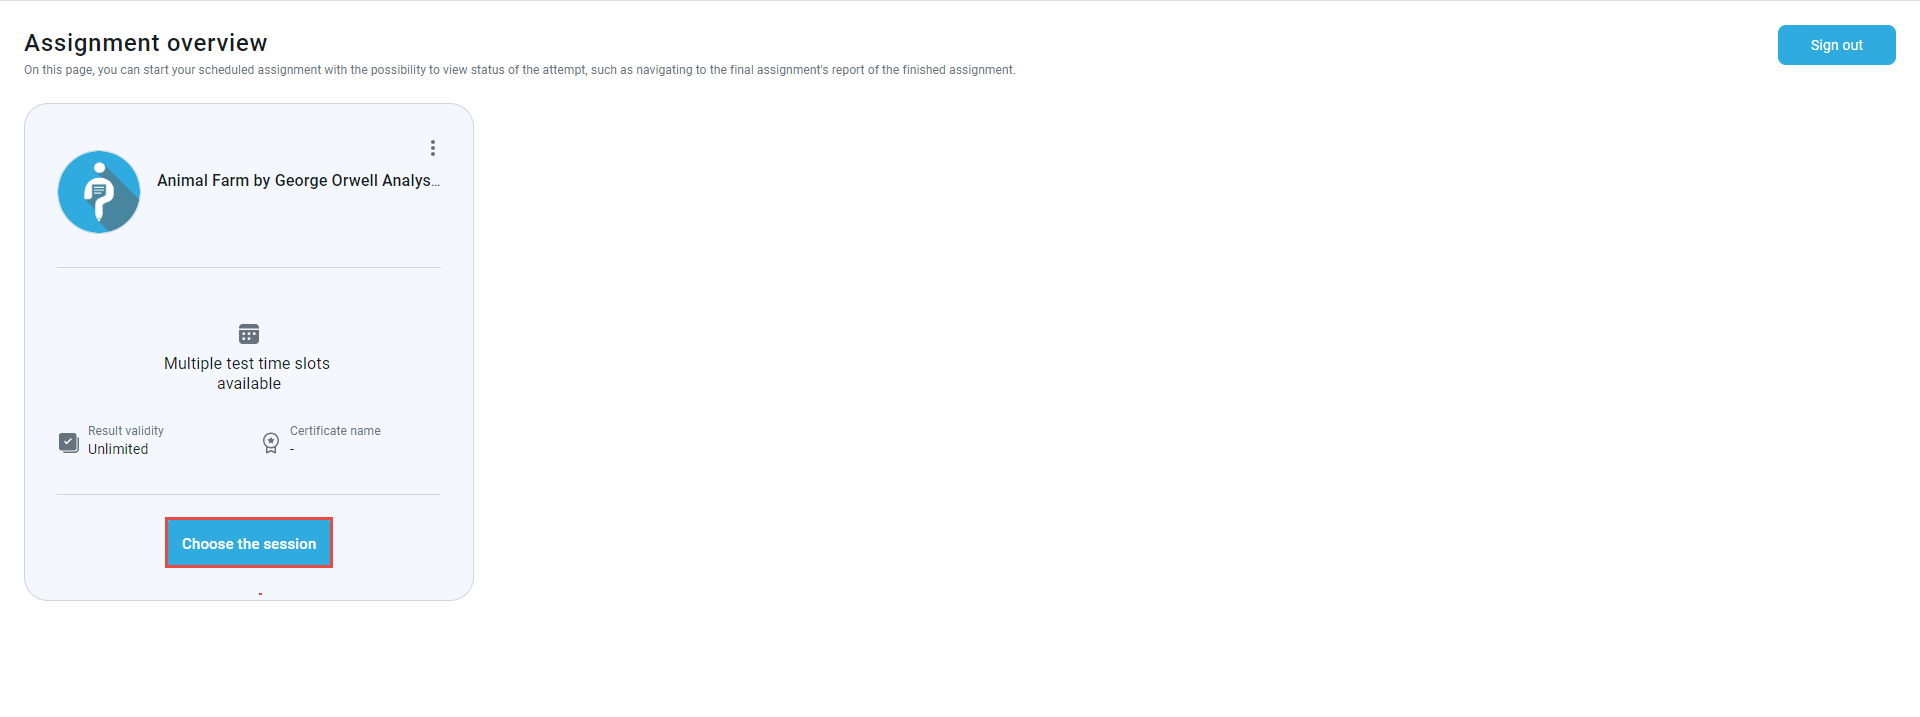
Once the integration is set, a candidate can start the test. To start the test, click the Connect button in the top right corner.

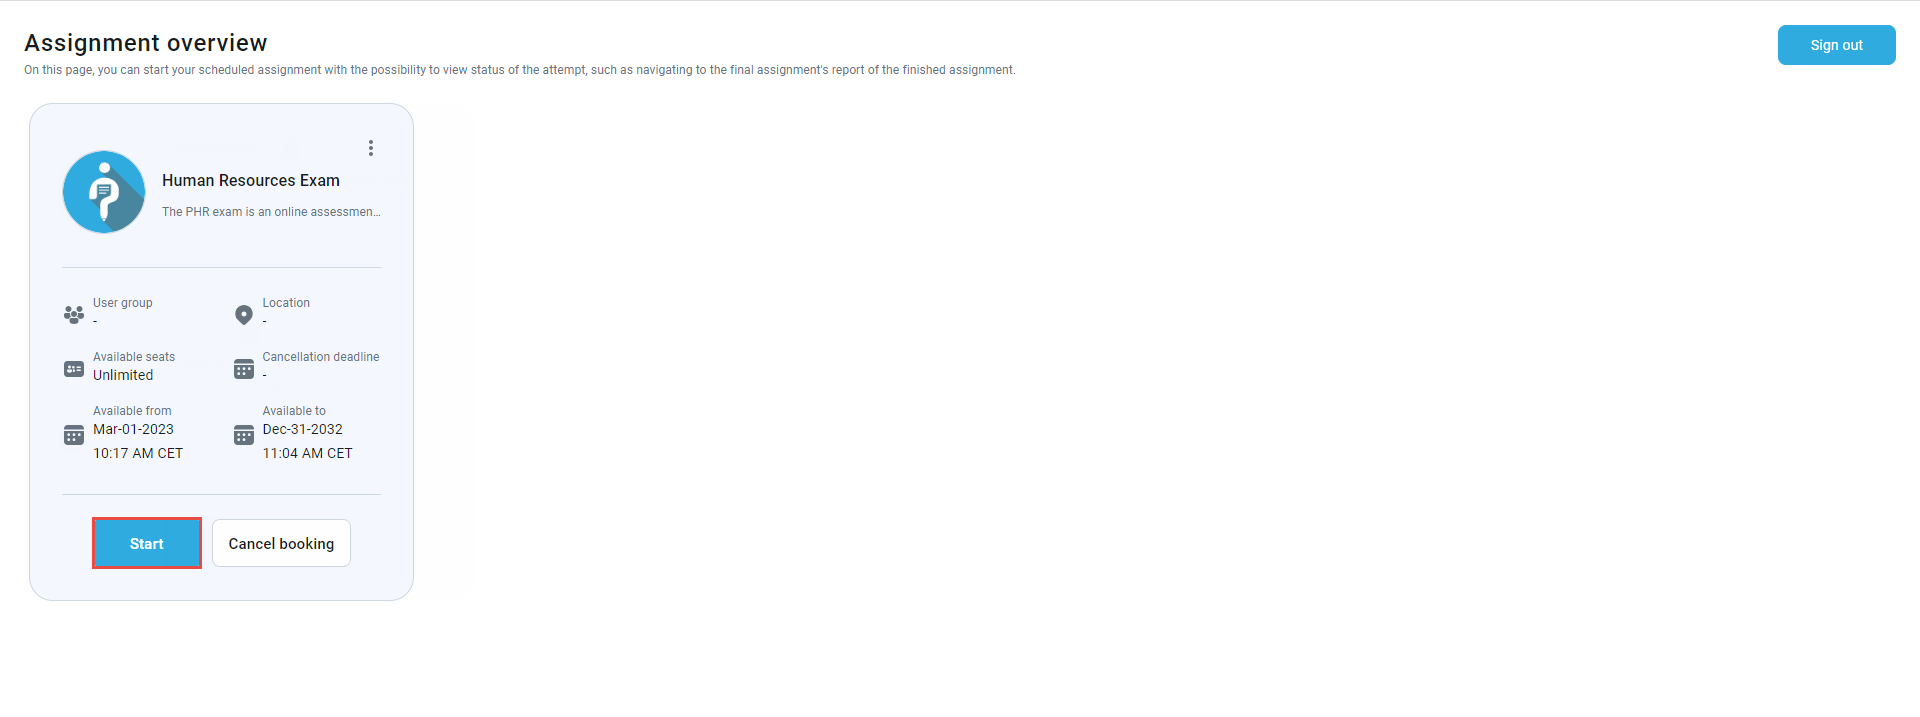
The candidate will be redirected to the GetCertified application, where they can start the test. If there are few testing sessions, the candidate should click the Choose the session button to choose the desired one to start the test. Otherwise, the candidate should only click the Book button to book the available session.
Once the test is completed, the candidate may be redirected to the personal report (depending on the test settings), and once checked, the candidate can Sign out by clicking the button in the top right corner.
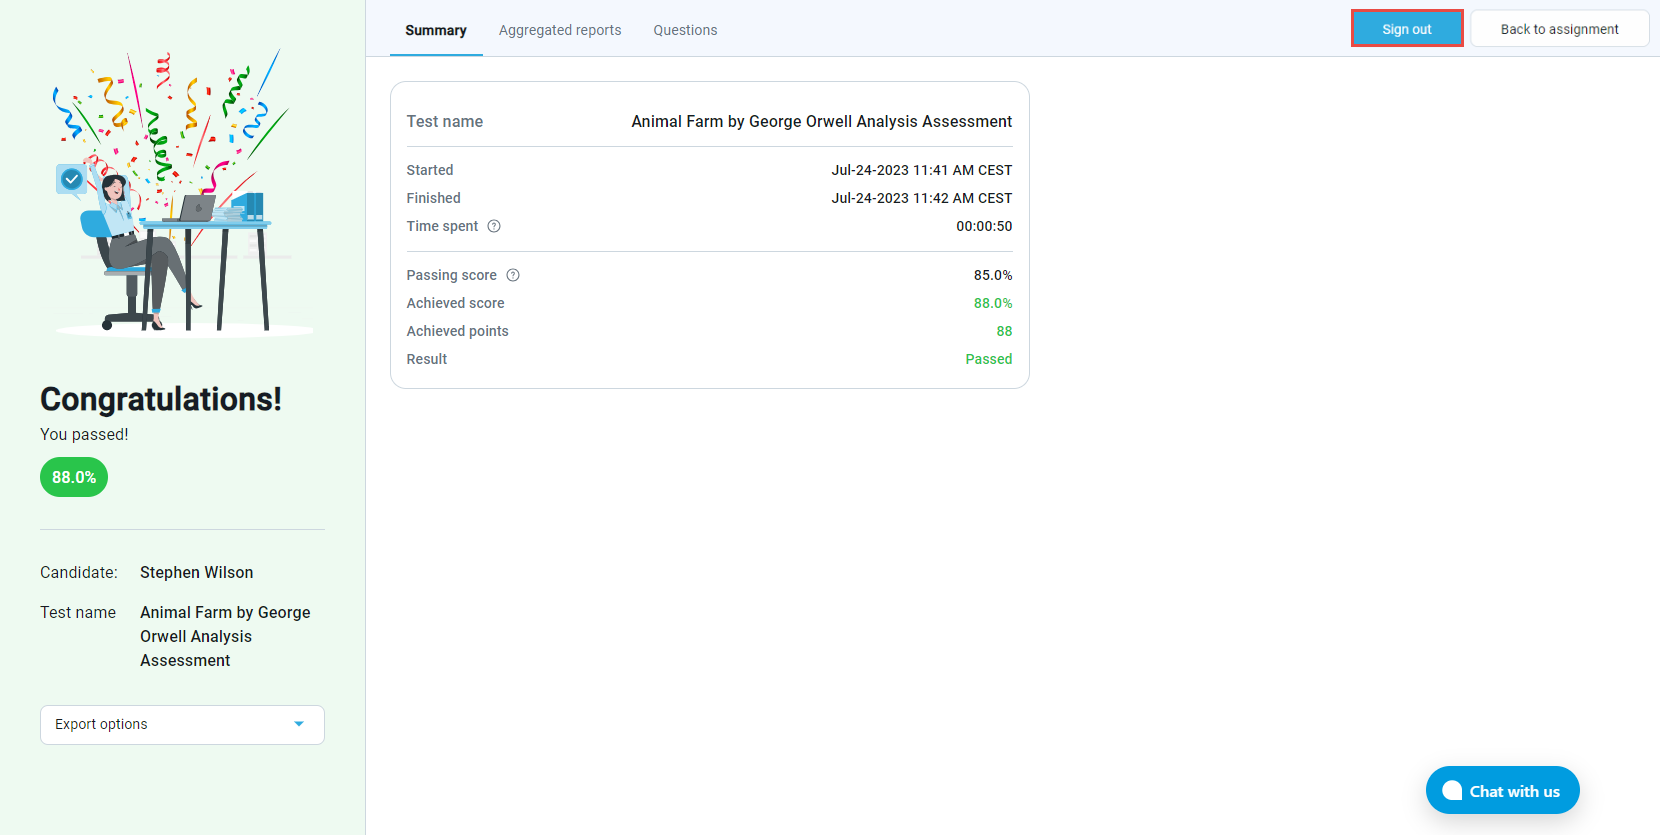
Once signed out, the candidate will be redirected to the LMS page. The candidate can access their report by clicking the View button, then Gradebook.
-
Navigate to the Message tab.
-
In the Custom parameters field, enter the testing_session_id=desired_testing_session_id.
-
Click the Save button.
To give candidates access to the testing session directly, you should do the following:

Once the integration is set, a candidate can start the test. To start the test, click the Connect button in the top right corner.
The candidate will be redirected to the GetCertified application, where they can start the test. Since the candidate has already been assigned to the testing session, they will have the Start button. The rest of the process is the same as for the first scenario.
Check the links below for more information about LTI integration.
Taking a Test in YouTestMe GetCertified Using the LTI Workflow
Sending the student back to the LMS (Test-taking via LTI)
-
-
OpenID Settings
GetCertified application can act as a Client in the OpenID Connect Single Sign-on (SSO) protocol, which allows user authentication and authorization by an Identity Provider, for example, Azure AD, Okta, etc. OpenID Connect-based SSO can be configured for multiple Identity Providers simultaneously. You need to create an OpenID configuration and define the parameters of the Identity Provider and the Client (GetCertified application).
Note: As an example, we will use Microsoft Azure as the OpenID Connect Identity Provider. Some basic information regarding the OpenID Connect integration can be found on the following link.
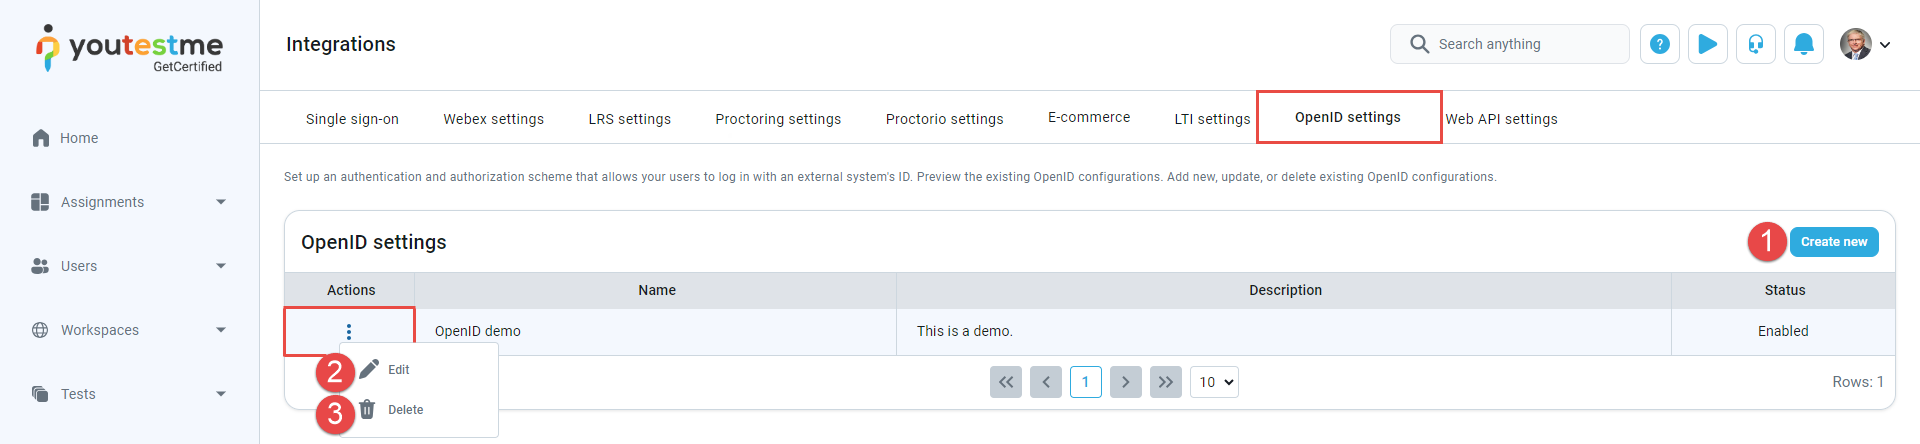
On this tab, you can access a comprehensive table displaying all existing Open ID configurations featuring details such as their names, descriptions, statuses, and available actions. Additionally, you can perform various actions, including:
-
Click the Create new button to create a new OpenID configuration. A pop-up window will appear, allowing you to input the required parameters.
-
Click the Edit button to preview or modify an existing OpenID configuration. A pop-up window with the same fields as the one for adding a new configuration will appear, enabling you to change the parameters of the selected OpenID configuration.
-
Delete existing configurations. Click the Delete button if you wish to remove an Open ID configuration. Confirm the deletion when prompted to delete the configuration permanently.
-
The Name of the OpenID configuration.
-
The Description of the OpenID configuration.
-
The Status of the OpenID configuration. If the status is Enabled, users will be able to log in with the IP specified in the configuration. Otherwise, they will not be able to do so.
-
The Configuration URL - URL where the configuration of the OpenID IP can be found, for example authorization endpoint URL, token endpoint URL, supported scopes etc. The OpenID IP provides this parameter.
-
The Client ID - Public identifier for the client (GetCertified application). The OpenID IP provides it when registering the application.
-
The Client secret - Value the client uses to exchange an authorization code for a token. The OpenID IP provides it when registering the application.
-
The Scope - Specify what access privileges are requested as part of the authorization.
-
GetCertified automatically generates the Initiate Login URL parameter in the configuration. This is the URL of the GetCertified endpoint that initiates the sign-in flow upon receiving a request. When the OpenID IP redirects to this endpoint, the client is triggered to send an authorization request. This parameter is optional, and if used, it is copied from the configuration window and pasted to the appropriate field in the app settings on the IP side.
-
The Callback URL parameter is automatically generated in the configuration by GetCertified. This is the URL of the callback endpoint where the OpenID IP redirects the user's browser and sends security tokens after authentication. On the IP side, this parameter might be referred to as "redirect URI" as well, and you have to copy it from the configuration window and paste it there.
-
The OpenID provider can send a request to this URL to initiate the logout on the client side when the user logs out. Sending a request to this URL will clear user session data in YouTestMe, and the user will have to log in again to access the application.
-
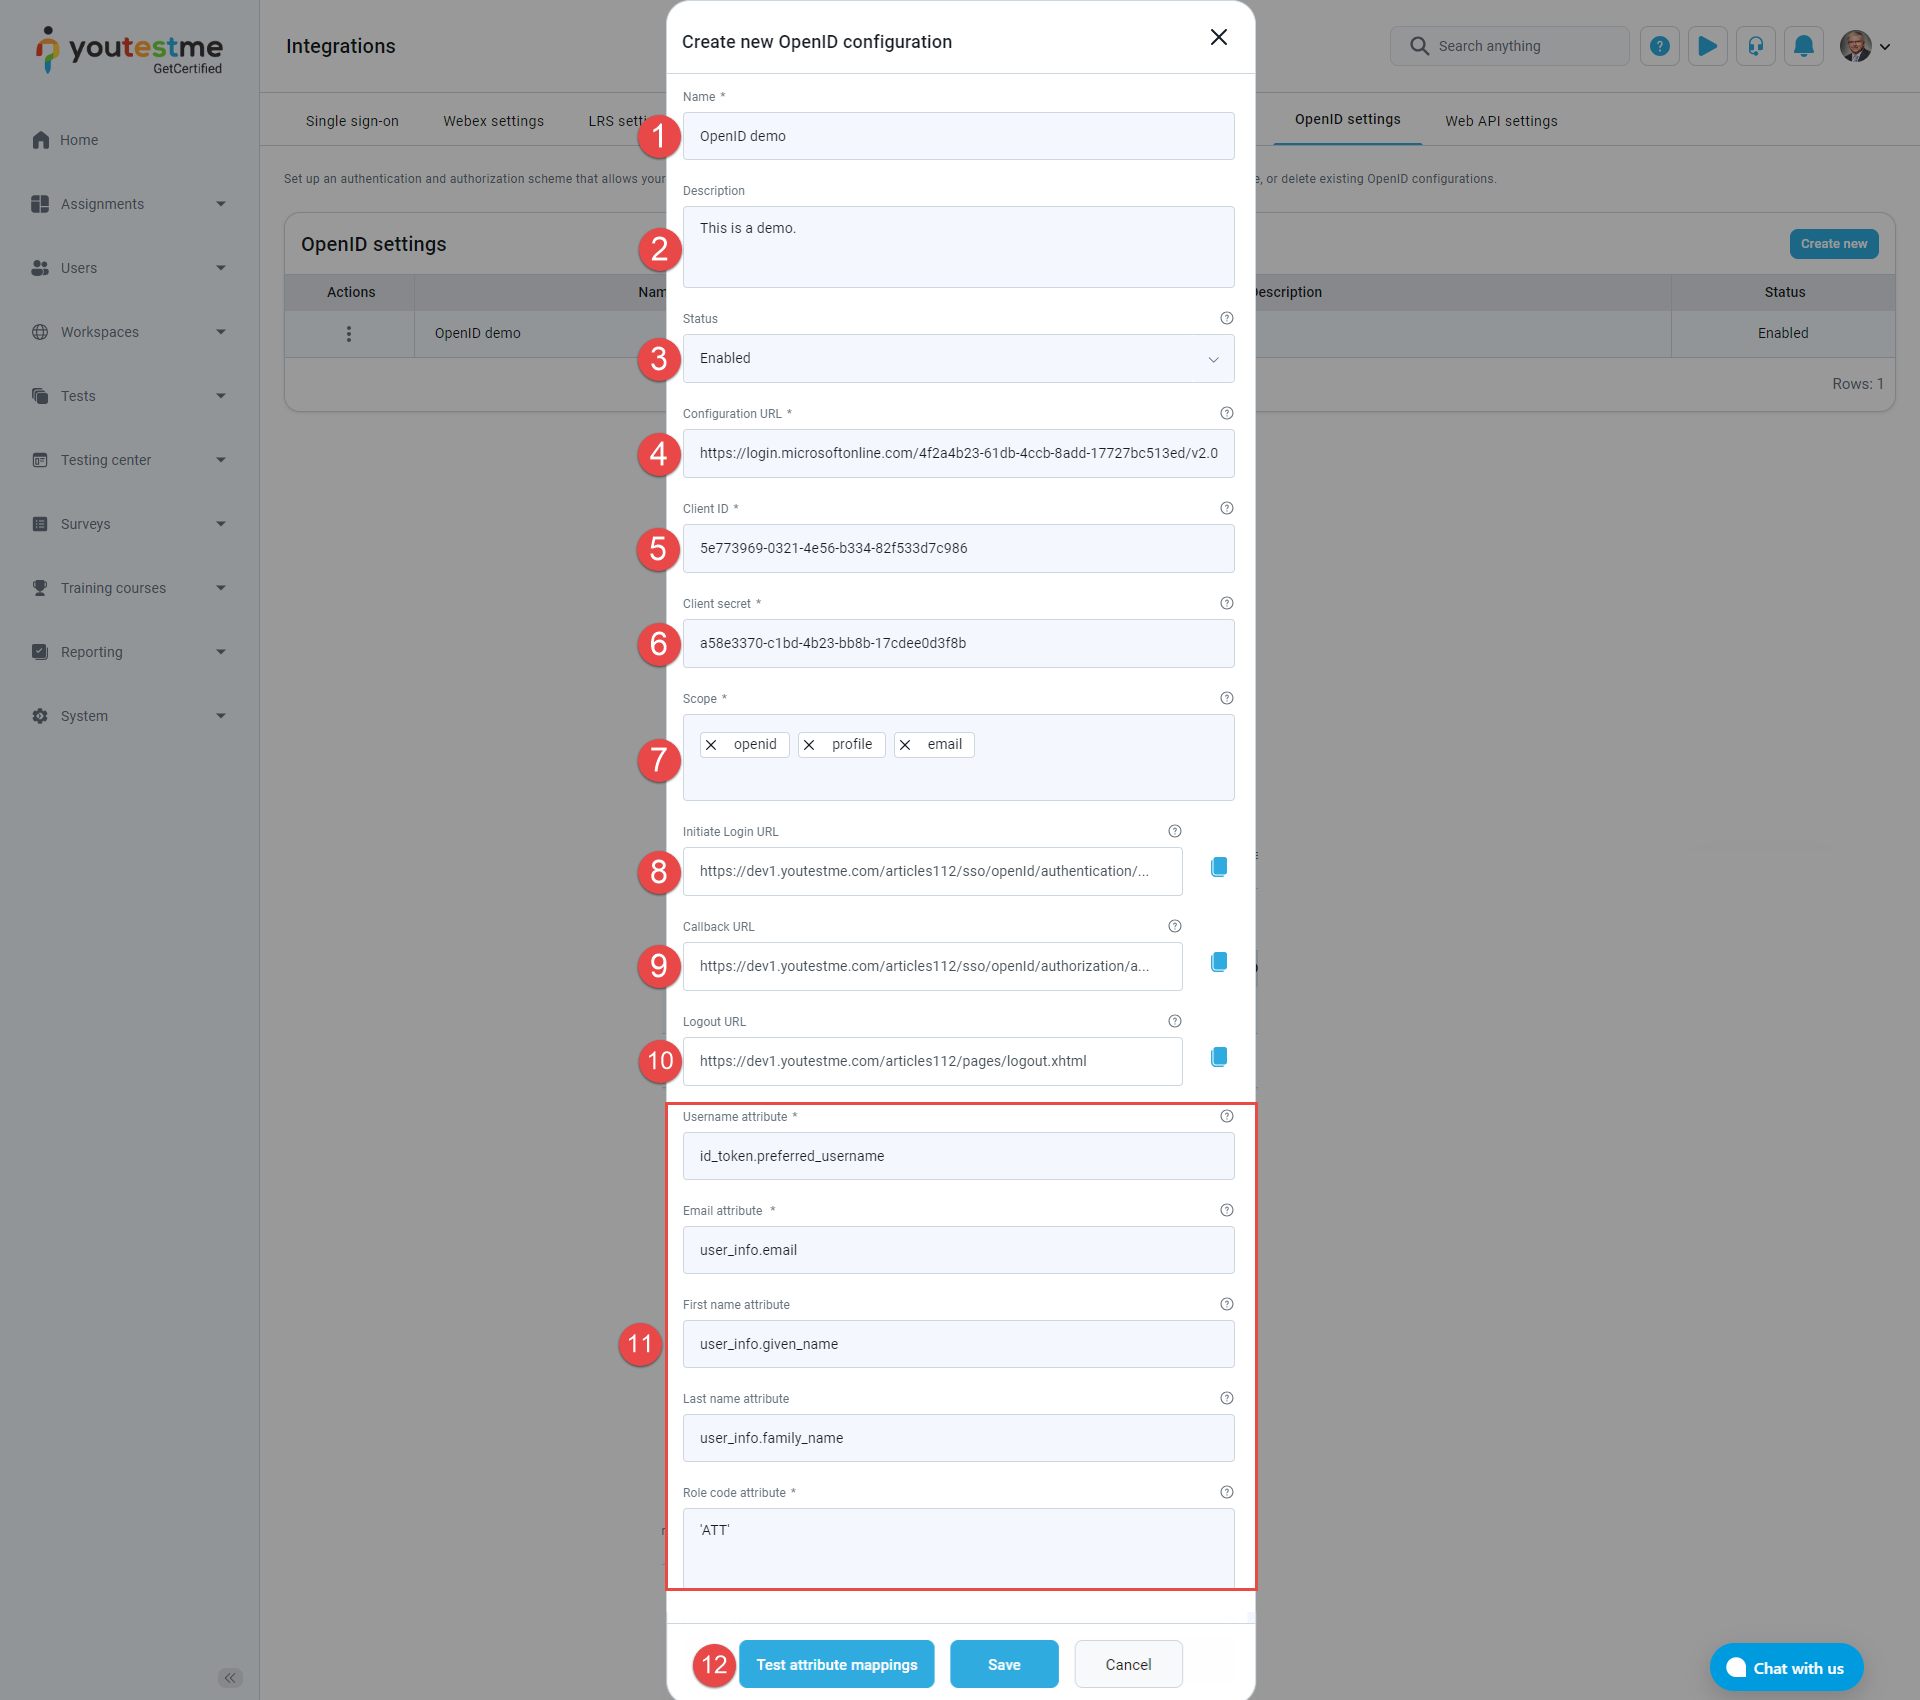
Mapping of the Authorization server (IP) claims to the GetCertified user profile attributes. Claims are name/value pairs that contain information about a user. The claims can be sent using the access token, the ID token, or the UserInfo endpoint data. An access token is an authorization in the form of a string given to an application to access a user's protected data. An ID token is a string that contains information about a user and proves that the user has been authenticated. The UserInfo endpoint returns claims about an authenticated user. The mapping from the claims can be specified for each GetCertified user account attribute. When a pop-up window for a new OpenID configuration opens, the default values are set for the most important attributes (username, email, first name, last name, role). These values are only suggestions, and they can be changed. Every value represents a JavaScript expression based on which the corresponding attribute is evaluated
-
The expression id_token.preferred_username can obtain the Username attribute value (assuming that the preferred_username claim is included in the ID token on the IP side). This means the result of evaluating id_token.preferred_username will be mapped to the Username attribute. A username is a unique identifier for the user, based on which it is determined whether the received claims are used to update an existing one or to create a new user.
-
user_info.email can be mapped to the Email attribute (assuming that the data sent by the UserInfo endpoint includes the email claim).
-
As a special case of a JavaScript expression, a constant represented by a string value (surrounded by single or double quotes) can be mapped to an attribute.
Note: Role code attribute is a predefined code – ‘ATT’ which shouldn’t be changed. With that setting, all users that log in using Open ID will get a Student role. If you wish to modify the role mapping, you can utilize the role code from the relevant role in the Roles and Permissions tab to create a new OpenID configuration or update the existing one.
Under Microsoft Azure, you can add claims to be sent in access token/ID token or add a new group of users. For example, we created several groups corresponding to the user roles in our application and assigned users to these groups. We determine the user role based on the group they belong to. The image below shows the groups we created.
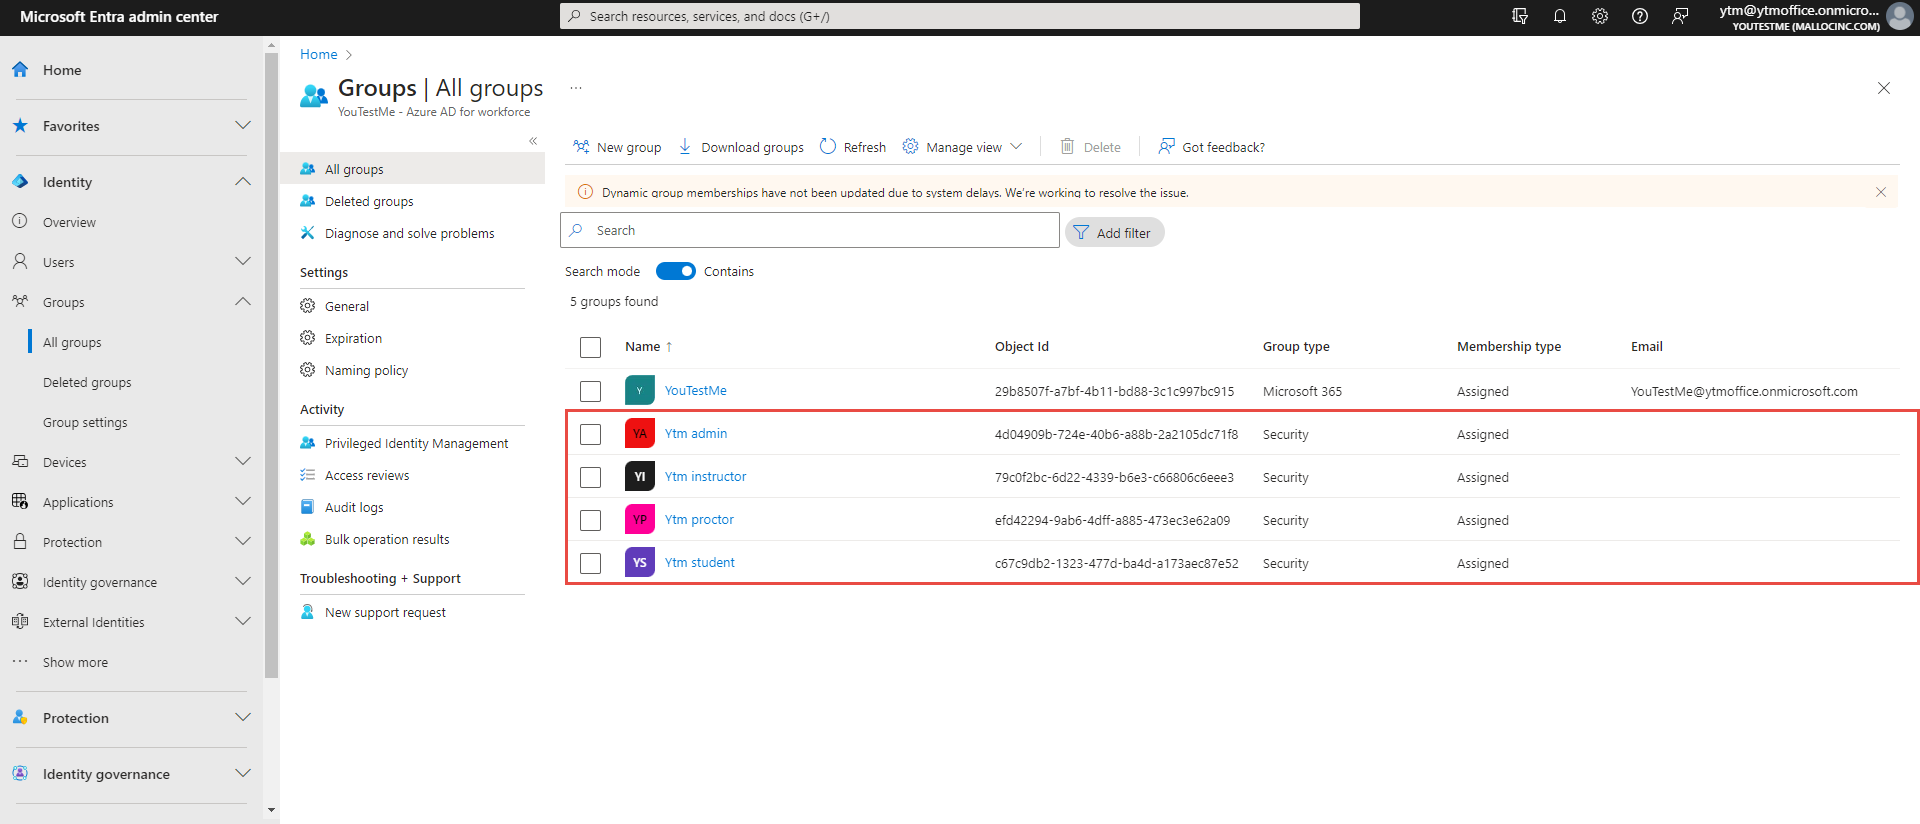 Every group is identified by its Object Id,
which we use in the JavaScript expression for
the Role code attribute.
Every group is identified by its Object Id,
which we use in the JavaScript expression for
the Role code attribute.
(id_token.groups.indexOf('4d04909b-724e-40b6-a88b-2a2105dc71f8') !== -1) ? 'ADM'
(id_token.groups.indexOf('79c0f2bc-6d22-4339-b6e3-c66806c6eee3') !== -1) ? 'INS'
(id_token.groups.indexOf('efd42294-9ab6-4dff-a885-473ec3e62a09') !== -1) ? 'PRC'
(id_token.groups.indexOf('c67c9db2-1323-477d-ba4d-a173aec87e52') !== -1) ? 'ATT'
From the example above, a user who belongs to the Ytm admin group (in IP side) will have an administrator role in GetCertified app, a user who belongs to the GetCertified instructors group, an instructor role, etc.
-
-
A new pop-up window opens when clicking the Test attribute mappings button, which tests the mappings between the IP's claims and GetCertified user profile attributes. This allows you to manually define strings in JSON format that simulate data received by the IP and examine the values of user profile attributes for that particular case.
-
Enter a JSON string that simulates the payload of an access_token received by the IP.
-
Enter a JSON string that simulates the payload of an id_token received by the IP.
-
Enter a JSON string that simulates the data received as the response to a request to the user_info endpoint of the IP.
-
The User profile attribute values corresponding to the above IP data are displayed by clicking the Test button.
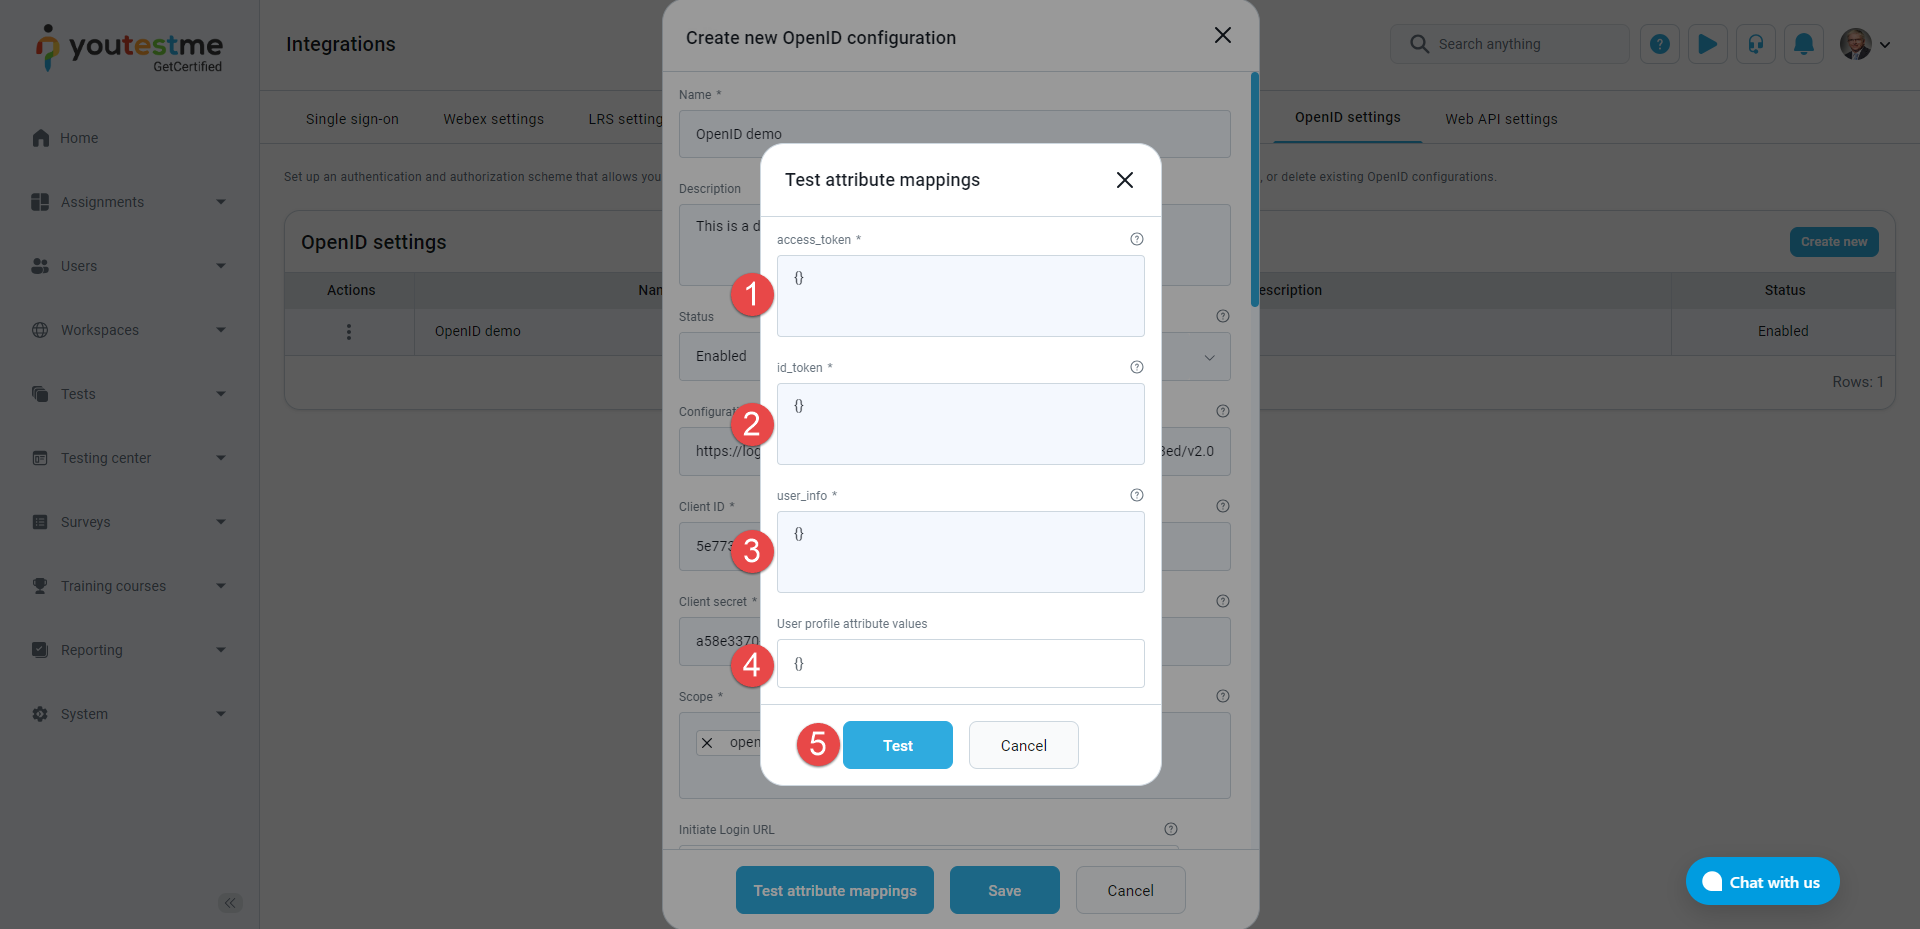
When the pop-up window opens:
-
Here, we will provide an explanation of all available options during creation or update. Subsequently, we will guide you through the process of configuring the OpenID configuration using the Microsoft Azure application.
-
Enter the Name of the OpenID configuration.
-
Optionally enter the Description of the OpenID configuration.
-
Select the Enabled status of the OpenID configuration.
-
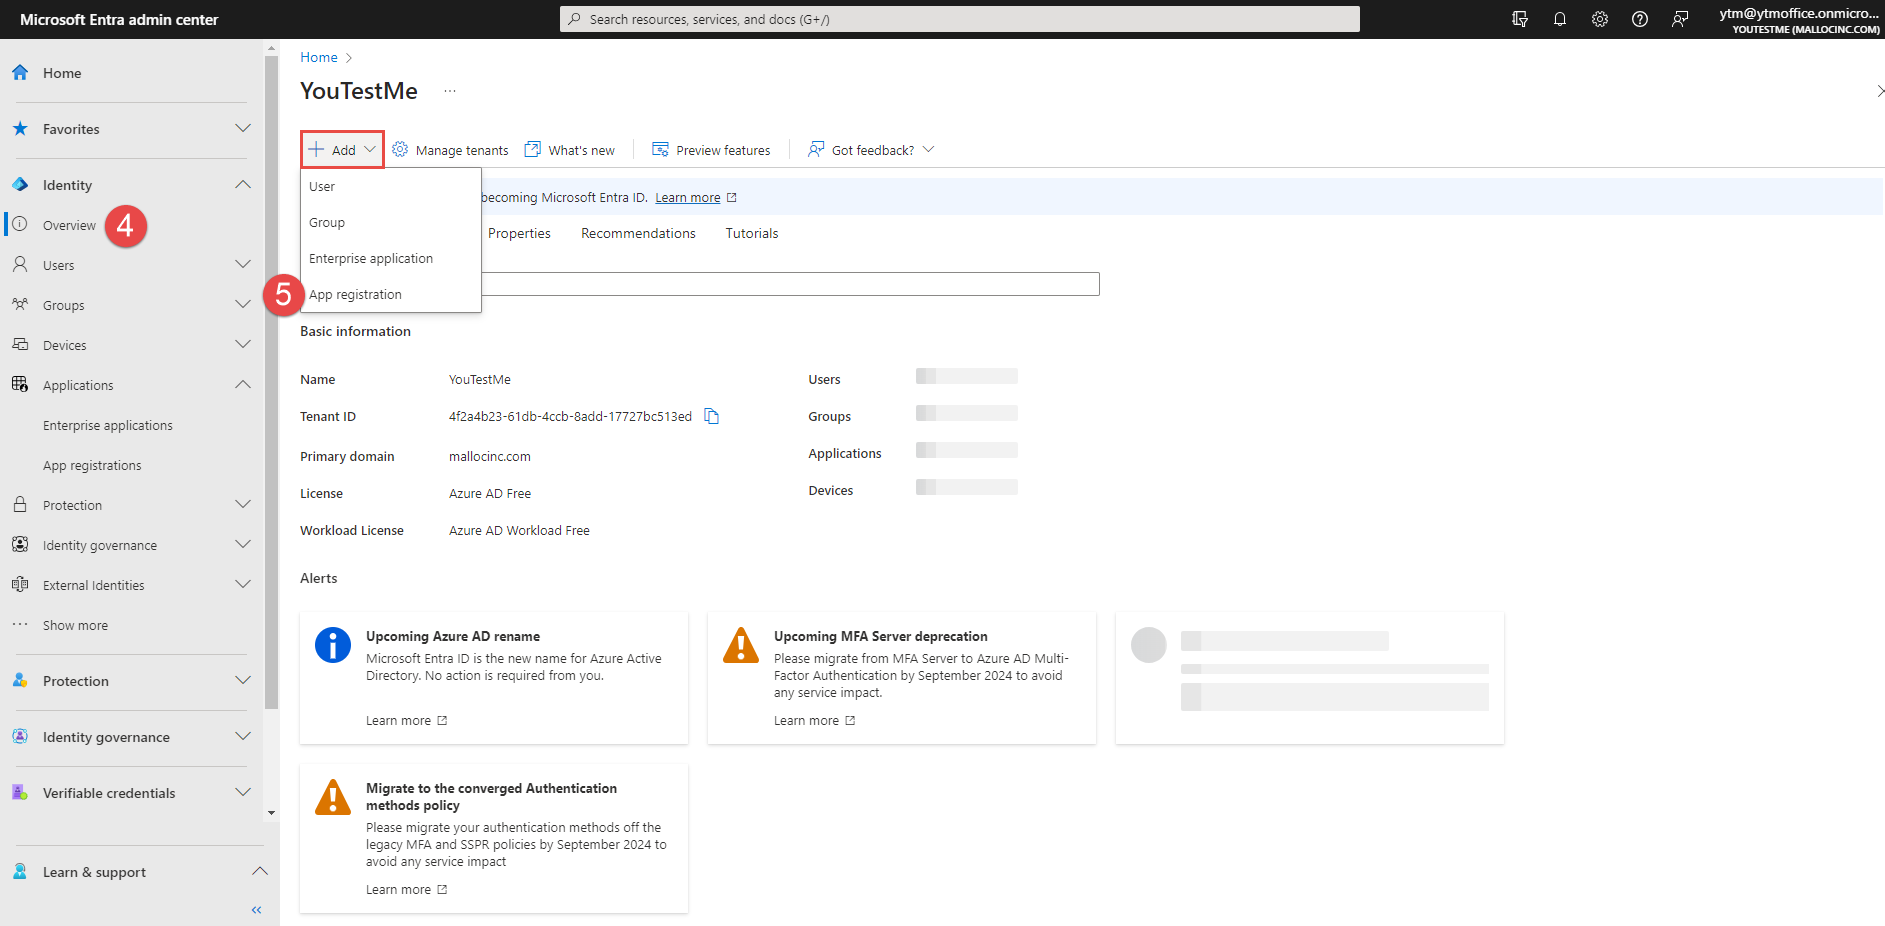
Go to the Overview tab.
-
Click the Add button and then click the App registration button.
-
Enter the name of the new registration.
-
Click the Register button.
-
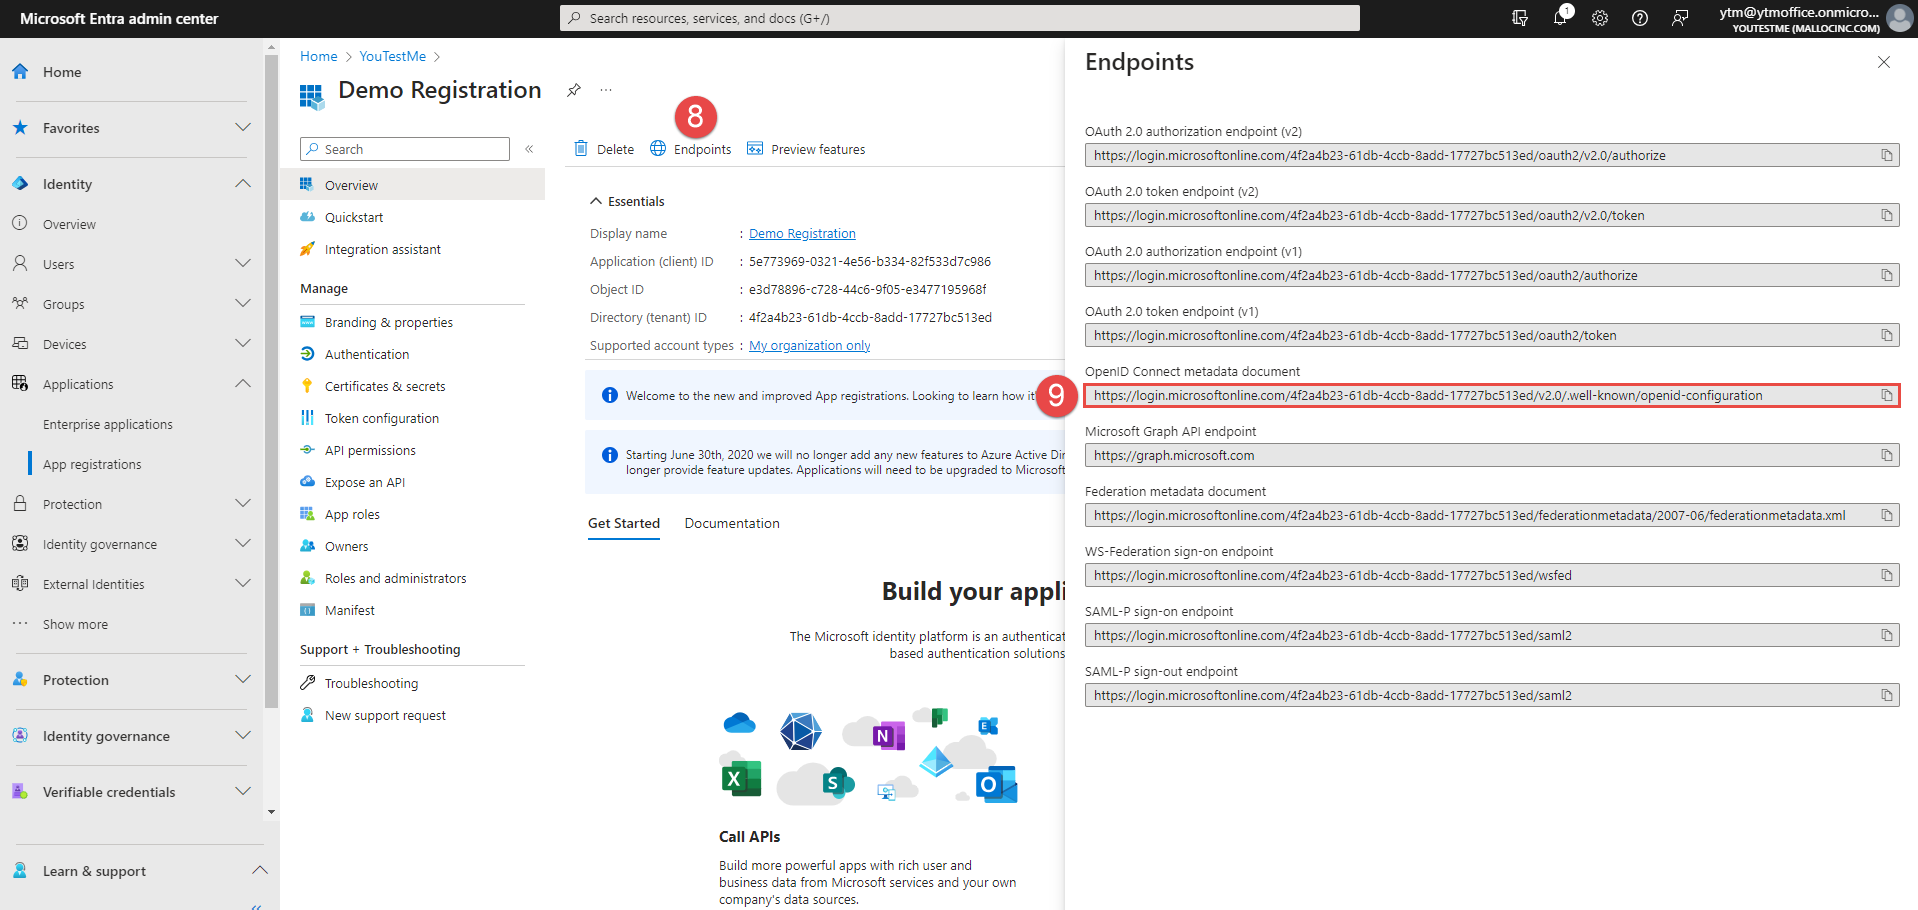
When the registration is created, navigate to the Endpoints.
-
Copy the OpenID Connect metadata document.
-
Paste the URL into the Configuration URL field in the GetCertified application.
-
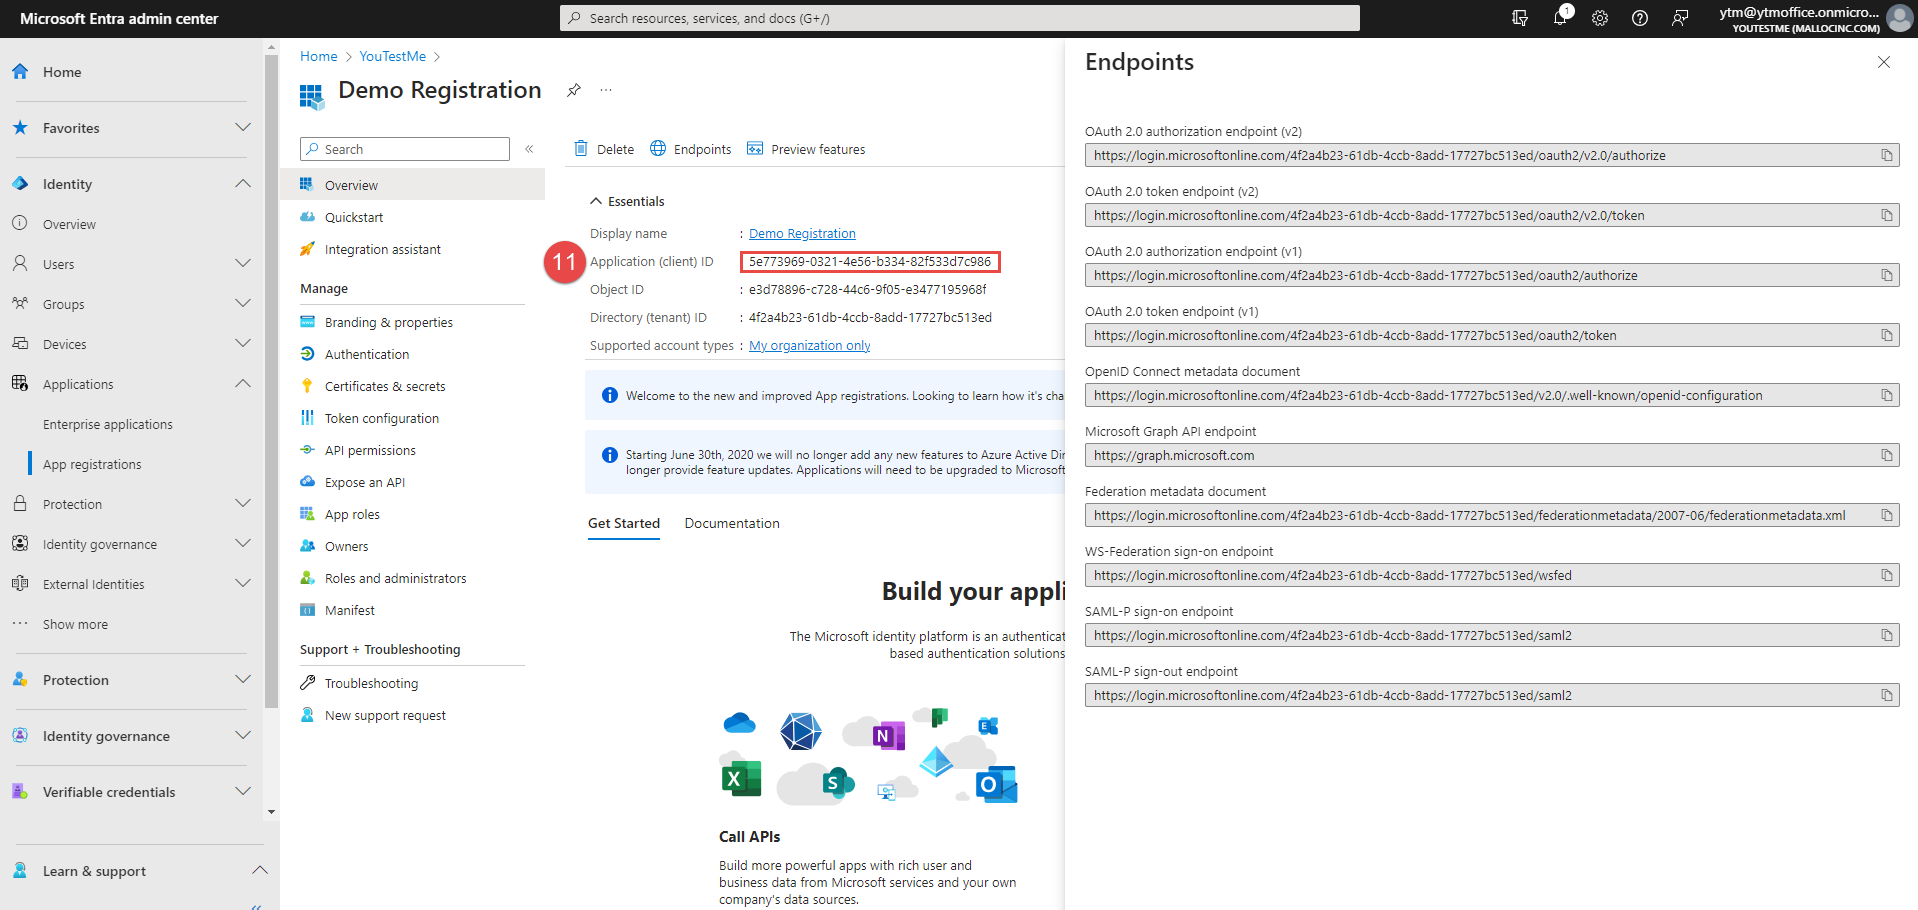
Copy the data from the Application (client) ID field.
-
Paste it to the Client ID field in the GetCertified application.
-
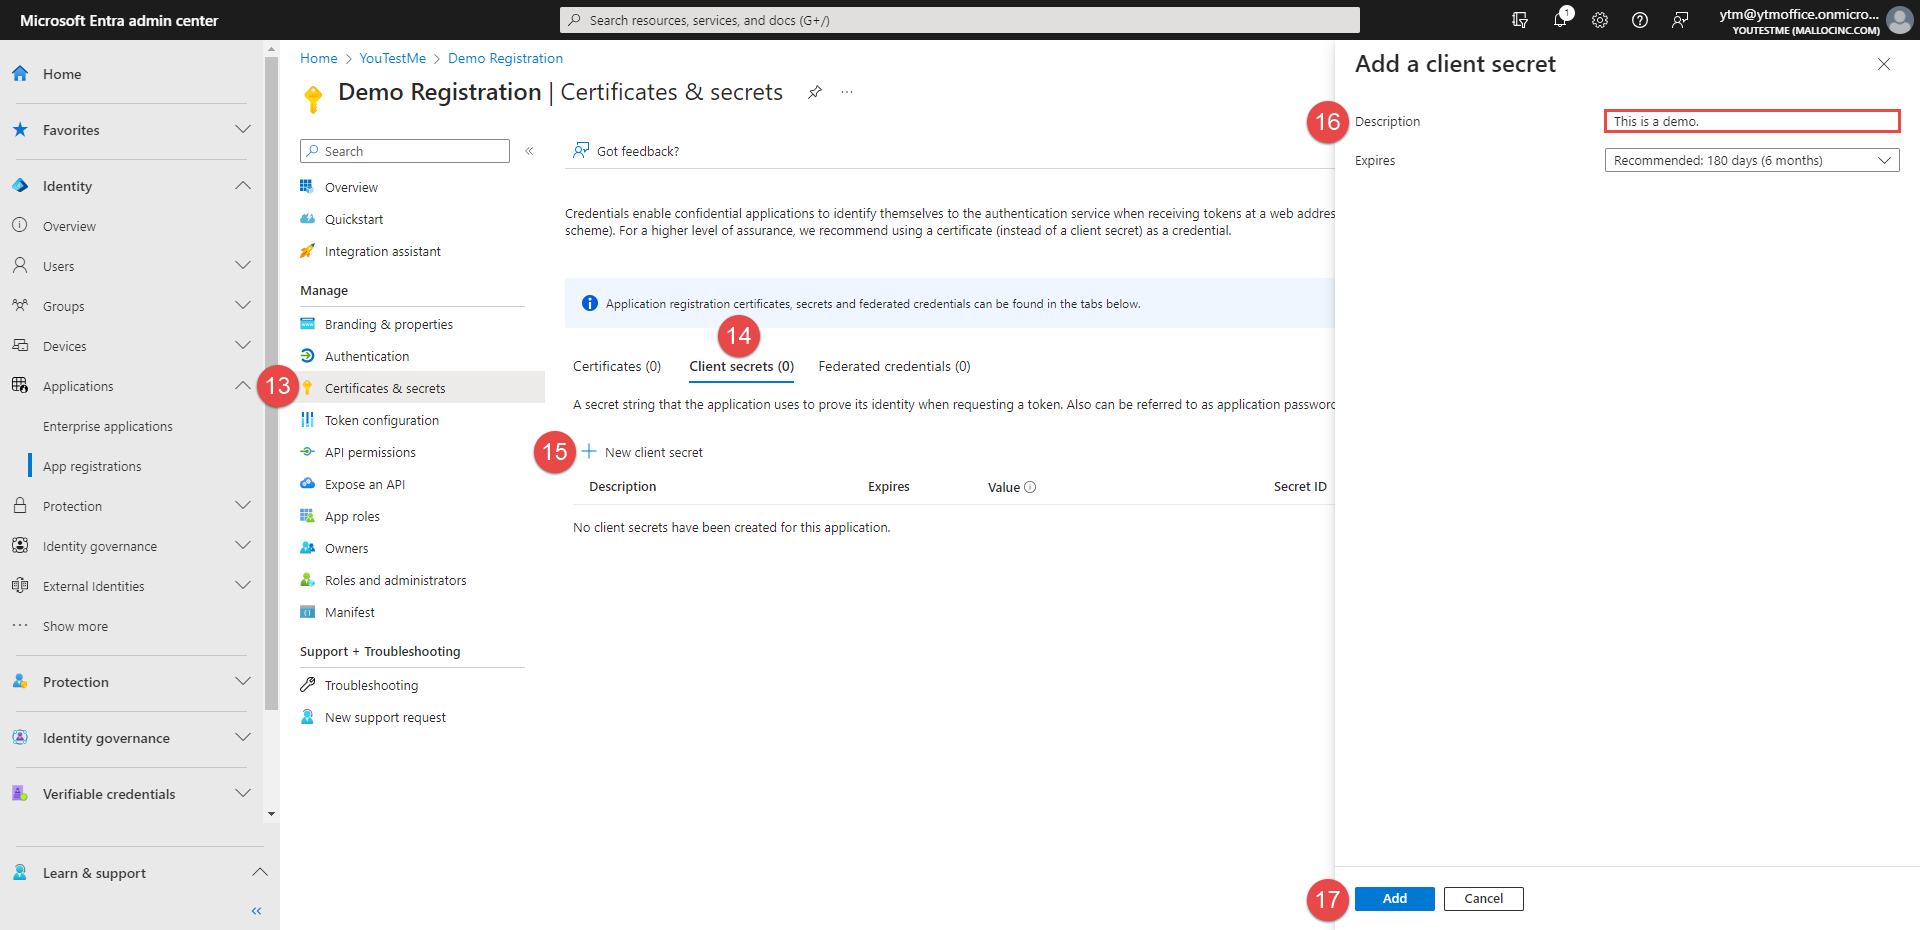
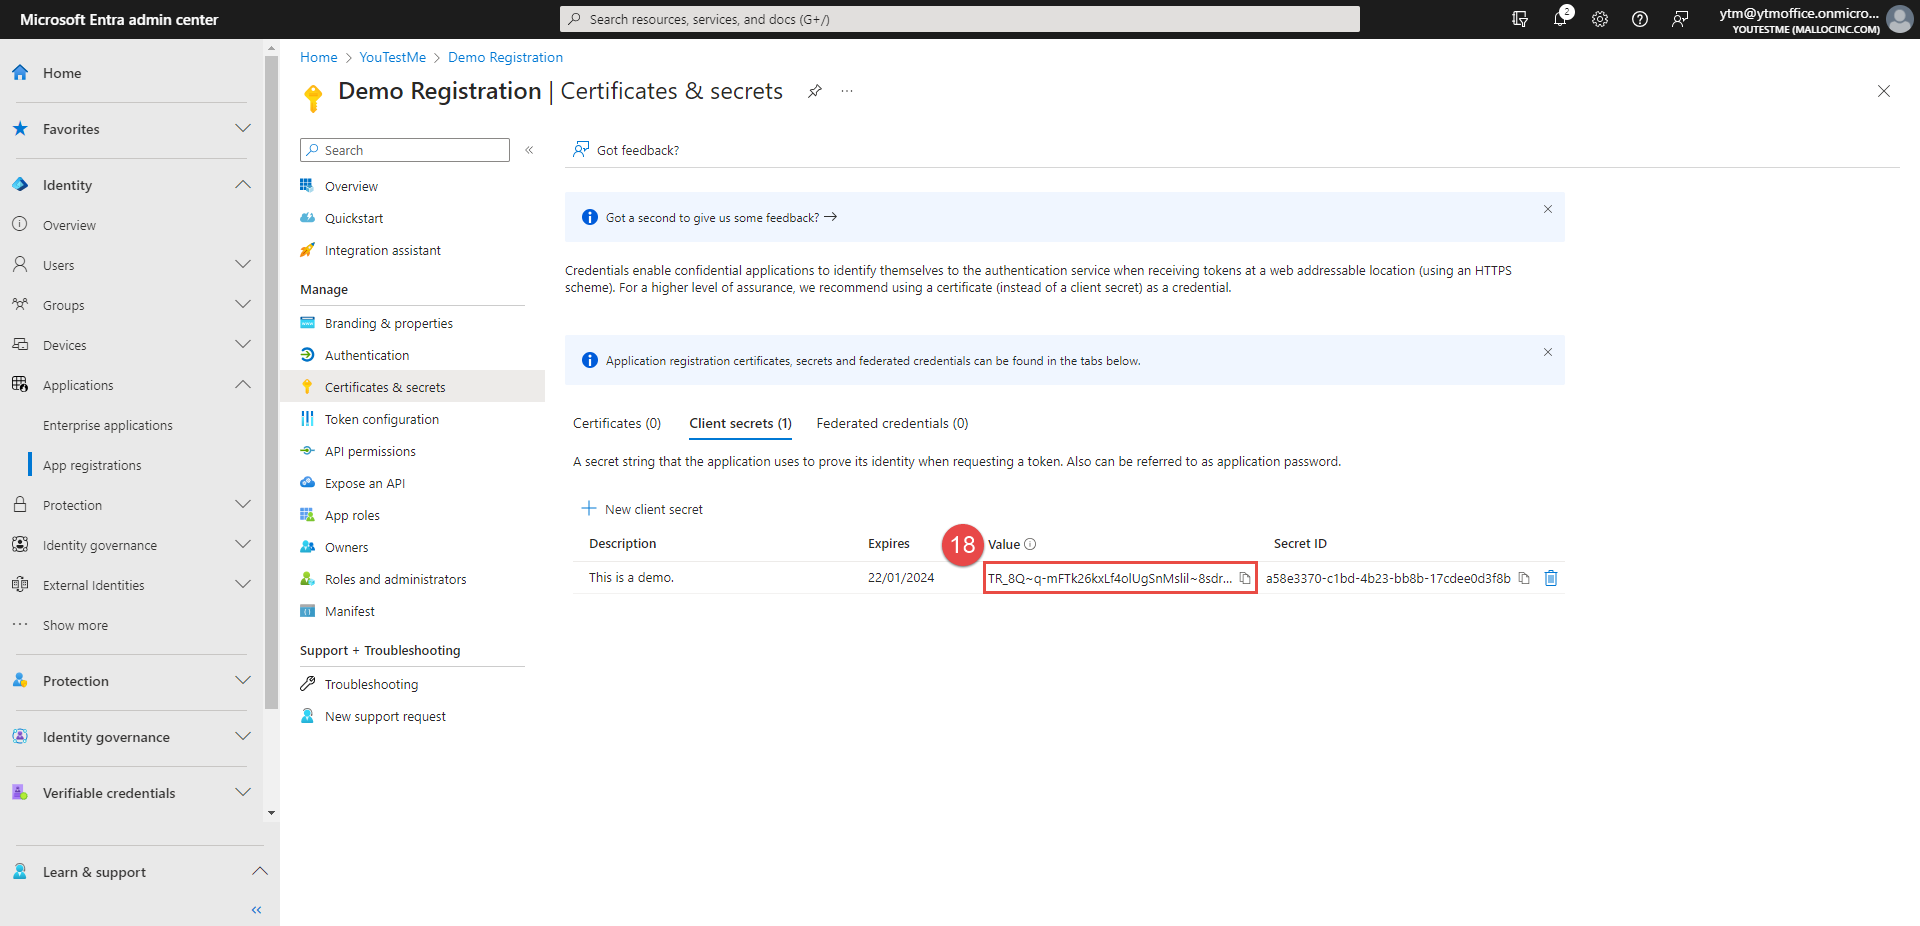
Go to the Certificates & secrets tab.
-
Open the Client secrets tab.
-
Click the New client secret button.
-
Enter the Description for this client's secret.
-
Click the Add button.
-
Once the Client secret is created, copy the Value.
-
Paste it to the Client secret field in the GetCertified application.
-
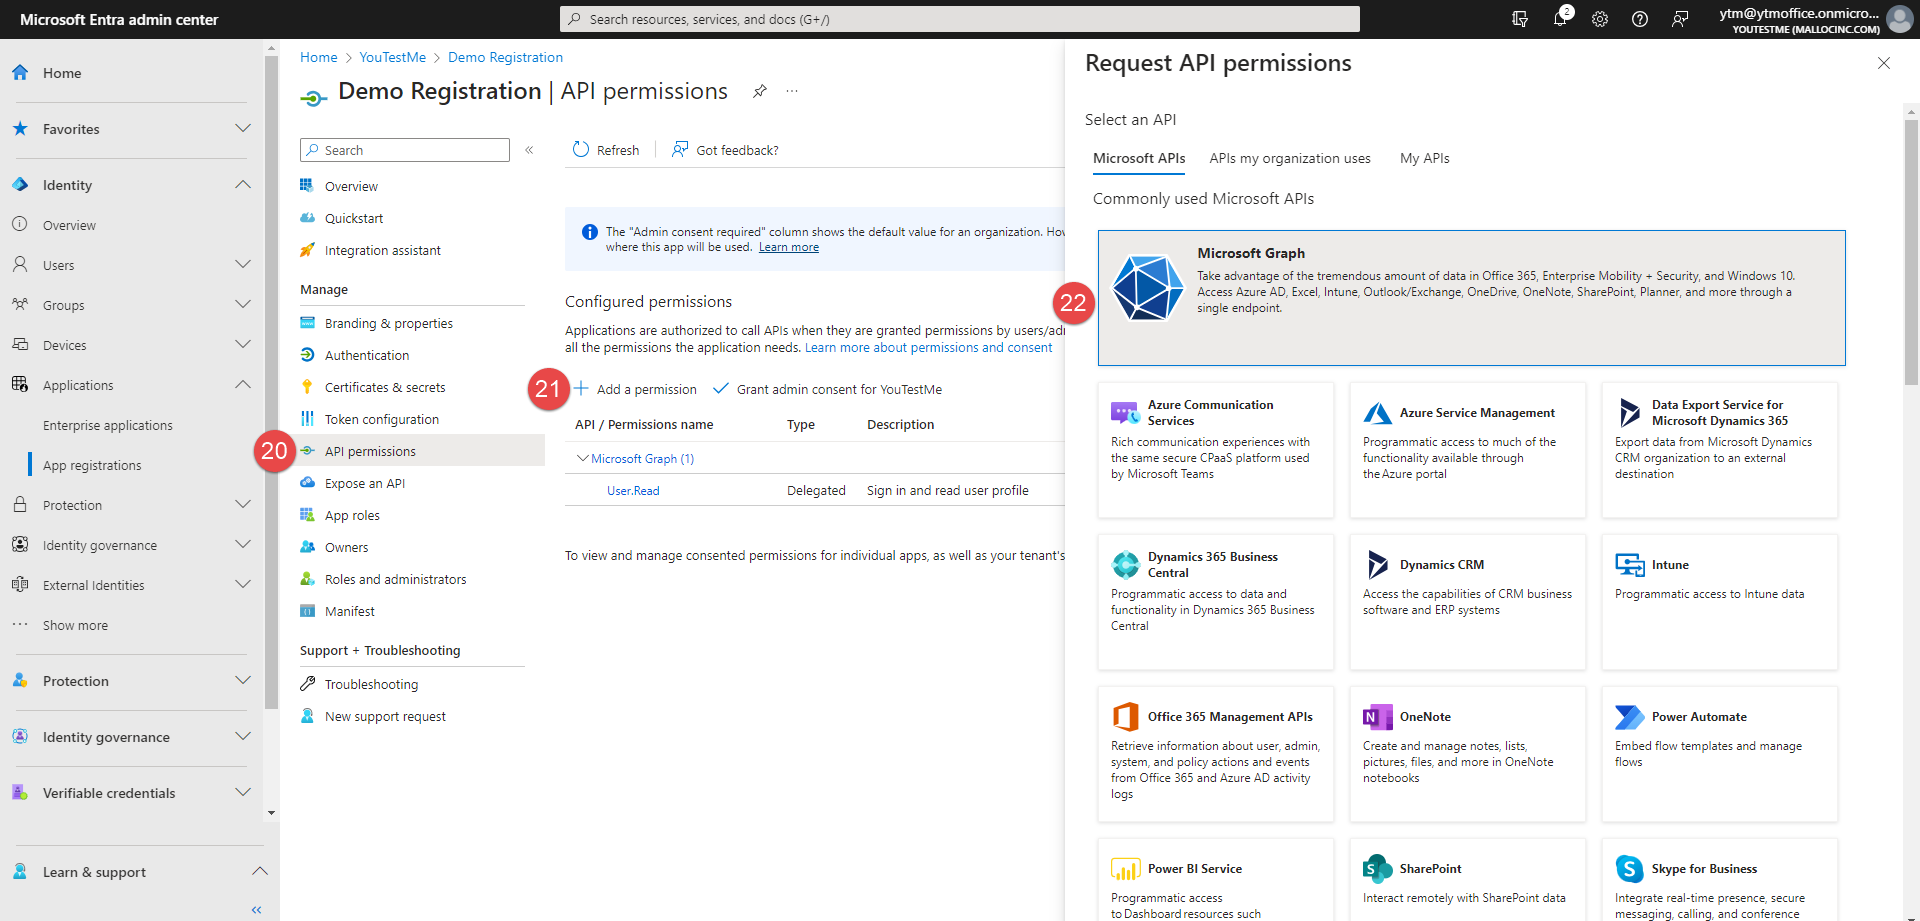
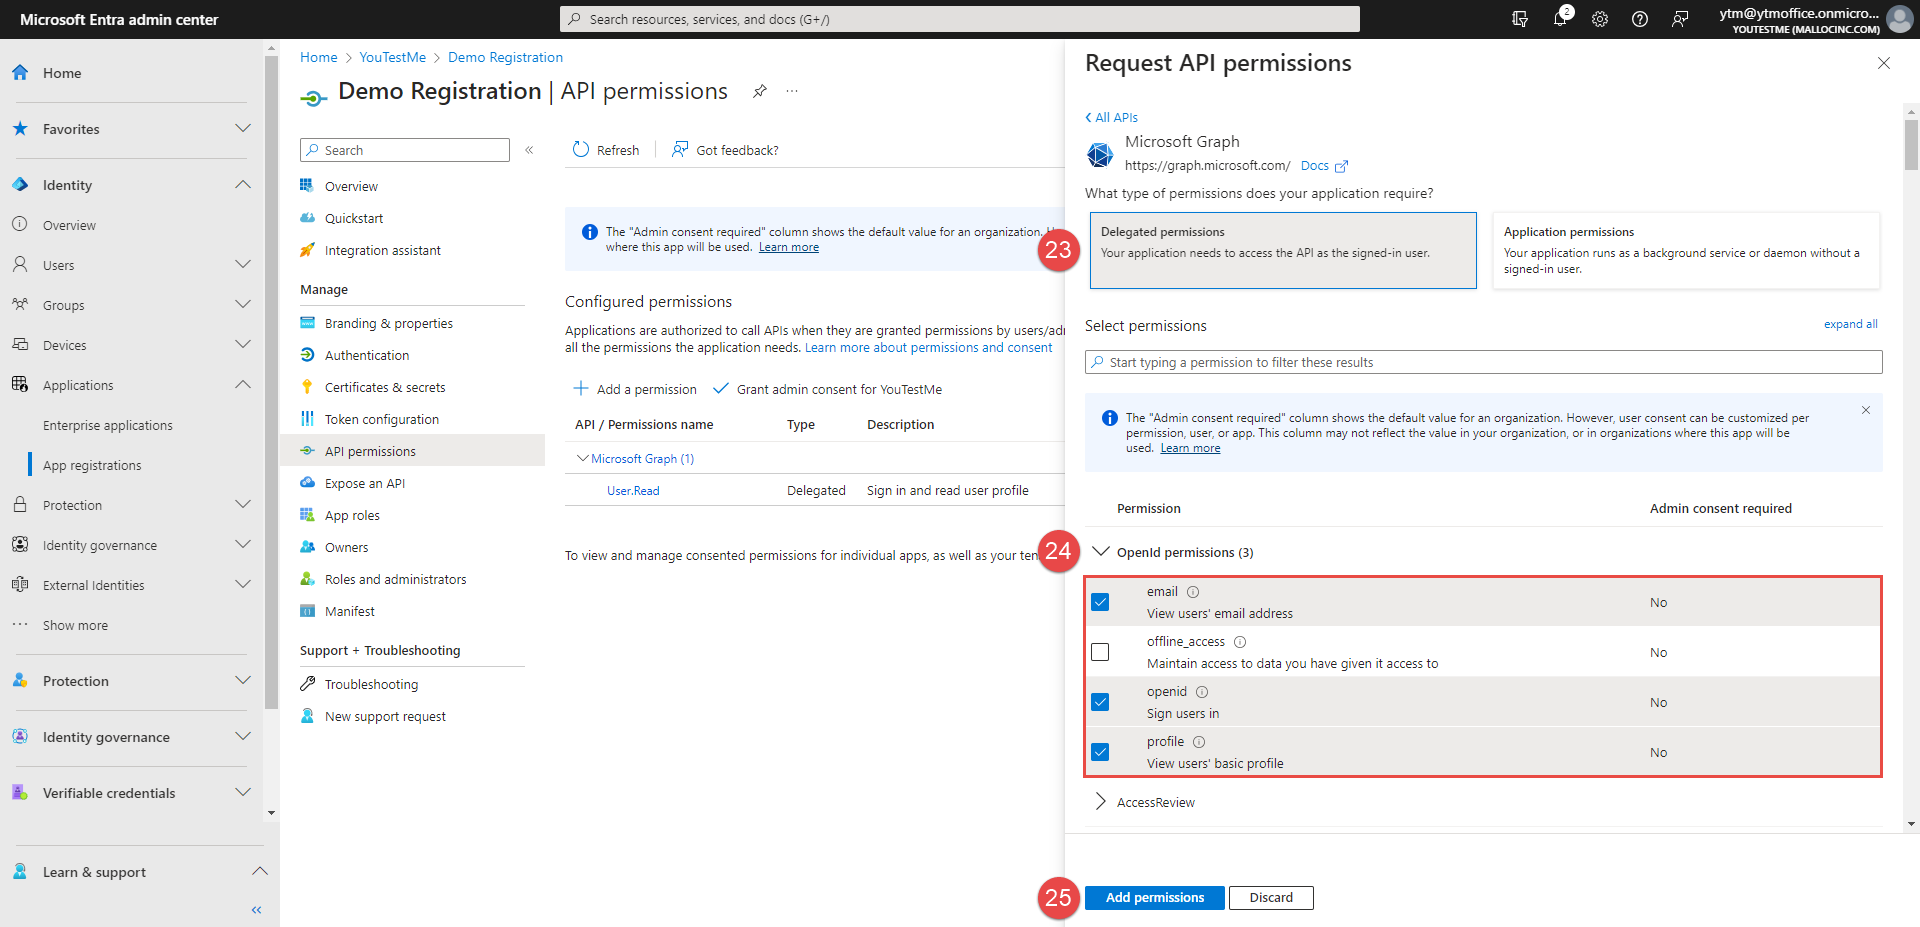
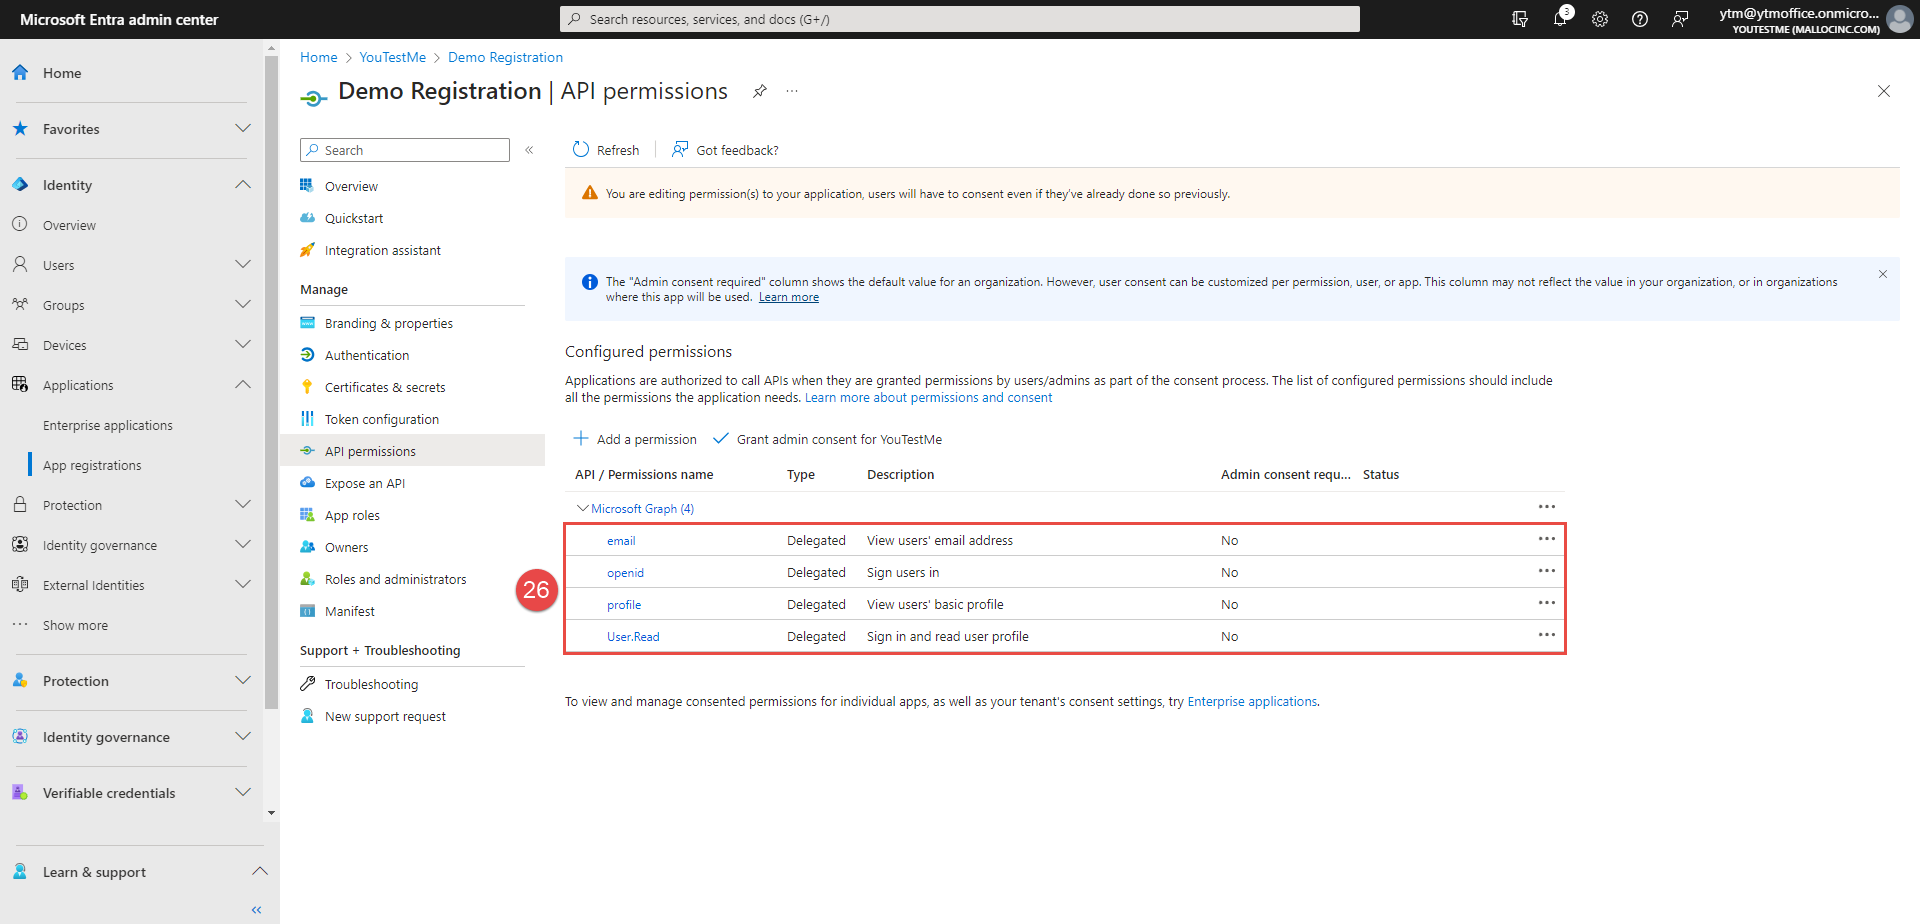
Go to the API permissions tab.
-
Click the Add a permission button.
-
Choose the Microsoft Graph.
-
Choose the Delegated permission.
-
Select the OpenId permissions as in the picture below.
-
Click the Add permissions button.
-
After you add permissions, it should be displayed as below.
-
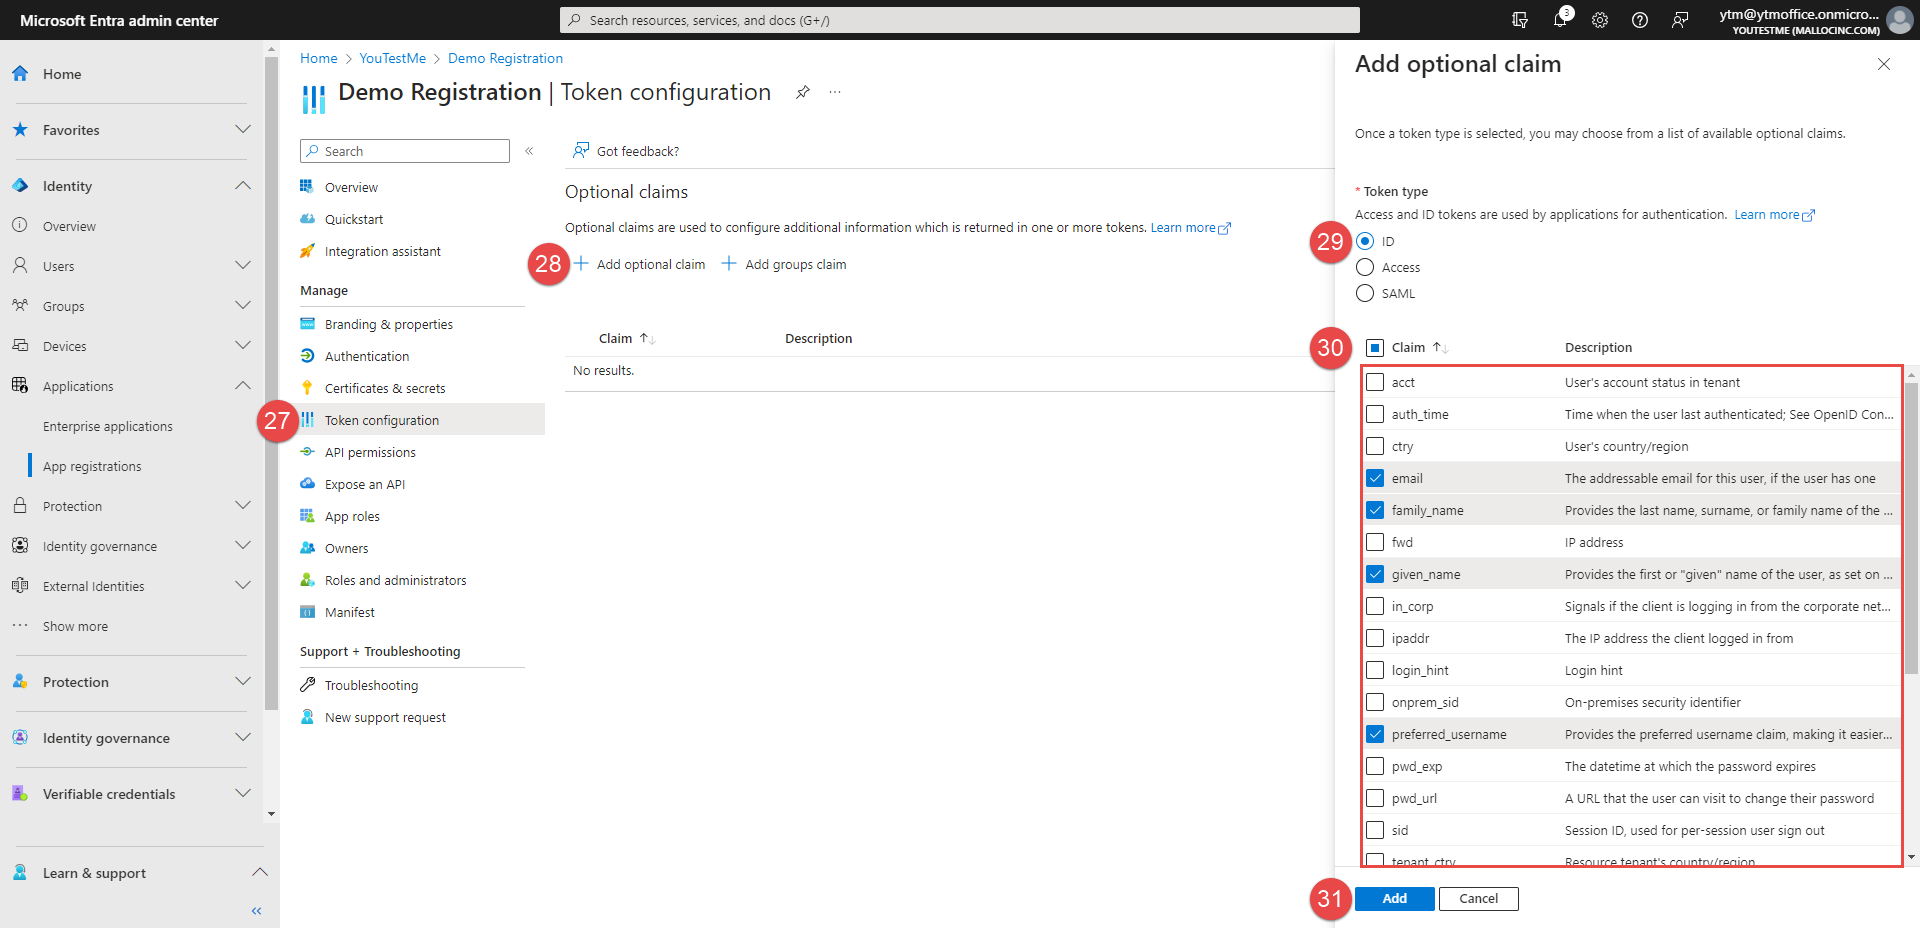
Go to the Token Configuration tab.
-
Click the Add optional claim button.
-
Choose the ID option.
-
Select the Claims as in the picture below.
-
Click the Add button.
-
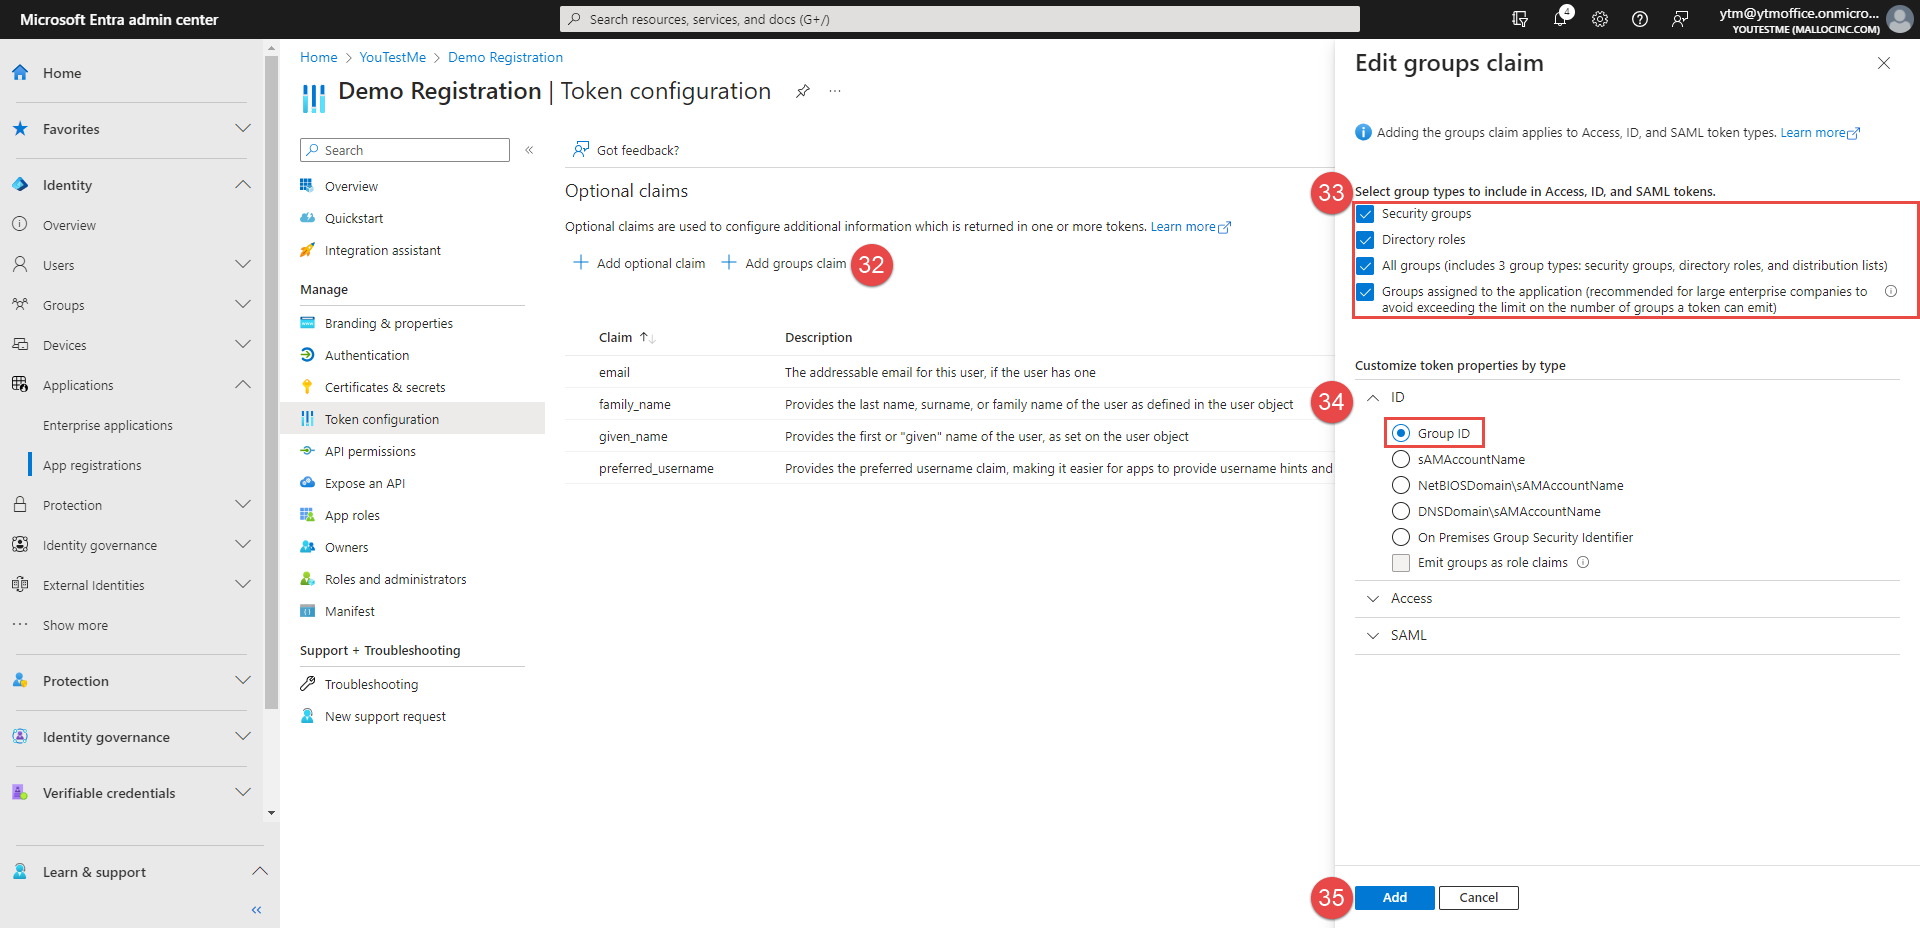
Click the Add groups claim button.
-
Select group types to include in Access, ID, and SAML tokens, as in the picture below.
-
Open the ID dropdown, and choose the Group ID option.
-
Click the Add button.
-
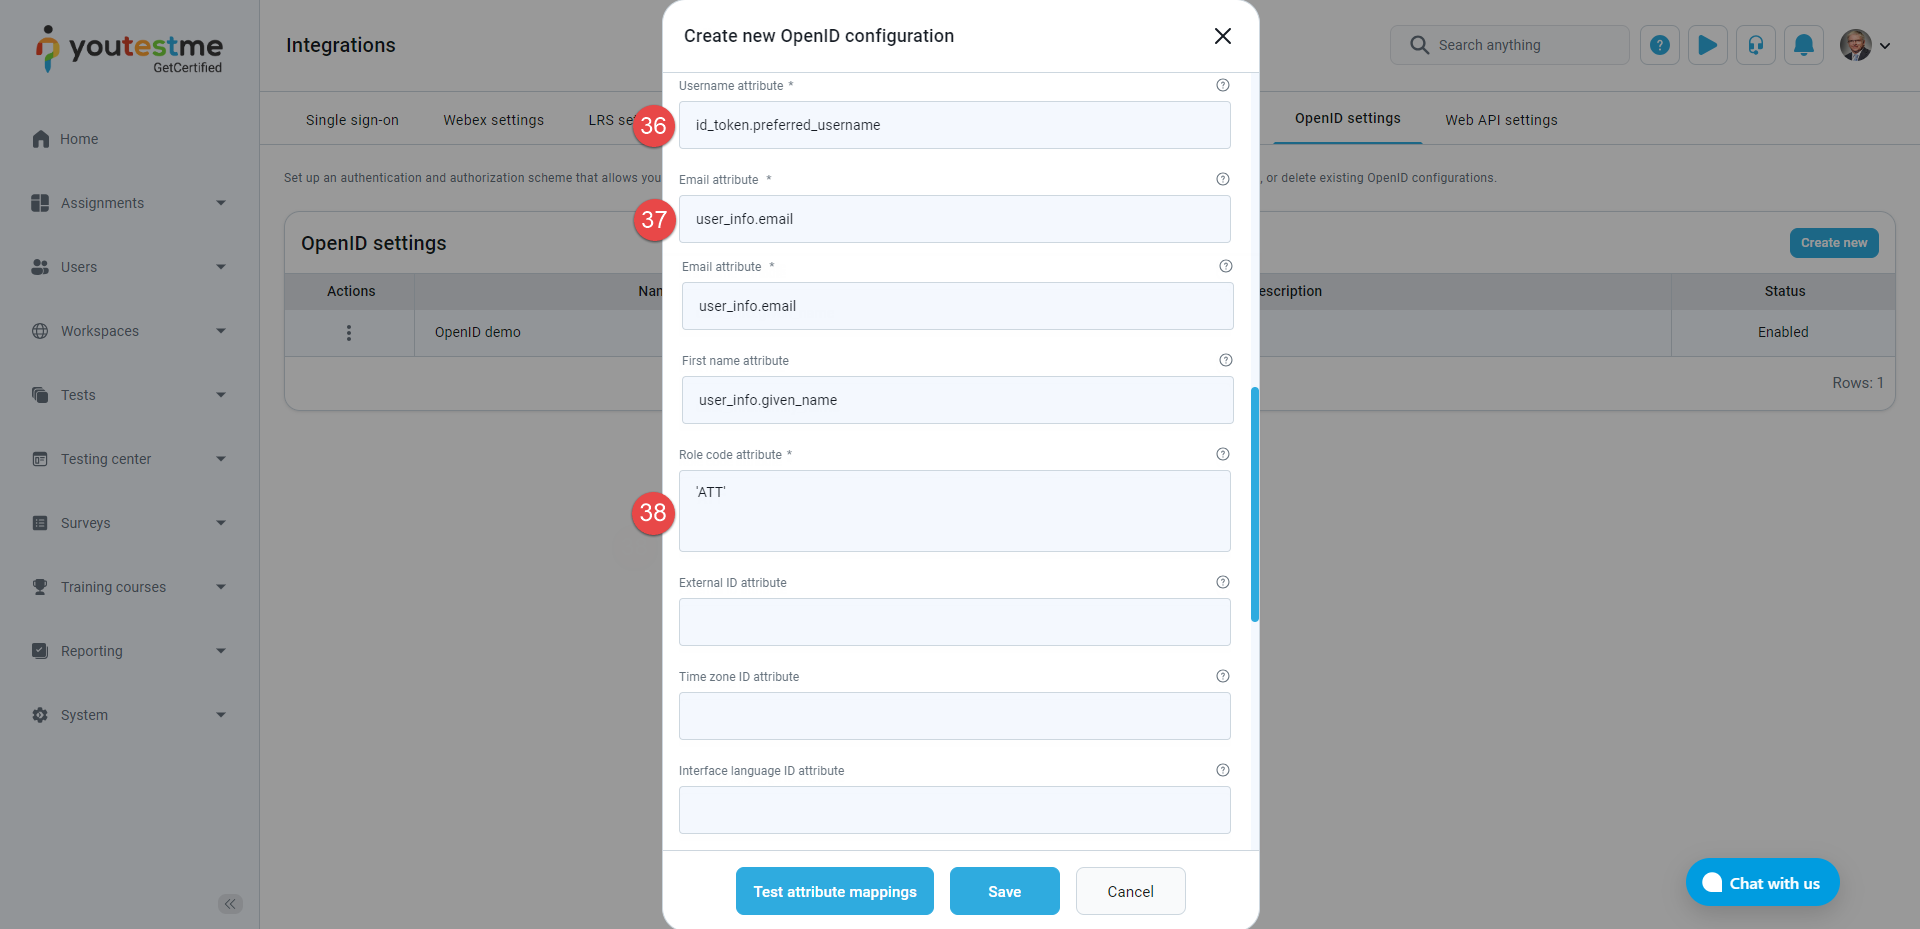
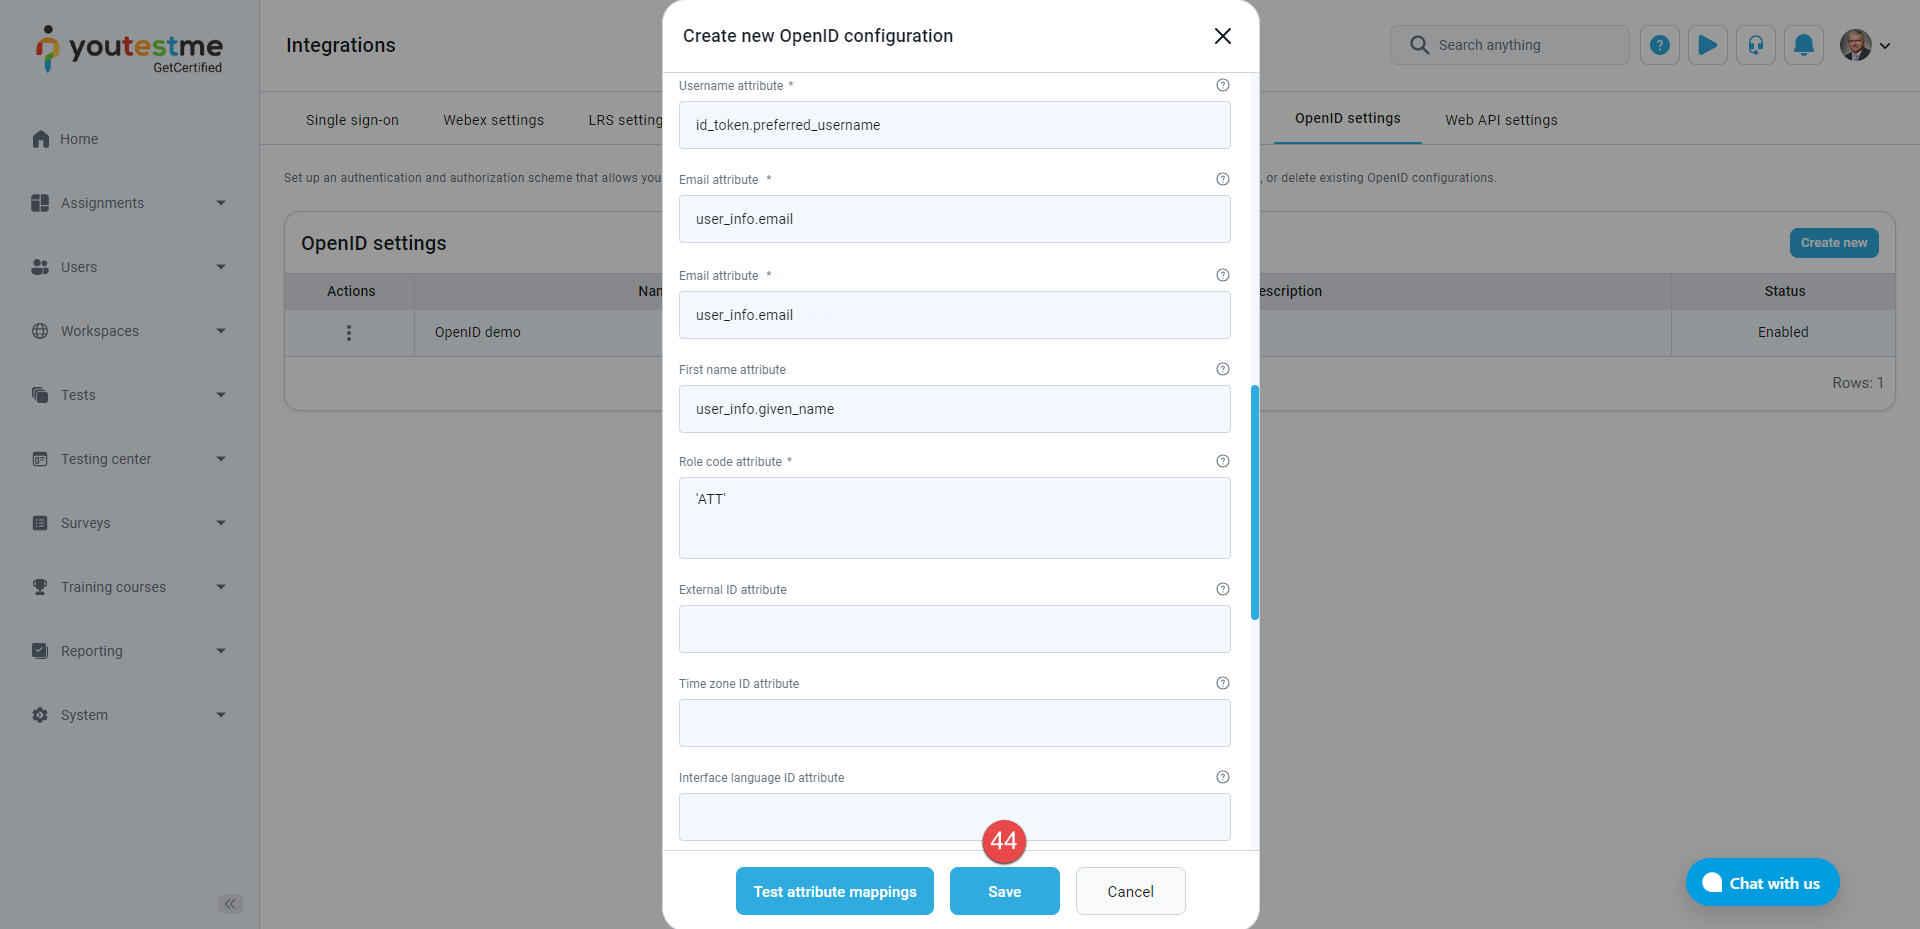
Username attribute - Copy and paste this value: id_token.preferred_username.
-
Email attribute - Copy and paste this value: user_info.email.
-
Enter the Role code attribute. Copy and paste this value: ‘ATT’.
-
Go to the Authentication tab.
-
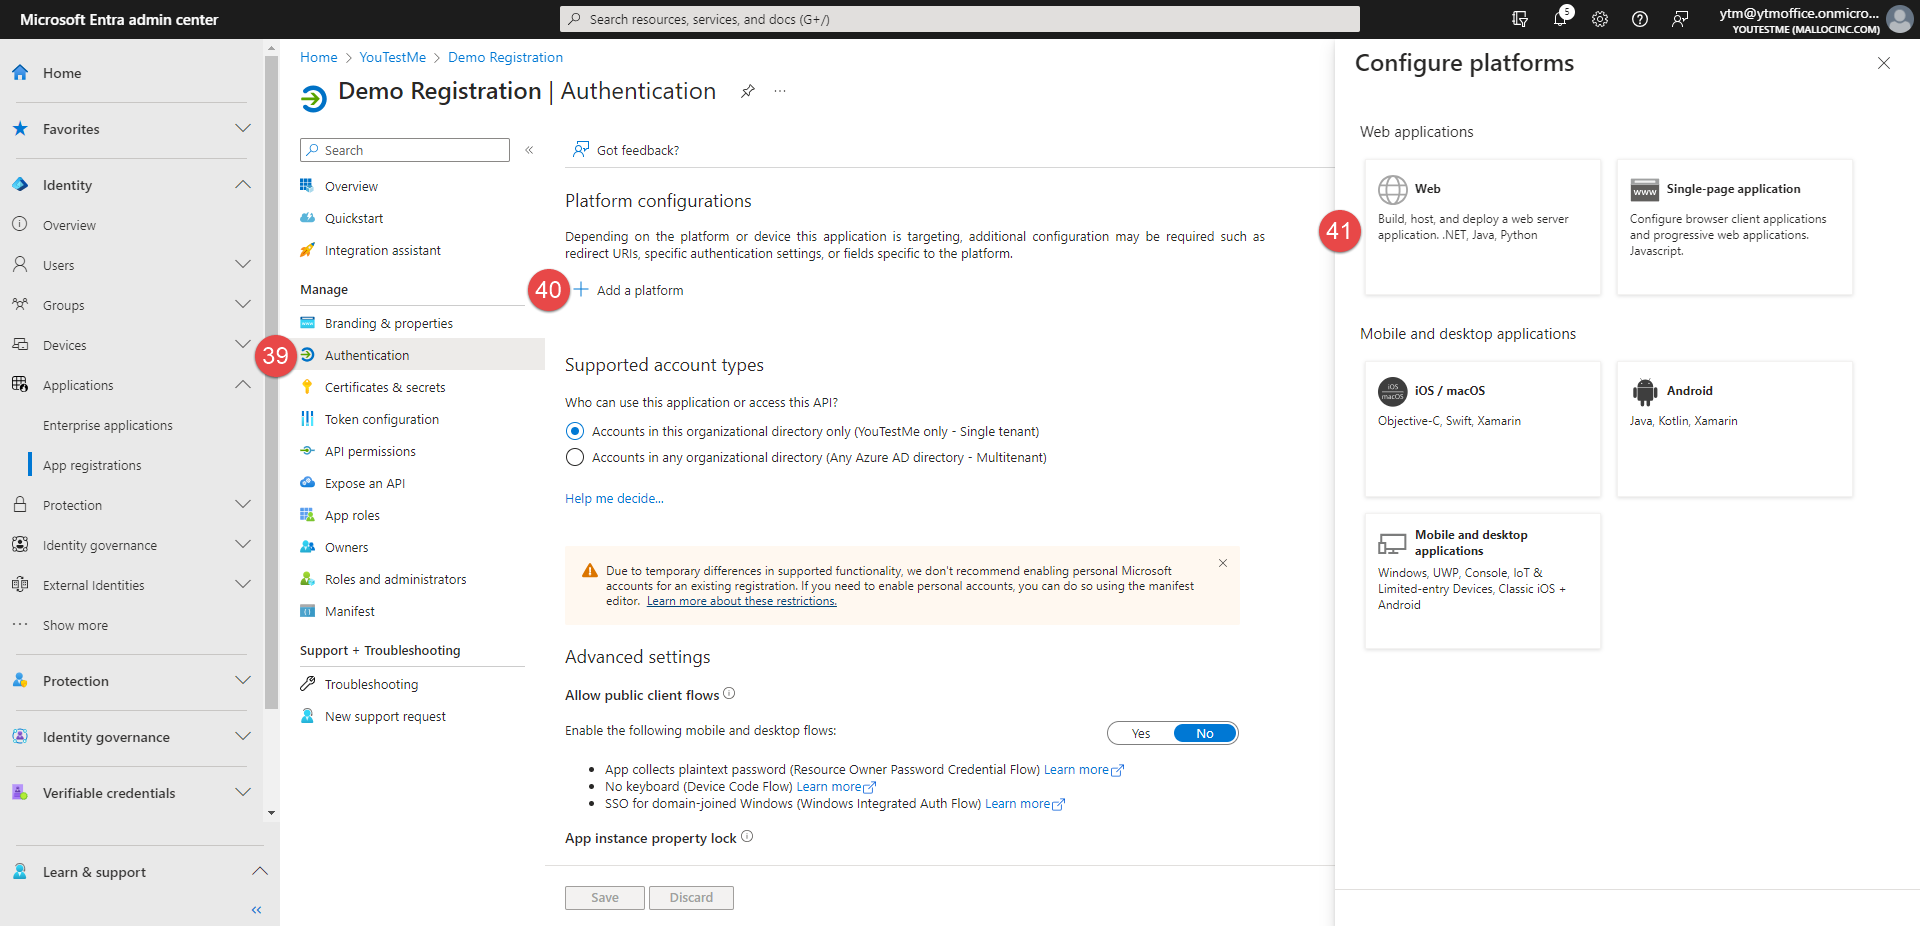
Click the Add a platform button.
-
Choose the Web option.
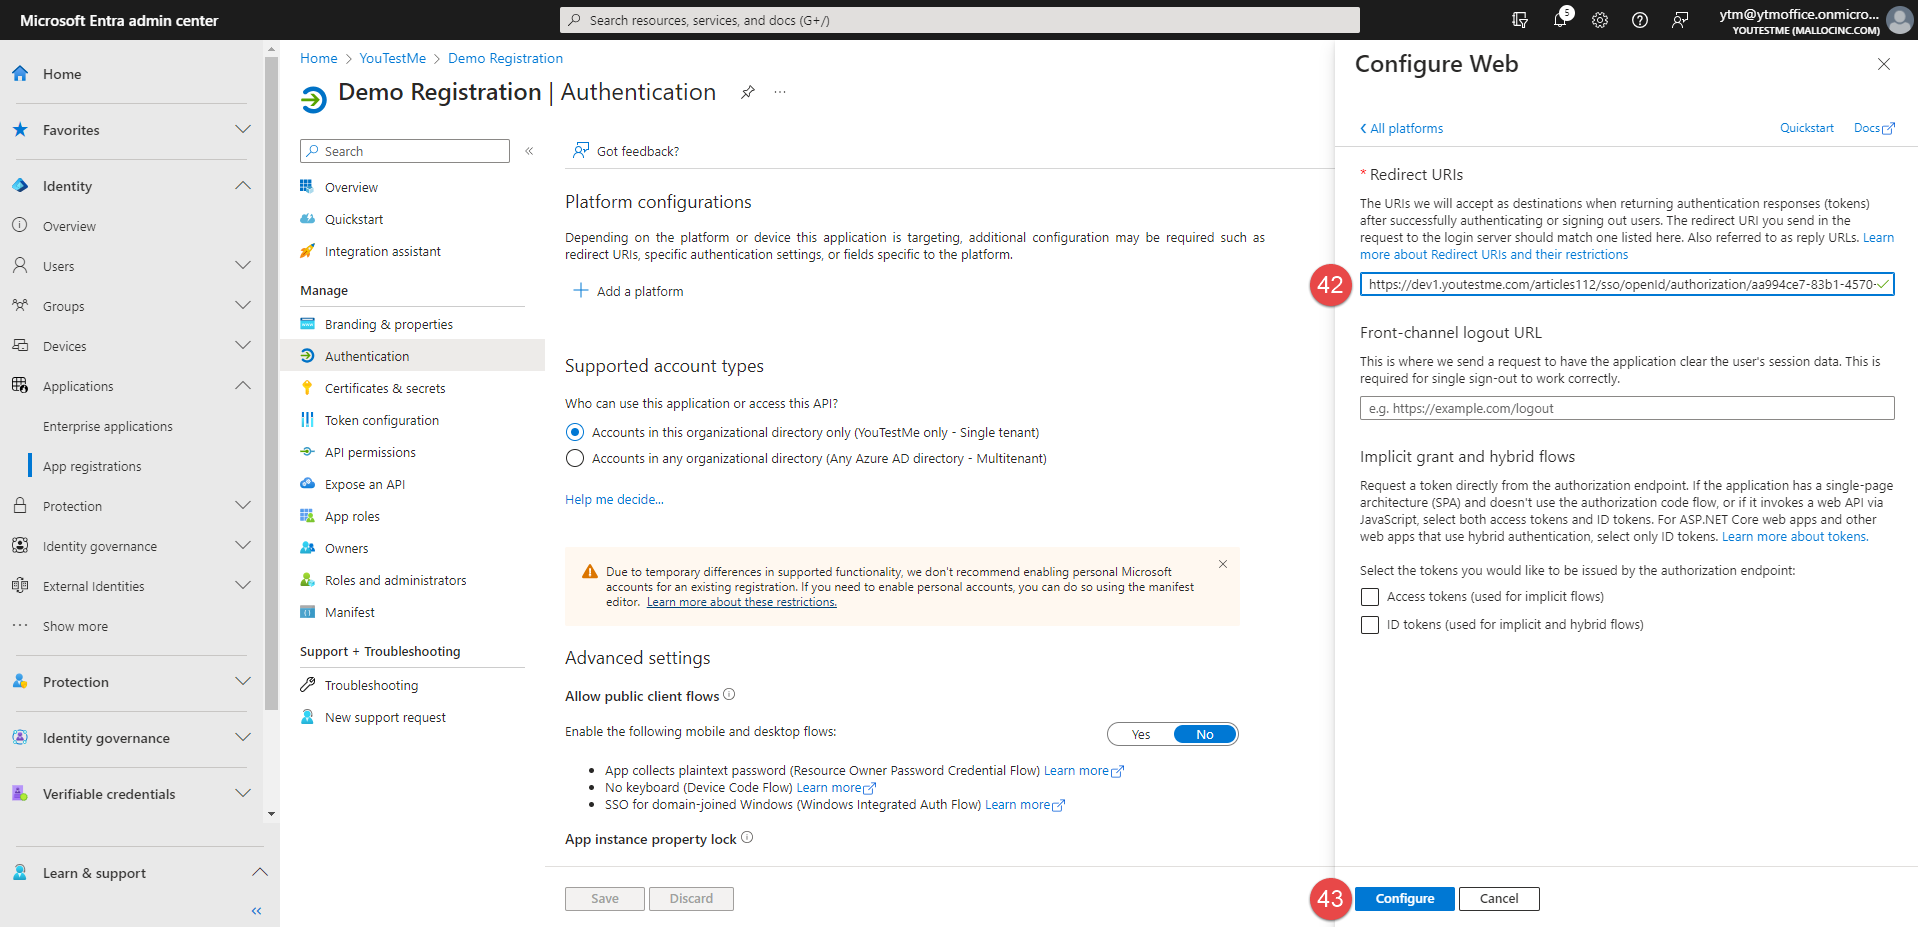
-
Copy and paste the Callback URL from the GetCertified application into Redirects URl.
-
Click the Configure button.
-
After adding all the mandatory fields, click the Save button to save the configuration.
Before proceeding with the configuration, please ensure that you have shared credentials for Microsoft Azure and can log in.
Note: If you don't have an account for your application on the Identity Provider (IP) side, you must register first. This process involves creating an application entry within the Identity Provider's environment. You can find detailed application registration instructions at the following link.

When creating a new or updating an existing OpenID configuration, you need to enter the parameters for configuring the client (GetCertified) and an Identity Provider (IP). For configuring the IP side, the Global administrator role is required. For configuring the YTM side, the Administrator role is required.
The steps to create a new OpenID configuration are listed below and marked in the image below:
Go to the Microsoft Azure application, log in, and create the new registration.


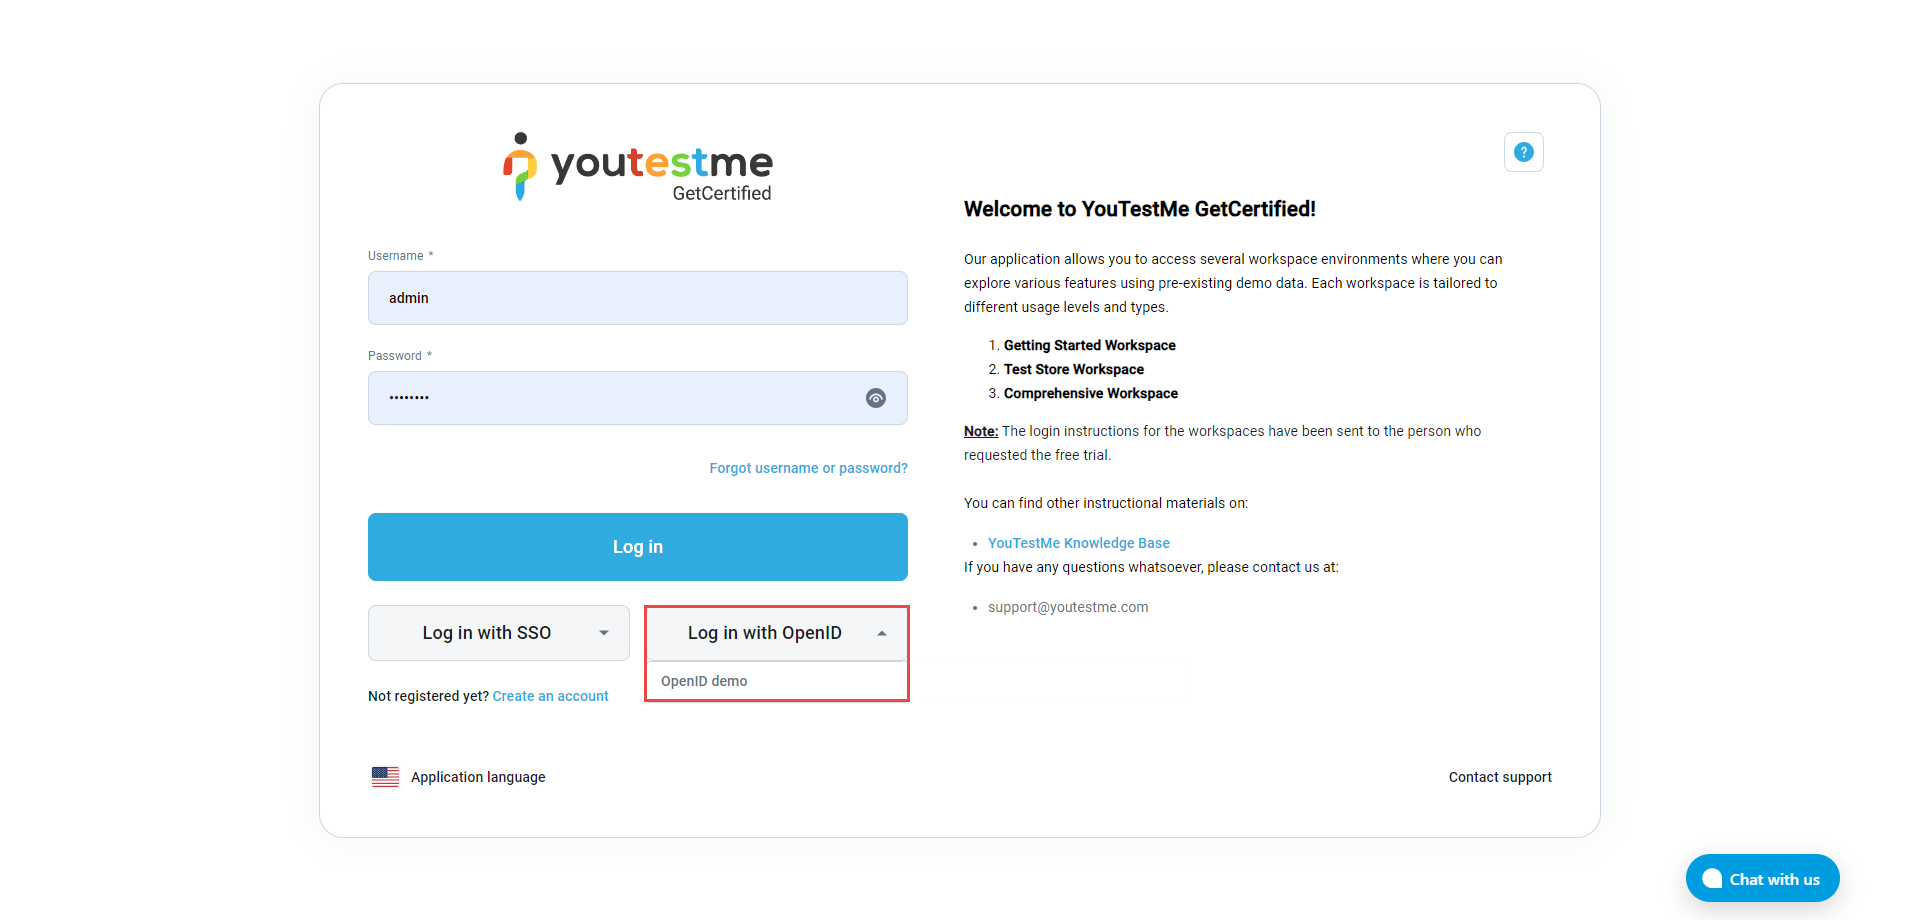
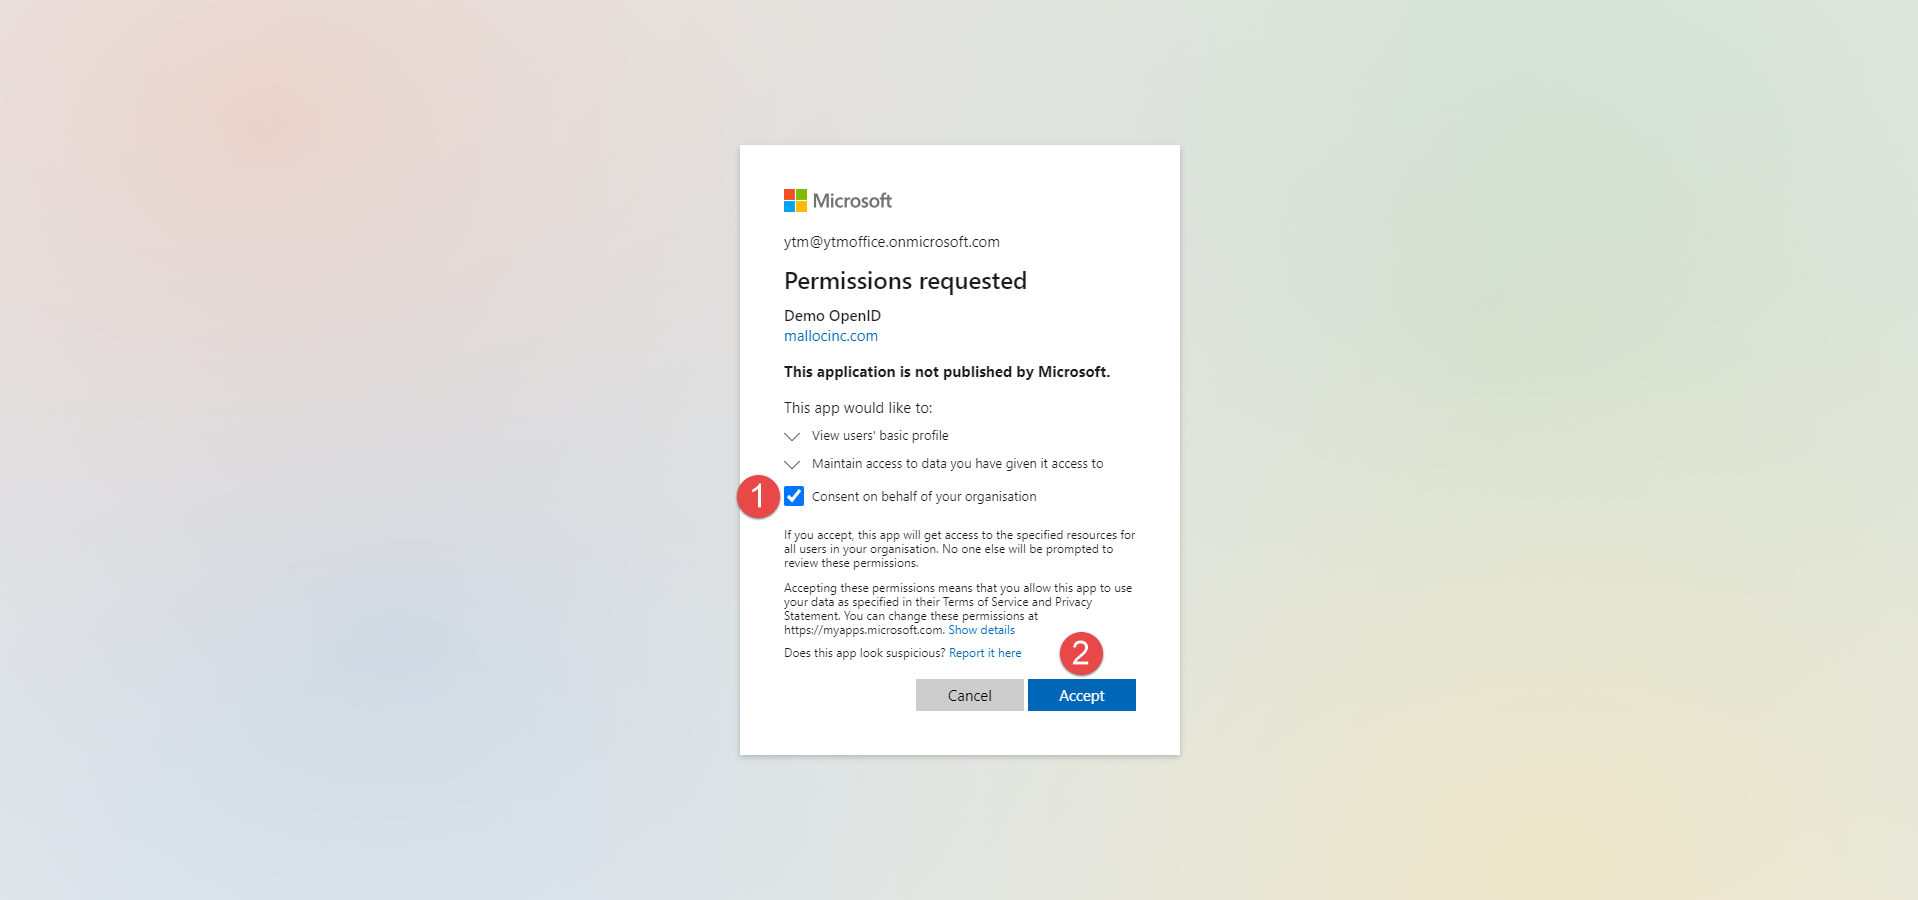
Click the Log in with OpenID button to display the available OpenID configurations. The user initiates the OpenID authentication and authorization flow by clicking one of them. The flow can also be initiated externally to the GetCertified application by redirecting to the location specified by the Initiate Login URL parameter.
Note: When signing in to the application for the first time, the user account will be created, and all mapped attributes will be transferred to GetCertified. Each new login into the application (through OpenID) with the same username will update the user profile.
These are the first-time login steps.
-
-
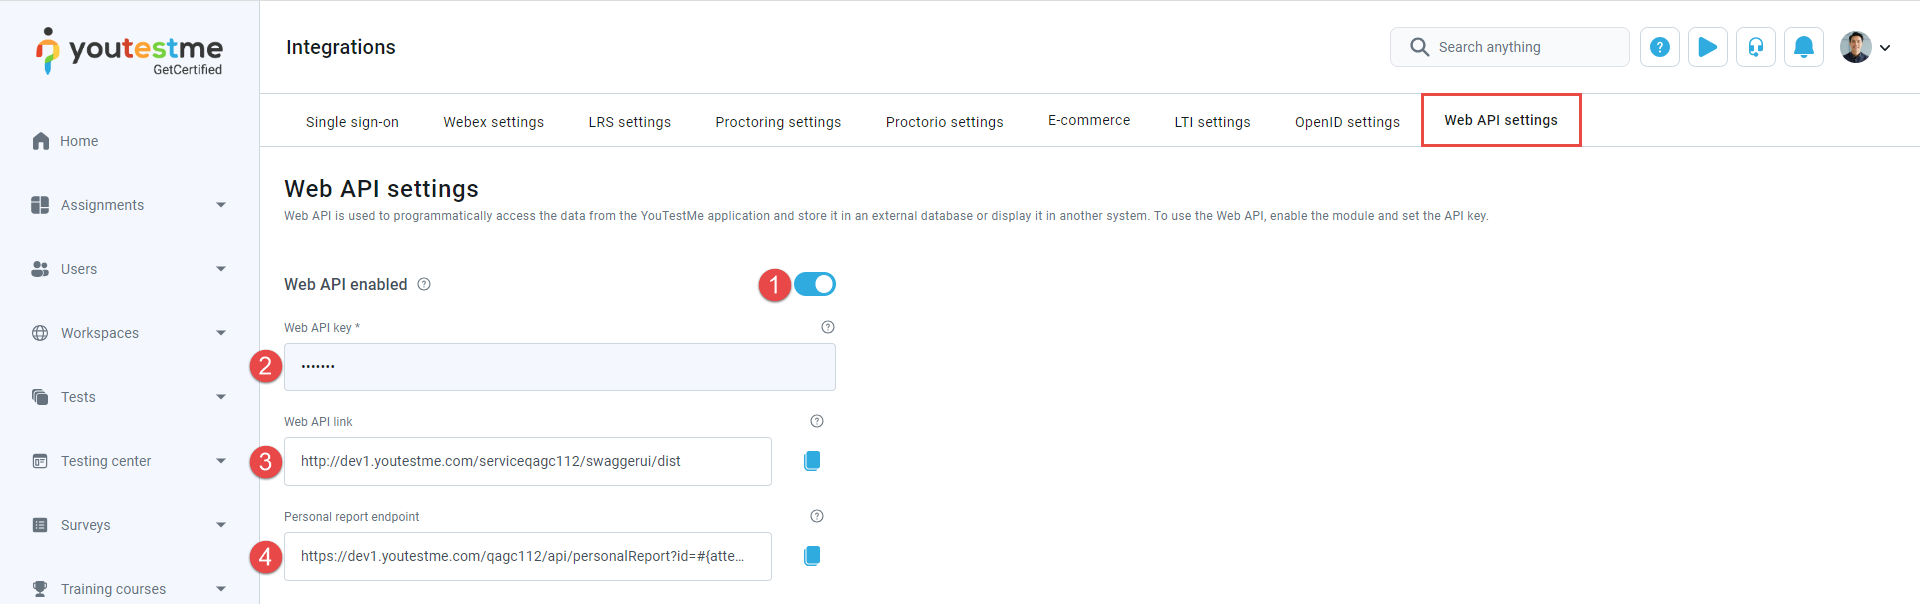
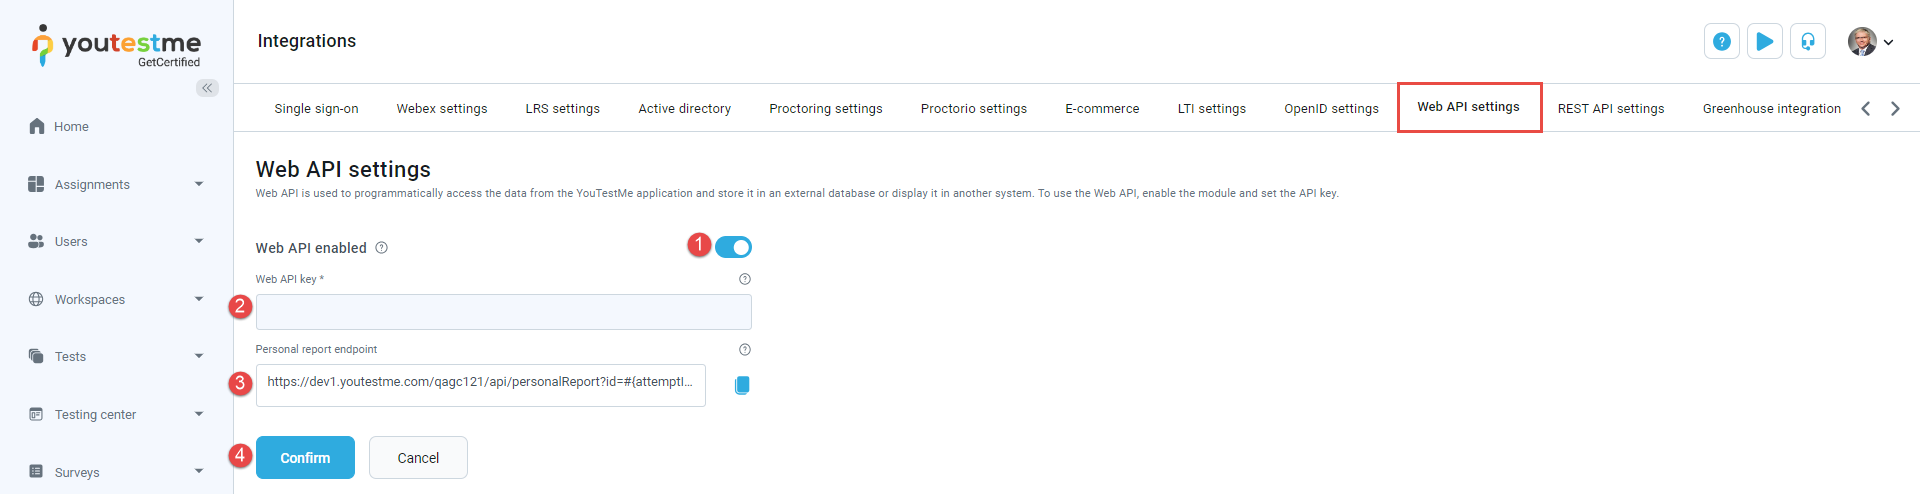
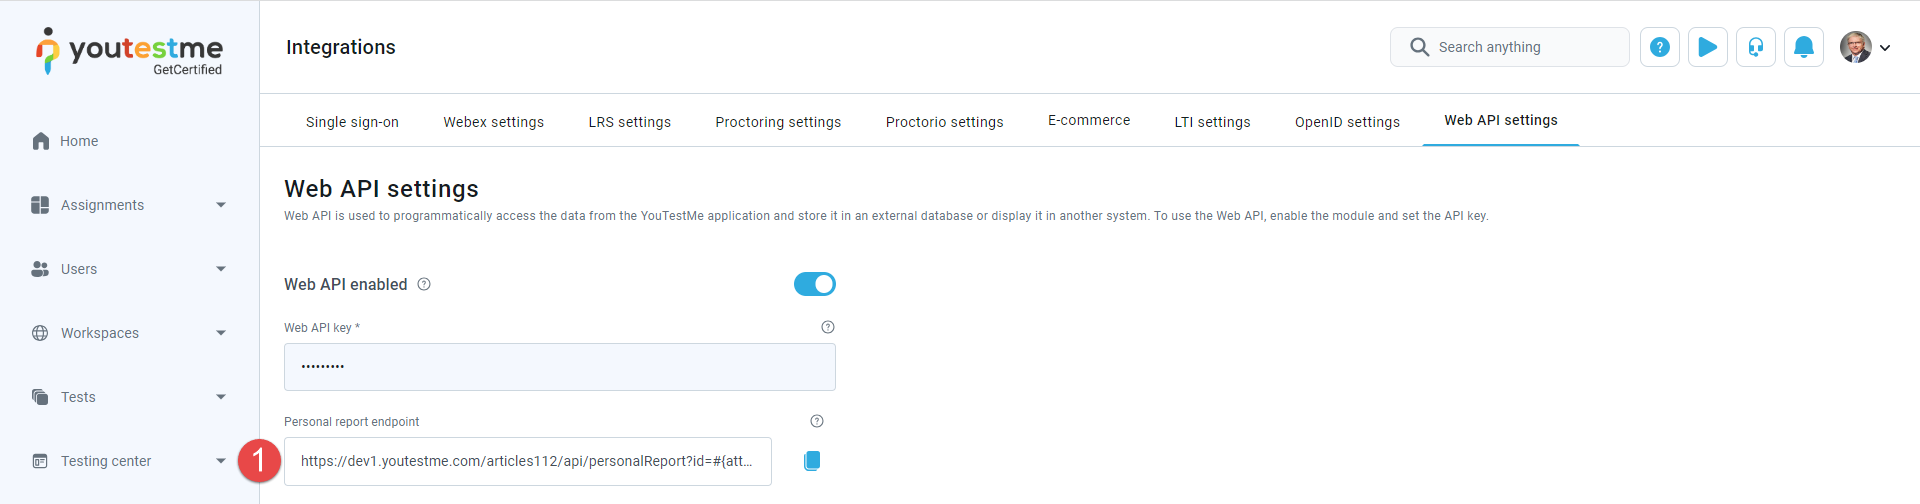
Web API settings
Web API is used to programmatically access data from the GetCertified application, store it in an external database, or display it in another system.
-
Web API enabled - To utilize the Web API effectively, ensure it is enabled.
Note: Request to Web API will fail if Web API is not enabled.
-
Web API key - We recommend using a random and non-guessable string as your API key for enhanced security. Adding this key as a request header "X-Api-Key" will authorize your API requests.
-
Web API link - Use this link to access the YouTestMe GetCertified REST APIs, which you can integrate into your system. If the link is not working, it may indicate that the API service needs to be activated. Please reach out to the YouTestMe team to request activation of the service. Refer to this article for instructions on using the YouTestMe GetCertified REST API.
-
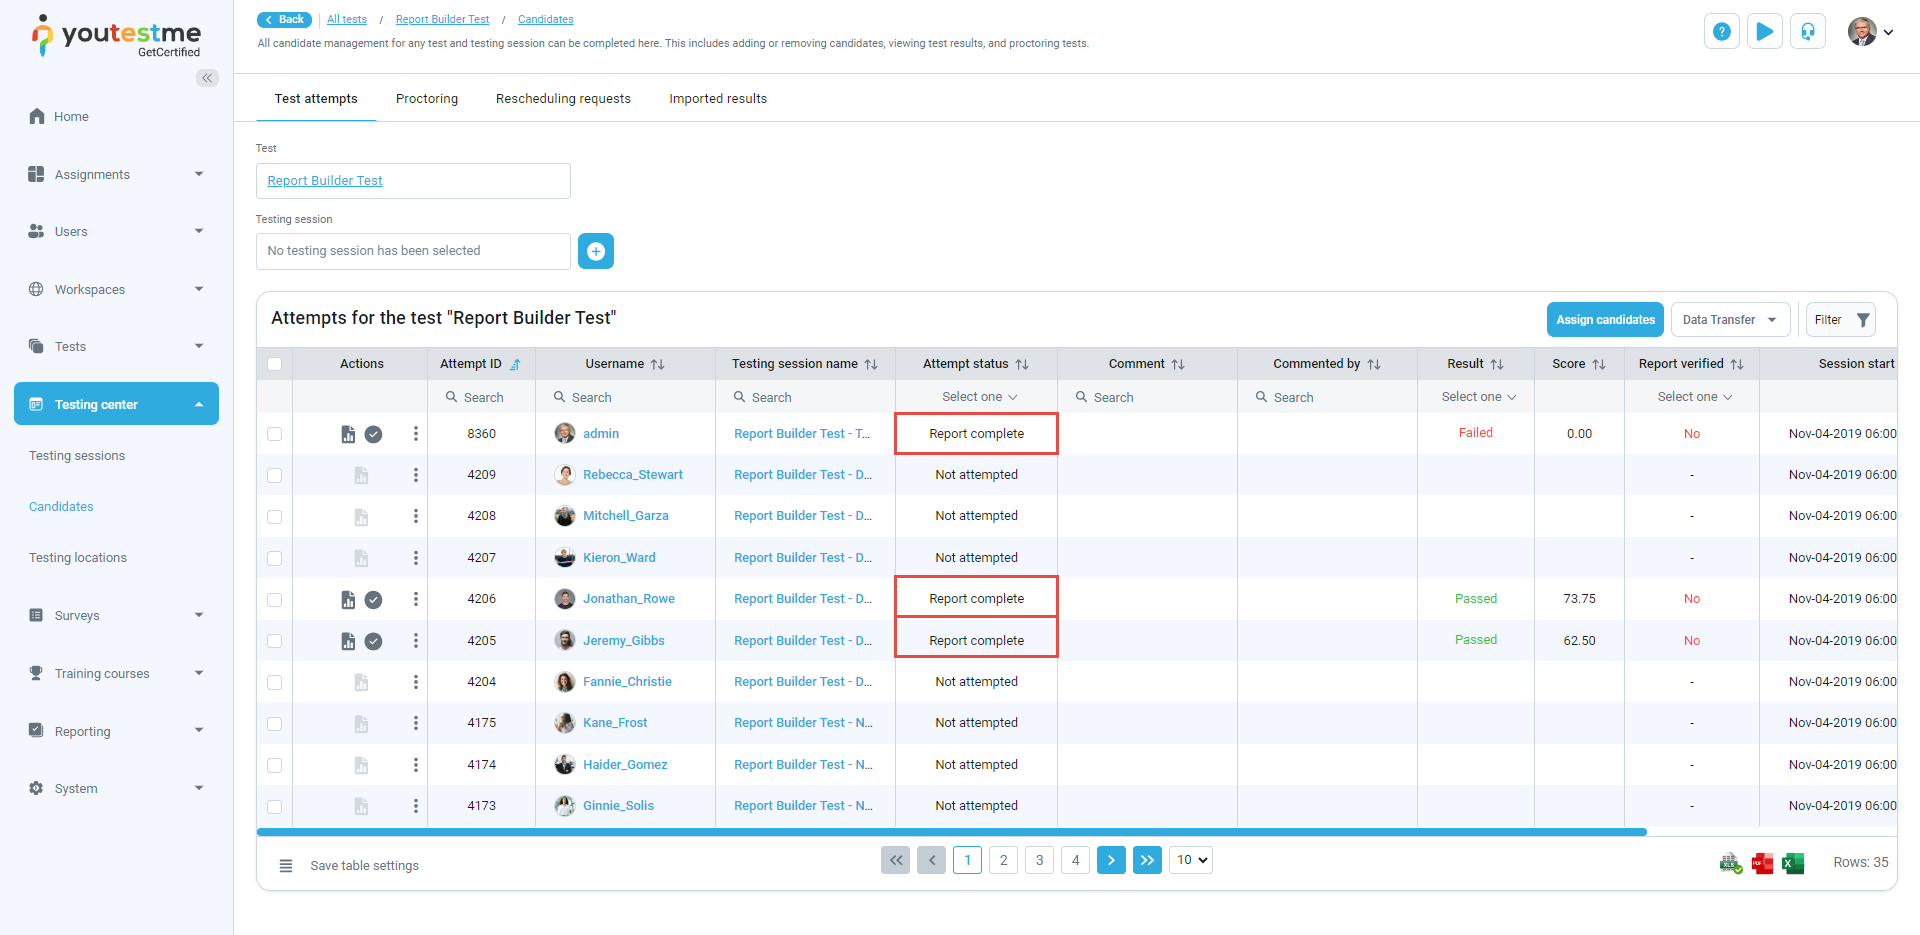
Personal report endpoint - This endpoint allows you to retrieve the content of the personal report for a specific attempt by sending an HTTP GET request. Simply replace the "#{attemptId}" part of the link with the actual ID of the attempt you want to retrieve. The content of the personal report will be returned as the body of the HTTP response. You can find the attempt ID in the Attempt ID column of the Candidates table on the test page. Ensure that the attempt has been started, and the test must have a Score and details report setting to download the report.
The Web API tab offers several options for configuring the Web API. These options include enabling the Web API, managing API keys, and retrieving personal reports.
-
To demonstrate how to configure the Web API and effectively
use the API key, which should be sent as the header of each
request, follow these steps:
-
Click the toggle button to Enable Web API.
-
Enter your Web API key (e.g., "WEBAPIKEY"). This key will serve as your authorization token for making API requests.
-
Click the Confirm button.
-
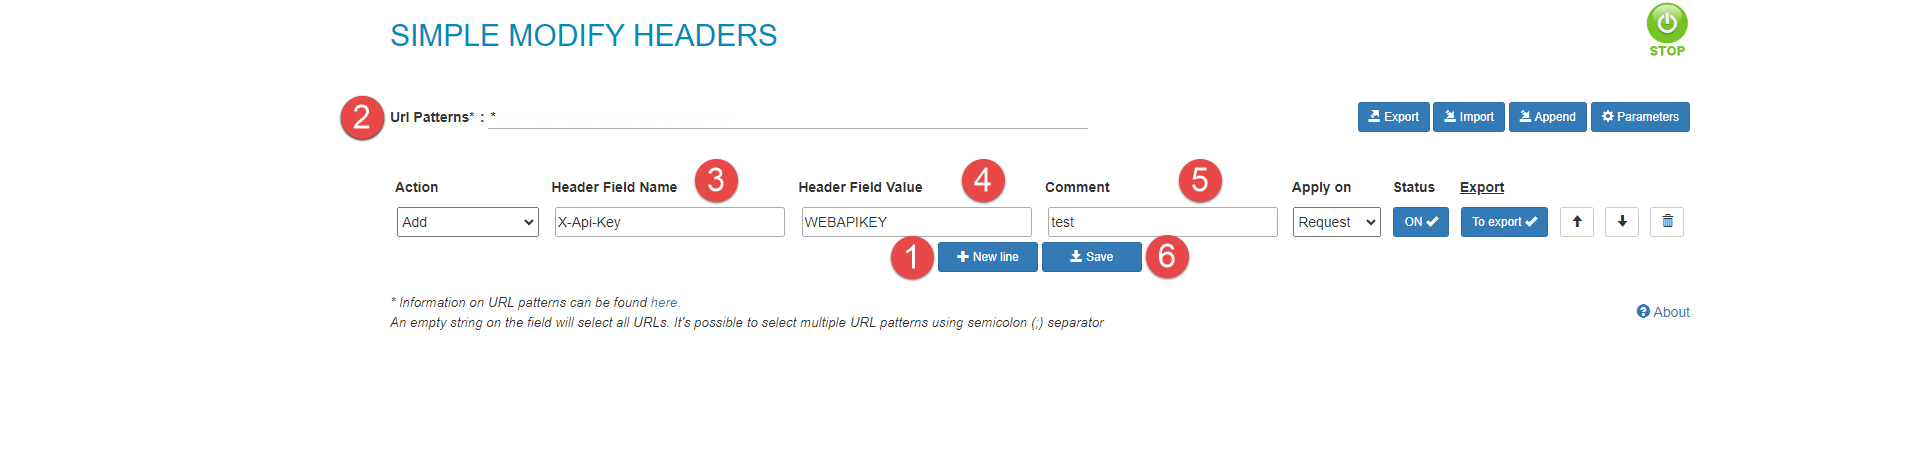
Download the simple-modify-headers extension for Google Chrome from the Chrome Web Store.
-
After downloading the extension, click on the extension icon in your browser's toolbar to open the extension and click on Configure button within the extension.
-
Click the New line button.
-
URl Patterns - Place the link to your application here or add *, as shown in the image.
-
Header Field Name - It must be set as X-Api-Key.
-
Header Field Value - Add the value you set on GetCertified as the API key. In this example, it should be "WEBAPIKEY".
-
Optionally, you can add a Comment to provide additional context or notes related to the API request.
-
Click the Save button.
-
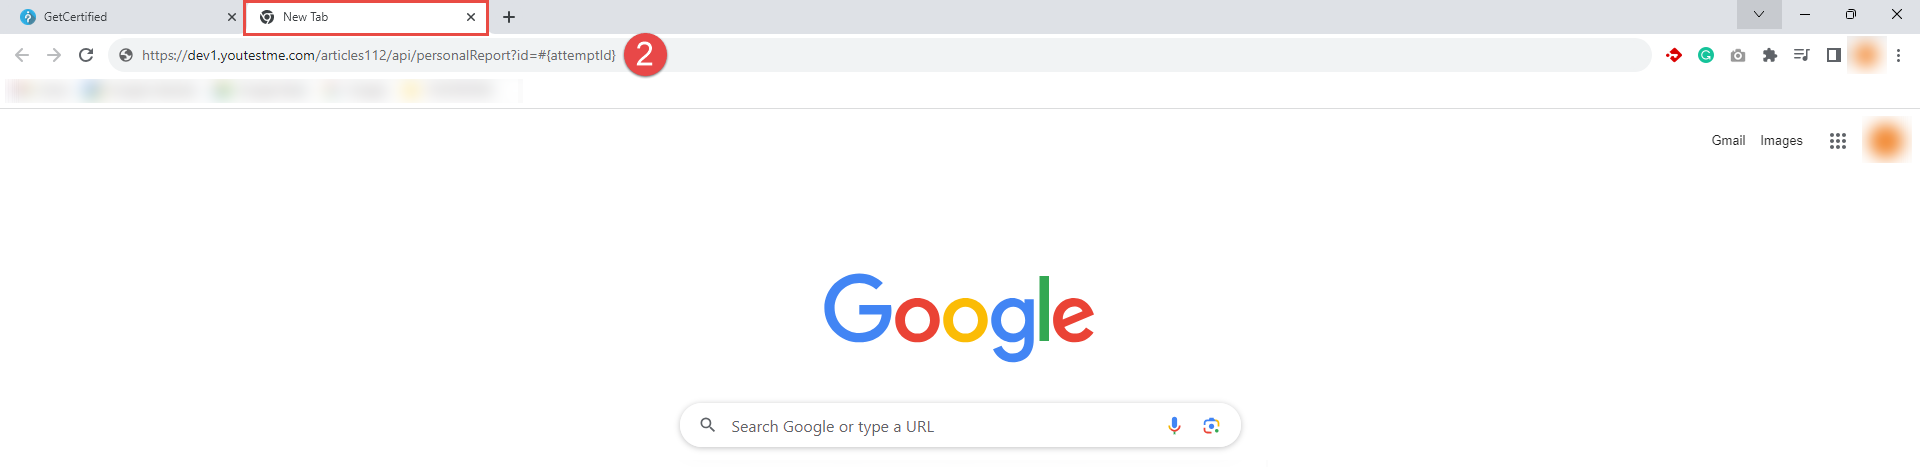
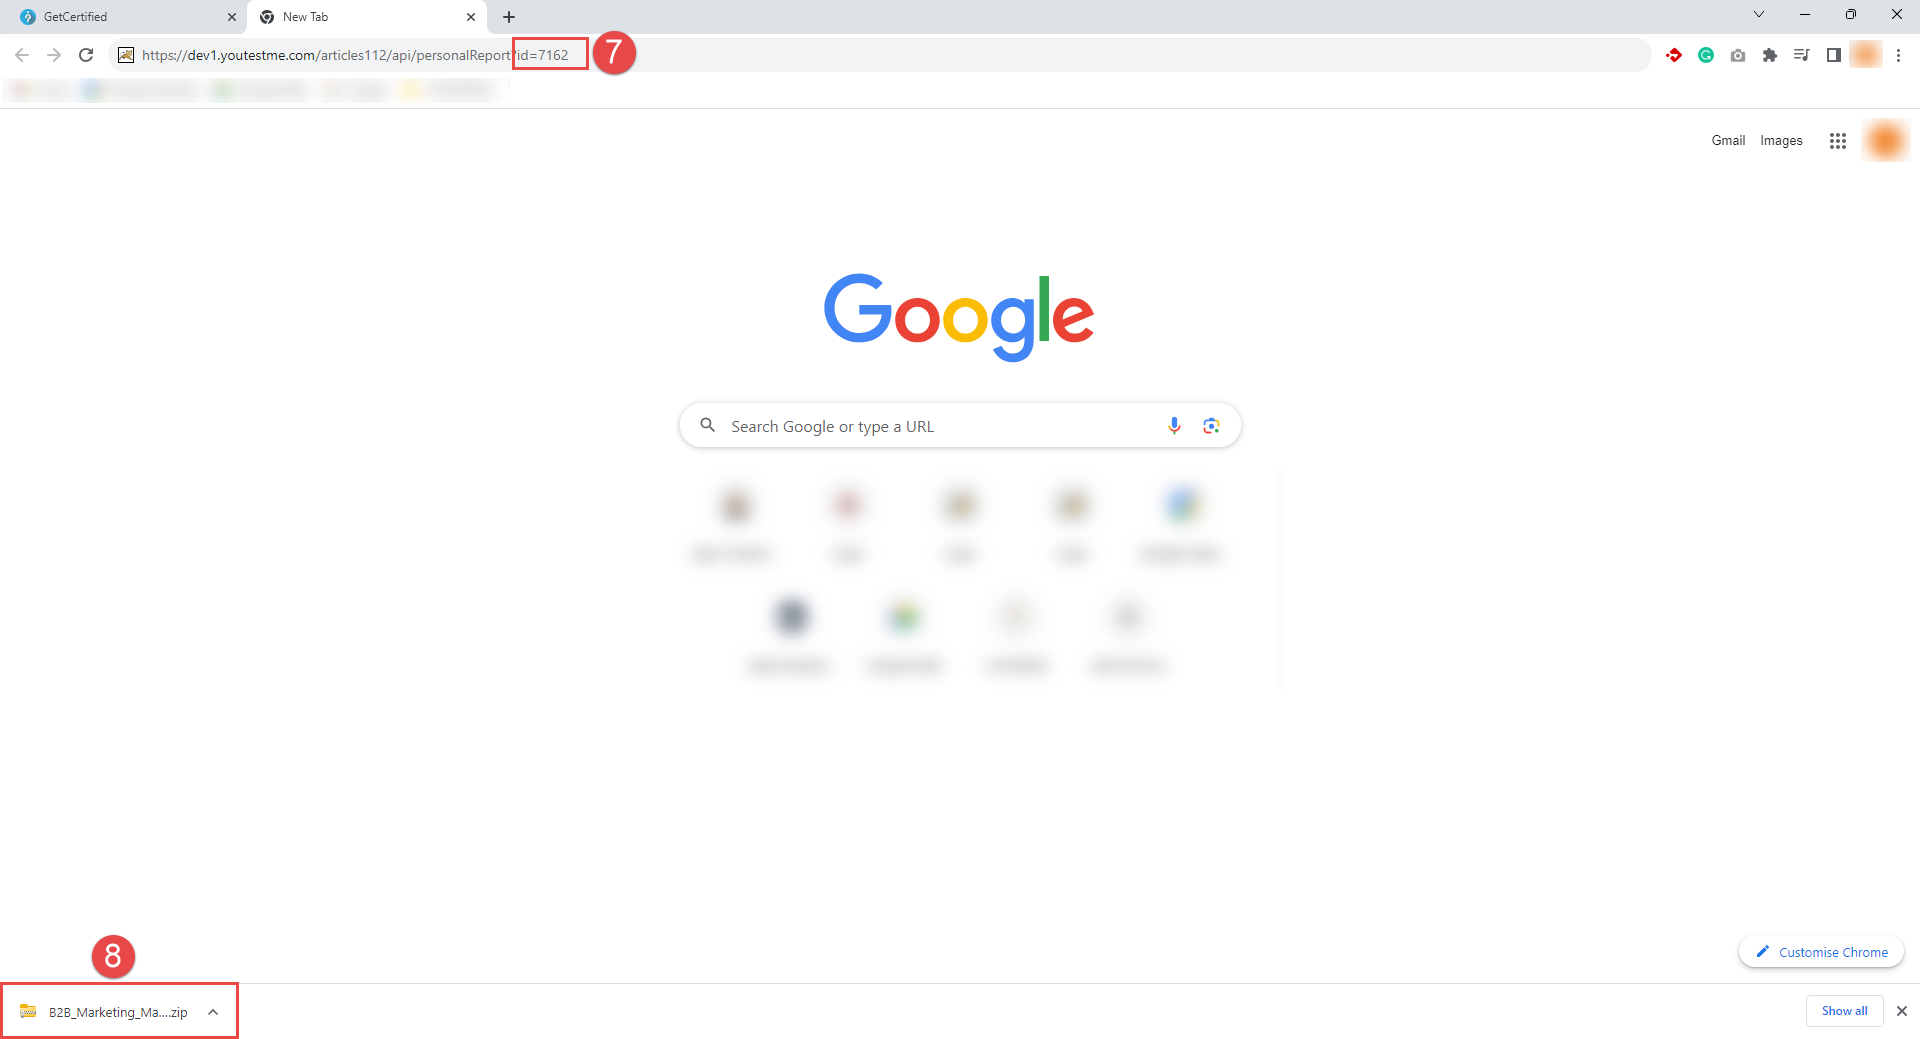
Copy the URL of the Personal report endpoint.
-
Paste the copied URL of the Personal report endpoint into a new tab in your web browser.
-
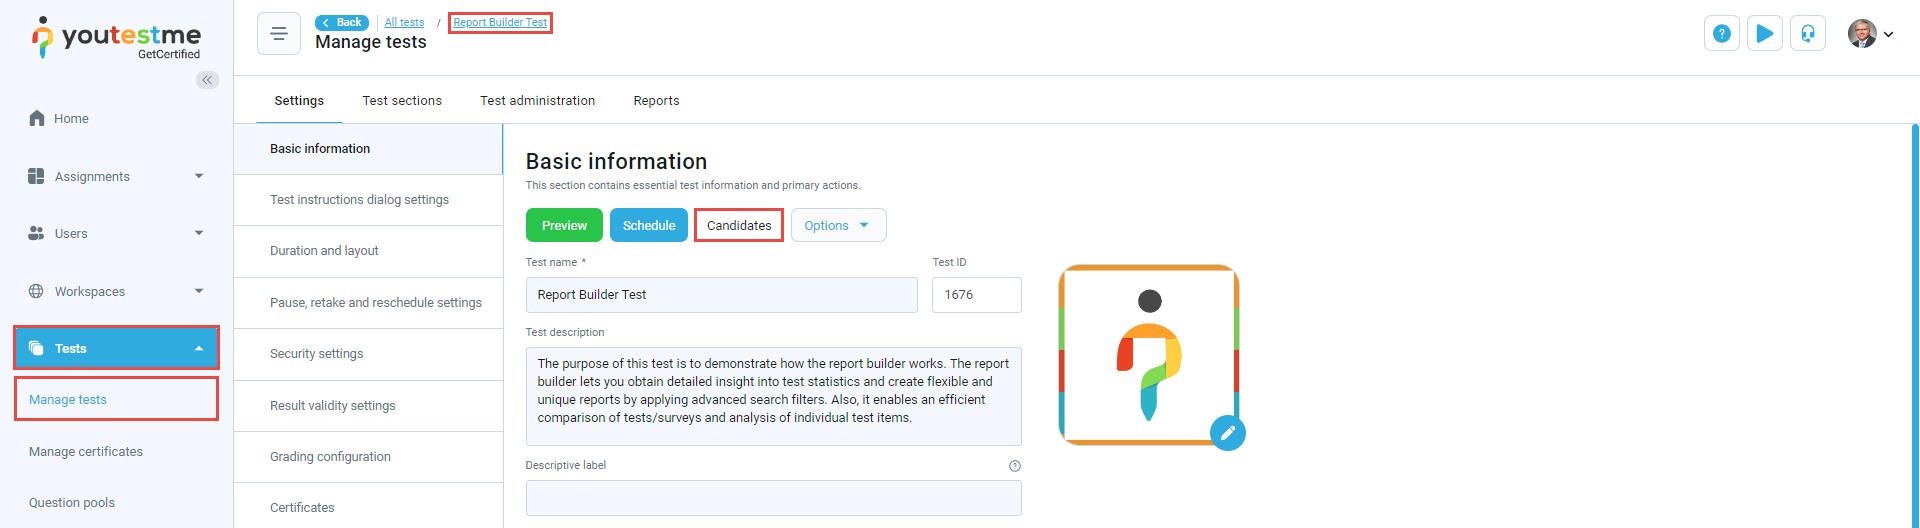
In the new tab, navigate to the Tests/Manage tests tab in your GetCertified application and open the test for which you want to retrieve the personal report.
-
Select the Candidates button.
-
Copy the Attempt ID. Locate the Attempt ID of the candidate for which you wish to download the personal report.
-
Replace #{attemptId} in the URL. Go back to the new tab where you pasted the URL of the Personal report endpoint. Replace #{attemptId} in the URL with the copied Attempt ID from the Candidates tab.
-
Press Enter on the keyboard, and the personal report will be downloaded automatically.
Note: This configuration process requires using the Google Chrome browser.
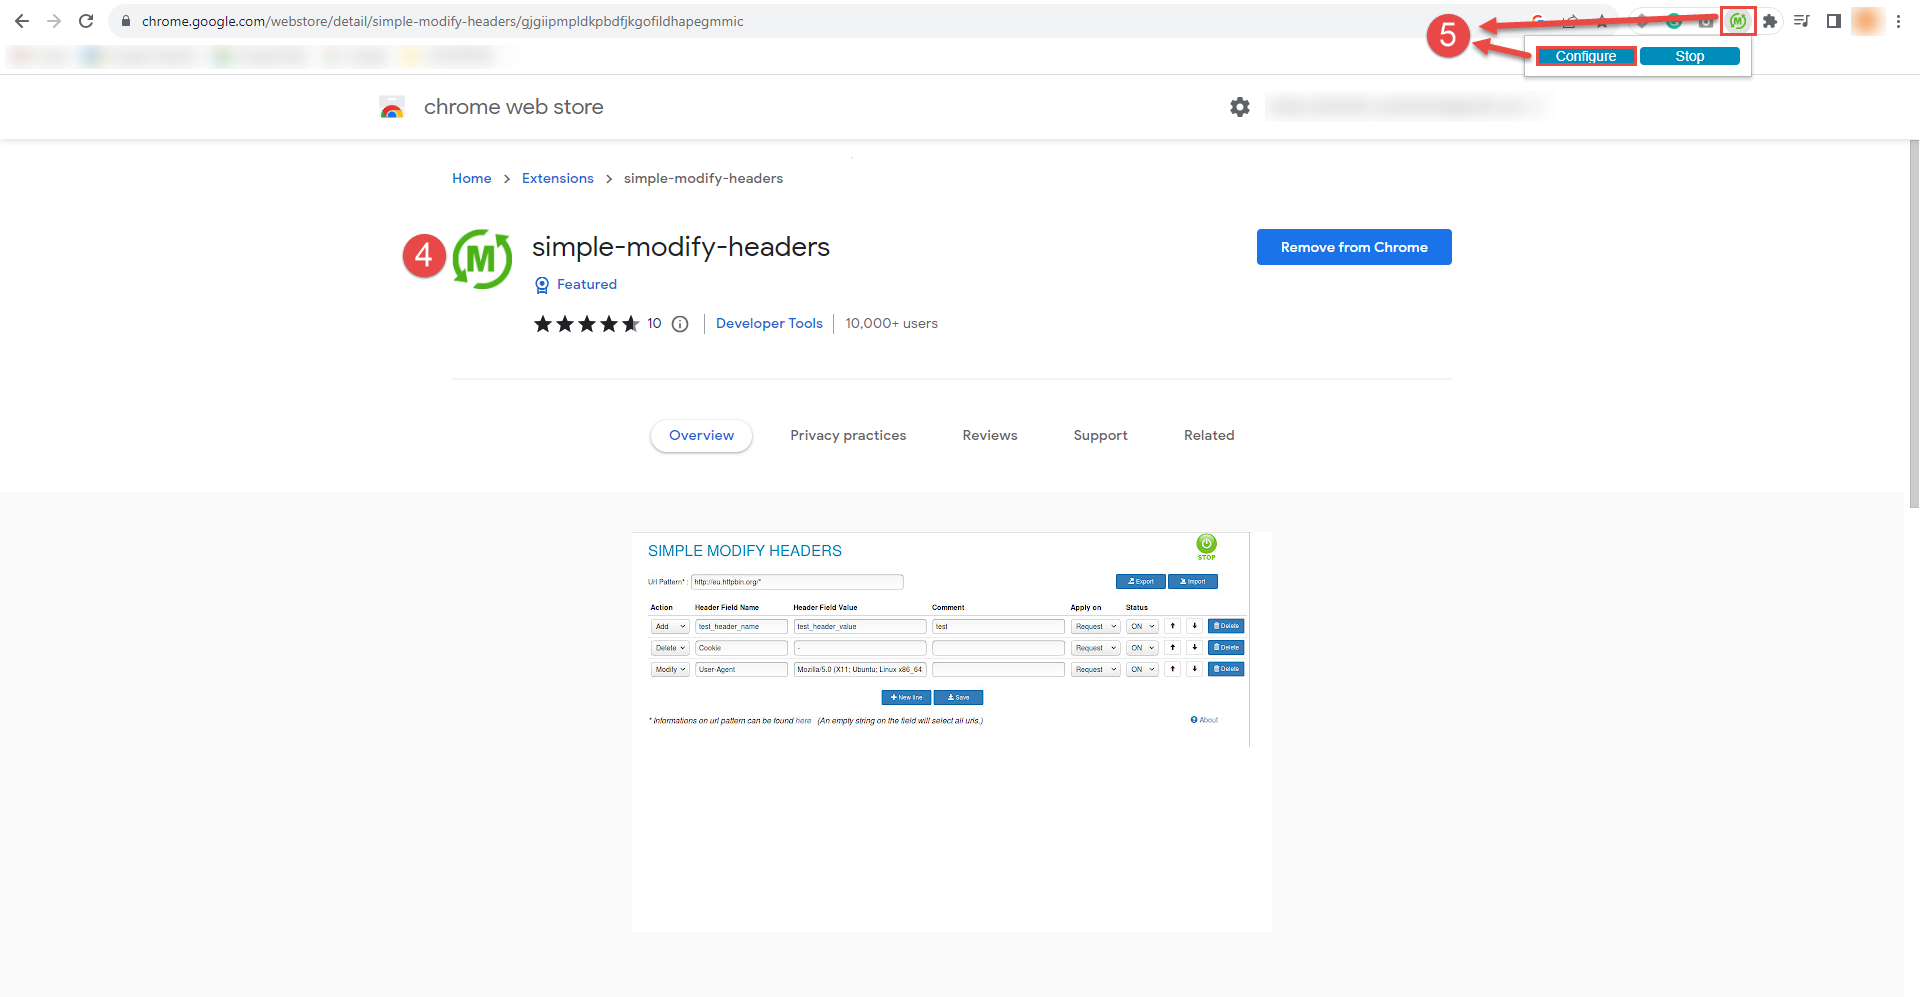
To configure Web API Key using a simple-modify-headers follow these steps:
To download a Personal report using the API key, follow these steps:
Note: The status of attempt must be Report complete.
-
-
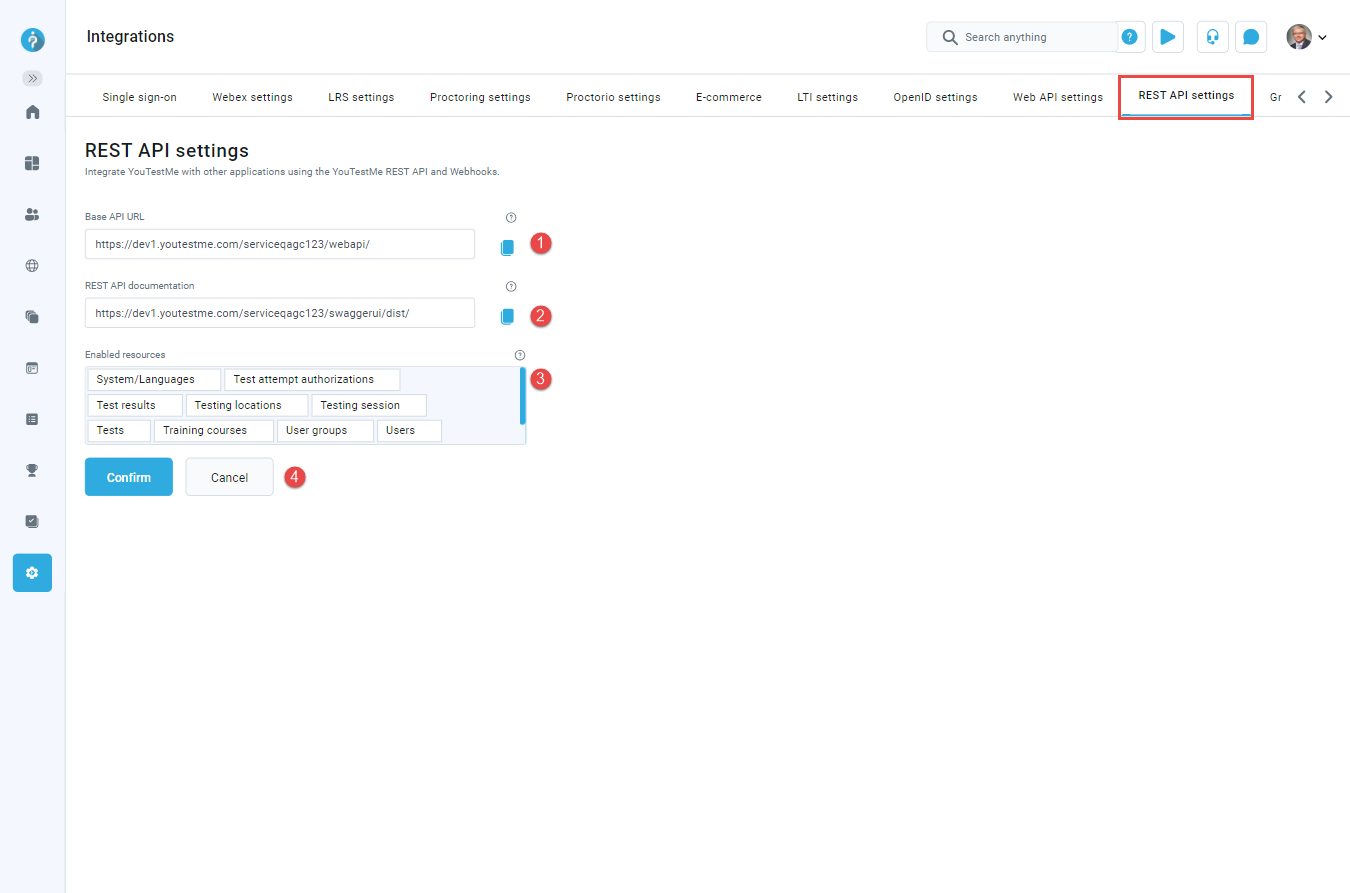
REST API settings
With the YouTestMe REST API and Webhooks you can build integrations with other applications using Zapier or Make, or you can develop custom integrations. The REST API settings tab displays the basic API information if the REST API is enabled:
-
Base API URL - The base URL of the YouTestMe REST API endpoints. For Zapier and Make integration you need this link for the authorization.
-
REST API documentation - The link to the REST API and Webhooks documentation.
-
Enabled resources - To forbid/permit the access to the API resources, deselect/select the resources from the dropdown list. API calls to the paths of disabled resources will result with 403 (Forbidden) status response with the proepr error message.
-
Press Confirm button to save the configuration.
Before integrating the YouTestMe using the REST API and Webhooks, please review the following useful links:
-
Exploring YouTestMe REST API documentation – This video demonstrates how to use YouTestMe REST API documentation to explore the API capabilities and try available endpoints. Also, it explains how to log in to REST API with the Basic and JWT Token authorization.
-
How to Use YouTestMe Webhooks - This video demonstrates how to register to the YouTestMe Webhooks to receive updates about specific events in the YouTestMe application.
-
YouTestMe integration scenarios and approaches - On this page, you can see the different approaches and scenarios for integrating YouTestMe with other applications, that can help you build your integrations with YouTestMe.
-
YouTestMe Zapier integration - Explains how to integrate YouTestMe with the applications available on Zapier.
Note: The REST API is a module from YouTestMe EE edition. To get the REST API module, contact the YouTestMe team at sales@youtestme.com.
If the YouTestMe REST API module is not enabled you will see the warning message in red:

-
-
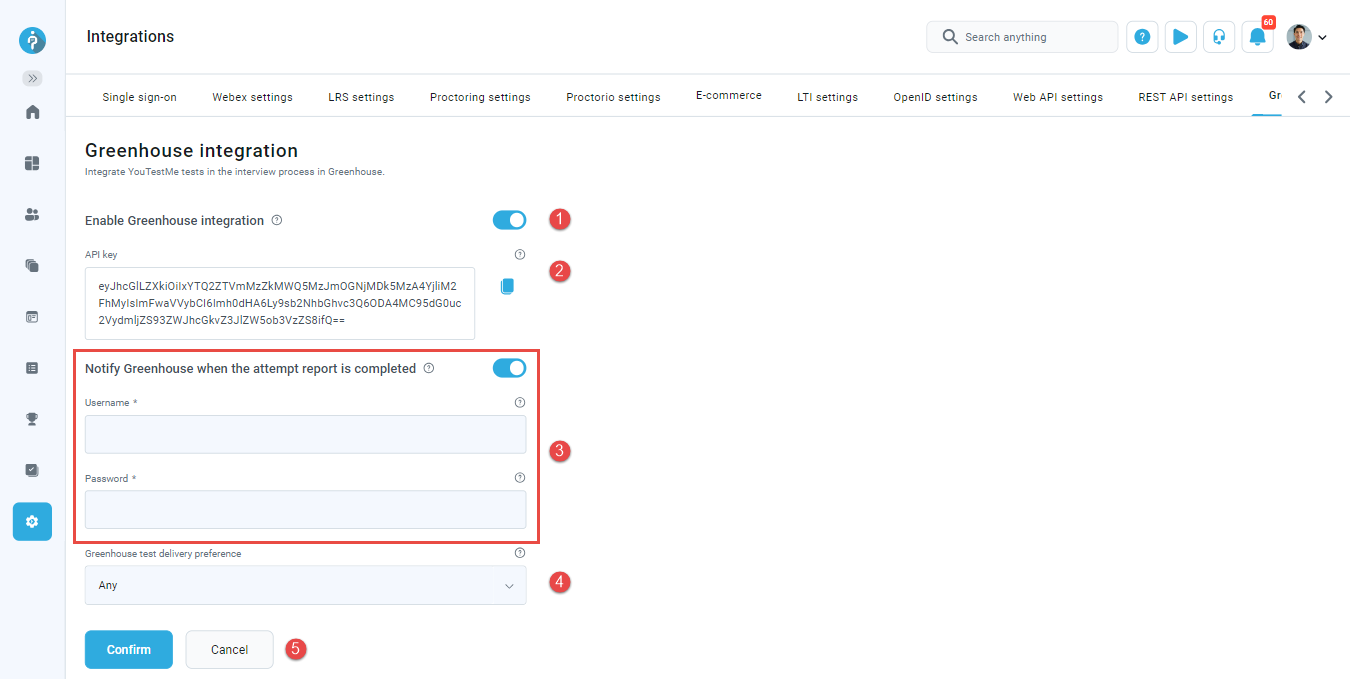
Greenhouse integration
YouTestMe has implemented the Greenhouse Assessment Partner API which allows you to seamlessly integrate YouTestMe assessments into your Greenhouse interview workflow. To set up the Greenhouse integration, please follow these steps:
-
Enable Greenhouse integration to use it. Request to Greenhouse integration endpoints will fail if Greenhouse integration is not enabled.
-
When you enable the Greenhouse integration the API key is generated and displayed. Provide this key to Greenhouse team to setup the YouTestMe integration. For more information about setting up the integration on the Greenhouse side, visit the following link.
-
When the integration is set up on the Greenhouse side, Greenhouse team will provide you the credentials for "Mark test as completed" endpoint. After that you can enable the "Notify Greenhouse when the attempt report is completed" to imeadiatly publish attempt results to Greenhouse when the report is completed. You will be required to enter Username and Passsword provided by Greenhouse. If you don't enable this option the results will not be visible immeadiatly
-
You may allow only the tests with a specific delivery preference to be offered in Greenhouse by selecting the Greenhouse test delivery preference. If you select Any, all tests will be offered. You can label the tests with one of the delivery preferences in the Test wizard or under the Test settings.
-
Set the time period in which grading attempt link will be valid. When grading attempt link is generated, set time will be calculated from the current time. After the time has passed, link will be invalid. If the 'Unlimited' option is selected, generated link will always be valid.
-
Press Confirm button to save the configuration.
Note: You may decide to notify the administrators via email or app notification whenever the integration error is reported. You can do that by enabling "Greenhouse integration error reported" email and/or app notification under Notification settings.
Note: For the Greenhouse integration, the REST API module must be enabled. To request REST API access, please contact the YouTestMe team at sales@youtestme.com.
If the YouTestMe REST API module is not enabled, you will see the warning message in red:

-
-
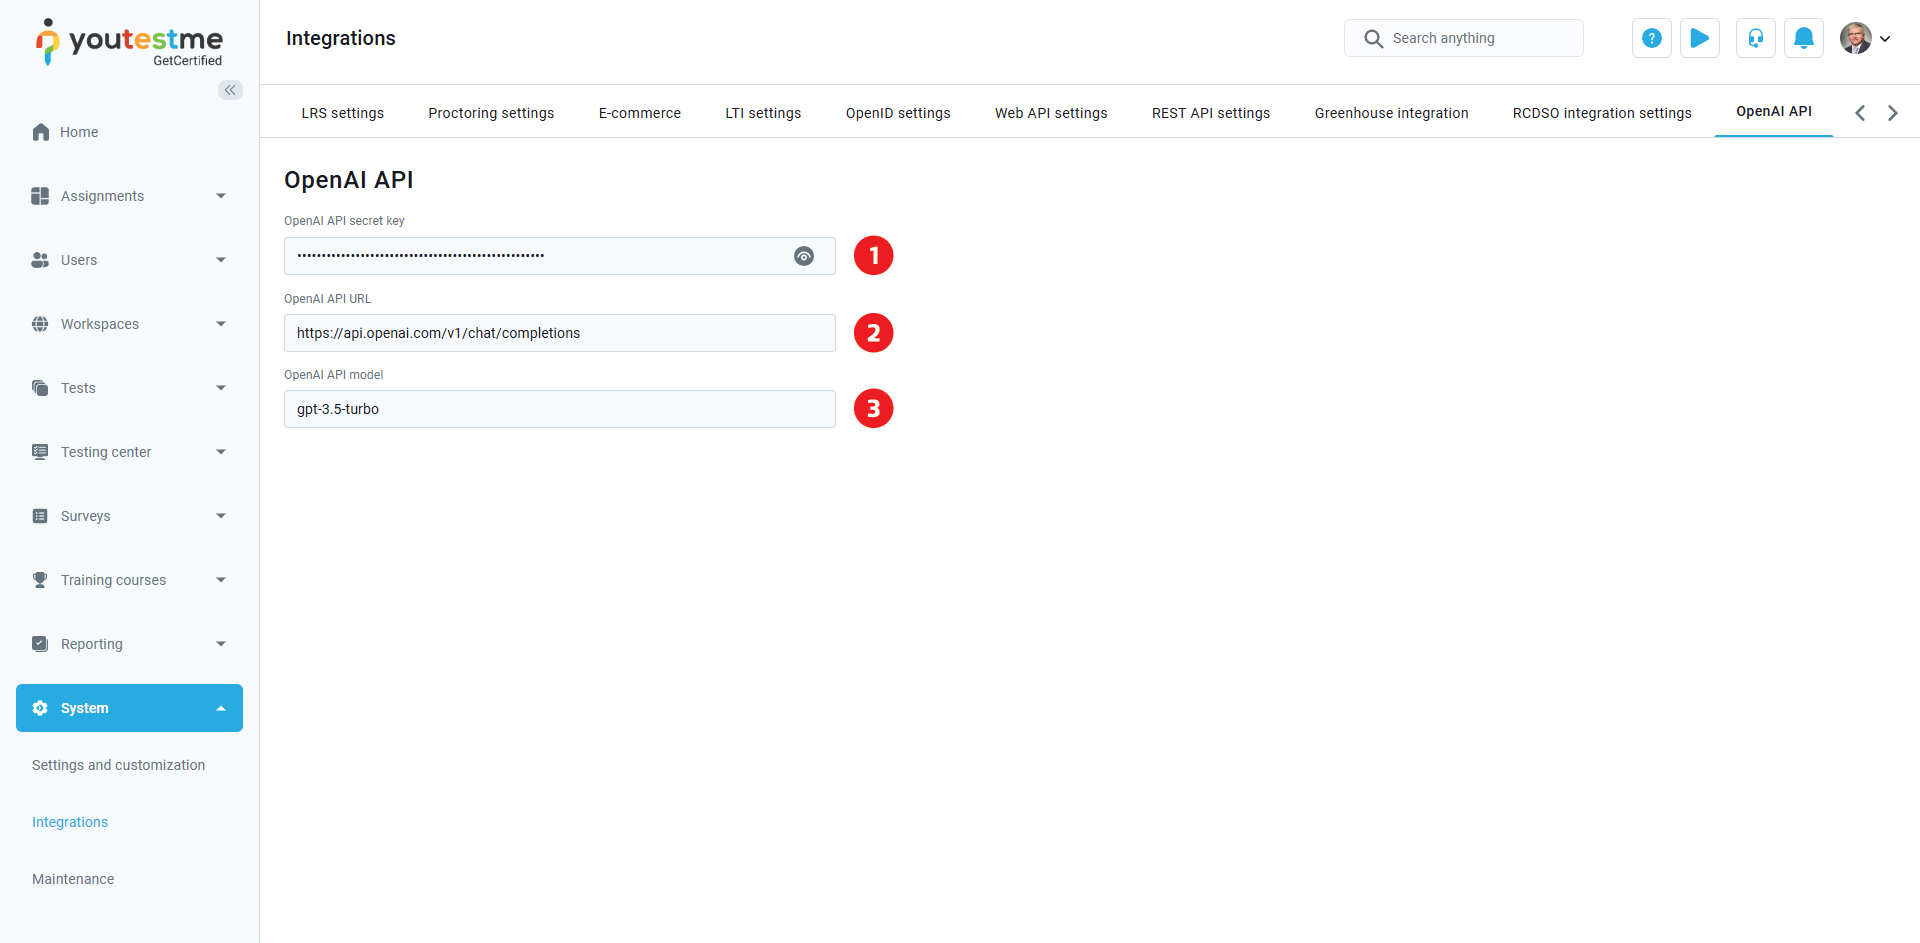
OpenAI API
-
OpenAI API secret key is a unique and private key that allows our application to authenticate with the OpenAPI service. It acts like a password, granting access to the API. Never expose it in public, as it can be used to make requests on your behalf.
-
OpenAI API URL is the endpoint where your chosen AI model is hosted and can be accessed. It typically follows a structured format, such as https://api.example.com/v1/models/{model_name}, where {model_name} represents the specific model you're using. You will send requests to this URL to interact with the model and receive responses.
-
OpenAI API model refers to the specific AI model you are utilizing within the API. Different models have different capabilities, response speeds, and accuracy levels. Examples include gpt-4, text-davinci-003, or a custom fine-tuned model. The model you choose will determine the quality and nature of the responses you receive.
-
-
