User manual
Testing sessions
-
Introduction
A testing session is a designated timeframe within which a candidate can start a specific assignment. On this page, you can manage existing testing sessions and create new ones for both tests and surveys. To access the page, navigate to the Testing center section in the main menu, then select Testing sessions.
Note: All information and explanations pertaining to tests are equally applicable to surveys.
Depending on the testing session settings, candidates may be manually assigned to the testing session by test managers, or they can self-enroll. Testing sessions possess various attributes that determine a candidate's access to the test, including availability period, the number of seats available in the session, deadline for booking the test, etc. A testing session can be scheduled for one or more tests. More information about each option can be found in the following chapters.
There are three different views, you can use to manage testing sessions:
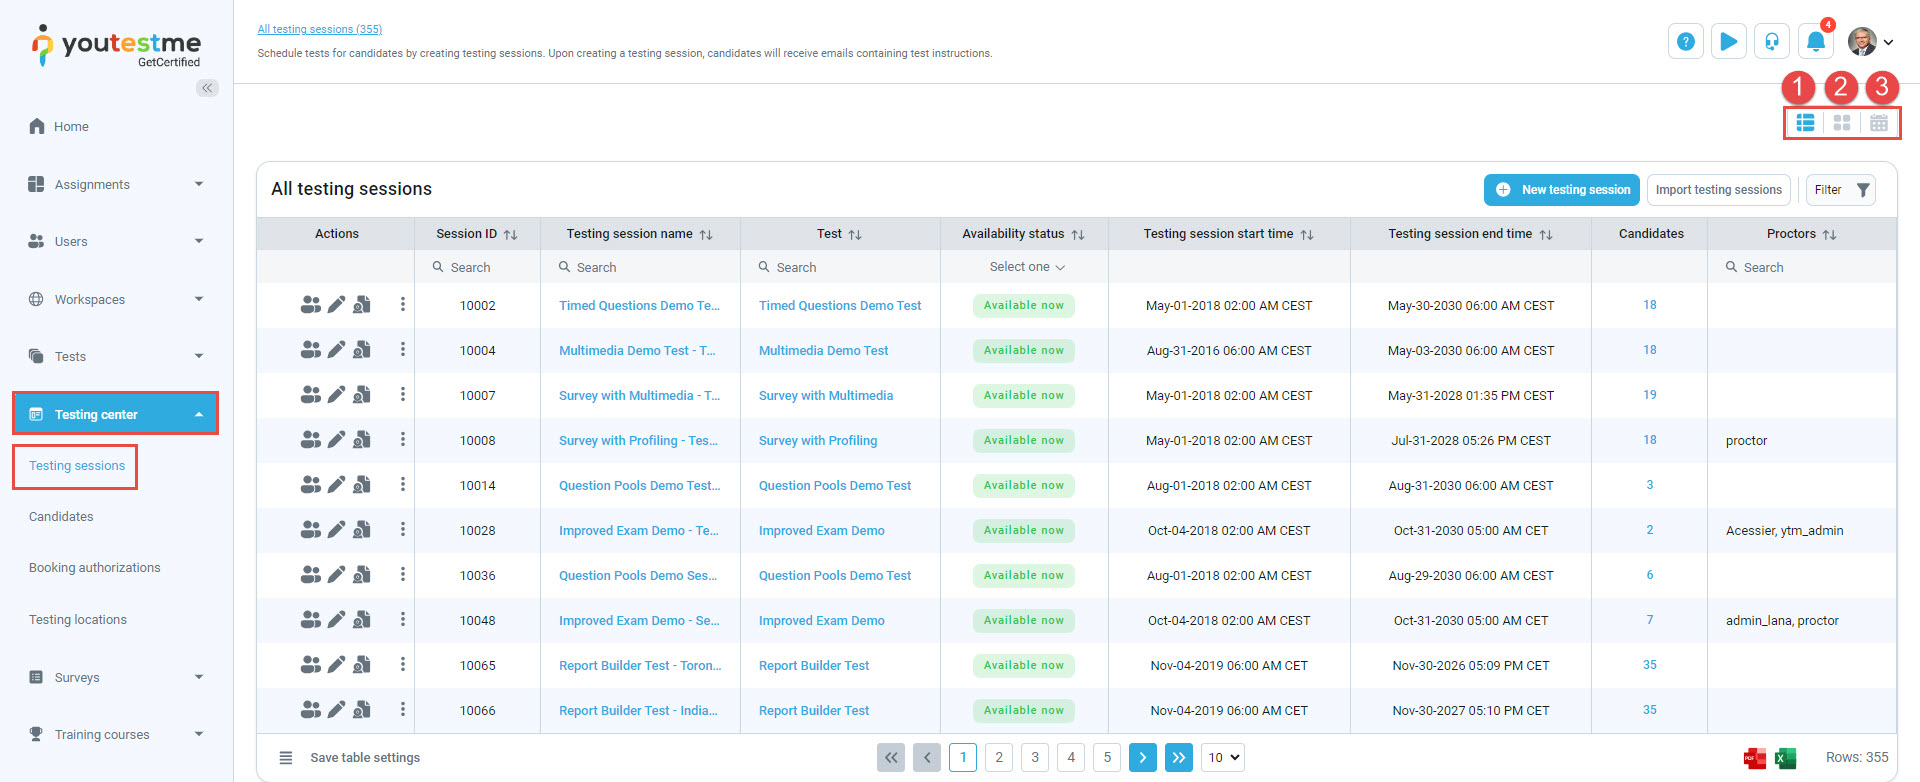
-
List view
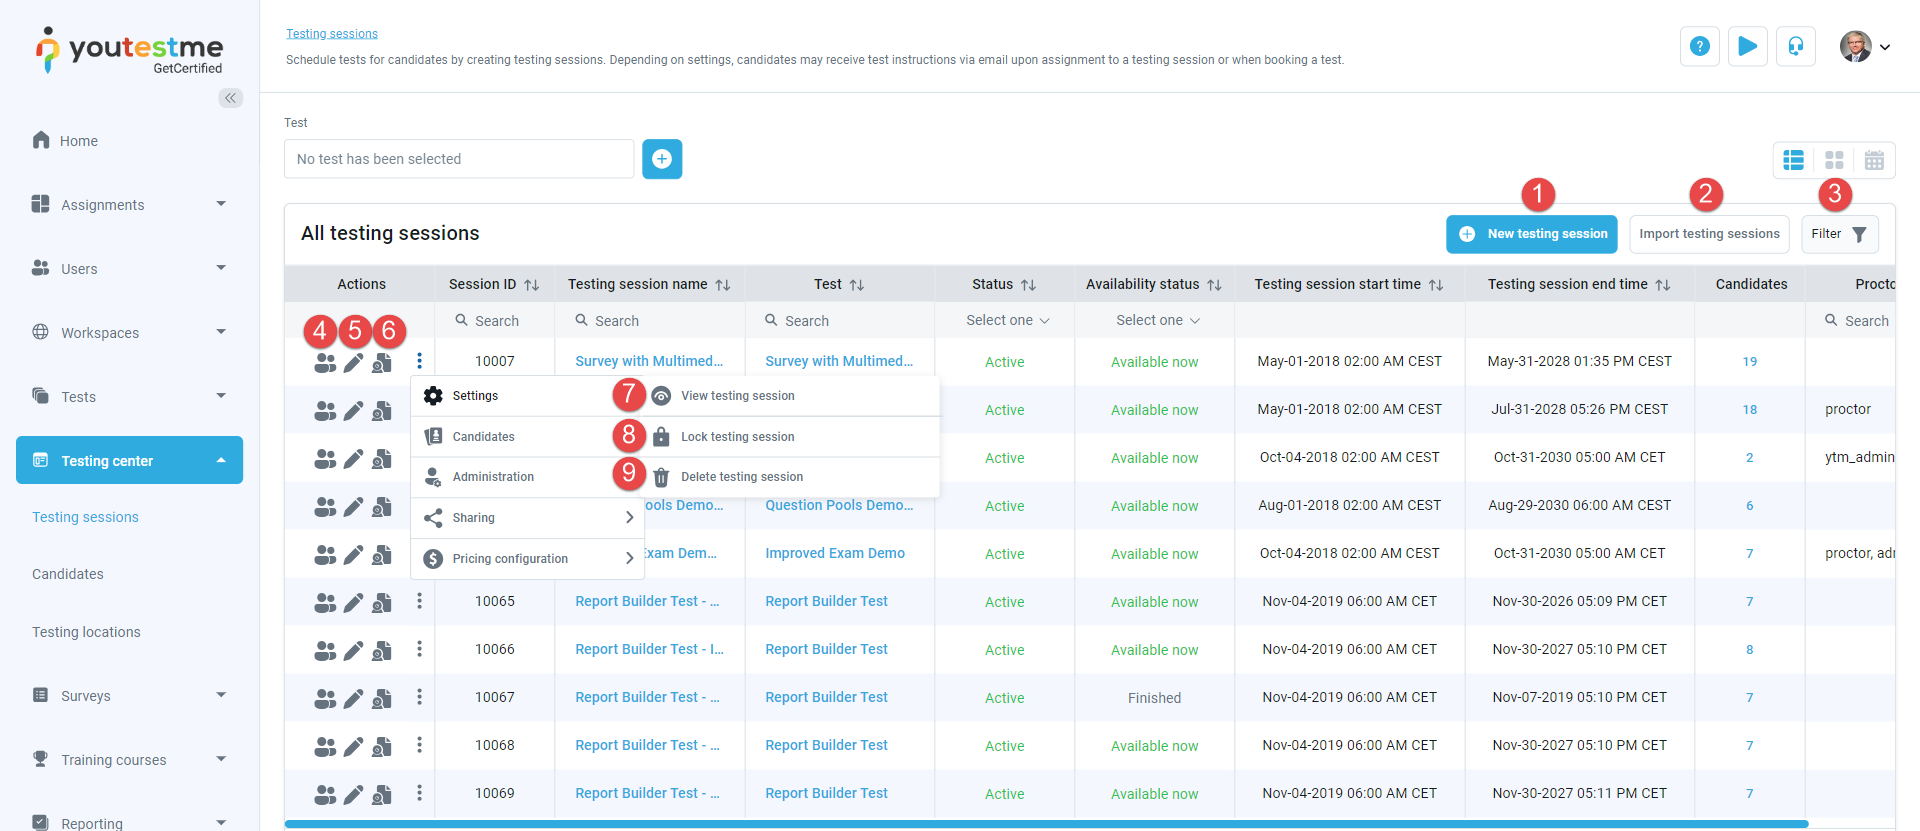
On this view, you can:
-
Import multiple testing sessions at once.
-
Filter already created testing sessions by the testing session start time. Choose to display only testing sessions that start within the selected time range.
-
Edit the testing session. Fields are the same as explained for testing session creation.
-
Enter the proctoring supervision dashboard to monitor proctoring sessions live or review and grade past proctoring sessions.
-
View testing session details.
-
Permanently Delete the testing session.
-
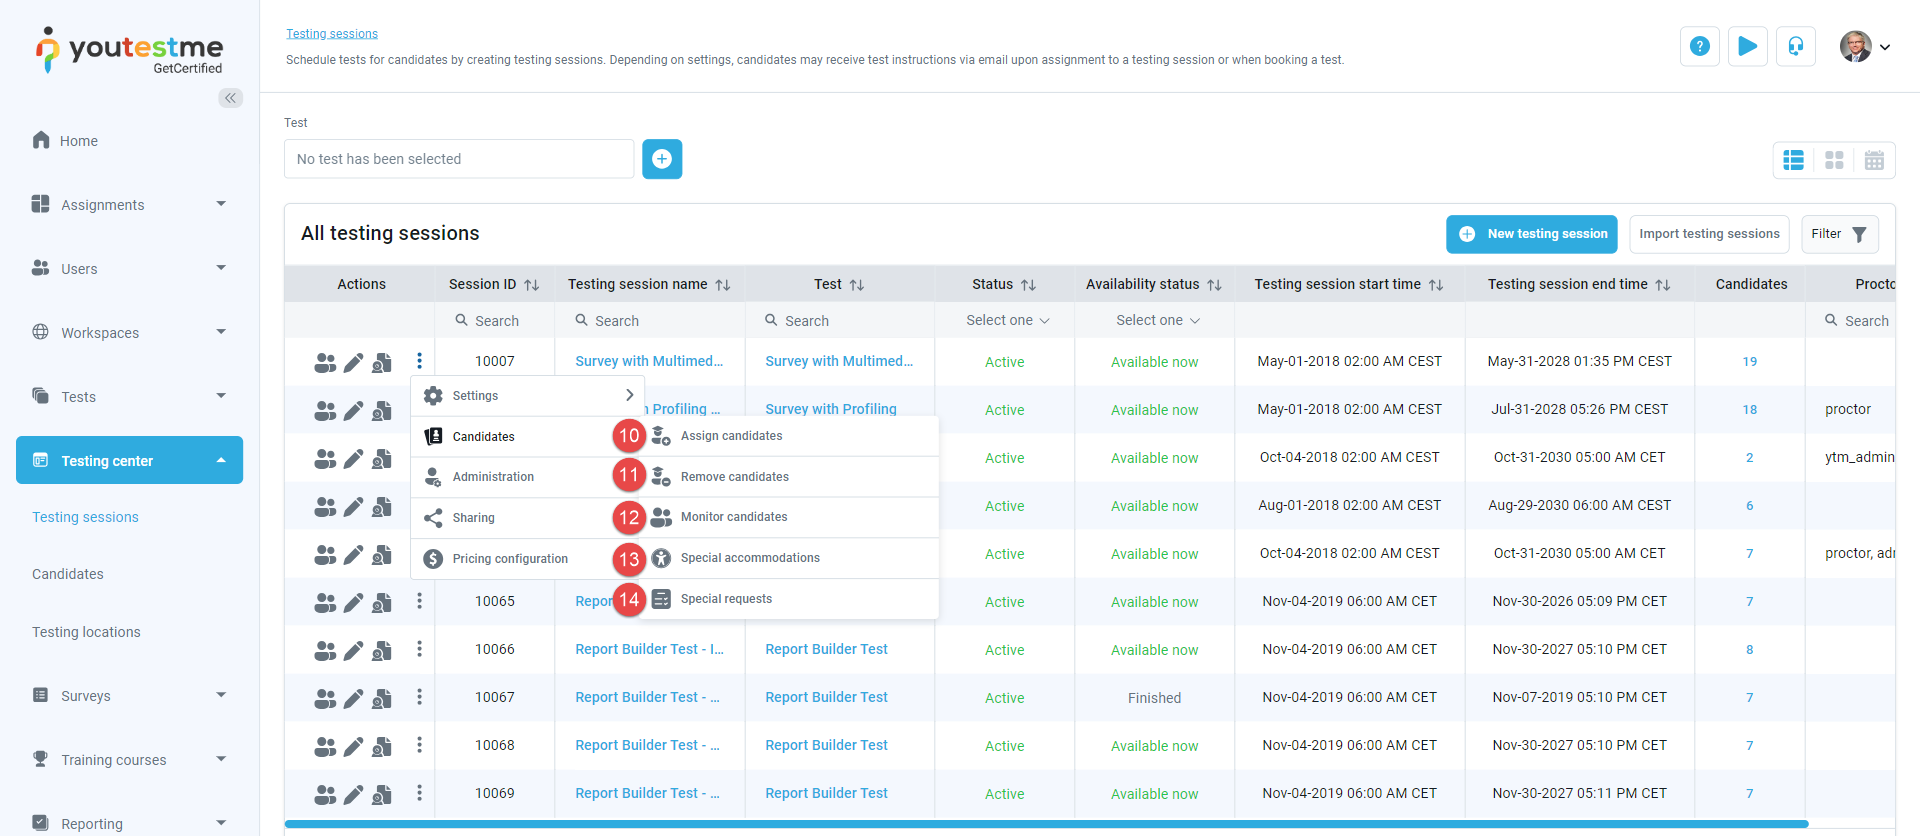
Assign candidates to the testing session.
-
Remove candidates from the testing session.
-
Manage Special accommodations.
-
Manage Special requests.
-
Manage tests for which the testing session is created.
-
Manage proctors responsible for monitoring the testing session.
-
Manage session managers. Session managers can manage testing sessions; they can change all settings for sessions they manage, assign/remove candidates, etc., but they cannot manage tests for which testing sessions are scheduled. To assign a session manager, click on Manage session managers and select users you want to assign as managers.
-
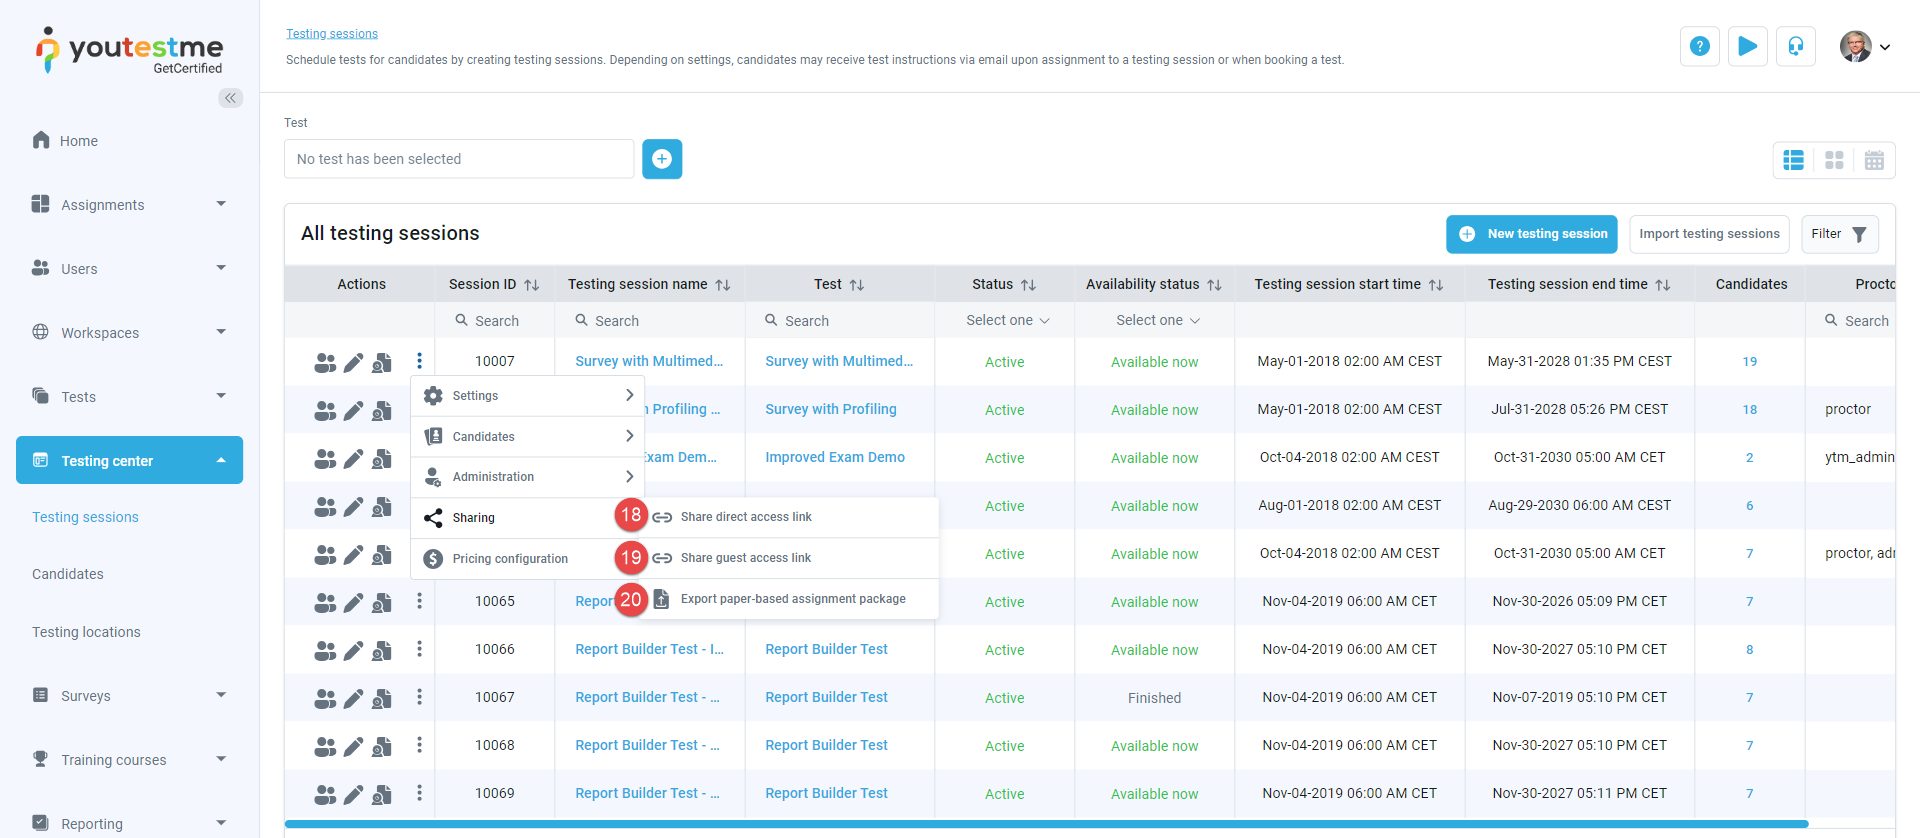
Share direct access link. Automatically generated link that redirects candidates directly to this testing session upon registration or login. The direct registration link does not insert new registrations into the group, and in that case, this does not work. When SSO configuration is set-up, the direct link with the SSO integration can be copied. Share the link directly with candidates, display it on your website, or include it in email notifications. Customize the notification for test publishing under System/Settings and customization/Notifications.
-
Share guest access link. Automatically generated link that allows unauthorized users to take the test in the testing session without creating an account. A temporary guest profile will be created for them, and the system will automatically delete the profile upon completion or exit from the test. This link can be useful for candidates to explore the application before their official tests. Share this link with candidates or display it on your website.
-
Export the paper-based assignment package which contains:
-
Tests and bubble sheets - Each test and bubble sheet are placed in a separate sub-folder. Files contain all the non-archived test versions.
-
Student labels - Include all candidates and the respective test versions assigned to them.
-
Signing sheet - Include a section for candidates to sign next to the test version they are completing.
-
Package summary - Include a list of tests along with the corresponding number of candidates assigned to each.
-
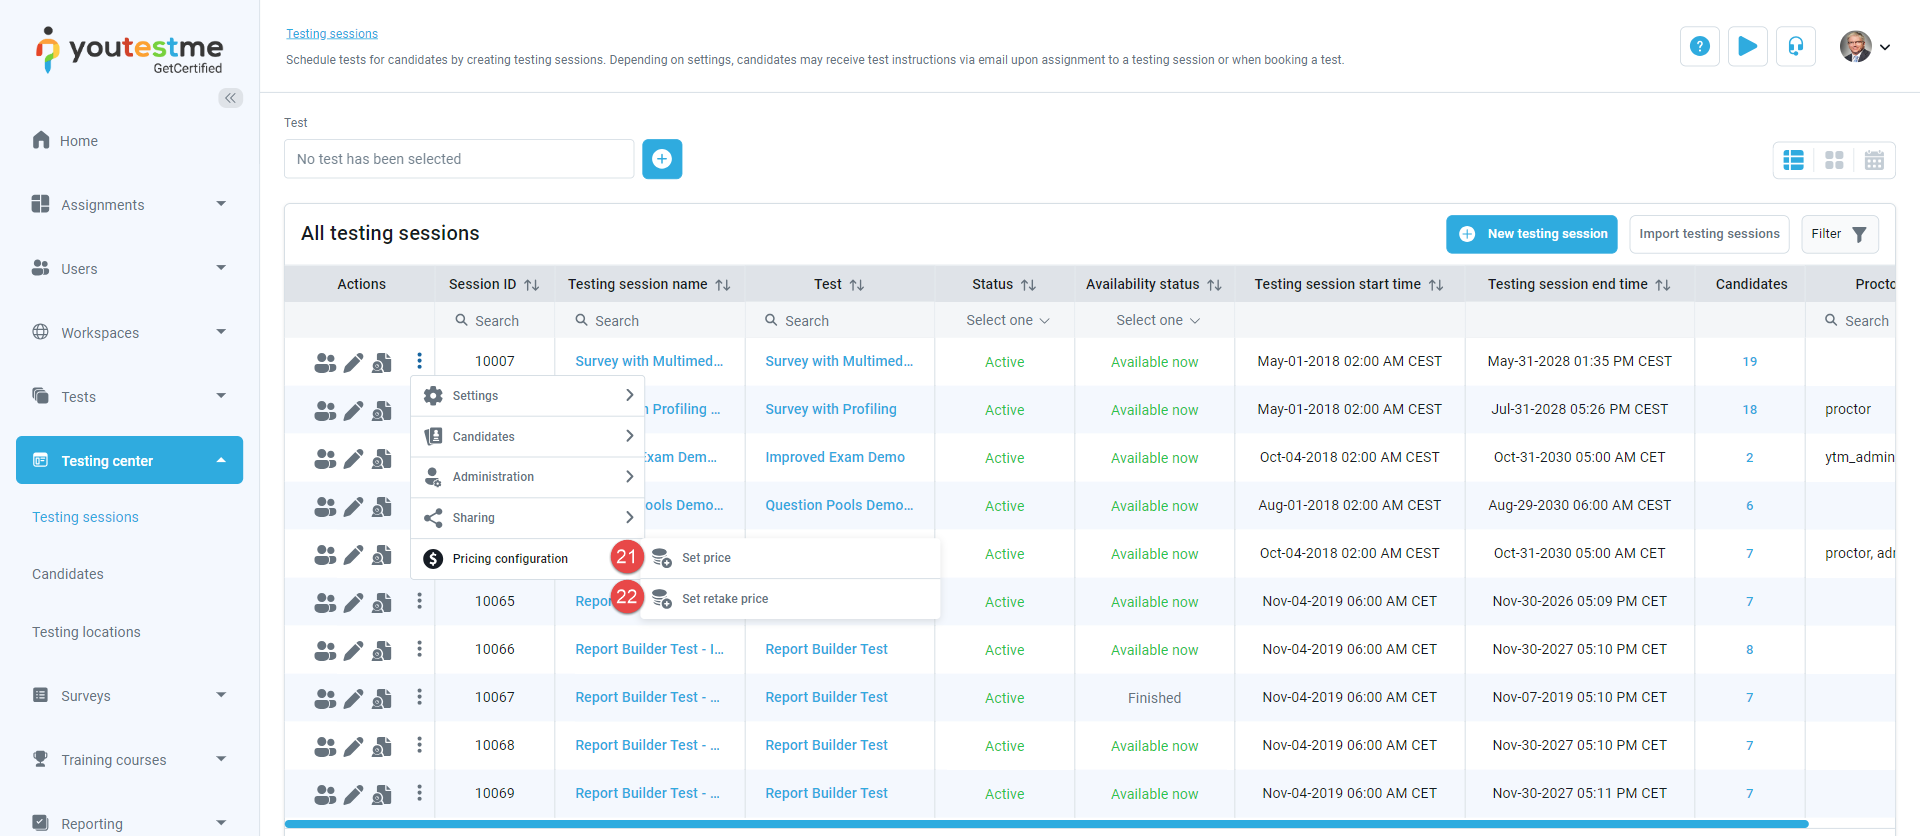
-
Set the price for the testing session.
-
Set the retake price for the testing session.
Note: The prices can only be set for self-enrollment testing sessions when the E-commerce module is enabled in the application. For details on configuring E-commerce and setting prices, refer to this article.

-
Table layout
This table contains essential information about testing sessions.
Most columns are explained in the section for testing session creation. Here are explanations for additional columns:
-
Session ID - Automatically generated upon testing session creation and cannot be edited. This ID may be useful for LTI integration; it allows direct assignment of candidates to the testing session.
-
Status - Indicates whether the session is currently active, meaning visible to candidates during its availability period. If the status is Inactive, the testing session will not be visible even during its availability period. Please note that the test must also be published for active sessions to be visible during their availability period.
-
Availability status of testing session can be:
-
Finished - The assignment is no longer accessible as the testing session period has expired.
-
Upcoming - Assignments will be available for taking in the future, starting from the specified date and time.
-
Available now - The assignment is currently accessible for candidates.
-
Suspended - The assignment is no longer accessible because the test for which the testing session was scheduled has been suspended.
-
-
Proctors - Usernames of assigned proctors for the testing session.
-
Direct access link - Automatically generated link that redirects candidates directly to this testing session upon registration or login. Share the link directly with candidates, display it on your website, or include it in email notifications. Customize the notification for test publishing under System/Settings and customization/Notifications.
-
Meeting link - If proctoring using conference tools is enabled, this is the link for the meeting that candidates need to start before beginning the test.

-
-
Create a testing session
To create a new testing session:
-
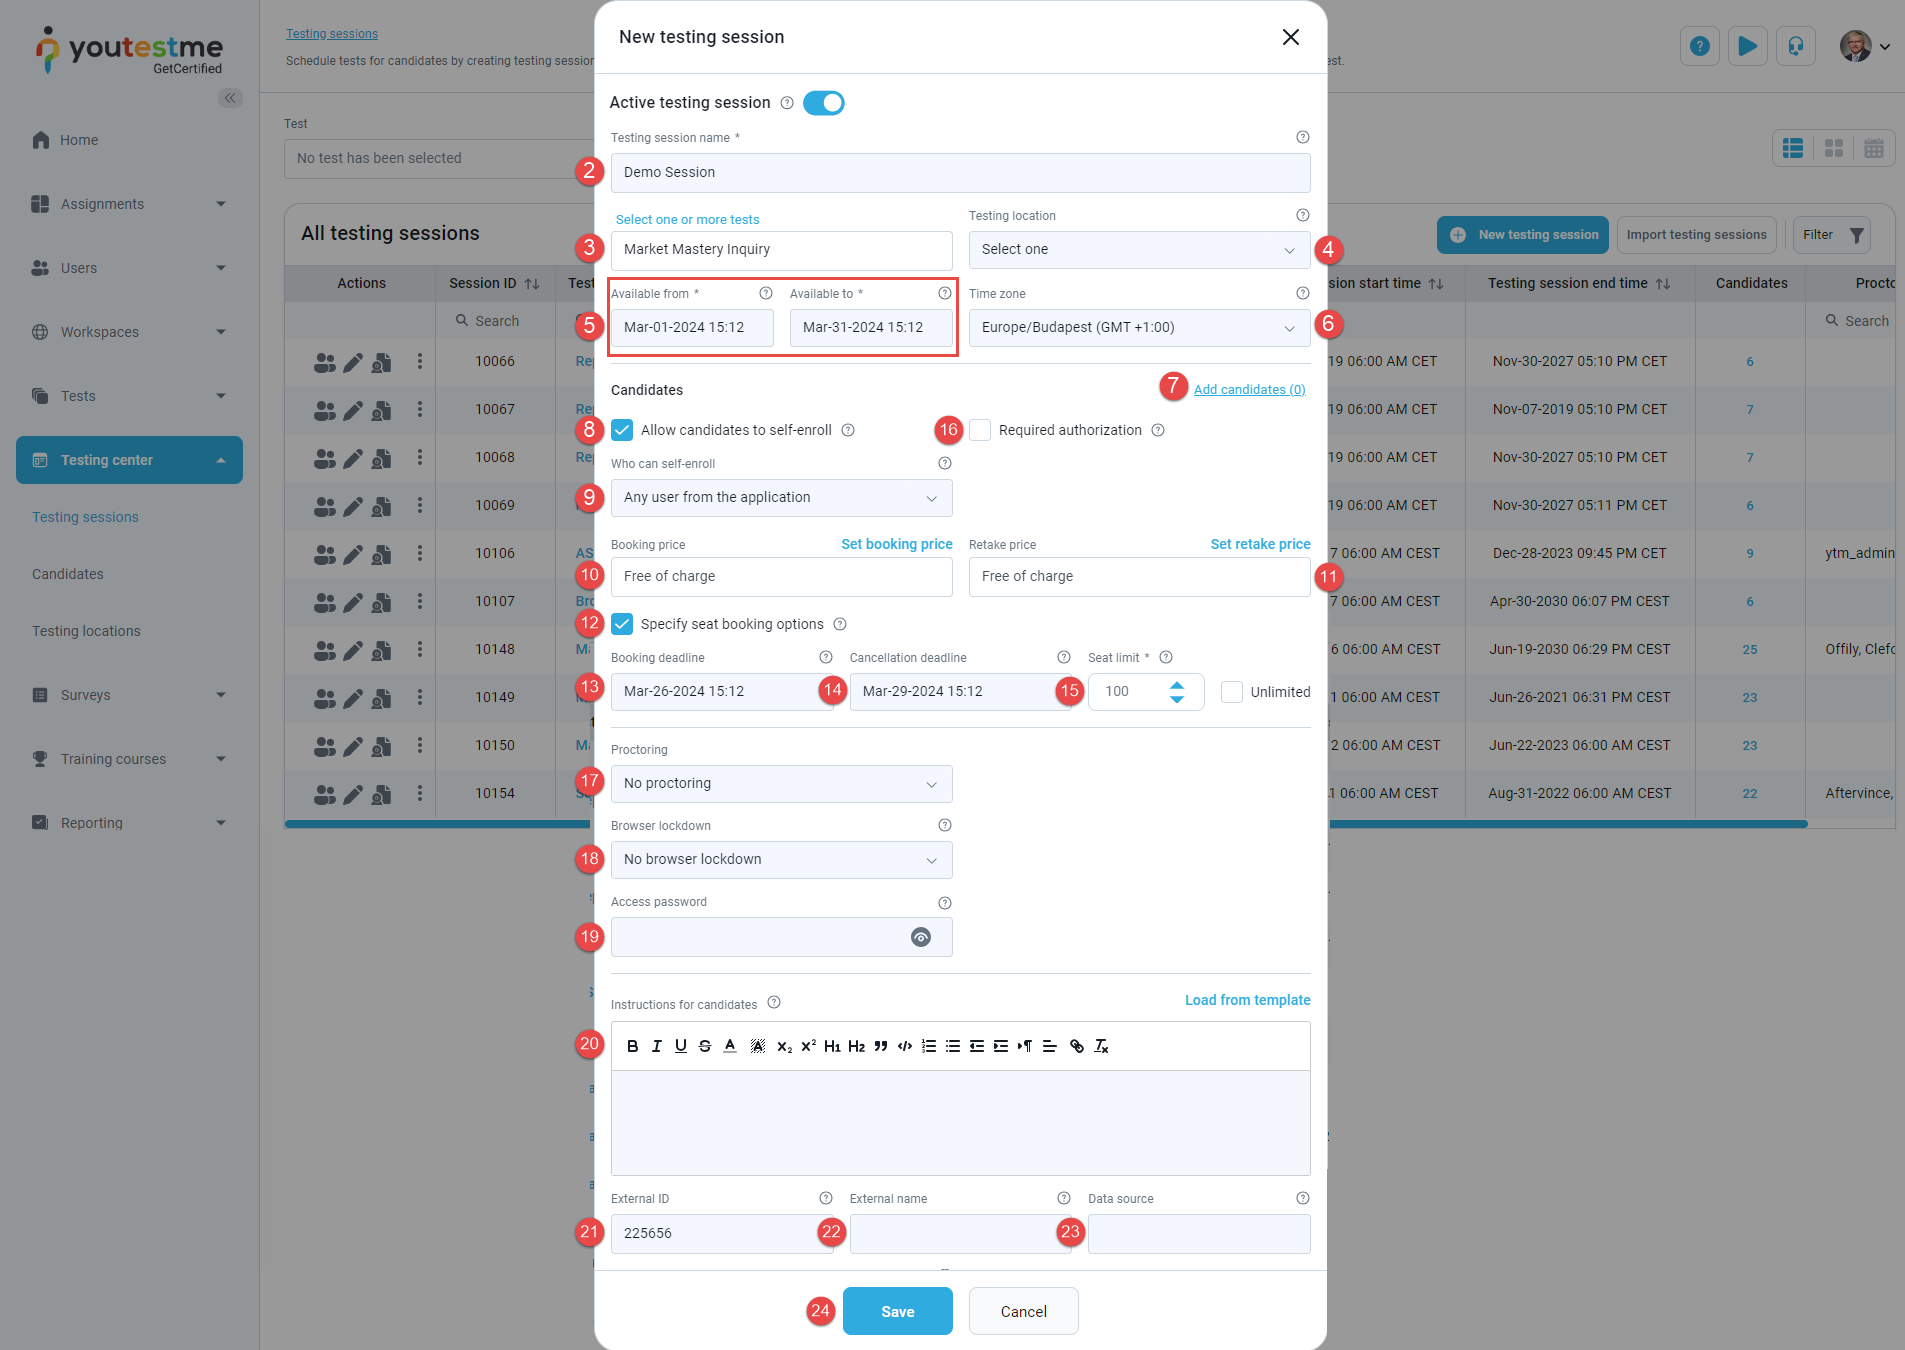
Define the session's status as either Active or Inactive. An active session is visible to candidates during its availability period, while an inactive session is not visible even during its availability period. Please note that the test must also be published for active sessions to be visible during their availability period. Additionally, notifications will be sent to all assigned users for an active session upon test publishing.
-
Enter the Testing session name. The maximum number of characters that can be displayed in this field is 100.
-
Select one or more tests in which the testing session will be created.
-
Select previously created Testing location and its time zone and assigned proctors will be automatically set for the testing session.
-
Specify Testing session start and end times - Define the period during which the test will be available for taking.
-
Select the Time zone in which date fields will be displayed.
-
Manually Add candidates to the testing session by selecting users from the list of all users or a specific user group.
-
Allow candidates to self-enroll. If this option is enabled, additional settings will become available.
-
Select Who can self-enroll - any user from the system, only members of a user group, or only members of a training course. This option is available if the Allow candidates to self enroll option is enabled.
-
Set Booking price - Specify the amount candidates must pay to start or book the test. The testing session is free by default.
Note: The price can only be set for self-enrollment testing sessions when the E-commerce module is enabled in the application. For details on configuring E-commerce and setting prices, refer to this article.
-
Set Retake price - Specify the amount candidates must pay to retake the test.
Note: The price can only be set for self-enrollment testing sessions when the E-commerce module is enabled in the application. For details on configuring E-commerce and setting prices, refer to this article.
-
Specify seat reservation options, allowing the definition of booking and cancellation deadlines, as well as seat limits. This option is available if the Allow candidates to self enroll option is enabled.
-
Define Booking deadline - The date until which candidates can book the testing session. If not specified, candidates can book the testing session at any time by the end of the testing session.
This option is available if Specify seat reservation options are enabled.Note: You can define the rule for automatic booking deadline setup under System/Settings and customization/System preferences/Test booking settings.
-
Define Cancellation deadline - The deadline for candidates to cancel a booking for the testing session. If not specified, candidates can cancel their testing session booking at any time before the end of the testing session.
This option is available if Specify seat reservation options are enabled.Note: You can define the rule for automatic cancellation deadline setup under System/Settings and customization/System preferences/Test cancellation settings.
-
Define Seat limit - Specify how many candidates can book the testing session. This option is available if Specify seat reservation options are enabled.
-
Select that Authorization is required for the test - Enable this option, and candidates will require authorizations to start the test. Test authorizations can be created under Test Administration/Authorizations.
-
Enable Proctoring to prevent cheating and maximize test integrity. Choose one of the offered Proctoring configurations to define the set of features and proctoring type that applies to the session.
Note: Proctoring module must be set under System/Integrations/Proctoring settings.
Note: When utilizing proctoring through conference tools, you need to choose between using Webex integration or manually copying the meeting link of your choice (Google meet, Zoom, etc.). If opting for Webex integration, you must first configure it under System/Integrations/Webex settings. For more detailed instructions on using proctoring with conference tools, refer to this article.
-
Enable the Browser lockdown option and choose between Built-in protection or Safe Exam Browser (SEB). In either case, the browser will enter full-screen mode during testing, with certain actions like cutting, copying, pasting, using the print screen key, and right-clicking disabled. If the Safe Exam Browser option is selected, the configuration can be selected from a predefined list, or you can upload your own with a .seb extension. Candidates starting a test with Safe Exam Browser option enabled must install the SEB browser to begin.
-
Define Access password to prompt candidates to enter a password when starting the test. This option may be useful when tests are conducted in physical locations, allowing you to provide the password to candidates at the designated time for starting the test. Additionally, this option is automatically enabled when the test is monitored using conferencing tools to ensure that only authorized users can start the test.
-
Define additional Instructions for candidates. Write additional instructions and rules that candidates must follow during the testing session. This information, along with the test instructions, can be added to the email notification sent to candidates. Customize notifications under System/Settings and customization/Notifications.
-
Enter the External ID used for integration with external systems.
-
Enter the External name, an optional name used for integration with external systems.
-
Data source - Enter the name of the external system.
-
Click the Save button to create the testing session.
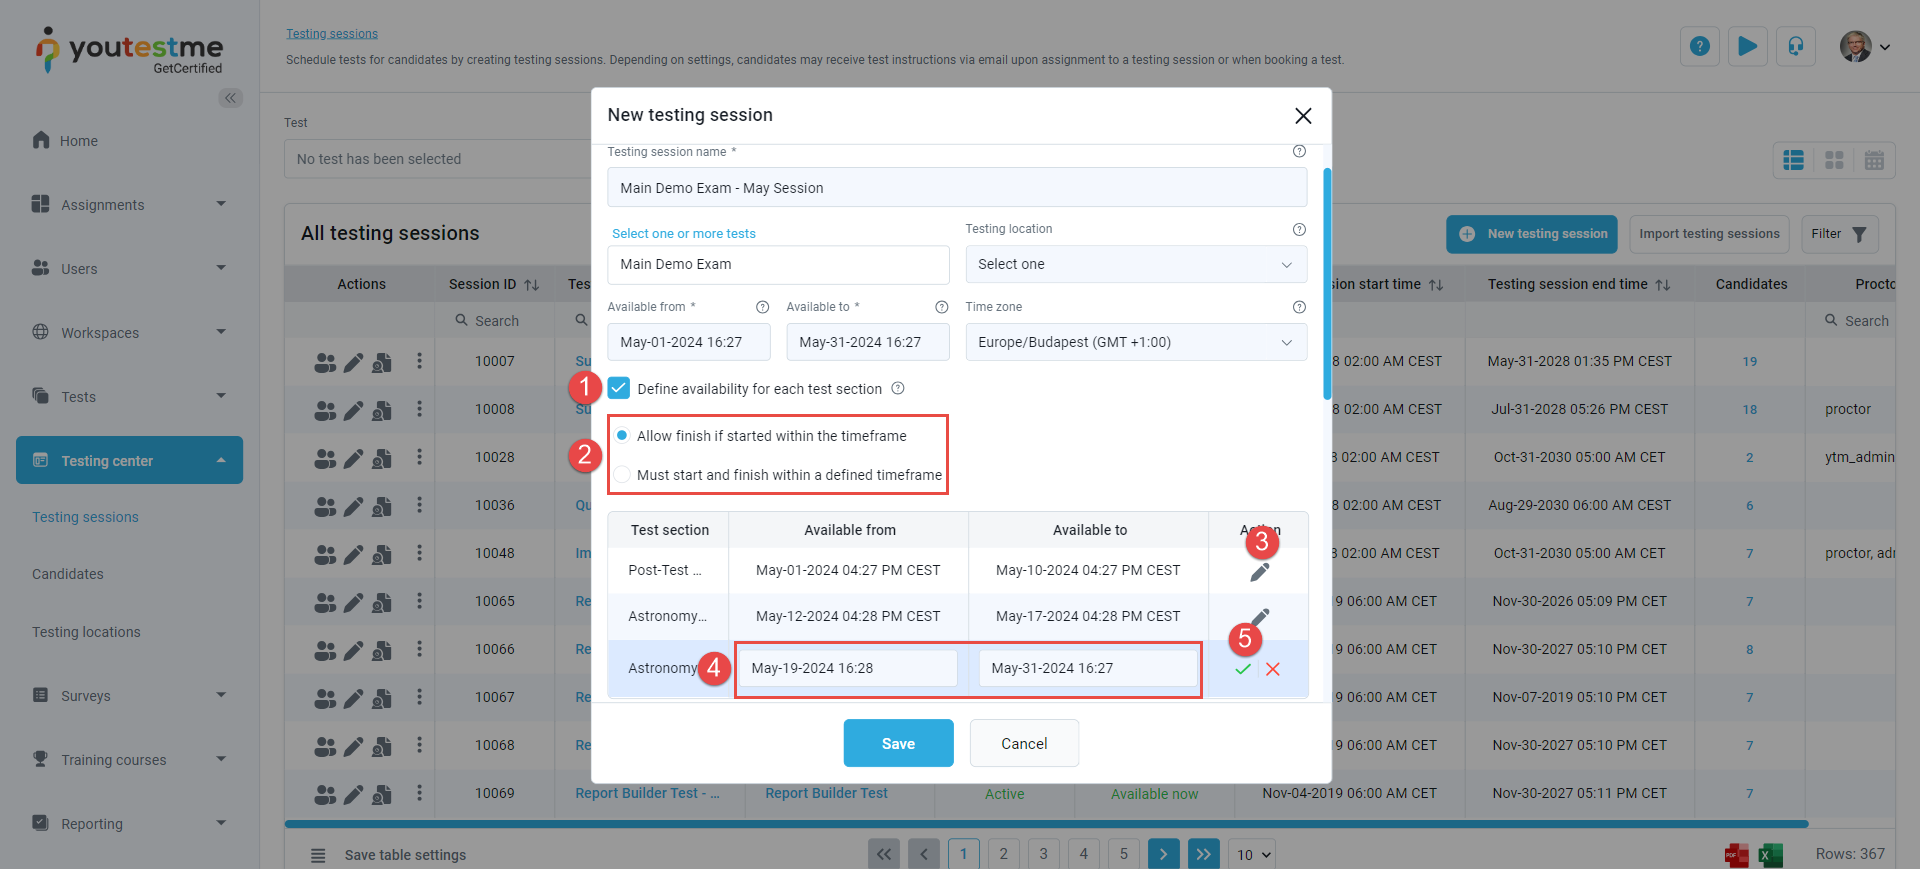
When the test contains sections, you can customize the availability for each section during the creation of the testing session:
-
Enable the Define availability for each test section option.
-
Decide whether candidates are allowed to finish sections started within the timeframe or must start and finish within a defined timeframe.
-
Click the pencil icon to modify section availability settings. If not defined, the section is available throughout the testing session period.
-
Set the specific timeframe during which the section will be available.
-
Save the configured settings for the section.
For additional guidance on defining availability periods for test sections, refer to this article.
-
-
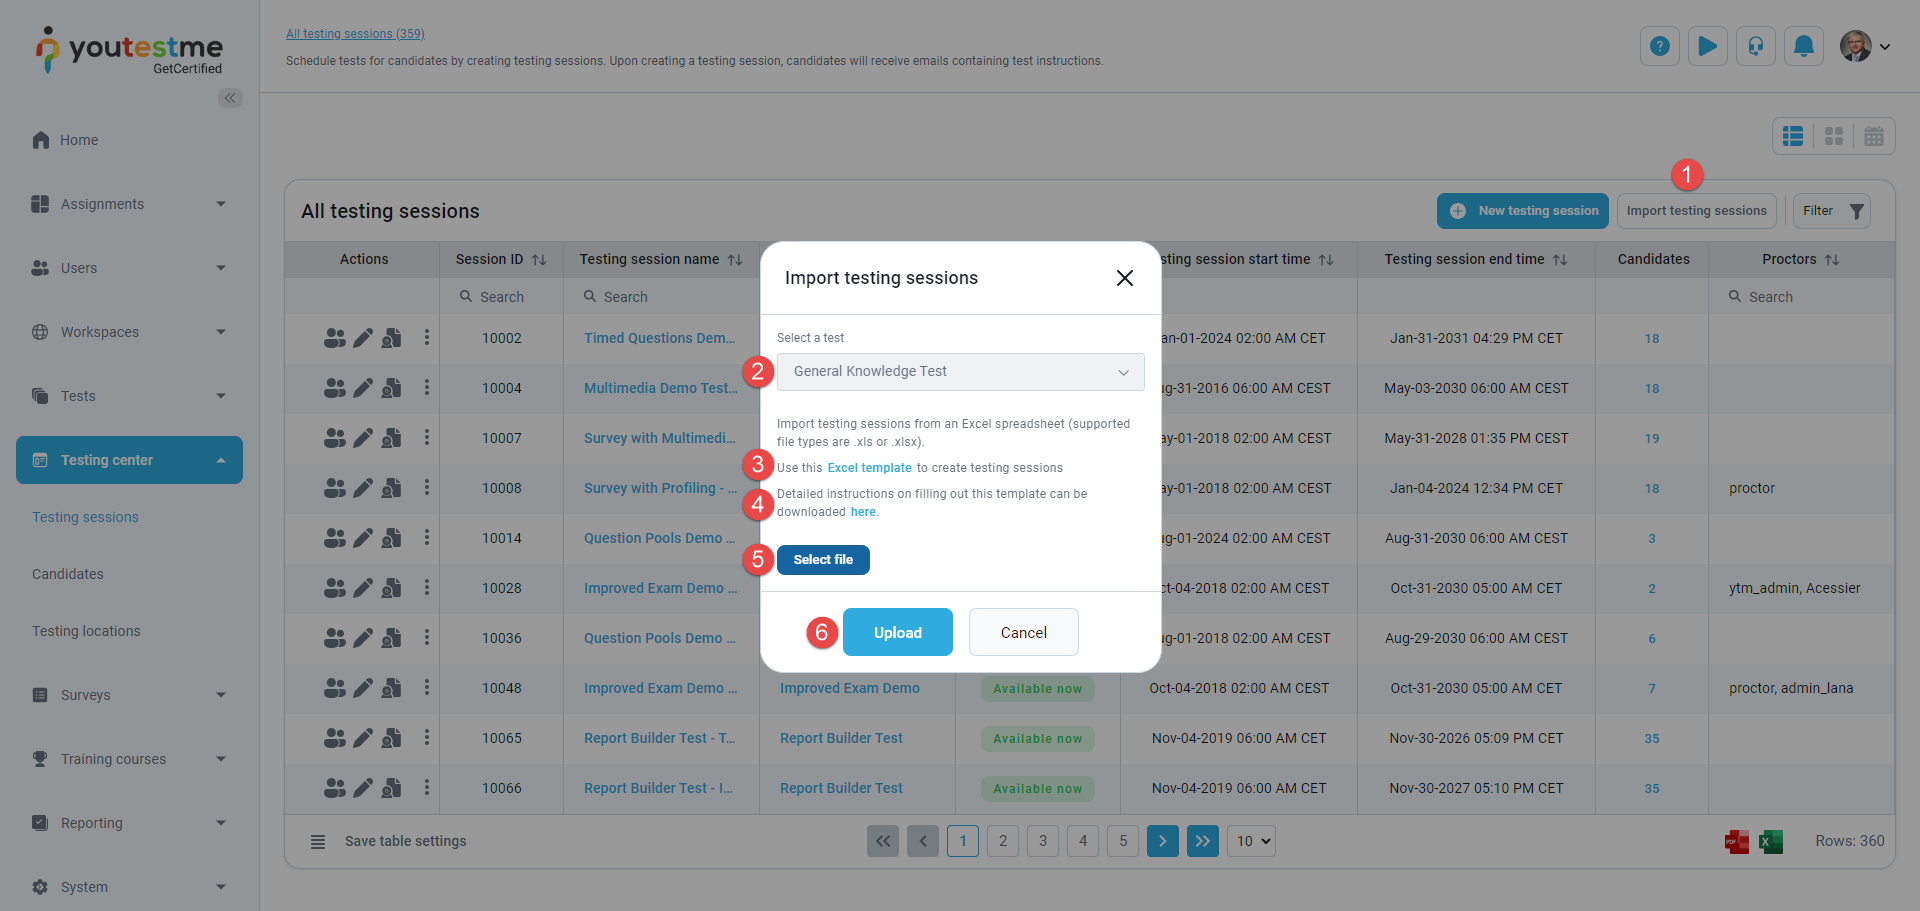
Import testing sessions
To import a large number of testing sessions from an Excel file:
-
Click the Import testing sessions button.
-
Select the test for which you want to create testing sessions.
-
Download the Excel template.
-
Refer to the provided instructions for guidance on completing the template.
-
Add the Excel file by clicking the Select file button and choosing the file from your device.
-
Click the Upload button.
For more information on importing testing sessions, refer to this article.
-
-
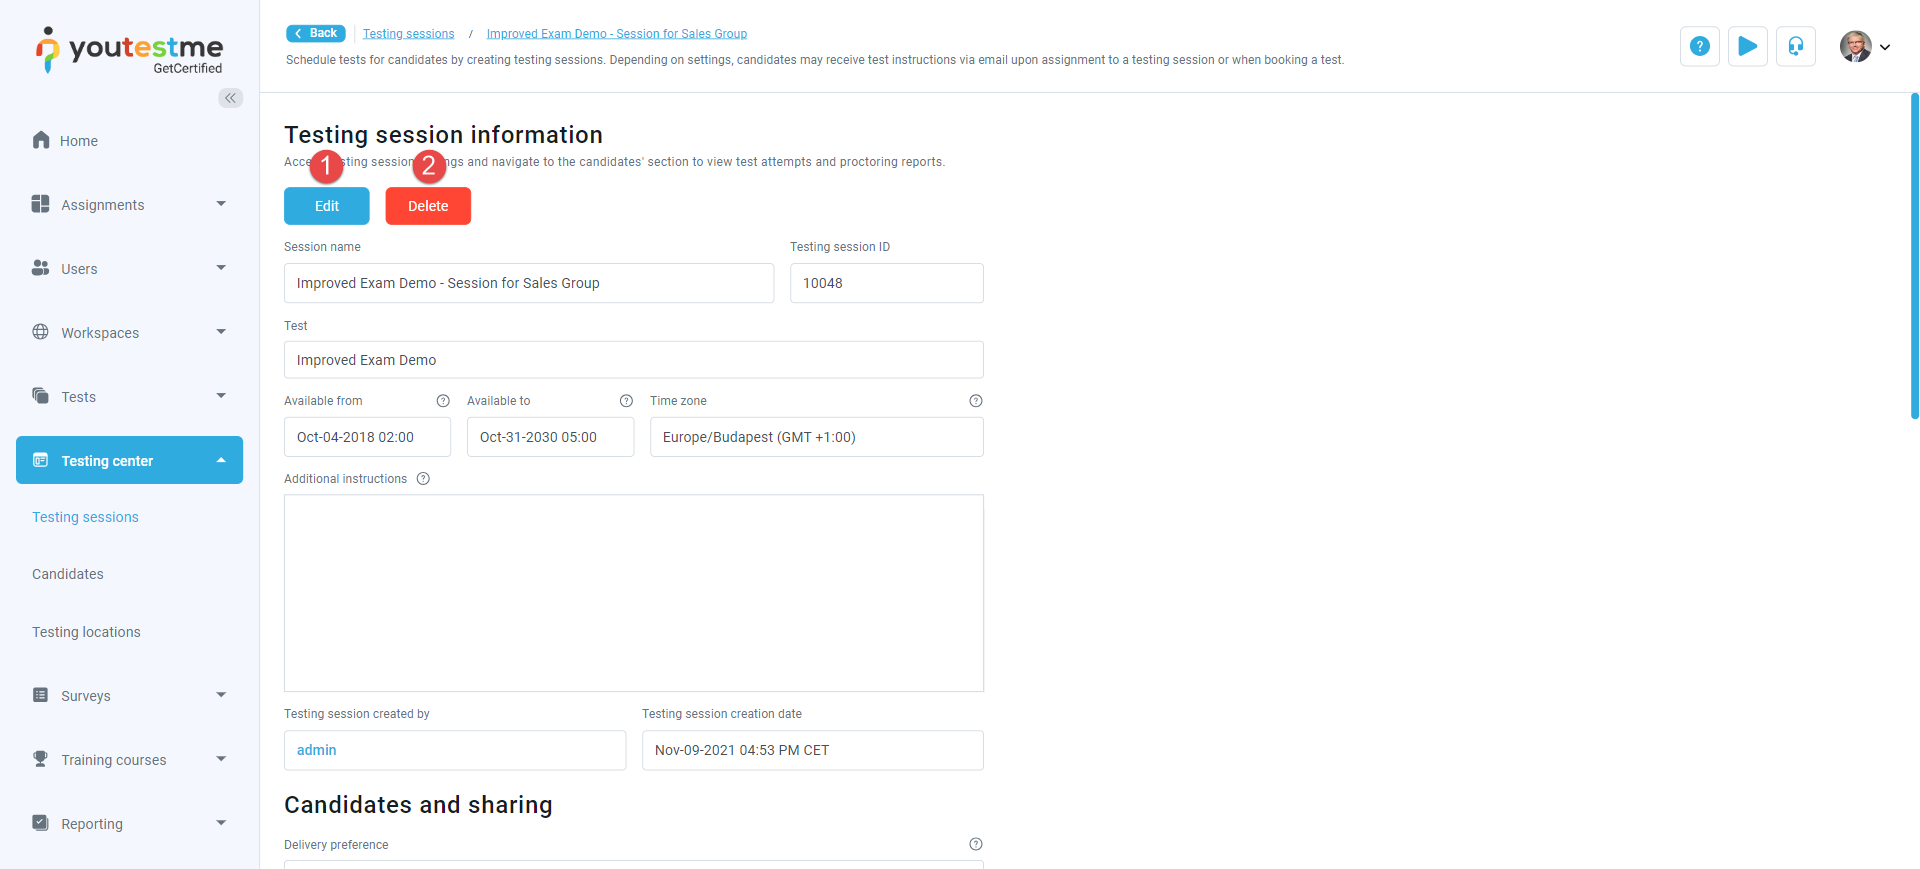
Testing session details
On this page, you can access a summary of all information related to the testing session. All fields are explained in the Create a testing session chapter.
Additional actions you can perform on this page include:
-
Edit testing session.
-
Permanently Delete the testing session. If candidates are assigned, delete all their test attempts before attempting to delete the testing session. To enable permanent testing session deletion, ensure the Allow delete data option is enabled in the system settings under Settings and customization/System preferences/Additional modules.
-
-
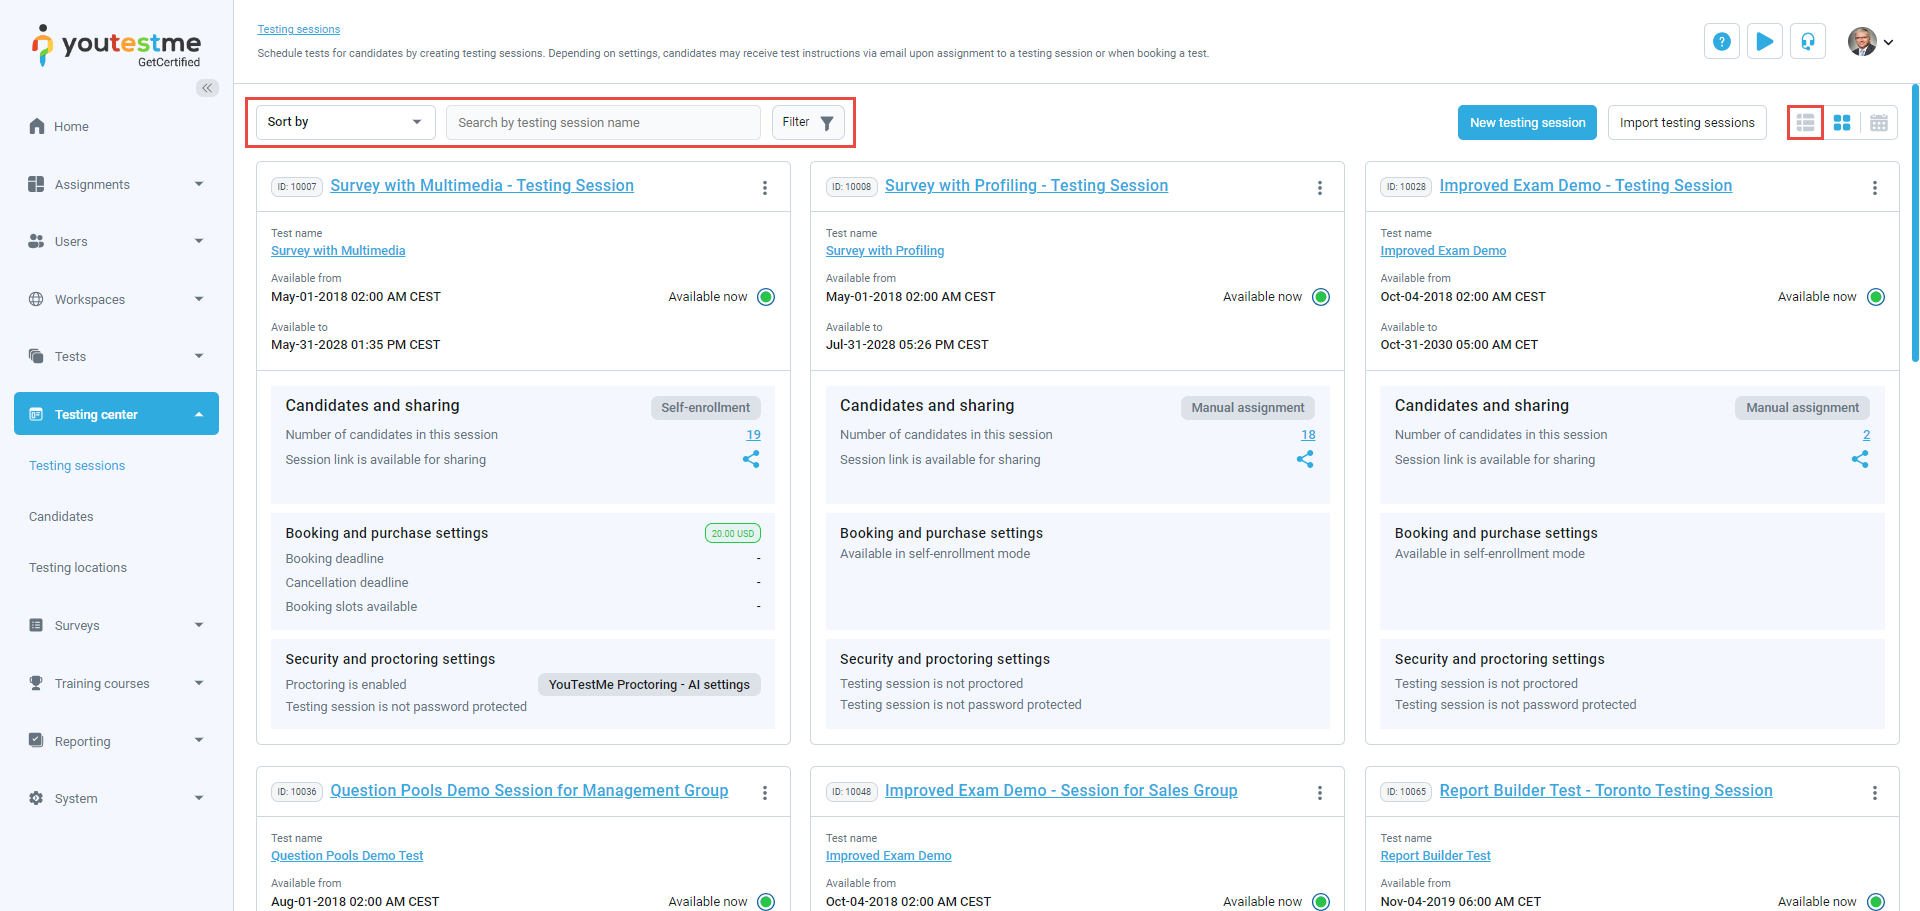
Tiles view
This view offers the same functionalities and information as others, but presents testing sessions in a tile format. You can find an explanation of actions in the List view chapter.
On this view, you can:
-
Sort tests by testing session name - Alphabetically (Z to A). If the name begins with numbers, alphabetical values take precedence over numerical characters.
-
Sort tests by creation date - Starting from the most recently created sessions.
-
Search by testing session name - Enter to find all tests containing the specific testing session name.
-
Filter by test - Enter part of the test name.
-
Filter by candidate assigned in session - Enter the candidate's username to locate testing sessions they are assigned to.
-
Filter by test manager in session - Enter the test manager's username to find testing sessions they are assigned to.
-
Filter by proctor assigned in session - Enter the proctor's username to find testing sessions they are assigned to.
-
Filter by testing session start time - Choose to display only testing sessions starting within the selected time range.
-
Filter by status - Show only sessions currently available, those scheduled for the future, or those that have concluded and are no longer available for taking.
-
Filter by location - Enter to display only testing sessions scheduled at a specific testing location.
-
Filter by delivery preference - Choose to display only tests with the selected delivery preference.
Additionally, filtering options are organized as follows:
-
-
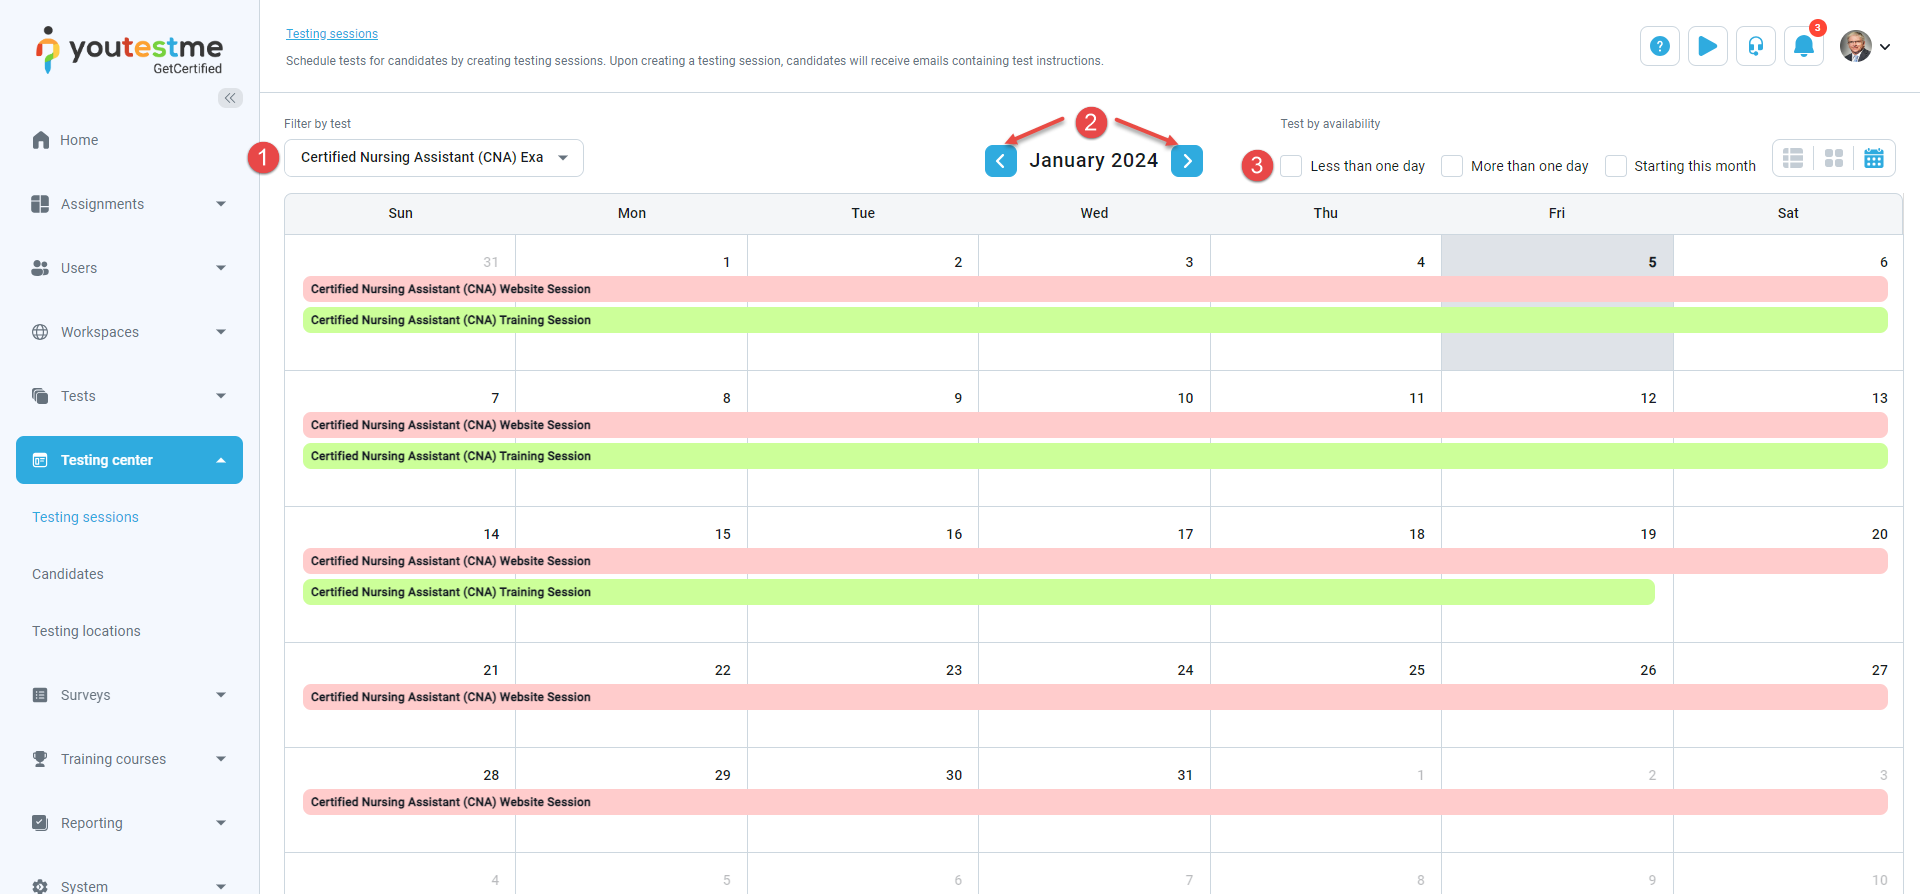
Calendar view
This view presents testing sessions in a calendar format. Each session is marked with a different colored line indicating the testing session start and end dates. Clicking on a testing session name allows you to view its details.
You can filter the testing sessions in two ways:
-
Display testing sessions only for a specific test.
-
Display testing sessions for the next or previous month.
-
Filter testing sessions based on availability:
-
Testing sessions lasting less than one day.
-
Testing sessions lasting more than one day.
-
Testing sessions starting this month.
-
-
