User manual
Candidates
-
Introduction
The Candidates page allows you to oversee participants in all tests and surveys. You can assign new candidates, remove those already assigned, view candidates' reports, and keep track of their progress.
Access it by going to the Testing center in the main menu and selecting Candidates.
Note: All information and explanations pertaining to tests are equally applicable to surveys.
The following tabs are available:
-
Test attempts - Assign candidates to testing sessions or remove those already assigned, view their test attempts, and grade them accordingly.
-
Proctoring - Efficiently manage and monitor test attempts from all tests on one page. Review candidate recordings and grade them as a proctor, handle special accommodation requests, and create and review special requests sent to candidates.
-
Rescheduling requests - Manage candidate requests to reschedule the testing session for taking the test.
-
Imported results - Process and view all staged import batches.
-
-
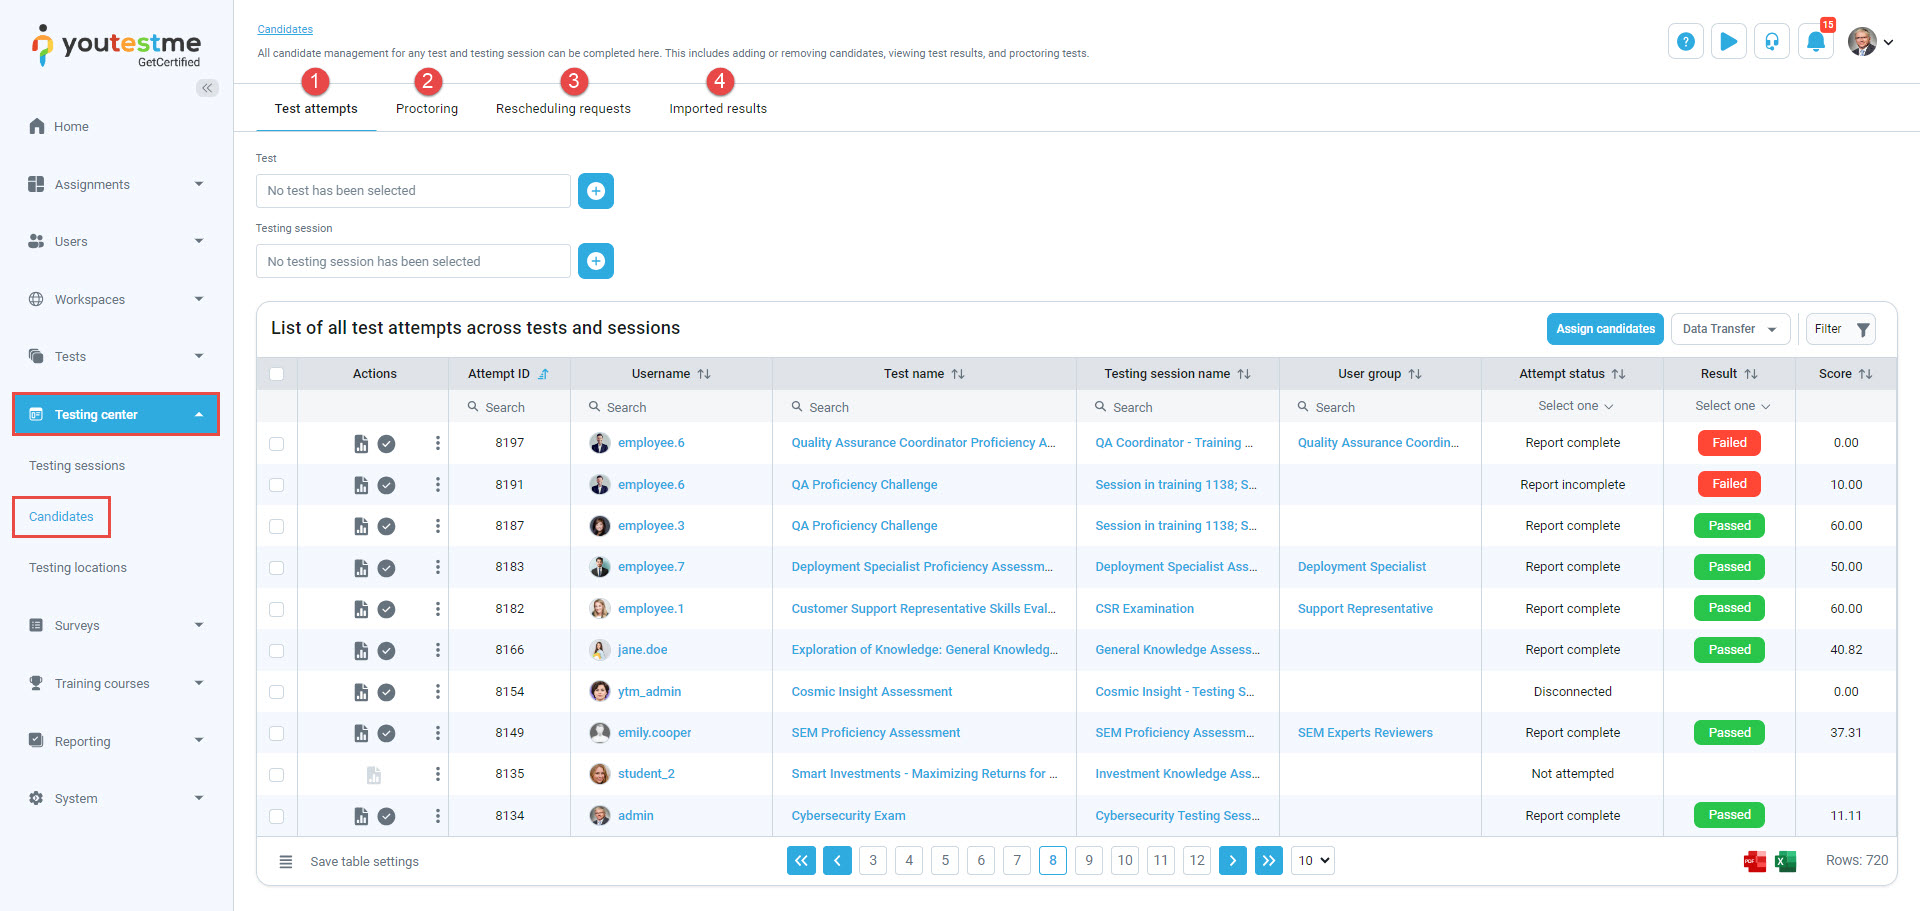
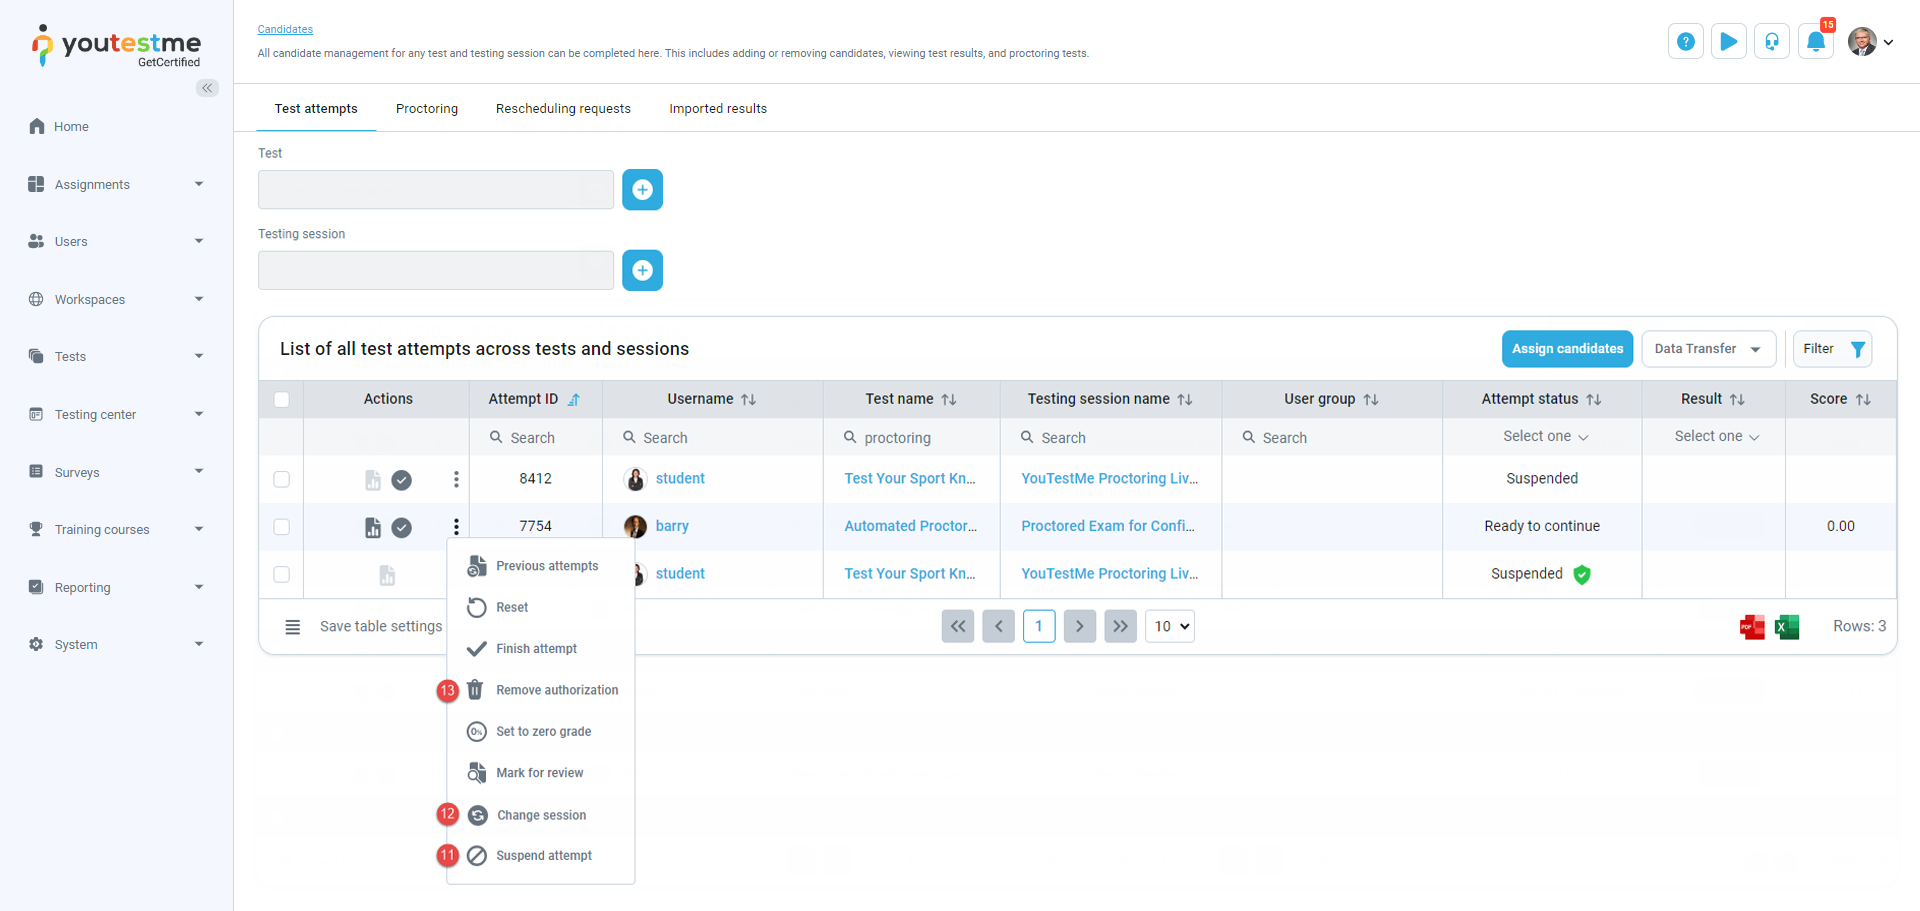
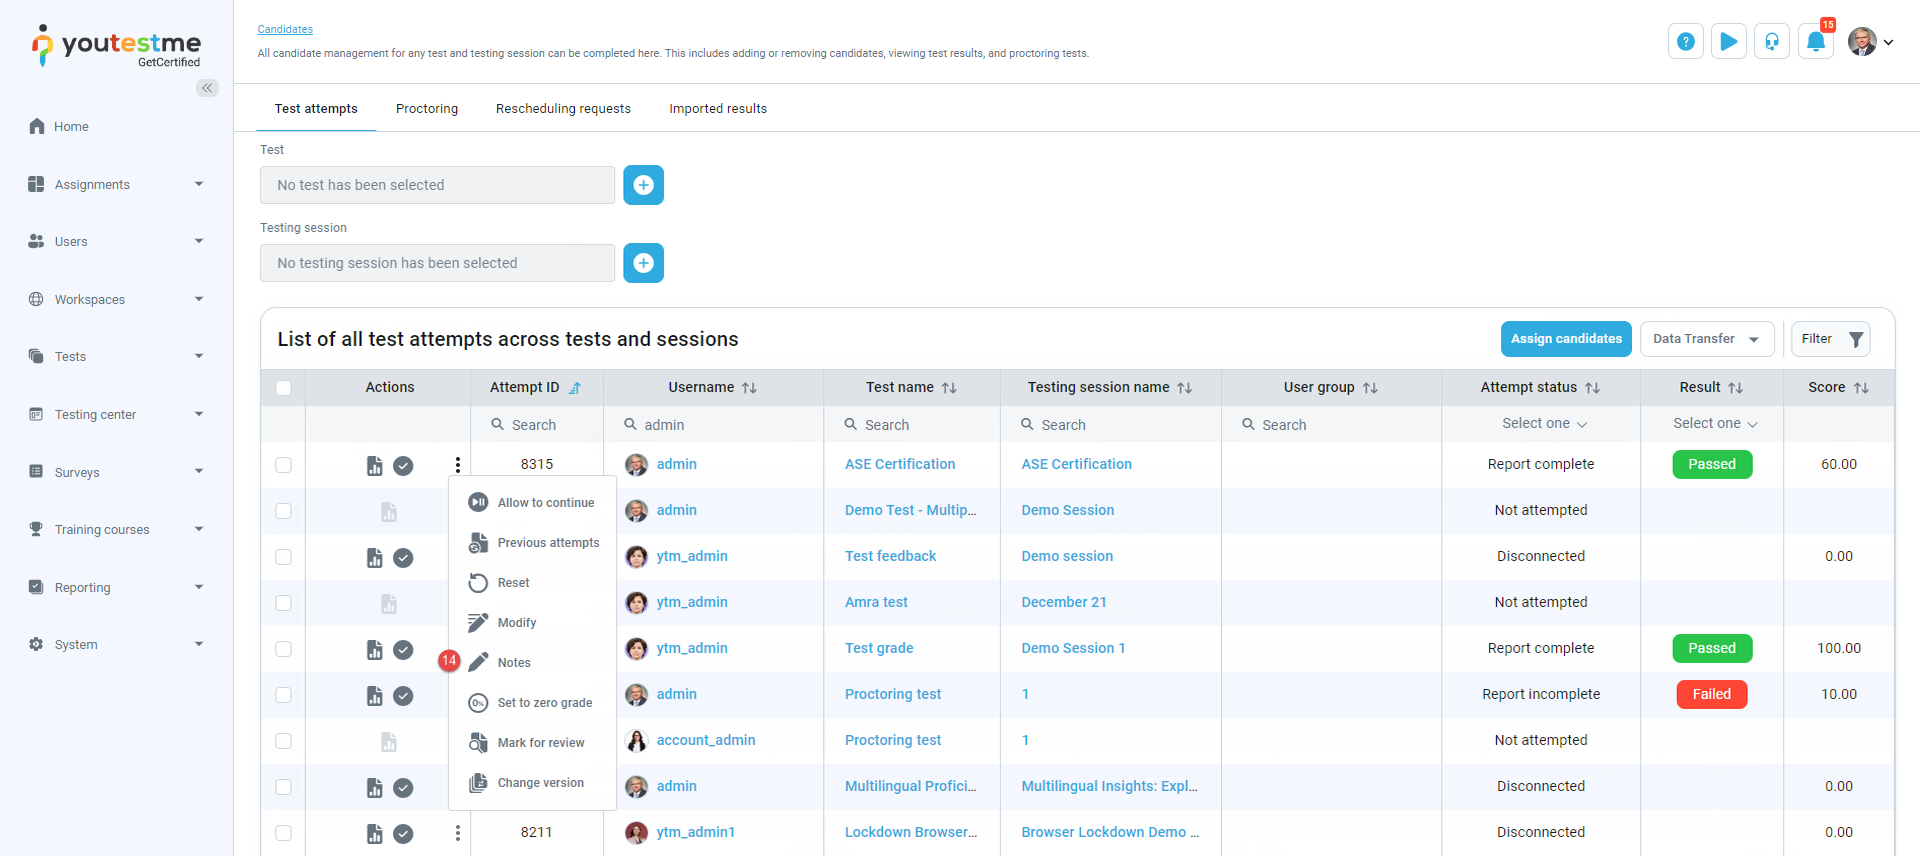
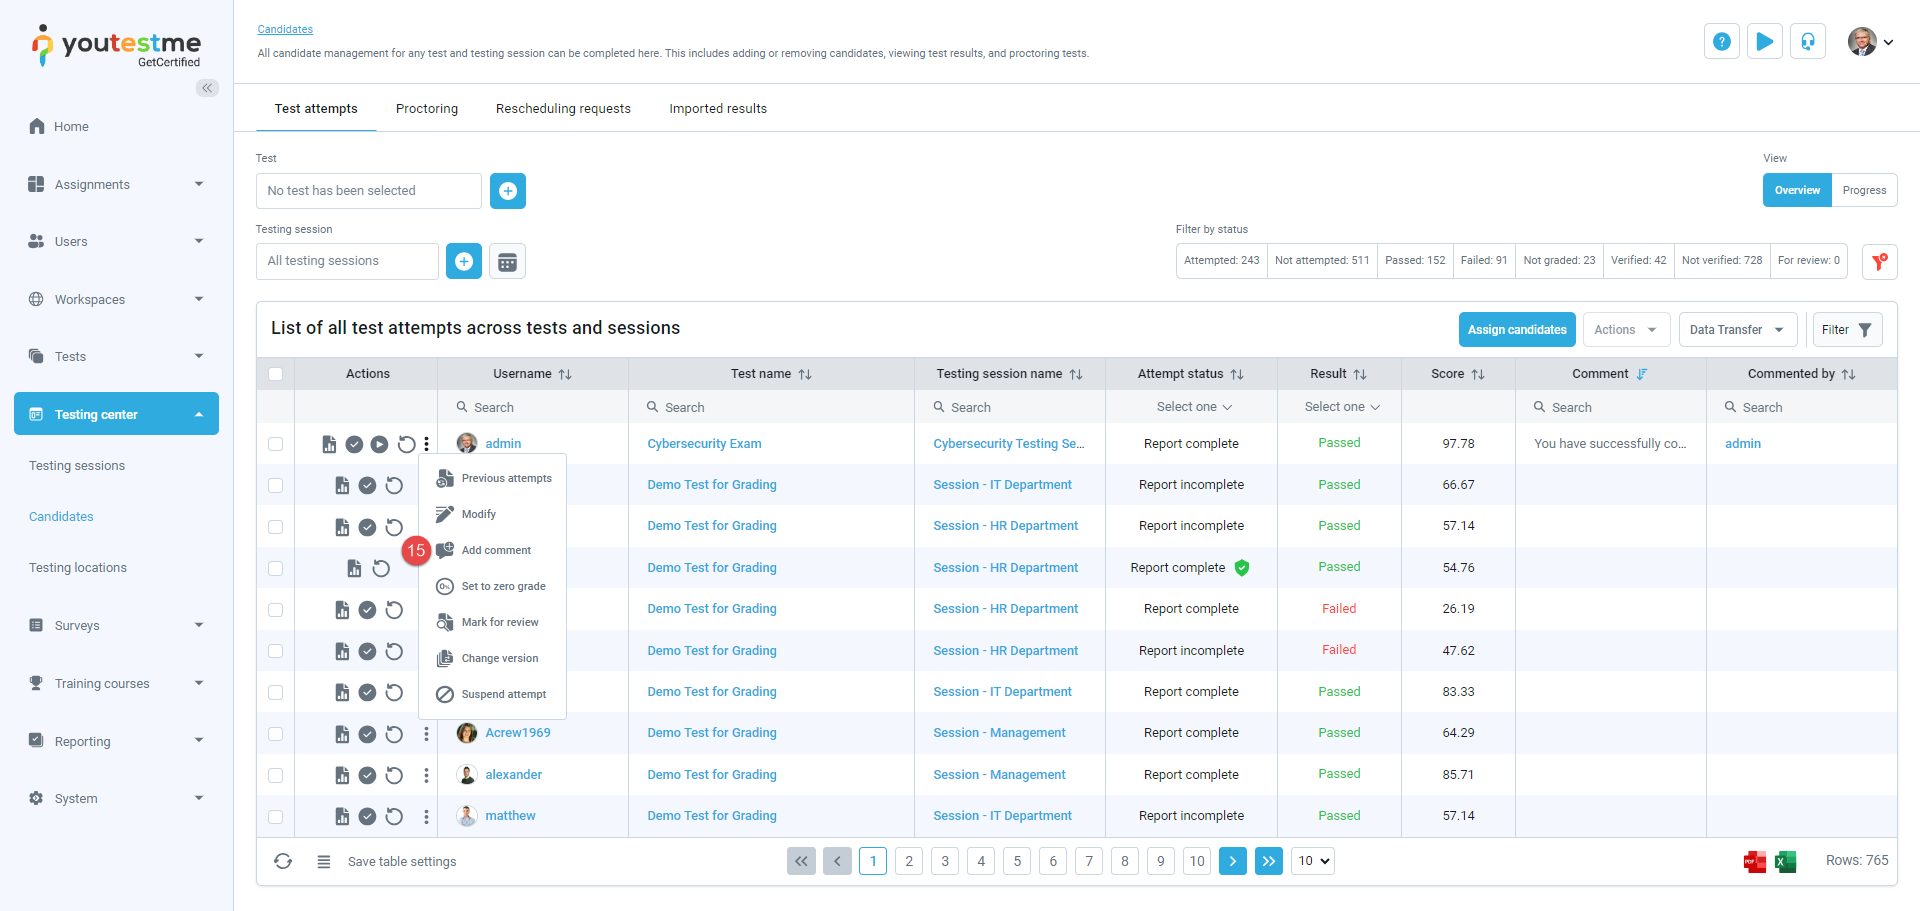
Test attempts
On this view, you can oversee all test attempts within the system.
All test attempt statuses are explained in the table below.
Value Description Not attempted Candidate has been assigned to a testing session but did not start the assignment. In progress Candidate is currently in the process of taking the test. Ready to continue Candidate paused the assignment but can resume where they left off during the testing session availability period. Ready to modify The candidate completed the assignment, and the test/survey manager permitted the candidate to modify answers. Disconnected Candidate left the test/survey either by closing the test window voluntarily or due to technical issues, like an unstable internet connection. Only users with permission to Manage any testing session or test managers can allow them to resume. If the system setting Attempt continuation always enabled is activated under System/Settings and customization/System preferences/Additional modules, the candidate can resume an attempt with this status at any time during the testing session availability period, regardless of the test/survey settings. This status does not appear when the test offers the option to pause and continue the test. Did not show up Candidate didn't start the test/survey, and the user with permission to Manage any testing session or test manager marked it as a no-show. Report incomplete The testing report is incomplete and inaccessible for candidates to review. This status can arise for three reasons: If the test/survey includes questions requiring manual grading.
When the Show report setting is configured as On manager approval or Immediately after result verification.
If the candidate completes the test, and the proctor submits a proctoring report with a neutral grade.
Report complete The report has been fully graded and is available to the candidate. Suspended The validity of the test/survey attempt has expired, resulting in a status of Suspended. Additionally, the test manager has the capability to manually designate the attempt as Suspended in case of violations during test-taking, issues with internet connection, etc. Refused NDA The candidate declined the non-disclosure agreement required to start the test. -
Choose the specific test for which you want to see test attempts. Click the plus icon to change the test, and you can remove filters as needed.
-
Select the testing session for which you want to see test attempts. Click the plus icon to change the testing session, and you can remove filters as needed.
-
Quickly filter test attempts by their statuses.
-
Select a testing session to display only test attempts taken during its availability period, or click Show all to remove testing session filtering. To hide the session list, click the calendar icon.
-
Filter by test attempt finishing time - Display test attempts completed within the selected date range.
-
Filter by testing session end time - Display test attempts that belong to testing sessions completed within the selected date range.
-
Filter by test result importing time - Display test attempt results imported within the selected date range.
-
Filter by delivery preference - Filter tests distributed through various methods, including online tests with AI/live proctoring, online tests without proctoring, or paper-based tests.
-
Show suspended attempts in the table.
-
Show test attempts from inactive users - Include test attempts of users whose profile is inactive.
To filter the test attempts:
Also, you have additional filters under the table header:

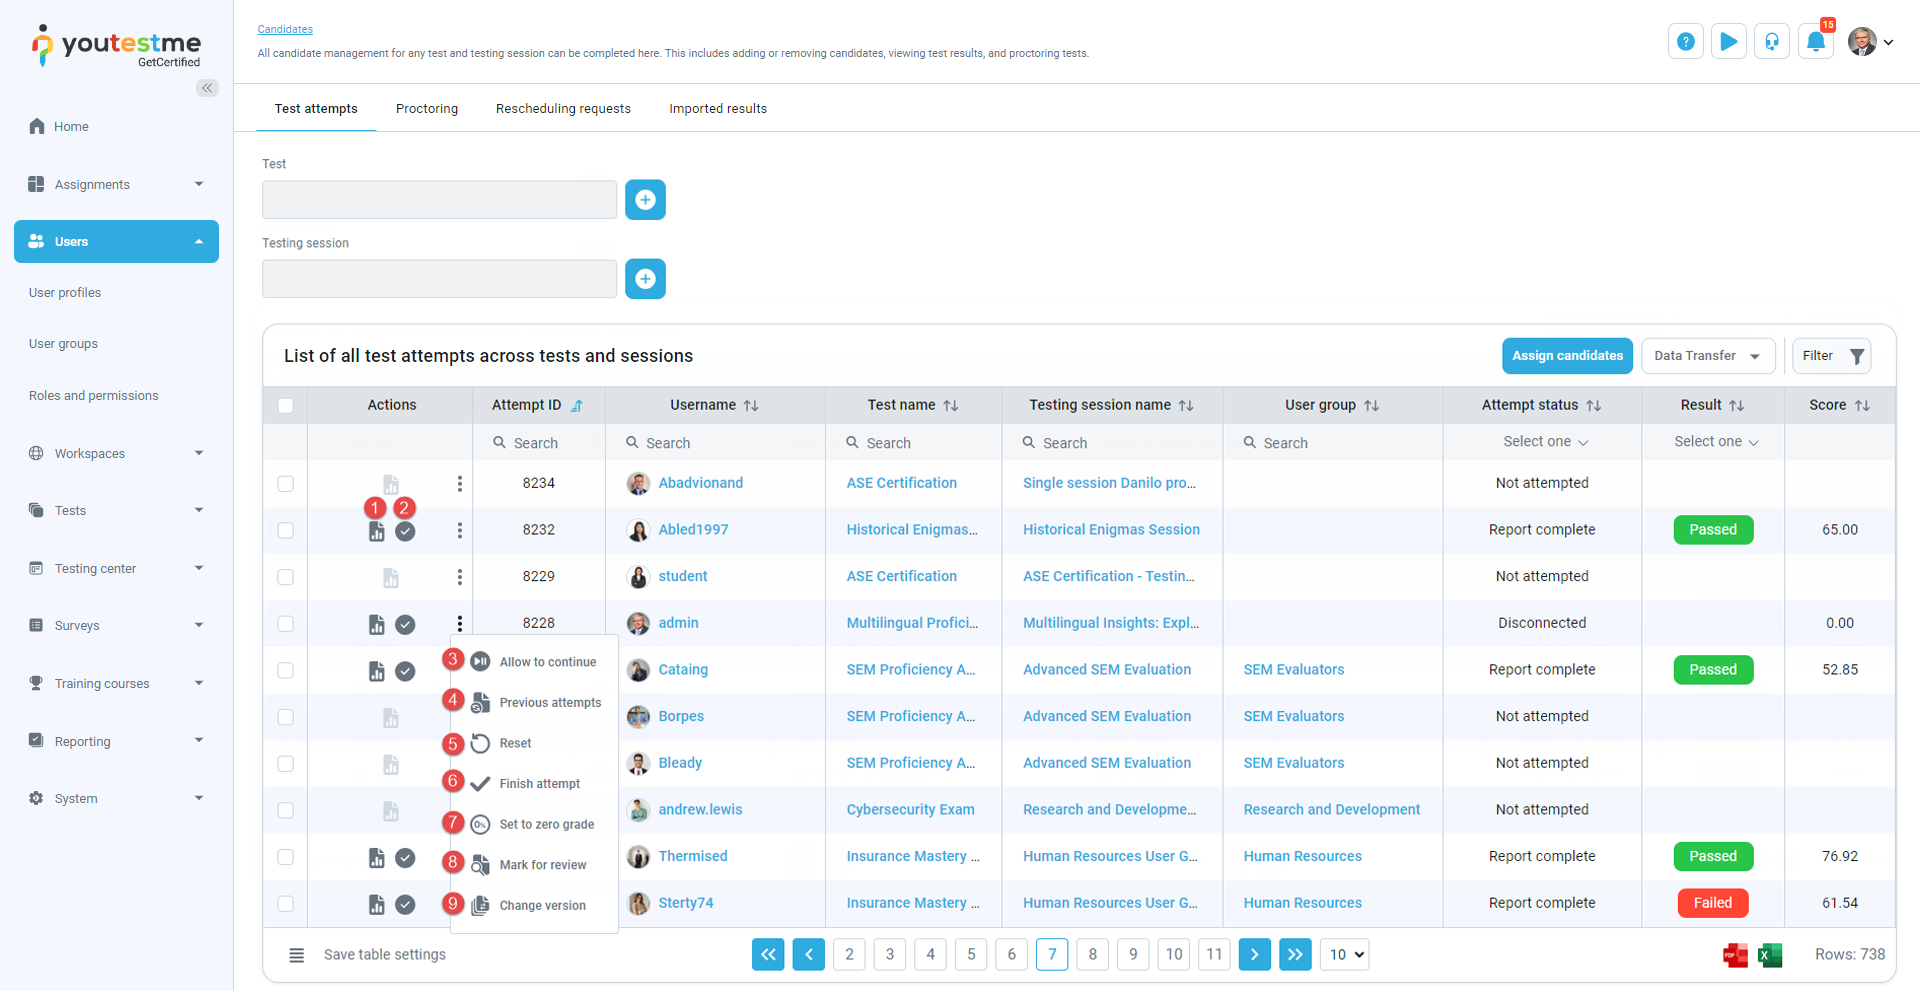
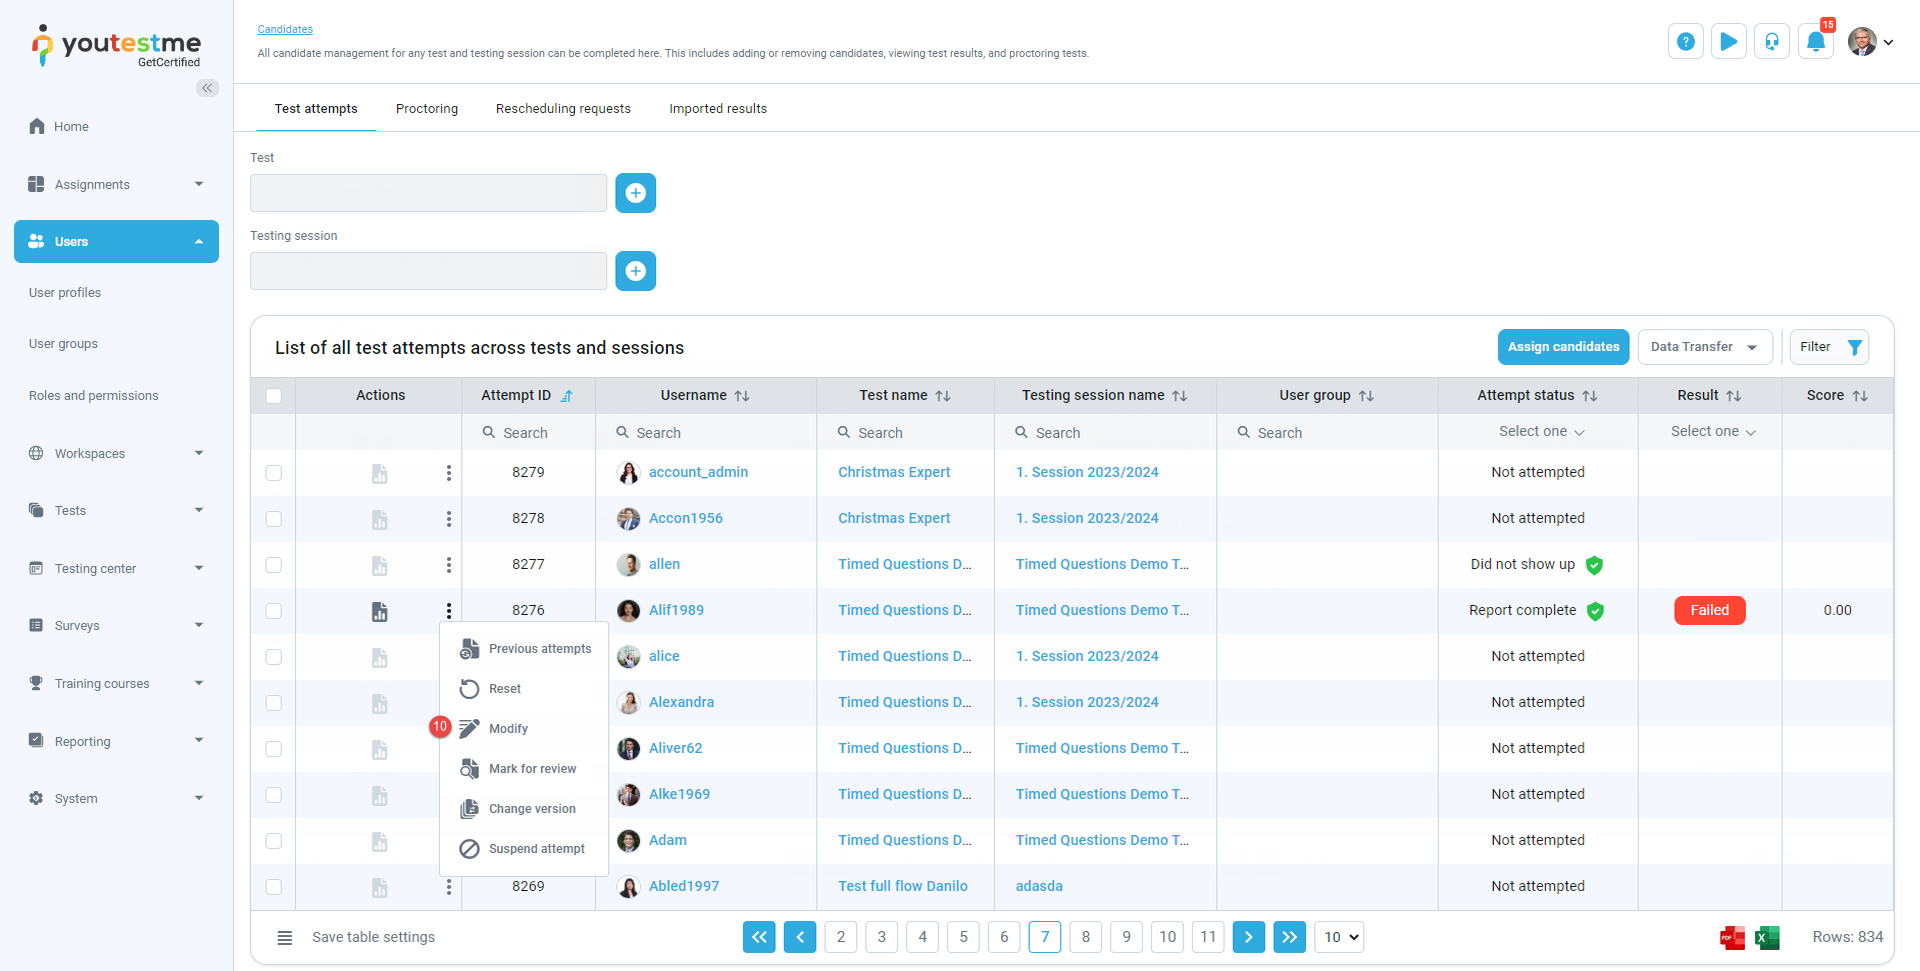
In the table of test attempts, you can:
-
Open the candidate's personal report.
-
Verify the test attempt for the candidate. Once verified, changing the grading setting will not affect the candidate's score.
-
Allow the candidate to continue their test attempt if they accidentally close the window or encounter technical issues. Users with permission to Manage any testing session or test managers can allow this by selecting this option. The candidate must initiate the test continuation during the testing session availability period; otherwise, the test cannot be continued. However, if the testing session concludes during the attempt, the candidate can finish the test without any interruption.
-
Preview the candidate's previous attempts. Optionally, open the desired report for a specific previous attempt.
-
Reset the test attempt for the candidate. After the reset, the candidate can initiate the test again within the testing session availability period.
-
Finish the test attempt for the candidate. For example, you can use this option if violations are noted during test monitoring, allowing for an immediate test interruption.
-
Set to zero grade - Overwrite the candidate's current score and set it to zero. This action cannot be undone.
-
Mark for review the candidate's test attempt.
-
Change version of the test for the candidate.
-
Allow the candidate to modify their test attempt and change answers. The candidate must initiate test modifications during the testing session availability period; otherwise, modifications cannot be made. However, if the testing session concludes during the attempt, the candidate can finish the test without any interruption.
This option is not available for surveys, when a test attempt is suspended or incomplete, and when the Real-time grading option is enabled under the Show report setting. -
Suspend the test attempt. In the event of violations during test-taking, issues with the internet connection, etc., you can suspend the current candidate's attempt and optionally permit them to retake the test later.
-
Change testing session in which candidate should take the test.
-
Remove authorization for the test attempt. Authorization may be necessary for specific testing sessions to allow candidates to take the test.
-
View or edit notes for the test attempt. This option becomes visible only when the test attempt is marked for review.
-
Add comment for the selected candidate's attempt. Should be used to provide feedback. Comment will be visible to the candidate on the personal report.
This option is not available for surveys, when a test attempt is suspended or incomplete, and when the Real-time grading option is enabled under the Show report setting. -
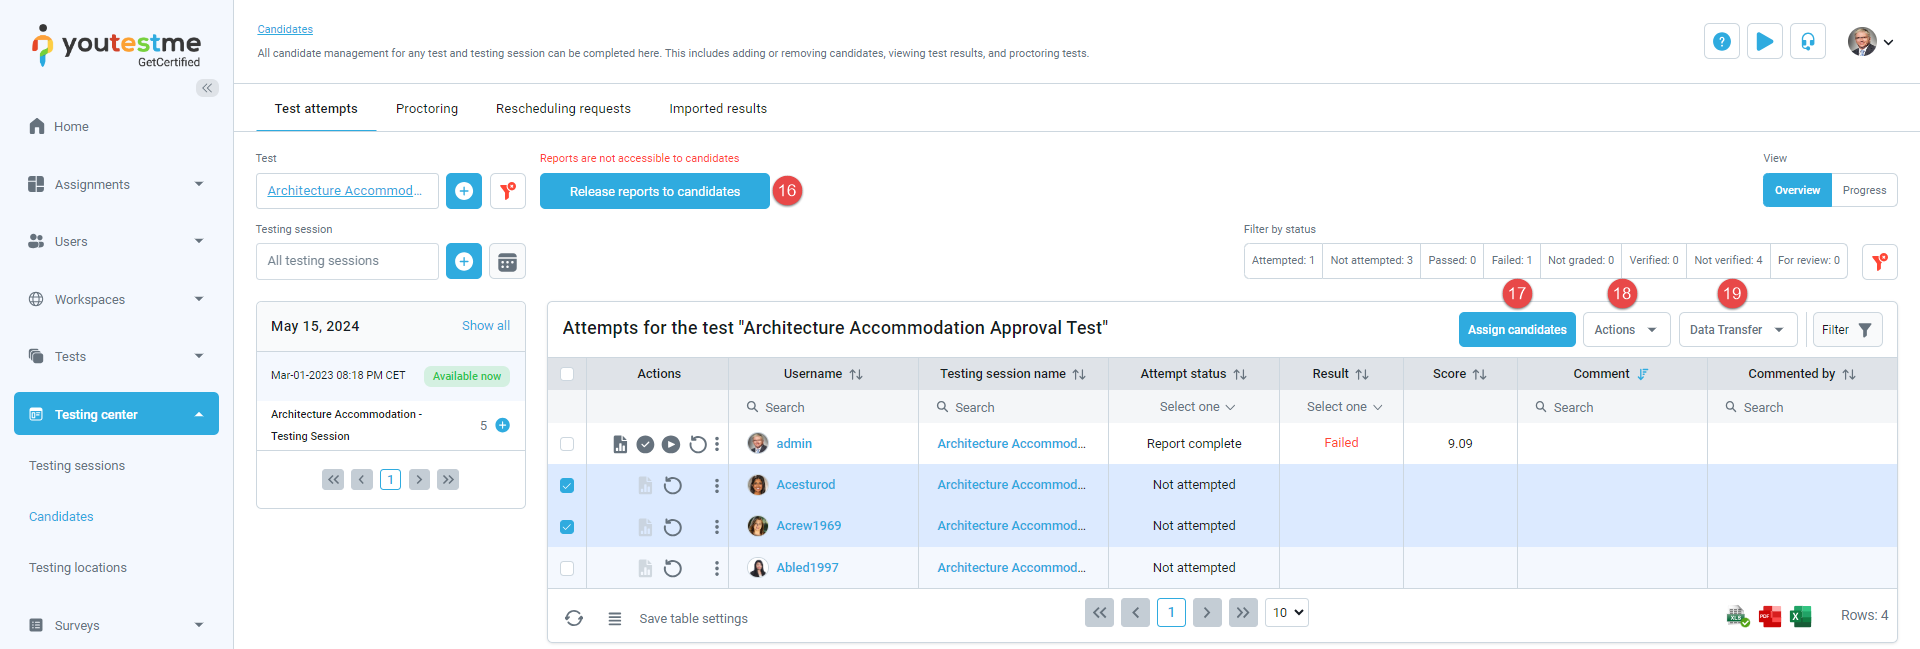
Release reports to candidates - Enable candidates to view results and notify them via email. Once a test manager clicks this button, candidates who have completed the test successfully but haven't seen the report yet will receive their reports.
-
Assign candidates to the selected test scheduled in the chosen testing session.
-
Make bulk changes to the selected attempts.
Verify all attempts for the selected test. Once verified, changing the grading setting will not affect candidates' scores.
Run on-demand verification by holding criteria for all non-verified attempts in the selected test. Criteria are defined under System/Settings and customization/System preferences/Verification process setup.
Verify selected attempts. Once verified, changing the grading setting will not affect candidates' scores.
Revert verification for the selected attempts. Test attempts will become changeable again and will be affected by the latest test grading setup.
Mark selected attempts for review.
Remove "Mark for review" from the selected attempts.
Mark selected attempts as "Did not show up" if candidates didn't take the test within the allotted time. Only attempts with the status Not attempted can be set as Did not show up.
Remove "Did not show up" status from the selected test attempts.
Send group email notification. Define the subject and text of the email to be sent to selected candidates.
-
Transfer the data.
-
Import Scantron results. Ensure you've selected the test before importing results. If you don't see this option, the test may contain unsupported question types. Results can be imported only for single-choice, multiple-choice, and true/false questions in tests without sections. Import is possible only for test attempts with the Not attempted status. Refer to this article for more information on importing test results.
-
Send test results to LRS. Currently, only results for tests containing true/false, single-choice and multiple-choice questions can be sent. Sending results for generated tests and tests with sections is not currently supported. For more information refer to this article.
-
Export test results via system job. The Export data job type must be created first under System/Settings and customization/ Job scheduler. Only verified results will be sent.
-
Export direct testing links. Use these URLs to test users without requiring registration or providing a username and password. The system will generate links in an Excel file for you to copy and embed in an external system, such as emails. The Excel file will include meeting links if the test is proctored using conference tools. Upon completing the test, candidates are redirected to the specified URL, and results are saved in the system for instructor review. You can specify the redirect URL, under System/Settings and customization/System preferences/Finish test URL.
-
-
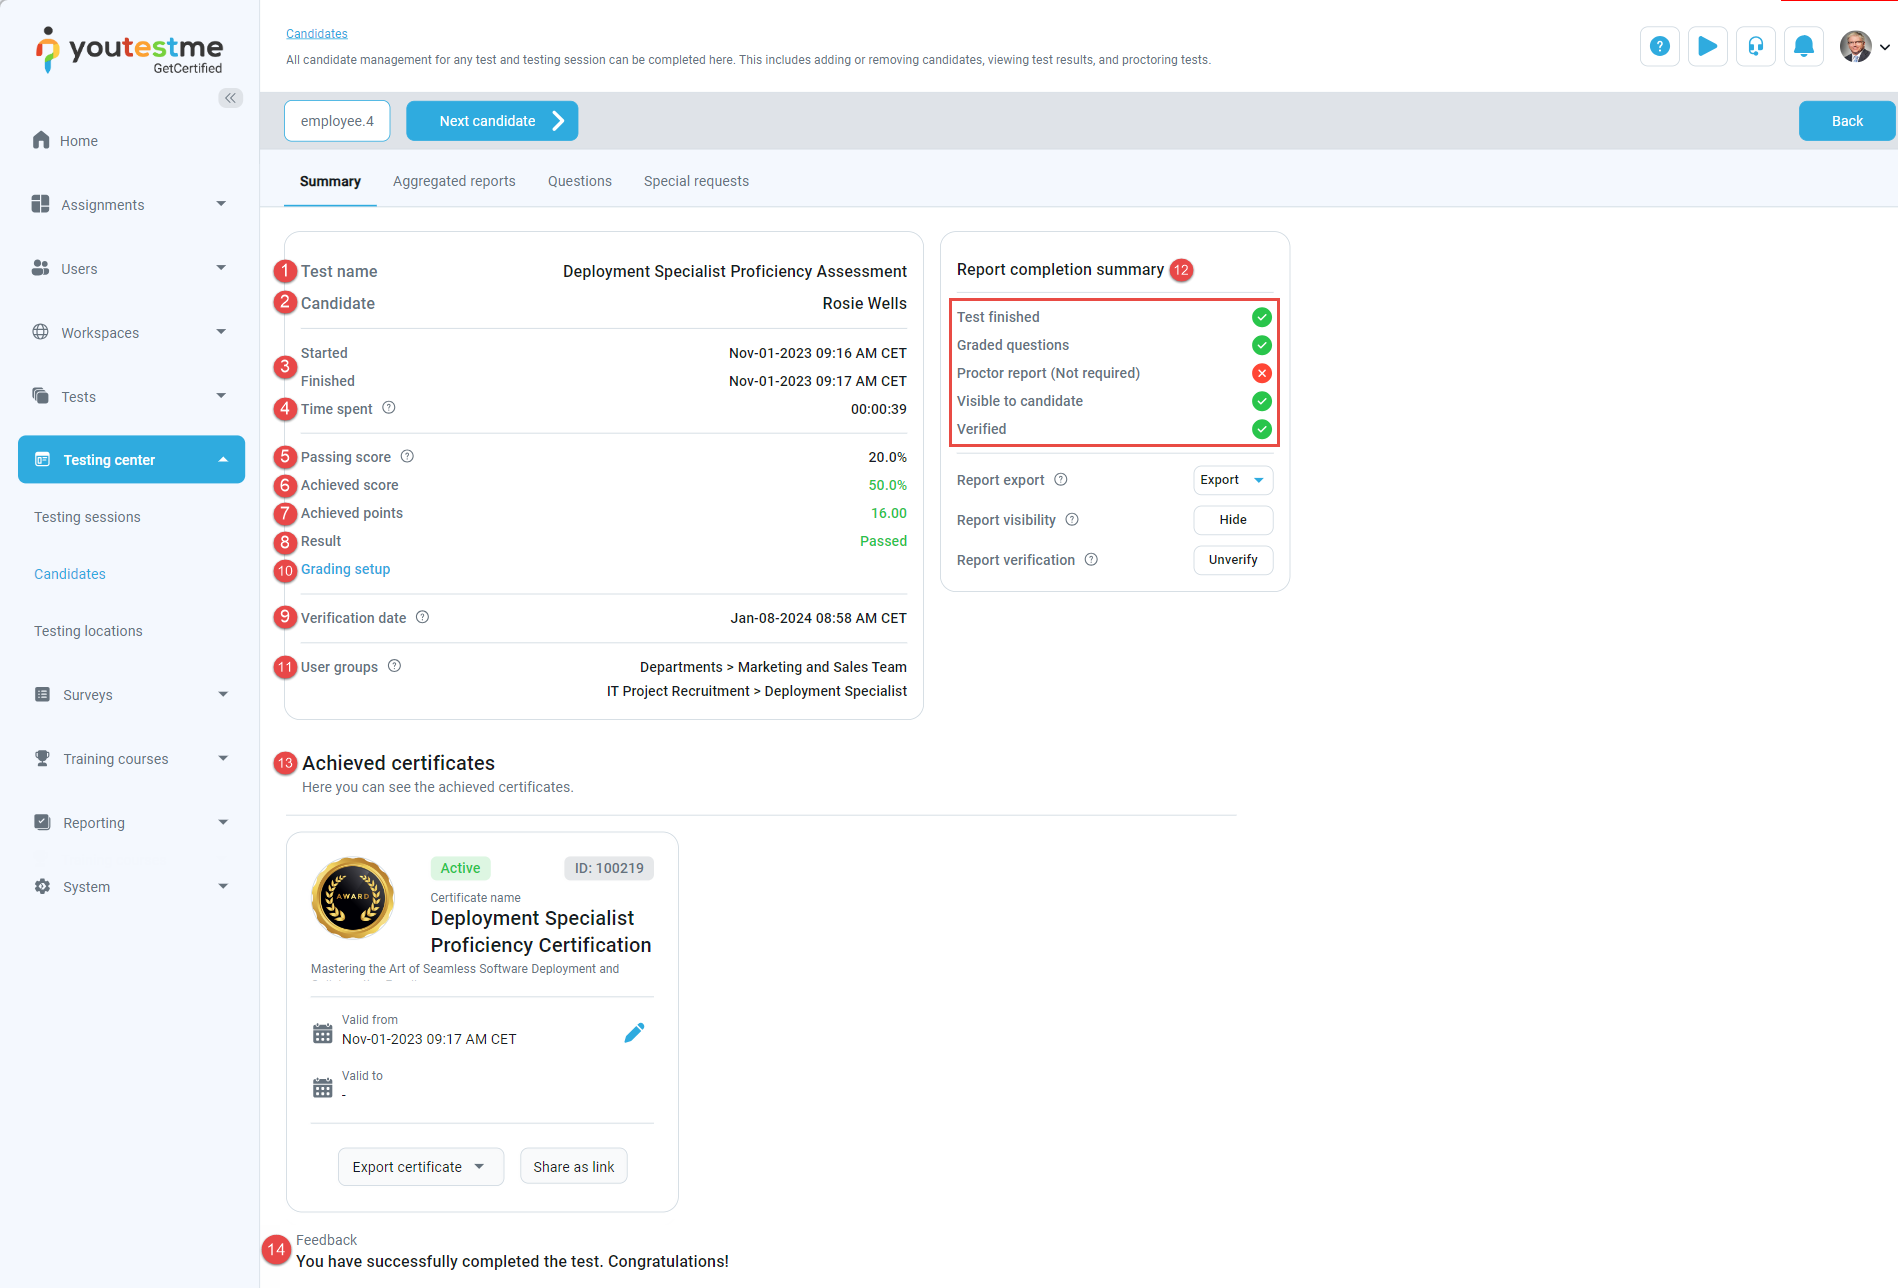
Personal report
The personal report offers thorough details on a candidate's performance and activity during a test. It includes information about the score, questions, time taken, earned certificates, and more. Here, you can review the candidate's reports and grade their answers.
Below, you'll find explanations for each tab in the personal report.
-
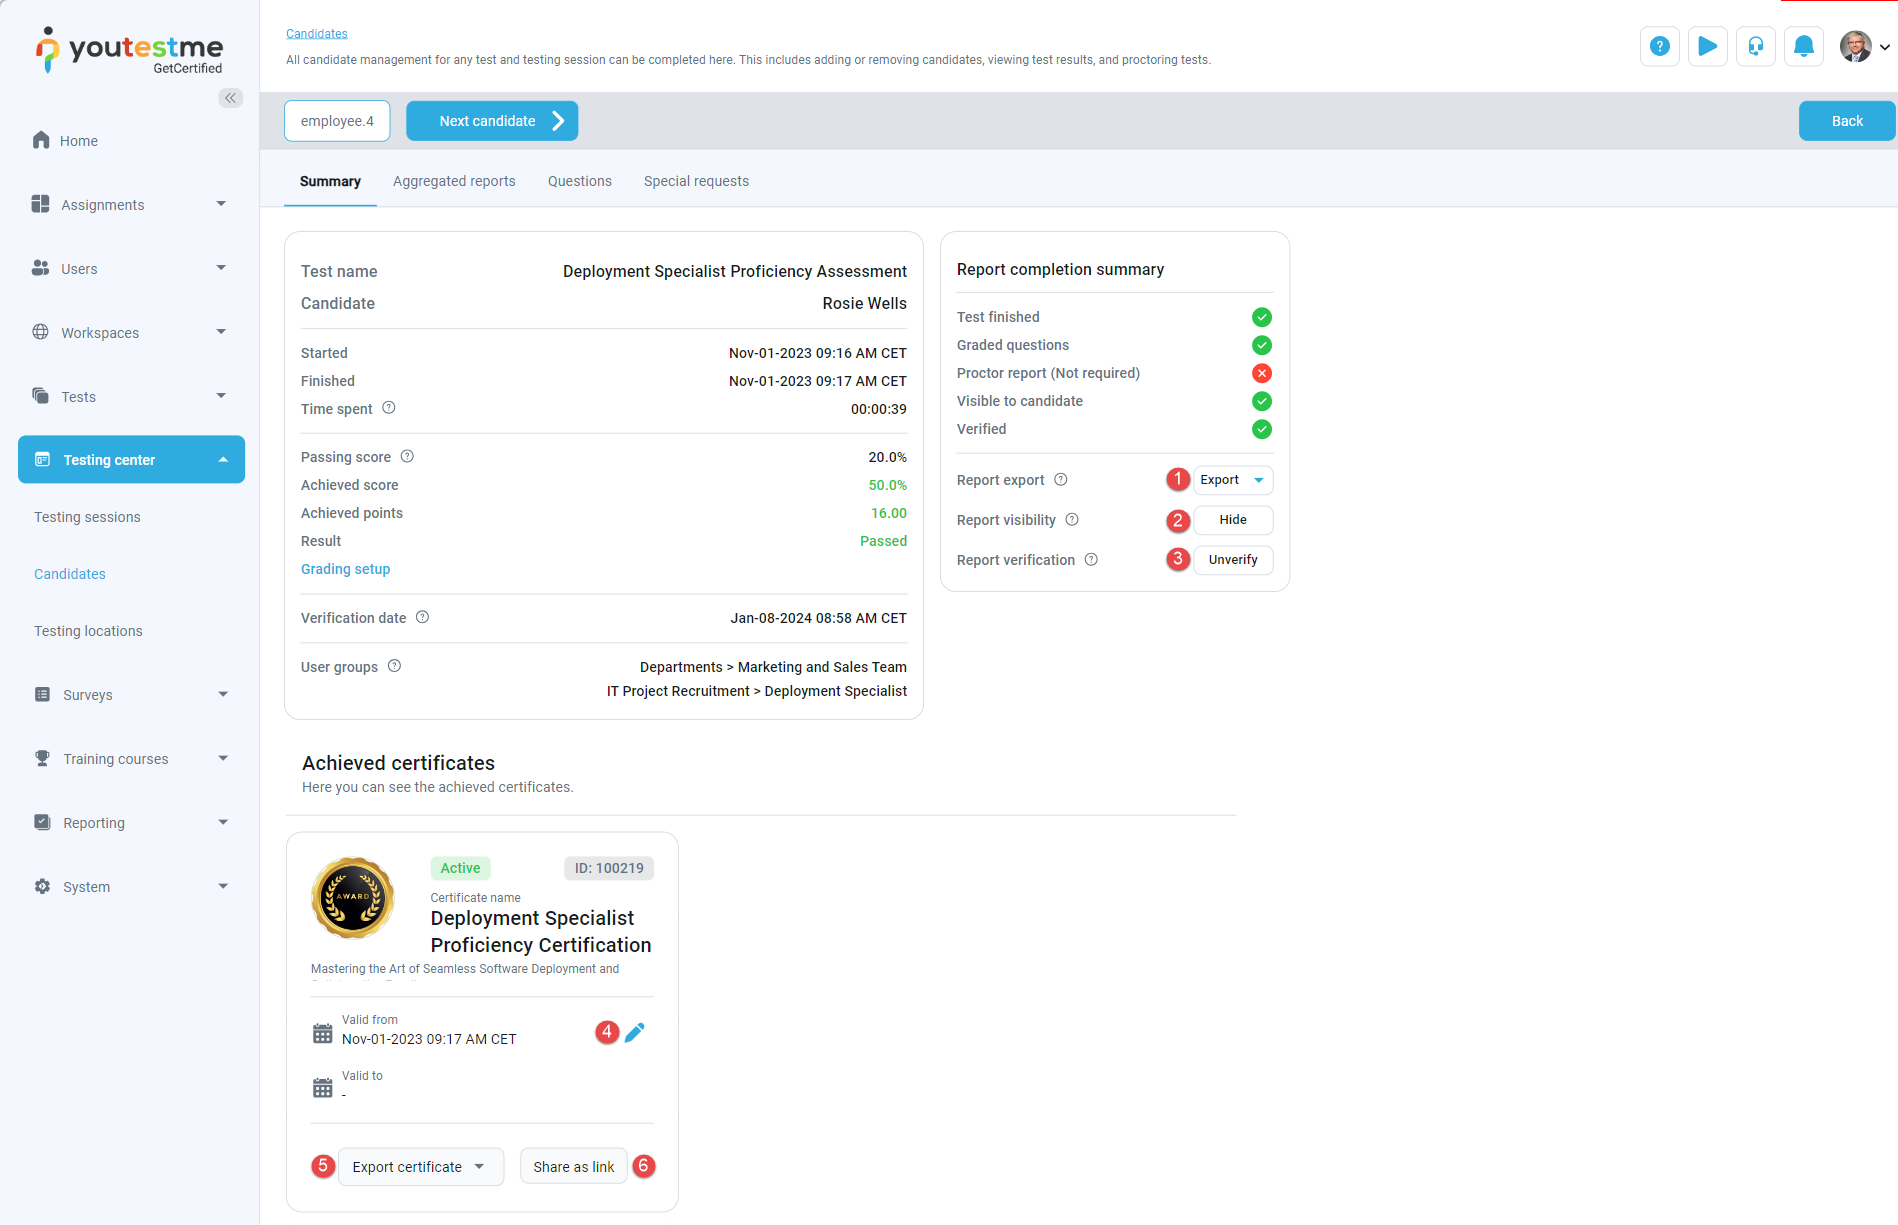
Summary page
The summary page is the main section of the report, offering an overview of essential information regarding the test and the candidate's results:
-
Test name - The name of the test that the user has completed.
-
Candidate - The name of the candidate who took the test.
-
Started/Finished - The time when the user started and completed the test.
-
Time spent - The total time taken to complete the test including any pauses or interruptions that may have occurred during test attempt.
-
Passing score - The percentage that must be achieved to pass the test. Depending on the test settings, this passing score may or may not be inclusive. If the passing mark is inclusive, candidates will pass the test if they gain a score equal to or higher than the passing mark. You can check whether the passing score is inclusive or not in the tooltip next to the label name.
-
Achieved score - The percentage achieved by the candidate.
-
Achieved points - The total points earned by the candidate.
-
Result - Indication of whether the candidate passed or failed the test.
-
Verification date - The date when the test attempt has been verified. Once verified, changing the grading setting will not affect the candidate's score.
-
If the test attempt has been verified, you can view the grading setup that was relevant at the time of verification.
-
User groups - Names of user groups to which the user belongs. If there are no user group names listed, it means the candidate is not a member of any user group. If a user is a member of a subgroup, the complete path to the subgroup will be shown.
-
Report completion summary:
-
Test finished - Indicates that the test has been successfully completed.
-
Graded questions - Shows whether all questions are graded. An X indicates that some questions need to be graded under the Questions tab, while a checkmark indicates that all questions have been graded.
-
Proctor report - Indicates whether the proctor has graded the report. Depending on the test settings, a proctor report may not be required. If required, the proctoring grade should be defined on the Monitoring page. A checkmark indicates that the proctoring report has been provided.
-
Visible to candidate - Indicates whether the report is accessible to the candidate.
-
Verified - Indicates whether the report is verified. If verified, changing the grading setting will not affect the candidate's score.
-
-
Achieved certificates - Displays the certificates that the candidate has earned.
-
Feedback - Test manager's comment left for the candidate's test attempt.
-
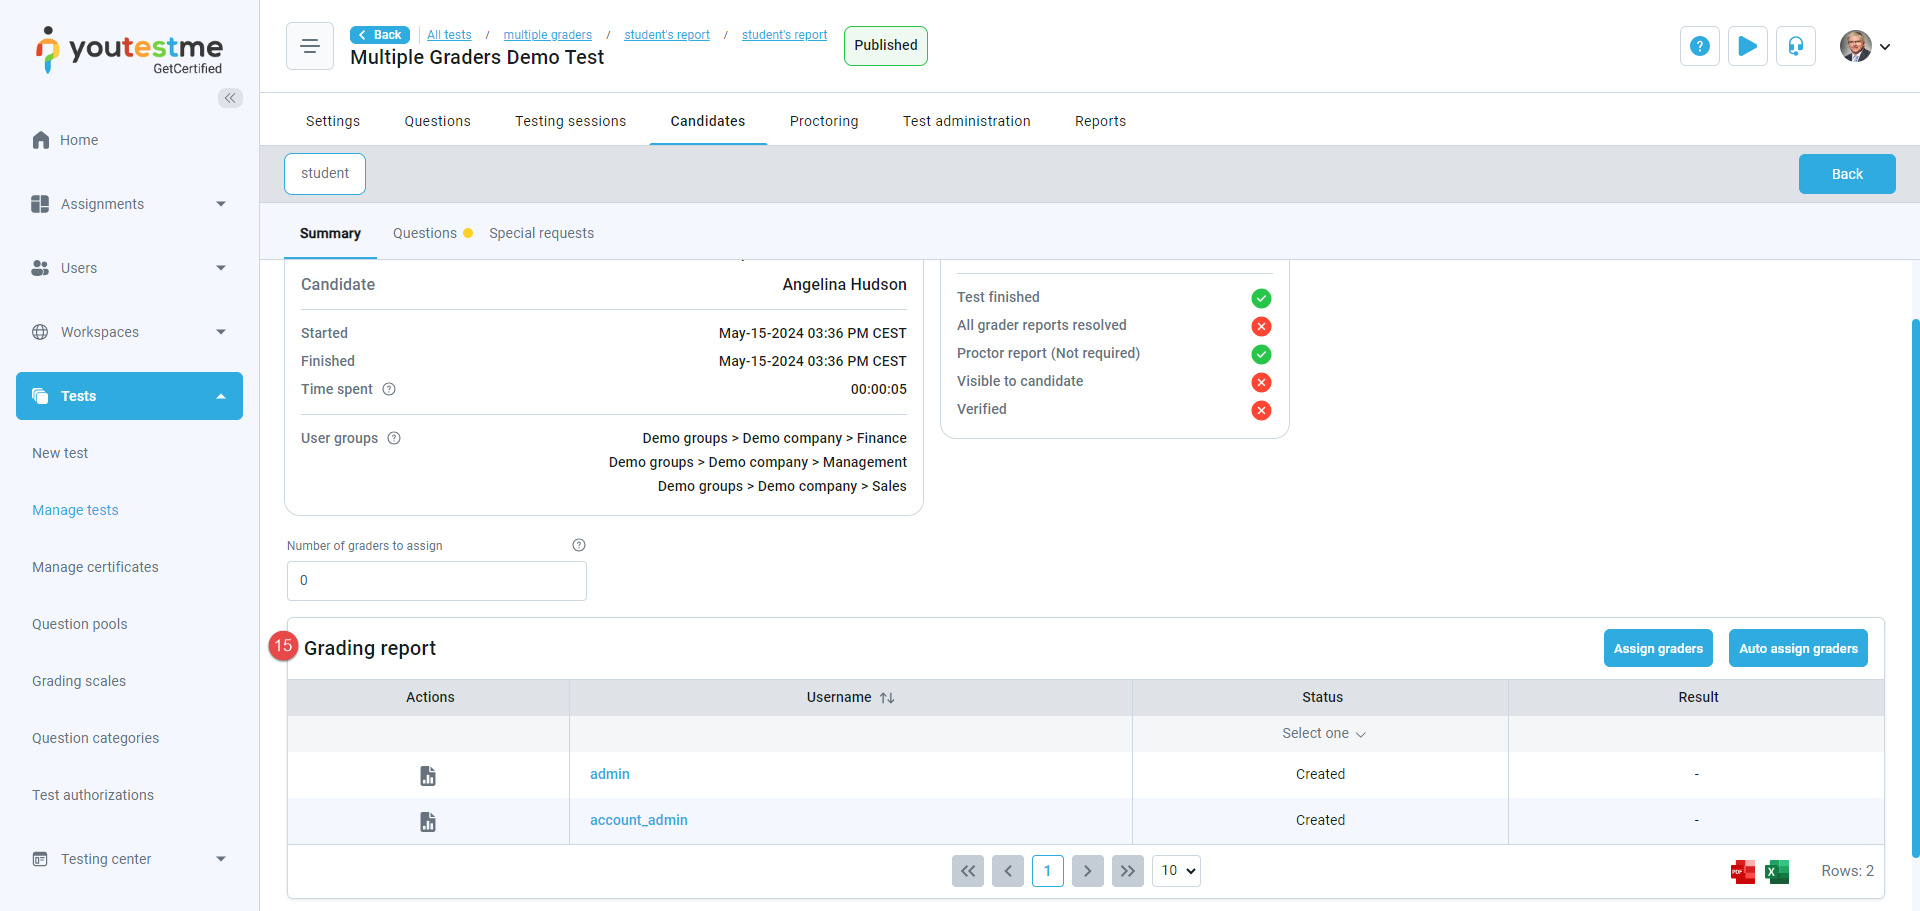
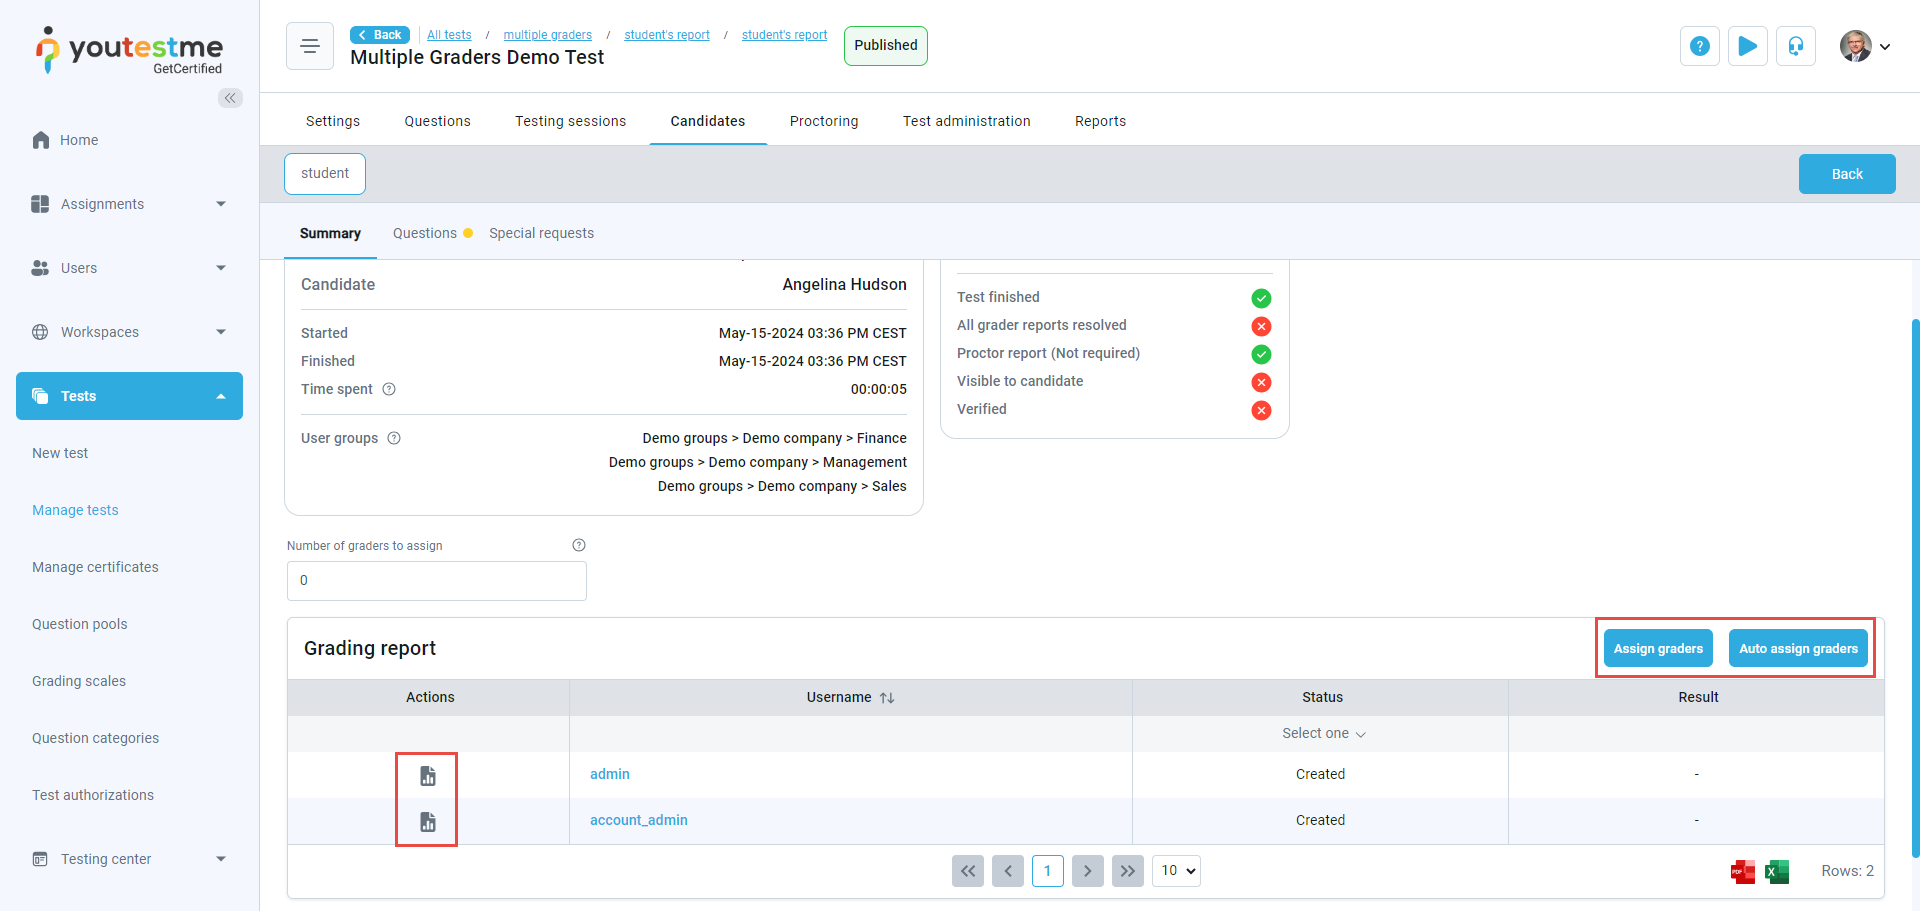
List of graders assigned to grade the test attempt (If the Multiple graders module is enabled under the Grading configuration).
Additionally, the options that can be performed on this page include:
-
Report export - Allows you to export:
-
Personal report as Excel
-
Personal report as PDF
-
Score report by question pools
-
Knowledge deficiency report - The report will display a list of question pools from which the candidate answered at least one question incorrectly. The report will show the lowest level of the question pools (sub-pools). The question pools will be arranged in alphabetical order and will not be divided into sections, if any.
-
-
Show/Hide report - Allow the report to be visible to the candidate and send a notification that the report is ready. Otherwise, make the report unavailable to the candidate.
-
Verify/Unverify report. When you verify the test attempt, the verification date will be shown, and changing the grading setting will not affect the candidate's score. After verification, you can unverify it by clicking the corresponding button.
-
Edit certificate validity. By default, the certificate has unlimited validity. If you define a date, it will be written on the certificate as the expiration date. The certificate is marked as Active until its validity period expires, at which point it changes to the Expired status.
-
Export certificate as PDF or image.
-
Share the certificate as a link.
-
Manage graders assigned to grade the test attempt. Click to auto assign graders from the list of Graders for the test (They will be assigned per their position defined for grading), or click to assign graders manually by selecting the desired users. To see how a particular grader rated a candidate's test attempt, click on the report icon.
-
-
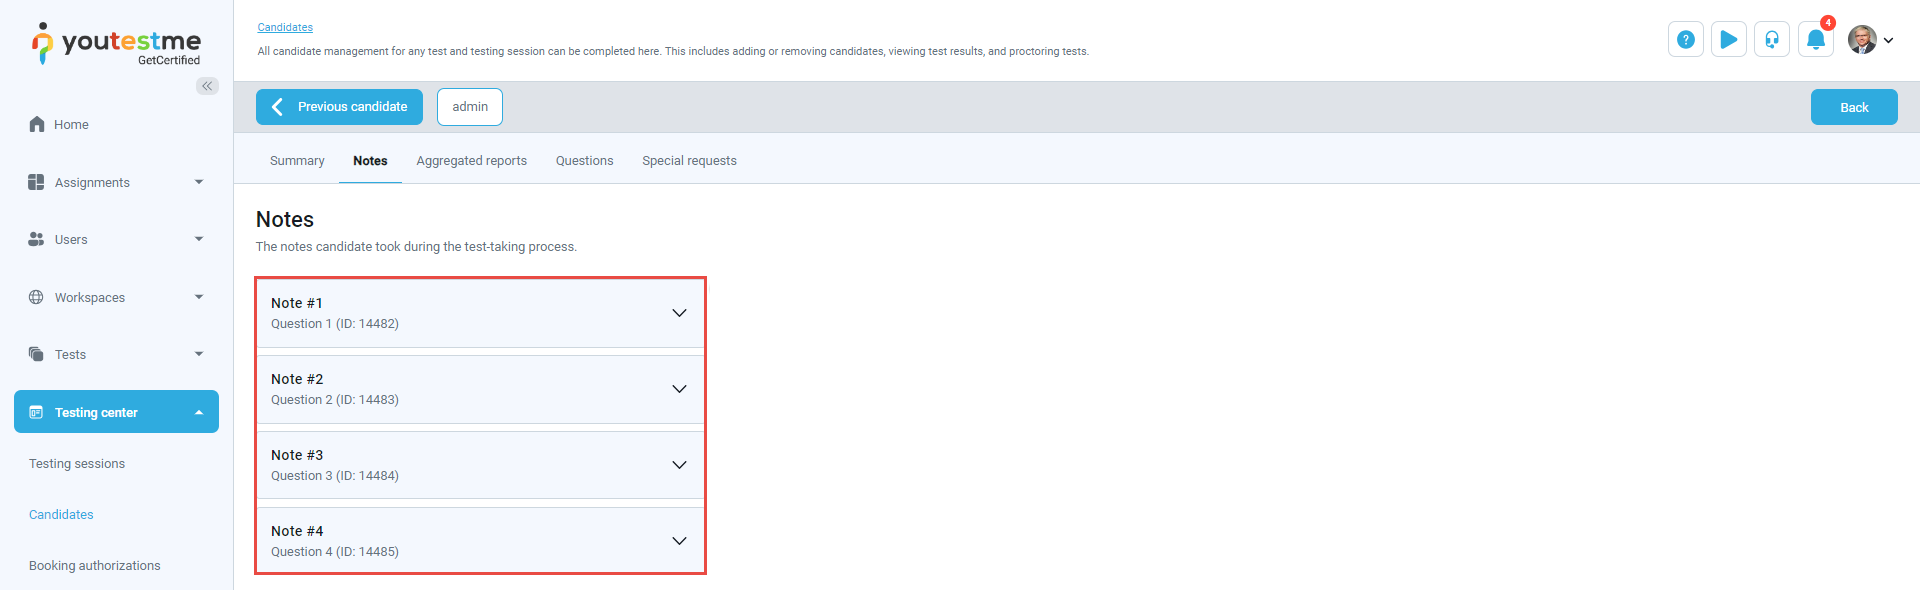
Notes
Depending on the test settings, candidate notes taken during the test may appear in the report.
In this tab, you can review all notes created by the candidate. To preview a note, click the arrow icon. For each note, you can view the associated question number, its ID, and the section number if the test contains sections.
-
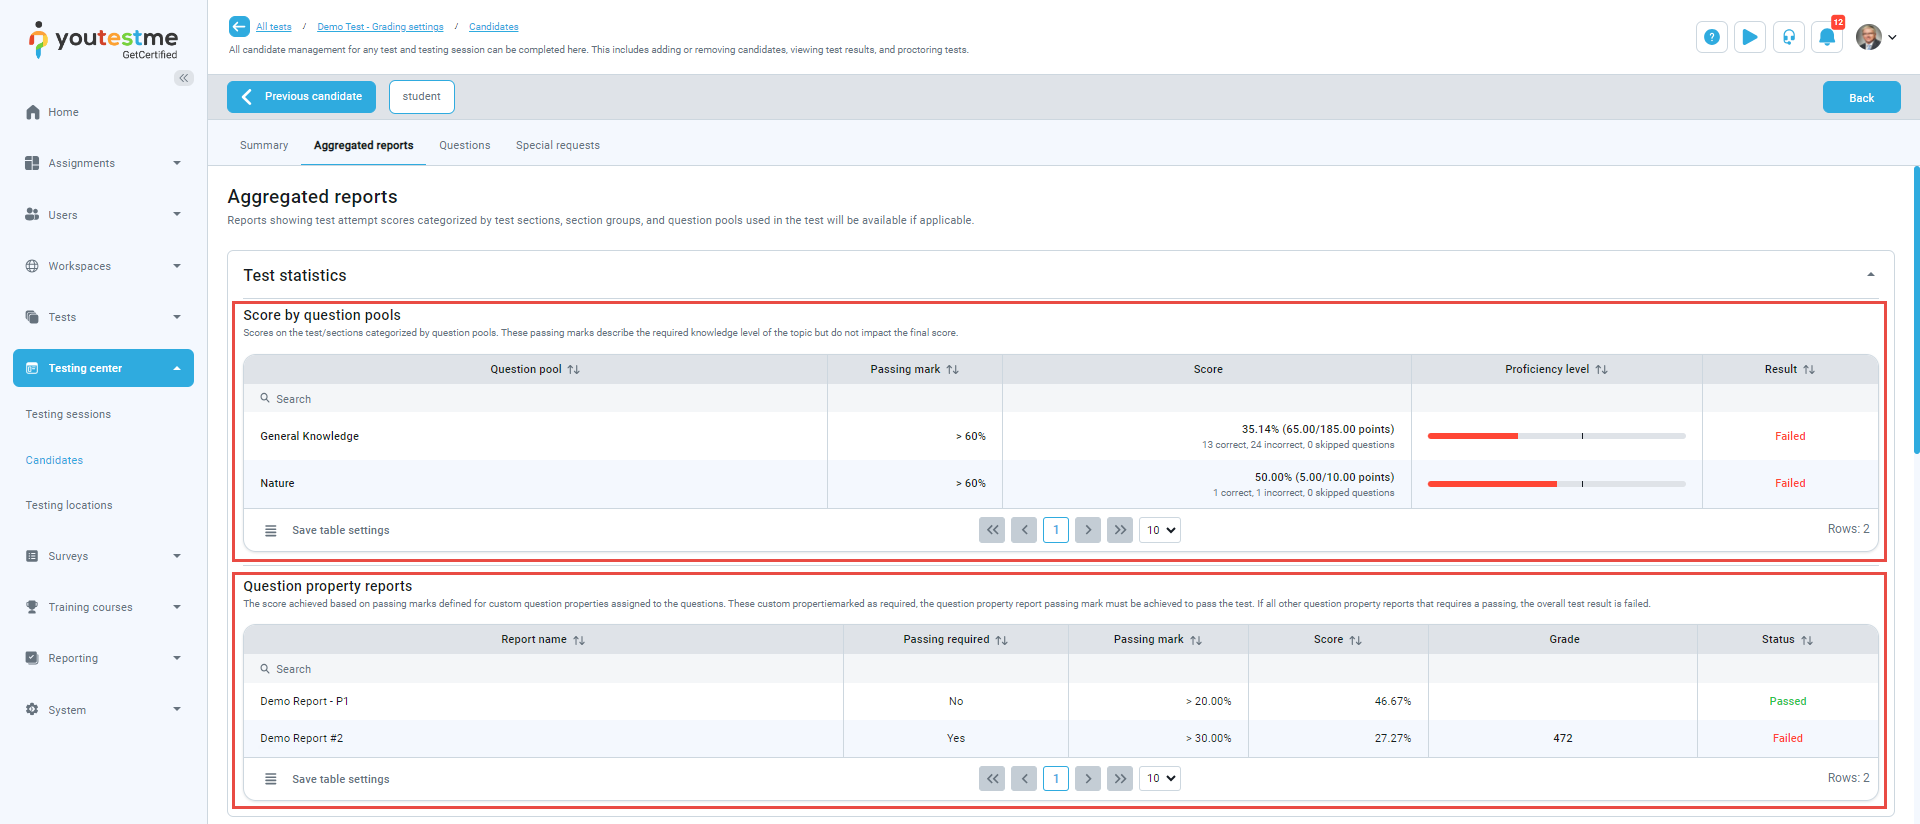
Aggregated reports
Aggregated reports are classified into overall test statistics and statistics at the test section level (if the test contains sections).
At the test level, results are presented based on question pools used for test generation. Each question pool may have its own descriptive passing mark, representing the expected knowledge level for a specific topic, but it does not impact the final test score.
Additionally, you can track statistics based on custom question properties assigned to questions, where passing marks and grading scales can also be defined. For more information, refer to this article.
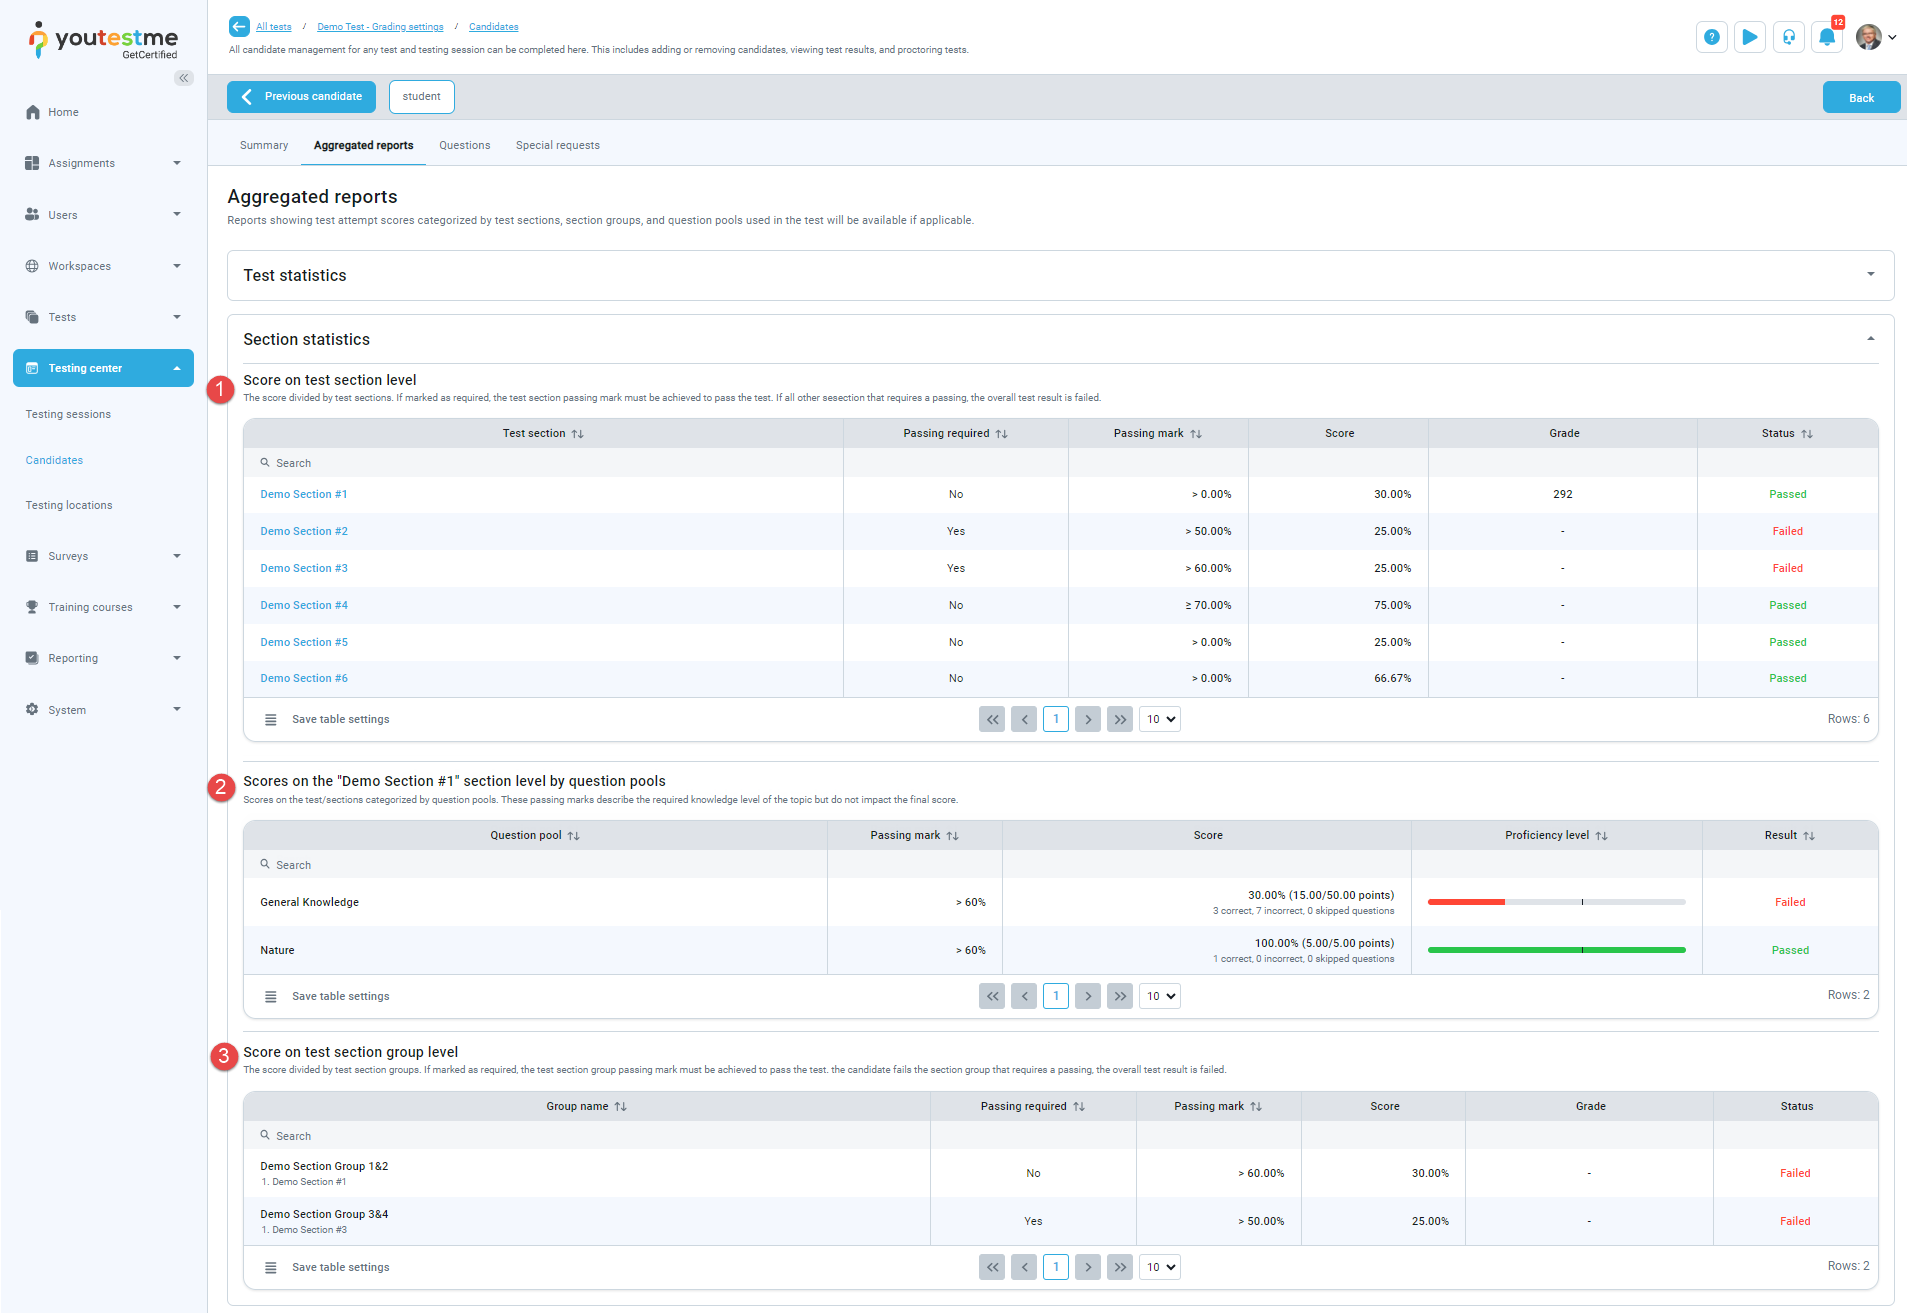
For test sections, various statistics can be tracked:
-
Statistics for sections, where each section may have its own passing mark and grading scale. Depending on test settings, passing a section may be mandatory to pass the test. If passing a section is necessary to pass the entire test, the Passing required column will indicate Yes. If a candidate fails the section that requires passing, the overall test result is considered a failure.
-
Statistics for question pools used for the test section generation. Each question pool may have its own descriptive passing mark, representing the expected knowledge level for a specific topic, but it does not impact the final test score.
-
Statistics at the section group level - Displays passing marks and grading scales for section groups. For example, if a test has six sections, there can be a group for sections #1 and #2 with a passing mark of 60%. Similarly, a group for sections #3 and #4 with a passing mark of 50%. This group can be set as passing required, meaning passing sections #3 and #4 is necessary to pass the test. If a candidate fails the section group that requires passing, the overall test result is considered a failure.
-
-
Questions
This tab contains all the questions from the test. If the test has sections, you'll see a list of all sections. Click on a section name to open the questions for that specific section.
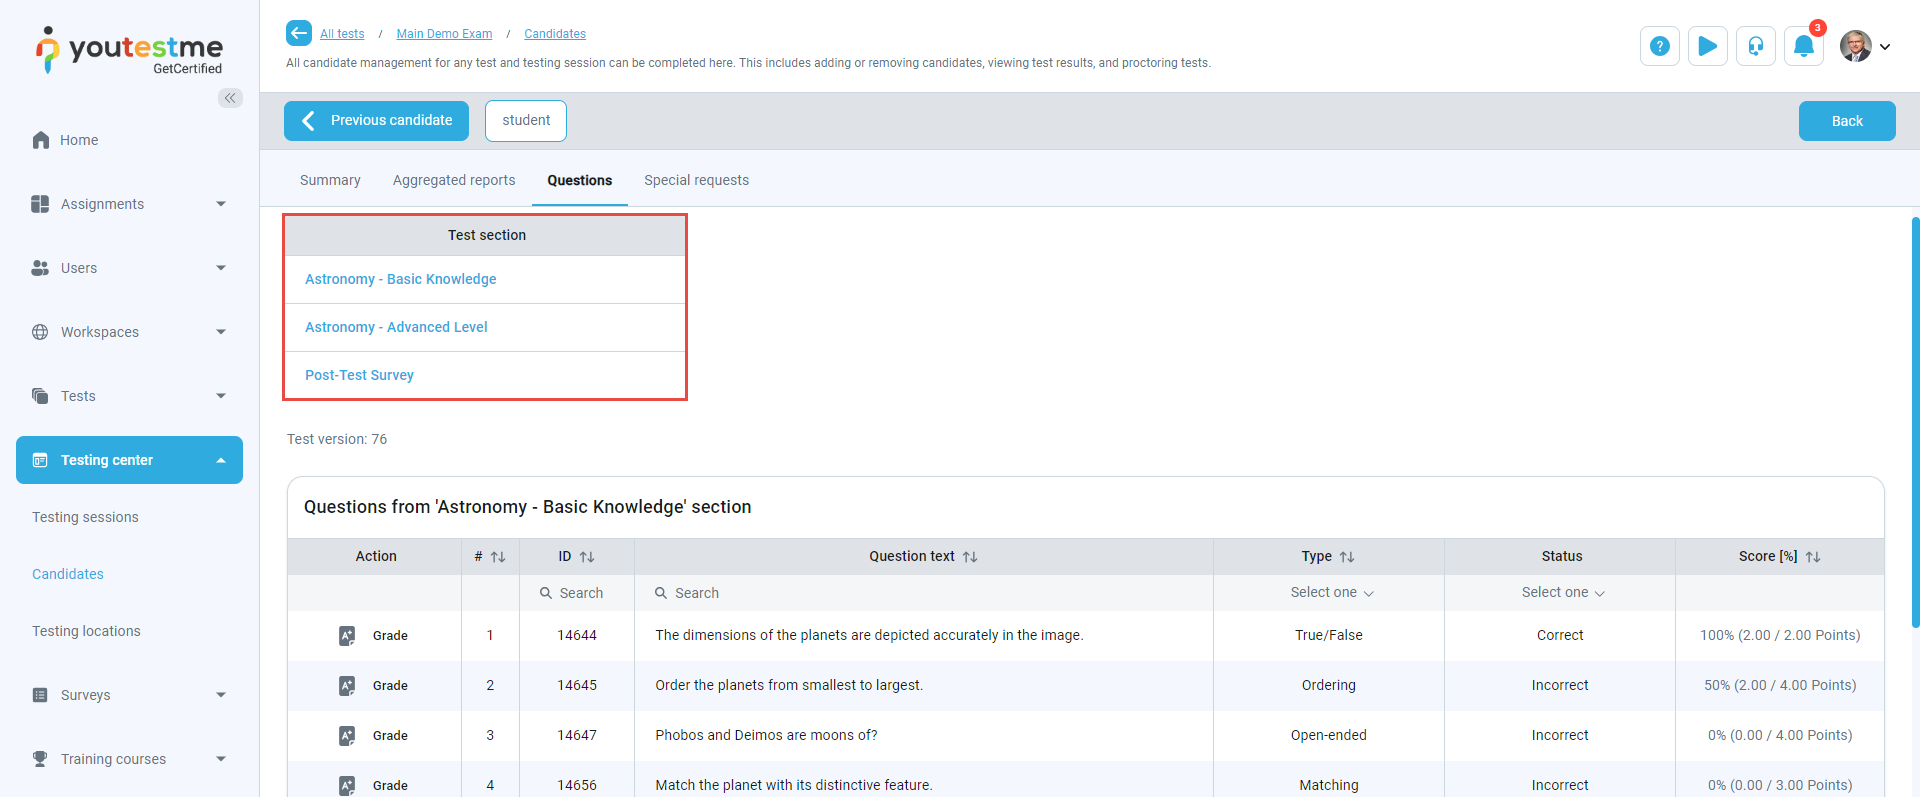
Depending on the question type and settings, some questions may be automatically graded, while others require assessment by the test manager. A yellow indicator will appear next to the tab name if the report has unanswered questions. Additionally, a filter will appear to facilitate access and review of unanswered questions.
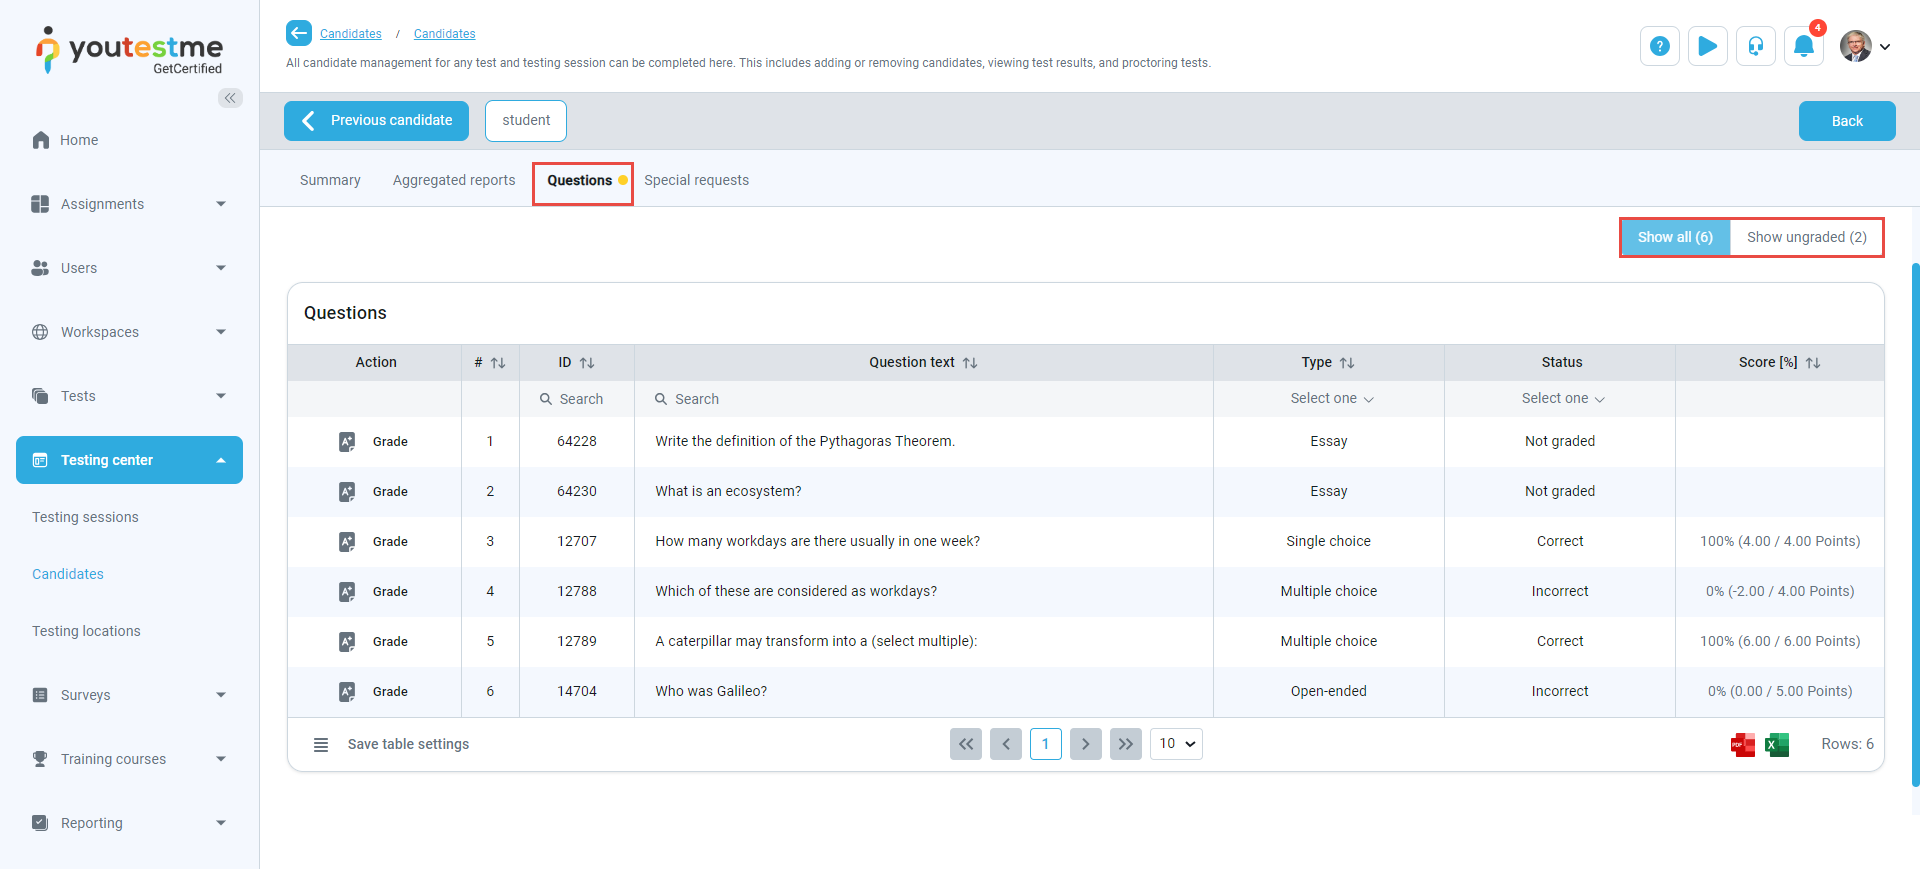
The question list provides basic information such as the question text, points earned, and question type. To grade a question:
-
Click the Grade button.
-
After reviewing the question, enter the assigned points. For more information on how you can use predefined question grading templates when grading questions, refer to this article.
-
To provide feedback on the candidate's answer, select Add feedback and enter desired feedback. This feedback will be displayed in the report when the candidate views it.
-
Click Submit.

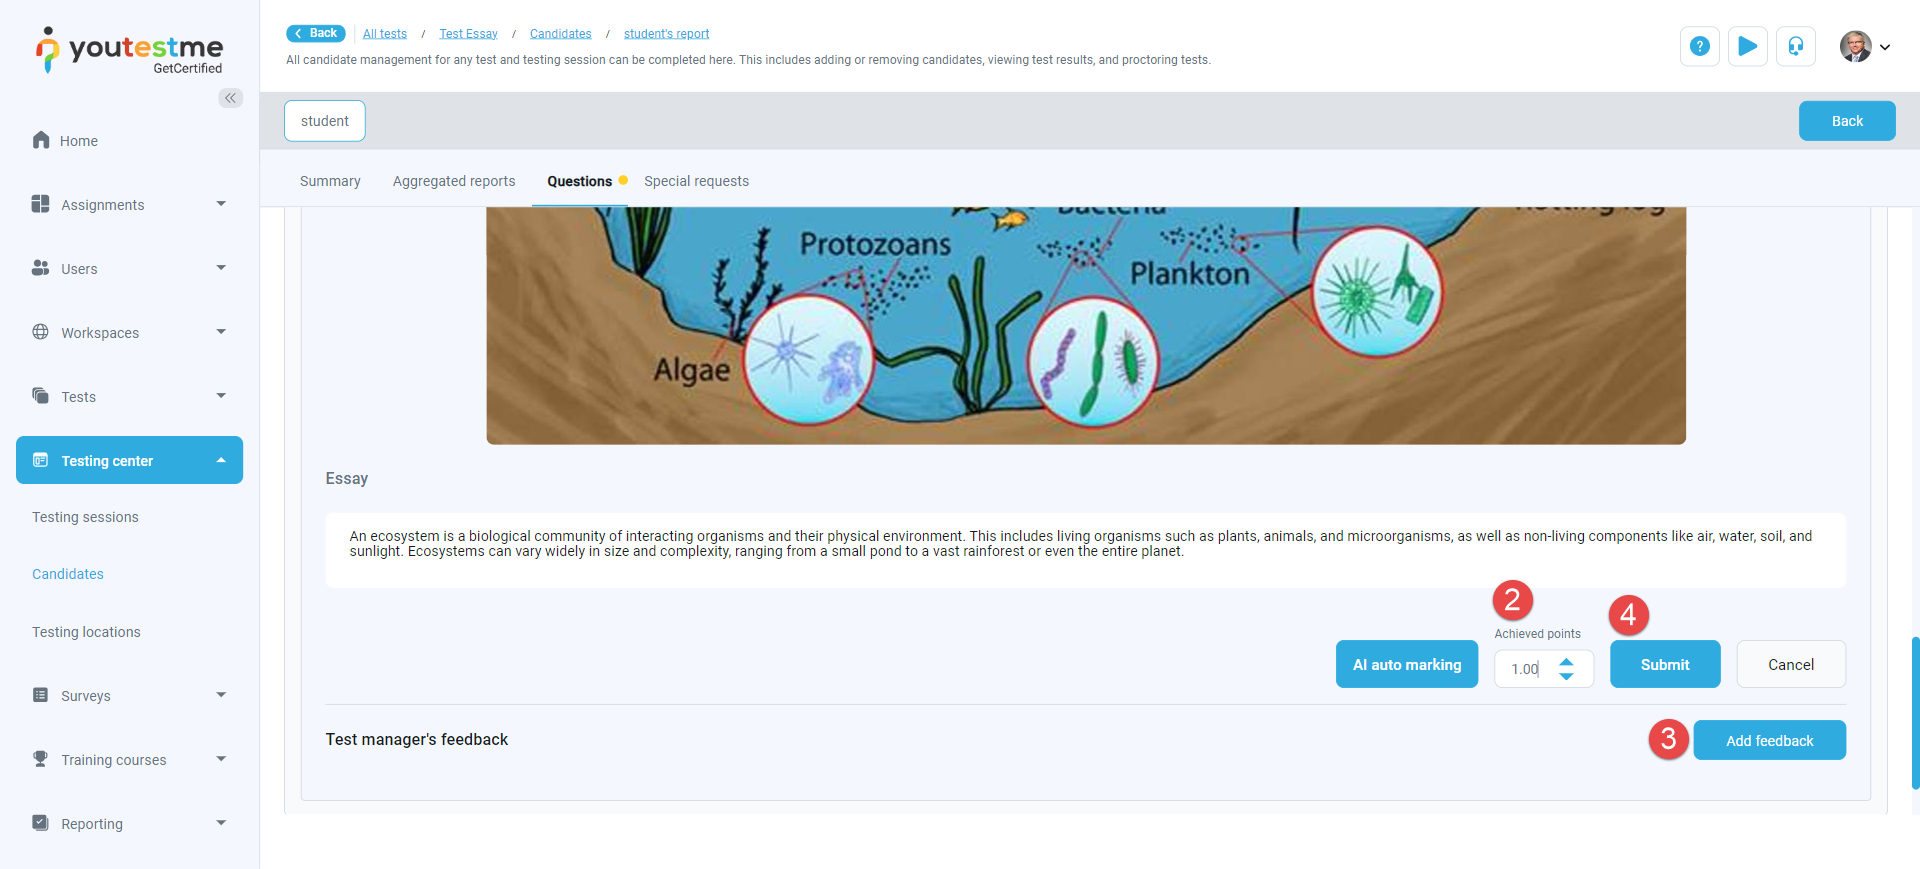 When grading questions, you’ll be able to select desired predefined points under the Predefined points label. Only points within the range from the maximum points for the question to the penalty points will be displayed. Values from the template outside this range won’t be shown. In this case achieved points field won't be displayed.
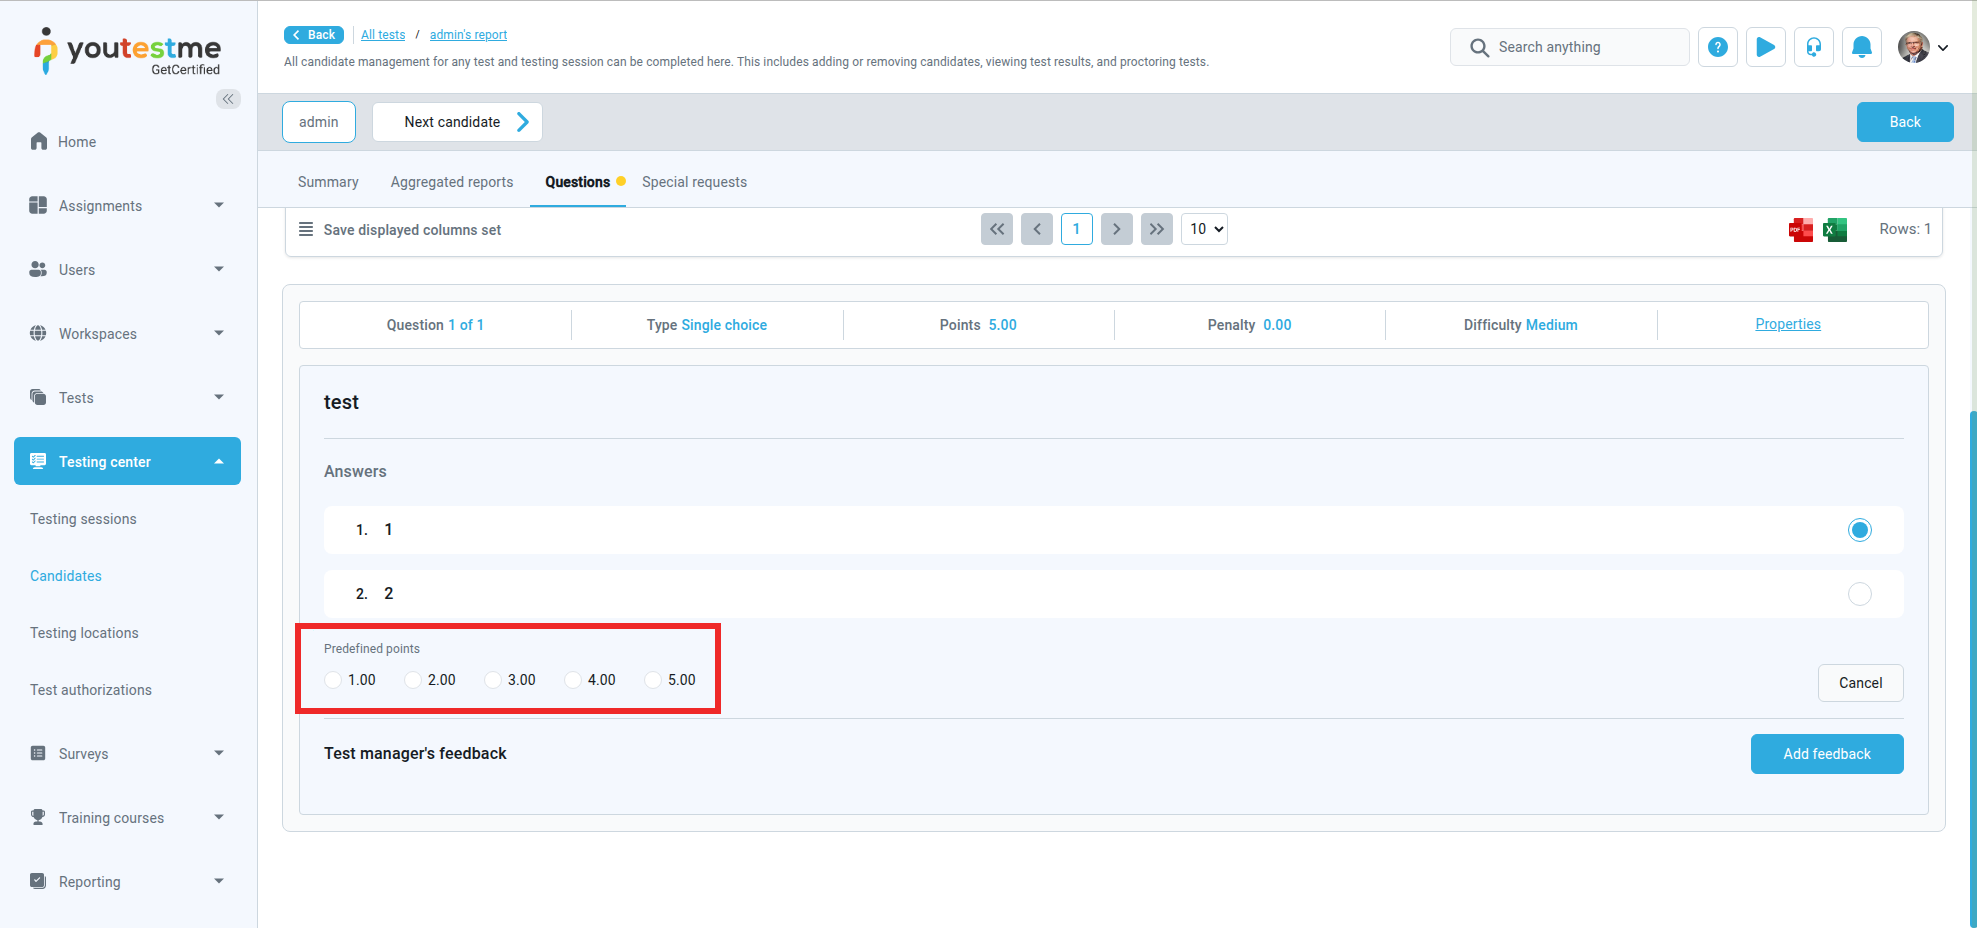
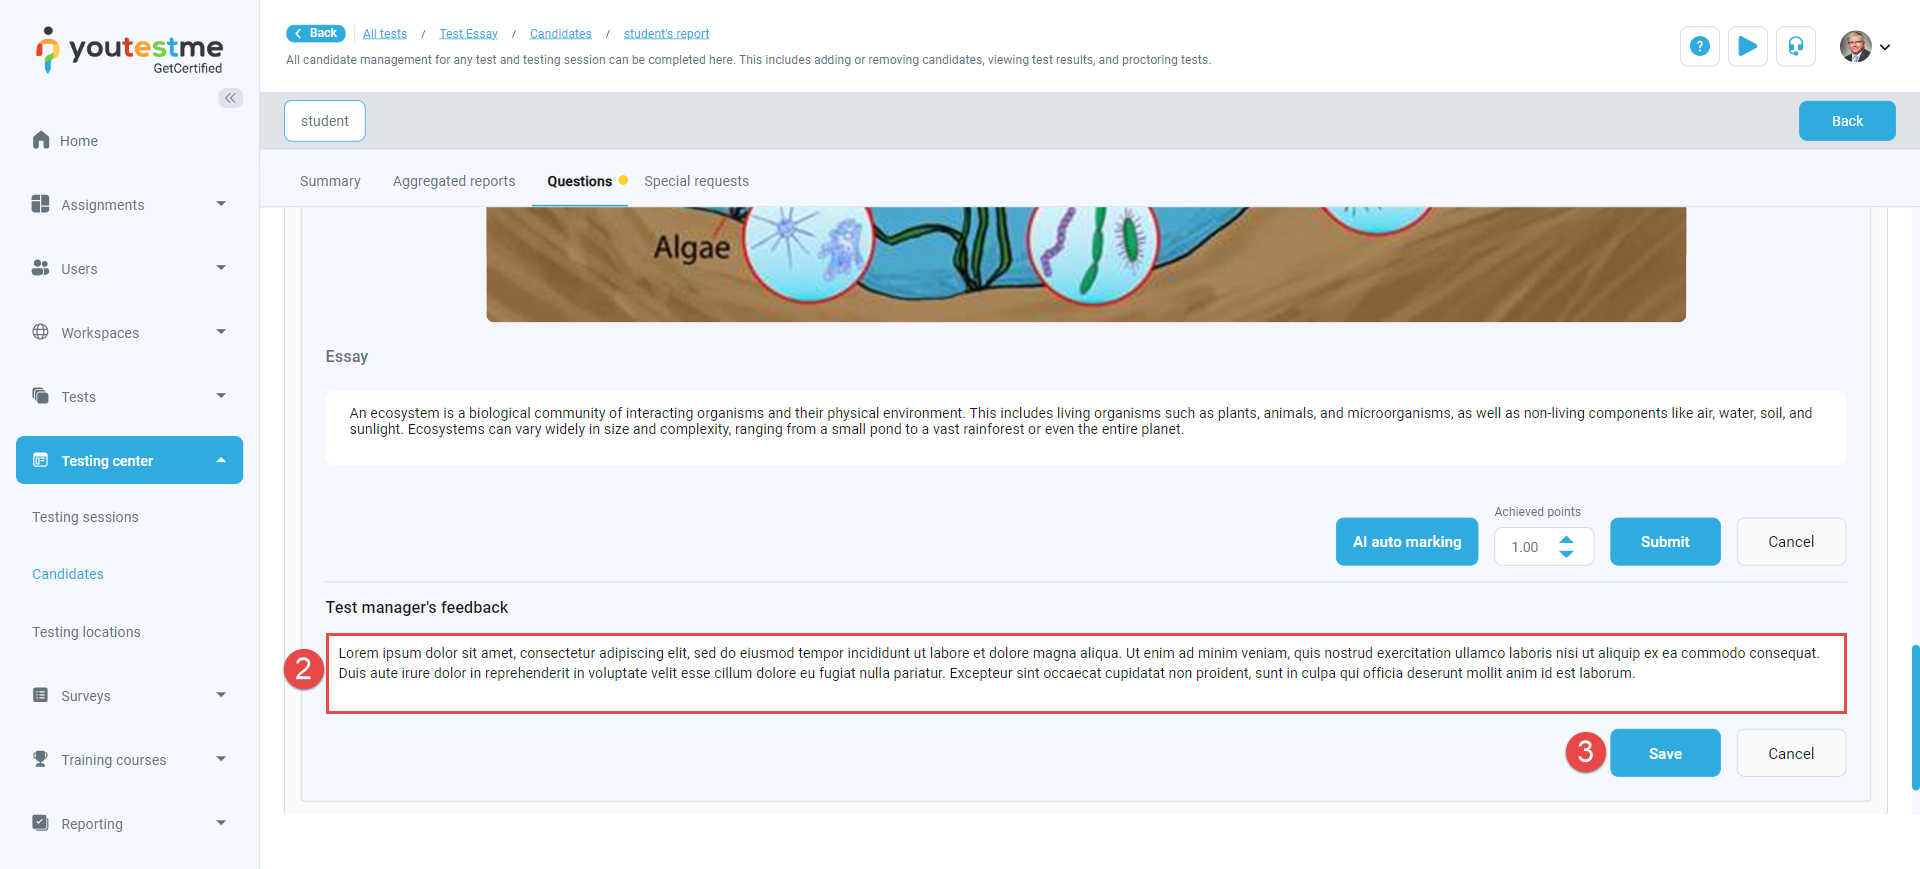
Test manager's feedback - To add feedback, please follow the steps:
- Click the "Add feedback" button.
- Enter your feedback.
- Click the "Save" button.
An AI grading option may be available for evaluating essay questions. To grade an essay question using AI:
-
Click the AI auto marking button.
-
Click the Library button to add a new document as a reference for grading (skip this step if you've already added a document to the library).
-
Click the Browse files button and choose the document from your device (skip this step if you've already added a document to the library).
-
Click the Refresh button to update the document list (skip this step if you've already added a document to the library).
-
Select the reference document from the list.
-
Click Run auto marking.
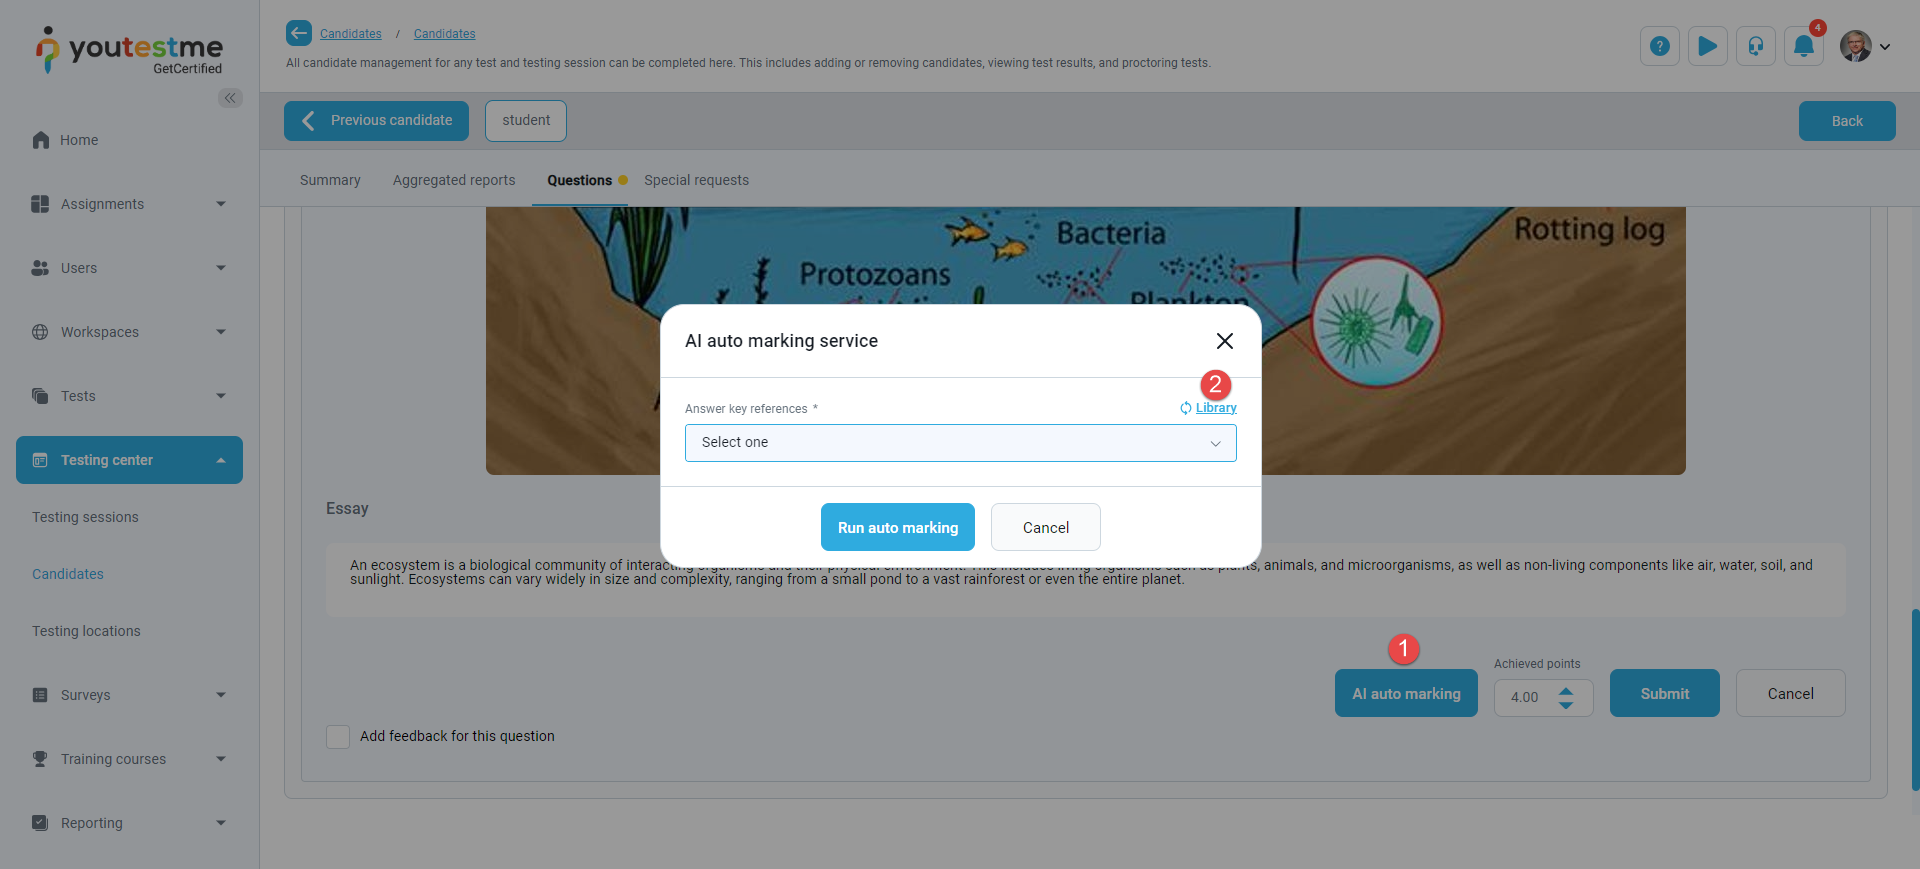
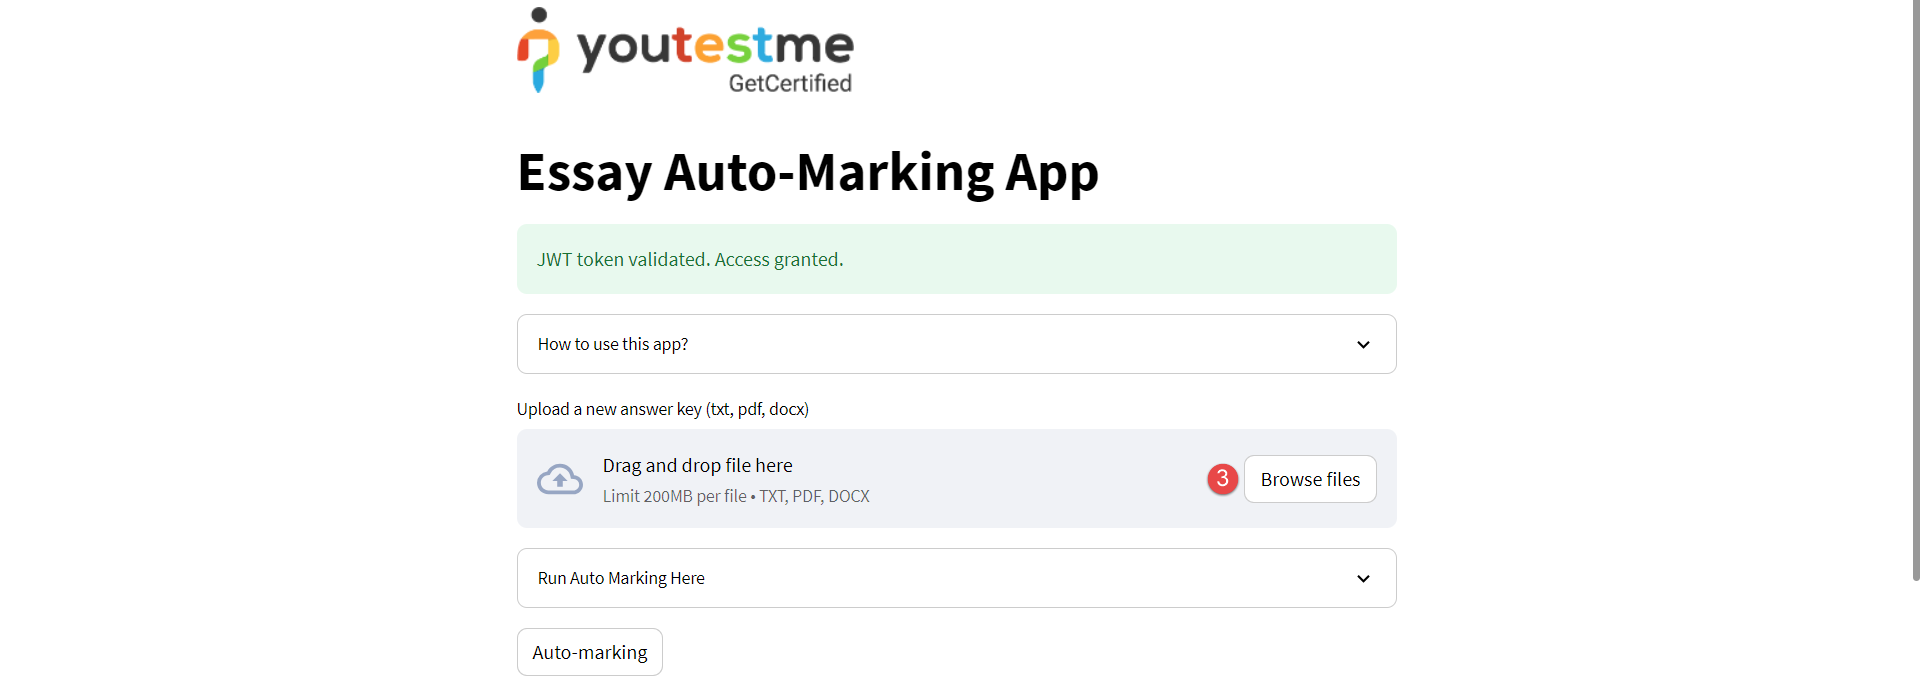
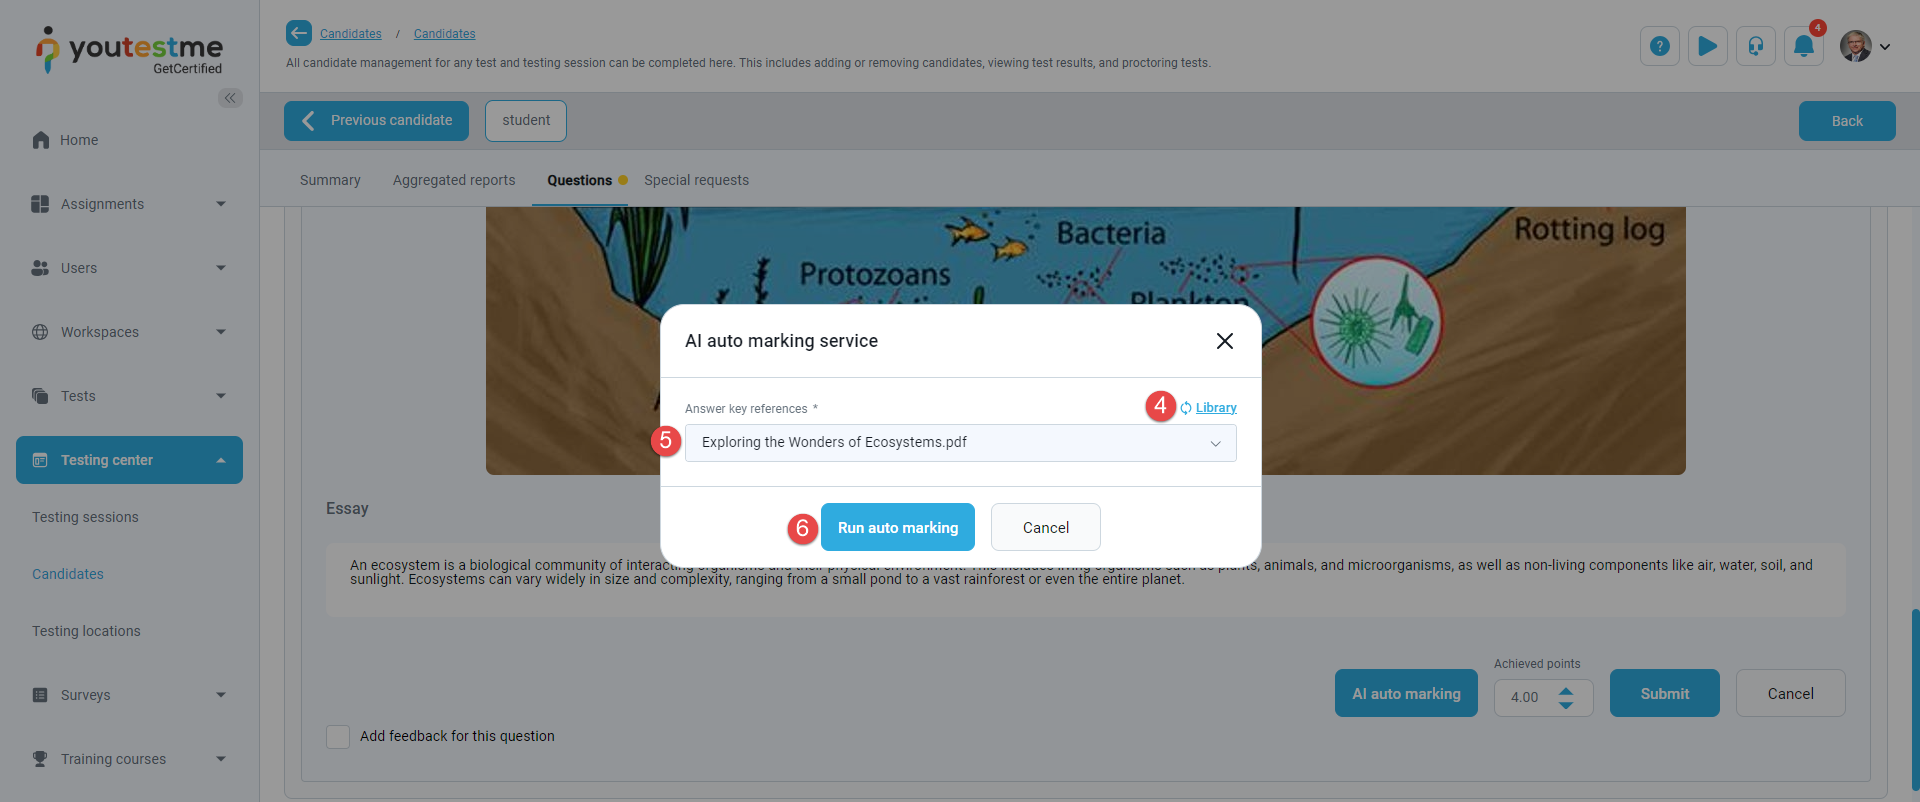
The number of assigned points will be updated. Note that when generating points, the AI focuses on comparing the candidate's answer with the selected reference document, without considering the question text. This method may not yield a 100% result as it checks for similarity in sentences, words, paragraphs, word order, and the use of synonyms. It provides answers based on the entire document, so the question should pertain to a significant part or the entirety of the document.
If you have a large document and wish to focus the question on a specific section, extract that section into a separate document to align with the question. Additionally, entering a keyword, i.e., a word frequently mentioned in the document, will result in a significantly higher accuracy percentage than 0.
Review the information and click the Submit button to save the assigned points or update the number if necessary.
-
-
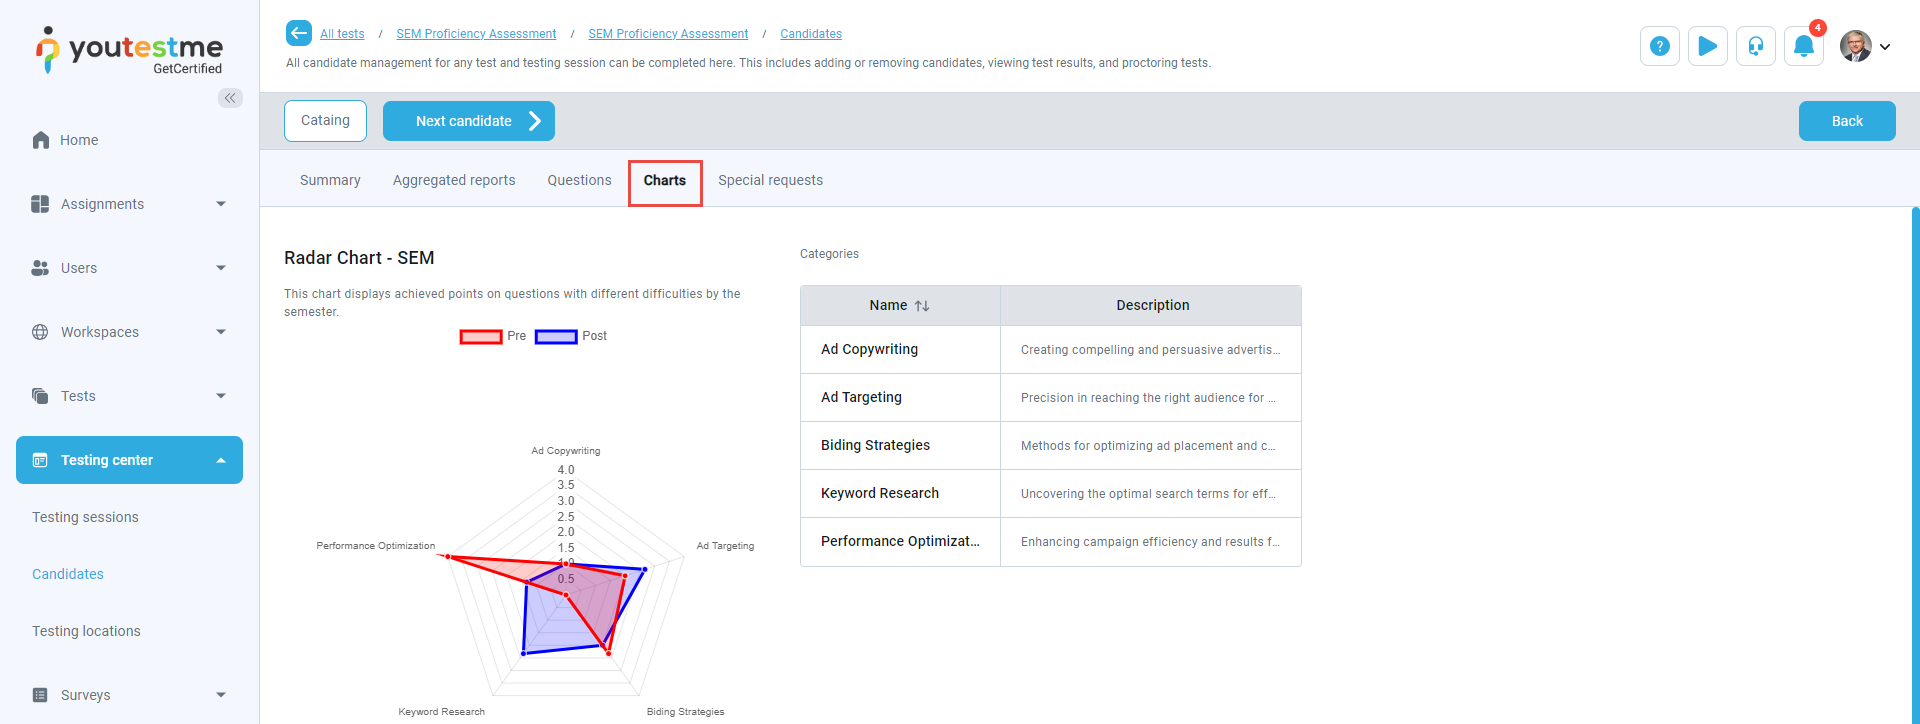
Charts
This tab features a chart displaying summarized or average points scored by question categories assigned to each question. This tab is only visible if a chart is created for the test. For detailed instructions on creating a chart, please consult the Personal report settings help page.
-
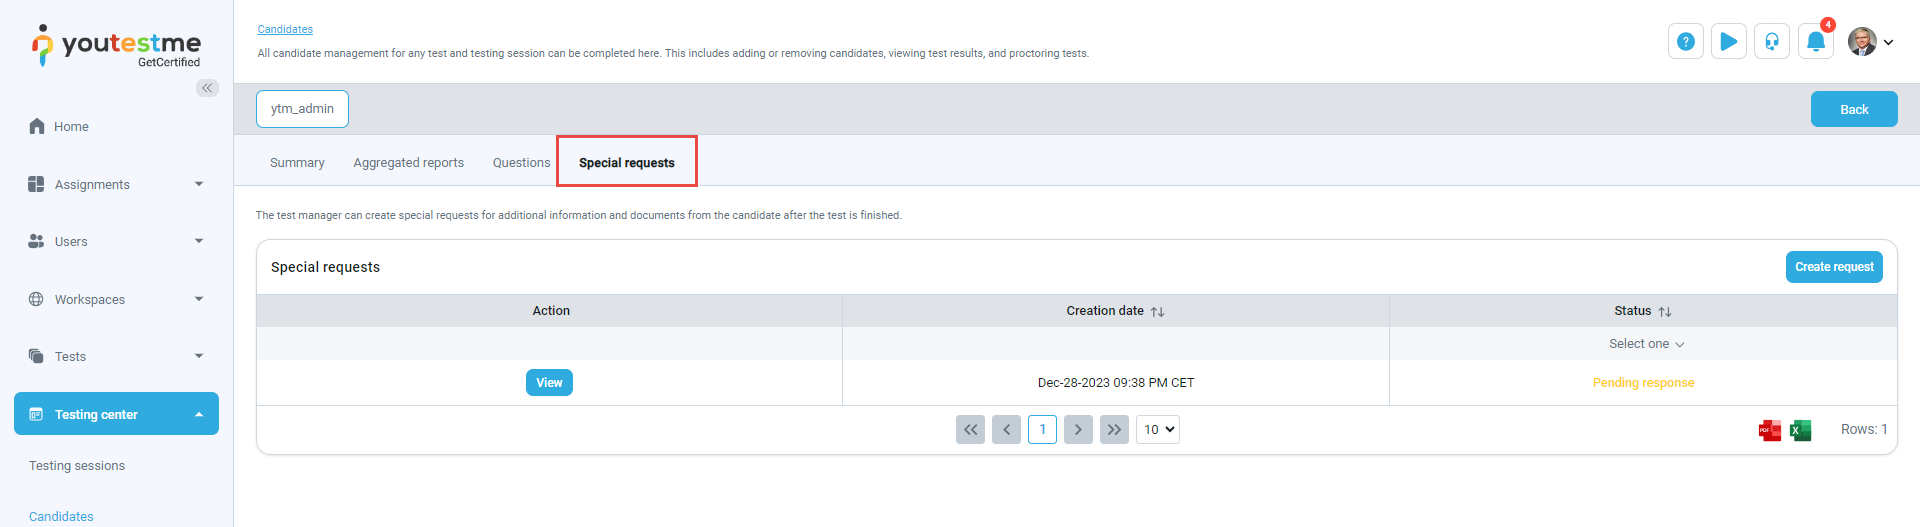
Special requests
This tab displays all special requests for the candidate and enables the creation of new ones. Special requests are used to request information or documentation from candidates, either before or after a test. For instance, if a candidate needs to provide an ID before a test, and it's found invalid, the instructor can send a special request for a valid ID to avoid canceling the test attempt.
-
Proctoring report
If the test is proctored, this tab is visible and contains recordings of the candidate's test attempt. If the proctoring recording is unresolved, a yellow indicator will appear next to the tab name. There might be one or more recordings (e.g., if test continuation is allowed or due to internet connection issues where the candidate had to change the computer, restart the router, etc.).
The test manager can grade the candidate's recording by clicking on the camera icon.
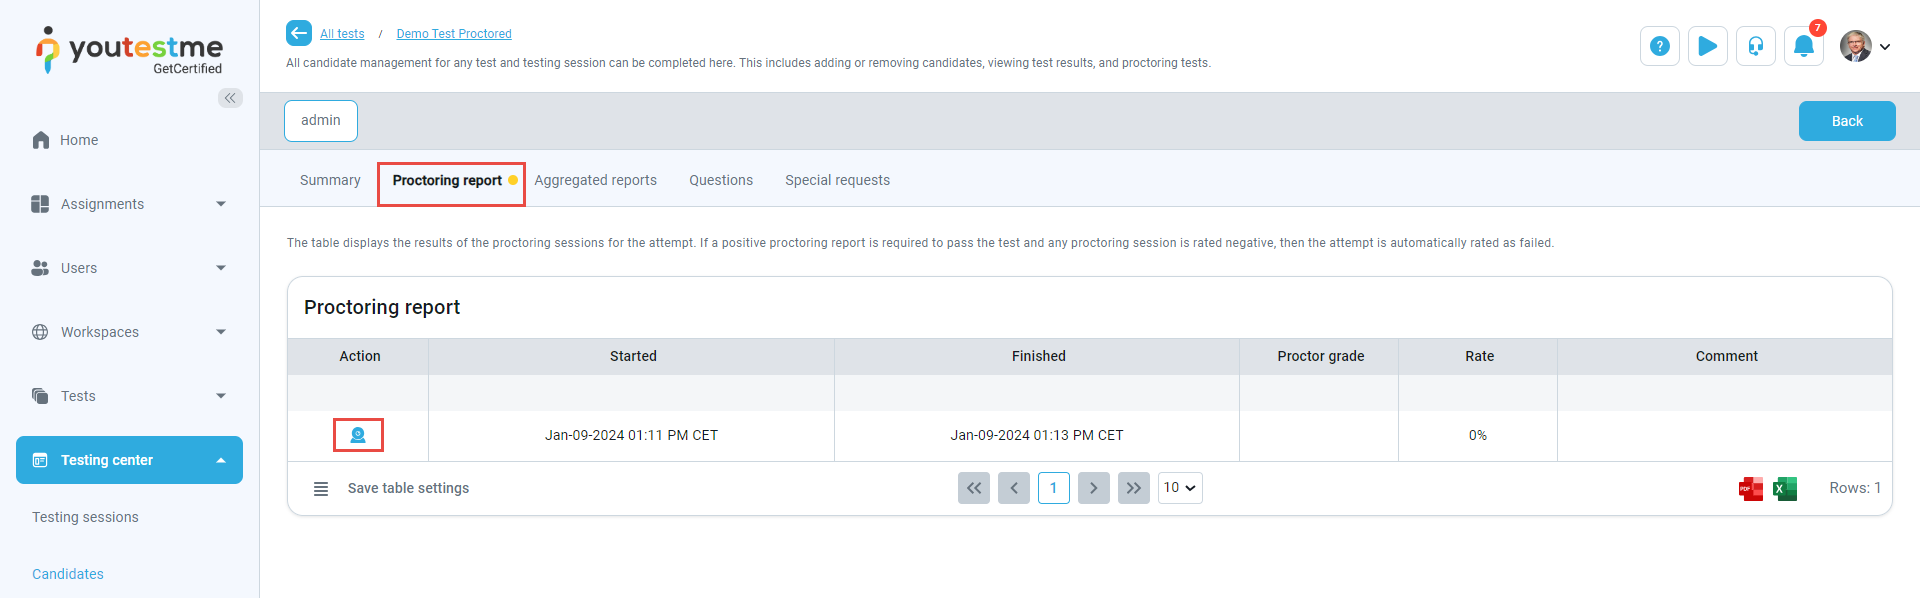
Depending on the test setting (if the Require positive proctoring report option is enabled under Grading configuration), the proctor must grade the candidate's behavior during the test for the attempt to be fully graded. In this case, the proctoring report will impact the final test result. If a candidate passes the test but receives a negative proctor's grade, they will fail the test. The default proctoring grade is Neutral. If a candidate completes the test and the proctor leaves a behavior report with a Neutral grade, a user with higher-level privileges should review the video for potential suspicious behavior. They will then decide whether to categorize the rating as Positive or Negative. The candidate's report remains incomplete until the proctoring report is graded as Positive or Negative.
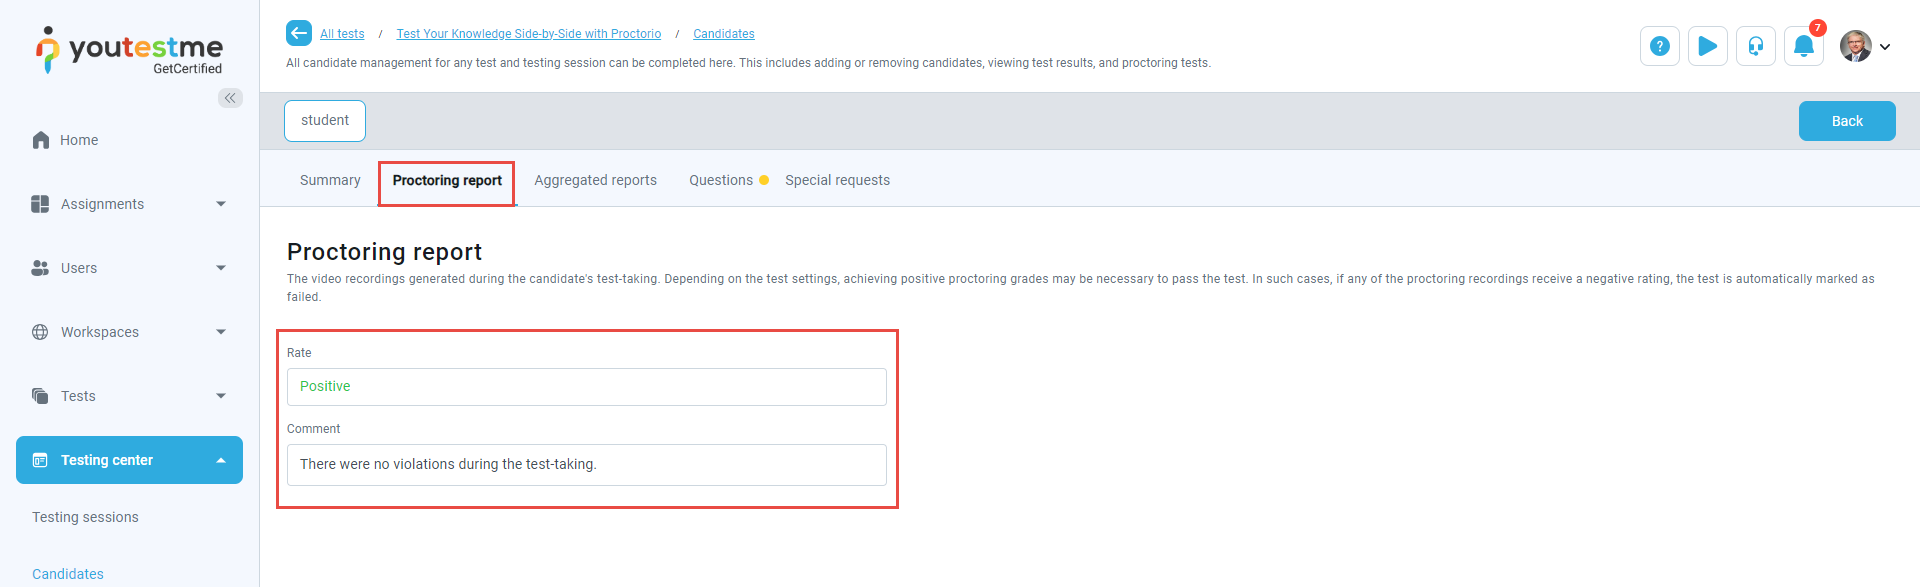
If the Proctorio integration is used for proctored tests, this tab will appear after the candidate's recording is evaluated through Testing center/Candidates/Monitoring. The proctor's rating and comment will be displayed.
-
-
Mark candidate's attempt for review
To mark a candidate's attempt for review, click Mark for review and a dialog will appear with the following information:
-
First name of the candidate.
-
Last name of the candidate.
-
Username of the candidate.
-
The name of the test.
-
Test external ID - Represents the unique identifier for this test in the external system.
-
Passed - Indicates whether the candidate passed or failed the test.
-
Score - The percentage of the achieved score on the test.
-
Available from/Available to - Timeframe during which the test can be started.
-
Started/Finished - The time when the candidate started and completed the test.
-
Import time The time when the candidate's result was imported from the external system and processed.
-
Update time for the latest changes on the test attempt.
-
Marked for review - Indicates whether the attempt is marked for review.
-
Additionally, you can use the Mark for review option to set the attempt for review. Optionally, you can provide review notes for other managers to view the details of the attempt analysis.
Note: Once marked for review, the attempt is no longer eligible for automatic verification.
-
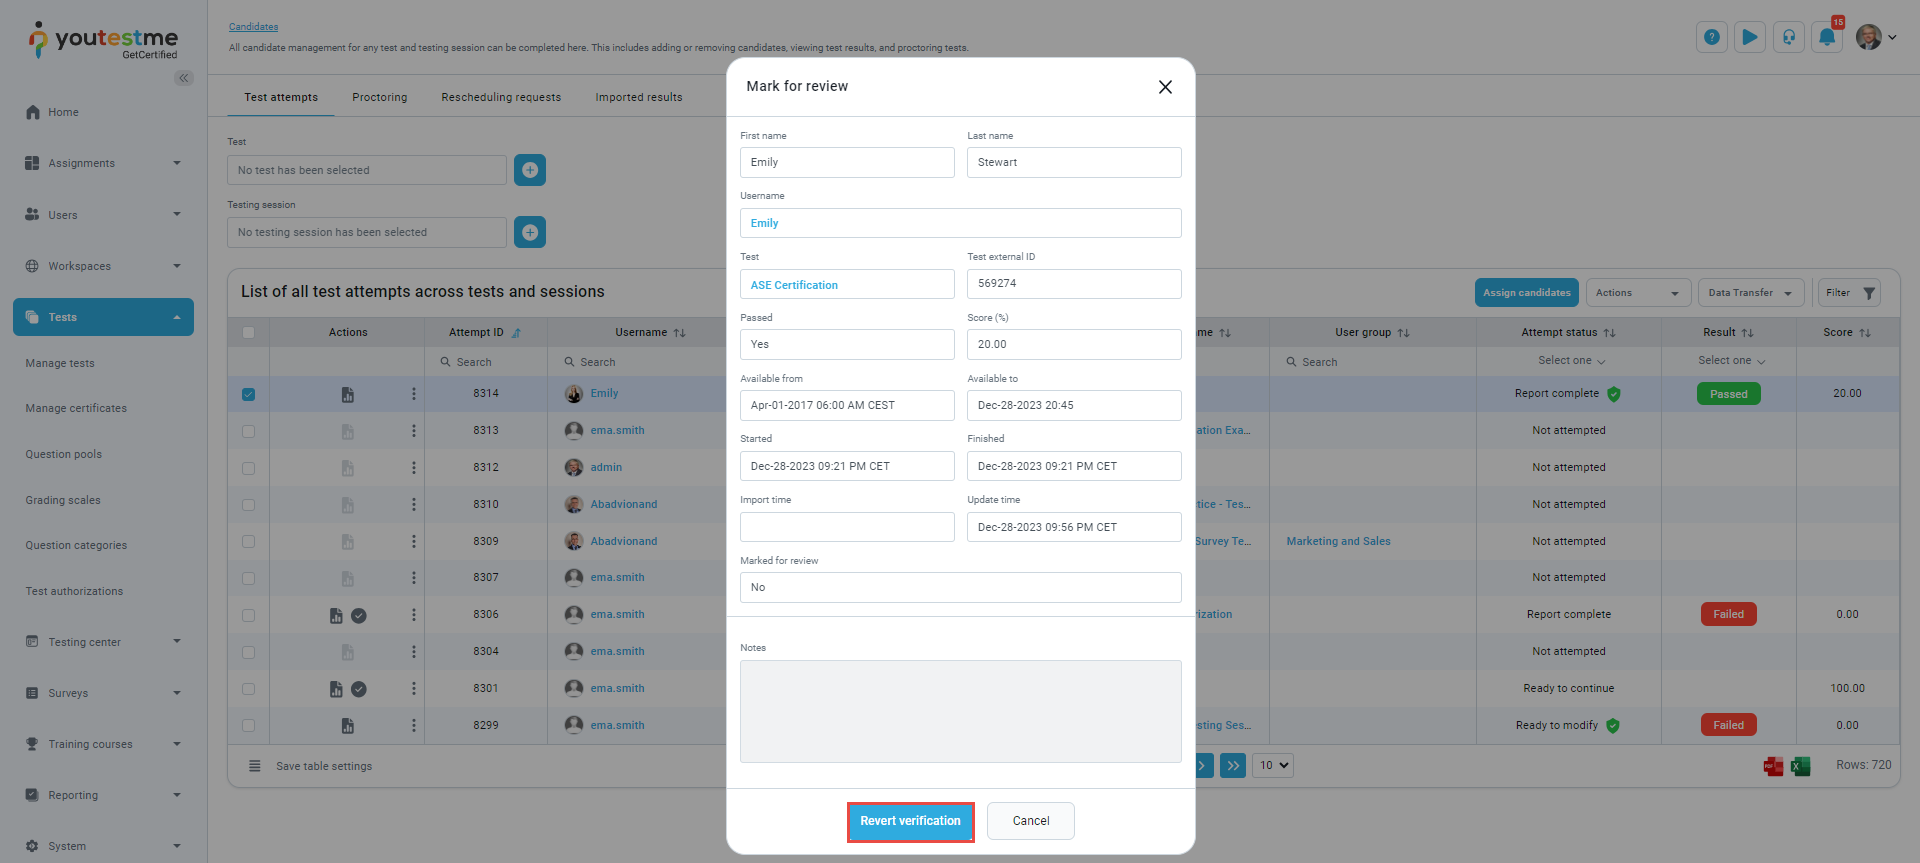
To verify the candidate's attempt, use the Verify option. Manual verification is applicable to all test attempts irrespective of hold criteria.
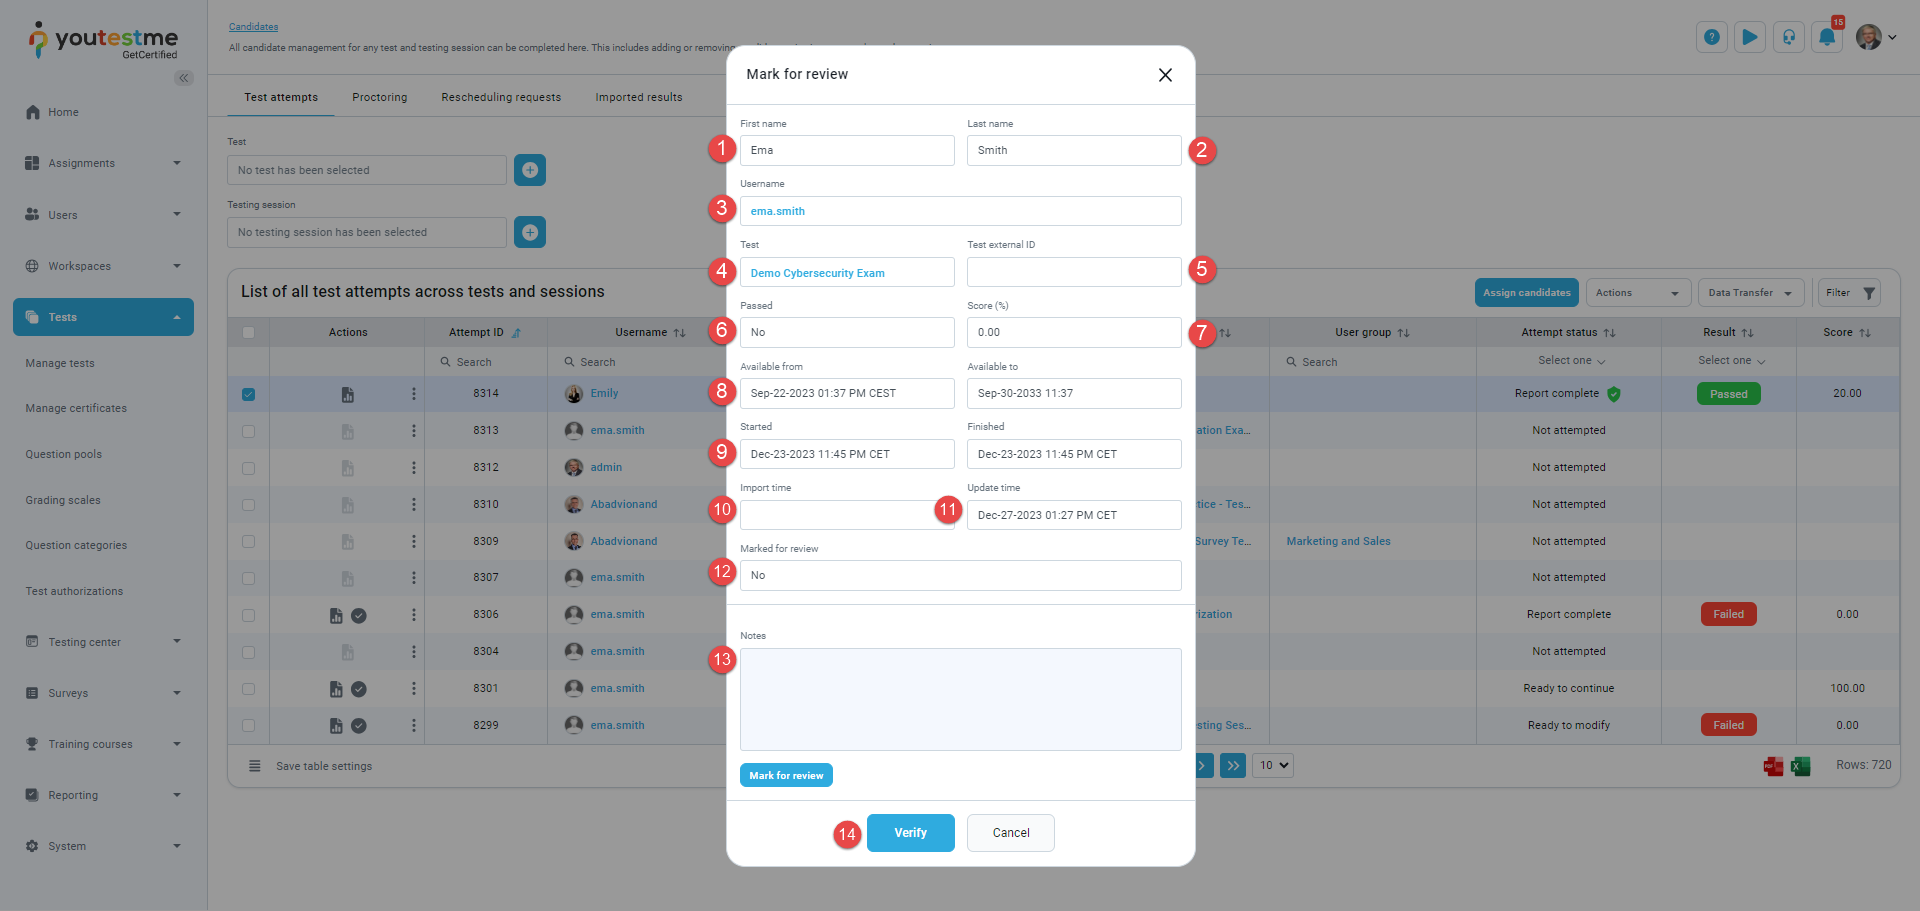
After verifying the attempt, you can revert the verification by clicking the Revert verification button. Subsequently, the attempt will become changeable again and be affected by the latest grading setup on the test.
-
-
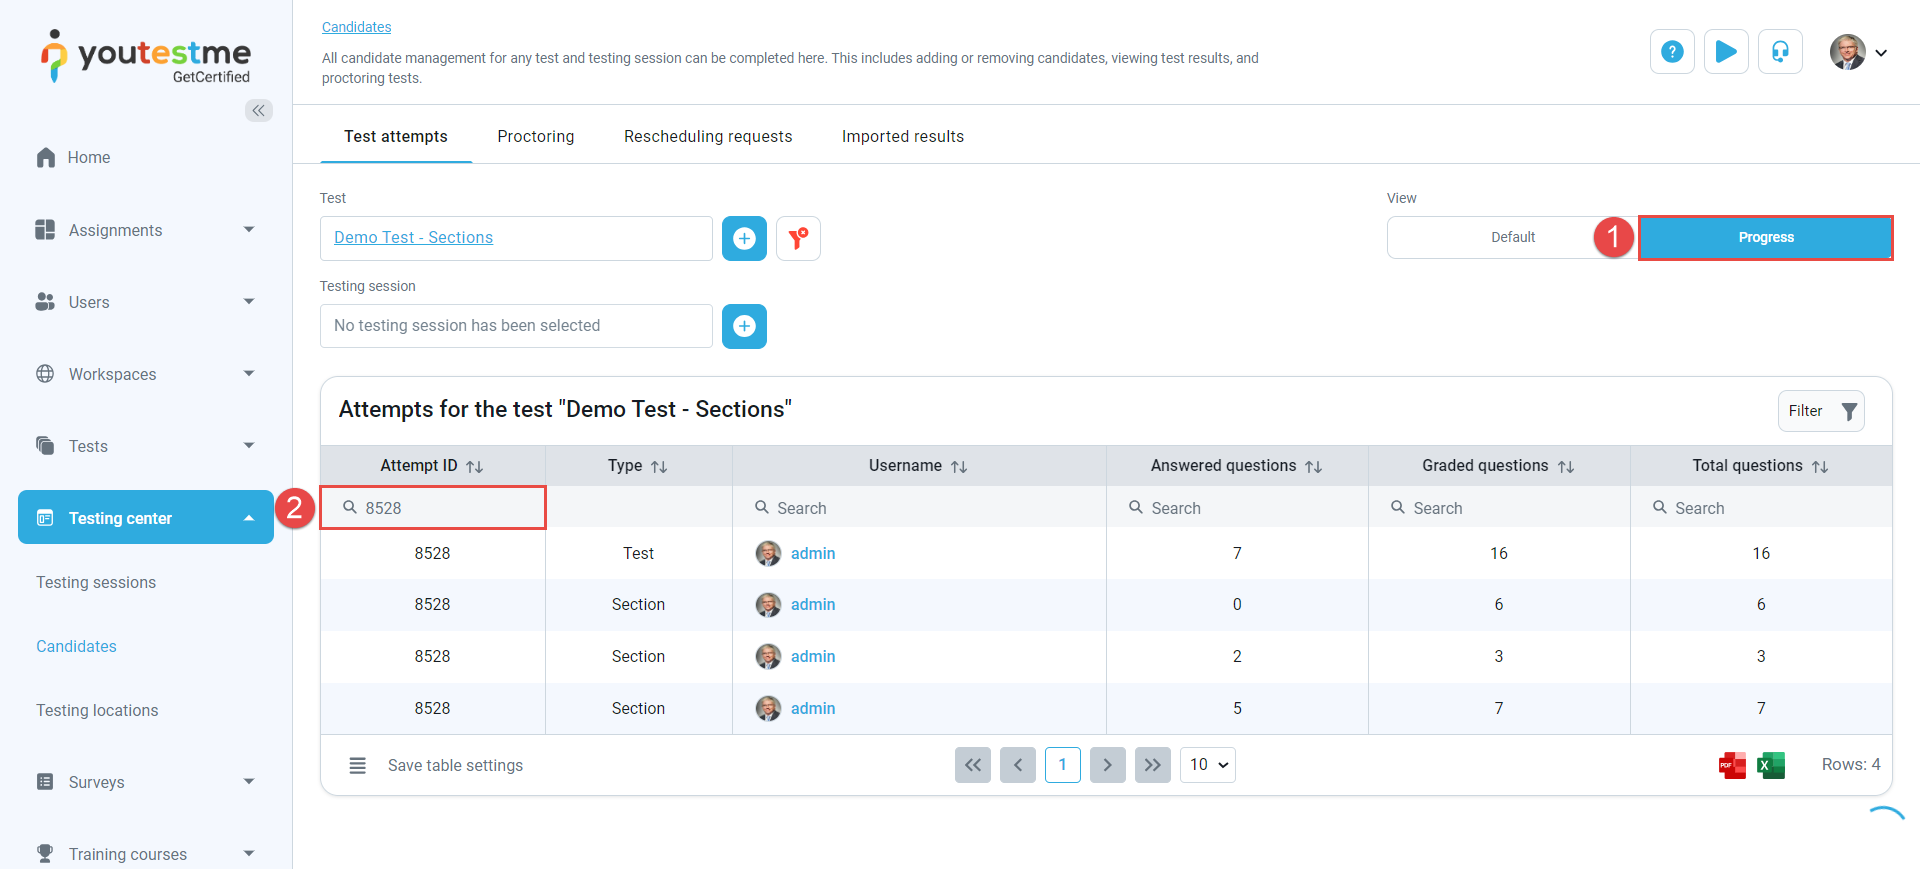
Additional attempt progress
Furthermore, users can access more detailed information about candidates' progress by switching to the progress view. This includes data such as the number of questions answered, the number of questions graded, and the total number of questions attempted for any candidate's attempt.
To streamline this process, simply filter the table by entering the attempt ID of the candidate. This will display the relevant statistics for the entire attempt, as well as separately for any test sections if applicable.
-
Proctoring
Efficiently manage and monitor test attempts from all tests on one page. Review candidate recordings and grade them as a proctor, handle special accommodation requests, and create and review special requests sent to candidates.
On this page, you have access to the following views:
-
Candidate monitoring - Efficiently manage and monitor test attempts from all tests on one page. Review candidate recordings and grade them as a proctor.
-
Special accommodations - Handle special accommodation requests for the test, whether responding to existing requests or creating new ones. This can include special accommodations like additional time, screen reading, and others.
-
Special requests - Create and review special requests sent to candidates by the proctor during the test attempt.
-
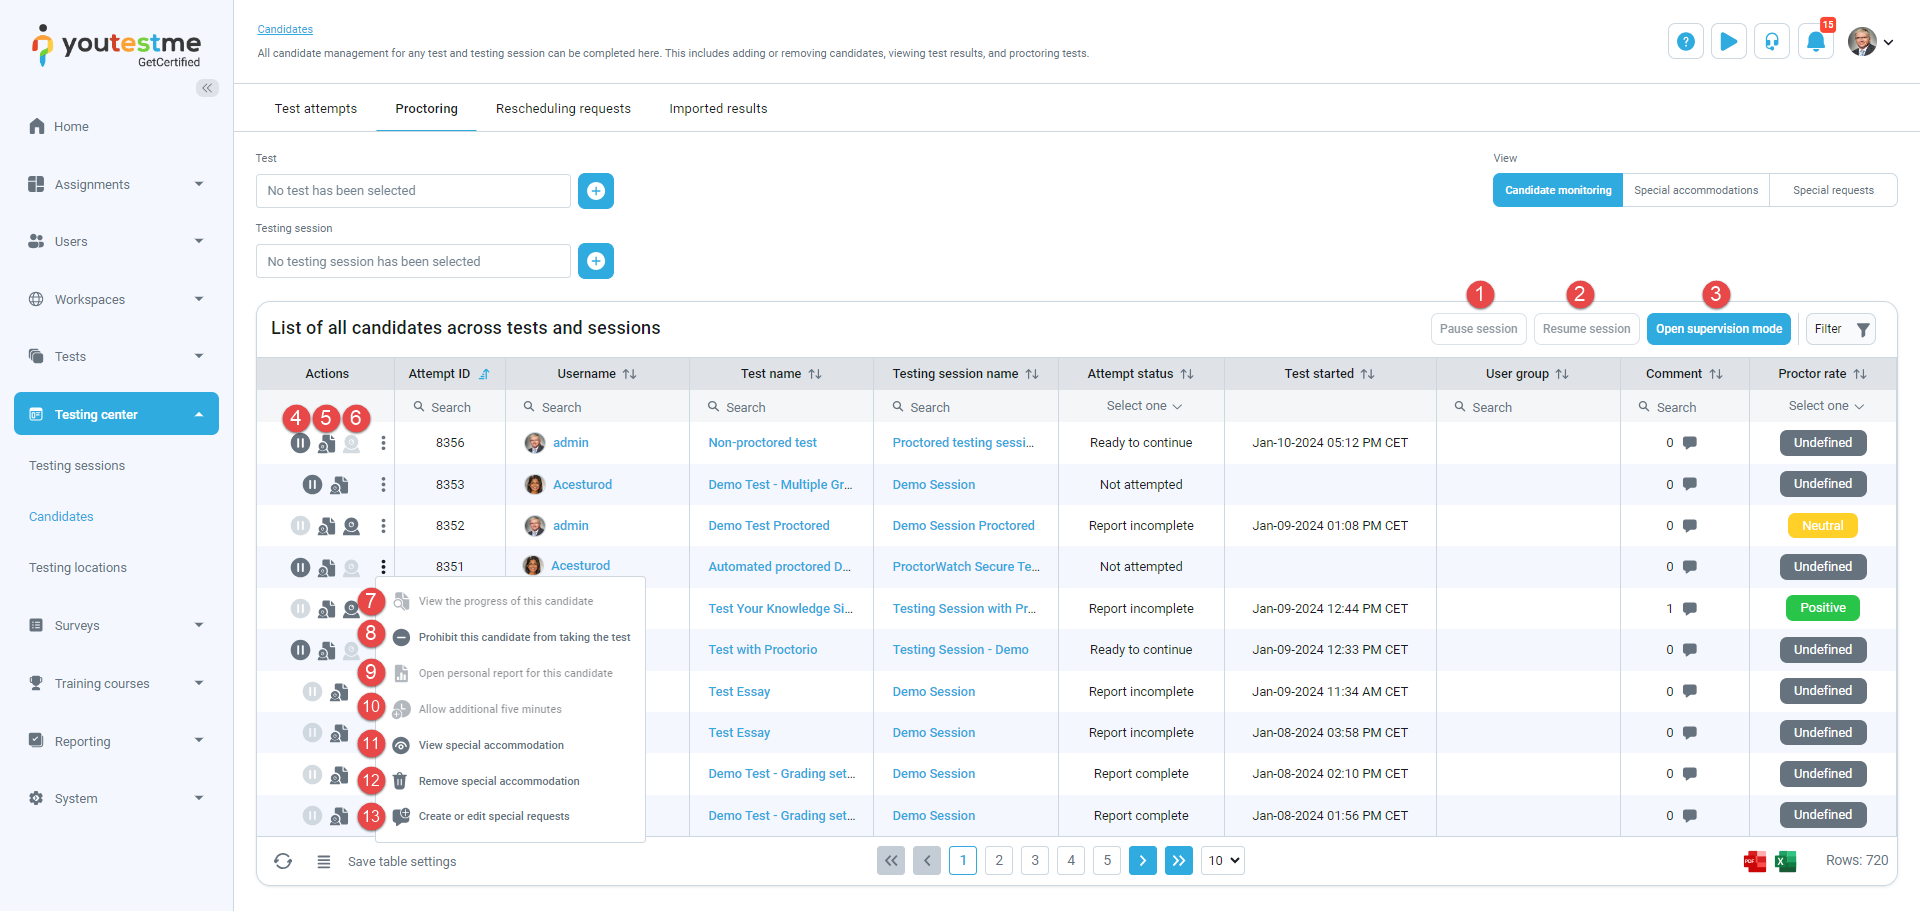
Candidate monitoring
To filter the test attempts you can monitor:
-
Choose the specific test for which you want to see test attempts. Click the plus icon to change the test, and you can remove filters as needed.
-
Select the testing session for which you want to see test attempts. Click the plus icon to change the testing session, and you can remove filters as needed.
-
Attempt start time - Display test attempts started within the selected date range.
-
Show suspended attempts in the table.
-
Show inactive users - Include test attempts of users whose profile is inactive.
Also, you have additional filters under the table header:

In the table, you can:
-
Pause the testing session for all candidates in the testing session. Write a message that will be displayed to candidates when the session is paused. Candidates can initiate the test, but the message will be visible on the screen, and they won't be able to view questions until the testing session is resumed.
-
Resume the testing session if it was paused.
-
Open supervision mode. Enter the proctoring supervision dashboard to monitor proctoring sessions live or review and grade past proctoring sessions.
-
Pause the testing session for a specific candidate. Write a message that will be displayed to the candidate when the session is paused. They can initiate the test, but the message will be visible on the screen, and they won't be able to view questions until the testing session is resumed.
-
Open proctoring report for the candidate. Depending on the test setting (if the Require positive proctoring report option is enabled under Grading configuration), the proctor must grade the candidate's behavior during the test for the attempt to be fully graded. In this case, the proctoring report will impact the final test result. If a candidate passes the test but receives a negative proctor's grade, they will fail the test. The default proctoring grade is Neutral. If a candidate completes the test and the proctor leaves a behavior report with a Neutral grade, a user with higher-level privileges should review the video for potential suspicious behavior. They will then decide whether to categorize the rating as Positive or Negative. The candidate's report remains incomplete until the proctoring report is graded as Positive or Negative.
Note: After the test manager verifies the test attempt, you can no longer make any adjustments to the proctoring report. Changes to the proctoring report are only possible before the test manager verifies the attempt.
-
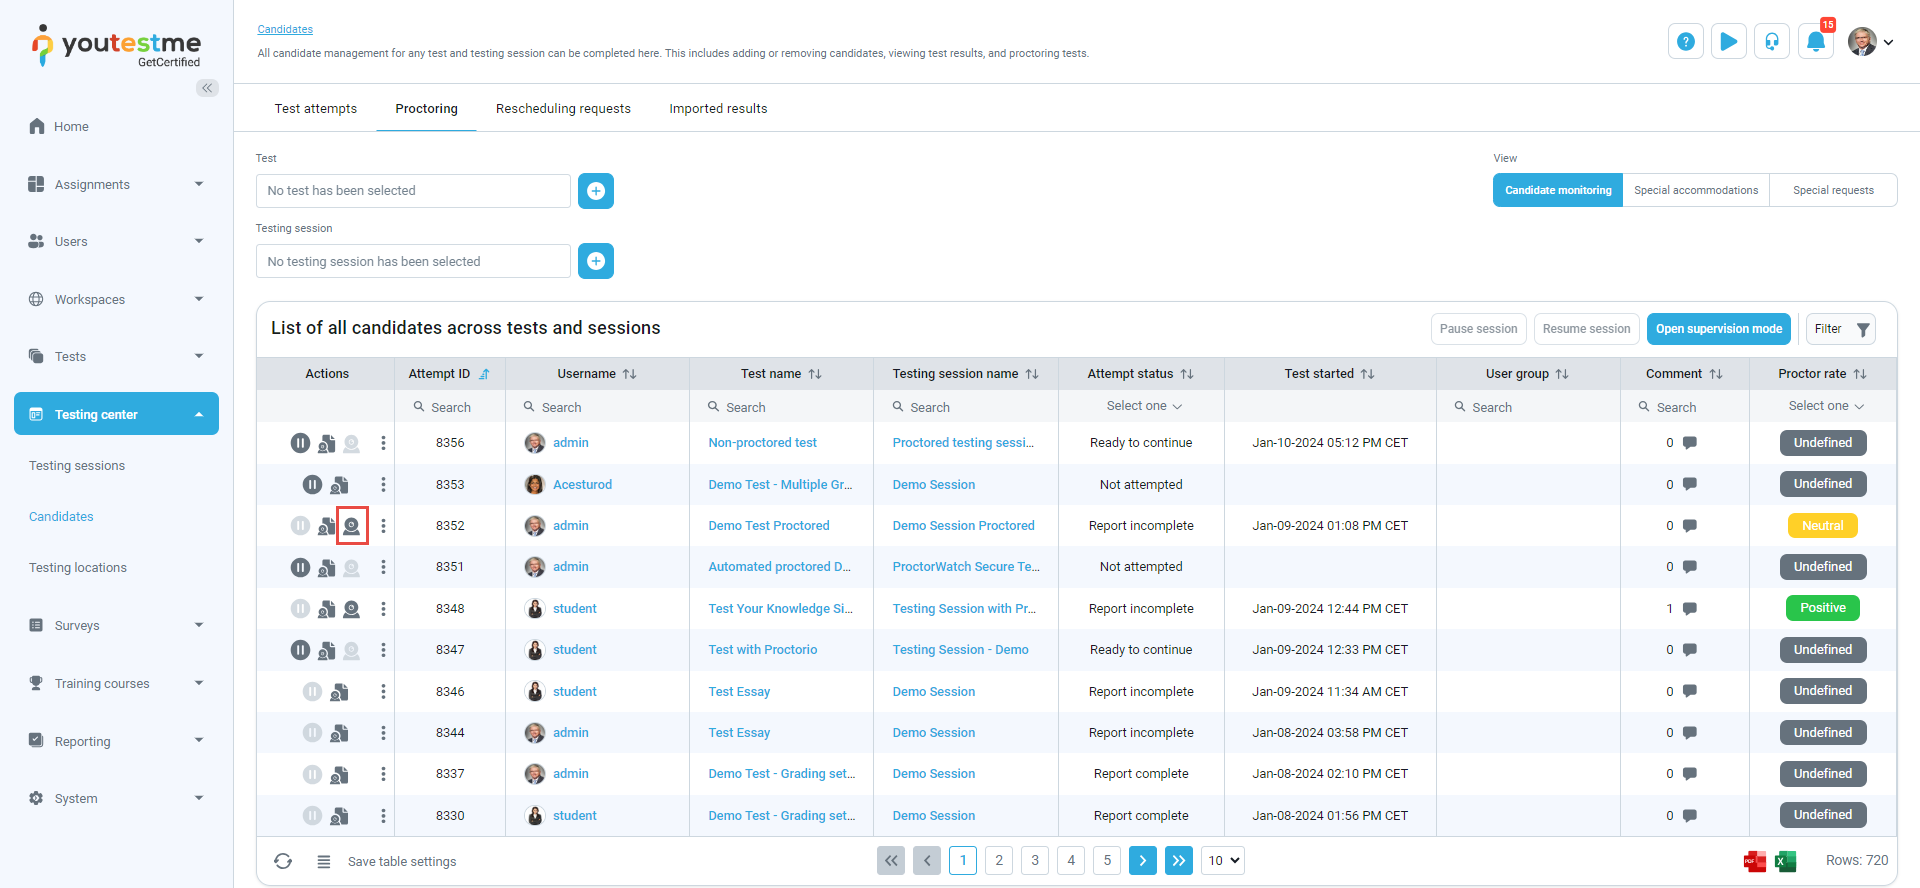
Open video recording for the candidate, allowing proctors to live-monitor candidates during the test and/or view the recording after the test is finished. For more information on grading the proctoring report, refer to the Grading a proctored test chapter.
-
View the progress of the candidate by tracking the event log and the status of each test question. You can see:
Action logs - Displaying all actions with timestamps for the attempt.
Question status - Showing the time a user spent on each question. For tests with multiple sections, you can also view the time spent on each section and the time spent on each question within the section.
-
Prohibit the candidate from taking the test attempt. However, if there are multiple testing sessions in the test, the candidate can book another testing session and take the test. To allow the candidate to take the test again, click the Allow this candidate to take the test option.
-
Open personal report for the candidate.
-
Allow additional five minutes to a candidate in real-time. This option only works if the candidate is currently taking a test. You can use this option an unlimited number of times.
-
View special accommodation for the candidate.
-
Remove special accommodation for the candidate.
-
Create or edit special requests for the candidate.
-
Grading a proctored test
To preview the recording of a test-taking process, click the camera icon, which will take you to the proctoring software.
When accessing the proctoring report, you can:
-
Rate the test attempt. Choose the grade, optionally write a comment to explain the grade, and save your evaluation.
-
Download the PDF report for the candidate.
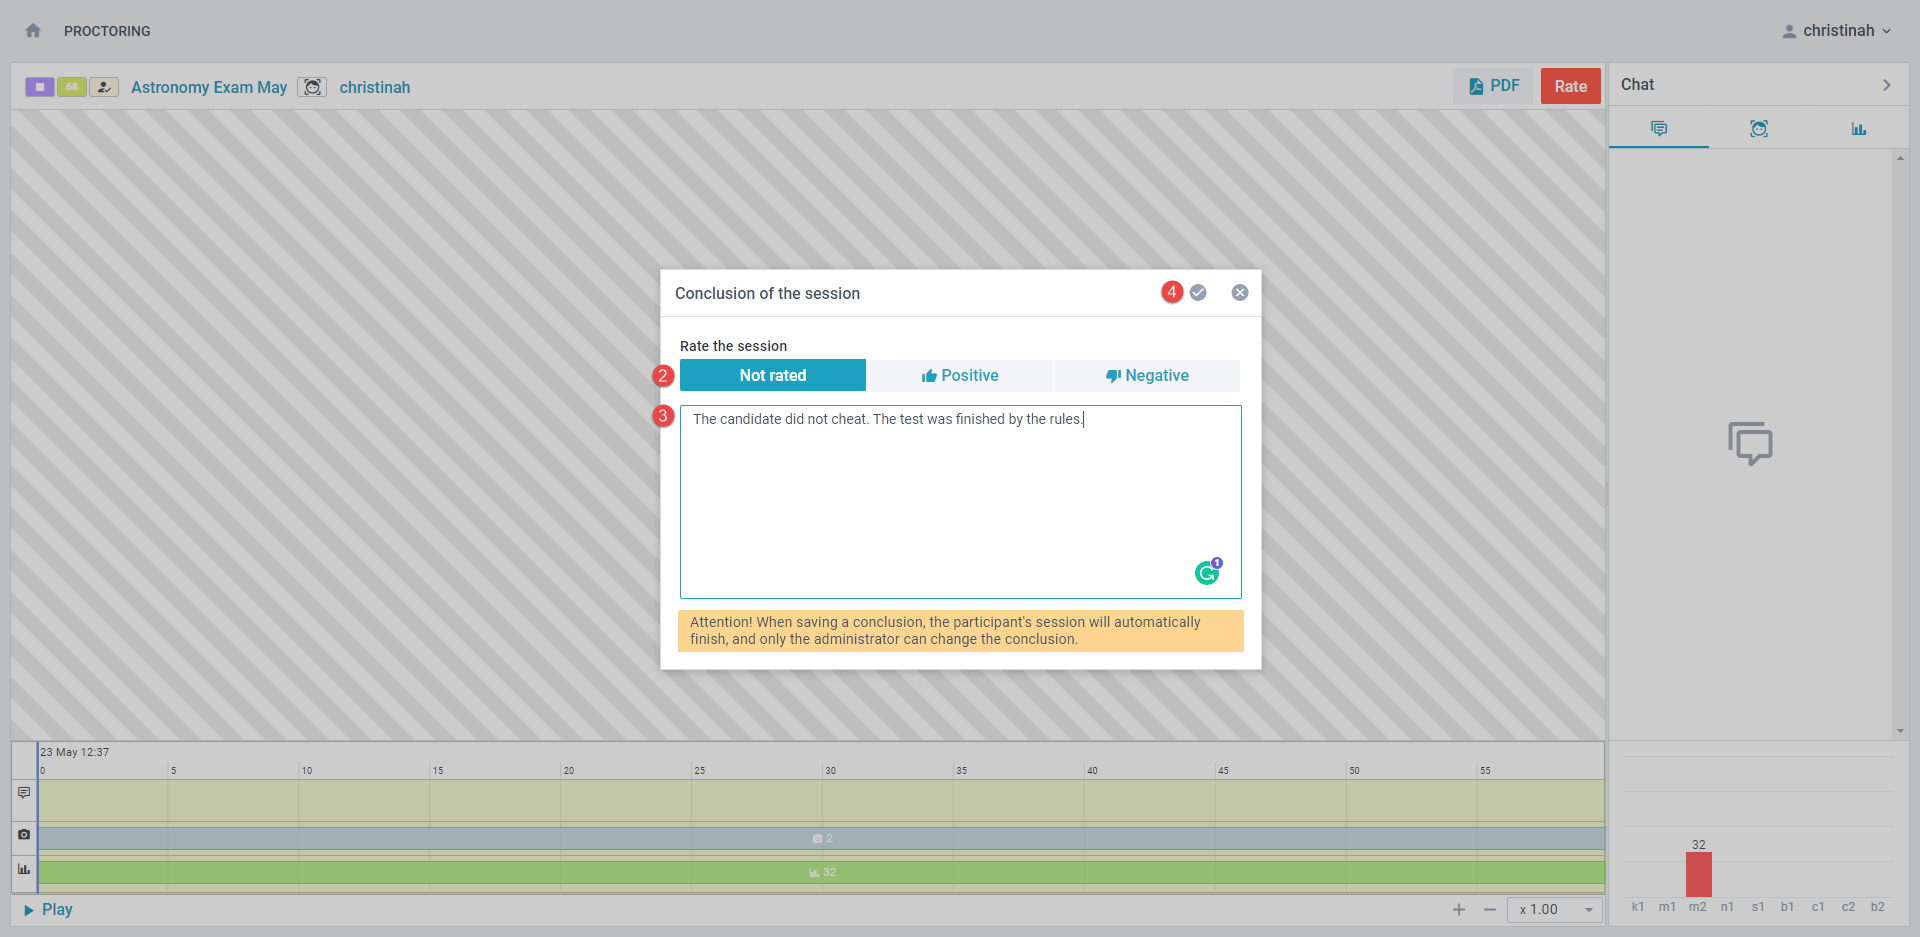
If the test attempt contains multiple recordings, you must grade all of them to resolve the candidate's report. Click the camera icon next to each recording and grade it as explained above.

-
-
-
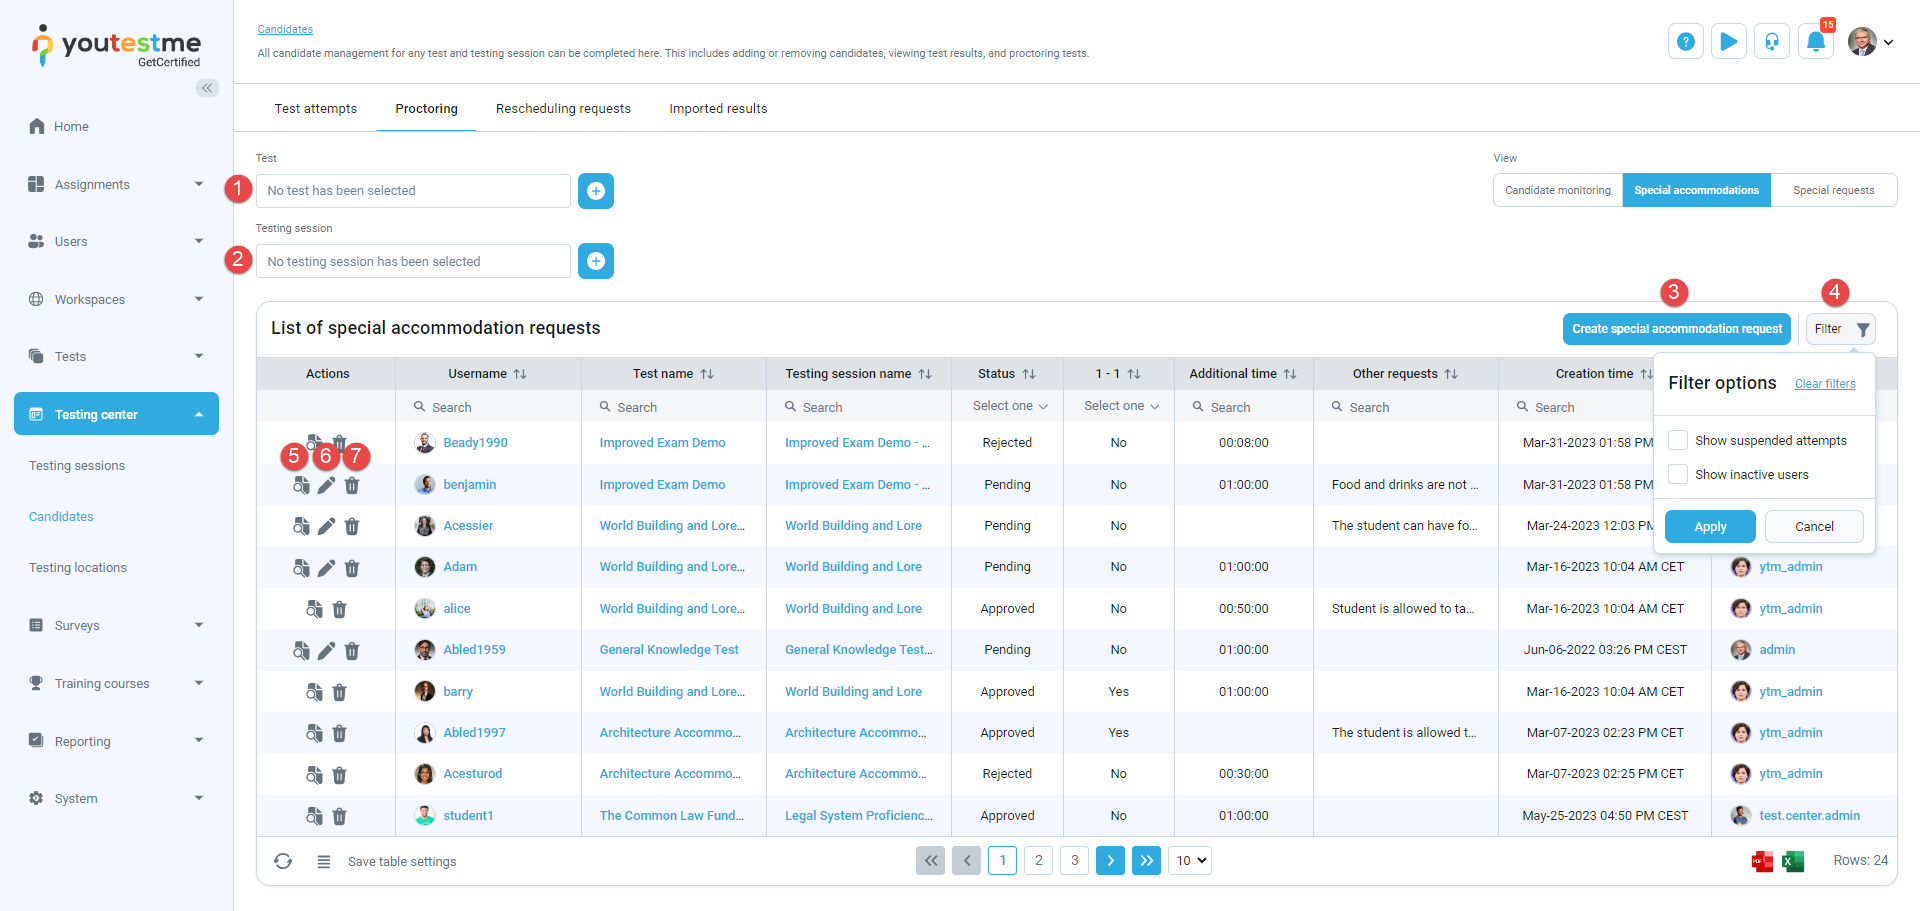
Special accommodations
Special accommodations refer to customized support provided during test-taking for users with unique needs. This can include special accommodations like additional time, screen reading, and others. Special accommodation applies only to the test attempt for which it is created.
Supported types of special accommodations:
-
Time accommodation that can be added if the test has a time limit for the entire test. You can choose one of the following options:
-
Manually defined time.
-
Extra time - Double the amount of the original test time.
-
Extra time - 50% of the original test time.
-
Extra time - 1 hour.
-
-
Other special accommodations - Define other special accommodations in free-form text, such as allowing food and drink during the test.
-
Required to have 1-1 session with a proctor - Allow the candidate to have a separate testing session with a proctor who will monitor the entire test-taking process.
The status of special accommodation can be:
-
Pending - Special accommodation still needs to be resolved.
-
Approved - The proctor has approved the requested special accommodation.
-
Rejected - The proctor has declined the requested special accommodation.
On this page, you can:
-
Choose the specific test for which you want to see special accommodations. Click the plus icon to change the test, and you can remove filters as needed.
-
Select the testing session for which you want to see special accommodations. Click the plus icon to change the testing session, and you can remove filters as needed.
-
Create a new special accommodation request.
-
Filter the table to:
-
Show suspended attempts - Include special accommodations for users whose test attempts are suspended.
-
Show inactive users - Include special accommodations for users whose profiles are inactive.
-
-
Manage special accommodation requests - Approve or reject accommodations and provide an explanation of your decision.
-
Edit special accommodation requests.
-
Remove special accommodations regardless of their status.
A role with the Manage accommodations permission can add new special accommodations, manage, and remove existing ones. A role with the View all accommodations permission can only view already created special accommodations. A role with the Respond to accommodation requests permission can resolve created special accommodations.
-
-
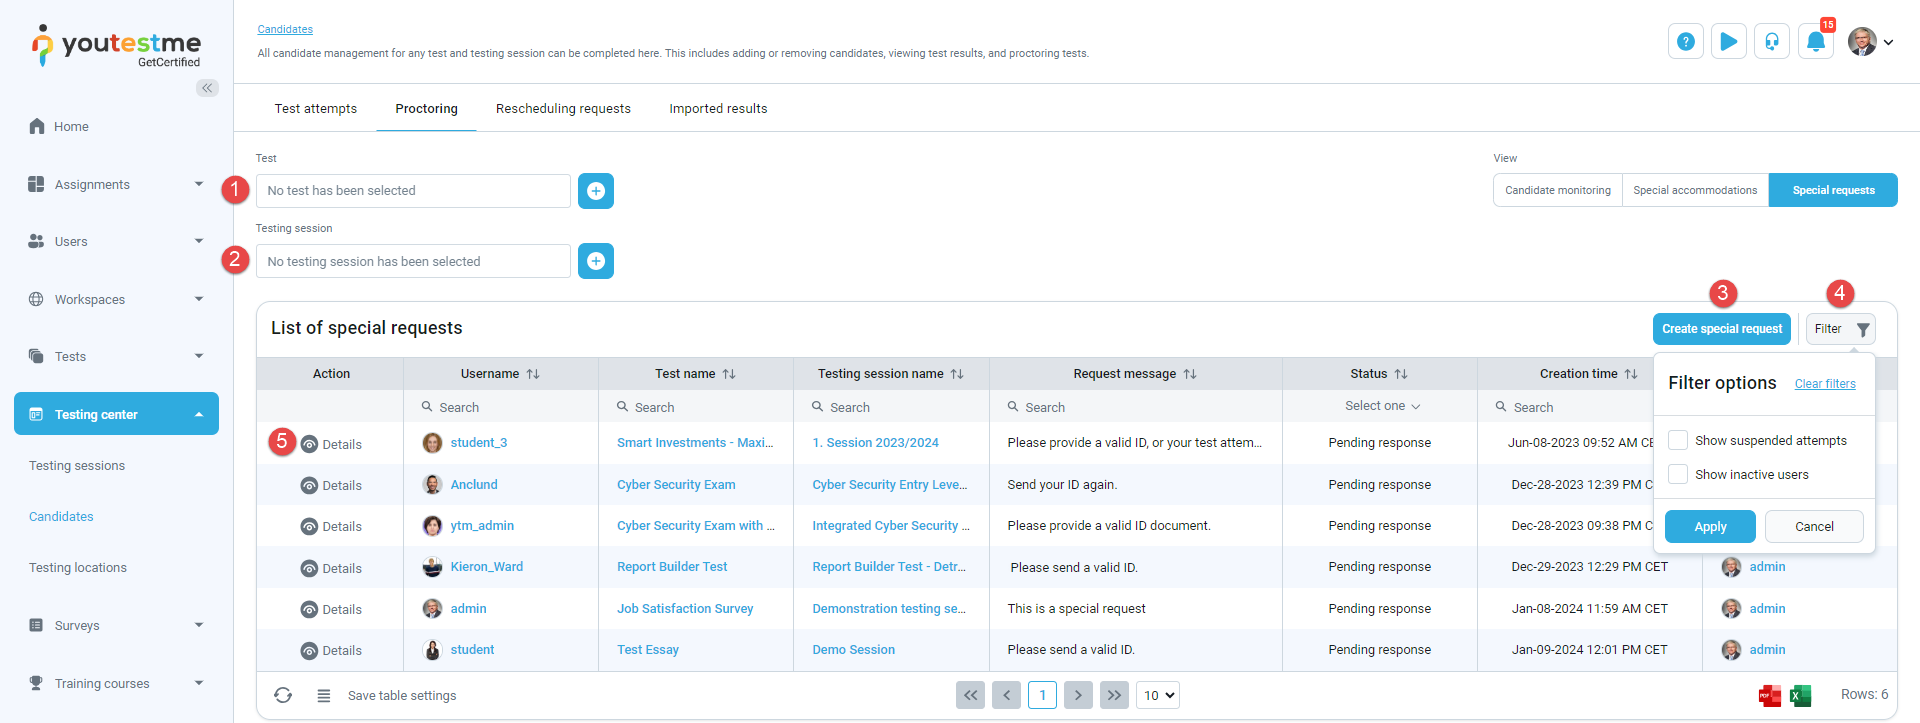
Special requests
Special requests are used to request information or documentation from candidates, either before or after a test. For instance, if a candidate needs to provide an ID before a test, and it's found invalid, the instructor can send a special request for a valid ID to avoid canceling the test attempt.
The status of special request can be:
-
Pending response - Proctor has sent a request to the candidate and is waiting for the candidate's response.
-
Pending review - The candidate has responded to the special request, and the proctor should now review it.
-
Satisfactory - The proctor has reviewed the candidate's response and marked it as satisfactory.
-
Unsatisfactory - The proctor reviewed the candidate's response and marked it as unsatisfactory.
On this page, you can:
-
Choose the specific test for which you want to see special requests. Click the plus icon to change the test, and you can remove filters as needed.
-
Select the testing session for which you want to see special requests. Click the plus icon to change the testing session, and you can remove filters as needed.
-
Create a new special request.
-
Filter the table to:
-
Show suspended attempts - Include special requests for users whose test attempts are suspended.
-
Show inactive users - Include special requests for users whose profiles are inactive.
-
-
View Details of already sent special requests.
-
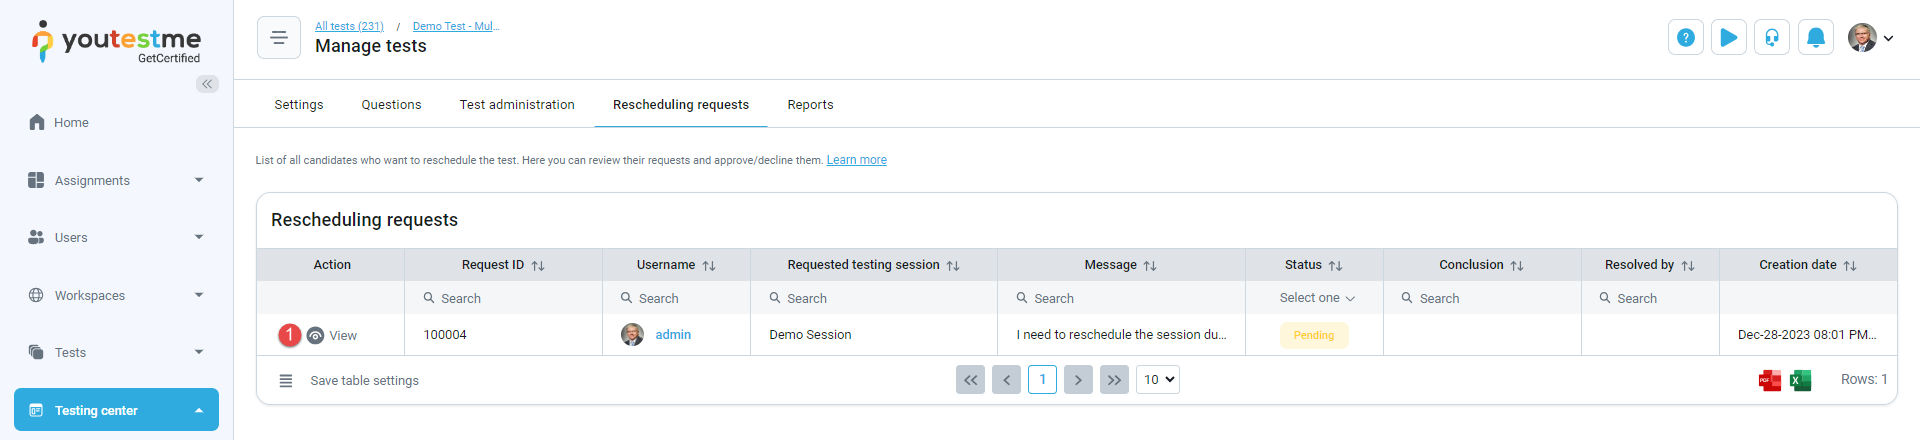
Rescheduling requests
Rescheduling requests enable users to change the testing session they are assigned to for a specific test. Before starting the test, users may choose one of the offered testing sessions if the test allows a certain number of free reschedules. However, if free rescheduling is not allowed, users must submit a rescheduling request, providing a reason and, optionally, proof why they need to change their current testing session. These rescheduling requests are forwarded to test managers for review. Managers can either approve the request, allowing the user to reschedule the desired session, or decline the request.
For more information, please check this article.
On this page, you can:
-
Choose the specific test for which you want to see rescheduling requests. Click the plus icon to change the test, and you can remove filters as needed.
-
Select the testing session for which you want to see rescheduling requests. Click the plus icon to change the testing session, and you can remove filters as needed.
-
Check the current status of rescheduling requests. If the status is Pending, it means the manager hasn't reviewed the request yet.
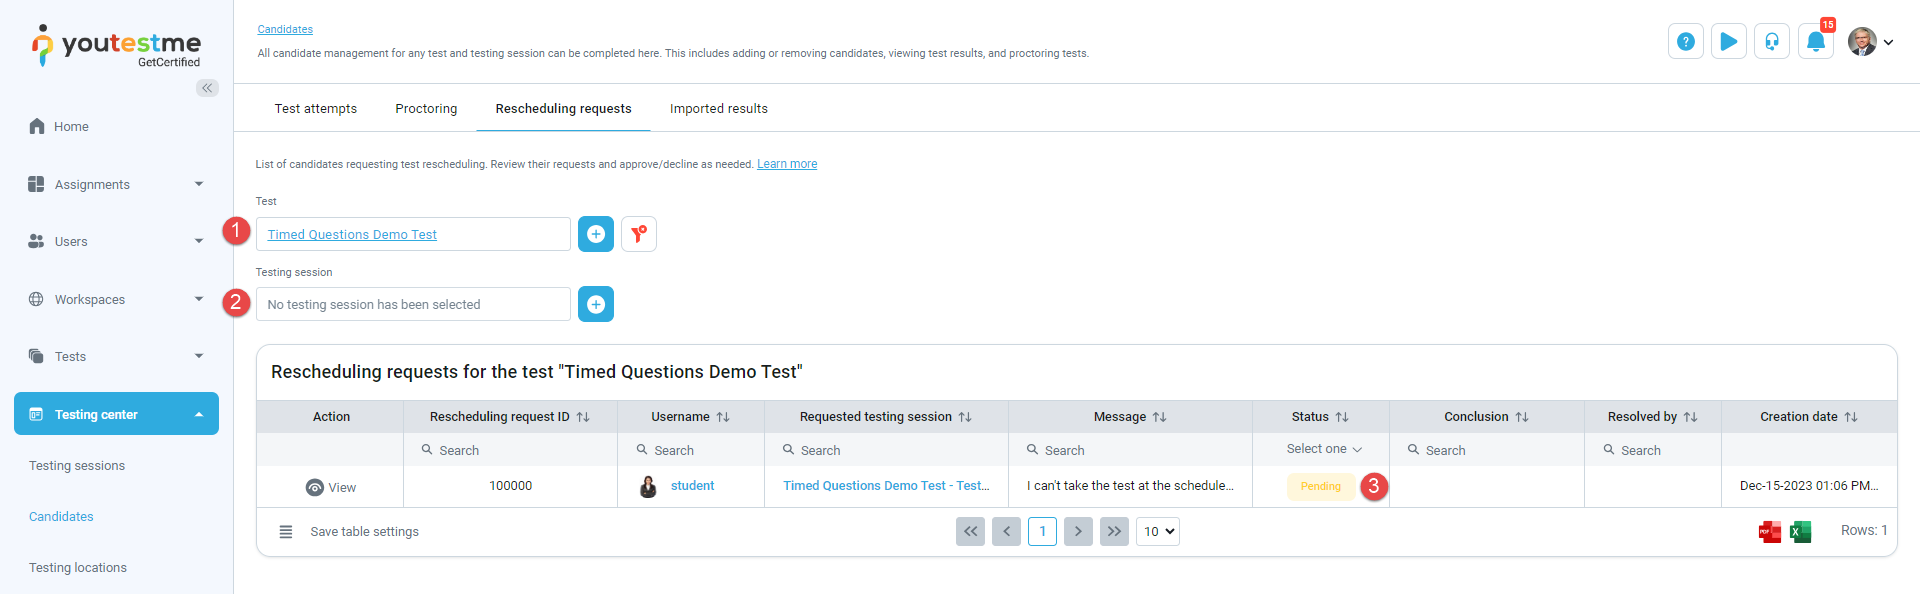
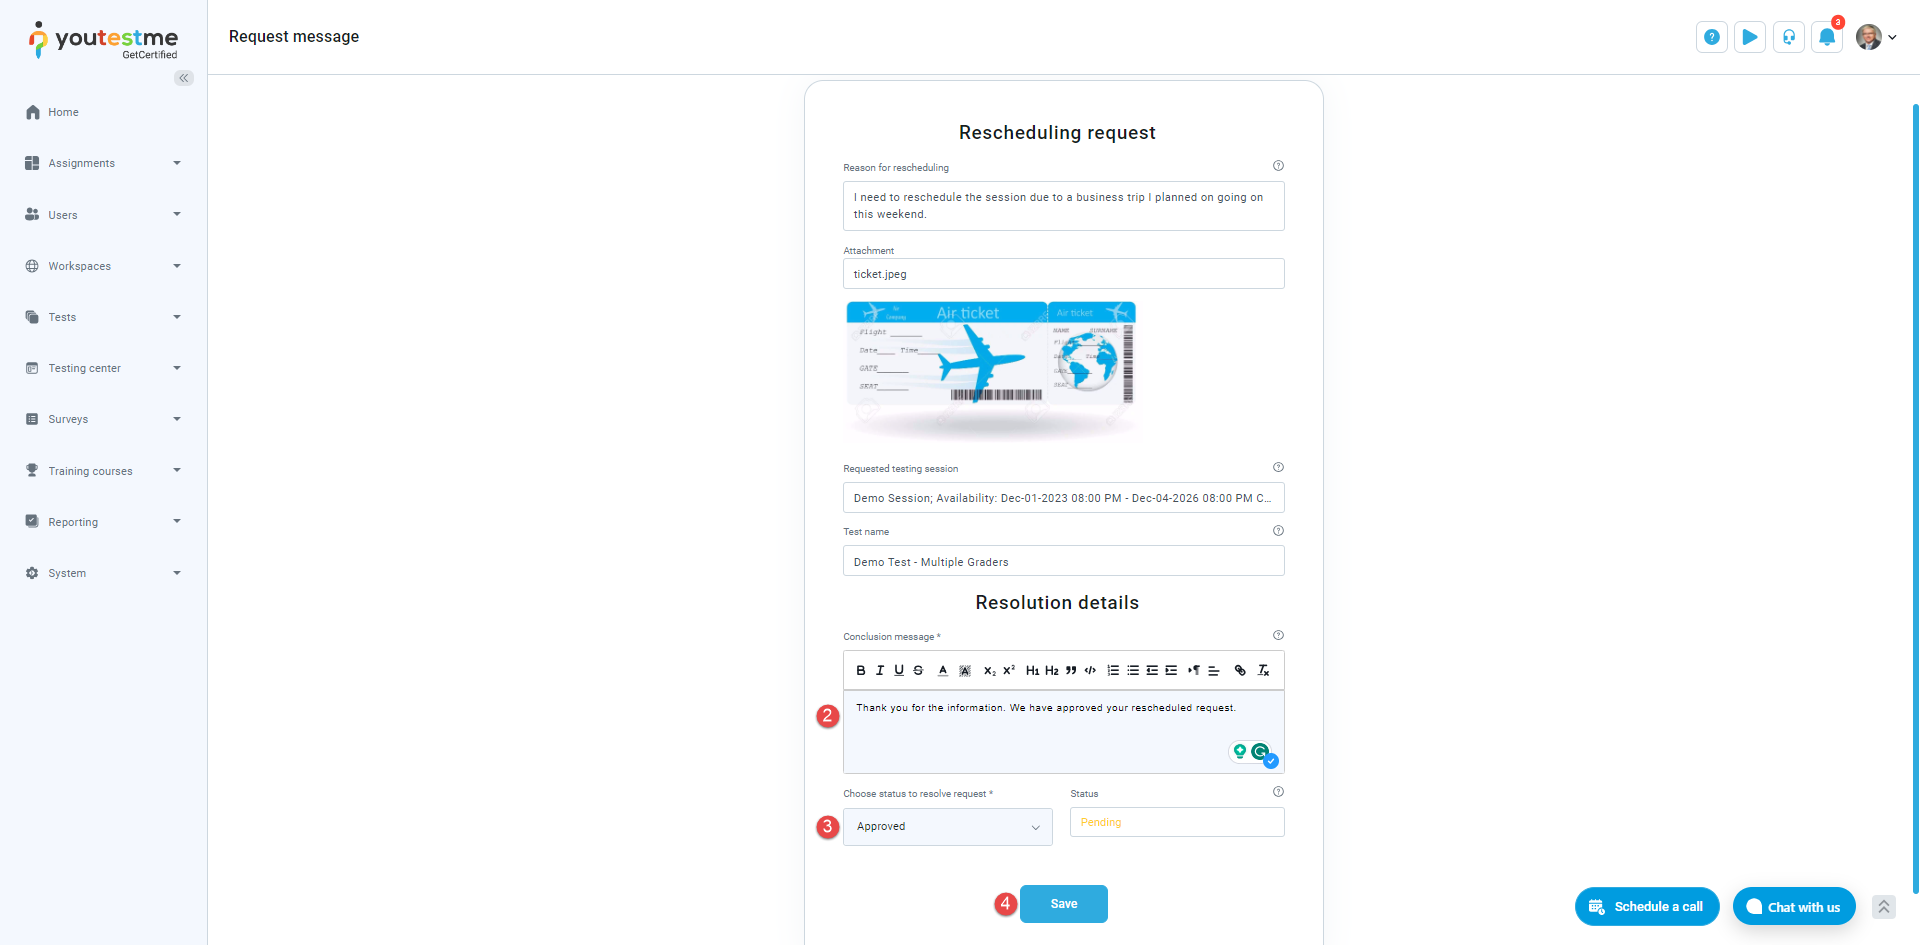
To resolve the rescheduling request:
-
Click the View button.
-
Write a Conclusion message for your response.
-
Choose the status to resolve the request.
-
Click the Save button.
Imported results
Note: This feature is supported only when the test is set with the Pearson VUE testing center and Paper-based delivery preference.
View all staged import batches and process them. Imported batches are initially sorted by creation date, with the most recent one at the top of the table.
In the Actions column column, you can find the following options:
-
Process - Start batch processing. After completion, the candidate's test results will be imported, and the log of the processed batch will be stored.
-
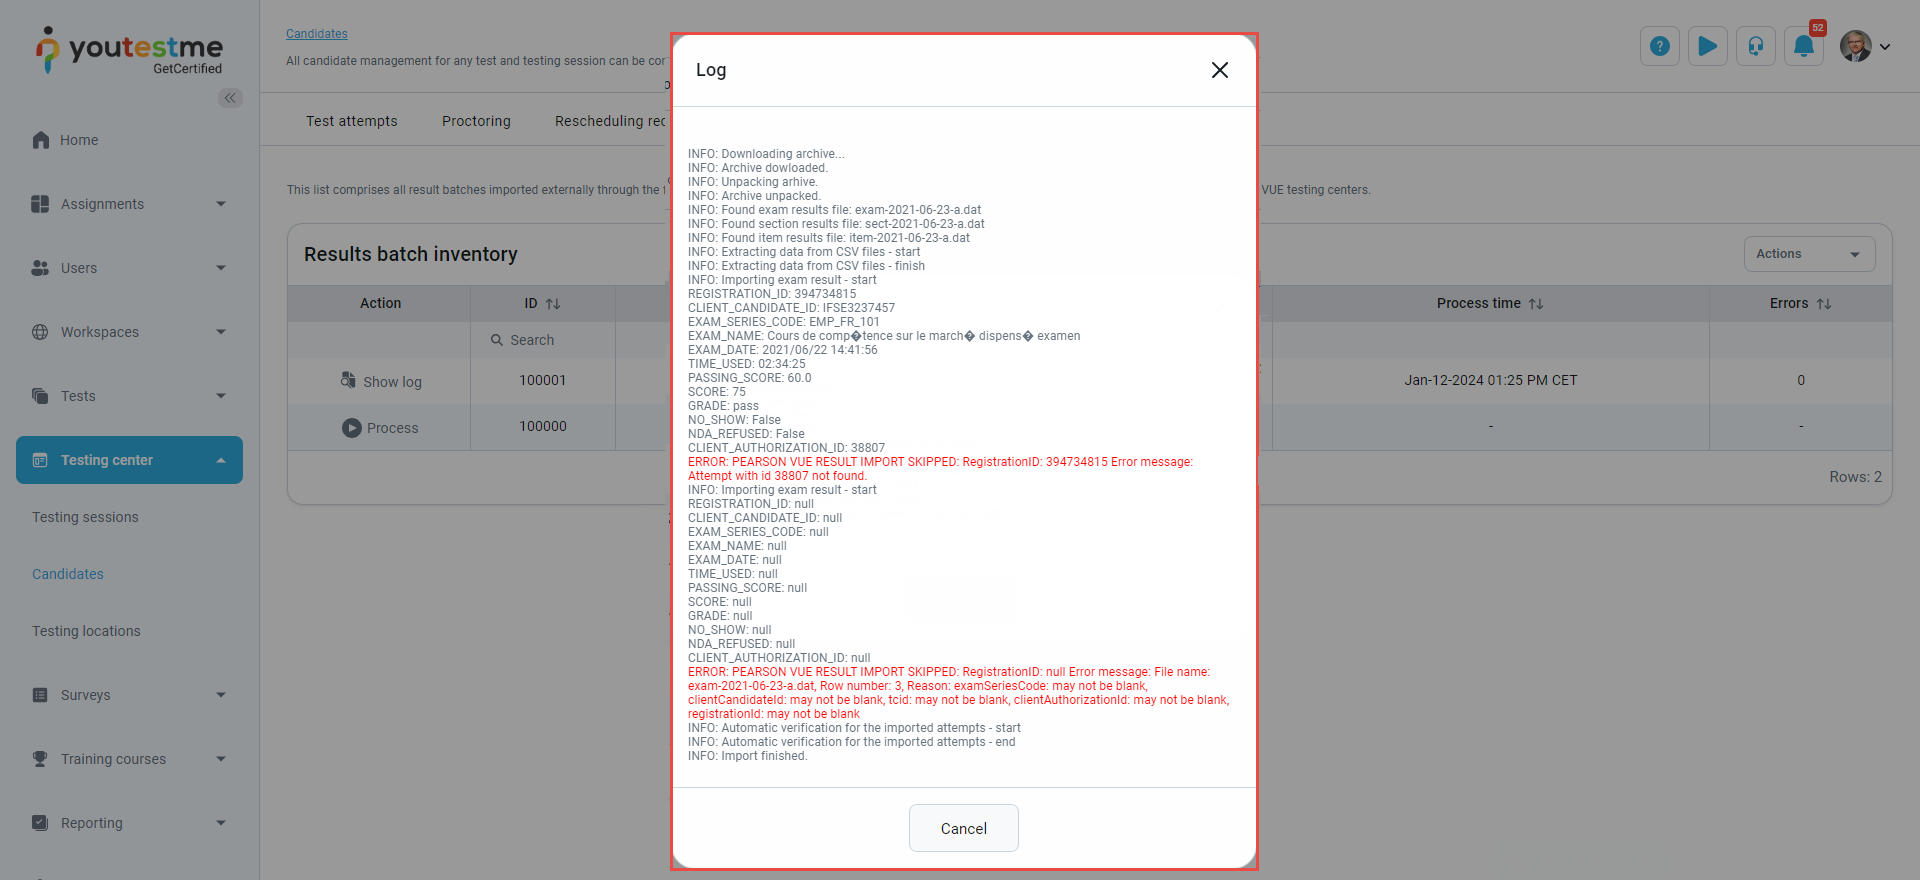
Show log - View the log of the processed batch, containing information about the import process, imported results, skipped results failed during validation, and errors encountered during import and abnormal interruptions.
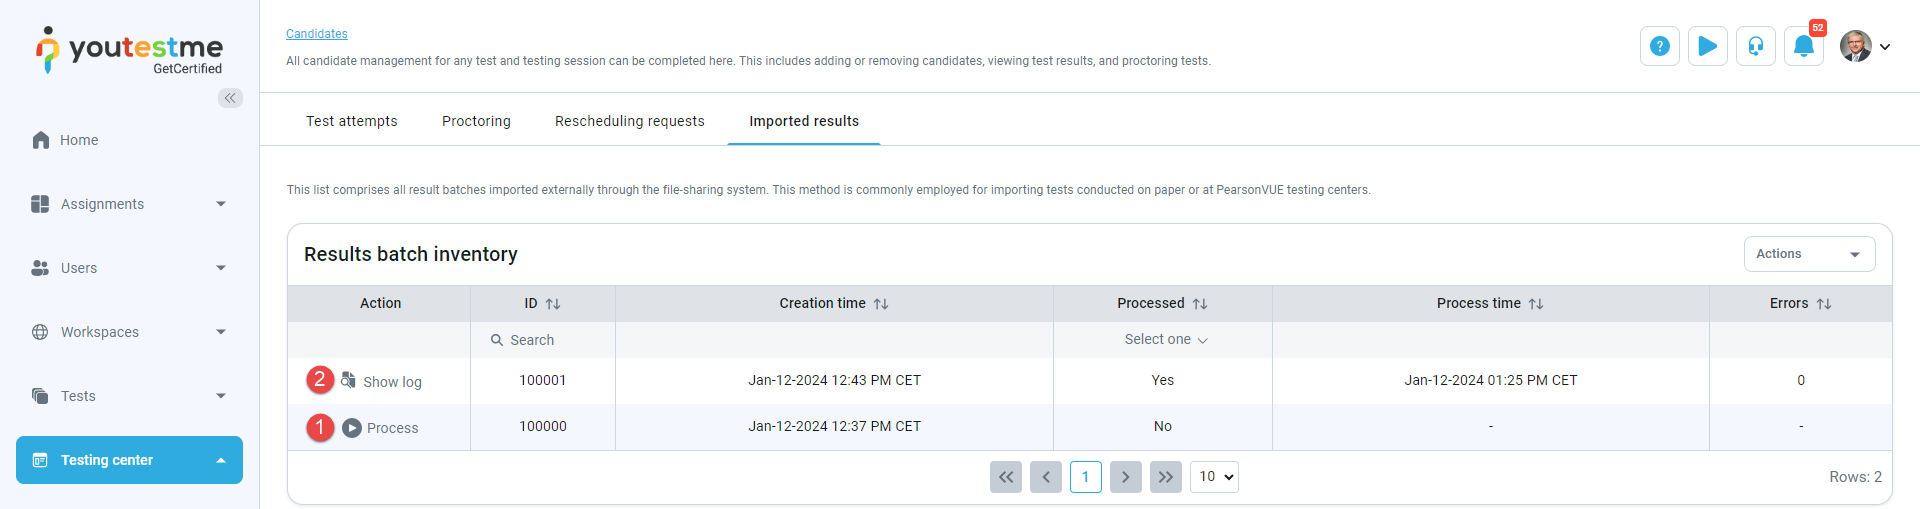
Clicking Show log opens a pop-up window with details about the import process, import results, and errors.
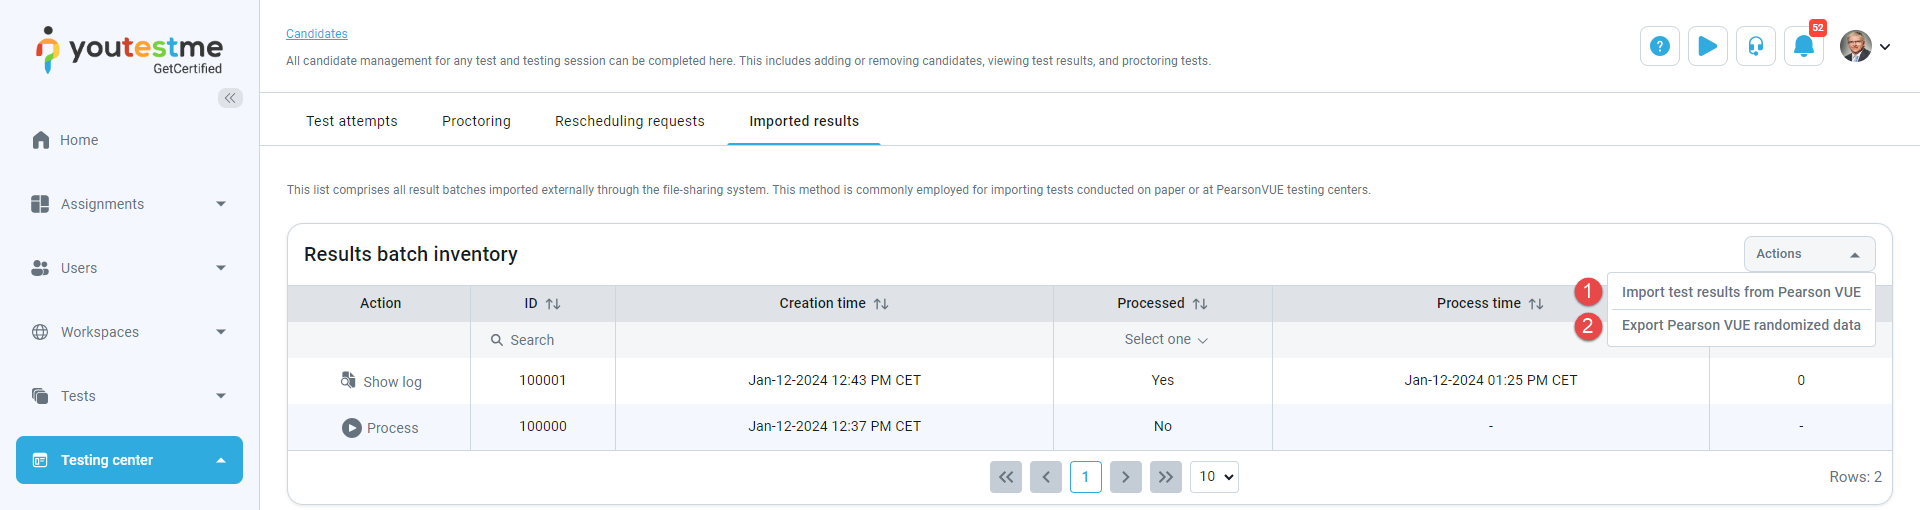
Click the Actions button in the table header to:
-
Import test results from Pearson VUE - Ensure you provide test results, section results, and item results in .csv format. Once the files are uploaded, the results will be displayed in the Test Attempts tab.
-
Export Pearson VUE randomized data to test the import feature. Make sure the selected test has assigned candidates to the testing session. This randomization applies only to candidates who have not taken the test.

-