User manual
New test
-
Introduction
Tests are assessments designed to evaluate a user's knowledge, understanding, or proficiency in a specific area. A testing session needs to be created for the test to be accessible to candidates. Additionally, only users with the appropriate permission, Create test, survey, or training, can create tests. These tests can be customized with different settings, question generation methods, grading configurations, and more. They may be created either with or without sections.
Test with sections are an assessment type with divided test sections, each focusing on specific topics, skills, or question categories. Each section can have its own settings and passing marks.
To create a new test, you can access the New test page by clicking the corresponding button on the Tests/Manage tests page. A test creation wizard will guide you through the process step-by-step.

-
Test creation process
The process of creating a test, whether with or without sections, is similar. However, for tests with sections, specific settings need to be defined for each section individually because certain settings may be enabled on one section while you may want to disable them on another. Additionally, some settings can only be defined on tests with sections. Further information about each setting can be found in the text below.
-
Test without sections
-
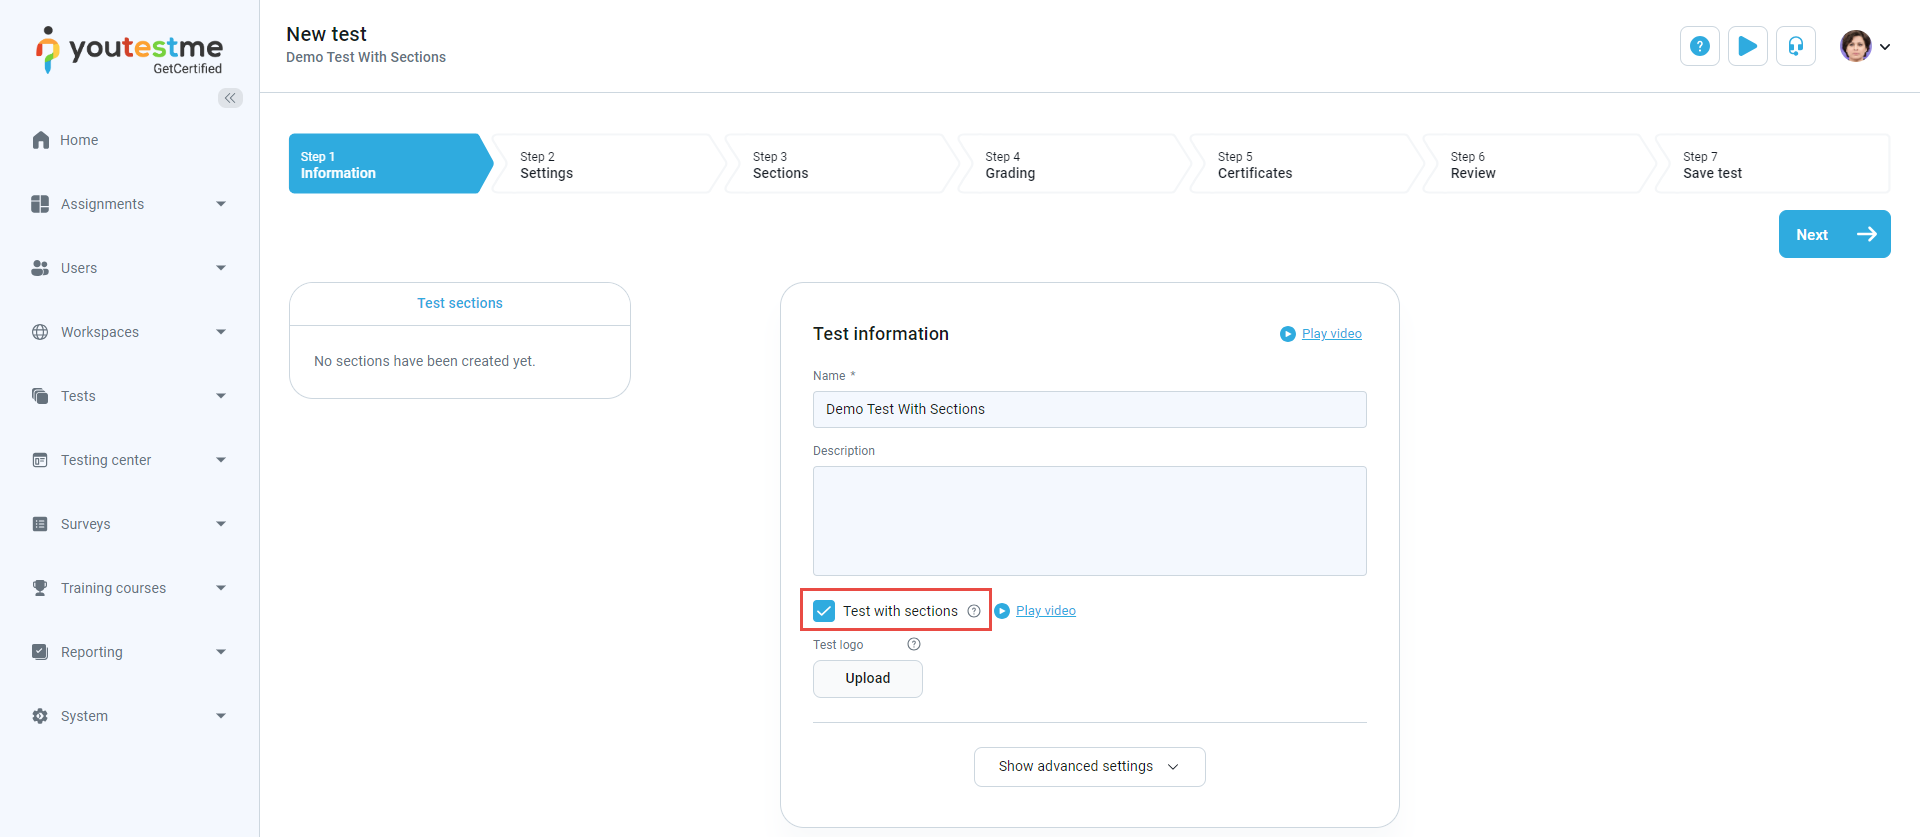
Test information
In this step, you can:
-
Enter the Name of the test.
-
Enter a test description to provide additional information about the purpose or content of the test.
-
To create a tests with sections, check the box Test with sections.
-
Upload or remove the custom test logo, which will appear on the candidate's My tests page.
-
Click the Show advanced settings to preview and modify the advanced test settings.

Additional settings and actions you may take are:
-
Add Test attachments containing instructions or useful materials in various formats.
-
Add a descriptive Label.
-
Choose a test category. If there are multiple types of categories, you should choose the Test category type first. It is possible to create new types or add new categories to the predefined ones under System/Settings and customization/Custom properties/Test categories. If there is only one test category type, only the Test category field will be visible.

-
-
Test settings
The Settings step contains the following options for configuring your test:
-
Use test template - When creating a test, you can save its settings and question pool as templates. You can use one of the previously created test templates by choosing it from the drop-down menu, and all saved test configurations will be automatically applied.
-
Duration type - Specify the type of time limit for completing the test.
-
Page format - Select whether all questions will be displayed on one page, or one question per each page.
-
Show report - Select when the report will be displayed to candidates.
-
Define Report content.
-
Select workspace - Add the test to your chosen workspace, and access will be limited to users within that specific workspace.
-
Enable proctoring.
By clicking on the Show advanced options button, additional test configurations will appear.

Advanced options are:
-
Enter test instructions.
-
Click the preview icon to see test instructions and the dialog that appears to candidates when starting the test.
-
Change the Acknowledgment text.
-
Note: This option can not be combined with the Enable browser lockdown option.
-
Enable "I don't know" option. View how it looks from the candidate's perspective on this link.
-
Enable answer feedback to candidates. View how it looks from the candidate's perspective on this link.
-
Show question attachments. View how it looks from the candidate's perspective on this link.
-
Enable notes. View how it looks from the candidate's perspective on this link.
-
Enable candidates' feedback on questions. View how it looks from the candidate's perspective on this link.
-
Require answering all questions. View how it looks from the candidate's perspective on this link.
-
Require updating user profile. View how it looks from the candidate's perspective on this link.

Click the Next button to proceed to the next step of test creation.
-
-
Methods for adding questions
You can choose between the following methods for adding questions to your test:
-
Let the generator select questions. There are two ways to generate tests:

-
Pick questions from pools or create them on the spot
On this step, you can create questions manually one by one or add existing ones from question pools. You can also combine these two options.
To create a question one by one:
-
Click the Add new question button.
-
Select the type of question you want to create. Fill in all necessary fields and add the question to the test. Detailed instructions for creating each question type can be found on the Question types help page.

To add questions to a test from an existing question pool:
-
Select the Import from pools option.
-
Select the question pool from which you want to import questions.

-
Preview each question.
-
Add a single question to the question pool.
-
Import all questions from the selected question pool.
-
Import selected question(s) from the question pool.
-
Change the question pool and repeat steps to add more questions. All questions assigned from the previously selected question pool remain in the test.

Once you choose a question pool, you can:
Once you have created and/or imported questions, you can define the following options:
-
Randomize question order - Each user will get questions in a different order. The report always has the same order of questions as when creating the test.
-
Randomize answer order - Each user will get a different answer order for the same question.

The following rules apply to a manually created test:
-
Answers of Ordering and Matching question types are always randomized.
-
Answers of Essay, True/false, Matrix, Open-ended, and Hot Spot questions always have the same answer order, which cannot be changed.
-
Multiple-choice and Single-choice questions always have the same answer order by default but can be randomized by enabling the Randomize answer order option.
-
Both options are disabled when the page format is set to All questions on one page.
On this step, you can also:
-
Change order of questions.
-
Edit specific question.
-
Remove specific question from question version.
-
Add more test versions - You can manually create as many test versions as you want. Test versions will be randomly assigned to candidates, or you can manually assign test versions when assigning candidates to a testing session.
-
Select the Current test version you want to edit.
-
Rename the test version.
-
Delete the test version.

-
-
Upload test from Excel
You can quickly upload as many questions as needed using our predefined template.
-
Click the Upload test button.
-
Download the Excel template.
-
Download the detailed instructions on how to enter the data into the template.
-
Once you fill in the template, click the Select file button to add the Excel file.
-
Click the Upload button.
Note: After uploading, you can additionally edit the questions and settings.

-
-
Test generator based on question difficulties
If you choose this test creation method, the system will generate test versions based on the difficulties assigned to questions.
To define generation settings, you can:
-
Enable Allow different points in test versions option. By default, branching questions and questions with the scoring method By answer weight are not included when generating test versions. Enabling this option includes them in test versions. Additionally, it allows the point and penalty of each question to be pulled from the configuration of the question itself instead of being uniform for all questions.
-
Click the Select question pool button.
-
Select the question pool.
-
Specify the number of easy, medium, and hard questions to be included in the test version.
Refer to Question pools help page for instructions on adding new questions to the question pool.
-
Click to View list of possible questions button if needed.
-
Click the Save button.

-
Add as many question pools as you want, by clicking the Add question pool button and repeating the steps above.
-
Include the frequency factor when generating test versions. The system will take into account the frequency factor defined for each question and determine how often it will appear in the test versions.
-
Edit the number of questions that will be used from each question pool.
-
Remove a question pool if it's not needed for generating test versions.
Also, on this step you can:

The next step is the Generator, and here you can:
-
Define the number of test versions to be created. Choose between unlimited dynamically generated versions or specify a limited number of versions.
-
Create this test as a Practice test, enabling candidates to specify the number of questions from each question pool the test will contain.
-
Set the number of points for the correct answer per difficulty level.
-
Set the number of negative points for the incorrect answer per difficulty level.

-
-
Test generator based on question categories
If you choose this test creation method, the system will generate test versions based on the question categories assigned to questions. It's essential that categories are assigned to the questions in the pool beforehand. For more information on creating question categories, assigning them to the questions and defining generation rules, refer to this article.
You can use this generation method even if you do not use question categories. Simply define the number of questions from the question pool you want to use to generate test versions. This allows you to easily generate versions regardless of question difficulties and categories. More information you will find below.
On this step, you can:
-
Enable Allow different points in test versions option. By default, branching questions and questions with the scoring method By answer weight are not included when generating test versions. Enabling this option includes them in test versions. Additionally, it allows the point and penalty of each question to be pulled from the configuration of the question itself instead of being uniform for all questions.
-
Include the frequency factor when generating test versions. The system will take into account the frequency factor defined for each question and determine how often it will appear in the test versions.
-
Define a New rule for test versions generation.

When you click the New rule button, a dialog will appear where you should:
-
Select the question pool.
-
Define the number of questions from the question pool you want to be contained in the test versions.
-
Select the Include all questions from question pool option if you want to include all questions from the question pool instead of inserting the number of questions manually. Note that if the number of questions in the question pool that meet the defined conditions changes, the number of questions included in the test version will also change.
-
Define the number of points that will be earned for correct answers to the questions.
-
Define the number of penalties that will be earned for incorrect answers to the questions.
-
Click the Add new condition button. One rule may have multiple conditions.
-
Select the desired question category from the dropdown menu.
-
Select the desired values of the question category, which will be used for filtering in the process of test version generation.
-
Click the Select button.
If you want to add more conditions for test generation, you can repeat the steps above.
-
Click the Change button if you want to edit a defined condition.
-
Click the Delete button if you want to remove a defined condition.
-
Click the Confirm button to create the test rule.

Note: In the Summary field, you can see a set of rules for generating test versions. If you have multiple conditions, the AND rule applies between them.
If you have selected multiple values for the question category, the OR rule applies between them.
If there are multiple rules, then the test version will contain a defined number of questions from each rule, according to the set conditions.
To define more test rules, you can repeat the steps above. Also, you can Edit the rule, or Delete it.
Once you have configured all the rules, click the Next button to proceed to the next step.

The next step is the Generator, and here you can:
-
Define the number of test versions to be created. Choose between unlimited dynamically generated versions or specify a limited number of versions.
-
If there are a limited number of test versions, you can enable the Randomize question order option.
-
If there are a limited number of test versions, you can enable the Randomize answer order option.
-
If there are an unlimited number of test versions, you can create this test as a Practice test, enabling candidates to specify the number of questions from each question pool the test will contain.

-
-
Grading test
On this step, you can define the passing criteria for your test. Use advanced grading configurations if needed, such as defining passing marks for each section, group of sections, etc. Optionally, select a grading scale you previously created to represent the test results as grades, e.g., from A to F.
For more information on configuring each grading setting, refer to the Grading configuration help page.
-
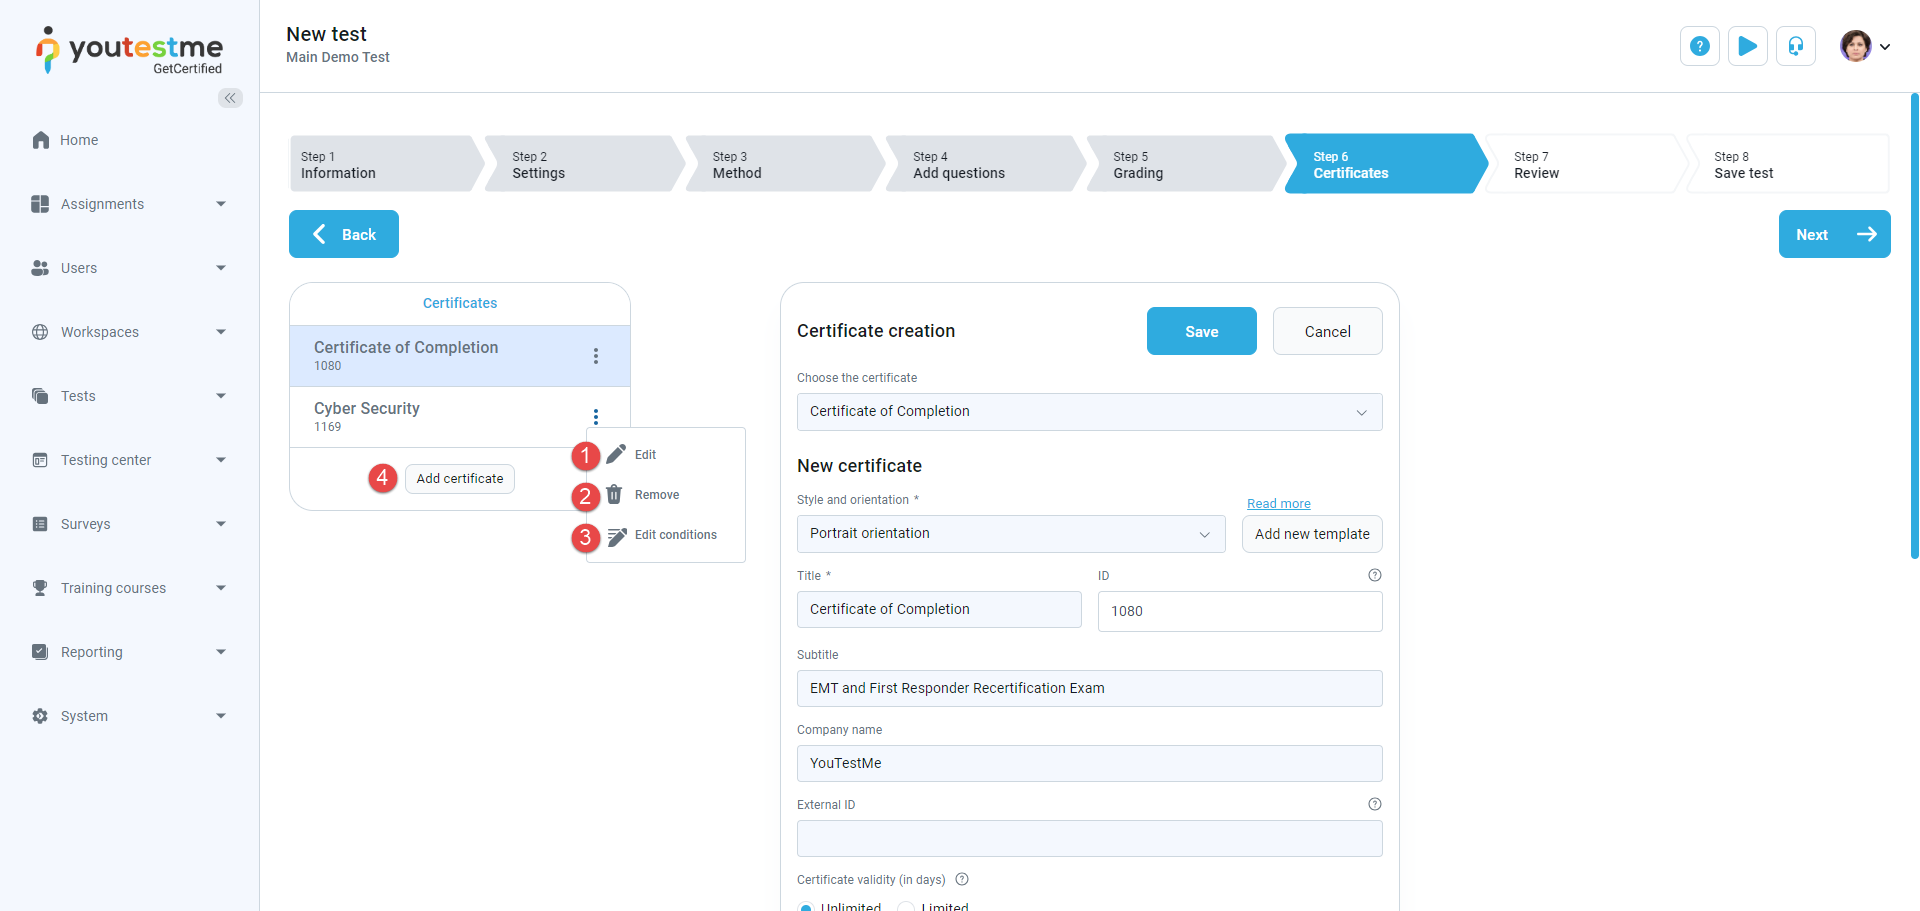
Certificates
On this step, you can include certificates that will be awarded to candidates upon passing or meeting specifically defined completion conditions. Candidates have the option to download the certificate in PDF format, as an image, or share it via a link. To add an certificate to the test, click the Add certificate button, or Next button to move on with test creation without adding certificates.

-
You can Choose the certificate from the list of existing certificates and add it to the test. Optionally, you can modify it before adding it to the test by using the fields below.
-
Alternatively, you can create a New certificate by configuring all the fields. For more information about each field, refer to the Manage certificates help page.
Note: Click the Preview button to check what the certificate looks like. Be sure to click the Save button to add the certificate before clicking Next.

Additionally, options that you can customize only during the creation process (and cannot be defined on the Manage certificates page) include:
-
Display title - Choose whether to display title on certificate.
-
Display test name - Choose whether to display the test name on the certificate.
-
Display score - Choose whether to display the achieved score on the test in the certificate.
-
Display date of issue - Choose whether to display the date when the certificate is granted.
-
Display expiration date - Choose whether to display the date when the certificate expires.
-
Display unique ID - Choose whether to display the certificate's unique identification in the certificate.
-
Display default logos - Choose whether to display the logo in the certificate if the other is not uploaded.

If you add multiple certificates to the test, you can manage them from the left side panel with the following actions:
-
Edit - Open the selected certificate in the panel for editing.
-
Remove - Delete the selected certificate from the test.
-
Edit condition - Change the condition in which the certificate will be granted to the user.
-
Add certificate - Add a new certificate to the test.
-
-
Review test
The Review step includes:
-
Summary of the test settings.
-
List of all question pools that are included in the test.
After you have checked everything, you can click the Next button to continue with the test creation process. You can return to any test creation step if you want to make changes to the test.

-
-
Save test
This is the last step in the Test creation wizard where you can:
-
Save and publish the test by clicking the Finish wizard button. To make the test available to candidates, you need to schedule testing sessions.
-
Save the test settings and question pool configuration as a test template for later use.

To save your test settings as a template:
-
Enter the name of the template.
-
Add a description, e.g., provide additional information about template configuration, included settings, etc.
-
Set the Privacy of the template. A Public test template is available to all users with the adequate permissions, while a Private test template is available only to the user who has created it.
-
Click the Save button.

-
Click the Next button to proceed to the next step of test creation.
-
-
Test with sections
Information on all settings defined specifically for sections can be found below.
-
Test information
To start creating a test with sections, check the Test with sections checkbox.
For more information about other fields you can define, refer to the Test information help page.
-
Test settings
Refer to the Test settings chapter for detailed information about each field.
-
Sections
To start adding sections, click the Add section button.

-
Section information
For more information on filling out Section information fields, refer to the Test information chapter. The purpose of these settings is similar, with the main difference being that you define settings for each section specifically rather than for the entire test.
-
Section settings
For more information about each Section setting, refer to the Test settings chapter.
An additional option you can enable only on the section level is Enable revisiting section. -
Method (sections)
The methods used for adding questions to the sections are the same as those for tests without sections. Please consult the Method chapter.
-
Add questions (sections)
Adding questions is done in the same way as for tests without sections. Please refer to the Add questions chapter.
-
Review (sections)
Reviewing sections is identical to reviewing tests without sections. Please refer to the Review test chapter.
-
Save (sections)
In this step, you can choose to:
-
Add new sections by clicking the Add another section button.
-
Save the section and continue with the other steps in the Test creation wizard.

-
-
Grading (test with sections)
For more information on configuring each grading setting, refer to the Grading configuration help page.
-
Certificates (test with sections)
For details about each field in the certificate settings, consult the Certificates chapter.
-
Review (test with sections)
Reviewing a test with sections is done in the same way as for tests without sections. Please visit the Review test chapter.
-
Save (test with sections)
Saving a test with sections is done the same way as for tests without sections. Please visit the Save test chapter.
-

-