User manual
Settings and customization
-
Introduction
Access the page by navigating to the System section in the main menu and then selecting Settings and customization. Customize your testing experience by configuring parameters to adapt the application to your specific requirements.
Options include setting up the mail server and notifications, specifying language preferences, branding the application, and more. For detailed information on each setting, refer to the content below.
Multiple setting sections are available:

-
System preferences
-
Date and time
On this page, you can:
-
Check the date format used in the application. The MMM-dd-yyyy format is currently in use, with "MMM" representing the abbreviated month (e.g., Jan for January), "dd" signifying the day of the month with a leading zero for single-digit days, and "yyyy" indicating the four-digit year. For example, "Jan-01-2022" would denote the first day of January in the year 2022.
-
Check the time format used in the application. The current time format in use is hh:mm a, following a 12-hour clock system. Here, "hh" represents the hour in two digits with leading zeros, "mm" denotes the minutes, and "a" indicates whether it is in the morning ("AM") or the afternoon/evening ("PM"). For example, "09:30 AM" indicates 9:30 in the morning, and "03:45 PM" represents 3:45 in the afternoon.
-
View the server time zone.
-
Set the default user time zone. Regardless of the user profile creation method — manual entry, file import, API, SSO, or self-registration — the default time zone applies if not specified during creation. When a user logs in through the standard login page, the device's time zone overrides their profile setting.

-
-
Web session parameters
On this tab, you can define Session timeout in minutes, which determines the duration of user inactivity before automatic logout. Once this period expires, users must log in again to perform any actions.

-
Internal network
On this tab, specify the allowed IP addresses for accessing tests limited to the internal network (defined under the test Security settings). For instance, setting the IP mask to 192.168 allows access only to users within the local network with IP addresses ranging from 192.168.0.1 to 192.168.255.254.
Client's IP - This represents your IP address.

-
Password configuration
On this tab, specify the minimum password length and the required minimum number of each character type, whether set manually or generated automatically.
-
Minimum password length - The minimum number of characters a password must have.
-
Minimum number of uppercase alphabet letters.
-
Minimum number of lowercase alphabet letters.
-
Minimum number of digits (0-9).
-
Minimum number of special characters. Allowed characters: !"#$%&'()*+,-./:;<=>?@[\]^_{|}~.
-
Click the Restore to default values button to reset the password configuration.

You can define:
-
-
Test booking settings
On this page, you can set the number of days, hours, and minutes before the start of a testing session that will automatically be established as the test booking deadline. Click Set and customize values for each delivery preference. The booking deadline is calculated by subtracting the entered duration from the testing session start time.
For instance, if a testing session starts on January 21, 2023, and a 4-day automatic booking deadline period is configured in the settings, then when creating the session, the automatic booking deadline will be set to January 17, 2023.
Although the automatic booking deadline is initially set during testing session creation, you can modify it according to your preferences.
Click Reset to opt out of the automatic booking deadline setting.

-
Test cancellation settings
On this page, you can set the number of days, hours, and minutes before the start of a testing session that will automatically be established as the test cancellation deadline. Click Set and customize values for each delivery preference. The cancellation deadline is calculated by subtracting the entered duration from the testing session start time.
For instance, if a testing session starts on January 21, 2023, and a 3-day automatic cancellation deadline period is configured in the settings, then when creating the session, the automatic cancellation deadline will be set to January 18, 2023.
Although the automatic cancellation deadline is initially set during testing session creation, you can modify it according to your preferences.
Click Reset to opt out of the automatic cancellation deadline setting.

-
Attempt continuation settings
On this tab, you can define rules for resuming a test in the event of a test interruption (e.g., poor internet connection), that is when the test attempt statuses are Disconnected or In progress.
The available options are:
-
'Disconnected' and 'In progress' attempts can be continued - If selected, candidates can resume Disconnected or In progress attempts within the testing session availability period, regardless of the test/survey settings (even if the Allow test continuation option is not enabled). If not selected, and the Allow test continuation option is also not enabled in the test settings, candidates won't be able to resume the test attempt in the event of an interruption. Instead, they can continue the test only if granted permission by the test manager (by clicking the Allow to continue option for the desired candidate on the Testing center/Candidates page).
-
Limit continuation period - If selected, candidates can resume Disconnected or In progress attempts within a specified period since the test interruption/disconnection. If this period expires, candidates can only continue the test if granted permission by the test manager (by clicking the Allow to continue option for the desired candidate on the Testing Center/Candidates page), even if the 'Disconnected' and 'In progress' attempts can be continued option is enabled.

-
-
Test authorization limit
On this tab, you can limit on the number of times a candidate can take a test with a single test authorization, regardless of whether the authorization is manually created or auto-generated. The default value is 1; leave it blank for an unlimited number of test attempts that can be taken with a single authorization.
Changes to this setting apply only to tests created after the adjustment, while previously created tests retain the previously defined limit.
Additionally, during the auto-authorization setting at the test level, despite the default limit being set, you can customize the limit for that specific test.

-
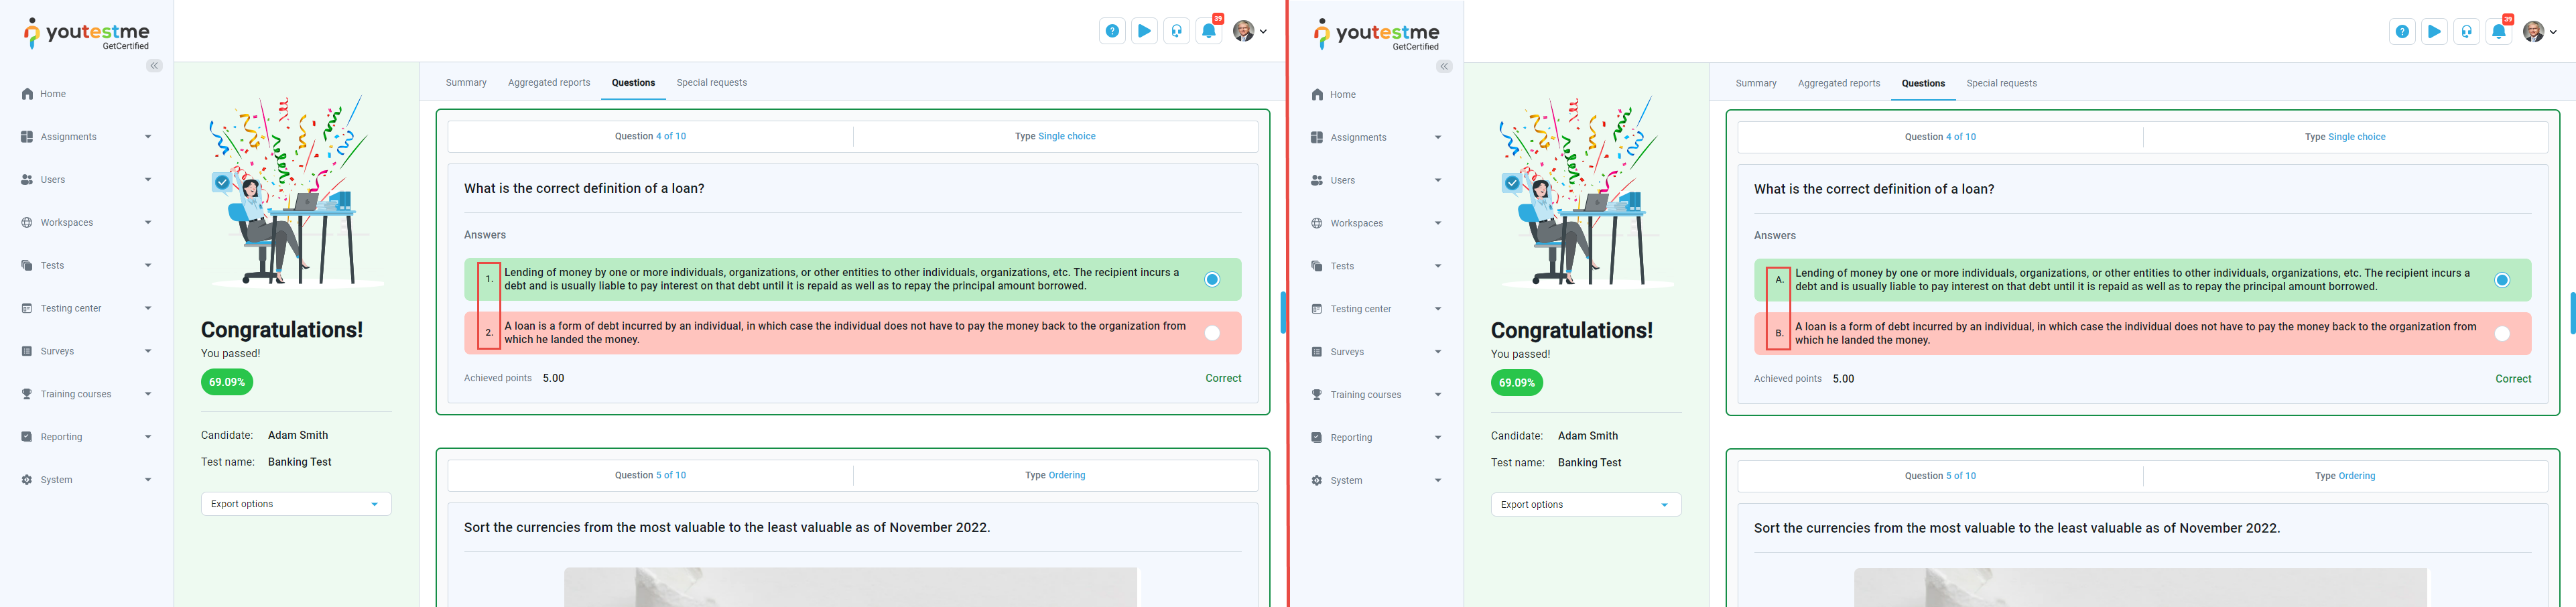
Answer ordinal markup
On this tab, customize the presentation of ordinal numbers next to question answers. The selected markup will appear during question creation, test-taking, in candidate reports, and in the report builder.
Choose from three options for displaying answer ordinal numbers:
- NUMERICAL - Presented as '1. 2. 3...'
- ALPHA_LOWER - Presented as 'a. b. c...'
- ALPHA_UPPER - Presented as 'A. B. C...'.

Your markup will be applied to all new and old tests/surveys. Answer ordinal markup is configurable for all question types except fill-in-the-blank and ordering questions, which are always numerical.
Examples of the modified ordinal number markup:


-
Score report setup
The score report is an advanced version of the personal report intended for export. On this tab, you can customize the default content of the score report. Additionally, you can adjust score report settings for specific tests under Score report setup.
-
Passing criteria - Enter the text outlining the conditions for taking the test.
-
Main text description - Provide necessary information about the test.
-
Sections description - Enter information about individual sections.
-
Re-test policy - Include details about the retake policy for the test.
-
Show pool information - Check this option if you want the report to contain information about the question pools included in the test.
-
Show sections diagram - Check this option if you want the report to display information about candidates' results for each section.
-
Show section groups diagram - Check this option if you want the report to include a diagram for created section groups.

Candidates can export the score report by opening their personal report, selecting Export options, and choosing the Score report by question pools option.


-
-
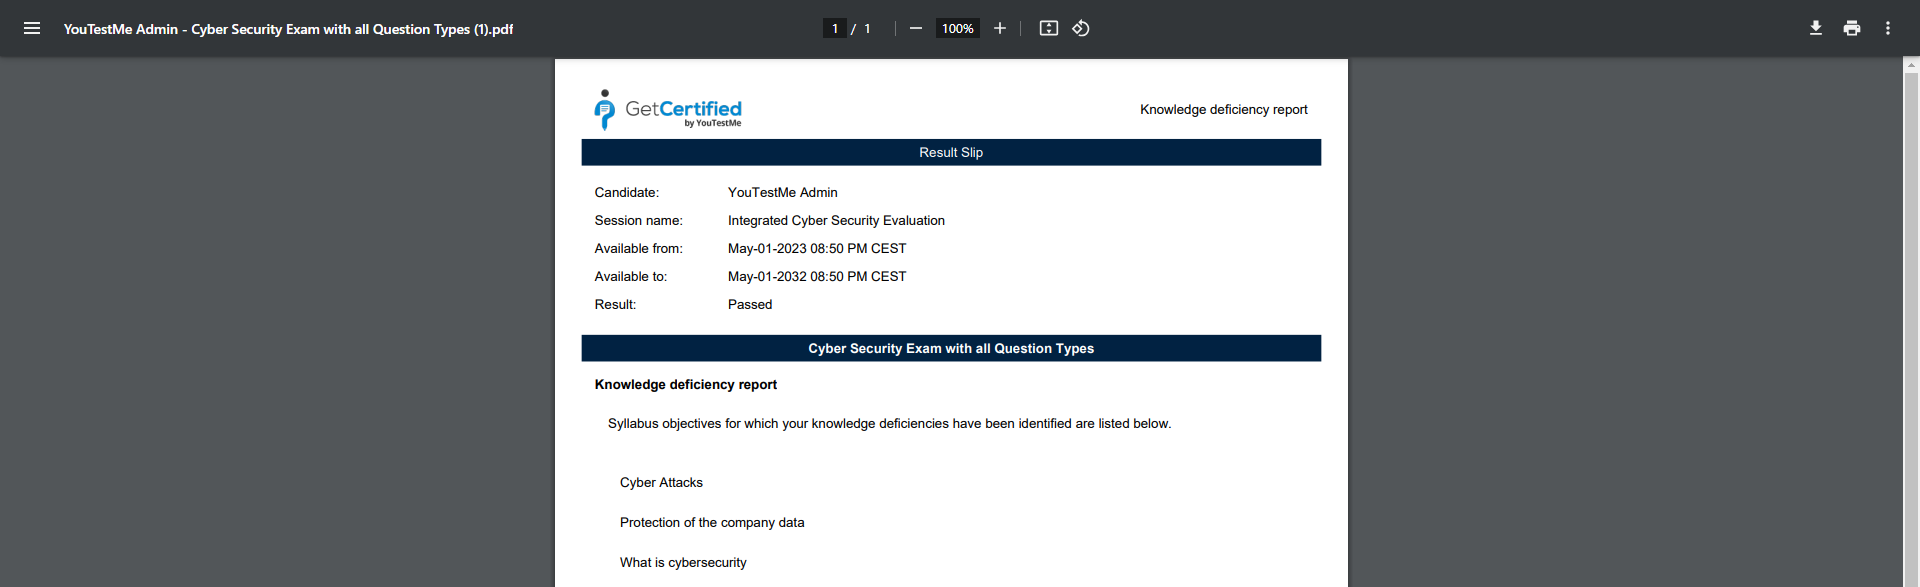
Knowledge deficiency report setup
-
Change the Header image (e.g., insert your organization logo).
-
Header text - Input custom text for the report header.
-
Free form text - Add a custom text explanation about the report.
-
Free form explanation - Enter a custom text explanation about the report.
-
Download demo - DOwnload a demo version of the report to preview its appearance for candidates.

In test settings, you can allow candidates to download knowledge deficiency reports. On this tab, you can adjust the layout of the knowledge deficiency report.
Candidates can export the report by opening their personal report, selecting Export options, and choosing the Knowledge deficiency report option.

-
-
Additional modules setup
On this tab, you can enable or disable specific application modules based on your requirements. Module availability may vary depending on your edition. To find out more about each module, refer to the Modules help page.
-
Email server
On this tab, set up email servers for sending notifications from the application. There is no limit to the number of email servers that can be configured, but only one can be active at a time.
By default, one email server is configured in the application, but you can set your own instead.
To configure email server:
-
Enter the host name of the mail server.
-
Enter the port number of the mail server.
-
Enable SMTP authentication if user authentication with the SMTP server is required.
-
Enable Start TLS if you need to use TLS encryption for secure email sending.
-
Enter the username of the mail server.
-
Enter the password for the mail server.
-
Enter the email address that will serve as the sender of the notification. If a user wants to respond to a notification, the email will be sent to this address.
-
Enter a test email address. After activating the email server, a test message will be sent to confirm that the server is working.
-
Click the Create new button to add new email server, or Update existing to reconfigure already added email server.

Once email server is added, click the Activate button.

After the email server is activated, click the Send button to send test email to the provided email address. Status of the sent email you can check under Reporting/Predefined reports/User reports/Sent emails report.

To permanently remove email server from the system, select the desired one, then click the Delete button. Only inactive mail servers can be deleted.

To set sending preferences:
-
Interval - Enter the number of seconds between two iterations for batch sending of emails.
-
Batch size - Enter the maximum number of emails to be sent in one iteration.

Additionally, you can define the email domains to which the application is permitted to send email notifications. Emails will not be sent to users whose email addresses do not have the specified domains.
To specify email domains:
-
Click the Set specific domains button.
-
Enter the domains to which you want to allow email addresses to be sent. Input each email domain individually, pressing the Enter key after each entry.
-
Click the Set button to save changes.
-
To permit sending to all domains, click the Allow all domains button.


-
-
Upcoming tests reminder
On this tab, you can set reminders to be sent to candidates assigned to the testing sessions. These reminders will be sent in a defined period before testing sessions begin.
At defined intervals, the system checks testing session availabilities. Candidates receive notifications if a testing session is scheduled to start within the specified period in the reminder settings.
Note: Reminders will be sent to all assigned candidates who have not completed the test, including those who paused the test, were disconnected due to technical issues, etc.
To configure upcoming test reminders:
-
Check the Enable "Upcoming tests reminder" option.
-
Choose the frequency of checks; this frequency aligns with how often candidates receive notifications about upcoming testing sessions.
-
Specify the starting date for checking testing session availabilities (daily or hourly) and sending reminders to candidates based on defined times.
-
Specify the days/hours before testing sessions start for sending reminders. For example, reminders will be sent to candidates one, five, and ten days before the test begins.
-
Click the Confirm button to save the settings.
-
Click the Cancel button to discard settings.
Customize the notification for the upcoming tests reminder under System/Settings and customization/Notifications.
For additional details and examples, refer to this article.

-
-
Expiring tests reminder
On this tab, you can set reminders to be sent to candidates assigned to the testing sessions. These reminders will be sent in a defined period before testing sessions finish.
At defined intervals, the system checks testing session availabilities. Candidates receive notifications if a testing session is scheduled to end within the specified period in the reminder settings.
Note: Reminders will be sent to all assigned candidates who have not completed the test, including those who paused the test, were disconnected due to technical issues, etc.
To configure expiring test reminders:
-
Check the Enable test expiration reminders option.
-
Choose the frequency of checks; this frequency aligns with how often candidates receive notifications about expiring testing sessions.
-
Specify the starting date for checking testing session availabilities (daily or hourly) and sending reminders to candidates based on defined times.
-
Specify the days/hours before testing sessions end for sending reminders. For example, reminders will be sent to candidates one, five, and ten days before the test ends.
-
Click the Confirm button to save the settings.
-
Click the Cancel button to discard settings.
Customize the notification for the expiring tests reminder under System/Settings and customization/Notifications.
For additional details and examples, refer to this article.

-
-
Finish test URL
On this tab, you can specify the URL where candidates will be redirected after completing the test via a direct access link (e.g., your website). If the field is blank, candidates will be redirected to the YouTestMe login page.
URL should start with http:// or https://.

-
My tests and surveys view configuration
On this tab, you can set default views for the My tests and My surveys pages in the My assignments section, displayed when candidates access those pages.
-
My tests and surveys view:
Title - Each test/survey is displayed as one tile.
List - All tests/surveys available to the candidate are displayed in a list format.
Calendar - In calendar format, candidates will see a list of tests available for each month.
-
Calendar session delivery preference - Choose default delivery preferences for displaying tests in calendar format.

-
-
Browser compatibility
On this tab, you can define the supported web browsers for the application. By default, the application is compatible with all browsers. If multiple browsers are set as supported, users will only be able to access the application if their browser is on the list of supported browsers (Ensure the browser status is set to Enabled).
Additionally, you can configure whether you want users to be notified with a warning message when they open the application using an unsupported browser or if you want to completely restrict the usage of the application on unsupported browsers.
On this tab, you can:
-
Forbid using unsupported browsers - Enable this option to restrict the application usage to supported browsers only.
-
Edit a specific browser settings. All fields are the same as when adding a new browser.
-
Delete a browser from the list, and it will no longer be considered supported.
To add new browser:
-
Click the Create new button.
-
Enter Name of the browser, such as Chrome or Firefox.
-
Define Regex pattern. Enter BrowserName.* to allow all versions of the browser. In relation to the defined regex pattern, it is compared whether the browser is supported or not.
-
Enter Description of browser.
-
Define Status - The browser must have an Enabled status to be considered when comparing the user's browser and supported browsers. If the status is Disabled, the browser is not used for the comparison.
-
Link - Provide the website link with information about the browser or the download link.
-
Click the Save button.

Note: Changes to supported browser settings do not affect users currently using the application; instead, they are applied on the next attempt to access the application.
Depending on the settings, below are examples of how the screen looks to the user when attempting to log in using an unsupported browser.

-
-
Question create/edit option
On this tab, you can enable or disable confirmation dialogs that appear when creating or editing questions.
When enabled, after saving the question, a confirmation dialog appears. You can enter a comment (e.g., noting changes in the question), add an external ID for the question version, or set an activation time. If these options are disabled, the question changes are saved upon clicking the Save button.
Below is an example of what the confirmation dialog looks like.

-
Web sockets and polling settings
The Web sockets and polling settings play a crucial role in ensuring real-time updates and data retrieval for the following monitoring dashboard features:
-
Pause/Resume test attempt
-
Add additional time for the test attempt.
There are two methods for synchronizing server events with the client side:
-
Web sockets - The server immediately pushes events to the client. However, network settings can sometimes block web sockets. It is recommended to use polling in conjunction with web sockets to overcome potential blocking issues.
-
Polling - The client checks for new server events at specified intervals. This method is useful when web sockets are blocked, ensuring the client receives events within the specified interval.
If monitoring features are in use, it is recommended to enable both web sockets and polling. Otherwise, it's advisable to disable both methods.
To configure web sockets and polling:
-
Enable web sockets if monitoring features are used. Otherwise, disable them to avoid potential impacts on system performance and capacity.
-
Enable polling if monitoring features are used; otherwise, disable them for similar reasons.
-
Specify the polling interval or how often the client will check for new events on the server. The recommended interval is greater than or equal to 30 seconds because shorter intervals can affect the performance and capacity of the system.
-
Click the Confirm button to save the settings.

-
-
Registration page layout
On this tab, you can customize the user registration page by selecting the fields to display or hide during the registration process. It's important to note that fields such as username, email, role, and captcha cannot be disabled.
-
First and last name
-
External ID
-
Date of birth
-
Address fields
-
Set the date of birth field as mandatory. This option is available only when the Enable date of birth field on the registration page option is enabled.
-
Define which address fields will appear on the registration page. You can show/hide Country, Street, City, Postal code, and State fields. This option is available only when the Enable custom properties on the registration page option is enabled.
-
Set all custom properties as required. This option is available only when the Enable custom properties on the registration page option is enabled.
You can choose to display/hide the following options:
Additionally, you can choose to:

-
-
Verification process setup
Verification can be the final step in managing test results. Once a candidate's report is verified, any changes to the grading settings will not impact the candidate's score.
On the Verification process setup tab, you can define when and how to verify the test attempts.
To set up the verification process for each delivery preference, click the Setup verification process button corresponding to your desired delivery preference."

-
Immediate verification by hold criteria after the test - This option allows for automatic verification of all attempts that meet the criteria set in this section, without requiring any manual intervention.
-
On-demand verification by hold criteria - This option allows users to manually verify attempts based on specific criteria instead of automatic verification, requiring them to click a button to verify each attempt.
A new window will appear, offering the following options:
Additional criteria for verification include:
-
Percent scored below - Test attempts won't be verified if the candidate scores below the specified percentage.
-
Report needs grading - The test attempt will not be verified if there are questions left that require manual grading.
-
Not finished - Verification won't occur if the candidate doesn't finish the test.
-
Time used below - Verification won't proceed if the candidate finishes the test in less time than specified.
-
Refused NDA - Verification won't occur if the candidate refused the Non-Disclosure Agreement (test attempt status is Refused NDA).
-
Did not show up - Verification won't proceed if the candidate did not take the test within the allotted time (test attempt status is Did not show up).
-
-
-
Theme and language
Tailor the visual elements of the application to meet your requirements. Adjust the application theme, login page appearance, logo, favicon, text, and language.
-
Theme
On this page, you can customize the application theme. By default, the GetCertified default theme is applied, but you can create new themes according to your needs and branding.
On this tab, you can:
-
View the list of already created themes. The Default column shows which theme is set as the default theme. The Active column displays themes marked as active. The System column identifies system themes that are always present in the application and cannot be deleted.
-
Apply one of the already created themes.
-
Edit an existing theme.
-
Delete a theme.

To create a new theme:
-
Enter the Name of a new theme.
-
Select the Set as default option if you want the currently selected theme to become the default theme applied when users log in to the application. Note that only one theme can be set as default at a time. If another theme was previously set as default, enabling this option on another theme will turn off the default setting on the previous theme.
To set a theme as the default, it must also be marked as Active. -
Set the theme as Active, and it will appear in the list of themes on the user's profile, allowing them to choose it for their profile. The default theme is applied if no other theme is selected in the user's profile. If the theme is not set as Active, it will not be displayed on the user's profile.
-
Adjust theme colors.
-
Choose between detailed 3D icons, or simple flat icons.
-
You can adjust the font size by dragging the circle to the right if needed.
-
Click the Create button.

-
Theme colors
-
Change primary color - The primary color is typically the dominant color used for buttons, links, marking menu items, and other key elements.
-
Change info color - The color used for informative messages that appear in the top right corner when performing specific actions, such as confirming the saving of test settings changes.
-
Change error color - The color for error messages that appear in the top right corner.
-
Change warning color - The color for warning messages that appear in the top right corner, for example, a note indicating that you need to select a test to perform a certain action.
-
Change success color - The color used to indicate important labels (e.g., the Passed label on tests or testing sessions that are currently available) or actions (such as the Start button on the My tests page, Test preview action, etc).
-
Change grey color - Customize the shades of grey used in the application; for example, all hints, tab names, and menu names will be changed according to these color shades.
Click the Invert grey scale button to change the colors by inverting the grayscale values. When you invert the grayscale, the darkest areas become the lightest, and vice versa. -
Change menu color - The background color of the main menu.
-
Change background color - The background colors, such as the colors of the pages, tabs, and header names.
-
Change white color - The interior color of buttons, dropdown menus, tab headers, the background of odd table rows, etc.
-
Change white text color - The color of white text, for example, text when the menu title is selected.
-
Change white icon color - The color of white icons, for example, icons for menu titles.
-
Change accent color - The color of even rows in the table and the background of introductory texts on the Question pools and Training courses pages.
-
Change elected accent color - The accent color used when selecting rows in tables.
-
Change hover accent color - The colors used when hovering over input or dropdown fields.
-
Change disabled accent color - The accent color used for fields that cannot be changed.
-
Change border color - The color of border lines.
Note: For colors where multiple shades are displayed on the right side, these varying shades will be applied to different parts of the application.
Below is an example where specific color changes can be observed.

-
-
-
White labeling
-
Web browser's tab title - Modify the application name in the web browsers tab title, right beside the favicon.
-
Confirmation label - Modify the acknowledgment text presented on the instructions screen before the test begins. Additionally, this text can be customized for each test separately under the Test instructions dialog settings. To include an acknowledgment checkbox for candidates, make sure to enable the Require instructions acknowledgment option.
Note: Changing the application language will result in the translation of the default text. However, modifying the default text itself will not be translated when altering the application language.
-
Emails sent from - The name entered here will be presented as the sender's name in the email body, replacing the $from$ parameter.
-
Application link - The URL entered here will be used to generate necessary links for email notifications. The YouTestMe team will update this link if you have configured a custom application domain. This ensures that the links in the emails will be presented using the new custom domain.
-
Login instructions - Provide detailed guidelines or include useful links for users to be displayed on the login screen.
-
Display privacy policy - Enable this option and a privacy policy link will be displayed on the user registration page.
-
Privacy policy link - Enter your custom privacy policy link instead of the default one.
-
Display personal report animation - Show/Hide animation on the left side of the candidate's personal report page.

On this tab, you can customize the text of the login page, privacy policy display, links, system naming, and more.
The following options are available:
-
-
Logo and favicon
-
Click the Change logo button to upload a logo that represents your company or organization. The recommended image size is 270 x 69 pixels.
-
Click Reset to default to restore the application logo to the default one.
-
Click the Change favicon button to replace the favicon displayed in the web browser's tab title.
-
Click Reset to default to restore the favicon to its default setting.

On this tab, you can change the logo and favicon of the application.
-
-
Language settings
On this tab, you can customize the available languages for selection under language settings. This includes options such as user profile language settings, test language preference settings, the login page language, and question translations.
The table provides:
-
A list of languages that can be used in the application. The availability of the language for use depends on whether the Interface language option is enabled or disabled.
-
Language codes - Use them to set user profile languages immediately during the user import process.
-
Interface language - Indicates whether a language is available in the application and can be used for interface translations. If the interface language is set to Disabled, it means that the language is not currently available and cannot be used in the application. However, it can be enabled. Users cannot enable an additional language on their own; instead, they need to contact the YouTestMe team to enable the language when necessary.
-
Test language - If enabled, the language will be displayed for selection in the language settings.
Below is an example that explains the different language settings:
Interface language Test language Language settings available for selection Disabled Enabled During question creation, it is possible to add a translation in that language. In language settings, that language will not be available for selection except for the Language in tests option (under the User profile/Account information), as test organizers handle question translations in the test. Therefore, users can display questions in that language during test-taking if a translation was created during question creation. Enabled Enabled The language will be displayed on all language settings. Enabled Disabled This language will not be displayed anywhere in the language settings.

-
-
Language bundles
Customize any text in the application (labels, hints, messages, and notifications). For example, change the word Test to Exam, Candidate to Student, and Question pool to Question bank, or rephrase in-app messages.
A language bundle is a file consisting of the key/value pair properties. Each property is tied to one or many UI components based on a property key. The property value is displayed as the label of the component/components.
Below is an example of text changes.

On this tab, you can:
-
Activate preview keys mode to find the key for the text you want to change.
-
Search for the desired property file by name, language, and file type.
-
Edit properties in the language bundle through the application.
-
Download the file, edit it offline using the desired text editor, and import the new language bundle.
-
Delete language bundle - Default language bundles cannot be deleted. Instead, you can edit them and save them as new custom language bundles. After deleting custom language bundle with the status Active, the default bundle will be activated automatically.
-
Activate language bundle to apply changes. When you create a new language bundle, it will have the status Inactive. Only language bundles with the status Inactive can be activated. Additionally, only one language bundle of one type and in one language can be active at any given moment.

-
Preview keys mode
The Activate preview keys mode option allows you to quickly identify which property file and its key you need to modify.
-
Click the Activate preview keys mode button.

-
Navigate to the page containing the text you wish to modify and click the button that appears at the top of the page. Instead of the application text, the names of the property file and keys will be displayed across the entire page.
-
Locate the property file name and key for the text you want to change, and make a note of it or save it to replace the text in the settings. The property file name is written in uppercase, and the rest of the text presents the key.

-
Click the same key icon at the top of the page to disable the option. Return to the language bundles settings page and refer to the further explanation for editing languages through the application or by importing a file.
Create a new language bundle through the application
When you click the Edit button, a list of all properties in the language bundle will open. Follow these steps:
-
Enter the key you previously found, or, for example, if you are editing a message, you can also type the text of the current message, and the key will be displayed.
-
Click the key name in the list.
-
In the Value field, enter the new text.
-
Click the Confirm button. Repeat steps 1 to 4 to change all the texts you want in the selected file.
-
Click the Save as button to create a new custom language bundle or update an already existing custom language bundle.
-
Enter the Name of the new custom language bundle.
-
Click the Save button. The new language bundle will be created, and you should activate it to apply changes.


Create a new language bundle by importing a file
Click the Download button to download the property file to your device. The file will be saved in .properties format.
Follow these steps:
-
Open the file in the desired text editor, e.g., Notepad.
-
Find the key you want to change, or, for example, if you are editing a message, search for the text of the current message.
-
Enter the new text.
Note: It is important not to change the keys.

-
Repeat steps 1 to 3 to change all the texts you want in the selected file. Then, save the file.
-
In the application, click the Edit button for the desired language bundle.
-
Click the Load from properties file button and select the file you edited.
-
Click the Save as to create a new custom language bundle or update an already existing custom language bundle.
-
Enter the Name of the new custom language bundle.
-
Click the Save button. The new language bundle will be created, and you should activate it to apply changes.


-
-
Message templates
The Message templates feature eliminates the need for repeatedly entering the same message when creating objects like testing sessions. Instead of typing the session instructions message each time when creating a testing session, you can create a session instructions message template in different languages. Additionally, you can set default session instructions messages for both self-enrollment sessions and sessions where you need to assign candidates manually.
On this tab, you can:
-
Create new message template. A new pop-up window will appear where you can enter the parameters of a new message template.
-
Edit an already existing message template. The fields are similar to those for creating a new message template.
-
Delete a message template. The message template cannot be deleted if it is used for testing session instructions.
-
Define Public testing session - session instructions. For self-enrollment sessions, you can select the default session instructions message from one of the previously created message templates.
-
Define Private testing session - session instructions. For sessions where you need to assign candidates manually, you can select the default session instructions message from one of the previously created message templates.
-
Export the message templates table to Excel, PDF, CSV, or XML format.

To create a message template, click the Create new button. A new dialog will appear where you should:
-
Enter the Name of the template.
-
Optionally enter the Description of the message template.
-
Choose a Language for which you want to define the message template.
-
Enter the Message text for the selected language.
-
Click the Save text button. The message will be saved for the selected language.
-
To add the same message in another language, select the language in the same window, enter the same message but in the chosen language, and save it by clicking the Save text button.
Note: You can define the same message in as many languages as you want.
-
Click the Save button to save the message template.

-
-
-
Notifications
On this tab, customize notifications for user actions. Notifications come with preset content, but you can customize it. Use predefined variables to pull information from the application for notification content.
There are two types of notifications:
-
Application notification - Notifications displayed to users within the application, accessible via the bell icon in the upper right corner.
-
Email notification - Notifications sent to the user by email.
On this tab, you can:
-
View all available notifications in the application.
-
Change the Status of the application notification. Notifications must be Enabled to allow sending. Otherwise, they will not be sent when specific actions occur.
-
Edit application notifications.
-
Change the Status of the email notification. Notifications must be Enabled to allow sending. Otherwise, they will not be sent when specific actions occur.
-
Edit email notification. The fields are the same as when editing application notifications.
-
Enable the option to Send application and email notifications to users upon creation or publishing of global self-enrollment testing/survey sessions. All application users will receive notifications about the testing session.
Note: Even if this option is disabled, if you've created a self-enrollment testing session assigned to a specific user group, notifications will still be sent to all users within that group.

-
Choose the Template language for customizing the notification.
-
Set the Notification title. This text will appear as the notification title in the notification list. For email notifications, the text from the Email subject name field will serve as the email subject.
-
Click the Restore to default button, to revert to the default notification text.
-
Enter the desired Notification text. Please note that variable names must be enclosed with $ signs at the beginning and end. Do not alter variable names to ensure accurate data retrieval from the application. Incorrectly formatted variables will trigger an error message when saving the notification.
-
Click the Save button to store the edited email/application notification.
To edit a notification:

-
-
Job scheduler
The Job scheduler feature automates tasks related to data management. It allows you to schedule and execute jobs for automatically importing data from external systems or exporting data from the application to external systems. This streamlines processes such as updating user information, transferring test results, and maintaining data consistency between the application and other systems.
There are two tabs:
-
Jobs - On this tab, you can create new jobs and manage existing ones.
-
Execution history and logs - Here, you can see the complete execution history and logs of all jobs in the system.
-
Jobs
On this tab, you can create new jobs and schedule their periodic execution. You can also view a list of all existing jobs and manage them.
Here, you can:
-
Preview complete execution history and logs of already executed jobs.
-
Execute the job immediately, disregarding the current schedule. If the job has set periodic execution, it will be executed at the next scheduled time according to the execution schedule.
-
Edit job. The fields are similar to those for creating a new job.
-
Copy job. Use the previously created job as a template to change only a few pieces of information and save it as a new job.
-
Delete job permanently, and it will no longer be executed in the future if it was previously scheduled.
-
Create a new job
To create a new job, click the Create new button. A new dialog will appear, consisting of the following three sections:
-
Job information - This section contains general information about the job, including its type, name, and description.
-
Schedule settings - Here, you can specify parameters for the schedule, such as the start time, end time, repeat interval, and the number of repeats.
-
Job parameters - This section allows you to define specific parameters related to the particular type of job.
Below, you'll find instructions on setting each parameter of the job.

-
-
Job information
This part of the dialog remains consistent for each job type you choose.
-
Type - Select the type of job you wish to create.
The currently supported job types are:
-
Import questions from QTI package
-
Pearson VUE results import - Import Pearson VUE results into the application.
-
Store media on filesystem
-
Question version activation - Periodically checks for scheduled question versions to activate. Old question versions will become inactive upon activation.
-
Test integrity check - Periodically checks for tests with breached integrity. The job log will indicate which tests have been breached and in which question pools there are insufficient questions.
-
Remark results import
-
Export data
-
Import Swiss users
-
Import data
-
Remove notifications
-
Assign authorizations automatically
-
Export test results with pool breakdown.
-
-
Name - Provide a name for the job.
-
Description - Optionally, enter a job description.

-
-
Schedule settings
This part of the dialog is the same for each job, regardless of the type you choose.
-
Start time - Specify the initial execution time by selecting a start time. If the chosen start time is in the past, the first execution will occur next time according to the schedule (considering the Repeat interval if the job repeats) or will only occur if the job repeats.
-
Repeat - Check this option to schedule the job to repeat periodically in equal time intervals after the Start time. If unchecked, the job will execute only once at the Start time.
-
Repeat forever - Check this option to schedule the job to repeat indefinitely or until the End time if specified.
-
Number of repeats - If Repeat forever is unchecked, choose the number of repeats after the first job execution at the start time. For example, if you choose three times, the job will be repeated in equal intervals after the start time and executed four times in total.
-
End time - Optionally, choose the End time. After the specified time, the job will no longer be executed, even if there are remaining repeats.
-
Repeat interval - Specify the Repeat interval, which is the time between two consecutive job executions. It should be at least 1 minute.

-
-
Job parameters
-
Importing data job parameters
To create a new Import data job, follow these steps:
-
Resource - Choose the type of data to import. Integrate external data into the application using CSV files or the SFTP server. This functionality imports various data, including:
-
Users
-
Tests
-
Testing sessions
-
Session candidates
-
-
Location - Select the location from which the files with data will be imported:
-
Choose File system to import data from the server's file system folder.
-
Choose an SFTP server to import data from files in the SFTP server folder. For the SFTP server, additional parameters have to be specified.
-
-
Folder - Enter the absolute path to the folder in the selected location from which you wish to import files.
-
File names - Specify the regex expression to match the names of the files to import from the folder. For example, the regex expression Users_.*\.csv will match all the files whose name starts with Users_ with the .csv extension.
-
File type - Supports only CSV format.
-
Modified only - Check this option to import only files created or modified after the previous job execution, or leave it unchecked to import all files from the folder satisfying the File names regex expression.
-
Delimiter - Enter the character to separate entries in the CSV file. For instance, the delimiter could be | or , or ;.
-
Skip lines - Enter the number of lines in the CSV file to skip before reading. Usually, it is set to one to skip the first line, which represents the header.

-
-
Export data job parameters
-
Resource - Choose the data type to export. Currently, only the Test results option is available.
-
Modified only - Check this option to export only records created or modified after the previous job execution. Otherwise, all records will be exported.
-
Location - Choose the location from which the files with data will be imported:
-
Choose the File system to export the file to the folder located on the server's file system.
-
Choose the SFTP server to export the file to the SFTP server folder. For the SFTP server, additional parameters have to be specified.
-
-
Folder - Enter the absolute path to the folder in the chosen location to export data to.
-
File Name - Input the prefix for the export file's name. The exported file will follow this format: #{file_name}_#{timestamp}.#{file_type_extension}.
Note: The format includes placeholders like #{file_name}, #{timestamp}, and #{file_type_extension}.
-
File type - Supports only CSV format.
-
Delimiter - Enter the character to use for separating entries in the CSV file. For instance, the delimiter could be | or , or ;.

-
-
Export test results with pool breakdown
This job exports authorized and verified test results into a zip file. The zip file comprises two CSV files: one containing general information about test results, such as test name, passing score, and actual candidate score; the other providing pool breakdown information, including pool name, number of correct answers, and number of incorrect answers.
To create a new Export test results with pool breakdown job, provide the following data:
-
Location - Choose the location from which the files with data will be imported:
-
Choose the File system to export the file to the folder located on the server's file system.
-
Choose the SFTP server to export the file to the SFTP server folder. For the SFTP server, additional parameters have to be specified.
-
-
Folder - Enter the absolute path to the folder in the chosen location to export data to.

-
-
Removing notifications job parameters
This job enables you to remove old notifications from the system by specifying their age.
When you select the Remove notifications type, you'll be prompted to specify the age of notifications to be removed, ranging from 1 to 6 months.

SFTP server parameters
-
Location - Select SFTP server.
-
Host - Enter SFTP server hostname.
-
Port - Enter SFTP server port.
-
Username - Enter the username of the SFTP server user.
-
Password - Enter the password of the SFTP server user.
-
Test connection - Verify entered parameters with a connection test.
The remaining options are consistent across all job types.

Execution history and logs
On this tab, you can see the complete execution history and logs of all jobs in the system.
Click the View option to check job details. You can view job execution information, including any errors encountered during execution.
The table also displays the job ID, name, and type, along with the start and finish times, and the count of errors, if any.

After each job execution, system administrators will receive a notification. You can find instructions on how to customize notifications under the Notifications help page.
-
-
Support
Define support contacts that all application users can reach. Once defined, users can initiate contact with support by clicking the dedicated support icon, which is displayed in the top-right corner of the login page and remains accessible from all application pages, excluding the test-taking screen.
To set support contact:
-
Describe the purpose of email, such as technical questions or inquiries about the test organization. Users will be allowed to choose different contacts from the dropdown, depending on their questions.
-
Provide the support Email where support emails will be sent when this contact is selected.
-
Provide the Phone number which users can.
-
Repeat the steps above for all contacts you want to add. You can add up to three contacts.
-
In the Additional info text field, you can provide useful details, such as the expected email response time or business hours when support is available.

Below, you can see how candidates can contact support:


-
-
Attachments library
The attachments library serves as a storage repository for all your attachments, including public attachments from other creators. Private attachments are visible only to you, while public attachments are accessible to all test creators. Attachments can be added to tests/surveys, training courses, questions, and user profiles. Additionally, attachments added to those pages will be displayed in this library.
It's important to note that users with role that have the Manage any attachment permission can access and edit all attachments in the system, regardless of attachment privacy. If you lack this permission, only public attachments and those you've created will be available to you.
Supported attachment types include: picture, video (MP4), audio (MP3), text, PDF, archive (.zip), Google Docs, YouTube video, Vimeo video, and link. The attachment size limit is 150MB.
On this tab, you can:
-
View list of all available attachments.
-
Include in the list all attachments from the system. This option can only be seen by users who have the Manage any attachment permission. It allows all attachments in the system to be displayed in a list, including private attachments from other users. By default, only public attachments and attachments created by you are displayed.
-
View attachment from list.
-
Download attachment.
-
Edit attachment name, description, and availability for other users.
-
Click Copy to make an identical copy of the attachment. You can change the name, description, and set the Attachment is available for any test creator option per your preference.
-
Remove attachment from the system. This action is only possible for attachments that are not referenced anywhere.

-
Click the Create new button.
-
Enter the attachment Name.
-
Provide an attachment Description.
-
Specify whether the attachment will be private (accessible only by you) or publicly available to any test creator (other users can view but not edit or delete it). To make it publicly available, check the Attachment is available for any test creator option.
-
Choose the attachment type and either upload the file or provide a link.
-
Click Save button to store the attachment in library.
To create new attachment:
Note: Users with role that have the Manage any attachment permission can access and edit all attachments in the system, regardless of attachment privacy.

-
-
Custom properties
On the Custom properties tab, you can create custom fields to easily categorize and filter data, including fields for managing users, questions, and tests.
-
Custom data types
When creating custom user/question properties, you can specify dropdown properties. This tab enables you to define custom data types, i.e., values for the Dropdown type of properties.
On this tab, you can view already existing custom data types, but also create new ones.
-
View list of already existing custom data types.
-
Edit an existing custom data type. The fields are similar to those for creating new custom data types.
-
Delete an existing custom data type. A custom data type can be deleted if no custom properties use it and its values.
-
Define values of an existing custom data type.
-
Create new custom data type.

To create a new custom data type:
-
Click the Create new button.
-
Enter the Name of the custom type. The name must be unique.
-
Optionally, provide a Description for the custom data type.
-
Click the Save button.

After creating a custom type, you can define values that will be displayed in the drop-down list.
-
Click the Define values button.
-
Click the Add new value button.
-
Enter the Name of the dropdown value. Values must be unique.
-
Optionally, provide a Description for the value.
-
Click the Save button. Repeat steps from 2 to 5 to add as many values as you want.

Additionally, you can Edit or Delete values as needed. A value can be deleted if there are no custom properties using this custom data type.

-
-
Custom user/question properties
Custom user properties are additional fields added to a user's profile when specific information needs to be stored, but there is no default field for it. These properties will be displayed under the Personal information tab on user profiles. Additionally, these fields can be displayed during user self-registration.
Custom question properties refer to additional fields that serve as attributes for questions and are not created in the application by default. They help categorize questions, provide extra data for easier search and management, and can be used to set criteria for passing the test.
You can add up to 15 custom user properties and up to 10 custom question properties in the following types:
-
Yes/No
-
Text
-
Date
-
Timestamp
-
Number
-
Dropdown - to create this type of custom property, you must first create a custom data type.
The process of creating and managing user and question properties is the same. However, depending on whether you want to create a user or question property, you should navigate to the desired tab:
-
For custom question properties, go to the Custom question properties tab
-
For custom user properties, go to the Custom user properties tab.

The tab layout and all processes will be explained using the example of custom user properties.
On this tab, you can:
-
View a list of already existing custom properties.
-
Edit already existing custom properties. The fields are similar to those for creating new custom properties.
-
Remove already existing custom properties.
-
Enable/disable custom properties. Enabling or disabling a custom property allows you to control the field's visibility. If a custom column is disabled, all stored values in the property are saved but not displayed.
-
Create new custom properties.

To create new custom user property:
-
Click the Create new button.
-
Enter the Name of the new custom property.
-
Enter a Description of the new custom property to explain its purpose.
-
Choose the Type of custom property. To create a Dropdown type of custom property, you must first create a custom data type, then select appropriate data type in the Custom data type field.
-
Click the Save button.

Question categories
Custom question categories refer to additional fields that serve as attributes for questions and are not created in the application by default. They help categorize questions and provide extra data for easier search and management. Unlike custom question properties, custom question categories can be used for test generation.
On this tab, you can:
-
View a list of already existing custom question categories.
-
Edit already existing custom question categories. The fields are similar to those for creating new custom question categories.
-
Delete already existing custom question categories. Custom question categories can be deleted if there are no tests generated based on that custom question category.
-
Define values of existing custom question category.
-
Create new custom question categories.

To create a new custom question category:
-
Click the Create new button.
-
Enter the Name of the new question category. The name must be unique. But if you are using the Workspaces module, you can create three question categories with the same name but add them to a different workspace.
-
Enter the Description of the new question category to explain its purpose.
-
Optionally, assign the question category to a workspace. When added, the category will be exclusively available in that workspace, accessible to all members. If the category is not added to a workspace, it will be visible to all users. However, only its creator and users with a system role possessing the Manage any question category permission can manage it, including changing the name, description, and adding/removing it from a workspace.
The displayed data may vary depending on the following conditions:
-
Whether the user has the system role Manage any question category permission, which allows them to preview all question categories in the system.
-
Whether the user has the workspace role Manage any question category permission, which allows them to preview all question categories added to their workspace.
-
Whether the user has the Create a question category permission which allows the user to create and manage said question categories.
-
-
Click the Save button.

After creating a custom question category, you can define its values.
-
Click the Define values button.
-
Click the Add new value button.
-
Enter the Name of the custom question category value. Values must be unique.
-
Optionally, provide a Description for the value.
-
Click the Save button. Repeat steps 2 to 5 to add as many values as you want.
Additionally, you can define sub-values for some values by clicking the desired value in the tree and then repeating the steps above.

Additionally, you can Edit or Delete values as needed. A value can be deleted if it is not used for generating any tests.

Test/survey categories
The Test/Survey categories facilitate grouping based on shared characteristics such as subjects, difficulty levels, or other criteria. For example, users may categorize tests/surveys into subjects like science, mathematics, language skills, etc.
Test/survey categories and their values cannot be deleted until they are removed from all tests/surveys.
The process of creating and managing test/survey categories is the same as for custom question categories. For more information on performing each action, refer to the Question categories chapter.
You can add these categories to test/surveys under the Basic information tab.

Templates
On this page, you can create and manage custom templates for displaying and exporting data from the application.
It is possible to create templates for:
-
Certificate - You can use them to create custom branded certificates.
-
Chart export - Used to create charts within the test Personal report settings.
-
Attempts export - Used to export lists of user test attempts on the My tests page.
On this tab, you can:
-
View a list of already created templates. In the Default column, you can see whether the template is preset (if the value is Yes) in the application or custom-created (if the value is No).
-
Create a new template.
-
Edit an already existing template. The fields are similar to those for creating new templates.
-
Delete an existing template.
Note: It is not possible to delete or edit default templates and custom templates that have already been used in a test.

To create a new template:
-
Enter the Name of the template.
-
Optionally enter a Description of the template to explain its purpose.
-
Choose the template type.
-
Upload the template file, which must be in .jasper format. For instructions on creating certificate templates in .jasper format and uploading them to the application, please refer to the following article.
-
Click the Save button.


-
-
-
-