User manual
Manage tests
-
Introduction
The Manage tests page is the central hub for managing the list of available tests. Here, you can schedule tests, adjust configurations, or check reports.
To get here, navigate to the Tests section in the main menu, then select Manage tests.
On this page, you can:
Access the test you wish to manage.
-
View and manage testing sessions for the test. Create new testing sessions as needed.
-
Preview the test to simulate the test-taking process. To review the entire test-taking process, which also includes accessing the test and previewing the report, you can assign yourself to the test and start it as if you were a candidate.
-
View candidates assigned to the test. Preview their reports and take any necessary actions.
-
Copy the test to make a duplicate with the same questions and settings.
-
Permanently delete the test. Delete all test attempts and testing sessions first.
For permanent test deletion, ensure the Allow delete data option is enabled in the system settings under Settings and customization/System preferences/Additional modules.
-
Create a New test.
-
Import the test from a JSON file exported from another YouTestMe application.
-
Filter the list of tests. Choose to include archived tests and/or show tests created during a specific period.
-
Open the side menu to view test categorization by test categories.
-
Create a new subcategory under the chosen test category.
-
Edit the test category, changing its name and description.
-
Delete the test category. Test categories can be deleted if they are not associated with any tests/surveys.


-
Settings
-
Basic information
This section contains essential test information and primary actions.
-
Preview button - Preview the test to simulate the test-taking process.
-
Schedule button - Schedule the test for candidates by creating testing sessions.
-
Candidates button - View candidates assigned to the test. Preview their reports and take any necessary actions.
-
Options button - Allow you to perform additional actions:
-
Export as PDF - Export test and test key as PDF.
Exporting question text containing a table is supported. However, if the answer text also contains a table, the exported answer will not include the table. Additionally, branching questions are not supported for export. For more information, refer to this article. -
Archive - Disable further test-taking and test modifications. When a test is archived, all testing sessions containing that test are also archived, meaning they are no longer available.
Candidates cannot initiate the test, and it won't be visible on the My tests page. If candidates have already taken the test, their results won't be visible on the My tests page.
If a candidate is in the process of taking the test when it's archived, they can complete the attempt without interruption. The report will be available immediately if configured in the test settings. Once the candidate closes the report, it won't be accessible on the My tests page.
When the Archive option is clicked, the Unarchive option becomes available. Unarchive the test at any time to make it visible again and open for taking. -
Create a copy - Make a duplicate with the same questions and settings.
-
Export as xAPI - Export the test in xAPI format.
-
Export as JSON - Export the test to a custom JSON file. Import this JSON file into another YouTestMe GetCertified application, facilitating data migration across different environments. This allows you to prepare tests in a testing environment and easily transfer them to the production environment when ready.
-
Delete "Preview" attempts - Delete preview attempts generated by clicking the Preview button.
-
-
Name - The name of the test.
-
Test ID - Automatically generated upon test creation and cannot be edited. This ID is used for linking the testing session to a particular test when uploading testing session through an Excel file.
-
Description - Provides additional information about the purpose or content of the test.
-
Descriptive label - An optional label used for additional classification that will be displayed in every exported report. For example: Classified, Confidential, etc.
-
Test category - Group tests based on shared characteristics such as subjects, difficulty levels, or other criteria.
-
Creation type - The method that was used when creating the test.
-
Test versions - Number of test versions created for the test.
-
Practice test option - When starting the test, let candidates choose the number of questions they want from each question pool included in the test. This way, they can customize the test according to their preferences.
-
Select workspace - Add the test to your chosen workspace, and access will be limited to users within that specific workspace.
-
Created by - Displays the name of the user who created the test.
-
Creation date - Displays the date and time when the test was created.
-
Updated by - Displays the name of the user who last updated the test.
-
Update time - Displays the date and time of the test's last update.
-
Upload or remove the custom test logo, which will appear on the candidate's My tests page. Supported file types are JPG, PNG, and BMP; the maximum file size is 1 MB. For the best experience, upload a square image of 200 x 200 pixels or higher. If no custom logo is uploaded for a test, the application favicon will be used as the test logo.

-
Test sections - Indicates the number of sections in the test. Clicking on it redirects you to the Test sections tab.
-
Enable section selection - Test managers can assign particular sections to candidates. If conditions are configured for sections when candidates start or book tests, they can only access sections that align with the specified conditions. For more information, refer to this article.
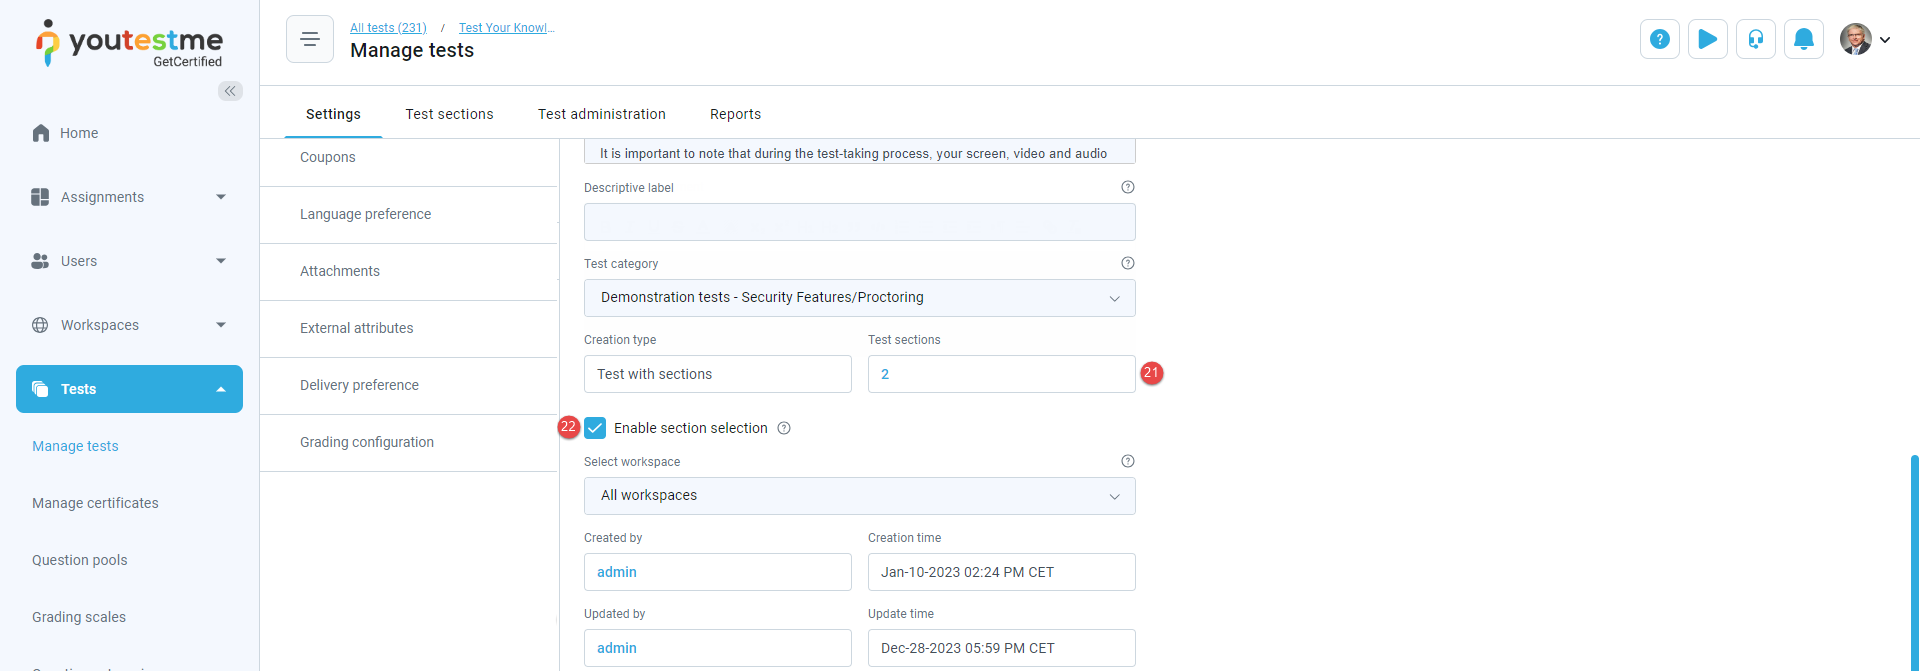


If the chosen test includes sections, additional settings will be available:
-
-
Test instructions dialog settings
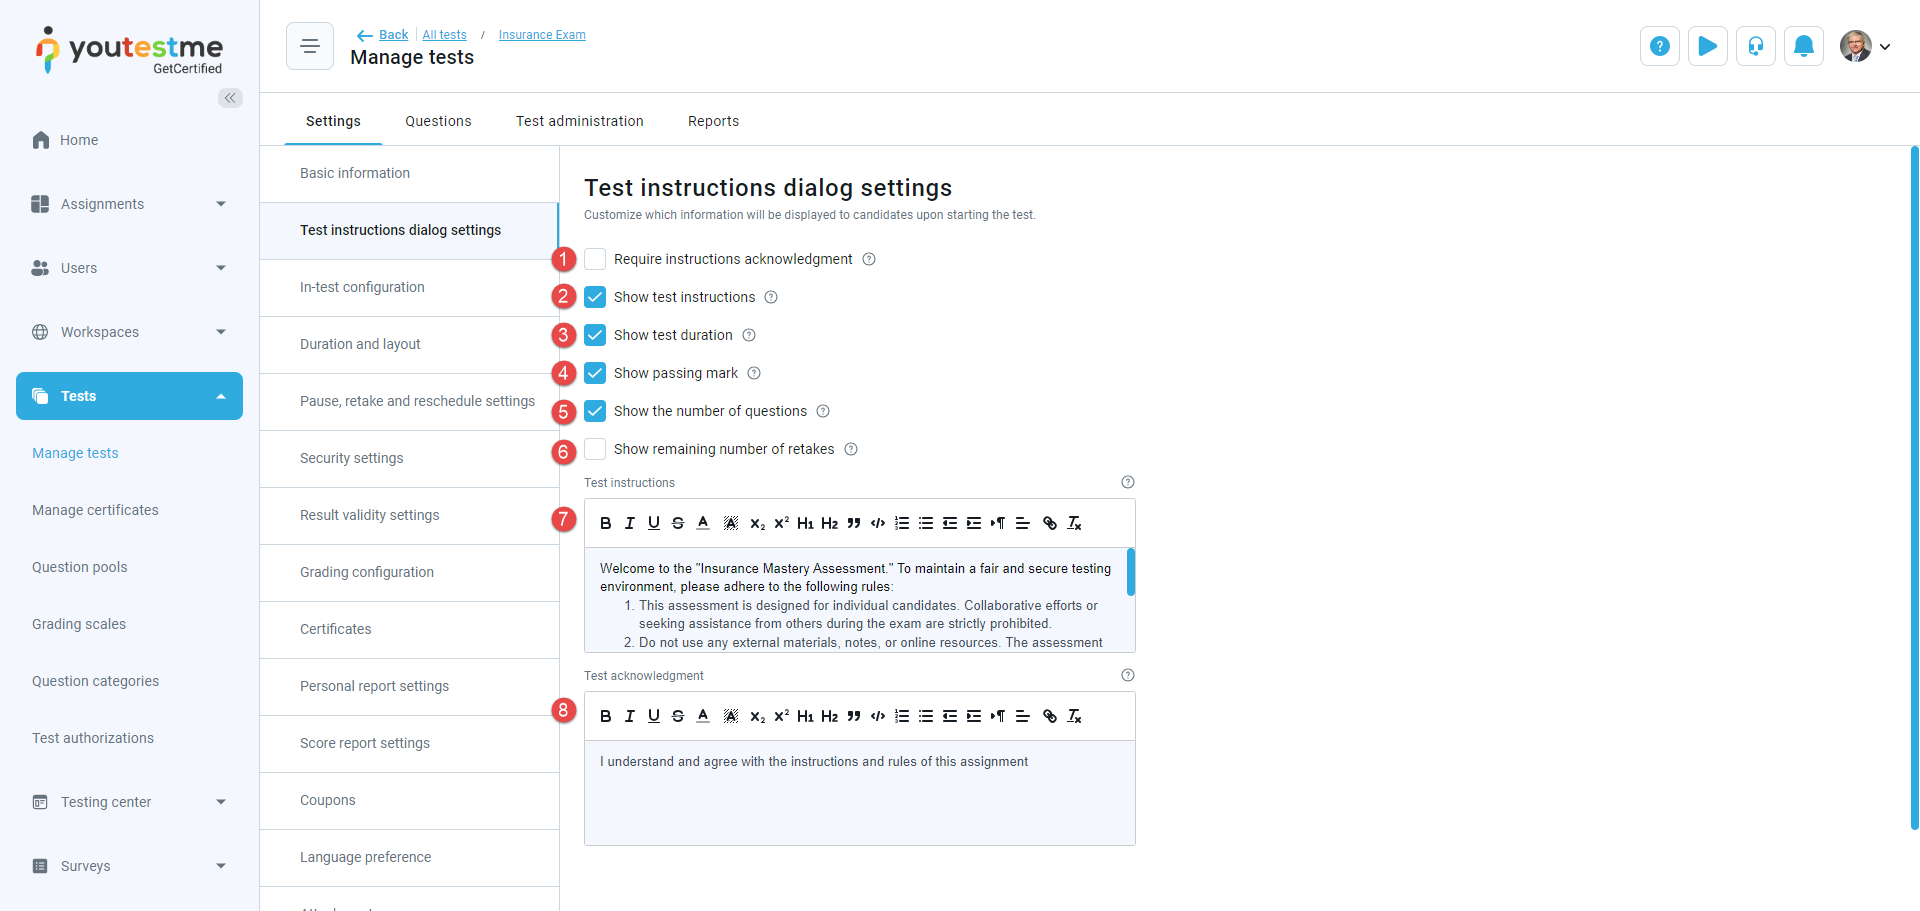
This page allows you to customize the information displayed to candidates in the pop-up dialog when starting the test.
-
Require instructions acknowledgment - Before starting the test, candidates need to confirm they've read and understood the test instructions. Once confirmed, the Start button becomes available.
-
Show test instructions - Display the test instructions in a pop-up dialog when candidates start the test. These instructions are set under the Basic information tab.
-
Show test duration - Show the allocated time for completing the test in a pop-up dialog when candidates start the test. The duration can be customized under the Duration and layout tab.
-
Show passing mark - Display the passing mark required to pass the test in a pop-up dialog when they start the test. The passing mark can be set under the Grading configuration tab.
-
Show the number of questions - Show the total number of questions in a pop-up dialog when candidates start the test.
-
Showing remaining number of retakes - Indicate the available number of test retakes in a pop-up dialog as candidates start the test (if retakes are allowed). You can configure the retake settings in the Pause, retake and reschedule settings tab. If test retakes are not allowed, this option is disabled.
-
Test instructions - Define specific test rules and guidelines for candidates to acknowledge in a pop-up dialog before starting the test. Include details on breaks, calculator usage, permitted learning materials, etc. These instructions can be accessed throughout the entire test-taking process.
-
Test acknowledgment - Modify the acknowledgment text presented on the instructions screen before the test begins.
Note: The default text I understand and agree to the instructions and rules of this task is integrated into the system and can be translated depending on which language is selected. Custom acknowledgment sentences will not be translated.
-
-
In-test configuration
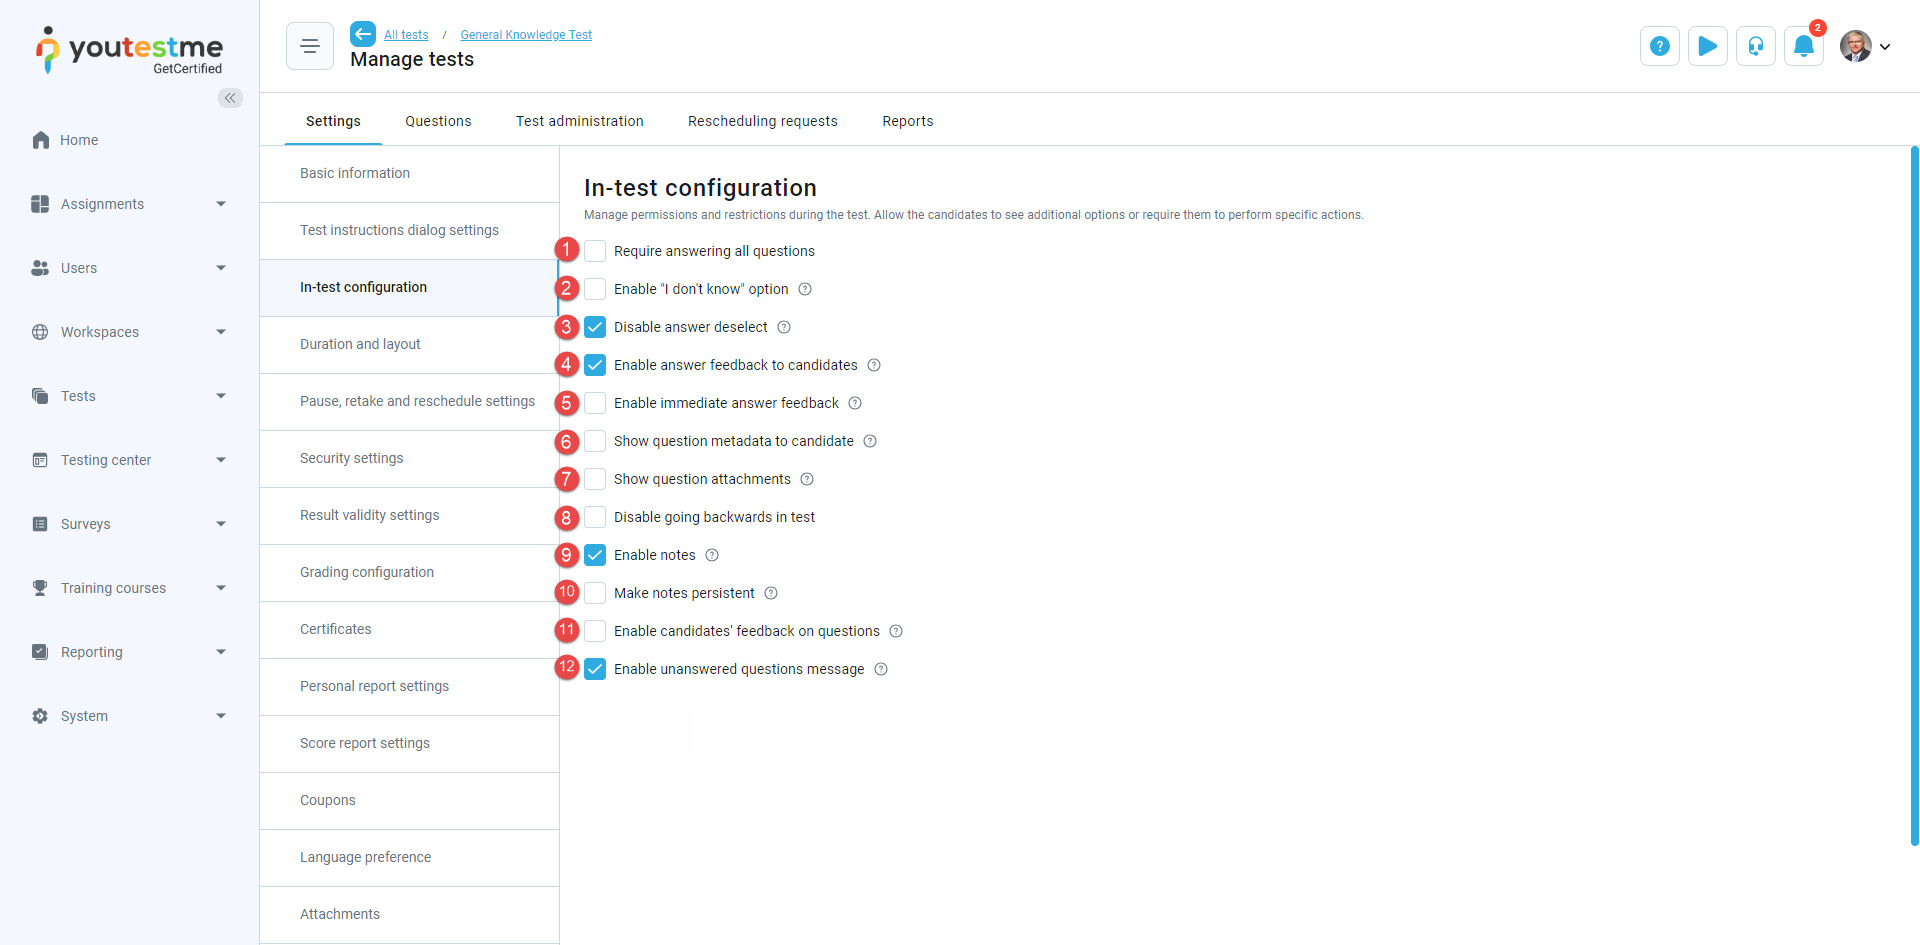
Manage permissions and restrictions during the test. Choose whether candidates can view additional options or if specific actions are mandatory.
Note: If the test contains sections, these options must be configured individually for each section.
-
Require answering all questions - If you select this option, candidates will receive a notification in a pop-up dialog when they click the Finish test button, indicating that they must answer all questions before completing the test. However, they still have the option to click the Finish anyway button to submit the test.
-
Enable "I don't know" option - Allow candidates to select this option to avoid negative points when unsure of an answer. Candidates will get specified penalties for incorrect answers or skipped questions if this option is not enabled.
-
Disable answer deselect - Do not allow candidates to deselect their answers. This rule applies to single-choice, multiple-choice, and true/false questions.
-
Enable answer feedback to candidates - Allows feedback for selected answers during the test-taking process. The feedback will be shown either when moving on to the next question or when clicking to finish the test. Feedback is added when creating questions.
-
Enable immediate answer feedback - Show answer feedback below the chosen answer immediately after the candidate clicks on it. This feature is applicable only to single-choice and multiple-choice questions. It can be enabled only when both Enable answer feedback to candidates and Disable answer deselect options are enabled.
-
Show question metadata to candidates - Display question details to candidates during the test-taking process, including information such as possible points, penalties, and difficulties.
-
Show question attachments - Show the attachments linked to a question during the test-taking process. Attachments should be added when creating questions.
-
Disable going backwards in test - Candidates will be prohibited from returning to the previously answered questions during the test-taking process.
-
Enable notes - Permit candidates to take notes during the test-taking process. Notes are only visible to the candidate while taking the test and will not be visible once the candidate finishes the test. To save notes after the test and make them visible in the candidate's report for both the candidate and test managers, enable the Make notes persistent option.
Note: If the test or question has attachments, the candidate can open the attachment as a note and write text underneath it by selecting the Open this attachment as note option.
-
Make notes persistent - Save the notes made during the test-taking process and display them in the reports for both test managers and candidates. This option can be activated only when the Enable notes option is enabled first.
-
Enable candidates' feedback on questions - Enable candidates to provide feedback for each question during the test-taking process. Candidates can rate questions as easy, medium, or hard and provide freeform feedback. The candidate's question feedback will be visible in the candidate's report for both the candidate and the test manager. Furthermore, question feedback will be displayed in the Predefined reports/Pool reports/Question feedback statistics on the pool level if questions are imported from question pools.
-
Enable unanswered questions message - After completing the test by pressing the Finish test button, candidates will receive a pop-up message indicating which questions were left unanswered.
-
-
Duration and layout
Available options on this tab are:
-
Duration type - Specify the type of time limit for completing the test. The duration type can be:
-
Unlimited - The test will not be time-limited.
-
Time per question - Each test question has its own time limit, which can be specified during the question creation process.
-
Time to answer all questions - Specify the time limit for the entire test.
If the test contains sections, the duration type can be:
-
Time defined in each section - The time limit will be set independently for each test section.
-
Time per test - Specify the time limit for the entire test.
-
-
Page format - Select whether all questions will be displayed on one page, or one question per each page.
-
Hide assignments metadata - Tailor the appearance of the test on the My tests page by selecting whether metadata fields, including the test logo, type, location, certificate name, etc., are visible or hidden.
-
Hide "Finish test" button until last question - Candidates will not see the Finish test button until they answer all questions or they are on the last question of the test.
Note: Duration type can be modified only in the test wizard.
Note: If the test contains sections, the page format must be set in each section separately.
If the test contains branching questions, the option All questions on one page is automatically disabled.
The All questions on one page option is recommended for tests up to 20 questions.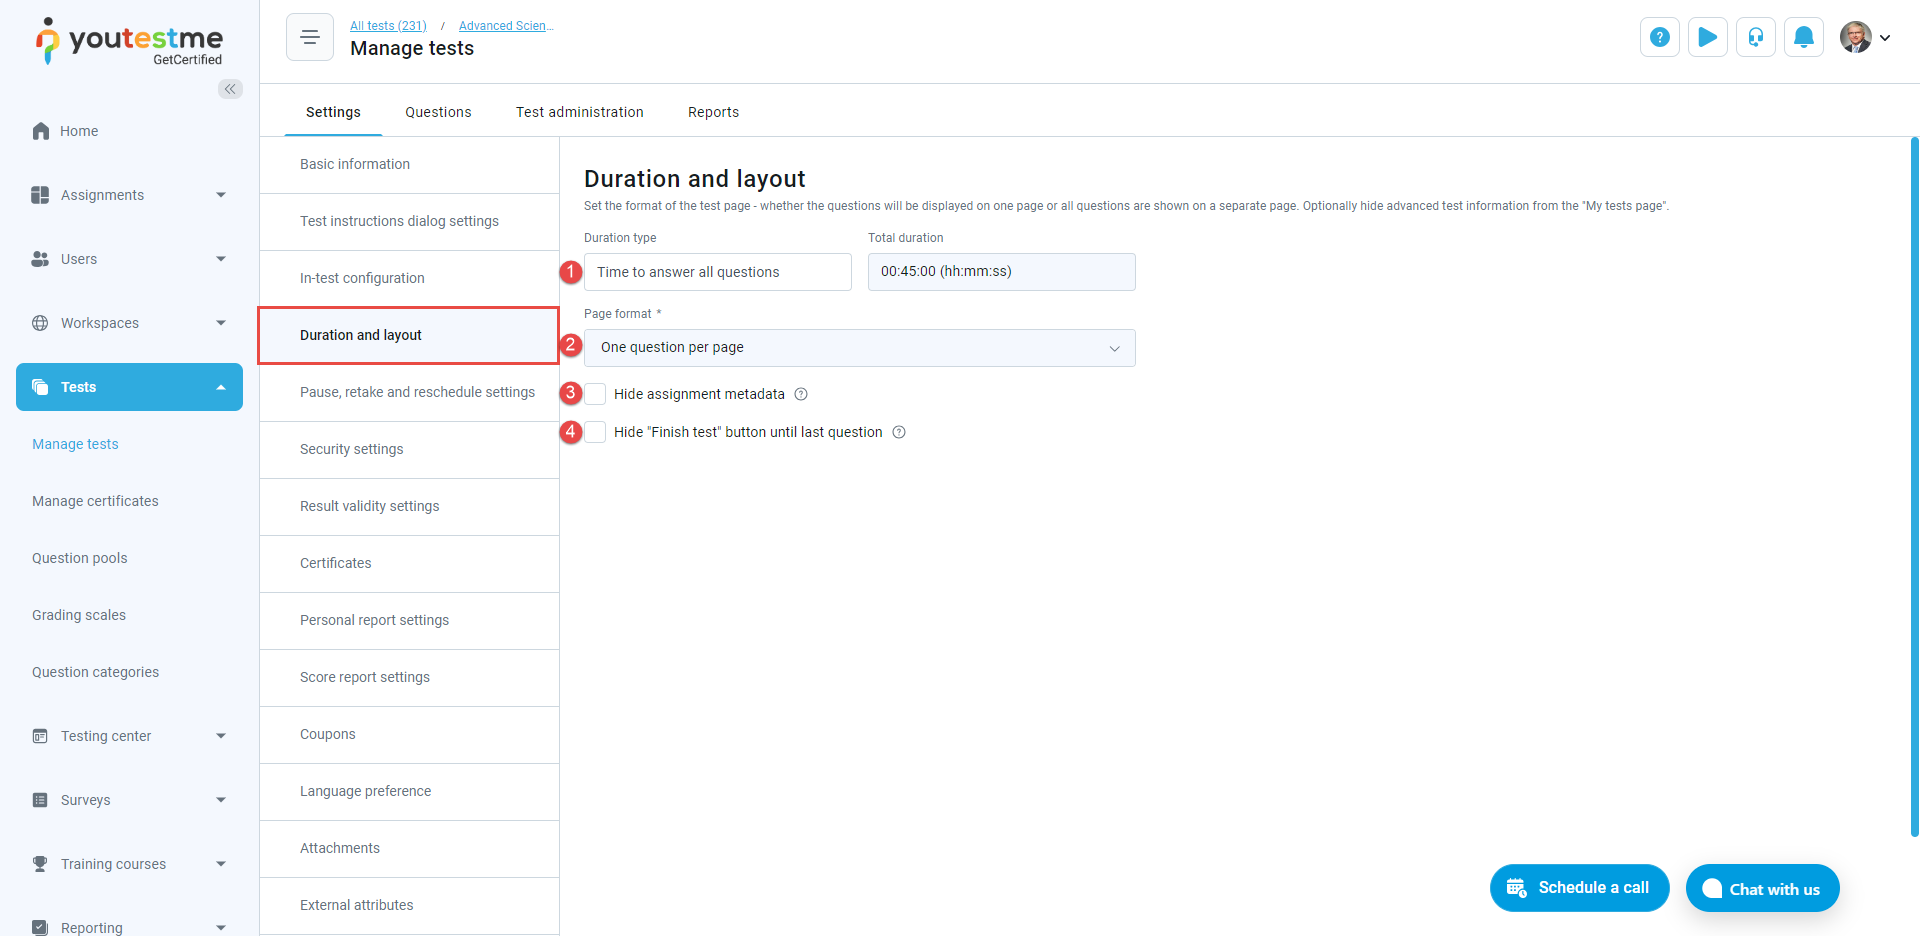
-
-
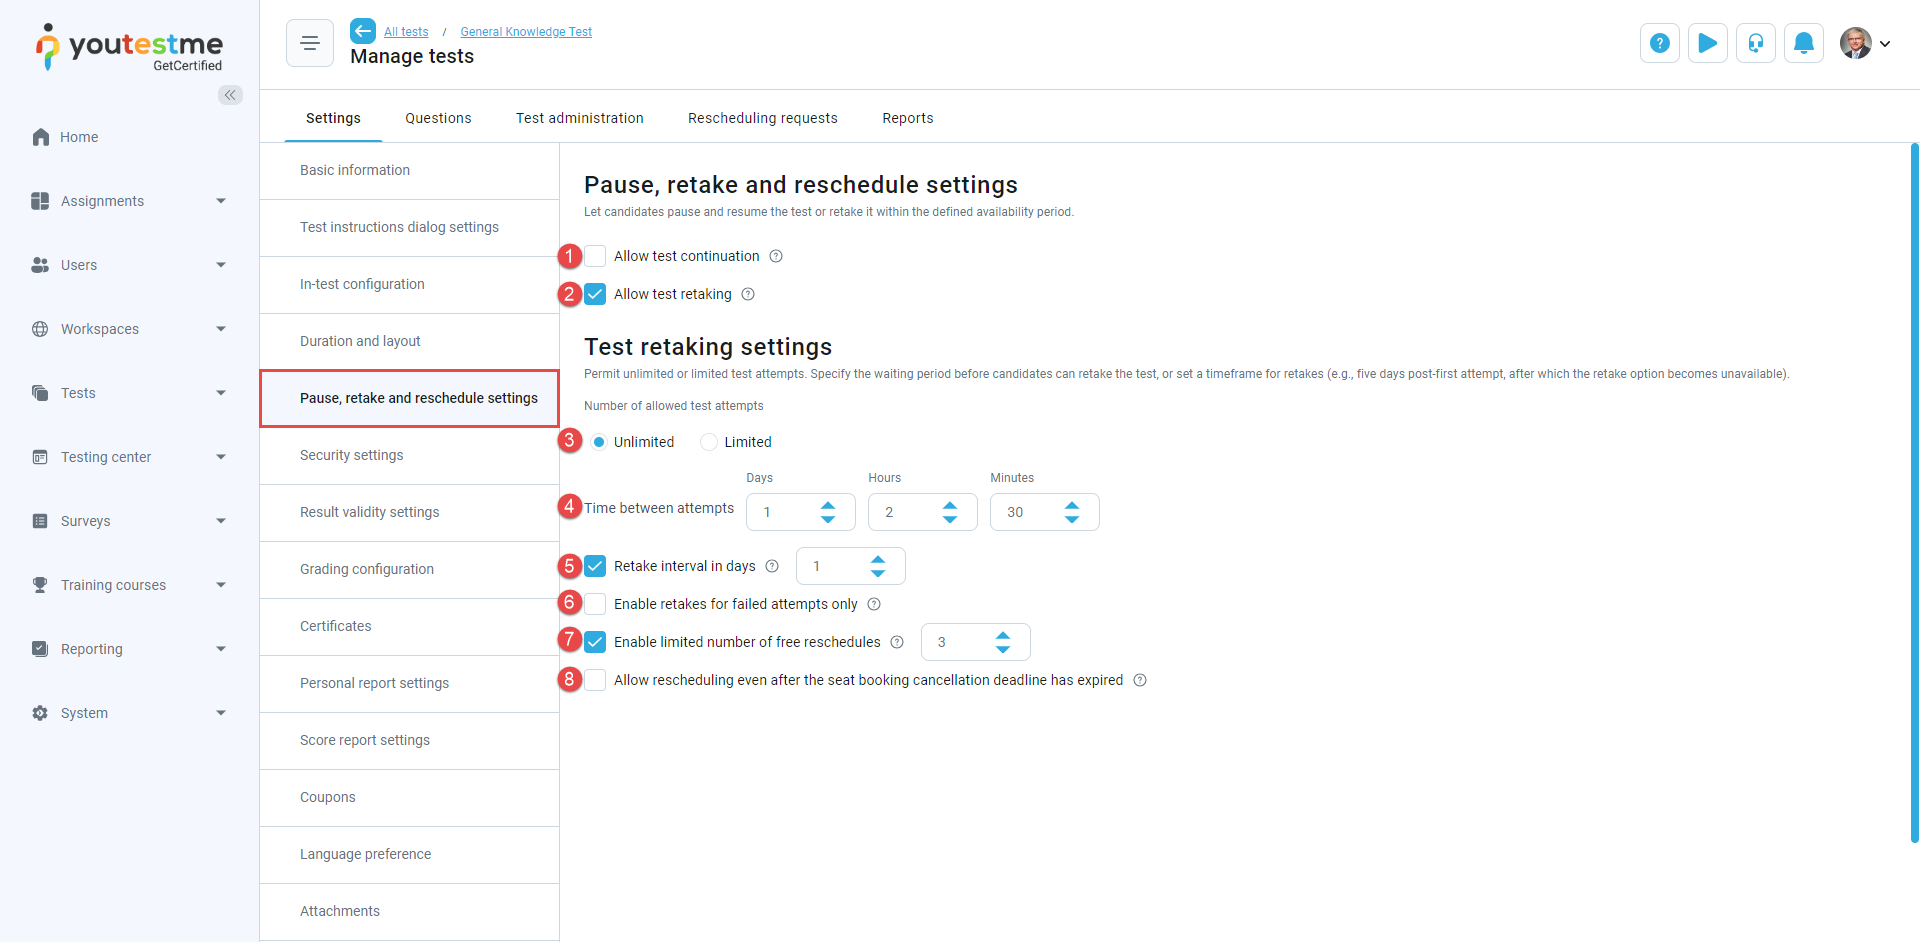
Pause, retake and reschedule settings
Available options on this tab are:
-
Allow test continuation - Enable candidates to pause and resume the test within its availability period. The progress they've made before pausing the test will be saved. The availability period is set during the testing session creation process. If the Allow test continuation option is enabled, the Enable browser lockdown option cannot be activated under the Security settings tab.
-
Allow test retaking - Enable candidates to retake the test within the specified availability period, which is determined during the testing session creation process. Retake conditions can be defined using the options explained below.
-
Number of allowed test attempts can be:
-
Unlimited - Candidate can retake the test an unlimited number of times.
-
Limited - Restrict the number of times a candidate can retake a test.
-
-
Time required to pass between attempts - Specify the duration that must elapse before a candidate is allowed to retake a test after their previous attempt.
-
Retake interval in days - Define the time window for a test retake. If set to 2 days, the retake is only allowed within the following 2 days after the initial attempt.
-
Enable retakes for failed attempts only - Allow retakes only for candidates who did not pass the test.
-
Enable limited number of free reschedules - Set a limited number of free reschedules candidates can use. After spending all of the free reschedules, they will have to send a request to reschedule again.
-
Allow rescheduling even after the seat booking cancellation deadline has expired - Candidates can cancel and reschedule the test even if the cancellation deadline has expired, but they will have to send a rescheduling request.
-
-
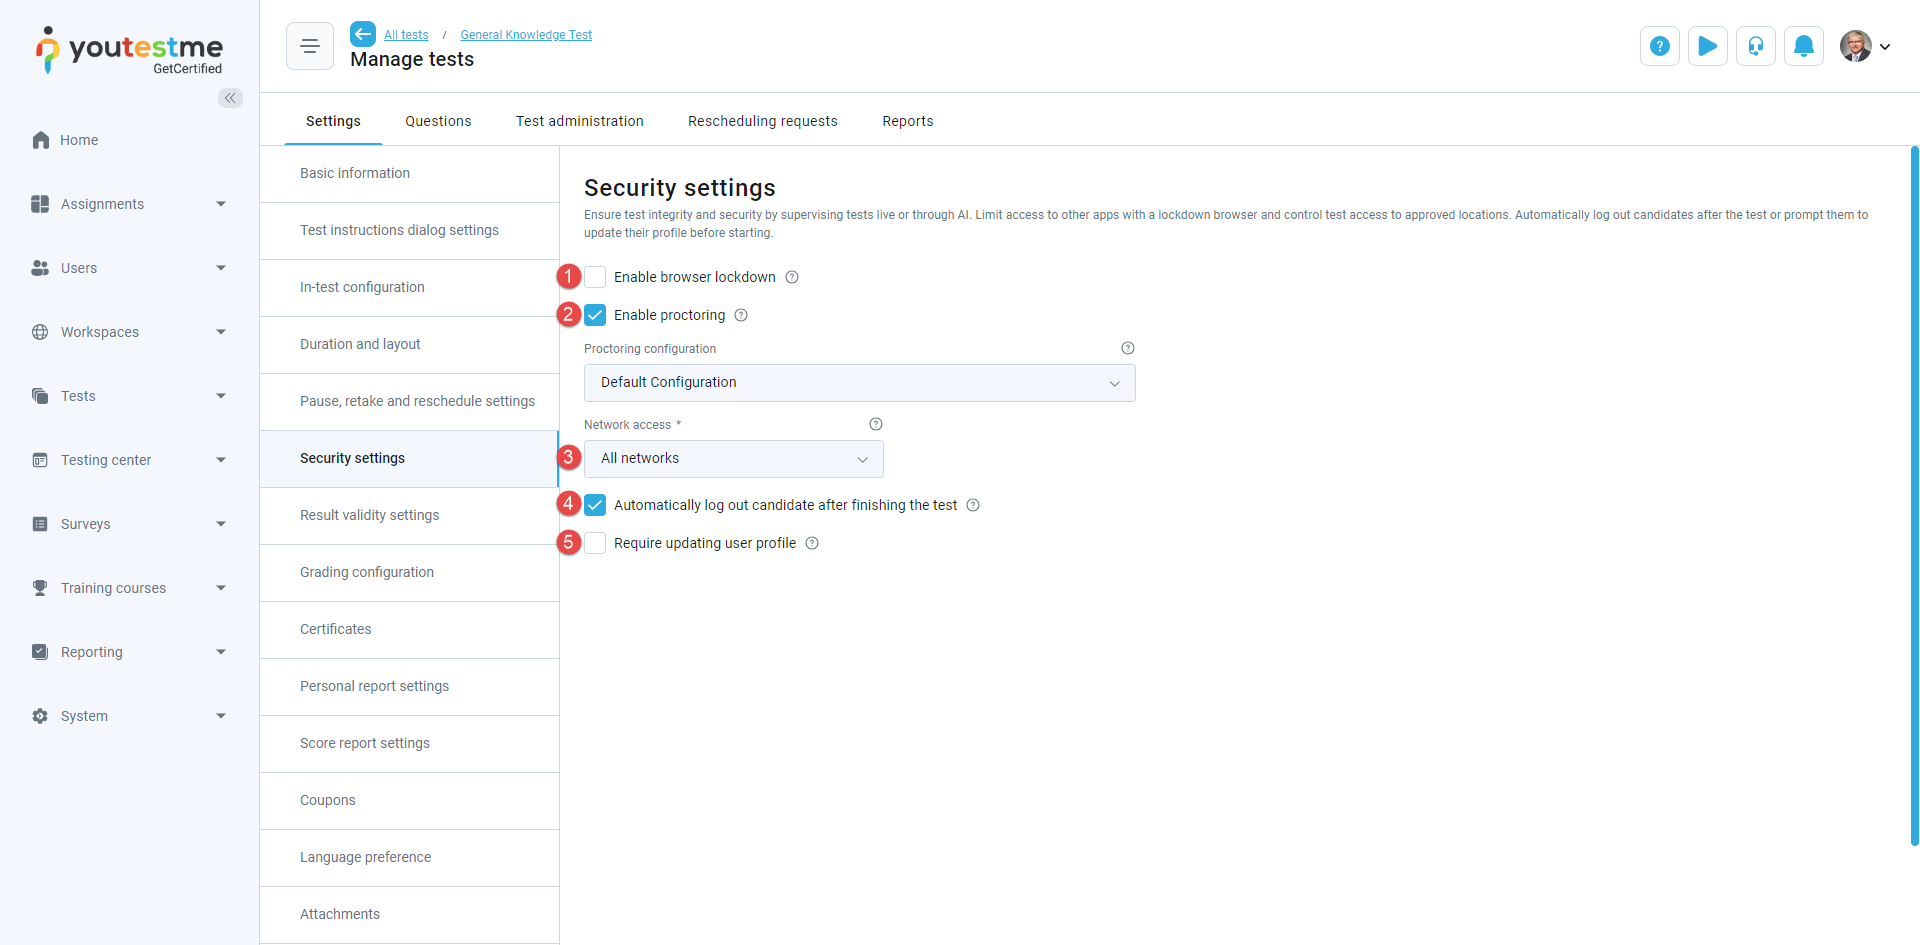
Security settings
Available options on this tab are:
-
Enable browser lockdown - Choose between two options:
-
Built-in protection - During the test, the web browser will operate in full-screen mode. Functions such as cutting, copying, pasting, utilizing the print screen key, and right-clicking on the mouse will be deactivated. If candidates attempt to minimize it, the test attempt will be terminated.
-
Safe Exam Browser - Candidates can only take the test using the Safe Exam Browser (SEB). If this option is chosen, a default configuration will be applied. The configuration file can be modified by uploading a custom configuration created with the SEB Configuration Tool. SEB must be downloaded and installed on the candidate's device (a download link for SEB will be provided if the candidate tries to start the test with a different browser).
-
-
Enable proctoring - Elevate test integrity through dedicated tools that observe and document a candidate's test-taking actions via a camera and microphone. By selecting this option, proctoring will be automatically activated for all new testing sessions, though you have the flexibility to disable it for specific testing sessions as required.
-
Network access - Select whether you want to restrict test access solely to users within your local network by opting for the Internal network option or permit access to candidates both inside and outside your network by selecting the All networks option. Internal network settings must be configured under System/Settings and customization/System preferences/Internal network.
-
Automatically log out candidate after finishing the test - Upon test completion, the application will automatically log the candidate out.
-
Require updating user profile - Upon initiating the test, a screen displaying the candidate's profile information will appear. The candidate can either confirm the existing information or make modifications to proceed with the test.
-
-
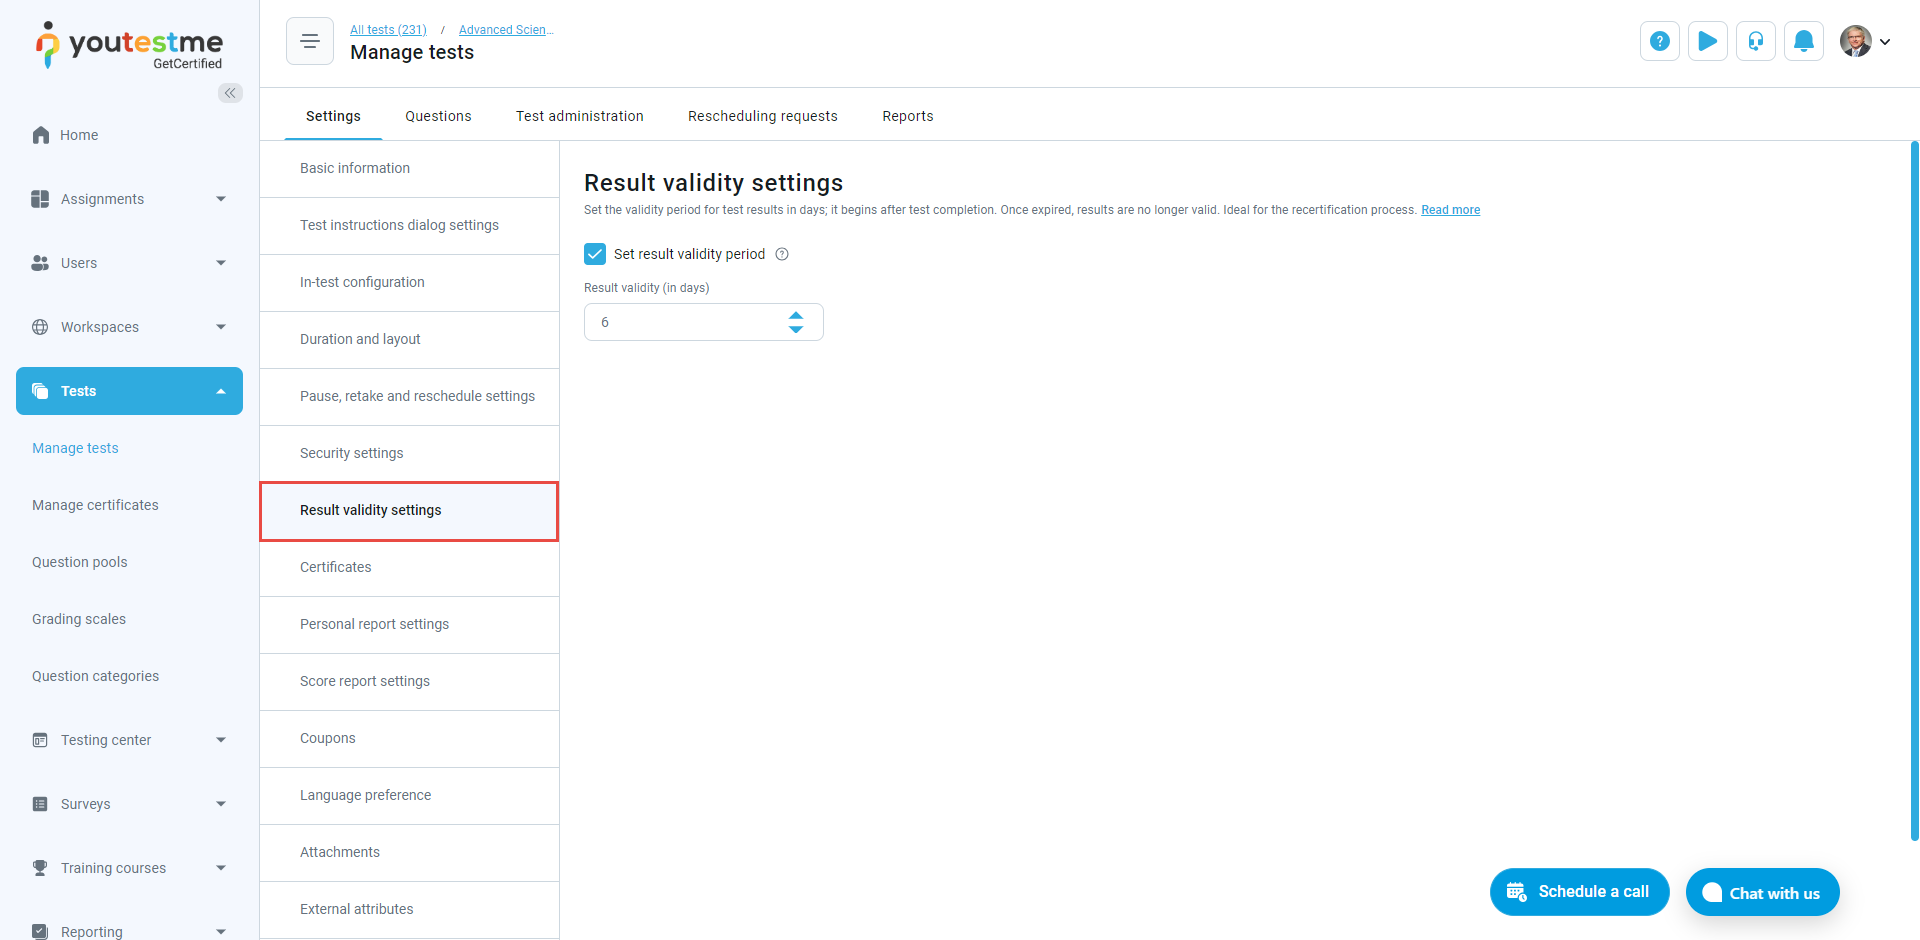
Result validity settings
You can set the validity period for test results in days, starting after the completion of the test. After this period expires, the results are no longer considered valid, and the test attempt will be marked as Suspended.
-
Grading configuration
On this tab, you can define the passing criteria for your test. Use advanced grading configurations if needed, such as defining passing marks for each section, group of sections, etc. Optionally, select a grading scale you previously created to represent the test results as grades, e.g., from A to F.
-
Set passing mark - Define the passing mark in percentage or points.
-
Make the passing mark inclusive and candidates will pass the test if they gain a score equal to or higher than the passing mark.
-
Enable the option to require candidates to obtain a positive proctoring grade in order to pass the test. Otherwise, the proctoring report will not impact the final score of the test.
-
Select a grading scale that you have previously created to link specific grades with corresponding points or percentages achieved. This mapping allows the system to represent the test results using grades, for example, from A to F.

-
Allows collaborative grading by multiple graders. You can set the minimum required grader reports for a final result and enable automatic grader assignments. With auto-assign enabled, the system automatically dispatches grading requests to the specified number of graders based on the minimum required grader reports configuration. Alternatively, you can manually add graders for each candidate attempt. In both cases, graders are chosen from the list defined under the Test administration page.
Once a candidate completes the test, the assigned grader for that specific version, first in the queue, receives a notification. If a grader declines the request, it moves to the next in the queue until the minimum accepted reports are received. Graders assess the questions, and their scores contribute to the final result. In cases of conflicting grades, the next grader in the queue makes the decision. For more detailed information, refer to the Grader report help page.
-
View the list of all question pools used in the test and define descriptive passing marks for each. These passing marks represent the expected level of knowledge for a particular topic but do not affect the final score on the test.
-
Define passing marks based on custom properties assigned to the questions. Dropdown custom question properties can be created, and questions labeled using their values. Optionally, you can define criteria for test passing based on these custom values. For more details on creating a question property report, read explanation below.

To create question property report:
-
Click the Create new button.
-
Enter the Name of the question property report.
-
Provide Description of question property report.
-
Select the question property based on which you want to define grading configuration.
-
Select question property values.
-
Define the passing mark. The candidate must achieve a score higher than the defined score to get a Passed in the question property report.
-
Select Inclusive passing mark to allow candidates to pass the question property report if they gain a score equal to or higher than the passing mark.
-
Select Passing required to make the passing of this question property report mandatory for passing the test as a whole.
-
Select one of the previously created grading scales if needed, to associate specific grades with corresponding percentages achieved in the question property report.
-
Click the Save button.

Note: If one item of the Question property report needs to be passed, candidates can download the Score report with question properties from their report. However, if multiple items need to be passed, the report will not be available.
-
-
Grading configuration (test with sections)
Grading in a test with sections follows the same configuration process as described for the test without sections (explained above). Additionally, there are two additional grading configurations:
-
Define passing marks for sections - Define the passing mark for a section and specify if passing the section is required for the candidate to pass the test. Set whether the defined passing mark is inclusive and decide if you want to assign a grading scale to associate specific grades with corresponding percentages achieved.
-
Define passing marks for section groups.

To create a section group:
-
Click the Create new section group button
-
Enter the section group name.
-
Enter a section group description to provide more information about the section group.
-
Choose the passing mark in percentages or points.
-
Set the passing mark value.
-
Make the passing mark inclusive (candidates pass the section group if they score equal to or greater than the passing mark).
-
Check the Passing required option if passing the section group is necessary for passing the test.
-
Select a previously created grading scale to associate specific grades with corresponding percentages achieved in the section group (e.g., on a scale from A to F).
-
Choose which test sections to include in the section group.
-
Click the Save button.

-
-
-
Certificates
On this tab, you can:
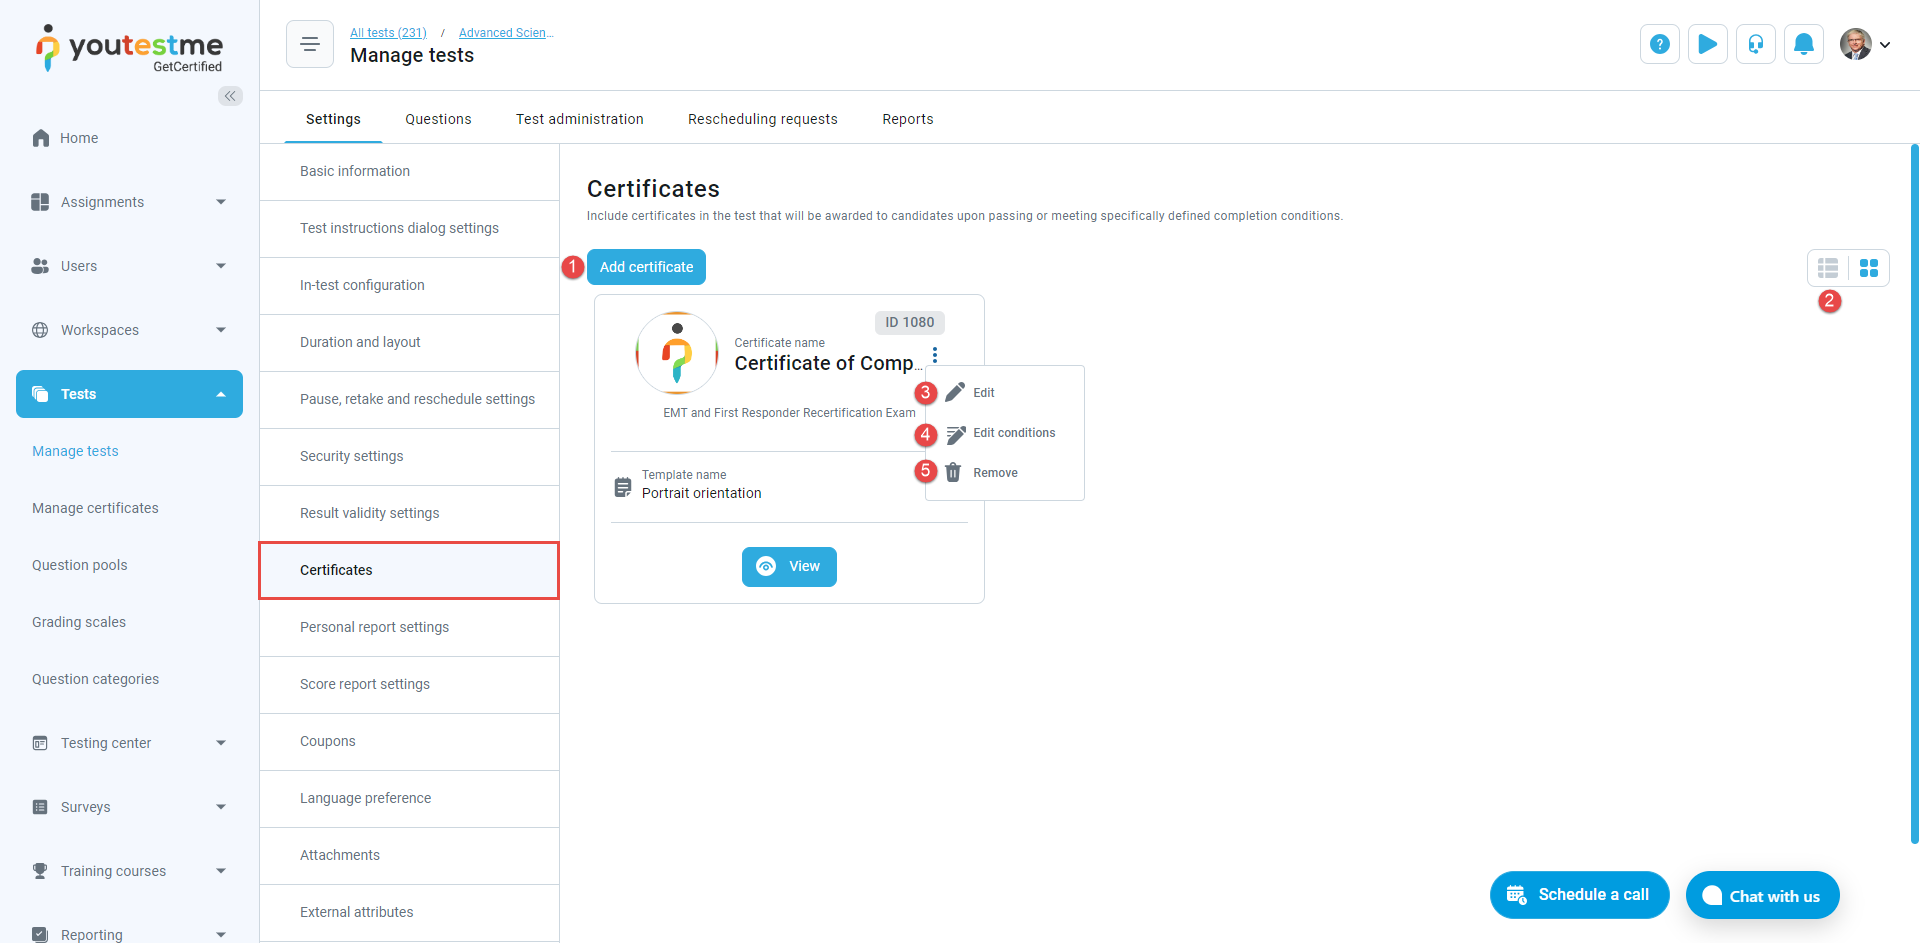
Include certificates in the test that will be awarded to candidates upon passing or meeting specifically defined completion conditions. Candidates have the option to download the certificate in PDF format, as an image, or share it via a link. To add an existing certificate or create a new one, click the Add certificate button. For additional details on creating new certificates, please consult the Manage certificates help page.
Present certificates in a tabular format.
Edit already added certificates. For detailed information about each field, please refer to the Manage certificates help page.
Edit certificate conditions - Set a custom condition for awarding the certificate to candidates upon test completion. Choose the property, criteria, and value. For instance: [Percentage], [greater than or equal], [60]. Using this condition, certificates will be granted to candidates who achieve a percentage greater than or equal to 60%. By default, the certificate will be assigned if the candidate passes the test.
Remove the certificate from the test. If a candidate has already earned it and you remove the certificate from the test, it will still be visible in the candidate's report.
-
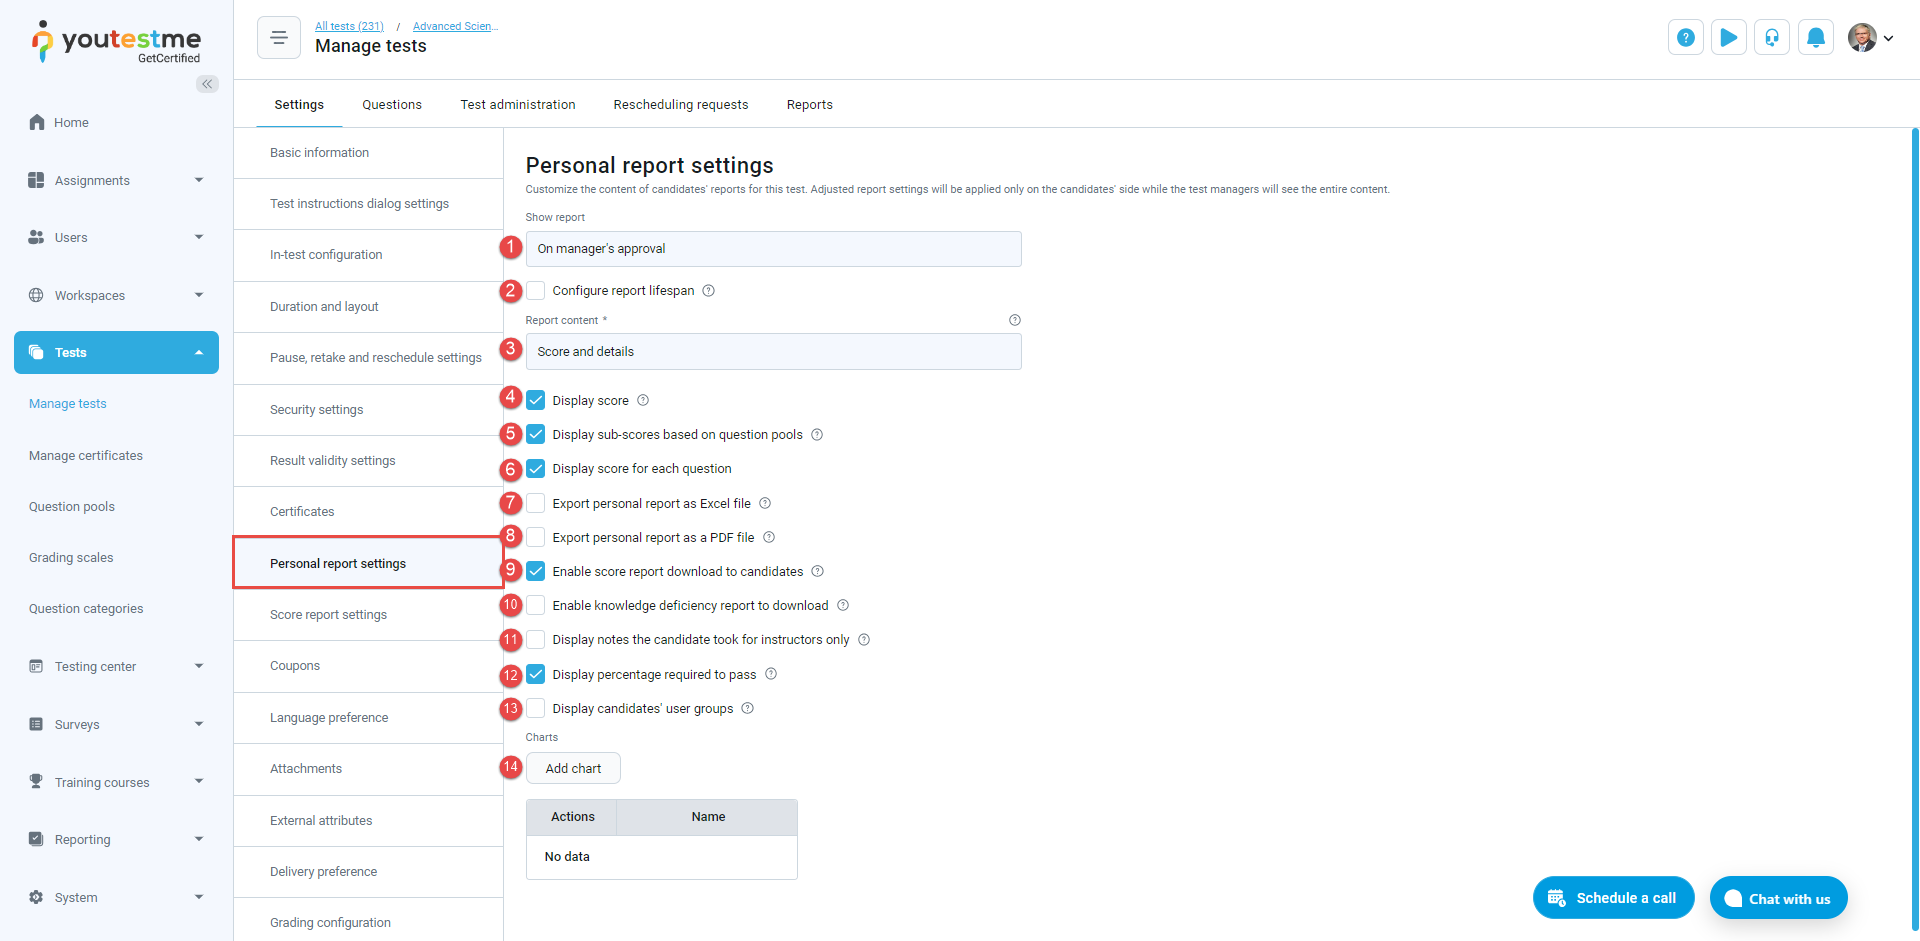
Personal report settings
Customize the content of candidates' reports for tests. Adjusted report settings will be applied only on the candidates' side while the test managers will see the entire content.
-
Show report - Select when the report will be displayed to candidates.
-
Immediately after finishing - Candidates will see the report immediately after completing the test, although some questions may not be graded.
-
Immediately after result grading - Candidates will view the report after the test manager completes grading for all questions that require manual evaluation. The report will be displayed immediately if none of the questions necessitate grading.
-
Immediately after result verification - Candidates will view the report after the test manager verifies their test attempt. Once verified, no further changes to the test results will be possible.
-
On manager's approval - Candidates will access the report after approval by the test manager. The approval can be done collectively for all candidates (via Testing center/Candidates) or individually for each candidate (via the candidate's report).
-
Real-time grading - Candidates will observe score updates in real-time during the test-taking process, with changes reflected after submitting each answer.
-
-
Configure report lifespan - Specify the timeframe during which the question details will be visible to the candidate upon opening the report.
-
Report content - Choose whether the report will display only the score or also the preview of the given and correct answers to each question.
-
Display score – Display achieved score in the report. If this option is not activated, the Export personal report as Excel file and Export personal report as a PDF file options cannot be enabled.
-
Display sub-scores based on question pools – Display the table with test results broken down by question pool scores.
-
Display score for each question – Show question details, including metadata, offered, selected, and correct answers, for all questions in the test. If this option is not activated, the Export personal report as Excel file and Export personal report as a PDF file options cannot be enabled.
-
Export personal report as Excel - If you select both the Display score and Display score for each question options, the Excel export option will be automatically enabled and checked by default. You can uncheck the option if you prefer not to allow the export of the candidate's report in Excel format.
-
Export personal report as PDF - If you select both the Display score and Display score for each question options, the PDF export option will be automatically enabled and checked by default. You can uncheck the option if you prefer not to allow the export of the candidate's report in Excel format.
-
Enable score report download to candidates - The score report represents an upgraded iteration of the personal report. The content within the score report is customizable for each test. Candidates can download their score report directly from their report.
-
Enable knowledge deficiency report to download - Candidates can download the knowledge deficiency report from the personal report. The report will display a list of question pools from which the candidate answered at least one question incorrectly. The report will show the lowest level of the question pools (sub-pools). The question pools will be arranged in alphabetical order and will not be divided into sections, if any.
-
Display notes the candidate took for instructors only – Notes taken by candidates during the test will not appear in the personal report. Only instructors can view these notes within the report.
-
Display percentage required to pass – Show the percentage required to pass the test in the personal report.
Display candidates' user groups - Show user groups where a candidate is a member.
Charts - Generate charts that select questions based on specific properties assigned to them and display the total score or average points. For more information on creating a radar chart, refer to this article.
Note: Some question types, such as essays, require manual grading by an instructor. Therefore, the results of tests containing this type of question cannot be immediately displayed.
-
-
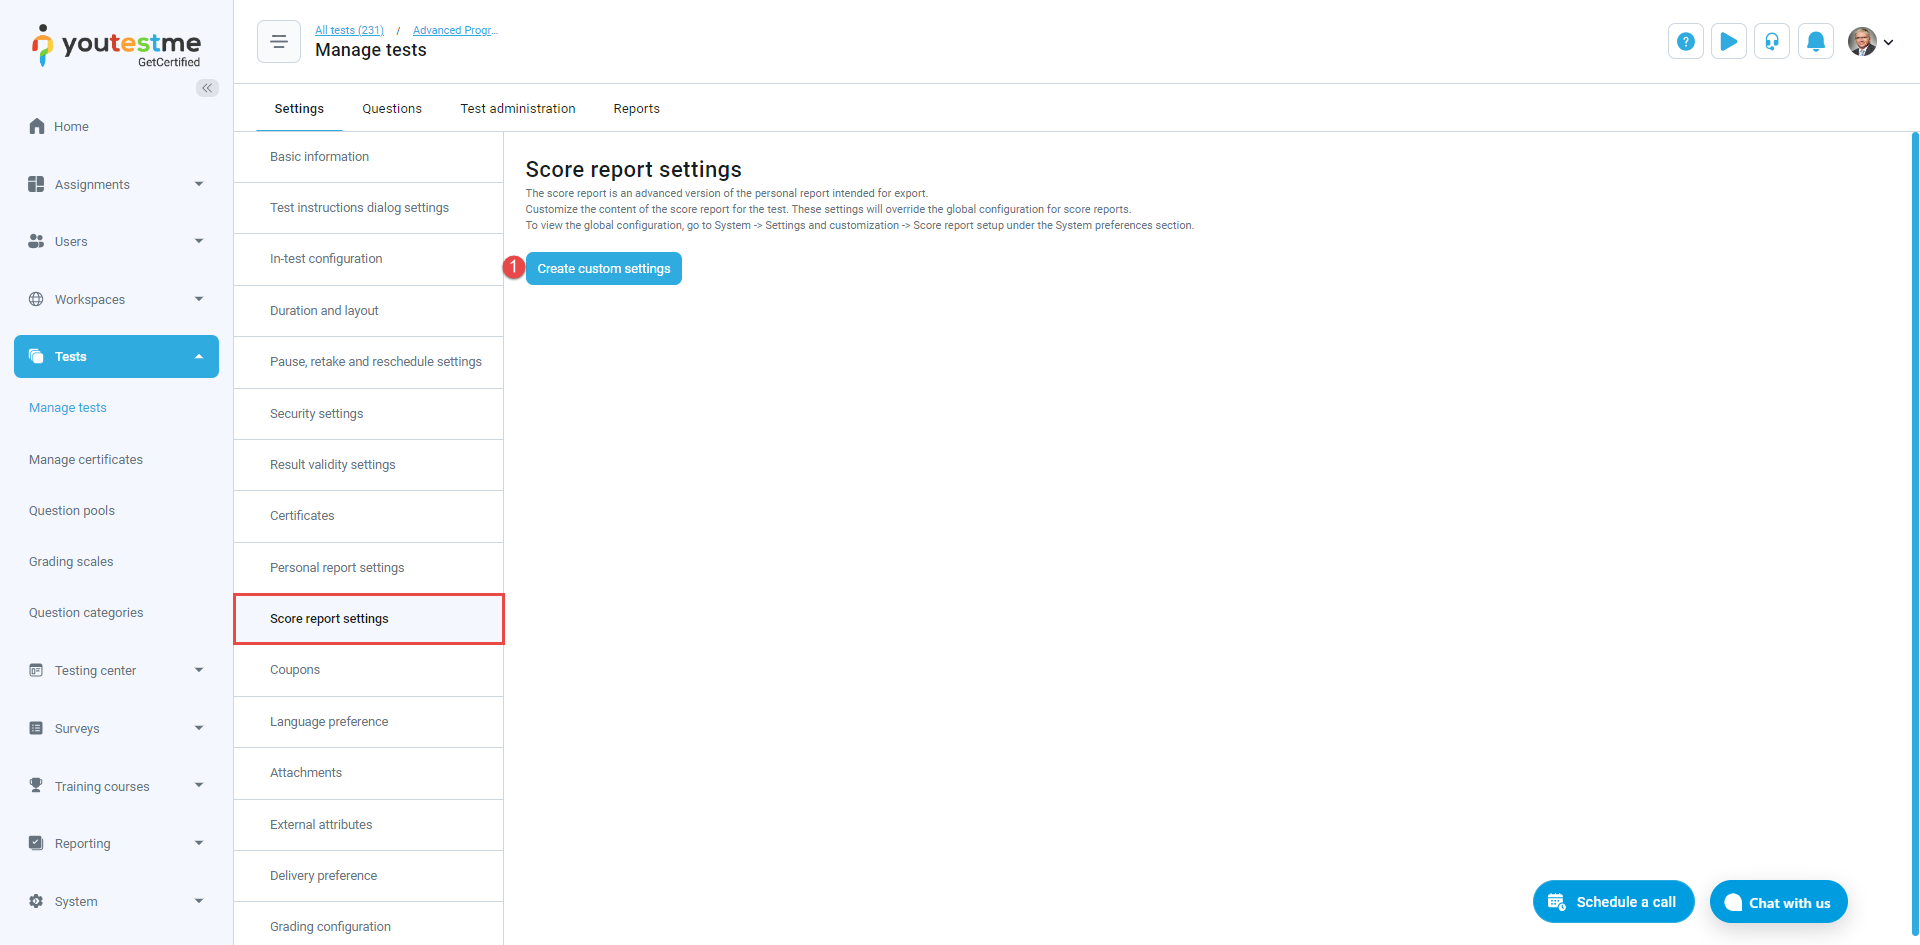
Score report settings
The score report is an advanced version of the personal report intended for export. Customize the content of the score report for a particular test. These settings will override the global configuration for score reports.
Click the Create custom settings button.
-
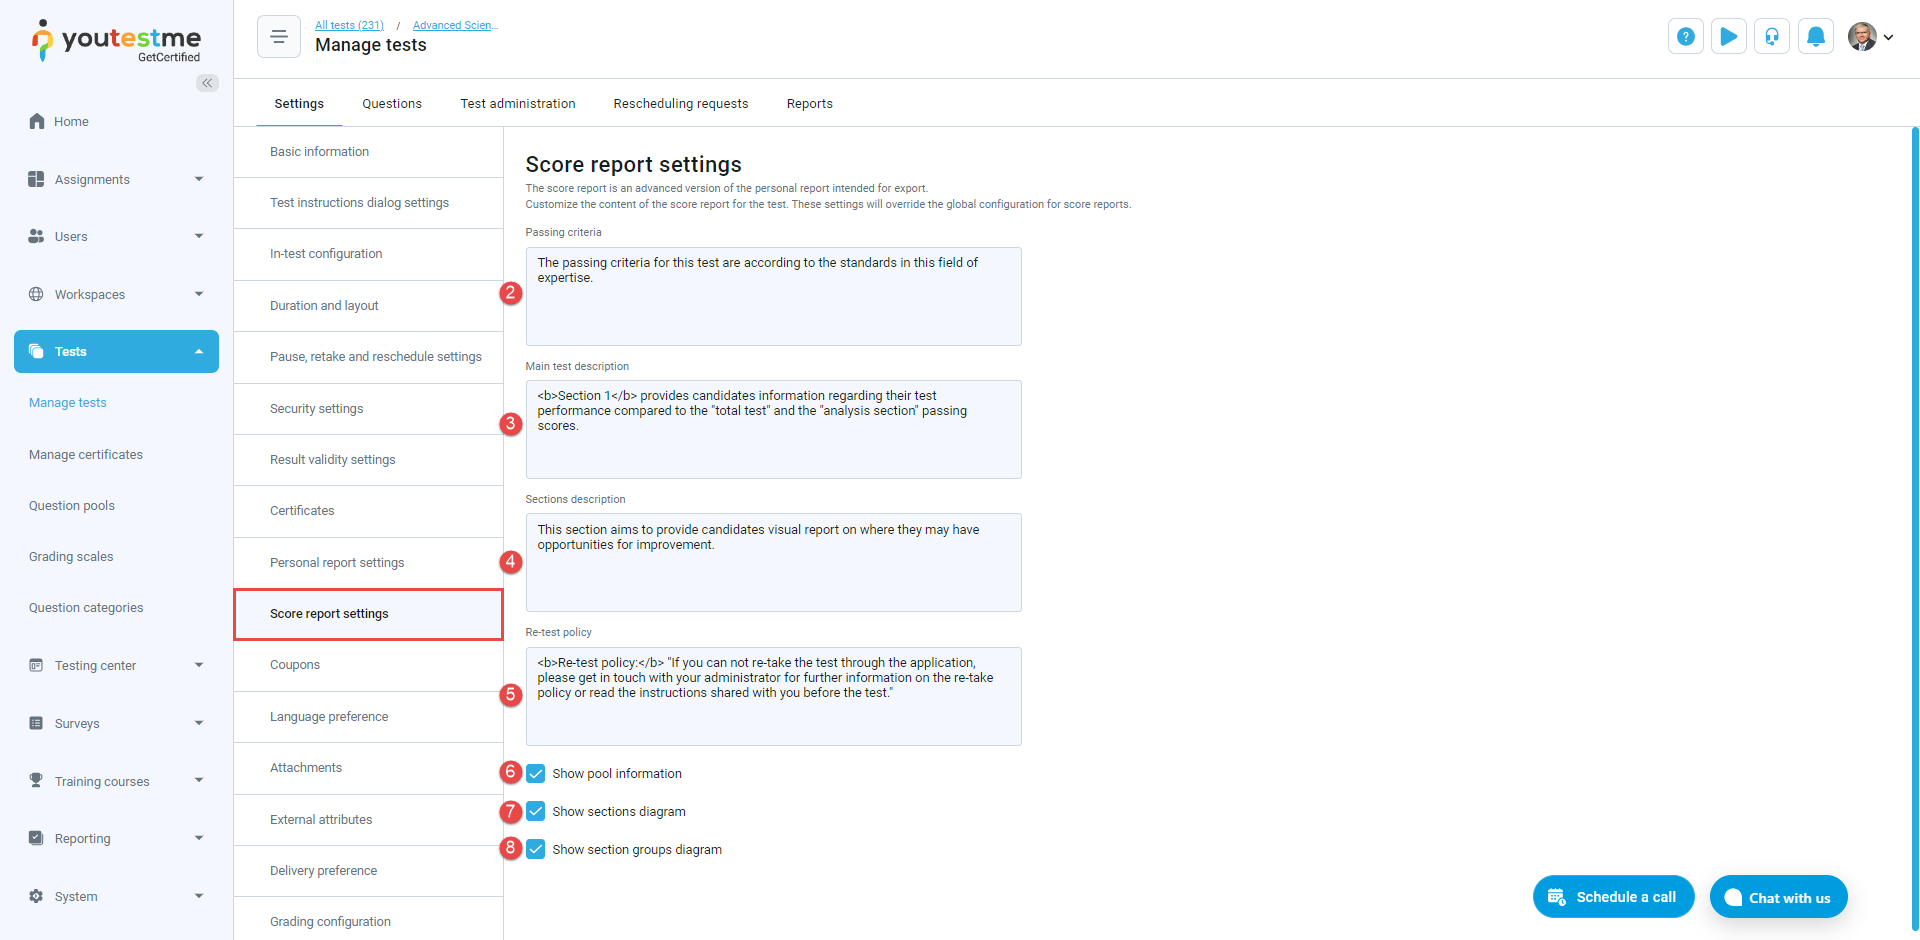
Passing criteria - Enter the text outlining the conditions for taking the test.
-
Main text description - Provide necessary information about the test.
-
Sections description - Enter information about individual sections.
-
Re-test policy - Include details about the retake policy for the test.
-
Show pool information - Check this option if you want the report to contain information about the question pools included in the test.
-
Show sections diagram - Check this option if you want the report to display information about candidates' results for each section.
-
Show section groups diagram - Check this option if you want the report to include a diagram for created section groups.
-
Coupons
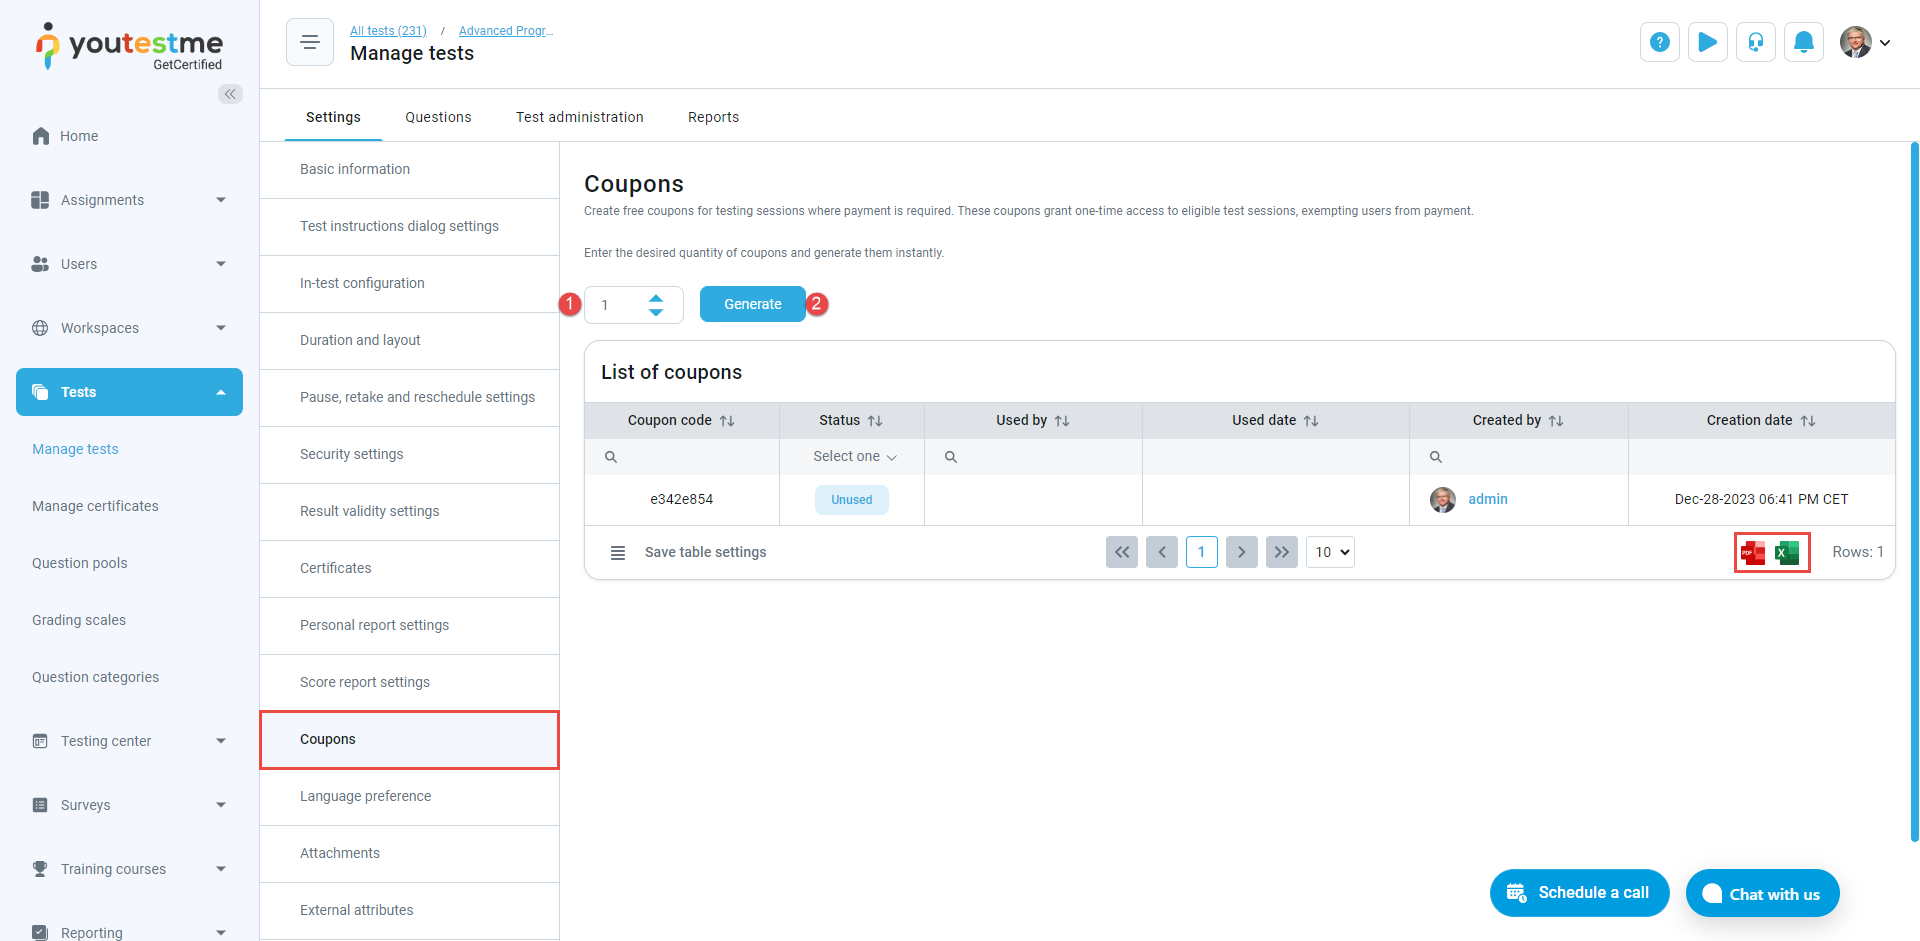
Create free coupons for testing sessions where payment is required. These coupons grant one-time access to eligible test sessions, exempting users from payment.
To generate coupons:
-
Enter the desired quantity of coupons.
-
Click the Generate button.
The generated coupons will be added to the coupon table which can be exported as a PDF or an Excel file by clicking the corresponding icon.
Coupons are not personalized, allowing you to share the coupon code with any candidate who needs to take the test. For more information on using coupons from the candidate's perspective, refer to this article.
-
-
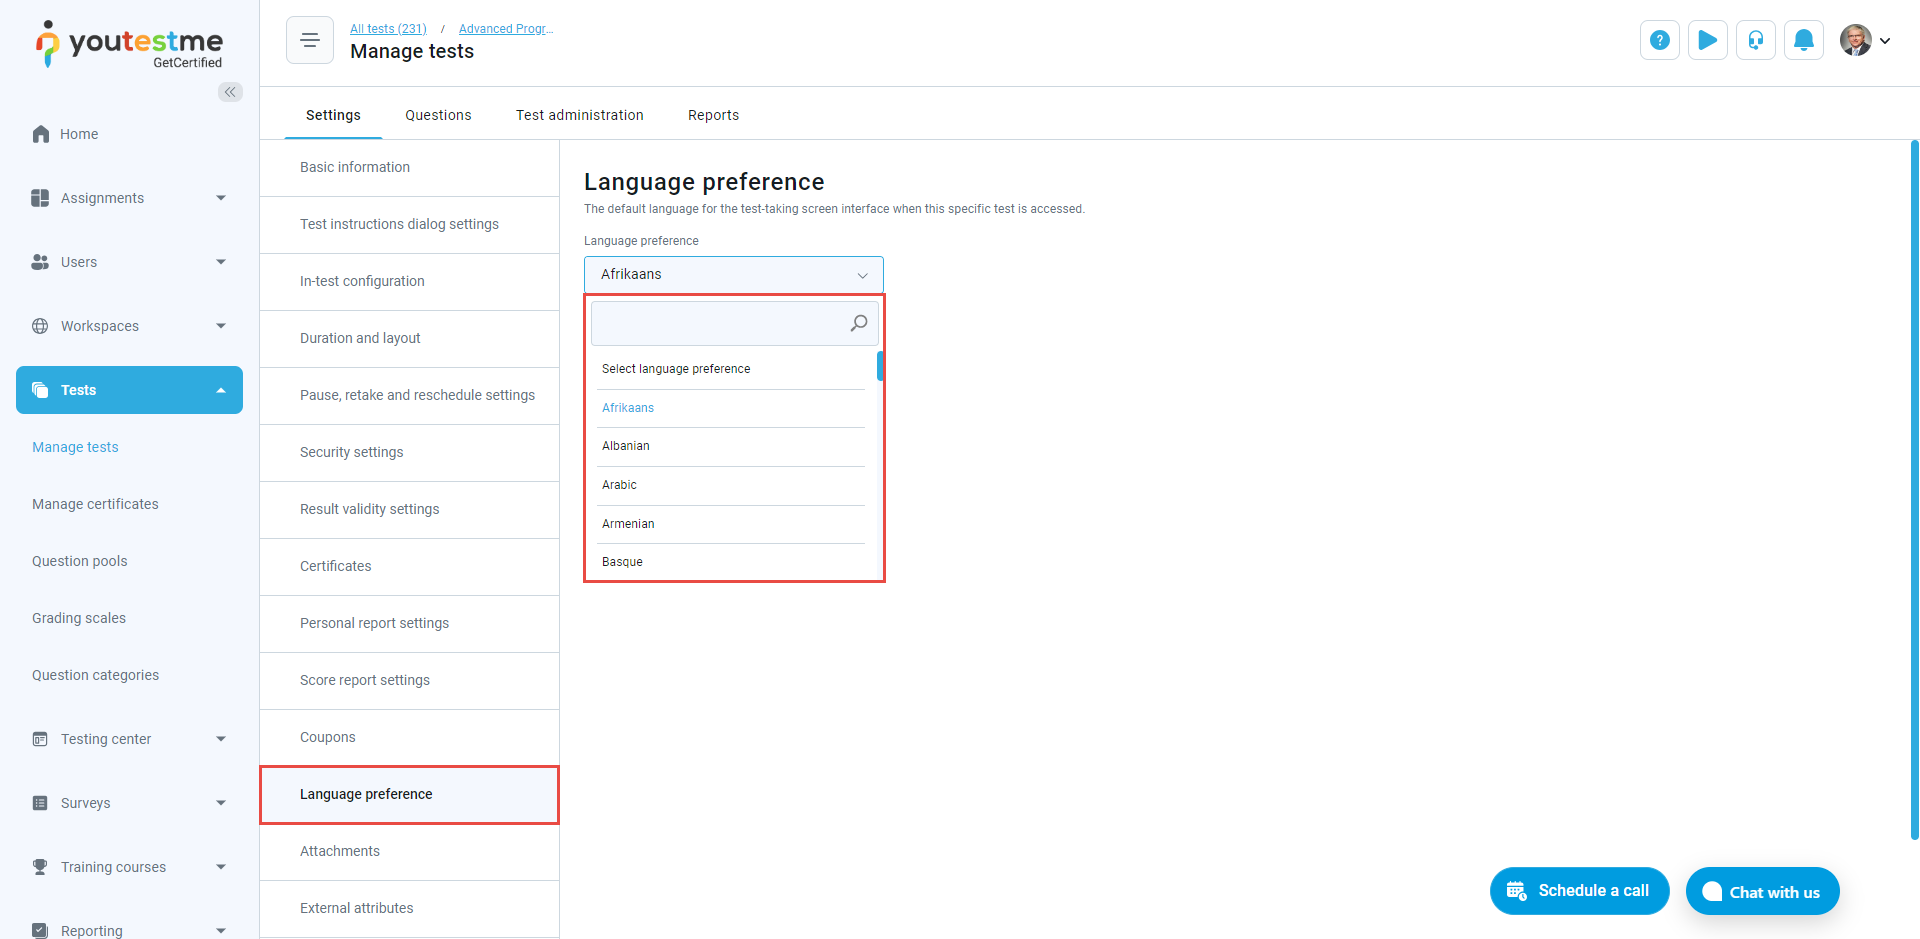
Language preference
Specify the default language for the test-taking screen interface (excluding user-generated content, such as question text, test descriptions, etc.) when accessing this test. If a language preference is configured, it will override the application interface language for the user account.
-
Attachments
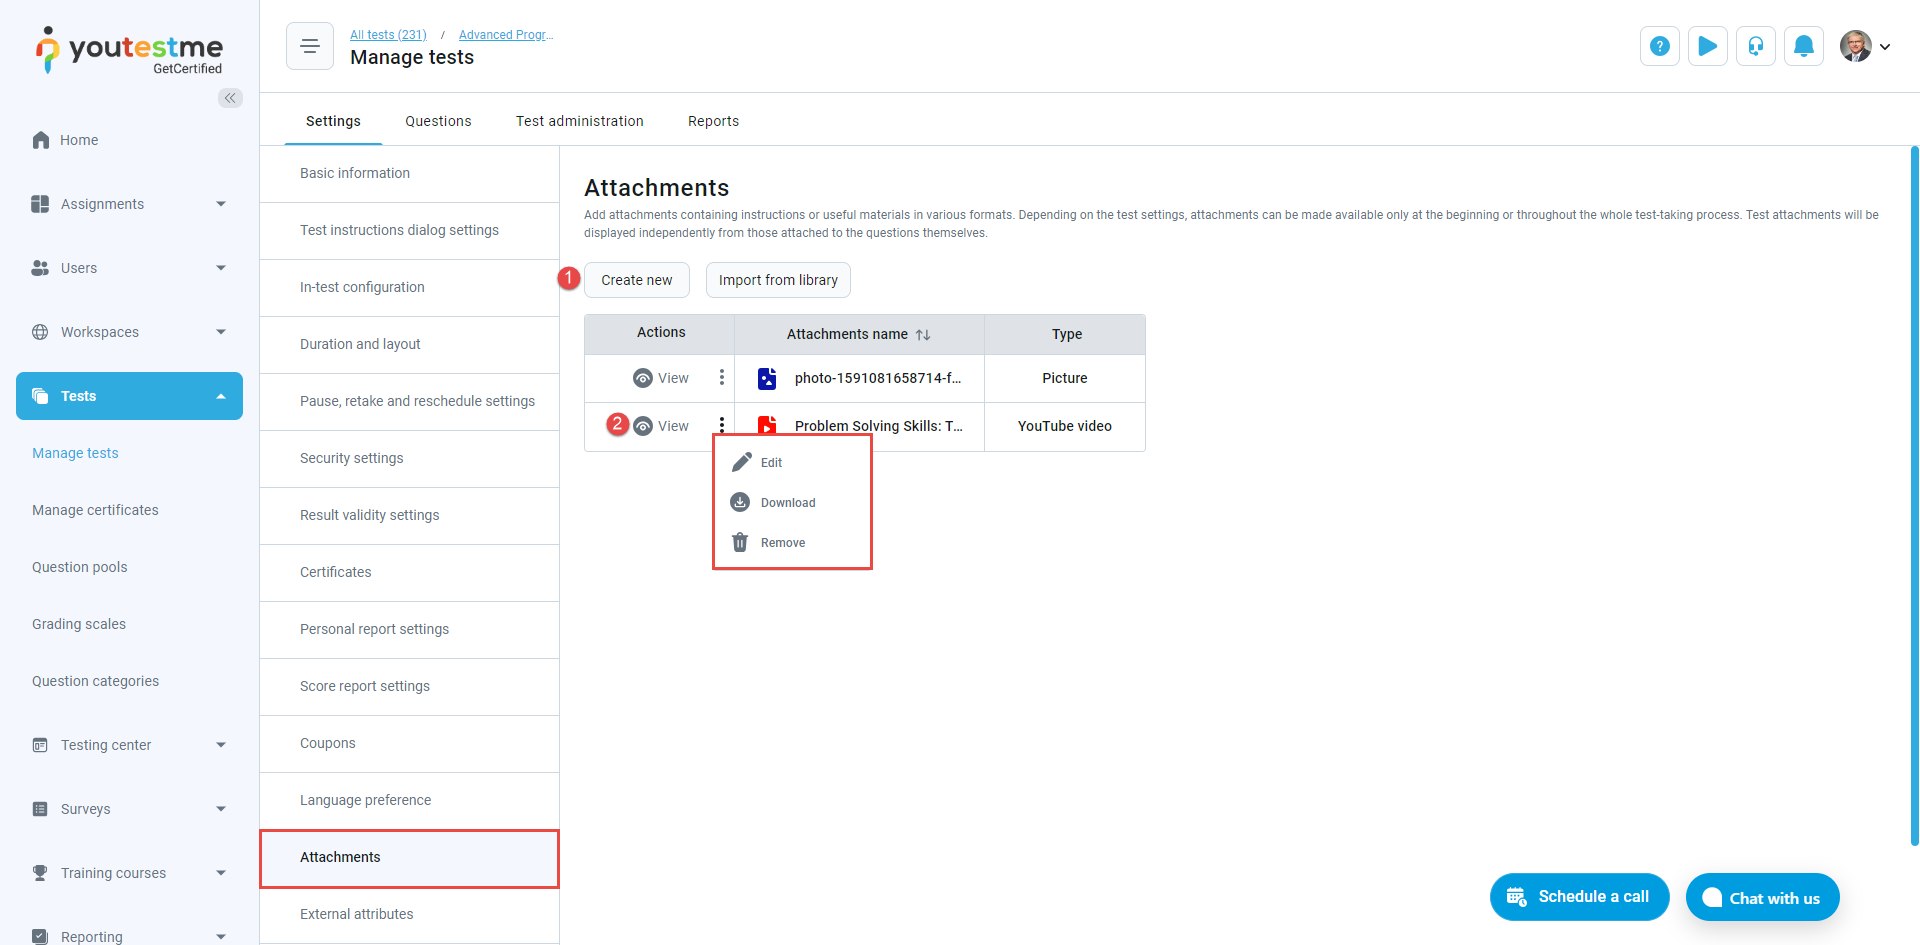
Add attachments containing instructions or useful materials in various formats. Depending on the test settings, attachments can be accessible either only at the beginning or throughout the entire test-taking process. Test attachments will be presented independently from those attached to the questions themselves. You can create new attachments or import existing ones from the library. An explanation of all fields for attachment creation and import can be found on System/Settings and customization/Attachment library.
All test attachments will be presented in a table, allowing you to view, edit, download, or remove them by clicking the corresponding icon.
-
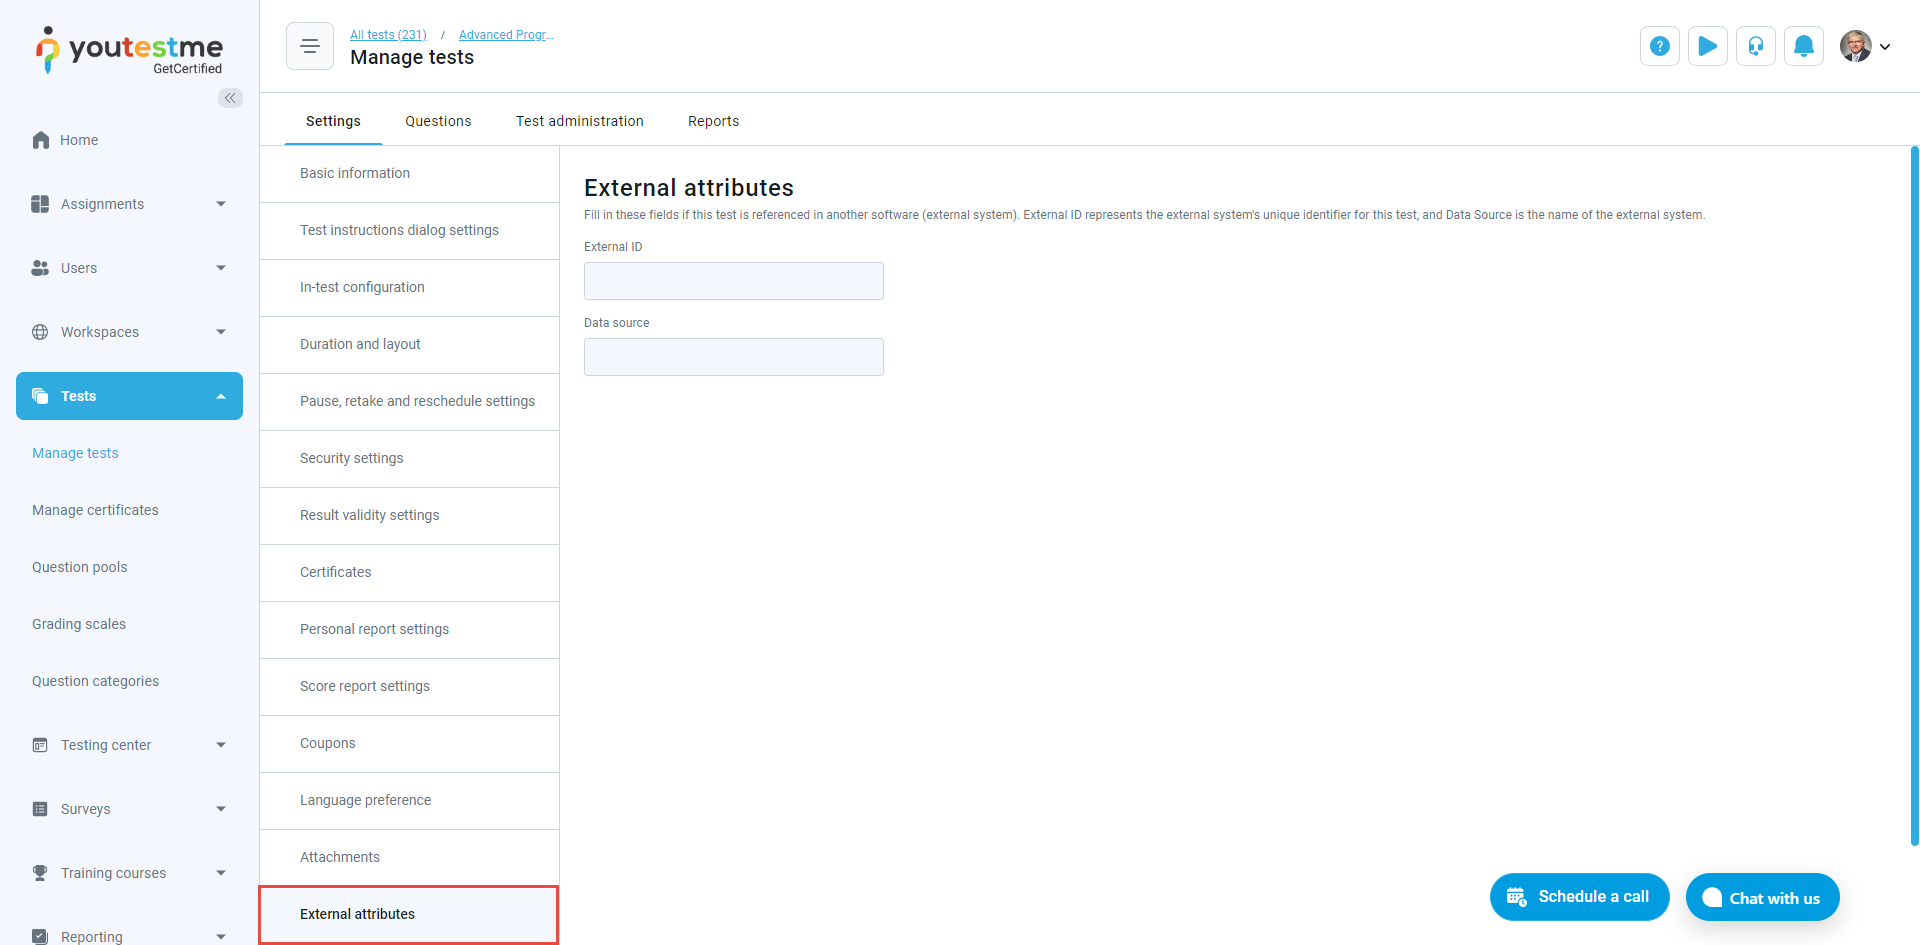
External attributes
Fill in these fields if this test is referenced in another software (external system). External ID represents the external system's unique identifier for this test, and Data source is the name of the external system.
-
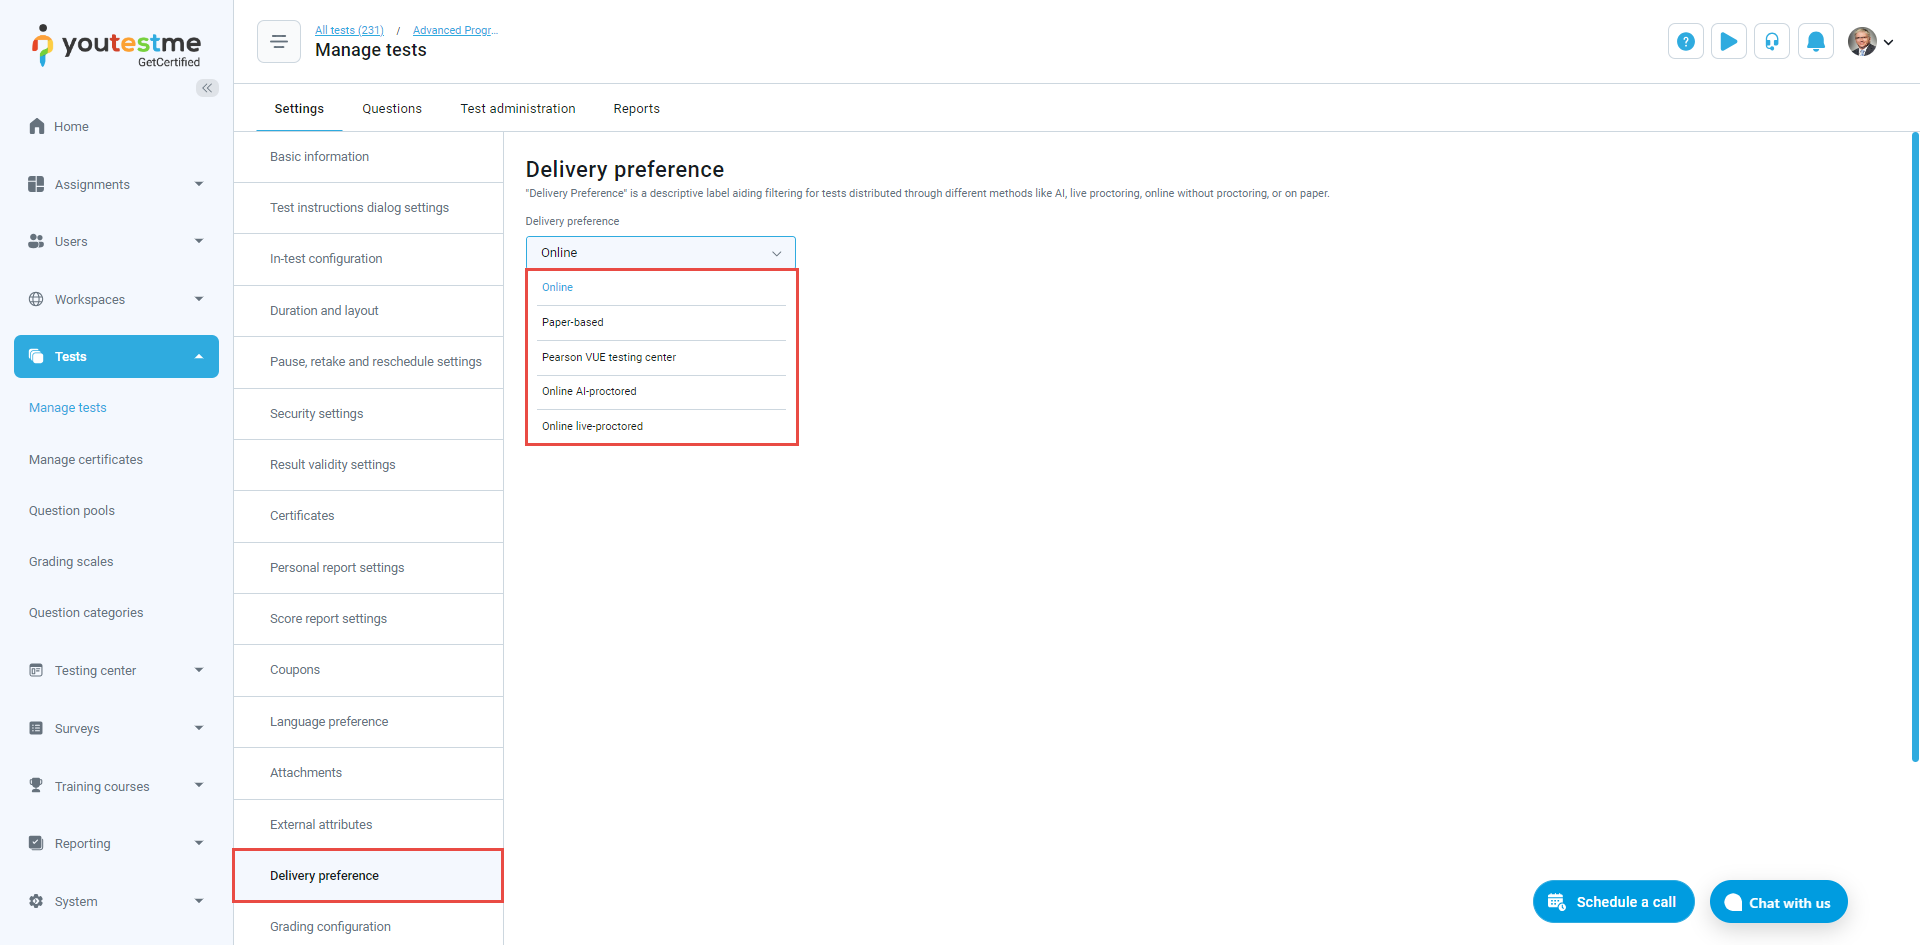
Delivery preference
Delivery preference is a descriptive label aiding filtering for tests distributed through different methods, such as online tests with AI/live proctoring, online tests without proctoring, or paper-based tests.
-
-
Questions
In the Questions tab, you can view and edit the test questions, and monitor question statistic.
Available sections on this page may be:
Test structure information - This section is visible for tests generated based on question difficulties and question categories. Here, you can view the rules for test generation, including the number of questions from each rule or question difficulty that will be included in the test version. Additionally, information about points and penalties is provided.
Randomization settings - In this section, you can choose to randomize the question order for each candidate, as well as the answer order in single and multiple-choice questions.
List of test versions - In this section you can see the list of all test versions generated for the test. Optionally, filter the table to include archived versions. For more information on managing test versions, check the Managing test versions chapter.
List of questions from chosen test version - For generated tests, you can review details and examine statistics about the questions. In manually created tests, you can also edit the list of questions. This includes removing or editing existing questions, as well as adding new ones. For more information on editing questions, refer to the Editing questions chapter.
List of question pools used from generation questions from the test version - This section is accessible for tests generated based on question difficulties and manually created tests.


Managing test versions
For test versions generated in the test, you can perform the following actions:
View test version.
Rename test version.
Edit version code - This code can be useful when exporting tests for paper format or when categorizing tests using custom codes.
Copy test version which you can additionally customize.
Archive test version - The candidates will not be presented with the archived version in future test attempts.
Generate updated versions - Generate a new set of active questions for the updated version, while archiving the previous one.

Note: In manually created tests, changes in question pools won't automatically update questions in test versions. Information about inactive questions in the test version can be useful in such cases. For more details on how to easily update questions in manually created tests, refer to this article.
Editing questions
Editing questions in the test version will archive the previous version, but you can still access it to view the questions if there were candidates who had already taken that version of the test. Additionally, a new version of the test will be created and provided to candidates taking the test after the changes.
-
Click the Edit questions button. Confirm creating a copy of the test version by clicking Yes.
-
Click the Import questions button to add existing questions from question pools. Select the desired questions pool and questions for import.
-
Create new question by clicking the respective button and choosing the desired question type.
-
Adjust the question order by specifying the desired number.
-
Preview how the question looks in the test-taking process.
-
Edit the question. For explanations of each field, refer to the Question types help page.
-
Delete a question from the test version.
To update the test version:


-
Test sections
In the Test sections, you can view information about the test sections included in the test. This includes details about each section such as the section name, passing mark, and whether it is required to pass in order to pass the overall test. Click the Details button to access the section and manage its settings.

Test section settings are similar to the test settings. For an explanation of each option, refer to the Settings chapter.
Additional options that do not exist on the test level:
Enable revisiting section under the In-test configuration tab - Candidates can switch between sections until they submit their answers for each section by clicking the Finish section button. To navigate between sections, candidates can use the table with section information. Some test sections may have this option enabled, while others have it turned off. Revisiting is only possible in sections where this option is enabled.
Section auto-assignment tab - Here, you can specify the conditions under which this section will be automatically assigned to candidates when they attempt to start or book this test. For more information about this feature, refer to this article.


Test administration
-
Managers
The user assigned as a test manager will possess all administrative privileges for the test. This includes the ability to edit test settings, add new candidates, proctors, and managers, create testing sessions, and monitor the progress of each candidate. Additionally, a manager can generate test reports and view question statistics.
On this page, you can:
-
Assign users as test managers.
-
Remove existing users as test managers.
-
Present a list of managers in tabular format.

-
-
Graders
Graders can review test attempts on the assigned test version when the Multiple graders option is selected in the grading configuration. If auto-assignment is enabled, grading requests are immediately sent to a specified number of users with this role, determined by the Minimum grader reports for final result setting. Graders are chosen based on their position in the queue. For instance, if the setting is 2, the first two graders in the queue will get the grading requests. If a grader declines, it moves to the next in the queue until the minimum required reports are received. Graders assess the questions, and their scores contribute to the final result. Candidate results are released only after each assigned grader completes grading, depending on the specified number of required graders. If there are conflicting grades, the next grader in the queue makes the final decision. If auto-assignment is turned off, you can manually select graders from the list for each candidate's report.
On this page, you can:
-
Choose the test version to which you want to assign graders.
-
Click the Assign graders button.
-
Select the users you want to assign.
-
Specify the grader's position in the queue, determining the order in which they will grade the test attempt.
-
Remove a grader from the list.

-
-
Authorizations
Test authorization regulates user access to tests. You can establish criteria, like mandatory payments or specific qualifications, for users to gain test authorization. Users without the necessary authorization for a test will not be able to view the test in their assignment list.
In the table, you can view all authorizations for the test. For detailed explanations of each column, refer to the Test authorizations help page.
For instructions on creating a new authorization, refer to this article.
To configure auto-authorization settings:
-
Navigate to Auto-authorization settings.
-
Define the conditions users must meet to be automatically authorized for the test.
-
Specify how many times a candidate can use the same authorization to take the test. If not set, the candidate can have an unlimited number of test attempts with the same authorization.
-
Set the expiration date for the authorization. Once this time passes, the user can no longer access the test with that authorization.
-
Click the Save button.

-
-
Comments
The Comments tab shows all comments linked to the chosen test. This is where you can make notes about changes in test settings, test organization, and so on. You can switch to see all comments for the test or just the ones you made.
To add new comment:
-
Click the New comment button.
-
Type in your comment.
-
Click the Confirm button to save your comment.

-
Reports
Here, you can can access and view various reports related to test results, candidate performance, and other relevant analytics.
On this page, you can:
-
Open report builder to generate custom reports.
-
Choose to Include suspended attempts in the statistics displayed below.
-
Preview attempts summary report. This report provides details like the total number of candidates who took the test, candidates who started but didn't finish, those who completed it, the number of reports that need grading, and the passed/failed attempts. It also shows the highest score, lowest score, average score, median, and standard deviation.
-
Release reports to candidates - Enable candidates to view results and notify them via email. Once a test manager clicks this button, candidates who have completed the test successfully but haven't seen the report yet will receive their reports.
-
View a graphical presentation of the number of passed and failed test attempts.
-
See a visual representation of score distribution in the test. The graph displays the percentage of test attempts in different score ranges, making it easy to see the count of attempts for each range.
-
Display test attempt statistics summarized by testing sessions created for the test. Optionally, you can use a filter to show only the attempts that started within a specific time period.
-
Show test attempt statistics summarized by testing locations where the test is organized. Optionally, you can use a filter to display only attempts that began within a specific time period.
-
Access the desired predefined reports. Open a report and easily schedule it for regular, automated sending.


