User manual
My profile/User profile
-
Introduction
The user profile page is a centralized location where users can view and manage their personal details and account settings. User actions on this page are determined by their system role and associated permissions.
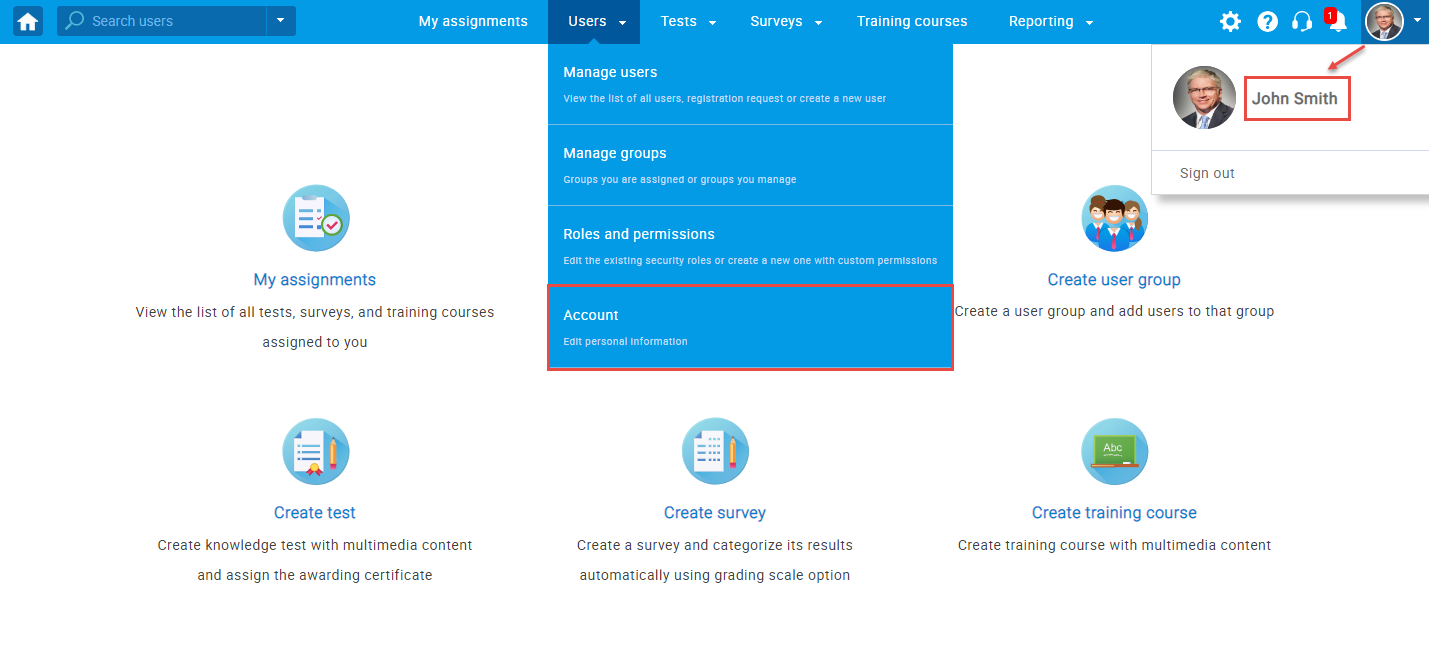
A user can access their profile by clicking on the User menu in the top-right corner of the application and selecting the My profile option.
-
Information
-
Account information
This section contains information related to the user's profile.
-
User ID - Automatically generated upon user profile creation and cannot be edited.
-
Username - The username field is case-sensitive and must be unique.
-
Email address where the user will receive notifications.
-
Current workspace - You can filter and display data exclusively from the selected workspace if assigned to multiple workspaces. When you switch workspace, the system customizes the display to show only the entities (users, tests, user groups, training courses, question categories, question pools) associated with the chosen workspace. If a workspace's theme, logo, and favicon are customized, the system branding will be overridden when the current workspace is selected. To view all available data, choose the All workspaces option.
This option is available for the users that have "Change own current workspace" permission.
-
Time zone in which the data containing the date and time will be displayed.
-
Switch the interface theme if multiple options are available. The change will be applied exclusively to your user profile..
-
Language in app - Determines the application interface's language (excluding user-generated content, such as question text, test descriptions, etc.). If a language preference is set for a specific test, it overrides the application interface language for a user account.
-
Language in tests - The default language for displaying questions and answers in tests, if defined during the question creation.
-
External ID - a unique identifier that serves as a distinctive label for the user in the system. This identifier can then be employed when integrating with other external systems.
-
Profile picture - Supported file types are JPG, JPEG, PNG, BMP, and the maximum size is 100MB.
-
Link to access assignments quickly.

-
-
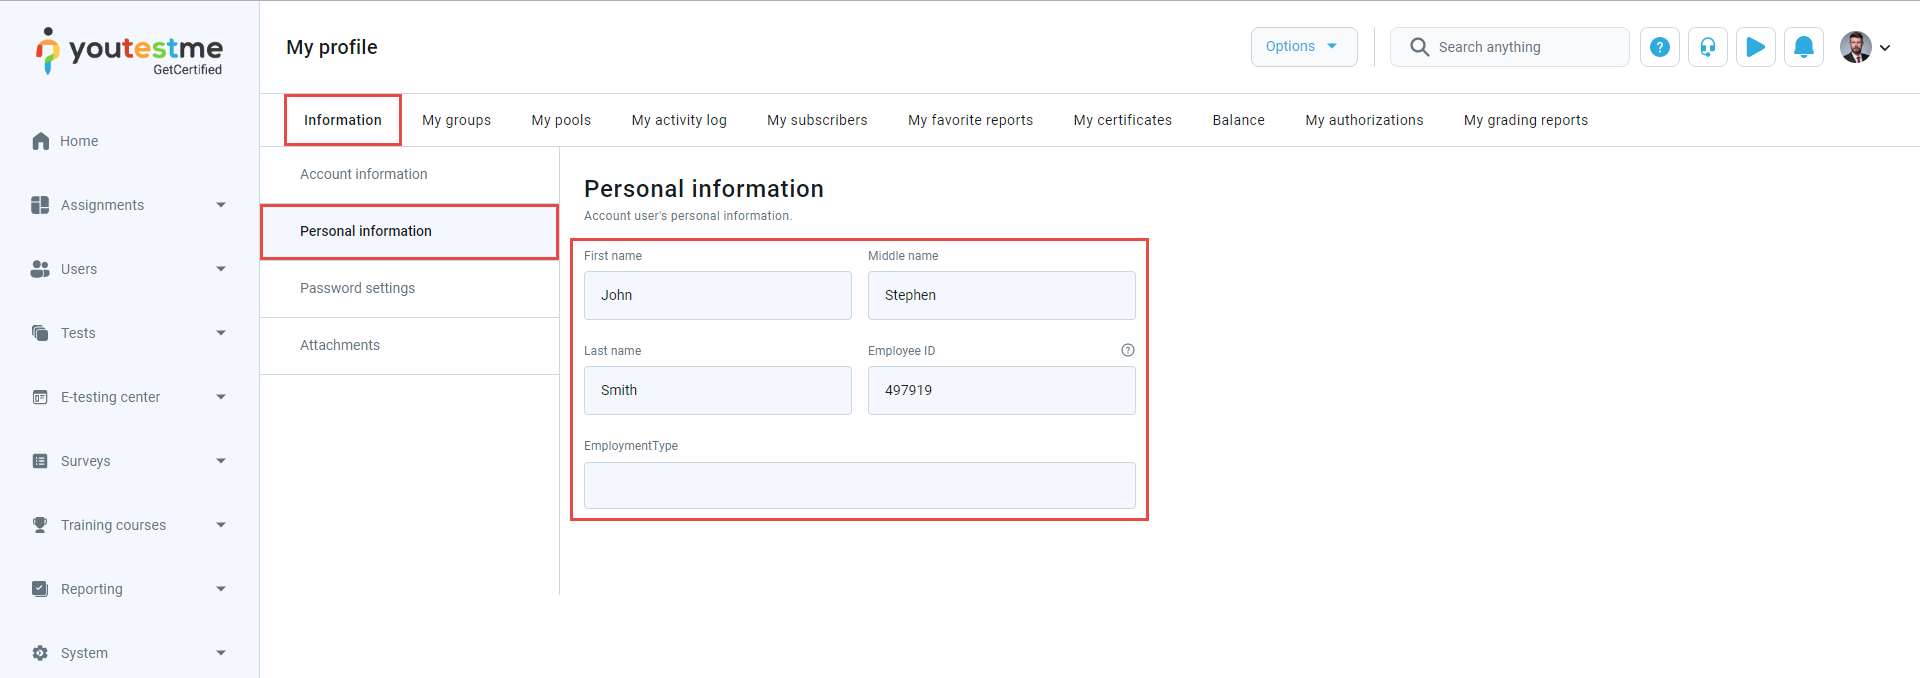
Personal information
This section displays users' personal information, including any custom user properties that have been created.
-
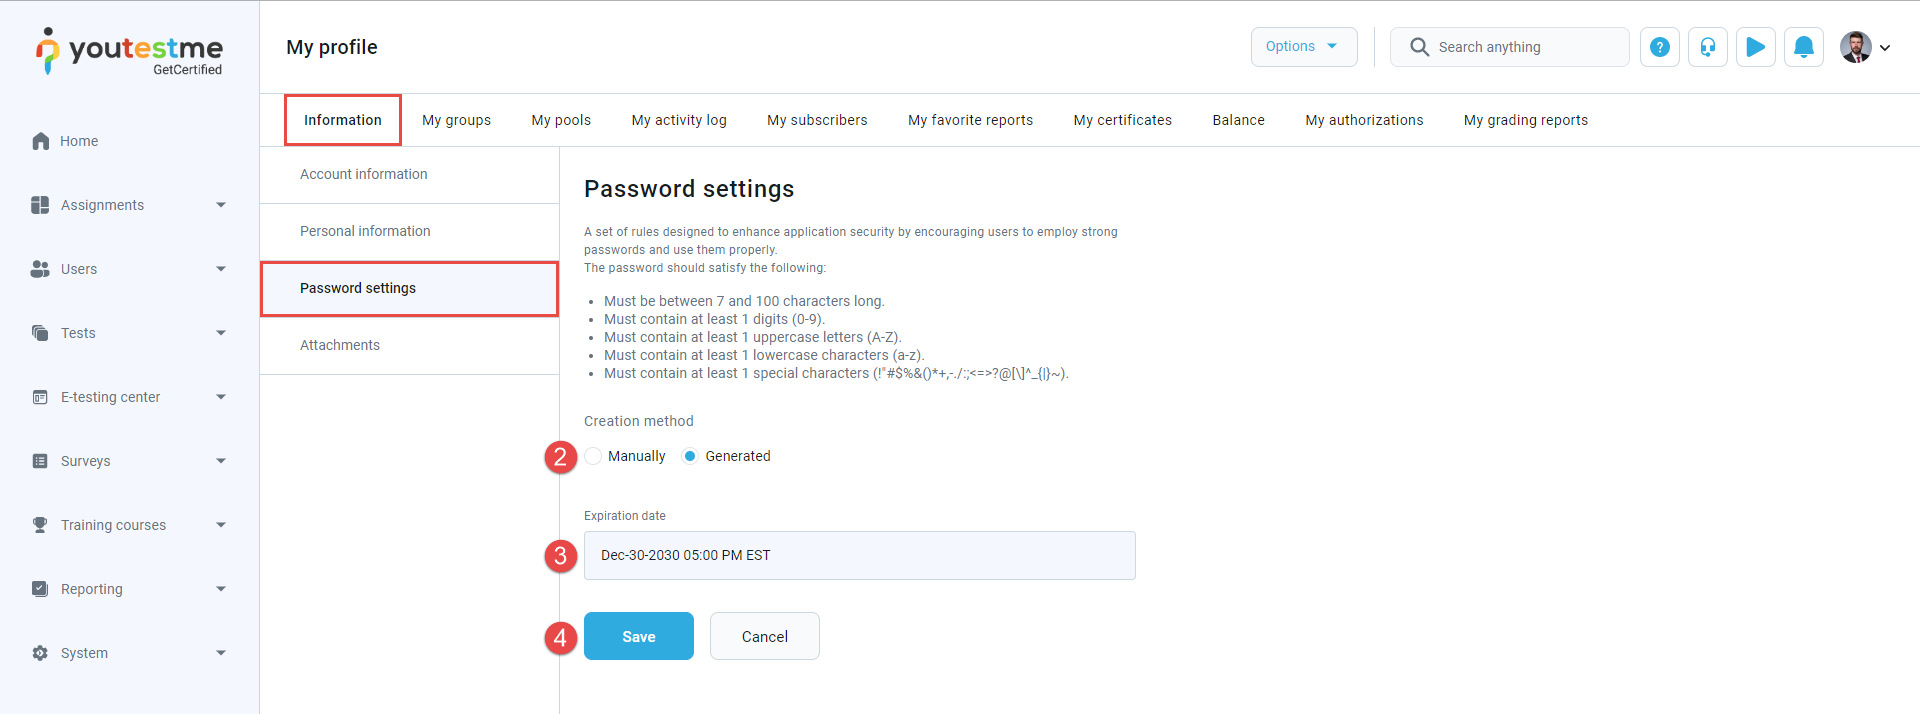
Password settings
This section is used to change the user profile password and its expiration time.
To change the password:-
Click the Change password button.

-
Choose the creation method:
-
Manually - Input and confirm the entered password.
-
Generated - The system will generate a password and send it to the user via email.
-
-
Set the Expiration date after which the password must be renewed.
-
Click the Save button.
-
-
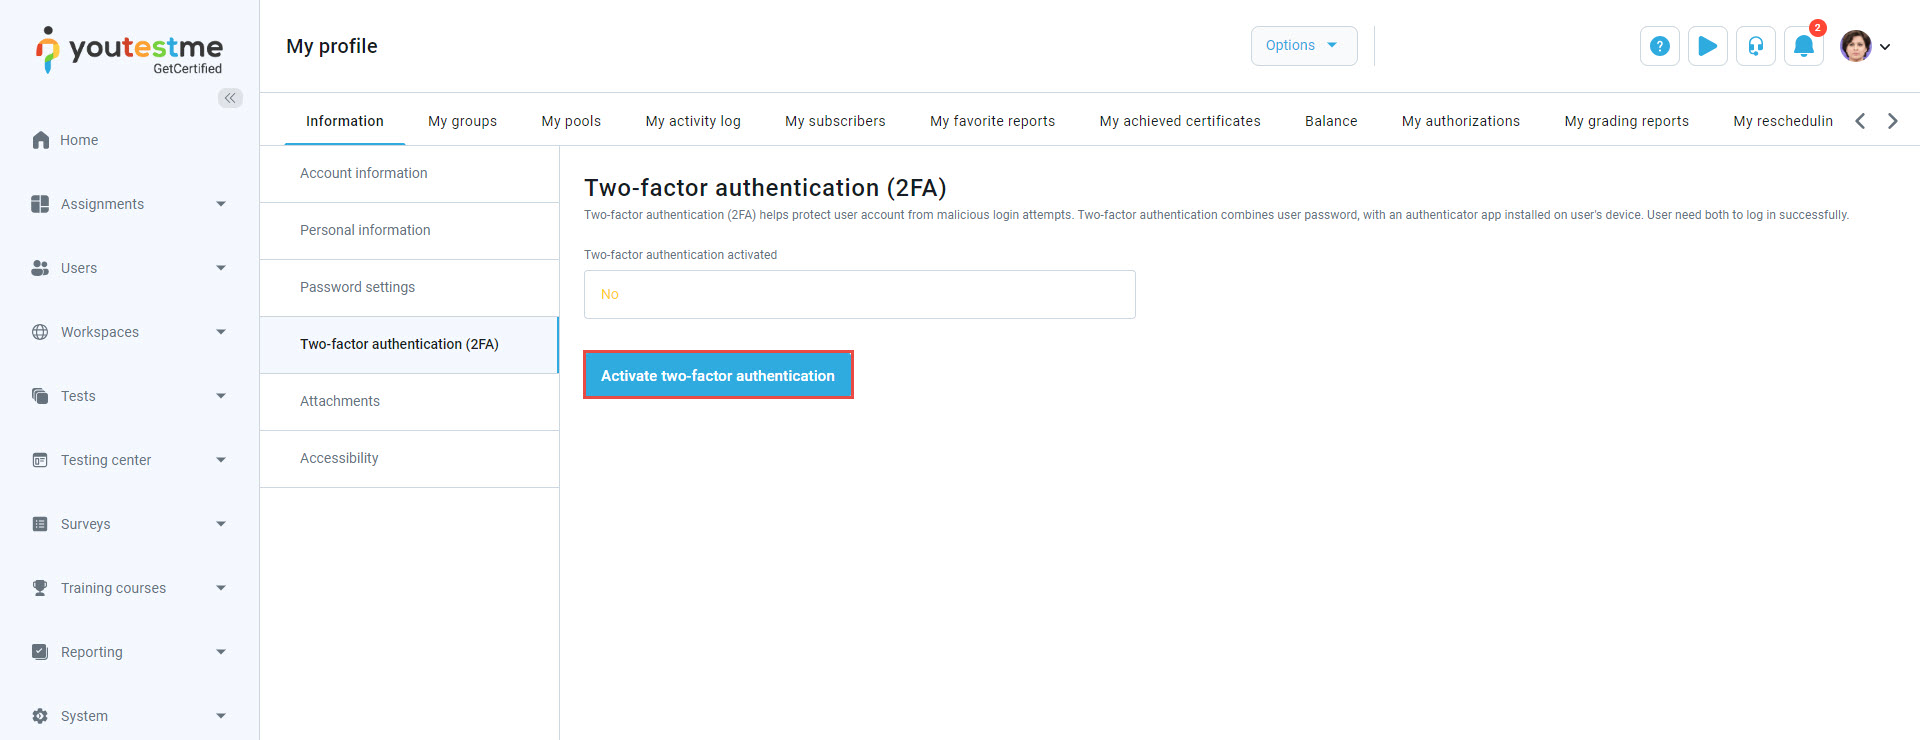
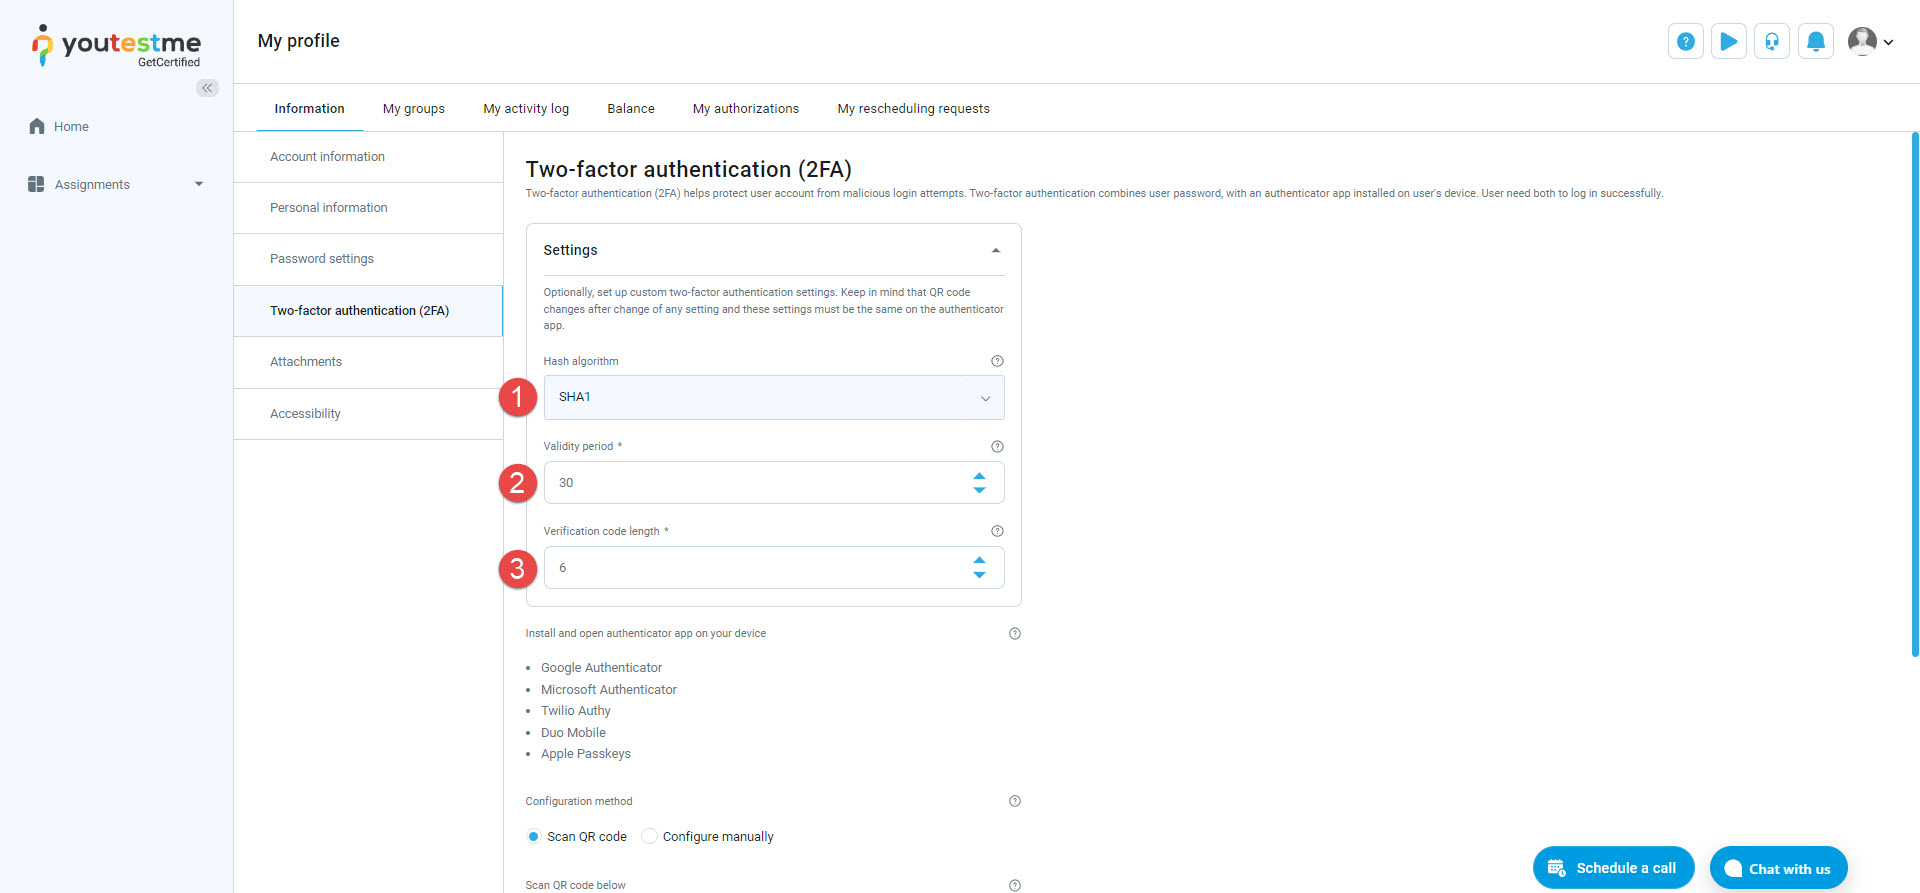
Two-factor authentication (2FA)
Two-factor authentication (2FA) is a security method that enhances account protection by requiring users to confirm their identity through two different authentication factors. This extra layer of protection, beyond usernames and passwords, blocks unauthorized access. For example, even with a compromised password, a second factor, like a phone-sent code, is required for a successful login.
To enable the 2FA, click the Activate two-factor authentication button.
You can customize your 2FA settings:
The Hash algorithm for one-time verification codes - Choose SHA-256, SHA-3, or MD5 based on your security preference.
Validity period - Set how long each verification code remains valid.
Verification code length - Adjust this value to align with your security preferences. A longer code increases complexity, making it more resilient against malicious attempts to decipher it.
Note: The QR code changes after modifying any setting, and these settings must be the same on the authenticator app.
Configure the authenticator app by scanning the QR code or manually entering the secret.
After attempting to log in, the app will request the verification code sent to the user's device.
Users can activate/deactivate 2FA for their accounts, while admin accounts can only disable it. This is useful if a user loses the device on which they receive the verification code.
For more information on configuring 2FA, refer to this article. Additionally, for instructions on how to require 2FA activation at the role level, consult this article.
-
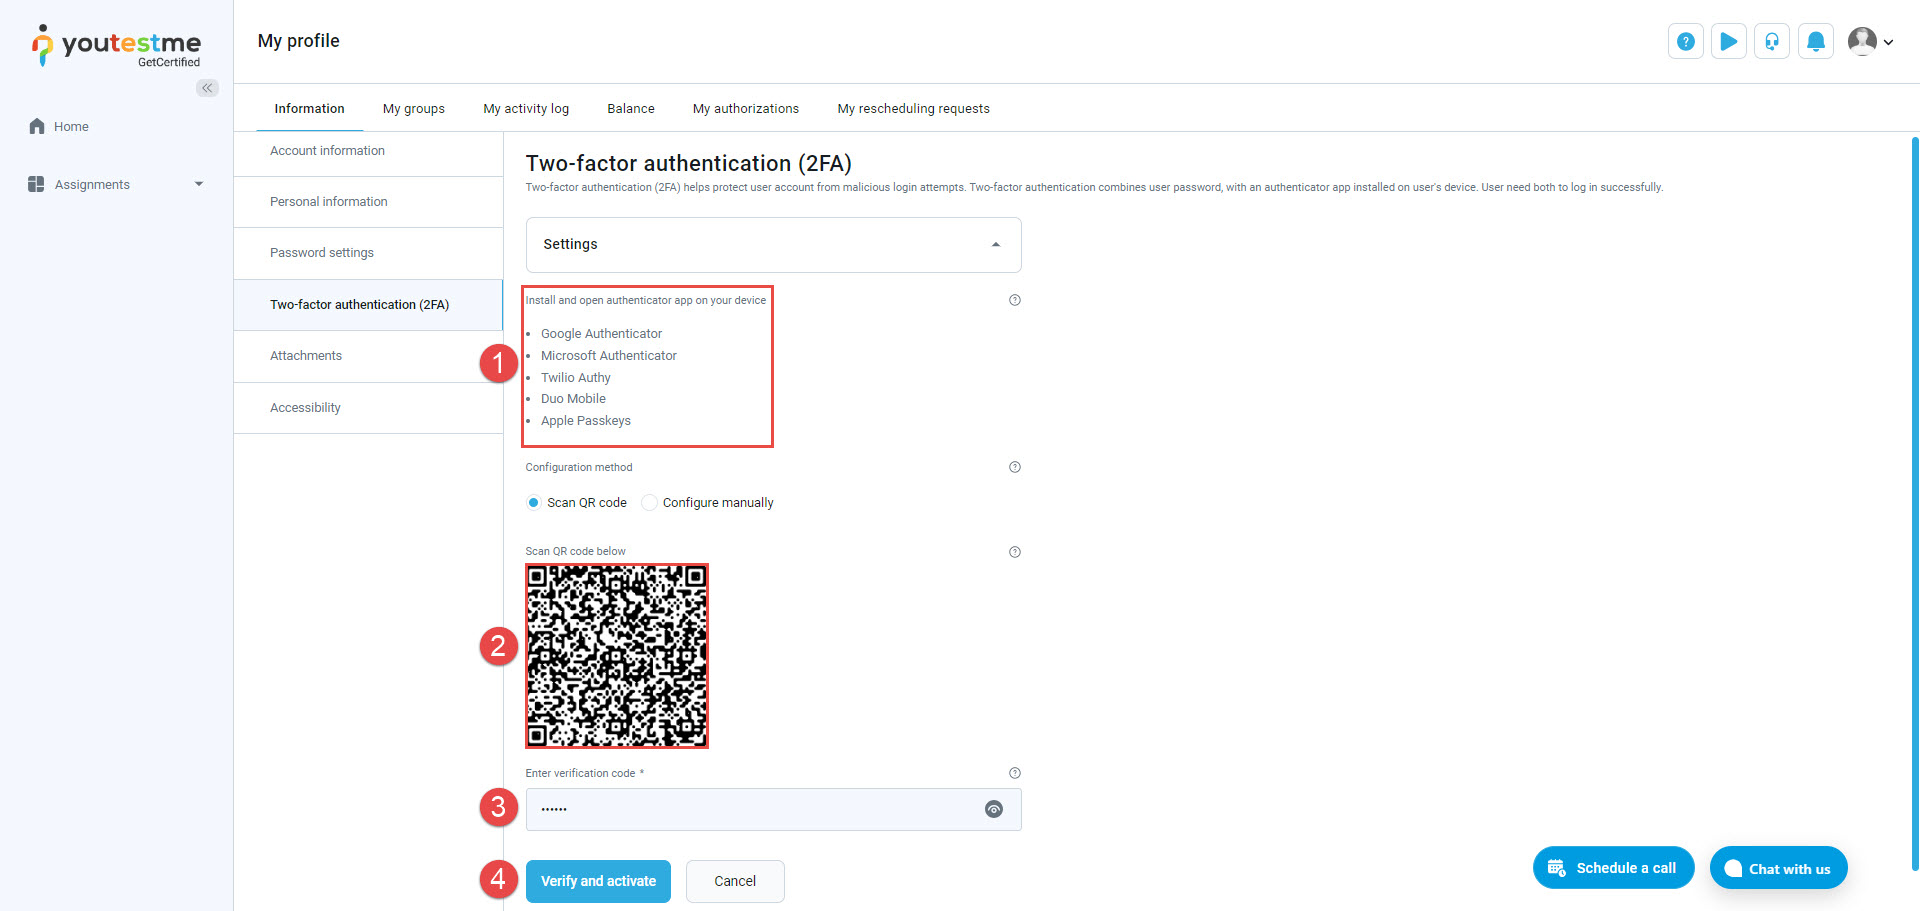
Set up the authenticator app by scanning the QR code
To set the two-factor authentication:
-
Install an authentication app on your device, such as Google Authenticator, Microsoft Authenticator, Twilio Authy, Duo Mobile, or Apple Passkeys.
-
Scan the QR code using the installed authenticator app.
-
Enter the verification code from the authenticator app.
-
Click the Verify and activate button.
-
-
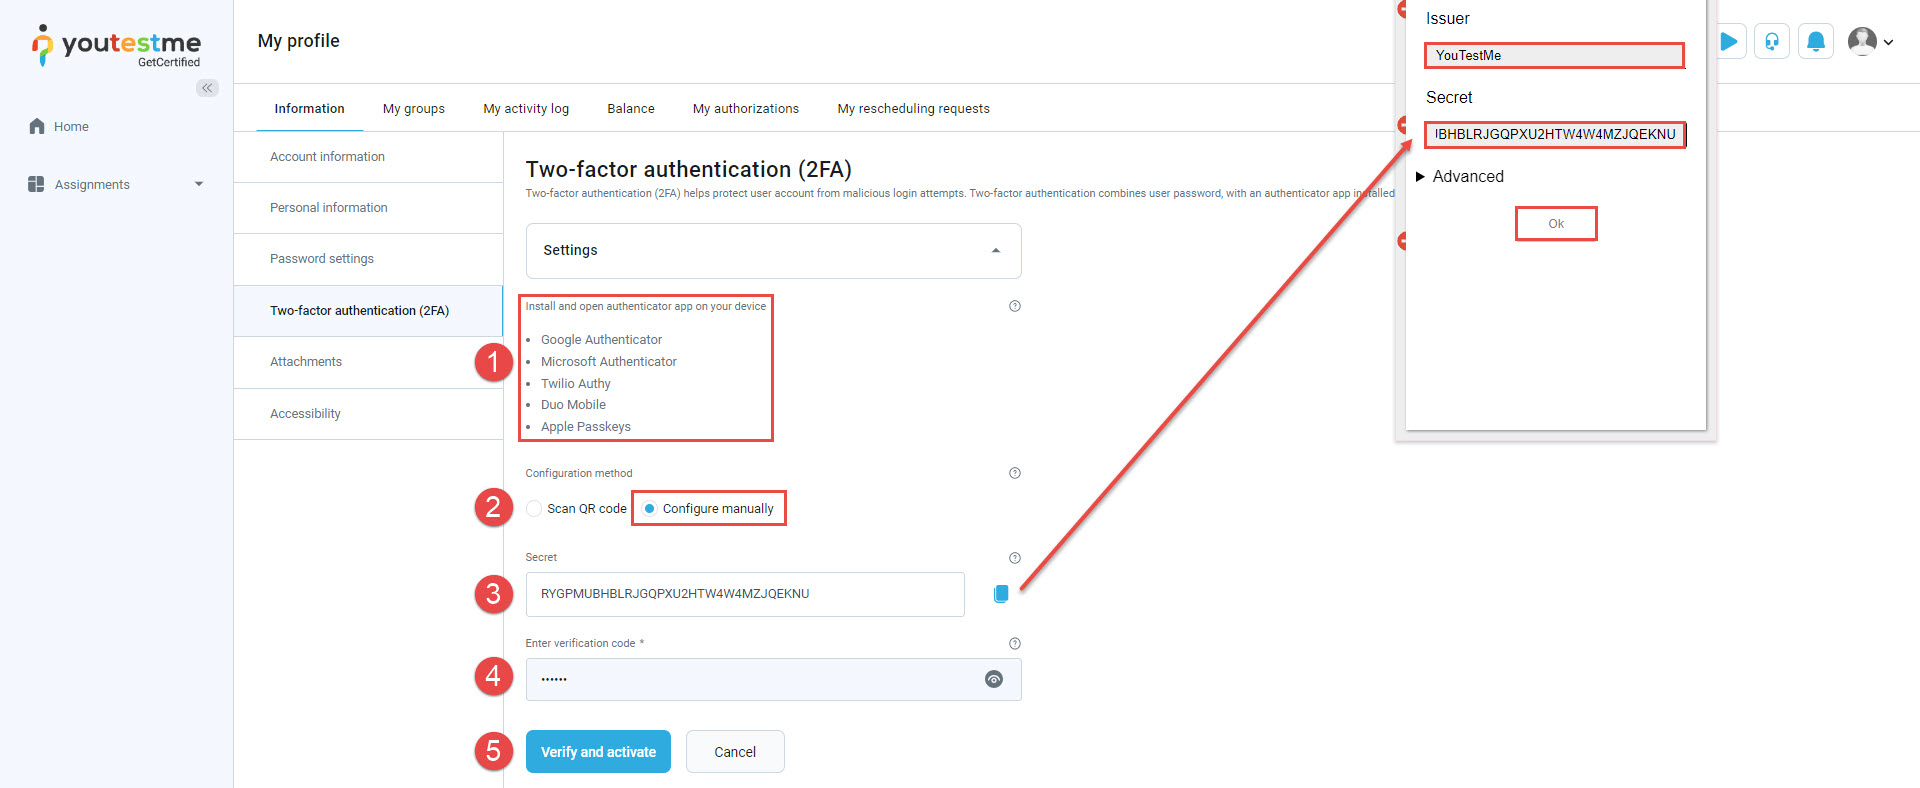
Set up the authenticator app manually
To set the two-factor authentication:
-
Install an authentication app on your device, such as Google Authenticator, Microsoft Authenticator, Twilio Authy, Duo Mobile, or Apple Passkeys.
-
Choose the Configure manually option for the Configuration method.
-
Copy the secret and manually configure the authenticator application.
-
Enter the verification code from the authenticator application.
-
Click the Verify and activate button.
-
-
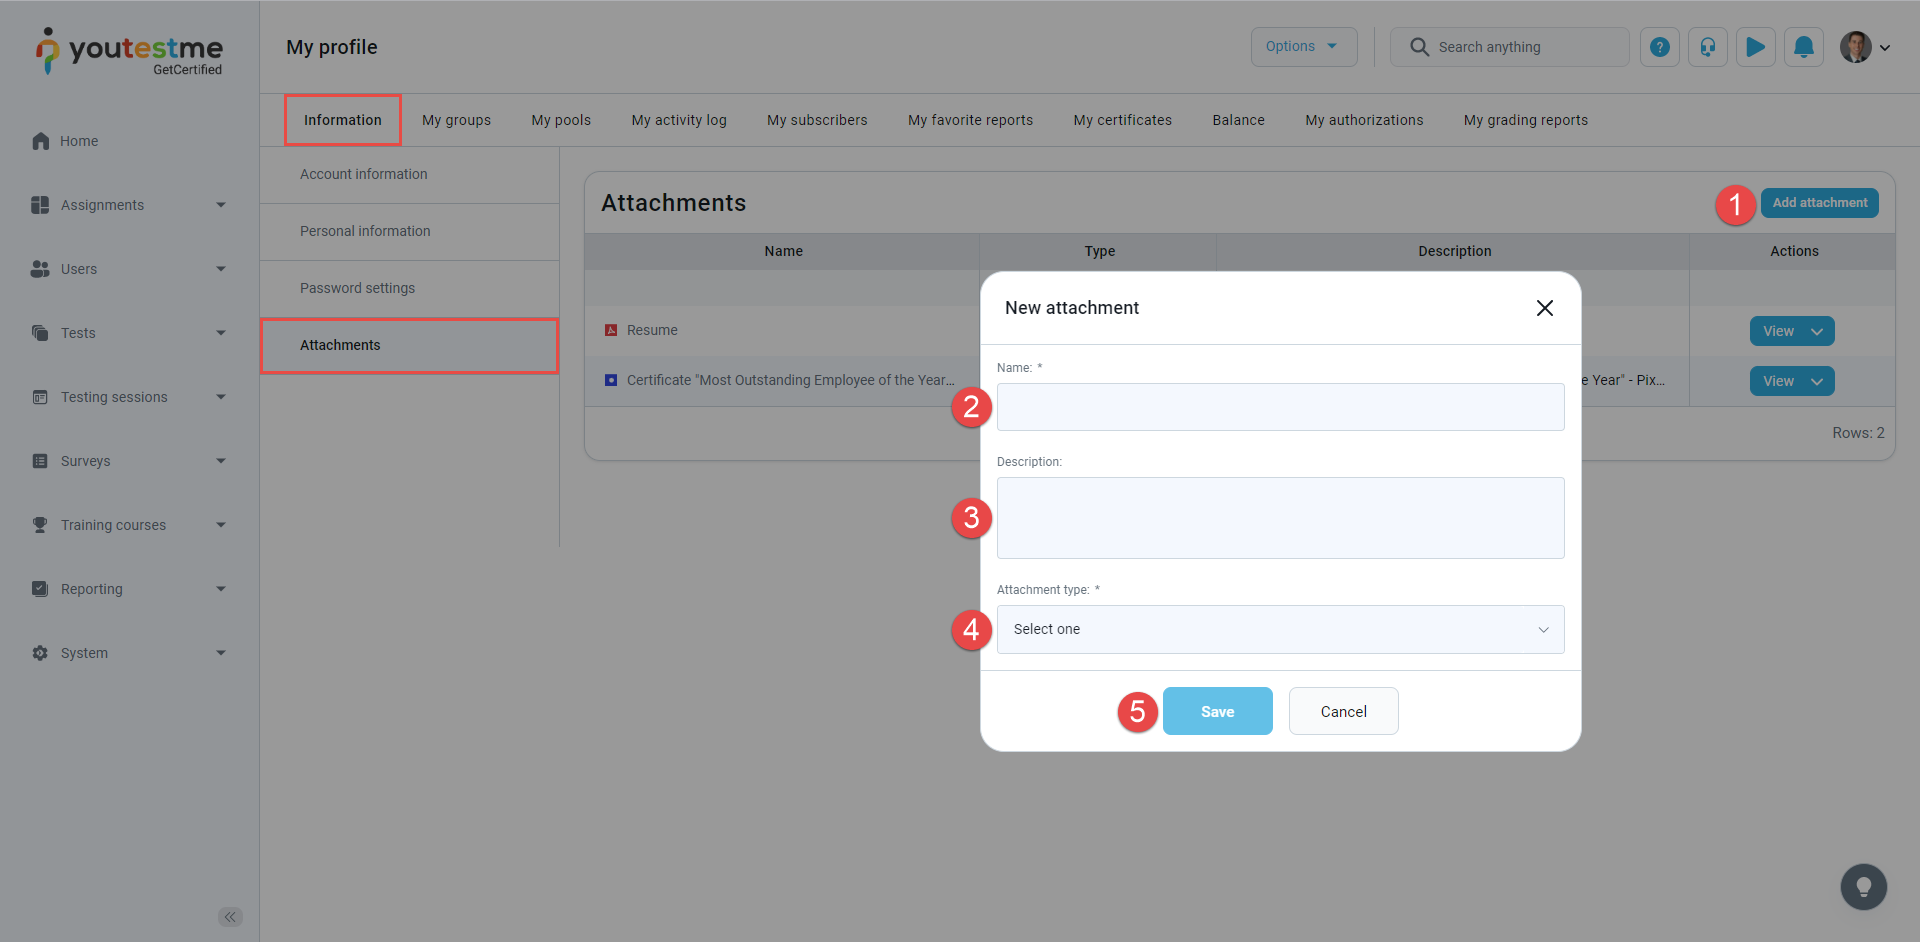
Attachments
This section stores documents in various formats, including CVs, certificates, and other files.
To add an attachment:-
Click the Add attachment button.
-
Enter the attachment name.
-
Provide an attachment description.
-
Choose the attachment type and either upload the file or provide a link.
-
Click the Save button.
-
-
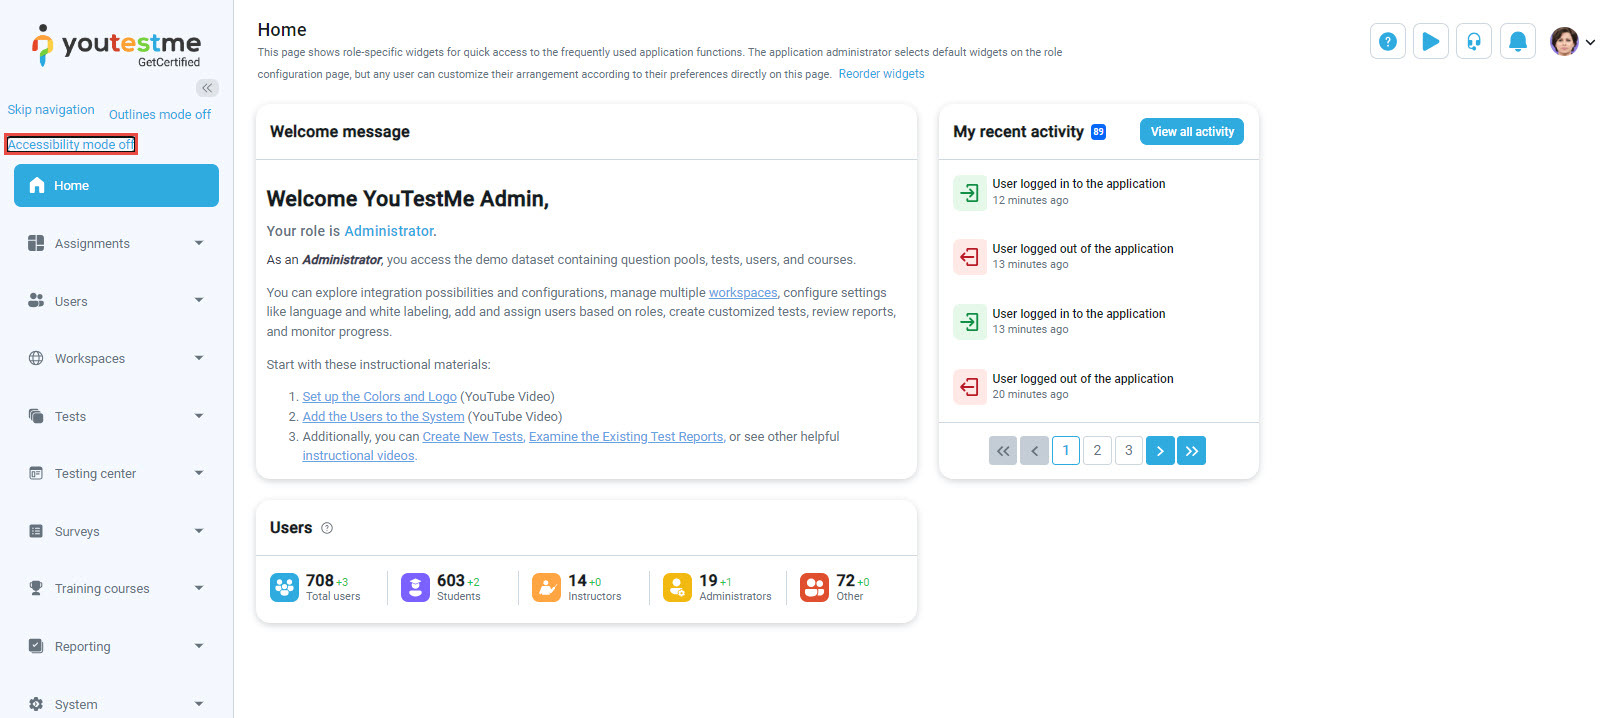
Accessibility mode
To use Accessibility mode, the Support for people with disabilities option must be enabled under the Settings and customization/System preferences/Additional modules.
To permanently enable the Accessibility mode on the profile:
-
Check the Turn on accessibility mode option.
-
Click the Save button.
In this case, the Accessibility mode will be enabled by default on the user's profile until this option is manually turned off.
-
Use TAB to advance the cursor to the next tab stop.
-
Use SHIFT+TAB to advance the cursor to the previous tab stop.
-
Use UP/DOWN to switch items in the text field of the main menu.
-
Use ALT+UP/DOWN for the main menu to list items in the list view.
To navigate the application using only a keyboard:
Temporarily activate Accessibility mode by pressing the TAB button. Options will appear in the side menu; press ENTER to enable it. Upon re-logging in, this option will be disabled.
-
-
-
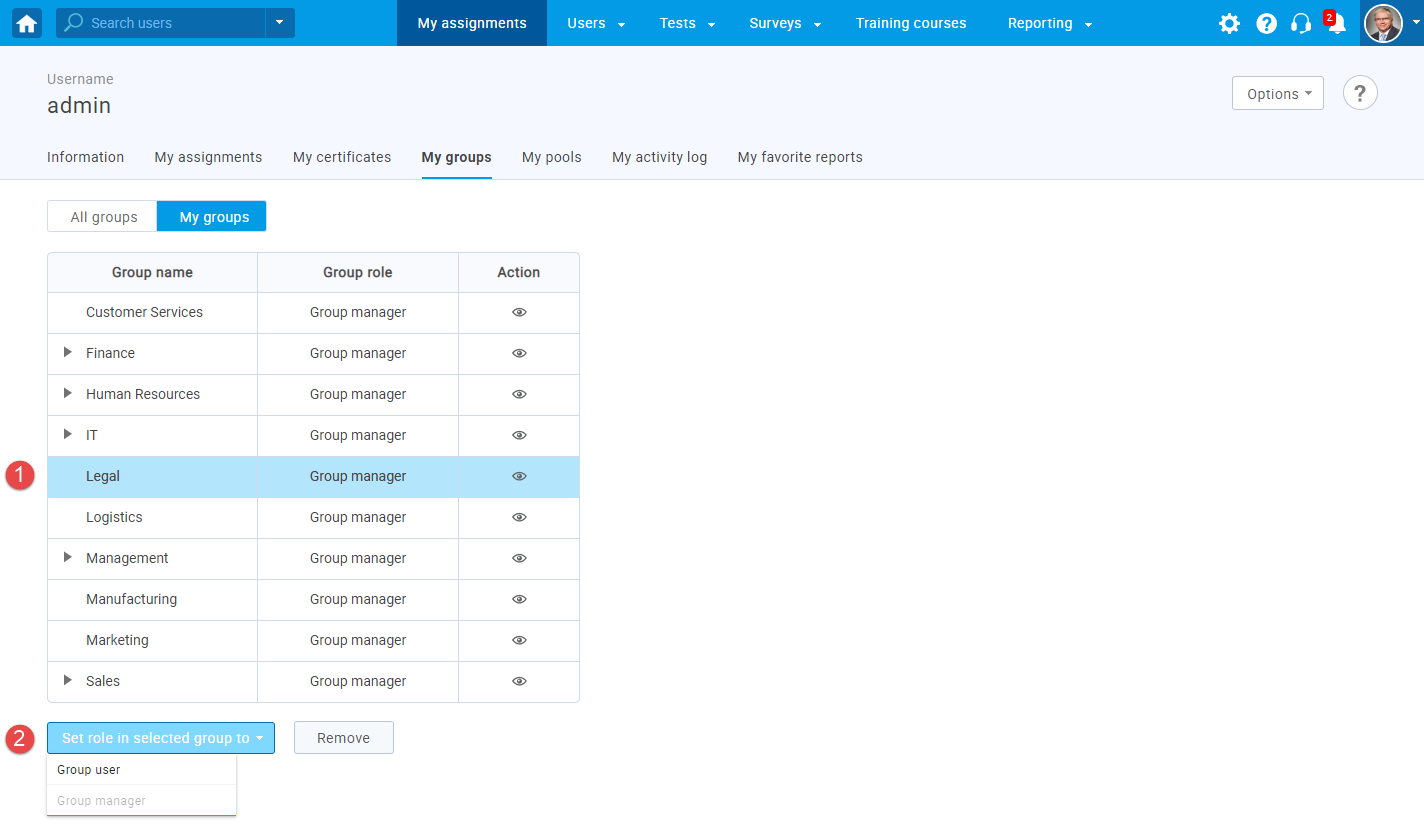
My groups
On this tab, you can see the list of available user groups .
Actions that can be performed:
-
See the groups in which the user is a member or a manager.
-
Switch between viewing groups you are a member of or see all user groups accessible to you.
-
Permanently remove a user from a group. Required permission to perform the action: Manage any group.
-
Set a user's role within a group. Required permission to perform the action: Manage any group.
-
View details of a user group. Required permission to perform the action: View all groups.
-
If self-enrollment is enabled for a user group, you can join yourself or another user if you are on their profile. Required permission to perform the action: View all groups.
-
-
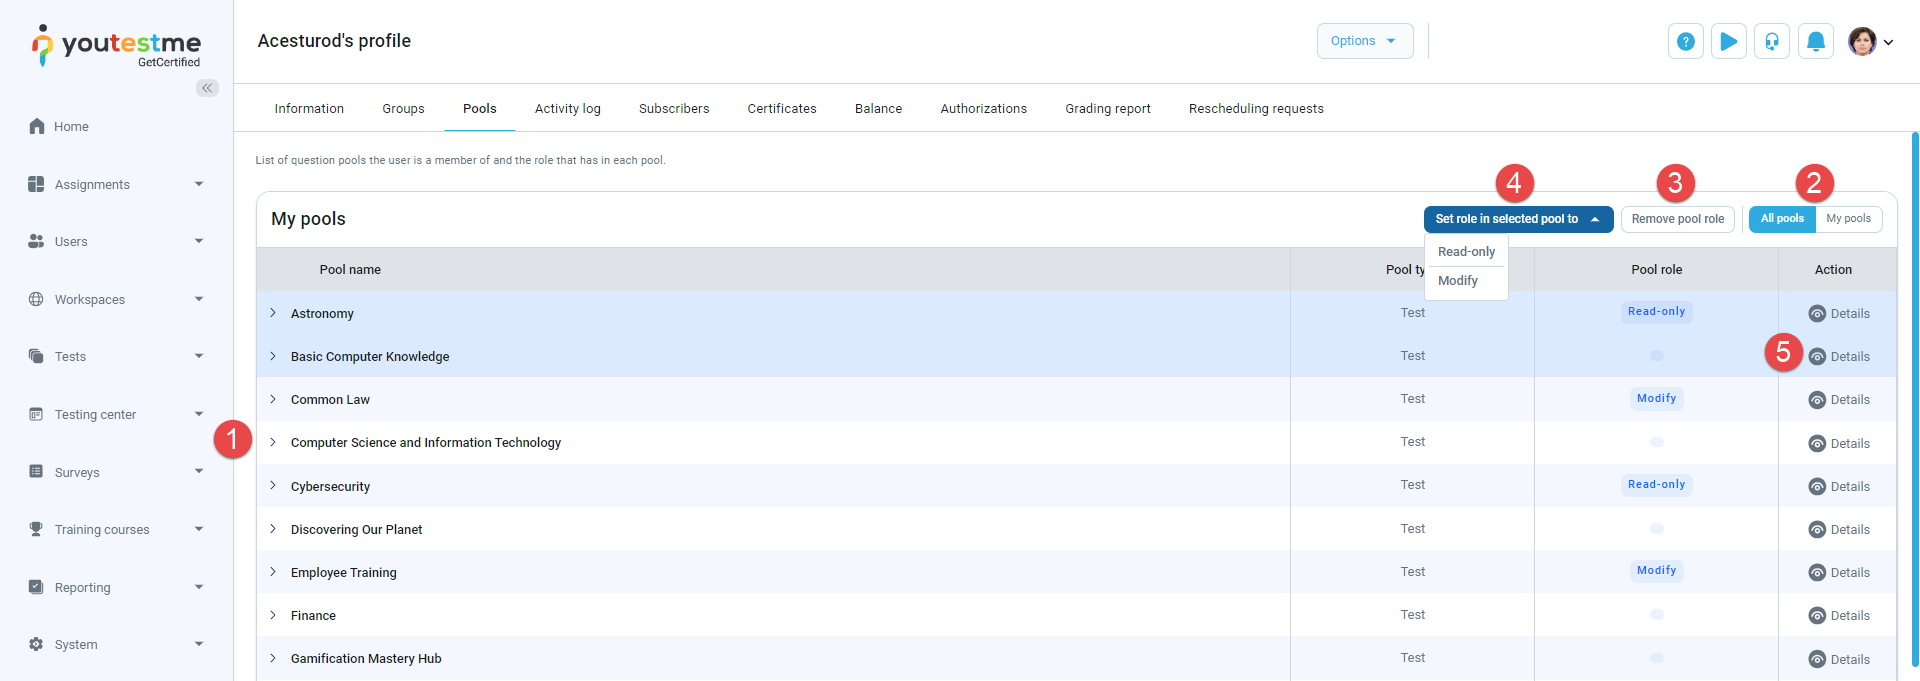
My pools
On this tab, you can see the list of available question pools.
Actions that can be performed:
-
See the question pools in which the user has a read-only or a manager role.
-
Switch between viewing question pools you created or all available question pools.
-
Permanently remove a user from the question pool. Required permission to perform the action: Manage any pool.
-
Set a user's role within a question pool. Required permission to perform the action: Manage any pool.
-
View details of a user group. Required permission to perform the action: Access the 'Pools' page.
-
-
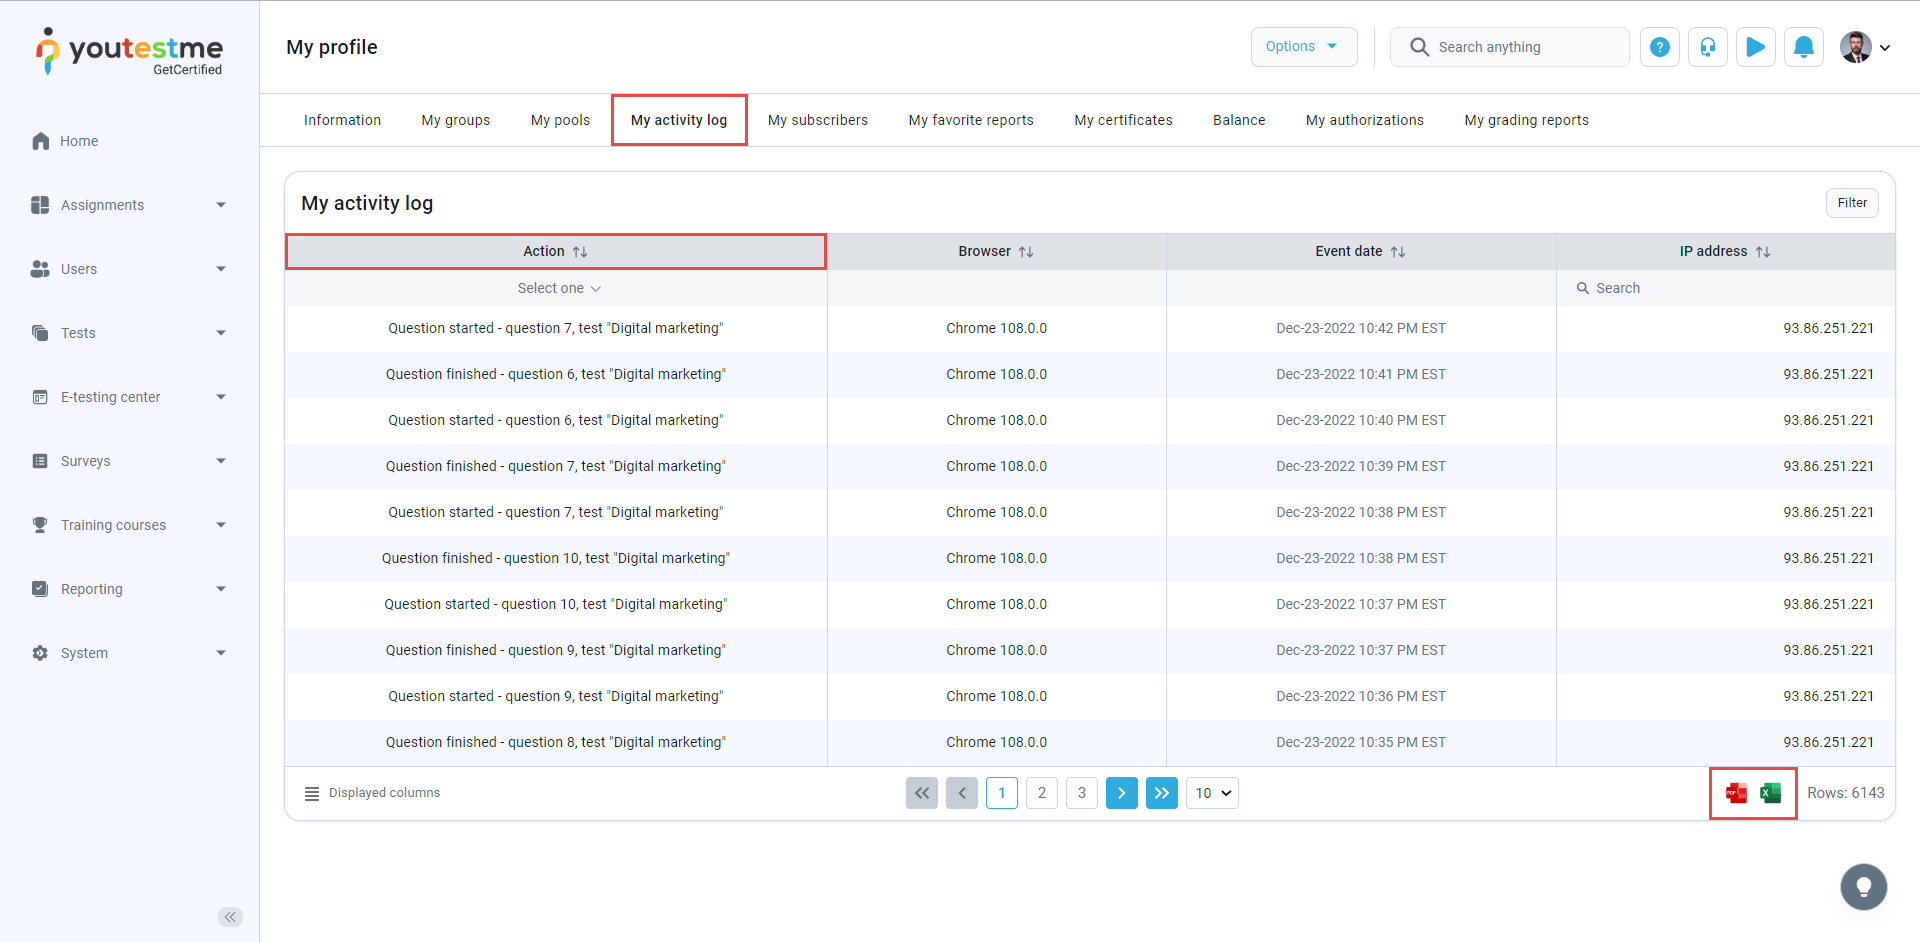
My activity log
This tab displays a summary of all user's activities in the system. Click the corresponding icon to export a user's activity as an Excel or PDF file.
-
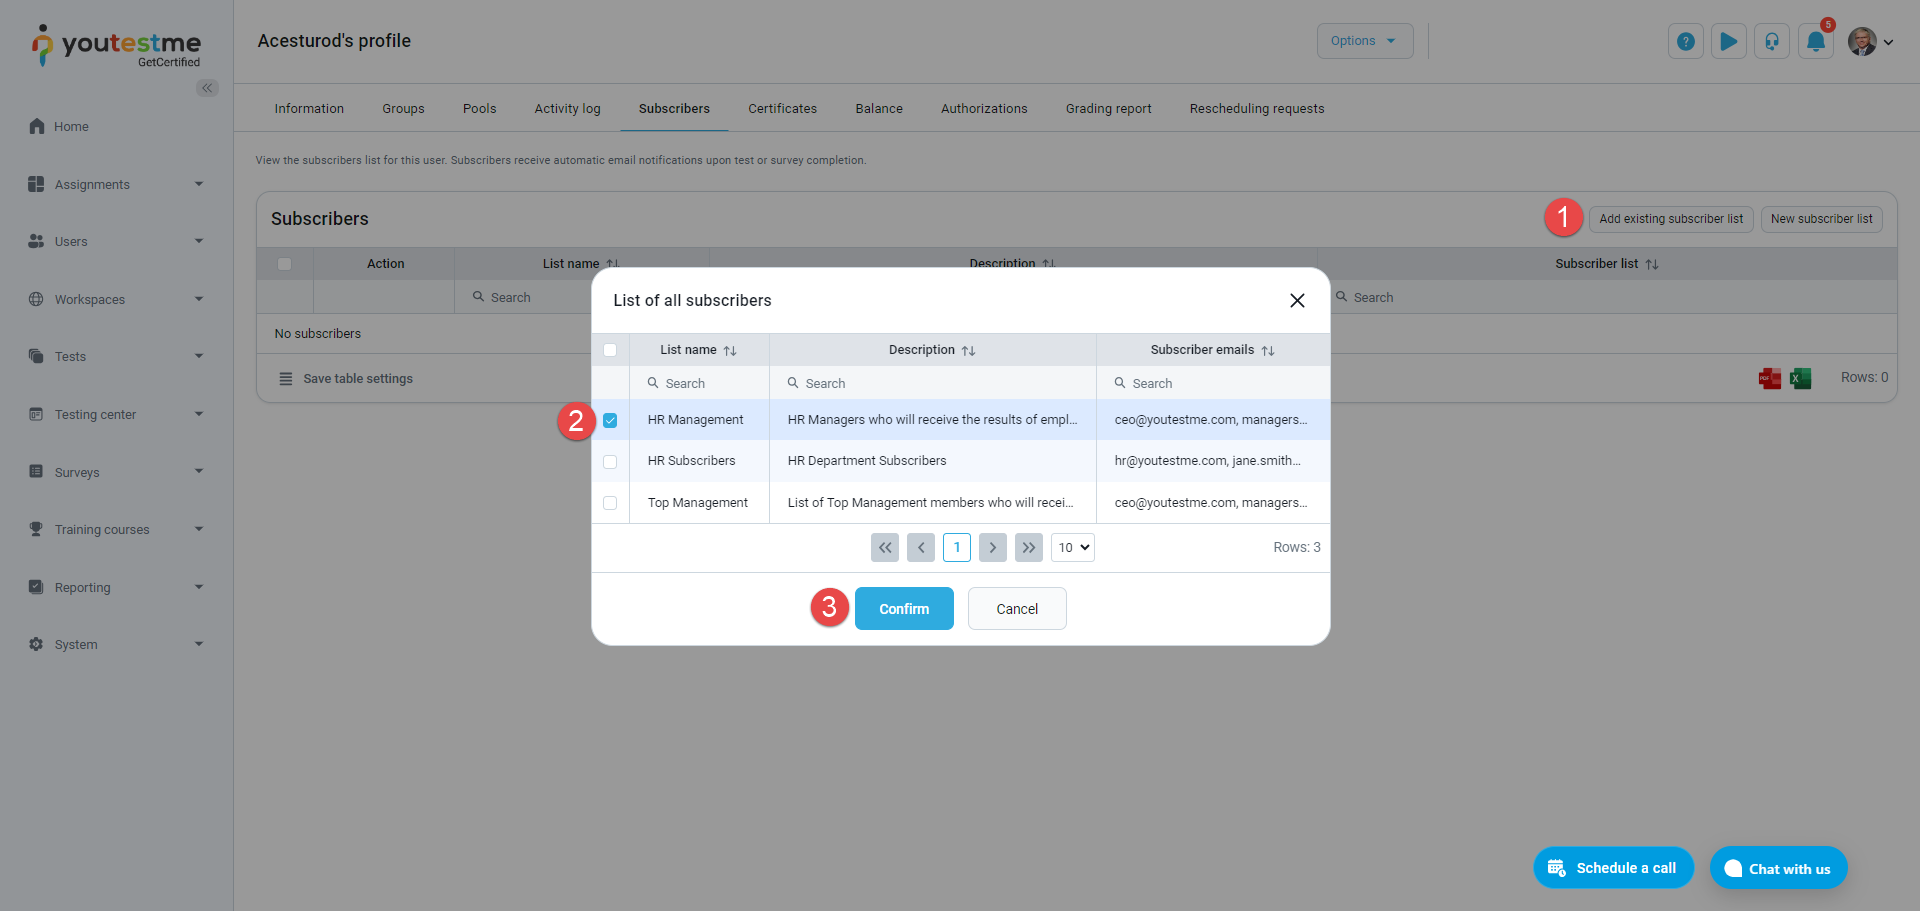
My subscribers
This tab displays a list of subscribers who will receive an email notification about the user's test and survey results.
To add an existing subscriber list to a user:-
Click the Add existing subscriber list button.
-
Select the subscriber list.
-
Click the Confirm button.
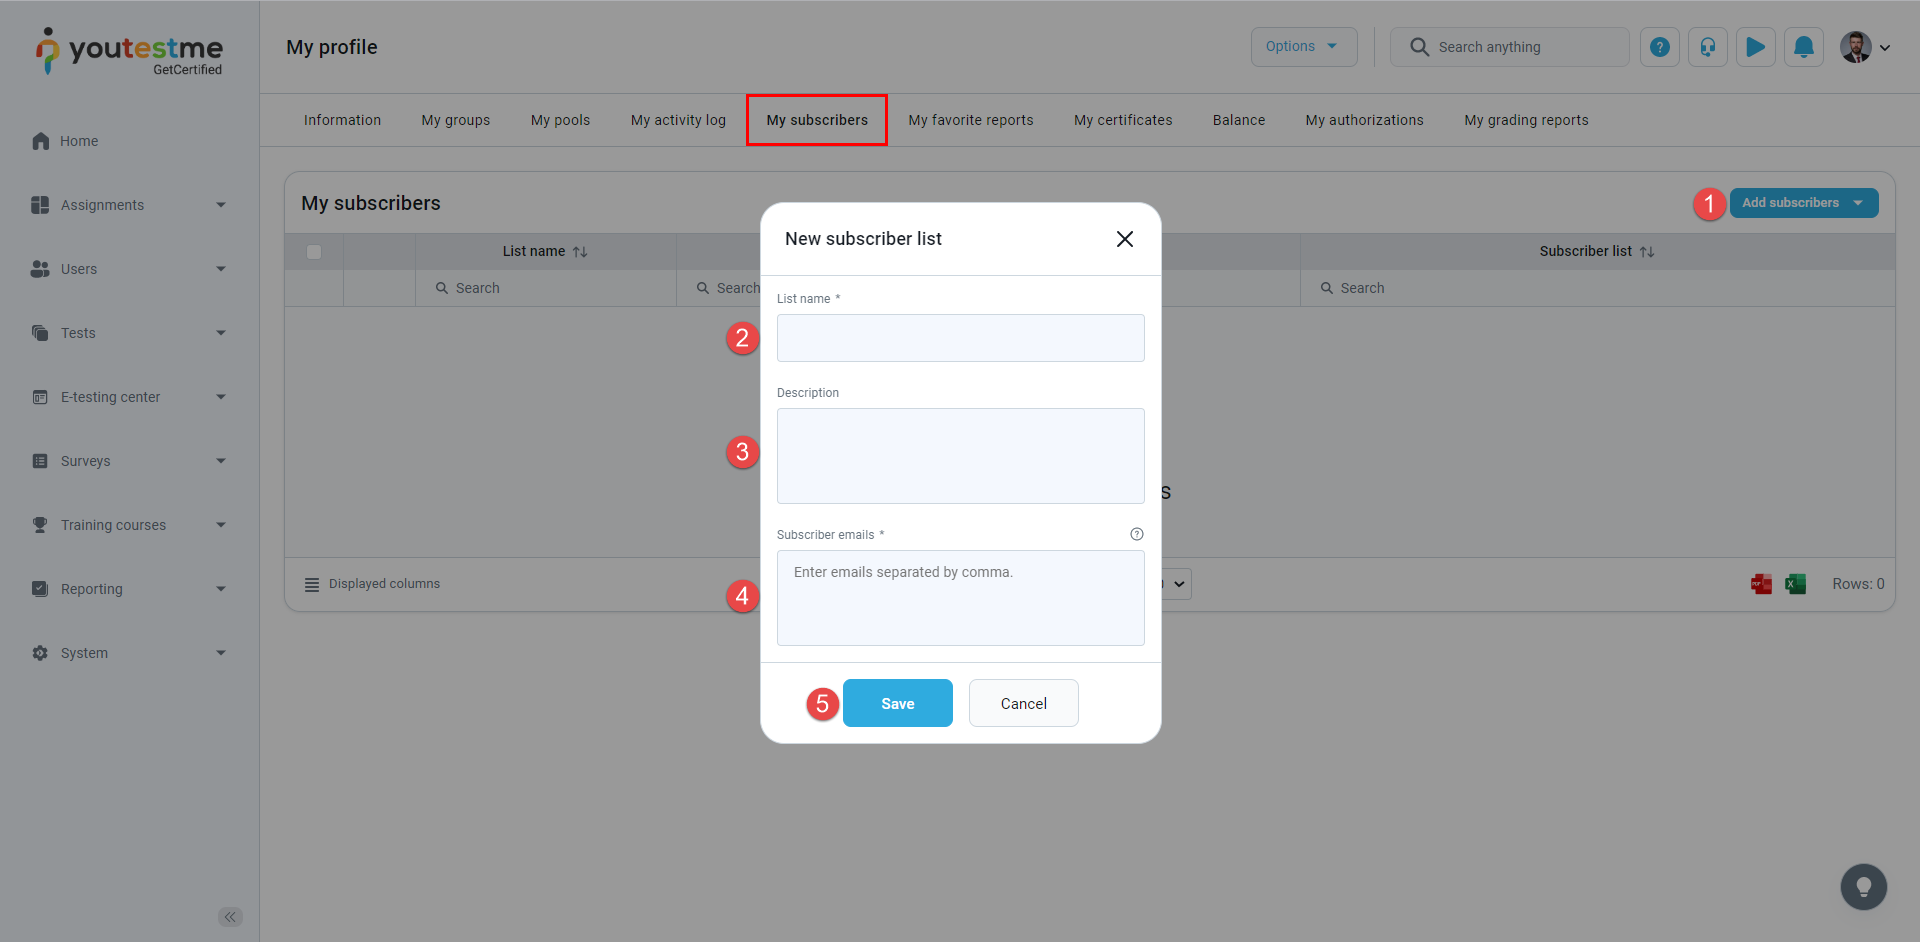
To create a new subscriber list to assign to a user:
-
Click the New subscriber list button.
-
Enter the subscriber list name.
-
Enter the subscriber list description.
-
Create a list of emails for notification regarding the test and survey results of their selected users. Enter each email individually, pressing the Enter key after each entry.
-
Click the Save button.
Additional actions that can be performed:
-
Edit a subscriber list.
-
Unsubscribe from a user - Select the desired subscriber list and click the Remove selected button.
-
Export the subscriber list as an Excel or a PDF file.

-
-
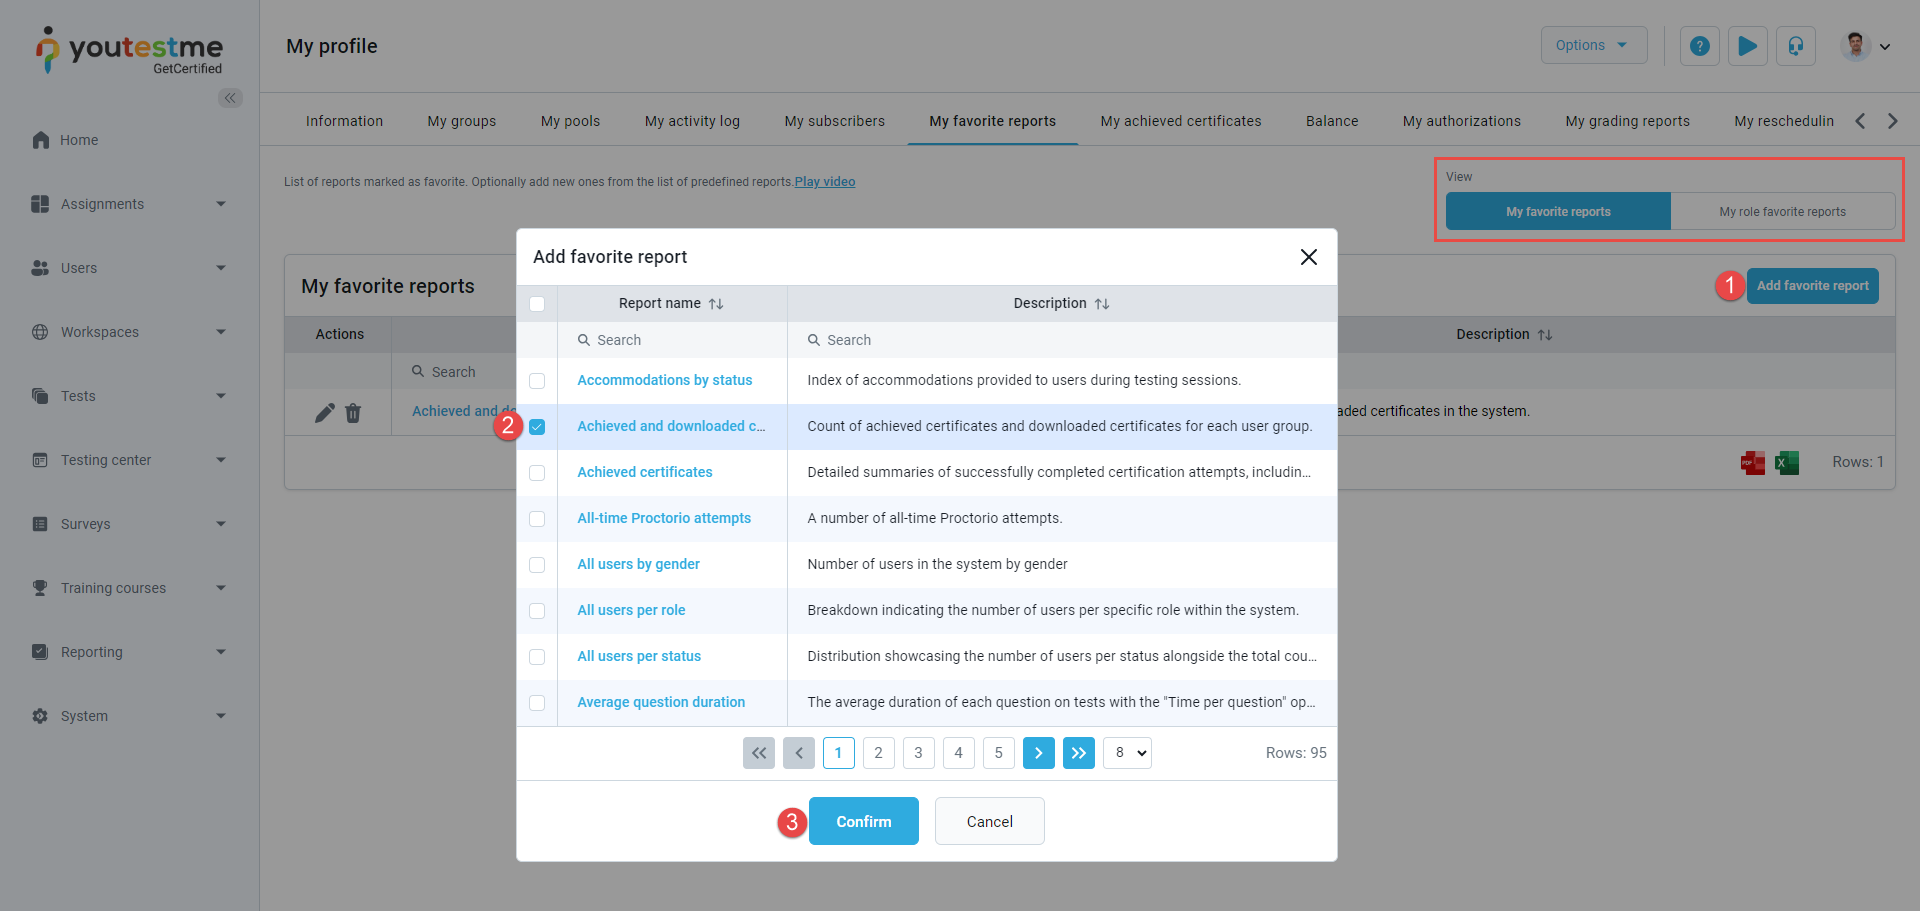
My favorite reports
This section displays a list of reports marked as favorites by the user or set as default for their role, typically including the most frequently used or important ones.
On this tab, users can switch between displaying reports they marked as favorites and those set as default for their role.
To add a report to the list of favorites:-
Click the Add favorite report button.
-
Select the desired report.
-
Click the Confirm button.
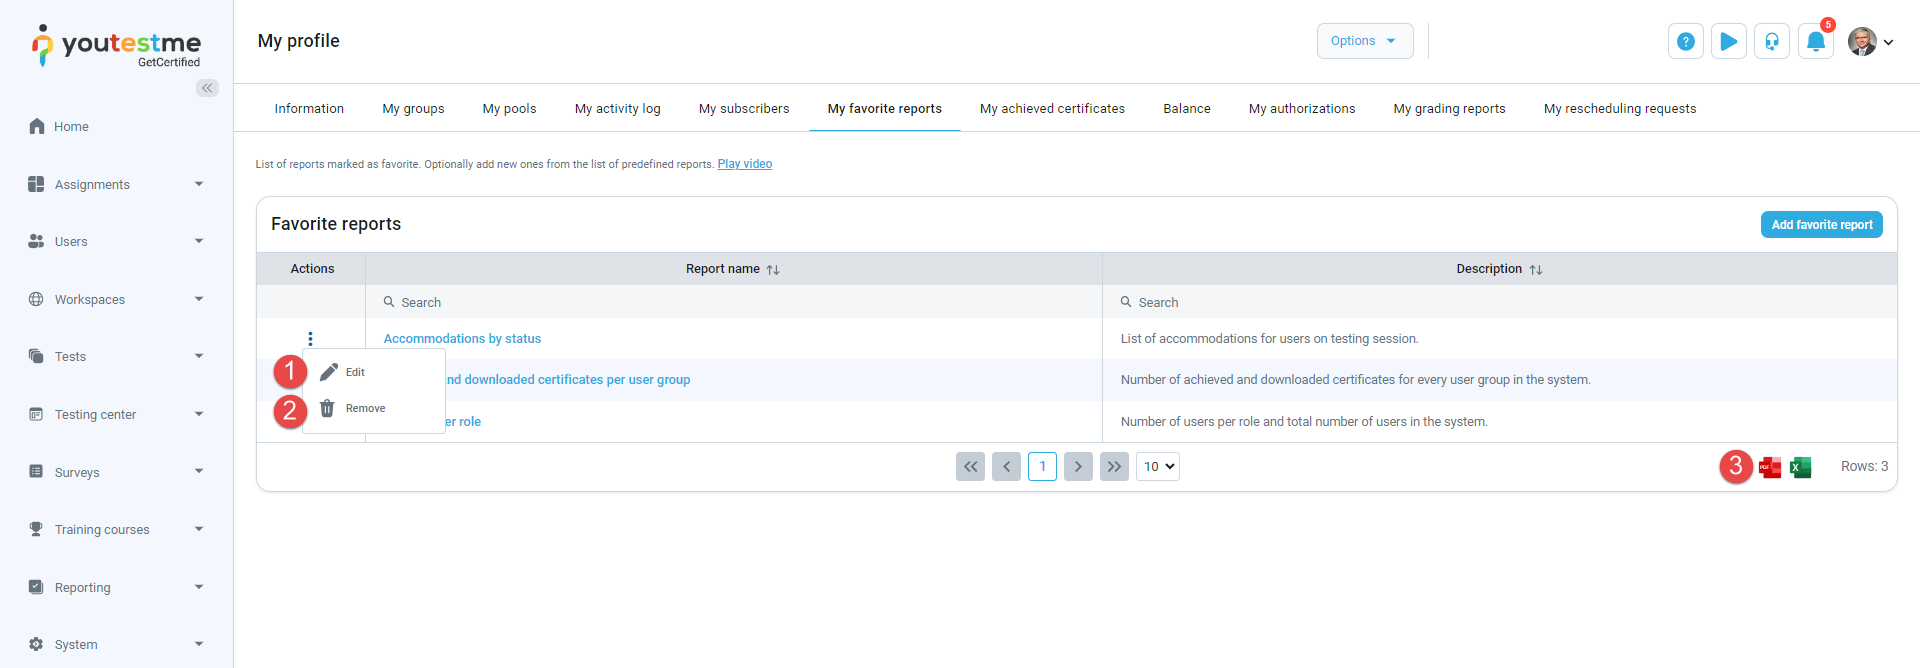
Additional actions that can be performed:
-
Edit a report's description.
-
Delete a report from the list of favorites.
-
Export the list of favorite reports as an Excel or a PDF file.
-
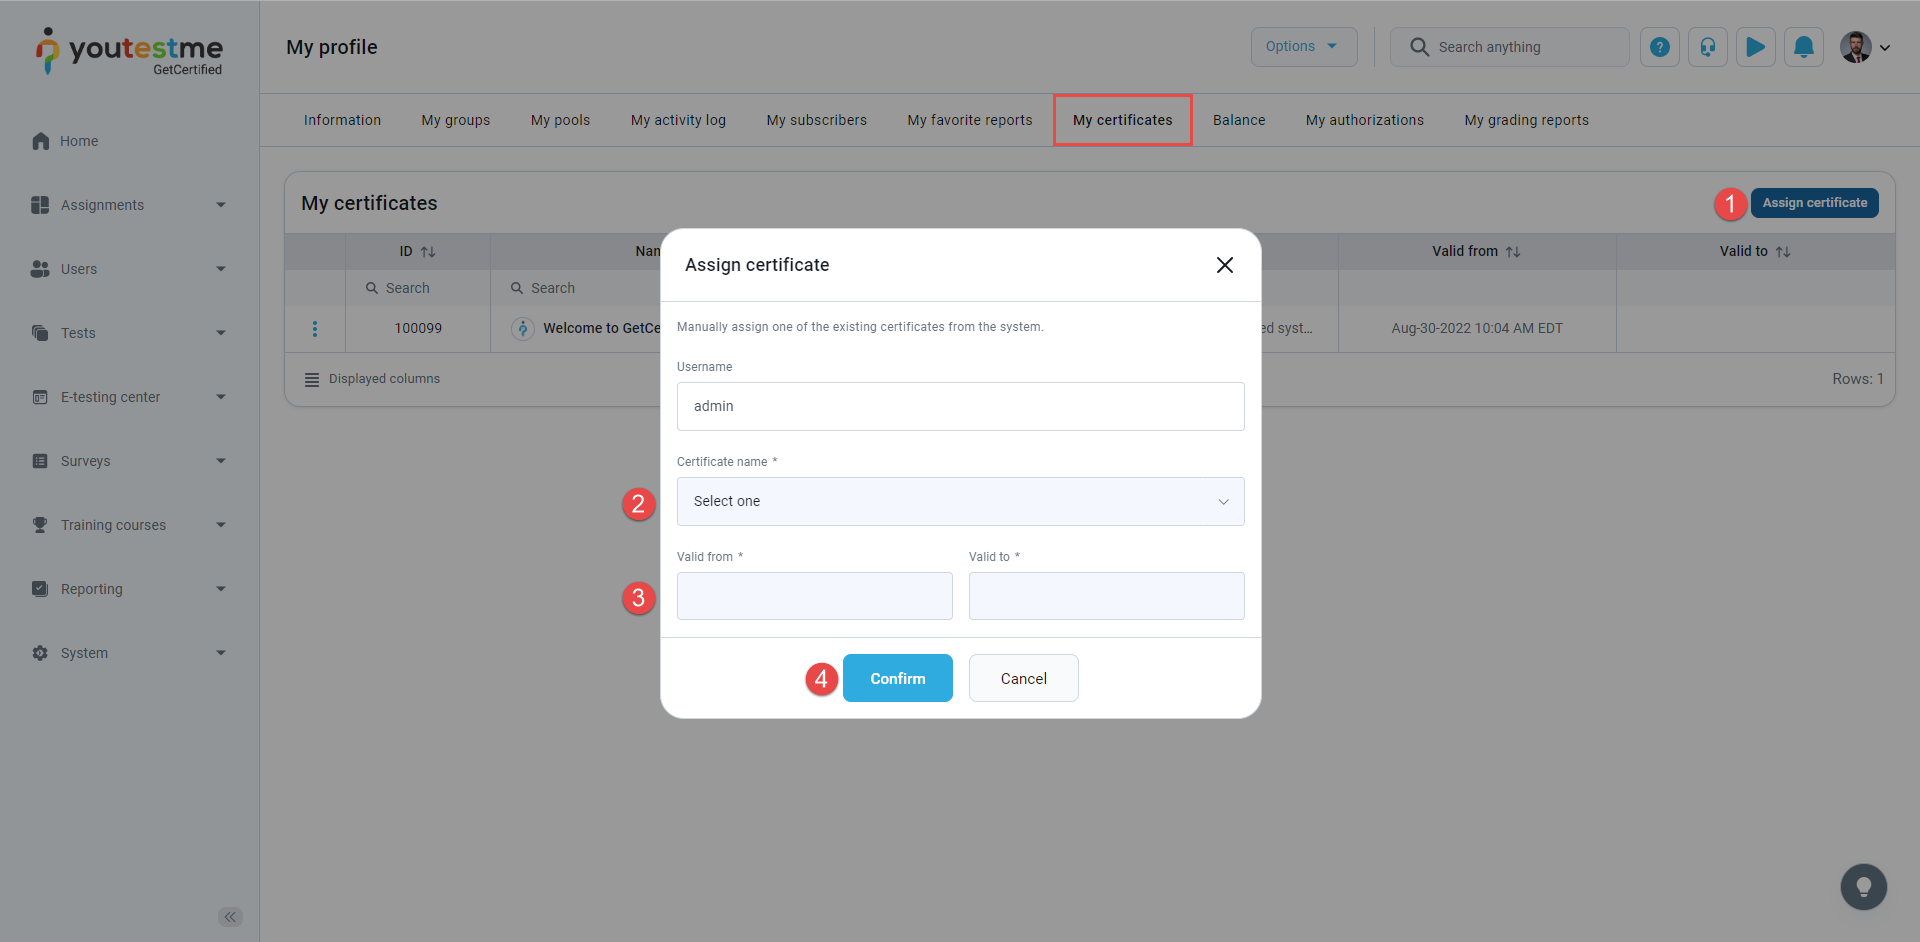
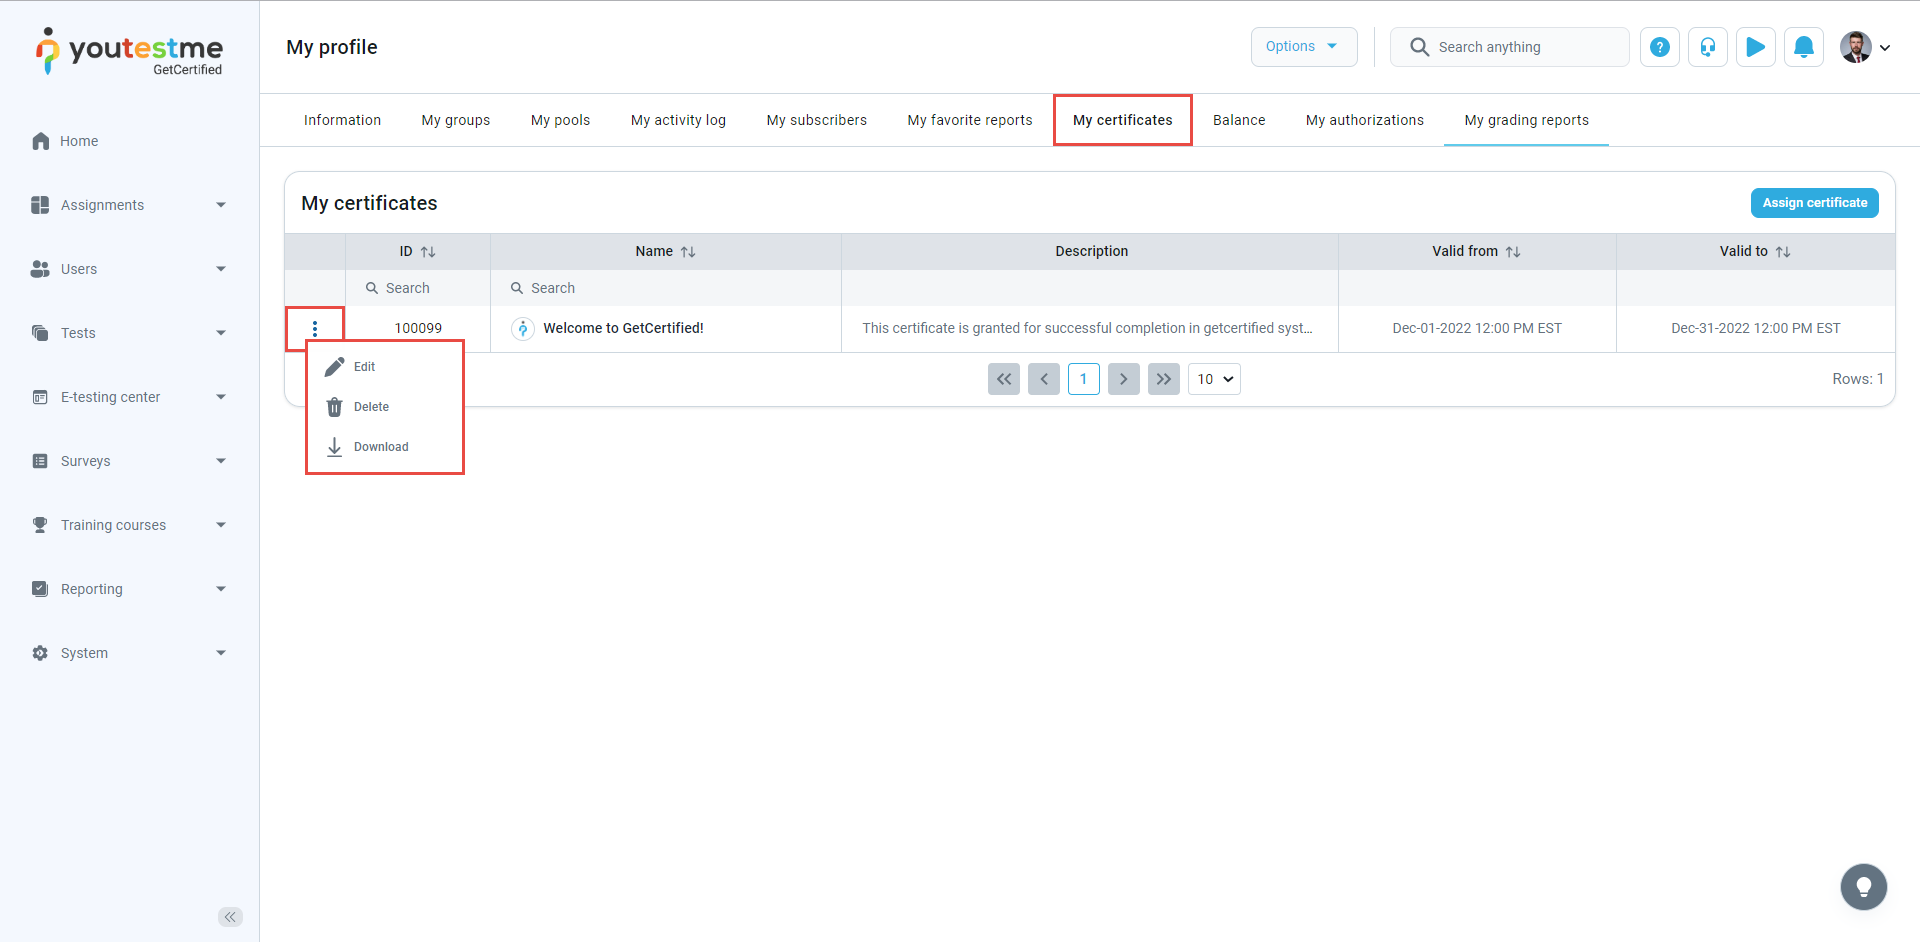
My achieved certificates
This tab displays all certificates acquired by the user upon completing relevant assignments.
To manually assign a certificate to a user without requiring them to complete an assignment:
-
Click the Assign certificate button.
-
Select the desired certificate.
-
Set the time frame within which the certificate will be valid.
-
Click the Confirm button.
To Edit, Delete, or Download a certificate as a PDF file, click the corresponding icon from the Actions button.
-
-
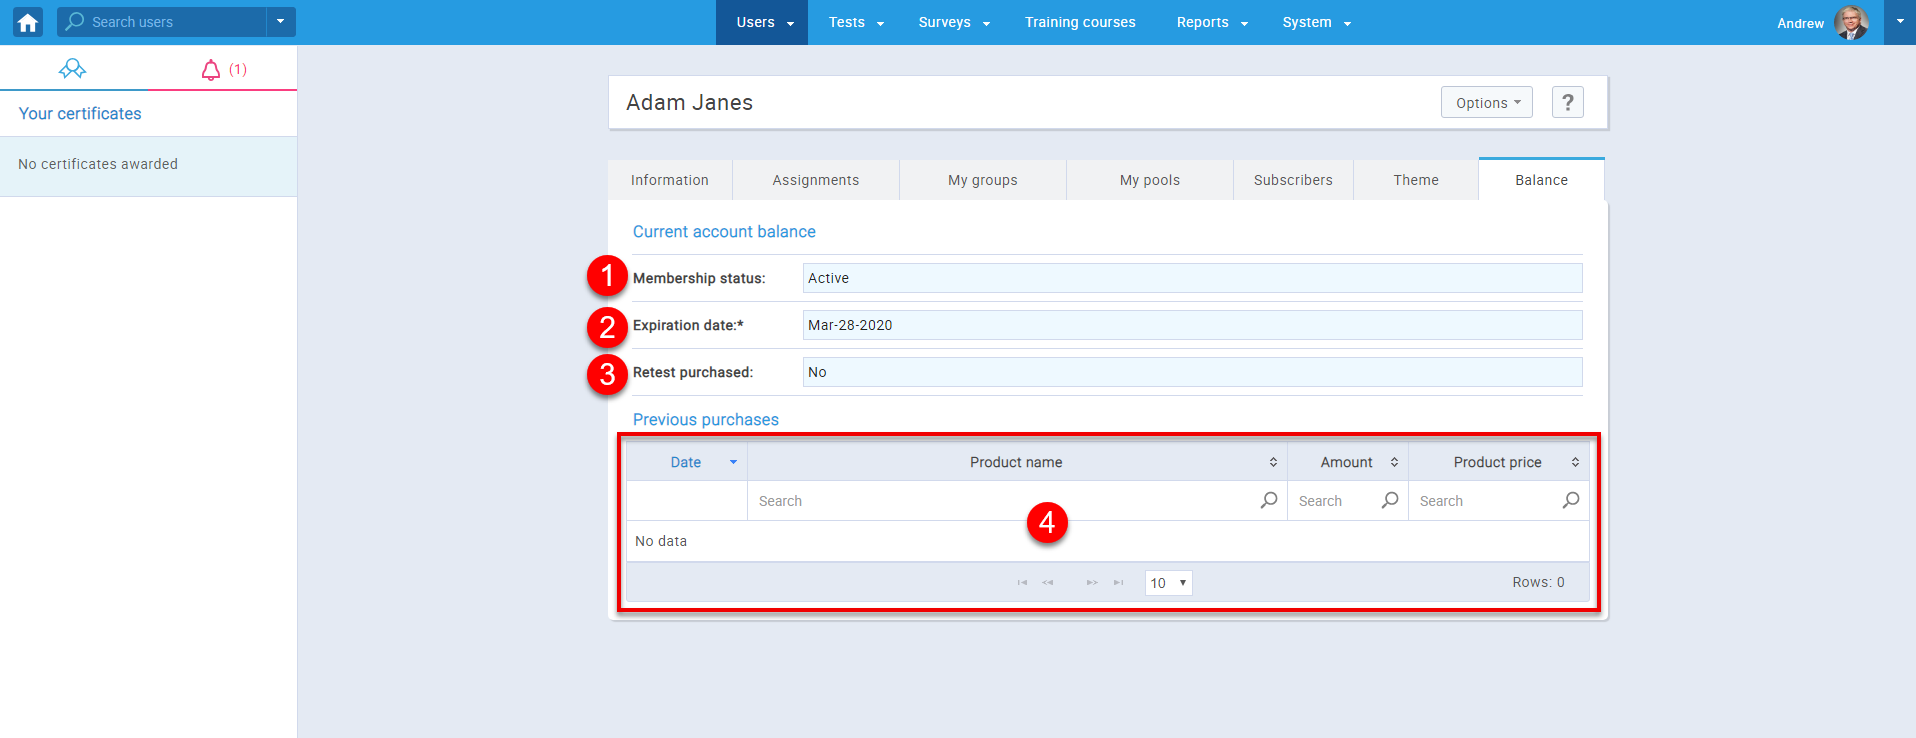
Balance
View a list of testing sessions and training courses purchased by the user. You can Export the details of purchases as an Excel or PDF file.
This tab is accessible only if the E-commerce module is enabled. For details on configuring E-commerce, refer to this article.
-
My authorizations
This tab displays a list of authorizations a user requires to book a testing session where authorization is required.
To manually create an authorization for the user:
-
Click the Create new authorization button.
-
Enter the External ID as a reference to the external system ID.
-
Set the authorization Expiration time - This authorization cannot be used for test-taking after this date. By default, the authorization validity period is unlimited.
-
Click the Assign to test button and select the test for which you intend to create an authorization.
-
Click the Create button.
The list of authorizations assigned to a user can be exported as an Excel or PDF file.
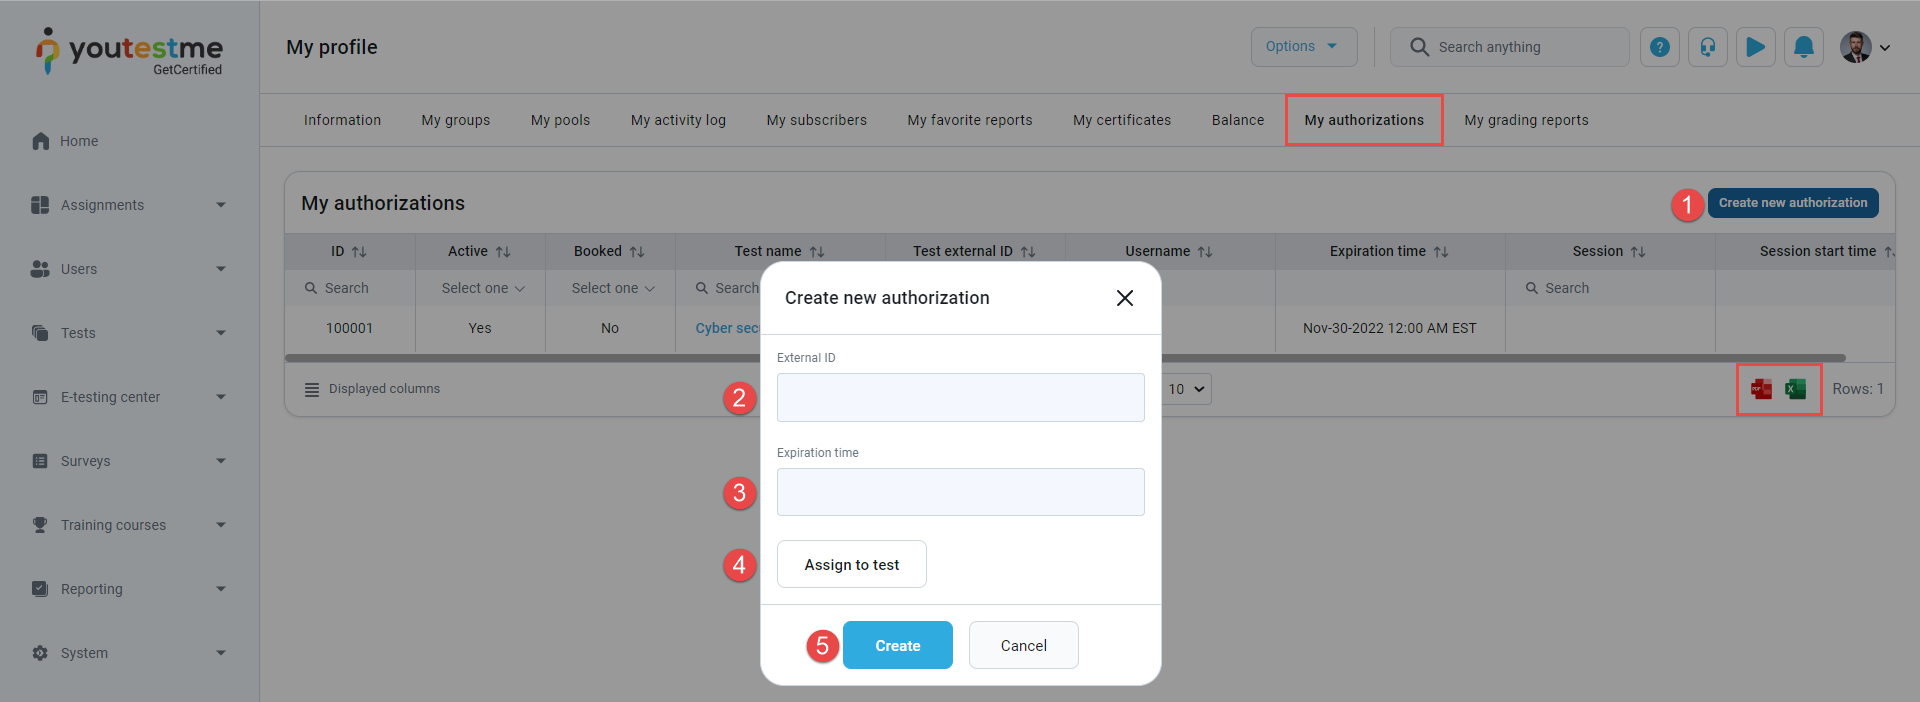
Note: Detailed explanations for each column can be found on the Booking authorizations help page.
-
-
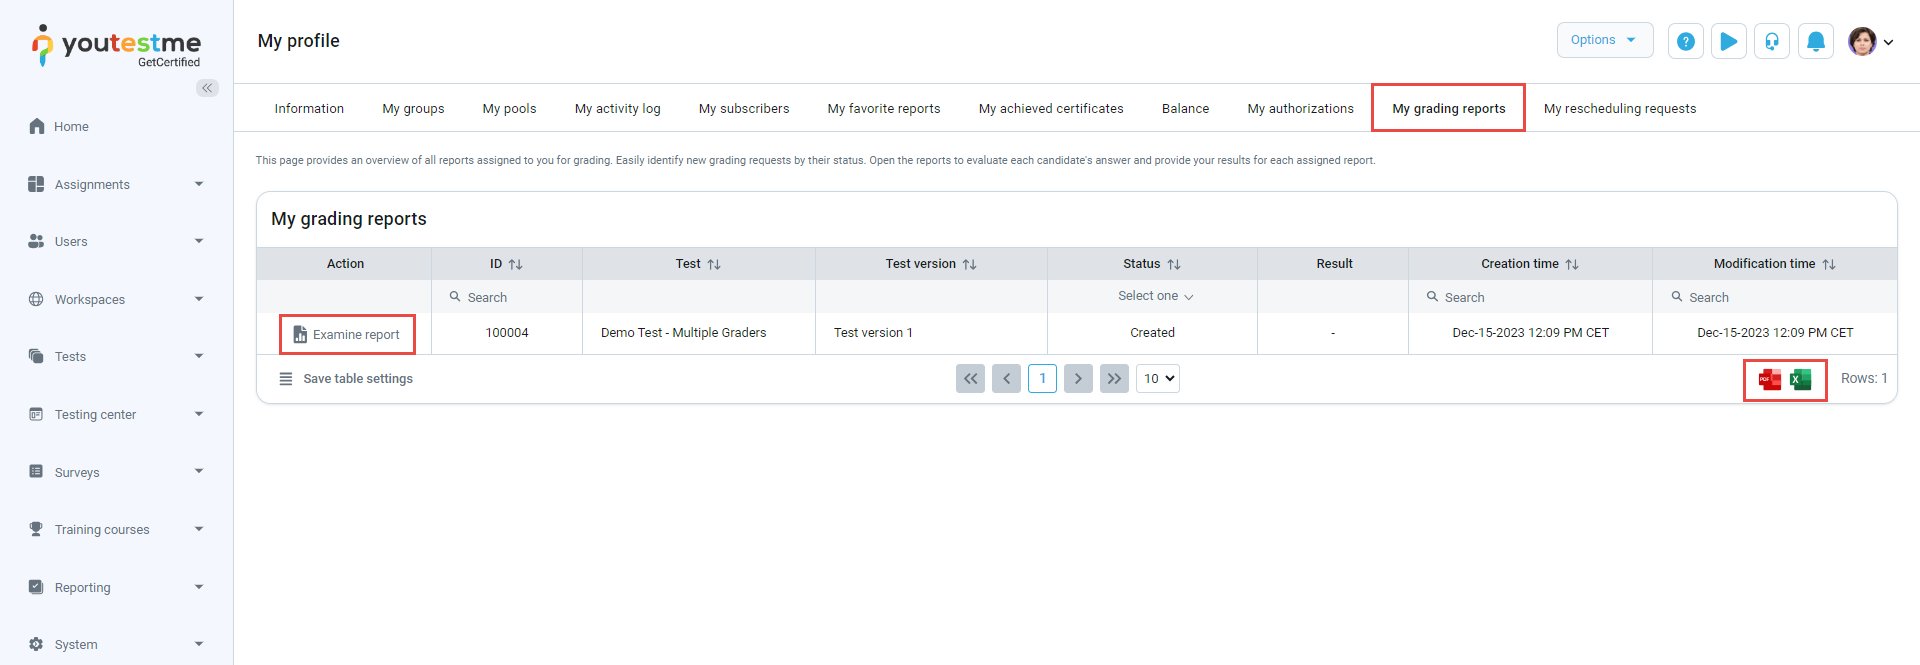
My grading reports
This tab displays a list of reports assigned to the user for grading. When the Multiple graders option is enabled in a test, multiple graders evaluate the test, and a designated number of grader reports must be submitted to determine the final result.
To examine the candidate's report, click the corresponding button.
The list of assigned grading reports can be exported as an Excel or a PDF file.
-
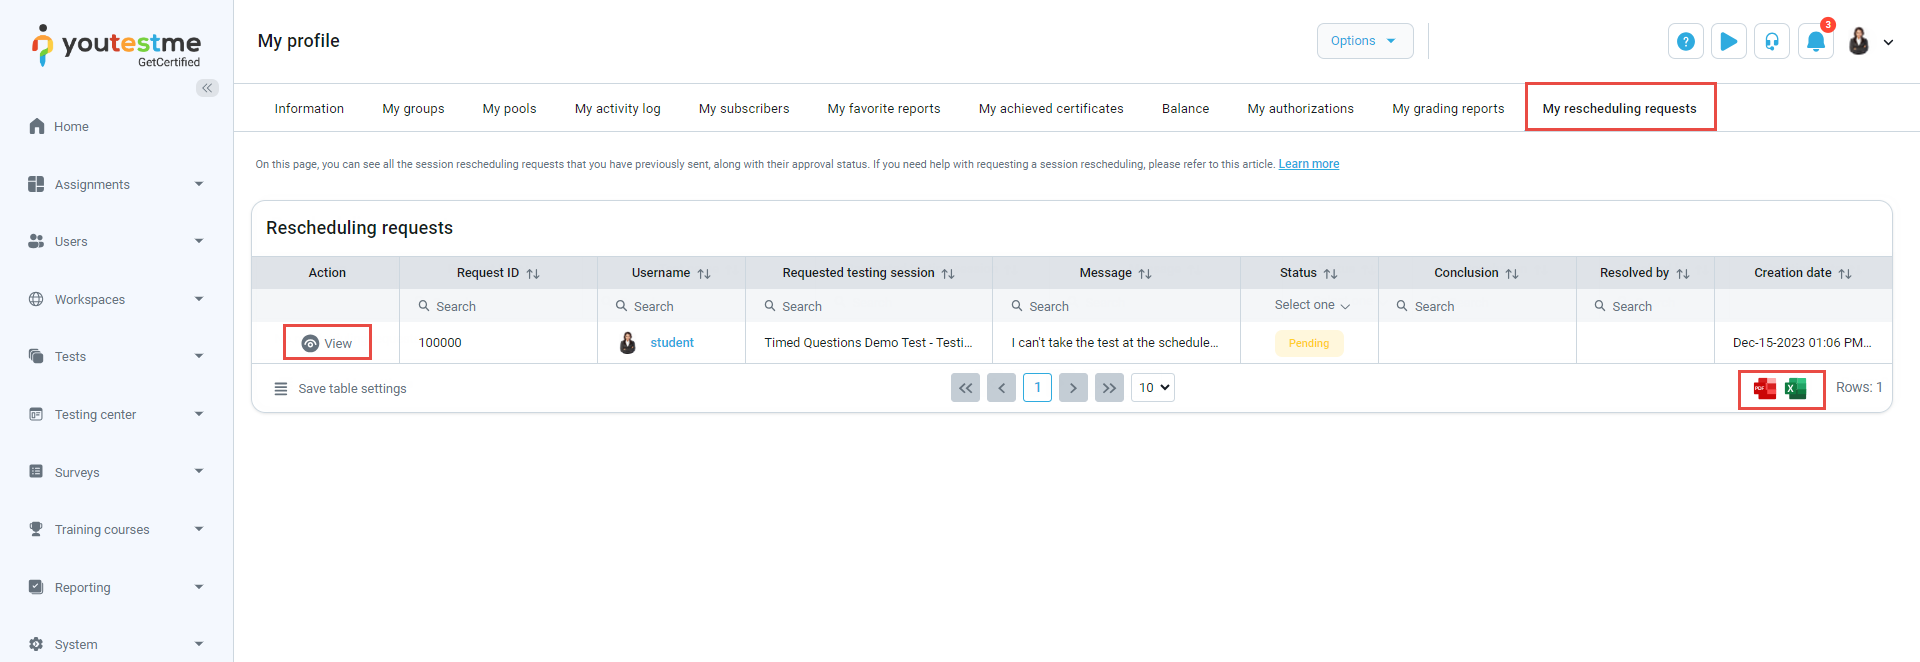
My rescheduling requests
This tab displays a list of all rescheduling requests sent by the user, including their statuses, conclusion messages, and resolution dates.
To View the rescheduling request, click the corresponding button.
The list of rescheduling requests can be exported as an Excel or a PDF file.

-